1
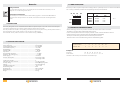
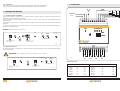
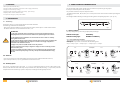
NOTE
ERONE
DIN GUIDE 4 RELAY RECEIVER
SEL2641R433-RBD
Guarantee
Guarantee period: 24 months from the productions date placed inside.
In this period if the appliance has any malfunction due to a defective component,it will be
repaired or replaced by the manufacturer.
The warranty doesn't cover the plastic box.
The assistance will be performed at the manufacturer site.
THE SMART LIVING
USE AND INSTALLATION MANUAL
Manufactured by Elpro Innotek SpA
Via Piave, 23
I-31020 S.Pietro di Feletto (TV)
Italy
Tel. +39-0438-450860 - Fax . +39-0438-455628
Web : www.erone.com - email: [email protected]
IS-RBDERUK Rev.0 del 24/09/2008
THE SMART LIVING
Remarks
Safety measures
For a perfect functioning of the device, read carefully this manual and follow all the indications, since an
inadeguate use can make damages to the device.
?
8 - MODE PULSE/ STEP
Each relay can be set in pulse or step mode according to the set-up of the dip-switch S1 as shown on the following
tab. 2. In step ( or bistable ) mode the led corresponding to the relay activated blinks.
R1 R2
Declaration of Conformity:
Elpro Innotek Spa as manufacturer declares that the following appliances : SEL2641R433-RBD fullfills the
requirements of the European Directives 73/23/CEE, 89/336/CEE and 99/05/CE and the Regulation EN
60950-1
R3
DIP-SWITCH S1
ON
OFF
R4
ON
OFF
1 - INTRODUCTION
The 4 relay DIN guide receiver DIN SEL2641R433-RDB is a superheterodyne receiver with 4 clean contacts outputs.
It can drive automation devices a nd alarm systems with max contact power of 3,5 KW.
The relay contacts are NO/NC. The operating mode of the relays can be pulse or step ( with dip switch selection )
The memorization of the remote controls can be carried on in self-learning.
The transmitter security codes are stored in a non-volatile memory ( EEPROM ).
RELAY1
BISTABLE
PULSE
RELAY2
BISTABLE
PULSE
RELAY3
BISTABLE
PULSE
RELAY4
BISTABLE
PULSE
Tab.2
9 - DISPLAY OF THE MEMORY SPACE
With the following procedure it’s possible to calculate the number of transmitters memorized.
The display is carried out by the led R3 ( Red) and R4 ( Green).
Push P1 and verify that R1 switches on. Keep on pushed P1 until R1 switches off and than release it.
At this point starts a sequence of flashes of the 2 leds R3 (RED) ed R4 (GREEN)
The sequence is the binary expression of the transmitter keys memorized.
The final number can be calculated making reference to the following table:
2 - TECHNICAL SPECIFICATIONS
Receiver type..........................................................................Superheterodyne
Carrier frequency ...................................................................433,92 MHz
Local oscillator frequency........................................................6,6128 MHz
Intermediate frequency ...........................................................10,7 MHz
Demodulation........................................................................AM/ASK
Channel width .......................................................................> 25 KHz
Input load..............................................................................50 Ohm
Local oscillator emissions ........................................................< -57 dBm
Sensitivity ( for good signal ) ....................................................- 115 dBm
Power supply .........................................................................12 Vac/dc
Current consumption ..............................................................250 mA @12 Vac
............................................................................................120 mA @12 Vdc
Output relay number ..............................................................4
Max power on relay contacts ...................................................3,5 KW / 230 Vac
Security coding ......................................................................Keeloq® Hopping code
Memory ................................................................................85 transmitter keys
Operating temperature ...........................................................-20°/+70°C
Enclosure IP grade .................................................................IP2X
Enclosure type........................................................................DIN 4 modules
Dimensions (mm ) ..................................................................70 x 90 x 60
Weight ..................................................................................420 gr
Led on
Green led value
Red led value
1°
1
0
2°
2
0
3°
4
0
4°
8
0
5°
16
0
6°
32
0
7°
64
0
Tab.3
Example 4:
Sequence :
LR, LR, LV, LV, LR, LR, LR.
Final number:
0 + 0 + 4 + 8 + 0 + 0 + 0 = 12
Therefore in the memory are memorized 12 transmitter keys.
2
7
THE SMART LIVING
THE SMART LIVING
3 - CONNESSIONI
6.3 Memory full
At the end of the memorization of the 85th transmitter key, R3 and R4 make a shork blinking.
If you try to memorize more keys, R3 and R4 make 2 flashes and the memorization fails.
COM
7 - TRANSMITTERS ERASURE
PR1
12 Vac/dc
7.1 Single transmitter cancellation
Keep the push button P1 pushed for 2 sec. until R1 switches on, release and push P1 again to select the led of to the
relay associated to the transmitter key to delete.
Push the key of the transmitter to delete ( example key A ): the receiver confirms the erasure with 2 flashes of R3 ( Red)
and R4 (Green ).
R1 switches on again for 4 sec. ( stable or blinking according to the position of the dip-switch and then switch off
definitively.
To cancel more keys of the same transmitter ( B, C, D ) it’s necessary to wait for the R1 switching off and repeat the
procedure from the beginning.
PR3
0V
1
2
3
4
5
6
ON
Example 3 : Erasure of the key A from relay 1
R1 lits
R1 lits
RED
7
8
PR4
9 10 11 12
R1 R2 R3 R4
STEP
R1 switches on
again for 2 sec.
GREEN
PR2
PULSE
P1
R3 and R4 flash twice s
imultaneously
Keep P1 pushed for 2 sec.
until R1 switches on
Release
P1
Push key ( ex. A ) of the
transmitter to delete
Fig. 4
7.2 Memory full erasure
Keep the push button P1 pushed for 2 sec. until R1 switches on. Release and push P1 again until R3 and R4 flash three
times simultaneously.
!
13 14 15 16 17 18 19 20 21 22 23 24
ATTENTION: At the end of the procedure all data of the memory are deleted.
R1 switches
off
Fig. 1
RED
K1
GREEN
K2
K3
K4
Relay outputs map
R1 lits
Keep the push button P1
pushed for 2 sec. until R1
switches on
R3 and R4 flash three times
simultaneously.
release
P1
Push P1 again until R1
switches off
Fig. 15
Relay
Terminal
Contact
Relay
Terminal
Relay 1
Relay 1
Relay 1
13
14
15
NO
C
NC
Relay 3
Relay 3
Relay 3
19
20
21
NO
C
NC
Relay 2
Relay 2
Relay 2
16
17
18
NC
C
NO
Relay 4
Relay 4
Relay 4
22
23
24
NC
C
NO
6
THE SMART LIVING
Contact
THE SMART LIVING
Tab. 1
6 - REMOTE CONTROLS MEMORIZATION
4 - FEATURES
! Memory for 85 transmitter keys;
! Single tx code memorization and erasure with a single push-button;
! Single tx or full memory erasing;
! Programmable operating mode for the relays : pulse or step;
! Display of the number of stored users;
! 4 inputs for emergency extra push-buttons.
The memorization of the remote controls can be carried on in sequential way, by using only P1.
Each step is confirmed by the led R1, R2, R3, R4.
The procedure consists in a sequence of pressures of P1
The lighting of the leds R1, R2, R3, R4 is cyclic: at each pressure of P1 a led is turned on and the preceding led is turned
off. (fig. 2)
The led light is stable or blinking according to the setting of the corresponding dip-switch. ( see. cap. 8 )
5 - INSTALLATION
5.1 - Positioning
The location choice is very important for the best result of the installation.
The following conditions have to be followed:
- fix the receiver far from interference sources as informatic systems, allarm systems or other radio emissions.
- the distance between 2 receivers should be more than 1,5 m.
R2
R4
R3
Fig. 2
6.1 Relay condition
The relay configuration ( pulse or step ) is displayed by the led light
ATTENTION
1 - The power 12 Vac/Vdc must be provided by a power supplier certified according to
Safety Regulations and must come from a SELV circuit, protected against short circuit.
2 - The appliance must be installed in an enclosure able to assure a Class I or II Safety
Class against electric chock.
!
R1
3 - The protection devices against extracurrents and short circuits must be provided by the
building electric installation when the relays are inserted on the supply of appliances
connected to the distribution network.
LED with stable light :
LED with blinking light :
PULSE Relay
BISTABLE or STEP Relay
6.2 4 keys remote memorization
The memorization consists in a sequence of pressures of P1
Example 2: 4 keys remote memorization with the following links:
Key A --> Relay 1, Key B --> Relay 2, Key C --> Relay 3, Key D --> Relay 4.
4 - Apply a max power of 3,5 KW / 230 Vac to the relay contacts.
In case of connection of the relays to dangerous voltages, foresee a sectioning circuit to
disconnect these parts.
R1 switches off
and on again
R1 lits
R2 switches off
and on again
R2 lits
5 - If there are mixed type loads ( 230V and 12 V ) connected to the relay terminals, these
must be connected by interposing a null relay: example R1=230V, R2=230V, R3= empty,
R4= 12V.
5.2 - Antenna
- if you connect an antenna ( not provided ) fix the wire to the terminal 4 and the shield to the terminal 3;
- if you use the piece of wire ( 16,5 cm ) provided connect it to the terminal 4.
Release
P1
Keep P1 pushed for 2
sec. until LD1
switches on
Release
P1
Press P1
R3 switches off
and on again
R3 lits
5.3 - Auxiliary inputs
Push key A of the
transmitter to
memorize
Push key B of the
transmitter to
memorize
R4 switches off and on
and after 2 sec.
switches off
R4 lits
The receiver is equipped with 4 extra inputs ( I1, I2, I3, I4 e COM) which allow to connect 4 NO auxiliary pushbuttons, fot the direct activation of the relays. The push-buttons PR1, PR2, PR3, PR4 on fig. 1 ( not provided ) act on the
relays like the remote controls keys, in pulse or step mode, according to the settings of dip-switch S1.
Press
P1
Release
P1
Push key C of the
transmitter to
memorize
Push P1
Release
P1
Push key D of the
transmitter to
memorize
Fig. 3
4
5
THE SMART LIVING
THE SMART LIVING