1
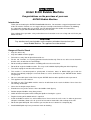
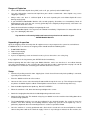
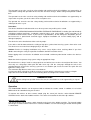
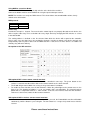
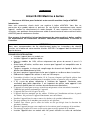
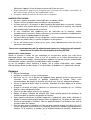
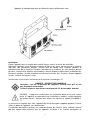
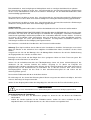
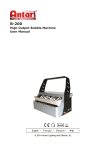
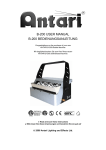
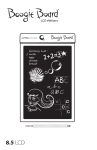
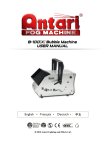
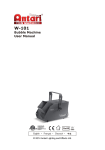
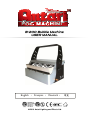
B-200 Bubble Machine USER MANUAL English • Français • Deutsch • 2010 Antari Lighting and Effects Ltd. 中文 TeUser Manual Antari B-200 Bubble Machine Congratulations on the purchase of your new ANTARI Bubble Machine Introduction Thank you for choosing the ANTARI B-200 Bubble Machine. You now own a rugged and powerful stateof-the-art machine. Prior to use, we suggest that you carefully read all of the instructions. By following the suggestions found in this user manual, you can look forward to the reliable and satisfactory performance of your ANTARI Bubble Machine for years to come. Please follow these operation, safety and maintenance instructions to ensure a long and safe life for your bubble machine. CAUTION! Pay attention to all warning lables and instructions printed on the exterior of your Antari Bubble Machine. This appliance must be earthed. Danger of Electric Shock Keep this device dry. Keep the bubble machine upright. For inside use only. Not designed for outside use. For the 110 V models, use 3-prong grounded electrical outlet only. Prior to use take care to determine that the unit is installed at the rated voltage. Do not overfill your bubble machine. Overfilling will cause the unit to leak. Do not tilt or angle the bubble machine. This may result in bubble liquid spilling out of the liquid tray. Turn off or unplug the machine when not in use. This machine is not water-proof or splash-proof. If moisture, water, or bubble fluid gets inside the housing, immediately unplug the unit and contact a service technician or your ANTARI dealer before using it again. No user serviceable parts inside. Refer to your ANTARI dealer or other qualified service personnel. This appliance must be earthed. For adult use only. The bubble machine must be installed out of the reach of children. Never leave the unit running unattended. Never aim the output at open flames. Extended use may make surfaces where the bubbles land slippery. Position output of bubbles away from persons. Switch off from main power when refilling the liquid or cleaning the system. Regular cleaning of the bubble wheel is required. Install the bubble machine in a well-ventilated area. Never cover the unit’s vents. In order to guarantee adequate ventilation, allow a free air space of at least 20 cm around the sides and top of the unit. Do not transport with liquid. If the machine gets wet, do not use it before it is completely dry. Antari bubble liquid may leave permanent marks on clothing. 1 Danger of Explosion Never add flammable liquids of any kind (such as oil, gas, perfume) to the bubble liquid. Use only high-quality, water-based liquid that your dealer recommends. Other liquids may cause clogging or “spitting”. Always make sure there is sufficient liquid in the tank. Operating this unit without liquid will cause damage to the pump. If your ANTARI B-200 Bubble Machine fails to work properly, discontinue use immediately. Drain all liquid from the tank, pack the unit securely (preferably in the original packing material), and return it to your ANTARI dealer for service. Always drain tank before mailing or transporting this unit. Never drink bubble liquid. If it is ingested, call a doctor immediately. If liquid comes in contact with skin or eyes, rinse thoroughly with water. Pay attention to all warning labels and instructions printed on the exterior of your ANTARI Bubble Machine Unpacking & Inspection Open the shipping carton and verify that all equipment necessary to operate the system has arrived intact. In addition to this user manual, the shipping carton should contain the following items: 1. 2. 3. 4. B-200 Bubble Machine Power cord and plug 1 Mounting bracket 2 pieces of tightening screws and metal screws, 5 pieces of washers, one safety ring. If any equipment is missing contact your ANTARI dealer immediately. Before beginning with the initial setup your Bubble Machine, make sure that there is no evident damage caused by transportation. In the event that the unit’s housing or cable is damaged, do not plug it in and do not attempt to use it until after contacting your ANTARI dealer for assistance. Setup Remove all packing materials from shipping box. Check that all foam and plastic padding is removed, especially in the nozzle area. Place the bubble machine on a flat surface. Loosen the side screws at the front of the B-200 and lift the top of the case up. This will expose the liquid tray where the bubble liquid is added. Fill the liquid to no more than 3 cm from the top of the tray. Pour the bubble liquid into the liquid tray, DO NOT OVERFILL. When the container is full, lower the housing and tighten the screws. Attach the hanging bracket with the included tightening and metal screws. Attach the M8 safety ring. This hooked safety ring can double insure the machine from falling down when installed at high positions. The B-200 Bubble machine can now be positioned in the desired location. Be careful to keep the machine even while moving and installing otherwise liquid may spill out of the liquid tray. This is particularly important when the mounting bracket is used to suspend the B-200. Once the machine is securely positioned and a final check is made to insure that no liquid has leaked, connect the power cord to the electrical supply. If there is any leakage or moisture on the machine, the 2 cord or the remote, leave the machine unplugged until the B-200 is dry. Washer Washer Tightening Screw Tightening screw Washer Washer M8 M8Screw Safety eyelet DMX DIP SW. Dip switches OFF ON SW. 1 2 3 4 5 6 7 8 9 CH. 1 2 4 8 16 32 64 128 256 Installation Install the bubble machine in a well-ventilated area. Never cover the unit’s vents. In order to guarantee adequate ventilation, allow a free air space of at least 20 cm around the sides and top of the unit. Install the device out of the public area. Please consider that liquid may be spitted during operation around the device. The resulting slippery surface can cause accidents. Position output of bubbles away from persons. The minium distance should be 1.5 m. Only install the machine on scratch resistant and water resistant surfaces. Please make sure that the inclination angle does not exceed 15°. DANGER OF FIRE! When installing the device, make sure there is no highly-inflammable Material (decoration articles, etc.) within a minimum distance of 0.5 m. This device is constructed for a standing installation only. If the device is to be installed overhead, the following safety instructions are binding: DANGER TO LIFE! Please consider the EN 60598-2-17and the respective national norms during the installation! The installation must only be carried out by an authorized dealer! The installation of the device has to be built and constructed in a way that it can hold 10 times the weight for 1 hour without any harming deformation. The installation must always be secured with a secondary safety attachment, e.g. an appropriate catch net. This secondary safety attachment must be constructed in a way that no part of the installation can fall down if the main attachment fails. When rigging, derigging or servicing the device staying in the area below the installation place, on bridges, under high working places and other endangered areas is forbidden. 3 The operator has to make sure that safety-relating and machine-technical installations are approved by an expert before taking into operation for the first time and after changes before taking into operation another time. The operator has to make sure that safety-relating and machine-technical installations are approved by an expert after every four year in the course of an acceptance test. The operator has to make sure that safety-relating and machine-technical installations are approved by a skilled person once a year. Procedure: The device should be installed outside areas where persons may walk by or be seated. IMPORTANT! OVERHEAD RIGGING REQUIRES EXTENSIVE EXPERIENCE, including (but not limited to) calculating working load limits, installation material being used, and periodic safety inspection of all installation material and the device. If you lack these qualifications, do not attempt the installation yourself, but instead use a professional structural rigger. Improper installation can result in bodily injury and or damage to property. The device has to be installed out of the reach of people. If the device shall be lowered from the ceiling or high joists, professional trussing systems have to be used. The device must never be fixed swinging freely in the room. Caution: Devices in hanging installations may cause severe injuries when crashing down! If you have doubts concerning the safety of a possible installation, do NOT install the device! Before rigging make sure that the installation area can hold a minimum point load of 10 times the device's weight. Mount the device to your trussing system using an appropriate clamp. For overhead use, always install a safety-rope that can hold at least 12 times the weight of the fixture. You must only use safety-ropes with quick link with screw cap. Pull the safety-rope through the hole in the mounting-bracket and over the trussing system or a safe fixation spot. Insert the end in the quick link and tighten the safety screw. The maximum drop distance must never exceed 20 cm. A safety rope which already has held the strain of a crash or which is defective may not be used again. Adjust the desired inclination-angle via the mounting-bracket and tighten the fixation screws. DANGER TO LIFE! Before taking into operation for the first time, the installation has to be approved by an expert! Operation The B-200 Bubble Machine can be operated with or without the remote control. In addition, it has built-in DMX and can be controlled using one channel. To connect the wireless or timer remote control, plug the stereo jack into the socket labeled REMOTE CONTROL on the back of the bubble machine. The socket is located to the left of the dip switches. Without remote control: Turn on the device via the power switch located on the back of the bubble machine. The internal bubble drum begins to rotate and the internal fan is activated. Bubbles are now constantly generated until the power is switched off. 4 Using DMX to control the B-200: Set the desired DMX channel using the dip switches at the back of the machine. Connect the bubble machine to the DMX chain using the input and output sockets. NOTE: The machine uses only one DMX channel. This channel does not control bubble volume, it only controls on & off functions. DMX protocol DMX value Feature 0 -128 OFF 129-255 ON Addressing Each device occupies 1 channel. To ensure that the control signals are properly directed to each device, the device requires adressing. This is to be done for every single device by changing the DIP switches as set out in the table below. The starting address is defined as the first channel from which the device will respond to the controller. Please make sure you don’t have any overlapping channels in order to control each device correctly and independently from any other device on the DMX data link. If two, three or more devices are addressed similarly, they will work similarly. Occupation of the DIP-switches: With optional BCT-1 timer remote control attached: When the remote is connected, the B-200 can be controlled in two ways. The green button on the remote is a manual override and the dial on the remote control sets the timer function. The B-200 will generate bubbles for as long as the green button is held down. To enable the timer function, turn the dial clockwise. When the yellow light on the remote turns on, the timer is on. The duration of bubbles is set at 10 seconds and is not adjustable. The interval between bubble blasts is adjustable between 3 - 220 seconds. To increase the interval, rotate the dial clockwise. To decrease the interval, rotate the dial counter-clockwise. With optional BCR-1 wireless remote control attached: When the button on the wireless key chain transmitter is pressed, the B-200 bubble machine will bubble continuously until the button is pressed again. The transmitter has a range of up to 50 meters from the receiver. Please save these instructions. 5 Mode d'emploi Antari B-200 Machine à bulles Nous vous félicitons pour l’achat de votre nouvelle machine à neige d’ANTARI. Introduction Nous vous remercions d’avoir choisi une machine à bulles d’ANTARI. Vous êtes en possession d’un produit robuste et puissant. En vue d’utiliser correctement votre nouvel appareil, veuillez lire attentivement ce mode d’emploi. Si vous respectez les instructions suivantes, vous profiterez d’une performance solide et convaincante de votre machine à bulles d’ANTARI pour de nombreuses années. Pour assurer la longévité et le bon fonctionnement de votre machine à bulles, veuillez lire attentivement les instructions suivantes concernant le maniement, la sécurité et l’entretien. ATTENTION ! Nous vous recommandons de lire attentivement toutes les instructions de sécurité inscrites sur le boitier de votre machine à bulles ANTARI. Cet appareil doit être branché à la prise de terre. RISQUE D’ELECTROCUTION Installez l’appareil dans un endroit sec. Installer l’appareil en position droite. Pour les modèles de 110V, utilisez uniquement des prises de courant à terre à 3 broches. Avant toute utilisation, veuillez vous assurez que l’appareil est compatible avec la tension locale. Toujours respecter le niveau de remplissage du réservoir du liquide à bulles afin d’éviter tout débordement et fuite. Ne jamais pencher l’appareil pour éviter que le liquide ne se déverse dans la machine. Débranchez l’appareil du secteur si vous ne l’utilisez pas La machine à bulles n’est pas étanche. Si de l’eau ou n’importe quel liquide pénètre dans l’appareil, débranchez immédiatement la machine à bulles et contactez votre revendeur. Il n’y a pas de pièces détachées à l’intérieur de l’appareil. Contactez votre revendeur pour toute réparation. Il est important de confier votre appareil à du personnel qualifié pour les services de maintenance ou d’entretien. L’appareil est conçu pour un usage en intérieur uniquement et dans un endroit. Attention à l’humidité qui pourrait endommager l’appareil. L’appareil doit être relié à la prise de terre. L’appareil doit être manipulé par des adultes. Vérifiez que l’installation soit hors de portée des enfants. Ne pas laisser l’appareil fonctionner sans surveillance. Installez l’appareil hors de toutes sources de chaleur et de produits inflammables Un usage prolongé de la machine peut rendre les sols glissants. Veuillez vous assurer que la sortie des bulles ne soit pas dirigée dans la direction des personnes alentour. Eteindre l’appareil lorsque vous remplissez le réservoir ou pour le nettoyage de la machine. Un nettoyage régulier de la roue est nécessaire pour un usage optimal de la machine. Installez l’appareil dans un endroit aéré. Ne jamais recouvrir les ouïes de ventilation. 6 Maintenez l’appareil à une distance minimum de 20 cm des murs. Ne pas transporter l’appareil avec du liquide dans le réservoir. Si la machine est mouillée, de pas l’utiliser avant qu’elle ne soit complètement sèche. Le liquide à bulles peut laisser des traces sur les vêtements. DANGER D’EXPLOSION Ne jamais ajouter de produit inflammable dans le liquide à bulles Toujours utiliser le liquide recommandé par votre revendeur Assurez-vous qu’il y ait toujours la bonne quantité de liquide dans le réservoir. (veuillez vous référer à la marque dans le réservoir). Faire fonctionner la machine sans liquide peut endommager la pompe de la machine. Si vous rencontrez des problèmes lors de l’utilisation de la machine, arrêtez immédiatement la machine. Videz entièrement le réservoir et contacter immédiatement. Toujours retirer le liquide pendant le transport. Ne jamais boire du liquide. En cas d’ingestion, veuillez contacter immédiatement votre médecin ou rendez-vous au service d’urgences le plus proche. En cas de contact avec la peau ou les yeux, rincez abondamment avec de l’eau et contactez votre médecin. Nous vous recommandons de lire attentivement toutes les instructions de sécurité inscrites sur le boitier de votre machine à bulles ANTARI. DEBALLAGE & VERIFICATION Sortez la machine à bulles de son emballage et assurez-vous qu'elle n'ait subi aucun dommage durant son transport. Dans le cas où le boîtier ou le câble d’alimentation de l'appareil seraient endommagés, ne branchez pas l'appareil. En cas de livraison endommagée ou incomplète, toujours contactez immédiatement votre revendeur. Le lot se compose d’une machine à bulles, de la notice d’utilisation, d’un cordon d’alimentation, d’une lyre de fixation, 2 vis de fixation, 5 rondelles et 1 attache de sécurité. Réglages Retirez l’emballage. Installez la machine sur une surface plane. Dévissez les vis sur le devant de l’appareil pour pouvoir retirer le couvercle du réservoir. Vous trouverez le plateau accueillant le liquide. Nous vous recommandons de remplir le réservoir afin de laisser 3 cm au sommet du plateau. Versez le liquide à bulles dans le réservoir. Attention à ne pas dépasser le niveau maximum. Quand le réservoir est plein, rabaissez le couvercle et remettez les vis. Vérifiez qu’elles soient solidement fixées. Fixez la lyre de fixation avec les vis fournies. Mettez en place l’attache de sécurité M8. Cette attache permet de renforcer la fixation lorsque la machine est placée en hauteur. Vous pouvez maintenant installée l’appareil à l’endroit de votre choix. Attention à garder la machine bien droite lorsque vous la déplacer ou l’installer afin de ne pas renverser du liquide à l’intérieur. Ceci est particulièrement vrai lorsque vous fixer la lyre de fixation en hauteur. Une fois que votre installation est fixée en toute sécurité et que vous êtes sûrs qu’il n’y pas de liquide renversé dans la machine, branchez le cordon d’alimentation au secteur. Si la machine, le cordon ou la télécommande est mouillée, débranchez 7 l’appareil et attendez que tous les éléments soient entièrement secs. Installation Placez l’appareil dans un endroit bien ventilé. Ne pas couvrir les ouïes de ventilation. Maintenez l’appareil à une distance minimum de 20 cm des murs. Ne pas laisser la machine trop près des personnes alentour sachant que du liquide peut s’écouler pendant le fonctionnement de la machine. Pendant l’utilisation de la machine, les sols peuvent devenir glissants. Veuillez faire attention aux accidents. Ne pas dirigez les bulles dans la direction des personnes alentour. Veuillez respecter une distance minimum de 1.5 mètres. Placez l’appareil sur des surfaces résistantes à l’eau. Veuillez vous assurez que l’inclinaison de la machine n’excède pas 15° DANGER - PRODUIT INFLAMMABLE Attention : Lors de l’installation de l’appareil, assurez-vous qu’il n’y ait pas de produit inflammable. Veillez à respecter une distance minimum de 0.5 de tout objet alentour. DANGER - L’appareil est conçu pour une installation droite et sur une surface plane. Si l’appareil est prévu pour une installation en hauteur, veuillez contacter des professionnels. Veuillez vous référer aux normes en vigueur EN 60598-217. La structure sur laquelle vous fixez l’appareil doit être prévue pour supporter pendant 1 heure, 10 fois le poids de l’appareil, sans déformation. L’installation doit toujours prévoir une seconde élingue de sécurité. Cette seconde sécurité doit être conçue pour maintenir tous les appareils en place si les fixations principales se 8 cassaient. Ne pas placez l’appareil dans le passage. Veillez à ne pas rester en dessous de la machine. L’installateur et l’utilisateur doivent s’assurer que les structures pour l’installation sont certifiées conformes aux normes de sécurité. Veillez à toujours vérifiez la validité des certificats et rapport de sécurité. Vérifiez les installations tous les quatre ans par un expert. Tous les ans, l’utilisateur doit vérifiez son installation tous les ans. L’appareil doit être installé en dehors des zones où les personnes peuvent s’asseoir ou circuler. IMPORTANT : Les installations en hauteur requièrent une expérience solide incluant le calcul des poids de charge, le type de matériel utilisé pour tel sorte de projet, la sécurité du matériel. Si vous ne pensez pas être assez qualifié, ne jamais installer les appareils par vous-même mais contactez un professionnel. Une mauvaise installation peut entraîner des accidents qui pourraient blesser des personnes ou endommager votre matériel. L’appareil doit rester hors de portée de toute personne. Si l’appareil doit être monté au plafond, veuillez utiliser des structures appropriées et contactez un professionnel. L’appareil ne doit jamais pendre au milieu de la pièce mais être solidement suspendu. Attention : en tombant, l’appareil pourrait causer de graves dégâts. En cas de doutes sur votre installation, ne pas fixer l’appareil ou contacter un professionnel. Votre structure doit pouvoir supporter 10 fois le poids de l’appareil. Toujours utiliser des crochets de fixation appropriés. Pour des installations en hauteur, toujours utiliser des élingues de sécurité pouvant supporter au moins 12 fois le poids de l’appareil. Pour fixer l’appareil, référez-vous au mode d’emploi de l’élingue. Veuillez laisser 20 cm de débattement. Ne pas utiliser des élingues de sécurité si celles-ci sont endommagées. Ajustez l’inclinaison de l’appareil grâce à la lyre de fixation et des vis de fixation. DANGER - Avant toute 1ère utilisation, l’installation doit être approuvée par des professionnels. Fonctionnement La machine à bulles B-200 peut être utilisée avec ou sans télécommande. De plus, l’appareil est muni de la fonction DMX et peut être contrôlée en utilisant 1 canal. Pour connecter une télécommande ou timer sans fil, insérez la prise jack stéréo dans la prise appelée REMOTE CONTROL située à l’arrière de l’appareil. La prise est située à gauche des dipswitch. Sans la télécommande Branchez l’appareil au secteur et appuyez sur le commutateur d’alimentation situé à l’arrière de l’appareil. Vous allez remarquer que les ventilateurs et le système de fabrication des bulles se mettent en route. Les bulles sortent petit à petit jusqu’à ce que vous éteigniez l’appareil. Avec la fonction DMX pour contrôler l’appareil Réglez le canal DMX de votre choix en utilisant les dipswitch situés à l’arrière de l’appareil. 9 Connectez l’appareil à la chaine DMX en utilisant les entrées et les sorties des prises de l’appareil. A NOTER : l’appareil n’utilise qu’un seul canal DMX. Ce canal ne contrôle pas le débit des bulles mais seulement les fonctions ON et OFF. Spécifications DMX Assignation DMX Chaque appareil est équipé d’un canal. Pour être sur que les signaux sont correctement dirigés vers chaque appareil, celui-ci doit avoir une adresse précise. Ceci doit être fait pour chacun des appareils de la chaine en changeant les dipwitch suivant le tableau ci-dessous. L’adresse de départ est définie comme le 1er canal de l’appareil qui va répondre à la télécommande. Assurez-vous que certains appareils n’ont pas la même adresse pour pouvoir contrôler chaque appareil correctement et séparément. Si plusieurs appareils ont la même adresse, ils vont fonctionner en même temps. Dipswitch Avec le timer BCT-1 (en option) Quand la télécommande est connectée, l’appareil peut fonctionner de deux façons : Le bouton vert est un fonctionnement manuel et les boutons gradateurs permettent de régler les fonctions timer. La B-200 va générer des bulles aussi longtemps que vous appuyez sur le bouton vert. Pour utiliser les fonctions timer, tournez les boutons dans le sens des aiguilles d’une montre. Quand la lumière jaune sur la télécommande s’allume, le timer est activé. Al durée des bulles est réglé à 10 secondes et ne peut pas être modifiée. L’intervalle entre l’émission des bulles est réglable de 3 à 220 secondes. Pour augmenter l’intervalle, tournez le bouton dans le sens des aiguilles d’une montre. Pour diminuer l’intervalle, tournez le bouton dans le sens inverse. Avec la télécommande sans fil BCR-1 (en option) Quand vous appuyez sur le bouton de l’émetteur, la machine émet des bulles de en continu jusqu’à ce que vous appuyez une nouvelle fois sur le bouton. Il a une portée de 50 mètres. 10 Bedienungsanleitung Antari B-200 Seifenblasenmaschine Herzlichen Glückwunsch zum Erwerb Ihrer ANTARI Seifenblasenmaschine. Einführung Danke, dass Sie sich für den Erwerb einer ANTARI Spezialeffekte-Seifenblasenmaschine entschieden haben. Sie sind nun im Besitz eines leistungsstarken Gerätes auf dem aktuellen Stand der Technik. Vor der Inbetriebnahme empfehlen wir Ihnen, alle Anweisungen sorgfältig zu lesen. Wenn Sie diesen Empfehlungen Folge leisten, dürfen Sie sich auf eine ANTARI-Seifenblasenmaschine freuen, die Ihnen über Jahre zuverlässige und zufrieden stellende Dienste leisten wird. ACHTUNG! Halten Sie sich bitte an folgende Bedienungs-, Sicherheits- und Pflegehinweise, um eine lange und sichere Lebensdauer Ihrer Seifenblasenmaschine zu gewährleisten. Stromschlaggefahr Vor Nässe schützen. Nur innerhalb geschlossener Räume betreiben. Nicht für den Betrieb im Freien geeignet. Achten Sie darauf, dass die Seifenbalsenmachine stets aufrecht installiert ist. Für die 110 V Modelle verwenden Sie bitte ausschließlich 3-adrige, geerdete Steckdosen. Vor Inbetriebnahme darauf achten, dass das Gerät an die richtige Spannung angeschlossen wird. Wird das Gerät außer Betrieb genommen, ist das Gerät auszuschalten oder vom Netz zu trennen. Dieses Gerät ist nicht wasser- oder spritzwassergeschützt. Sollte Feuchtigkeit, Flüssigkeit oder Seifenfluid in das Geräteinnere eindringen, trennen Sie bitte das Gerät sofort vom Netz und verständigen Sie einen Servicetechniker oder Ihren ANTARI-Händler, bevor Sie das Gerät wieder in Betrieb nehmen. Keine zu wartenden Teile im Geräteinnern. Wartungsarbeiten sind nur vom Ihrem ANTARI-Händler oder qualifizierten Servicetechnikern durchzuführen. Nur von Erwachsenen zu bedienen. Das Gerät muss außerhalb der Reichweite von Kindern installiert werden. Betreiben Sie das Gerät niemals unbeaufsichtigt. Richten Sie das Gerät niemals mit der Austrittsöffnung direkt auf offenes Feuer. Richten Sie das Gerät niemals mit der Austrittsöffnung direkt auf Personen. Ziehen Sie immer den Netzstecker Ihrer ANTARI-Seifenblasenmaschine, bevor Sie den Tank auffüllen. Die regelmäßige Reinigung des Seifenblasenrades ist notwendig. Installieren Sie das Gerät an einem gut belüfteten Ort. Niemals die Lüftungsschlitze verdecken. Um eine ausreichende Belüftung zu gewährleisten, halten Sie bitte einen Mindestabstand von 20 cm um und über dem Gerät ein. Entleeren Sie den Tank immer, bevor Sie das Gerät verschicken oder transportieren. ANTARI-Seifenblasenflüssigkeit kann permanente Flecken auf Kleidung hinterlassen. 11 Explosionsgefahr Mischen Sie niemals entzündliche Flüssigkeiten jeglicher Art (Öl, Gas, Duftstoffe) unter das Seifenblasenfluid. Verwenden Sie ausschließlich hochwertige und von Ihrem Händler empfohlene Seifenblasenfluide. Andere Fluide können zum Verstopfen oder Tropfen des Gerätes führen. Achten Sie unbedingt darauf, dass sich immer eine ausreichende Menge Fluid im Tank befindet. Der Betrieb ohne Fluid führt zu am Gerät. Sollte Ihre ANTARI Seifenblasenmaschine einmal nicht mehr ordnungsgemäß arbeiten, schalten Sie sie bitte sofort ab. Entleeren Sie den Tank vollständig, verpacken Sie das Gerät sorgfältig (am besten in der Originalverpackung) und schicken Sie es bei Ihrem ANTARI-Händler ein. Entleeren Sie den Tank immer, bevor Sie das Gerät verschicken oder transportieren. Trinken Sie niemals Seifenfluid. Sollte es dennoch einmal verschluckt werden, konsultieren Sie bitte sofort einen Arzt. Sollte die Haut oder die Augen einmal mit Seifenfluid in Berührung kommen, bitte sorgfältig mit Wasser auswaschen. Bitte beachten Sie alle auf dem Gehäuse Ihrer ANTARI Seifenblasenmachine angebrachten Warnhinweise und Anweisungen. Auspacken und auf Transportschäden untersuchen Öffnen Sie den Außenkarton und stellen Sie sicher, dass alle Teile, die für den Betrieb des Systems notwendig sind, in einem einwandfreien Zustand eingetroffen sind. Zusätzlich zu dieser Bedienungsanleitung sollte der Versandkarton sollte folgendes enthalten: 1. 2. 3. 4. B-200 Seifenblasenmaschine Netzkabel 1 Hängebügel Schrauben und Unterlegscheiben Wenn Ausrüstungsteile fehlen sollten, nehmen Sie bitte sofort mit Ihrem ANTARI-Händler Kontakt auf. Bevor Sie mit der Inbetriebnahme der ANTARI-Seifenblasenmaschine beginnen, stellen Sie sicher, dass kein offensichtlicher Transportschaden vorliegt. Sind Gehäuse oder Kabel beschädigt, schließen Sie das Gerät nicht an und versuchen Sie nicht, es in Betrieb zu nehmen, ohne Vorher mit Ihrem ANTARI-Händler Rücksprache gehalten zu haben. Inbetriebnahme Entfernen Sie jegliches Verpackungsmaterial vom Versandkarton. Vergewissern Sie sich, dass alle Schaumstoff- und Plastikeinlagen entfernt werden, insbesondere in der Nähe der Austrittsdüse. Installieren Sie das Gerät auf einer ebenen Oberfläche und schrauben Sie den Deckel des Fluidtankes ab. Füllen Sie den Tank mit ANTARI Seifenblasenflüssigkeit oder anderen hochwertigen Seifenblasenfluids auf Wasserbasis. Alle anderen Fluidarten können Beschädigungen am Gerät zur Folge haben. ÜBERFÜLLEN SIE DEN TANK NICHT! Nach dem Befüllen verschließen Sie den Tank bitte wieder mit dem Deckel. Befestigen Sie den Hängebügel mit den beigefügten Schrauben und Kunststoffscheiben am Gerät. Schrauben Sie die beigelete Fangseilöse (mit Unterlegscheibe) an der Geräterückseite (oberhalb der DMX-Buchsen) fest. 12 Washer Unterlegscheibe Tightening screw Feststellschraube Unterlegscheibe Washer M8Fangsicherung Screw DMX SW. DipDIP Schalter OFF ON SW. 1 2 3 4 5 6 7 8 9 CH. 1 2 4 8 16 32 64 128 256 Montage Installieren Sie das Gerät an einem gut belüfteten Ort. Ein Betrieb in unzureichend belüfteten Räumen kann zur Kondensation des Seifenblasenfluids führen. Die dabei entstehende rutschige Oberfläche kann zu Unfällen führen. Halten Sie einen Mindestabstand von 20 cm um und über dem Gerät ein. Desweiteren ist darauf zu achten, dass die Austrittsdüse nicht in Augenhöhe des Publikums ausgerichtet wird. Um einen guten Effekt zu erzielen, sollte der Abstand zum Publikum mindestens 1,5 m betragen. Stellen Sie die Seifenblasenmaschine nur auf feuerfeste, kratz- und wasserunempfindliche Oberflächen. BRANDGEFAHR! Achten Sie bei der Installation des Gerätes bitte darauf, dass sich im Abstand von mind. 0,5 m keine leicht entflammbaren Materialien (Deko, etc.) befinden Bitte achten Sie darauf, dass die maximale Neigung von 15 Grad nicht überschritten wird. Das Gerät ist sowohl zur stehenden wie hängenden Montage vorgesehen. Soll das Gerät über Kopf installiert werden, gelten folgende Sicherheitsvorschriften: LEBENSGEFAHR! Bei der Installation sind insbesondere die Bestimmungen der BGV C1 (vormals VBG 70) und EN 60335-1:1996 zu beachten! Die Installation darf nur vom autorisierten Fachhanddel ausgeführt werden! Die Aufhängevorrichtungen des Gerätes muss so gebaut und bemessen sein, dass sie 1 Stunde lang ohne dauernde schädliche Deformierung das 10-fache der Nutzlast aushalten kann. Die Installation muss immer mit einer zweiten, unabhängigen Aufhängung, z. B. einem geeigneten Fangnetz, erfolgen. Diese zweite Aufhängung muss so beschaffen und angebracht sein, dass im Fehlerfall der Hauptaufhängung kein Teil der Installation herabfallen kann. Während des Auf-, Um- und Abbaus ist der unnötige Aufenthalt im Bereich von Bewegungsflächen, auf 13 Beleuchterbrücken, unter hochgelegenen Arbeitsplätzen sowie an sonstigen Gefahrbereichen verboten. Der Unternehmer hat dafür zu sorgen, dass sicherheitstechnische und maschinentechnische Einrichtungen vor der ersten Inbetriebnahme und nach wesentlichen Änderungen vor der Wiederinbetriebnahme durch Sachverständige geprüft werden. Der Unternehmer hat dafür zu sorgen, dass sicherheitstechnische und maschinentechnische Einrichtungen mindestens alle vier Jahre durch einen Sachverständigen im Umfang der Abnahmeprüfung geprüft werden. Der Unternehmer hat dafür zu sorgen, dass sicherheitstechnische und maschinentechnische Einrichtungen mindestens einmal jährlich durch einen Sachkundigen geprüft werden. Vorgehensweise: Wird das Gerät hängend installiert, darf es nicht im Aufenthaltsbereich von Personen installiert werden. WICHTIG! ÜBERKOPFMONTAGE ERFORDERT EIN HOHES MAß AN ERFAHRUNG. Dies beinhaltet (aber beschränkt sich nicht allein auf) Berechnungen zur Definition der Tragfähigkeit, verwendetes Installationsmaterial und regelmäßige Sicherheitsinspektionen des verwendeten Materials und des Gerätes. Versuchen Sie niemals, die Installation selbst vorzunehmen, wenn Sie nicht über eine solche Qualifikation verfügen, sondern beauftragen Sie einen professionellen Installateur. Unsachgemäße Installationen können zu Verletzungen und/oder zur Beschädigung von Eigentum führen. Das Gerät muss außerhalb des Handbereichs von Personen installiert werden. Achtung: Über Kopf installierte Geräte können beim Herabstürzen erhebliche Verletzungen verursachen! Wenn Sie Zweifel an der Sicherheit einer möglichen Installationsform haben, installieren Sie das Gerät NICHT! Vergewissern Sie sich vor der Montage, dass die Montagefläche mindestens die 10-fache Punktbelastung des Eigengewichtes des Gerätes aushalten kann. Befestigen Sie das Gerät mit dem Bügel über einen geeigneten Haken an Ihrem Traversensystem. Die Bohrung hat einen Durchmesser von 10 mm. Sichern Sie die Seifenblasenmaschine bei Überkopfmontage immer mit einem Sicherheitsfangseil, das mindestens für das 12-fache Gewicht des Gerätes ausgelegt ist. Es dürfen nur Fangseile mit Schnellverschlussgliedern vewendet werden. Hängen Sie das Sicherheitsfangseil in der dafür vorgesehenen Fangsicherung an der Geräterückseite ein und führen Sie es über die Traverse bzw. einen sicheren Befestigungspunkt. Hängen Sie das Ende in dem Schnellverschlussglied ein und ziehen Sie die Sicherungsmutter gut fest. Der maximale Fallabstand darf 20 cm nicht überschreiten. Ein Sicherungsseil, das einmal der Belastung durch Absturz ausgesetzt war oder beschädigt ist, darf nicht mehr als Sicherungsseil eingesetzt werden. Stellen Sie den Neigungswinkel über den Hängebügel ein und ziehen Sie die Feststellschrauben gut fest. LEBENSGEFAHR! Vor der ersten Inbetriebnahme muss die Einrichtung durch einen Sachverständigen geprüft werden! Sicherheitshinweise für Tankfüllung: Versichern Sie sich, dass der Netzstecker gezogen ist, bevor Sie das den Deckel des Fluidtankes abschrauben Seitlich des Gerätes befindet sich der Fluidablassstutzen. Stellen Sie sicher, nachdem Sie diesen aufgedreht haben, um Flüssigkeit abzulassen, dass dieser wieder fest zugedreht wird. 14 Bedienung Stecken Sie den Netzstecker in eine geerdete Schutzkontaktsteckdose ein. Schalten Sie den Netzschalter auf der Rückseite des Gerätes auf "ON". Seifenblasen werden jetzt produziert. Ferbedienung Schalten Sie das Gerät über den Netzschalter ein. Schließen Sie die Fernbedienung an die Remote ControlBuchse an. Durch Betätigen des grünen Schalters auf der Fernsteuerung wird der Seifenblasenausstoß ausgelöst. Über den Regler lässt sich das Intervall der Seifenblasen einstellen. Wenn das gelbe Licht aufleuchtet, ist die Timerfunktion aktiviert. Die Zeitabstände zwischen den einzelnen Seifenblasenausstößen können zwischen 3 Sekunden und 220 Sekunden eingestellt werden. Die Dauer jedes Seifenblasenausstoßes beträgt 10 Sekunden. Wird die grüne Taste erneut gedrückt, wird der Seifenblasenausstoß beendet. Wichtig: Während des Seifenblasenausstoßes immer auf die Fluidtankanzeige achten. Der Betrieb eines Seifenblasengerätes ohne Fluid kann zu irreparablen Schäden Ihres Gerätes führen. Sollten Sie einen verminderten Ausstoß, Pumpgeräusche oder überhaupt keinen Ausstoß feststellen, sofort vom Netz trennen. Kontrollieren Sie den Fluidstand, die externe Sicherung, den Anschluß zur Fernbedienung und die Stromversorgung. Sollte nach 30 Sekunden permanenten Drückens des Fernbedienungsknopfes immer noch kein Ausstoß erfolgen, überprüfen Sie bitte den Verbindungsschlauch zum Tank und vergewissern Sie sich, dass Fluid hindurchfließen kann. Wenn Sie die Ursache des Problems nicht feststellen können, drücken Sie bitte nicht weiter die Fernbedienungstaste, da dies zu Schäden am Gerät führen kann. Schicken Sie das Gerät bei Ihrem ANTARI-Händler ein. DMX-gesteuerter Betrieb Über Ihren DMX-Controller können Sie das Gerät steuern. Die Antari B-200 belegt einen Steuerkanal, mit dem sich das Gerät an- und ausschalten lässt. DMX Protokoll DMX Wert 0 -128 129-255 Eigenschaft Aus An Adressierung des Gerätes Jedes Gerät belegt 1 Steuerkanal. Damit die Steuersignale richtig an jedes Gerät adressiert werden, müssen diese Geräte kodiert werden. Die Kodierung muss an jeder Maschine einzeln durchgeführt werden, indem Sie die DIP-Schalter entsprechend untenstehender Tabelle einstellen. Bitte vergewissern Sie sich, dass sich die Steuerkanäle nicht mit anderen Geräten überlappen, damit die B-200 korrekt und unabhängig von anderen Geräten in der DMX-Verbindung funktioniert. Werden mehrere B-200 auf eine Adresse definiert, arbeiten sie synchron. 15 Belegung der DIP-Schalter: Wartung Achten Sie darauf, dass das Seifenblasen-Liquid nicht verschmutzt wird. Verschließen Sie den Deckel des Tanks und des Vorratsbehälters sofort nach dem Befüllen. Vor längerer Betriebspausen System unbedingt mit klarem Wasser spülen. 16 TeUser Manual Antari B-200 泡泡機 感 謝 您 選 用 A n t a r i 泡 泡 機 產 品 , 在 開 始 使 用 之 前 , 我們 建 議 您 先 仔 細 閱 讀 本 說 明 書 , 遵 循 使 用 手 冊 中 的 說 明 , 這 會 有 助 於 您 在 使 用 A n t a r i泡泡機時更得心應手,達到最滿意 的 效 果 , 對 於 機 器 的使 用 壽 命 也 更 為 延 長。 警 告 請 注 意 並 閱 讀 所 有 在 A n t a r i 泡 泡 機 上 的 警示 印 刷 或 貼 紙 ,此機器必須接地。 注意事項: 注意事項: 請 保 持 機 器 乾 燥。 請 保 持 泡 泡 機 正 面 朝上 。 請於室內使用,此機器並非戶外使用機. 1 1 0 伏 特 的 機 器 使 用 的 是 接 地 型 插 頭 , 使 用 前 請 小 心 判 定 電壓 級數,伏特 。 不使用 時 請 關 機 , 長 時 間 不 使用 時 請 拔 掉 插 頭 。 請 勿 將 泡 泡 液 裝 填 過滿 , 容 易 導 致 泡 泡 液溢 出 容 器 而 造 成 電路危 險 。 本 產 品 之 設 計 為 不 防 水 , 遇 潮 濕 或 浸 水 或泡 泡 液 滲 出 時 請 即 刻拔 掉 插 頭 並 擦 乾 , 在下 次 使 用 前 , 聯 絡 技 術人 員 或 A n t a r i 的 代 理商 檢 修 。 本 包 裝 中 未 附 維 修 零件 , 敬 請 聯 繫 A n t a r i 代 理 商 , 或 洽詢 合 格技 術 人 員 。 此機器電源線必需接地。 機 器 僅 限 成 人 使 用 , 安 裝 泡 泡 機 之 地 點 應 避 免 兒 童 可 及 之 處 , 請 於 外 出 離 去 時 確 實關 閉電源。 請 勿 將 機 器對 準 火 焰使用 。 長 時 間 使 用 會 造 成 地面 濕 滑 , 請 特 別 小 心注 意 安 全 。 請勿將機器對著人體及動物直射。 當 要 清 潔 機 器 或 需 添加 泡 泡 液 時 , 請 確 實切 斷 電 源 。 平時請多清潔泡泡環。 請將機器安裝於通風處,不要堵住機器出口,並確認至少預留 20 公分的空間以利空氣流 通。 當 機 身潮濕時 , 請 勿 任 意 移 動 機 器,並 等到機 器 乾 燥 時 再 使 用 。 衣 服 若 不 慎 沾 上 泡 泡液 , 請 盡 速 沖 洗 以 免留 下 永 久 性 的 污 漬。 在插 入 電 源 插 座 時 ,請 確 保 電 源 插 頭 的 清潔 與 乾 燥 。 17 特殊事項: 特殊事項: 請勿添加任何易燃液體,例如:汽油、液態瓦斯、香水…等。 請使用 Antari 代理商所推薦的高品質泡泡液,任何其他液體將可能造成機器堵塞及滴 水。 機器使用前請先確認是否已添加泡泡液。 若您的 Antari B-200 泡泡機發生故障,請立即停止使用,將泡泡液清理倒出,並妥善包 裝好機器,送回 Antari 代理商維修。 在包裝及寄送前,請確認泡泡液已完全倒出。 請勿食用泡泡液。若不甚誤食,請盡速就醫。若泡泡液接觸到皮膚或眼睛,請立即用清 水清洗。 請詳細注 意 所 有在 Antari 泡泡機上的警示印刷或貼紙 拆 除 包 裝 及 檢 視 機 器: 請打開包裝確認機器運作的所有設備齊全,請參考配置圖,確認您所購買的機型應包括 之 項 目 , 倘 若 有缺 少任 何 項 目 , 請 即刻 聯絡 A n t a r i 經 銷 商。 機器出廠時應包含以下物 件: 1. B-200 泡泡機一台 2. 電源線一條 3. 吊架一組 4. 2 個長柄螺絲、2 個金屬螺絲、 5 個華司墊片、1 個安全吊環 在 開 始 安 裝 機 器 之 前 , 請 先 確 認 本 產 品 未因 運 送 過 程 造 成 外 部的 損 壞 , 若 機 器 電 源 線 有 任 何 損 壞 , 請 勿 插 上插 頭 , 並 請 勿 使 用 ,馬 上 與 Antari 代 理 商 或 經 銷 商聯 繫 。 機器安裝: 機器安裝: 拆 開 包 裝 , 小 心 的 移除 所 有 的 包 材 墊 片 。 將 泡 泡 機 放 置 於 平 坦表 面 。 鬆開 B-200 前方邊緣的螺絲,往上方打開機蓋,即 可 看 見 裝 盛 泡 泡液 的水盤。 倒 入 泡 泡 液 至 水盤 中, 請 特 別 注 意 不 要 裝填 過 滿 , 建 議 為七 分滿 即 可 。 當 泡 泡 液填完 , 請 降下 關 起 機 蓋 並 旋 緊 螺絲 。 附贈的 M8 安全吊環,是為了能夠更確保機器在高處落下時的安全防護,請確實接扣。 B-200 泡泡機可以放置在任何所需演出的位置,在搬移或裝置機器時,請注意勿讓水盤 內的泡泡液潑灑出來,特別是在機器位於高處時,需更加小心。 請先確認機器已妥當、安全的裝置好,並尋視水槽四周無裂縫時,再啟動機器的電源開 關。若機器或控制器上有任何漏水或潮濕,請先等待 B-200 乾燥時再使用。 18 Washer 華司墊片 Tightening screw 長柄螺絲 Washer 華司墊片 華司墊片 M8 M8Screw 安全吊環 DMX DIP SW. DMX 指撥開關 指撥開關 OFF ON SW. 1 2 3 4 5 6 7 8 9 CH. 1 2 4 8 16 32 64 128 256 請將機器安裝於通風處,不要堵住機器出口,並確認至少預留 20 公分的空間以利空氣流 通。若需裝置在公眾場合,請先考慮泡泡液可能會造成地面濕滑,而發生危險。盡量在遠離 人群的位置安裝機器,至少預留 1.5 公尺的距離,並確認機器安裝在防滑且防水的地方。 請確保機器安裝勿傾斜超過 15 度角。 危險易燃物! 危險易燃物 當安裝機器時,請確認機器四周無存放易燃物,或至少保持 0.5 公尺的距離。 此機器只設計為固定式的裝置使用,若需將機器安裝於高處,請注意以下的安全指示: 危險! 危險 安裝時請注意 EN 60598-2-17 安全要求以及各國國家規範。安裝工程務必請授權 的代理執行! 此機器必需安裝在可耐機器十倍重量至少一小時,且不會變形的承載物上。並確實搭配安全 裝備使用,例如:安全網…。而這第二道安全裝置,必須確保不會再發生任何安全意外。 當機器裝置在高處,請勿站在安裝處的下方或周圍可能發生危險的區域。 操作者在任何新場所執行的第一次安裝時,都必須確認所有的安全防護及機器操作技術上, 皆經過專家的認可。 19 操作者務必每四年請專家再度檢查確認所有機器的安全防護設施無虞。 對於機器本身的安全及操作技術,每年需請工程人員執行確認動作。 安裝程序: 安裝程序: 該機器請安裝在大範圍的空間場地。 重要! 在高處的吊設安裝需豐富的經驗,包括工作承載限制的計算、必需的安裝材料以及週期性的 安裝材料及機器的安檢。若不符前述資格請勿擅自安裝,敬請使用專業的工程索具。 不適當的安裝可能導致身體以及器材的損傷。 機器須安裝於人們無法輕易觸及的範圍。 若機器將由天花板或高樑下放則需使用專業的舞台構架。機器不應固定在室內某處使之隨意 搖晃。. 警告: 警告: 垂吊的機器可能於墜落時造成嚴重的傷害!安裝時只要有任何安全上的疑慮,則請勿安裝! 請於吊掛機器前確認安裝的地方能夠承載機器自身十倍以上的重量。 固定機器於舞台構架時請務必使用適當的鉗夾。 高處安裝請務必使用能夠支撐機器本身 12 倍重量以上的安全繩索。請務必只使用帶有螺紋 閥帽連結圈的安全繩索。將安全繩索穿過吊架上的圓環然後繞過舞台構架或者安全固定點。 將安全繩索終端套入連結圈內然後旋緊螺紋閥帽。 安全繩索最大落下距離請勿超過 20 公分。 因機器墜落而已有損傷或損壞的安全繩索請勿再使用。 請使用吊架螺絲來調整適當的傾斜角度。. 危險! 首次操作前請確認安裝為專家所認可! 機器操作 B-200 泡泡機可以單獨運作,也可搭配控制器使用。此外,機器內建有 DMX 可透過 DMX 控台其中一個頻道來執行操作。 若要連接定時或無線控制器,請直接將控制器插頭插入泡泡機後方,位於 DMX 指撥開關左 方的插座,即可使用。 20 B-200 單機操作 (無搭配控制器 無搭配控制器): 無搭配控制器 : 請開啟機器後方的電源開關,泡泡輪環及風扇便會開始轉動,此時就可製造出大量的泡泡效 果直到電源關閉。 B-200 搭配 DMX 使用: 使用: 請先設定好機器後方的 DMX 指撥開關到想對應的頻道,再連接至 DMX 控台。 注意: 注意:機器只需設定一個頻道即可,此頻道為控制機器開與關的功能,並無法控制泡泡量的 大小。 DMX 頻道說明 DMX 數值 0 -128 129-255 對應功能 OFF ON DMX 位址碼 每部機器佔用一個頻道,為了確認每部機器都有直接對應到各頻道,請依下方 DMX 指撥開 關的對應表來設定 DMX 位址。 每部機器都需設定獨立專屬聯接的位址碼,請確認勿設定到重覆的位址碼。若位址碼重覆, 則會一次同時控制到所設定的機器數量。 21 DMX 頻道設定方法 頻道設定方法: 方法: 設定 DMX 啟動 位址碼 機器編號與頻道 指撥開關數字 DMX 位址碼 機器 1 – 頻道 1 機器 2 – 頻道 2 機器 3 – 頻道 3 機器 4 – 頻道 4 機器 5 – 頻道 5 B-200 搭配 BCT-1 定時控制器操作: 定時控制器操作: 當連接 BCT-1 定時控制器,B-200 泡泡機有兩種控制方式。分別為手動及定時模式。 手動模式下,按下綠色按鈕啟動,B-200 便開始製造泡泡效果。 若要執行定時功能,請以順時針方式轉動弦鈕。當按下黃色按鈕、黃燈亮起則表示定時 功能啟用,每次執行運作的時間為固定 10 秒,而定時時間可從 3 秒調至 220 秒,順時 針轉動為增加,逆時針轉動為縮短秒數。 B-200 搭配 BCR-1 無線控制器操作: 無線控制器操作: 只需按下無線控制器上的按鈕,B-200 即可開始運作製造泡泡效果,再按一次按鈕則解 除動作。無線控制器的有效距離為 50 公尺。 請妥善保存此說明書. 請妥善保存此說明書 22 C08B20001 23