1
Drofly Pro
Flight Controller
MegaPirateNG
User manual
Version 1.0 - 01/08/13
DROTEK
Web shop: www.drotek.fr
Table of contents
1. INTRODUCTION
2. SOFTWARE SETUP
Getting started with Arduino software
a.
Download
b. Install
Getting started with MegaPirateNG code
a.
Download
b. Install
MegaPirateNG code setup :APM_config.h file
a.
Number of motors
b. Flight controller selection
Uploading MegaPirateNG code into flight controller
Using Mission Planer GUI
a.
Installation
b. Usage
3. HARDWARE SETUP
Setup on your frame
Connecting flight controller
a.
To BEC
b. To receiver
c.
To ESCs/motors
4. ADDITIONAL MODULES
GPS
DROTEK
Web shop: www.drotek.fr
1. INTRODUCTION
The MegaPirateNG project focuses on porting ArduCopter2 open
source project to IMU board.
MegaPirateNG now supports multiple sensors and IMUs.
More information available here:
http://code.google.com/p/megapirateng/
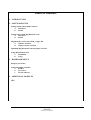
With this firmware it is possible to use the Mission Planer, created
by Michael Oborne, which serve to setup the Arducopter hardware and
by extension the DroflyPro with MegaPirateNg firmware.
This software does a lot more than its name. Here are some of
the features:
Point-and-click waypoint entry, using Google Maps.
Select mission commands from drop-down menus
Download mission log files and analyze them
Configure APM settings for your airframe
See the output from APM's serial terminal
Even if using MegaPirateNG is simple, even for a beginner, it
requires a few hardware and software initial tasks.
This user manual will guide you through the basic steps to get your
model flying.
This section will explain how to edit, setup and upload the
MegaPirateNG code into your flight controller.
DROTEK
Web shop: www.drotek.fr
2. SOFTWARE INSTALL
Getting started with arduino software
As described in the introduction, MegaPirateNG project uses
Arduino development platform.
This section will explain how to setup Arduino software on your
computer in order to edit and upload MegaPirateNG code into your
flight controller.
a.
Download
Latest Arduino software version is available here:
http://arduino.cc/en/Main/Software
Select and download a V1.0x version available for your
computer/operating system then extract the zip file.
The version 1.5x is not compatible with the MegaPirateNG
code.
b.
Install
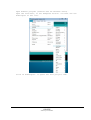
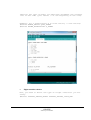
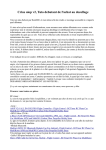
Open the extracted folder and Open Arduino program (arduino.exe for
Windows users).
This window will be displayed.
DROTEK
Web shop: www.drotek.fr
Arduino software is now installed and ready to use on your
computer.
Getting started with MegaPirateNG code
This section will explain how to tune MegaPirateNG code to fit
your flying model.
a.
Download
Please download the latest version of the MegaPirateNG code
available on this page:
https://code.google.com/p/megapirateng/downloads/list
The downloaded file should be named as follow:
"MegaPirateNG_xxx_Ry.zip"
b.
Install
Extract it in a dedicated folder; 2 subfolders will be created:
- ArduCopter contains the code to be uploaded onto the
flight controller
- Libraries contains all the software librairies.
Move the content of “Librairies” folder in the Arduino libraries
folder.
Move too the “Arducopter” folder into the Arduino librairies
folder.
DROTEK
Web shop: www.drotek.fr
Before editing the configuration file of the ArduCopter project,
you must edit the following file
“AP_InertialSensor_MPU6000_I2C.cpp” in the
“Librairies\AP_InertialSensor” folder.
Search at line 145 the following code
} else if (_board_Type == PIRATES_DROTEK_10DOF_MPU || _board_Type ==
PIRATES_CRIUS_AIO_PRO_V1 || _board_Type == PIRATES_CRIUS_AIO_PRO_V2) {
_gyro_data_index[0]
= 5;
// Y
_gyro_data_index[1]
= 4;
// X
_gyro_data_index[2]
= 6;
// Z
_gyro_data_sign[0]
= 1;
// Y
_gyro_data_sign[1]
= 1;
// X
_gyro_data_sign[2]
= -1;
// -Z
_accel_data_index[0] = 1;
_accel_data_index[1] = 0;
_accel_data_index[2] = 2;
_accel_data_sign[0]
= 1;
_accel_data_sign[1]
= 1;
_accel_data_sign[2]
= -1;
}
And replace it with
} else if (_board_Type == PIRATES_CRIUS_AIO_PRO_V1 || _board_Type ==
PIRATES_CRIUS_AIO_PRO_V2) {
_gyro_data_index[0]
= 5;
// Y
_gyro_data_index[1]
= 4;
// X
_gyro_data_index[2]
= 6;
// Z
_gyro_data_sign[0]
= 1;
// Y
_gyro_data_sign[1]
= 1;
// X
_gyro_data_sign[2]
= -1;
// -Z
_accel_data_index[0] = 1;
_accel_data_index[1] = 0;
_accel_data_index[2] = 2;
_accel_data_sign[0]
= 1;
_accel_data_sign[1]
= 1;
_accel_data_sign[2]
= -1;
DROTEK
Web shop: www.drotek.fr
}else if (_board_Type == PIRATES_DROTEK_10DOF_MPU ) {
_gyro_data_index[0]
= 4;
// X
_gyro_data_index[1]
= 5;
// Y
_gyro_data_index[2]
= 6;
// Z
_gyro_data_sign[0]
= 1;
// X
_gyro_data_sign[1]
= -1;
// Y
_gyro_data_sign[2]
= -1;
// -Z
_accel_data_index[0] = 0;
_accel_data_index[1] = 1;
_accel_data_index[2] = 2;
_accel_data_sign[0]
= 1;
_accel_data_sign[1]
= -1;
_accel_data_sign[2]
= -1;
}
And save the file.
The goal of this code is to adapt the sensor orientation of the
Drofly Pro with the MegaPirateNG code.
DROTEK
Web shop: www.drotek.fr
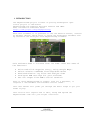
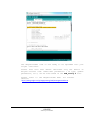
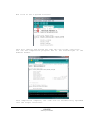
Open Arduino program (arduino.exe for Windows users).
Open the File menu, in the Examples section. You must see the
Arducopter in the list.
Click on ArduCopter. it opens the full project code.
DROTEK
Web shop: www.drotek.fr
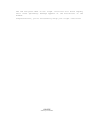
MegaPirateNG setup: APM_Config.h file
The M e g a P i r a t e N G
code is splitted in several files,
displayed in different tabs in Arduino. Each one of them is
dedicated to a specific functionality (radio, commands, motors,
etc…).
APM_Config.h is the parameters file to be edited in order to fit
your flying model.
WARNING: Do NOT modify other files unless you’re an advanced user.
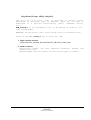
Click on the APM_Config.h tab to enter the code.
a. Flight controller selection
#define PIRATES_SENSOR_BOARD PIRATES_DROTEK_10DOF_MPU
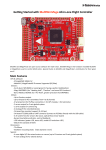
b. Number of motors
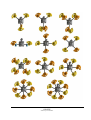
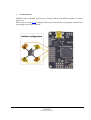
Multicopter models can take numerous different designs and
number of motors.
MegaPirateNG code can handle all the listed types of models:
DROTEK
Web shop: www.drotek.fr
DROTEK
Web shop: www.drotek.fr
Identify the type of model you need then uncomment the relevant
line in the code (just remove // at the beginning of the line).
Example, for a quadricopter X (2 front motors, 2 rear motors):
#define FRAME_CONFIG QUAD_FRAME
#define FRAME_ORIENTATION X_FRAME
c.
Flight controller selection
Now, you need to select the type of flight controller you are
using.
#define PIRATES_SENSOR_BOARD PIRATES_DROTEK_10DOF_MPU
DROTEK
Web shop: www.drotek.fr
The MegaPirateNG code is now ready to be uploaded into your
flight controller.
Please note this user manual describes only the basics of
M e g a P i r a t e N G code. Additional parameters ( rx type, gimbal
parameters, etc…) can be fine-tuned in the APM_Config.h file.
Please refer to the MegaPirateNG Wiki for further
details:
https://code.google.com/p/megapirateng/wiki/GettingStarted?tm=6
DROTEK
Web shop: www.drotek.fr
Uploading MegaPirateNG code into flight controller
In order to compile and upload the code into the flight controller,
you need to select :
-the type of board:
In Arduino program: Tools>>Board>>Arduino Mega 2560
DROTEK
Web shop: www.drotek.fr
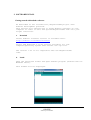
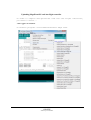
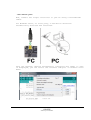
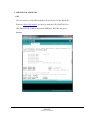
-the serial port
Now, connect the flight controller to your PC using a miniUSB-USB
cable.
For Windows users, on first plug, a new device should be
automatically detected and installed.
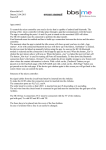
Once the message “device successfully installed and ready to use”
is displayed, you can select the relevant COM port in Arduino Tools
menu:
DROTEK
Web shop: www.drotek.fr
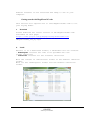
Now click on the « upload » button:
This will compile and upload the code into the flight controller.
You can see compilation progress bar at the bottom-right of the
Arduino window.
Once compilation complete, the code will be automatically uploaded
into the flight controller.
DROTEK
Web shop: www.drotek.fr
The red and green LEDs on the flight controller will blink rapidly
until “Done uploading” message appears at the bottom-left of the
window.
Congratulations, you’ve successfully setup your flight controller!
DROTEK
Web shop: www.drotek.fr
Using MegaPirateNG GUI
MegaPirateNG can be used with the “Ardupilot MegaPlanner 10” GUI
(Graphical User Interface) which helps the user to setup:
-sensors recognition
-accelerometer/compass calibration
-PIDs setup
-rx channels calibration
You can refer to the “Ardupilot MegaPlanner” dedicated section
“Configuration via GUI”, available here:
https://code.google.com/p/ardupilot-mega/wiki/Mission
DROTEK
Web shop: www.drotek.fr
3. HARWARE SETUP
Now your flight controller is ready on the software side, let’s see
how to set it up on your flying model.
SECURITY WARNING: make sure the propellers are OFF the motors before testing.
Setup on your frame
First, you need to identify the front of your flight controller.
If you’ve followed this guide, the front of the FC is the side
where the micro-USB port is located.
Anyway, you can easily identify flight controller orientation using
GUI.
Please make sure your flight controller is securely attached to
your model frame and make sure propellers are off the motors. You
can refer to your frame user manual.
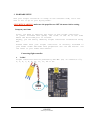
Connecting flight controller
a.
To BEC
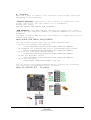
Flight controller must be powered by ESC BEC (5V) on connector n°2,
3, 5, 6, 7, 8, 9, 10, 11, 12, 44 or 45.
DROTEK
Web shop: www.drotek.fr
b. To receiver
Here are 2 ways to connect your receiver to the flight controller
depending of your harware:
-classic receiver: each port of the receiver is connected to the
flight controller. You can connect up to 8 channels.
Define this lines:
#define SERIAL_PPM SERIAL_PPM_DISABLED
-PPM receiver: with PPM enabled receiver one jumper servo cable
handles all the channels (number of channels depends of your Tx/Rx
hardware).
You need to enable PPM receiver functionality in APM_Config.h file.
Define this lines:
#define SERIAL_PPM SERIAL_PPM_ENABLED
You can choose between many set of TX/RX channels map :
- TX_set1 for Graupner and Spektrum
PITCH,YAW,THROTTLE,ROLL,AUX1,AUX2,CAMPITCH,CAMROLL
- TX_standard for standard PPM layout Futaba/Robbe/Hitec/Sanwa
ROLL,PITCH,THROTTLE,YAW,MODE,AUX2,CAMPITCH,CAMROLL
- TX_set2 for some Hitec/Sanwa/others
PITCH,ROLL,THROTTLE,YAW,AUX1,AUX2,CAMPITCH,CAMROLL
- TX_mwi for MultiWii layout
ROLL,THROTTLE,PITCH,YAW,AUX1,AUX2,CAMPITCH,CAMROLL
- TX_JR for JR layout
FLAPS:MODE, GEAR:SAVE TRIMM = apm ch7
You can choose your TX/RX channels map by setting the following
line with the corresponding option as above :
#define TX_CHANNEL_SET
TX_standard
DROTEK
Web shop: www.drotek.fr
c.
To ESCs/Motors
MultiWii code can handle various types of flying models with different number of motors
and servos.
Please refer to section 2.3.a to identify which type of model you’re flying then connect ESCs
accordingly to the flight controller.
DROTEK
Web shop: www.drotek.fr
5. ADDITIONAL MODULES
GPS
You can connect a serial GPS module to the serial port 2 of the Drofly Pro.
With our Ublox GPS module, you have to setup the GPS_PROTOCOL to
GPS_PROTOCOL_UBLOX and set the SERIAL2_BAUD to the good
baudrate.
DROTEK
Web shop: www.drotek.fr