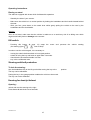
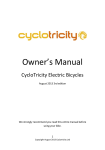
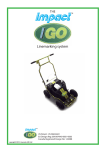
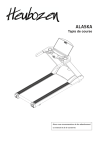
1
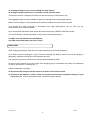
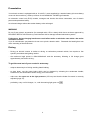
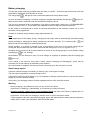
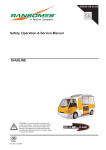
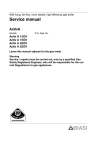
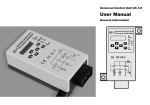
Scoot'elec User Manual
CONTENTS
Contents .......................................................................................................................................................... 1
Introduction ...................................................................................................................................................... 2
Safety advice ..............................................................................................................................................2 - 3
Presentation..................................................................................................................................................... 4
Driving.............................................................................................................................................................. 4
Driving battery.................................................................................................................................................. 5
Battery charging............................................................................................................................................... 6
Battery maintenance........................................................................................................................................ 7
Anti-theft advice ............................................................................................................................................... 8
Braking............................................................................................................................................................. 8
Operating instructions..................................................................................................................................... 9
Driver's cockpit ..............................................................................................................................
10
Instrument panel.............................................................................................................................11-12
Start checks ......................................................................................................................................... 13
Starting................................................................................................................................................. 13
Driving modes...................................................................................................................................... 14
Parking................................................................................................................................................. 14
Kill switch ............................................................................................................................................. 15
Steering anti-theft protection ............................................................................................................... 15
Housing for demi-jet helmet ................................................................................................................ 15
Seat...................................................................................................................................................... 16
Lighting and indicators .................................................................................................................16 - 17
Maintenance and adjustments .............................................................................................. 17 -18 - 21
Coded anti-start : changing the code .................................................................................................. 19
Technical specifications ............................................................................................................................... 20
Maintenance plan ......................................................................................................................................... 21
1 mile
1 kilometre
1 livre
1 kilogramme
= 1.6 kilometres
= 0.62 miles
= 0.45 kilogrammes
= 2.2 livres
ELMANANG.DOC
5/24/2003
1
Introduction
This manual is your guide for driving, use and basic maintenance of your PEUGEOT electric Scooter.
Your electric scooter has been given the name Scoot'elec, a name which embodies its international
ambitions.
Take the time to read this document carefully.
As for all high technology machines, the care and attention with which you use and maintain your Scooter
will guarantee problem-free driving and maximum performance.
Your PEUGEOT MOTOCYCLES dealer is there to advise and inform you and his expertise is available for
carrying out the maintenance of your vehicle and battery with care and to maintain them in perfect working
order.
Your PEUGEOT MOTOCYCLES Scoot'elec registered dealer knows all about the special features of your
Scooter.
He has all PEUGEOT original parts at his disposal as well as the special tooling for carrying out routine
maintenance of your Scooter in the best conditions.
We would like to thank you for having chosen PEUGEOT and guarantee that your electric scooter will give
you many years of safe and happy transport.
For now, we want to congratulate you for having the will to see things differently.
Safety advice
The safety of the vehicle depends on the care of the driver.
High speed is a decisive factor in many accidents. Obey speed limits and never drive faster than safety
conditions allow.
Beware of the risk of slipping on road markings.
Before use, always carry out a general check to make sure that the vehicle can be used in all safety.
Road safety regulations mean that wearing a helmet is compulsory for the driver and passengers under
fourteen. It is also recommended to wear gloves, eye protection and bright and visible clothing to increase
your safety.
A new electric scooter driver must familiarise himself with his vehicle before driving in traffic.
Do not forget that your scooter does not make any noise due to its electric motor and therefore
pedestrians are more likely to be taken unawares.
BE DOUBLY CAREFUL
Safety advice
An electric scooter driver must inform other road users of his presence by :
ELMANANG.DOC
5/24/2003
2
• avoiding driving in areas of non visibility for other drivers.
• driving carefully at junctions, in car parks, at exits and slip roads.
Your electric scooter is designed for urban use and for driving on road surfaces only.
The baggage holders or bags available as options are designed for carrying light objects.
Make sure that weight is evenly distributed and that any objects are firmly secured in place.
Your scooter has been designed in accordance with legal requirements. Do not carry out any
modifications on your electric scooter.
Only use products which have been tested and recommended by PEUGEOT MOTOCYCLES.
The scooter battery contains electrolyte; in the event of electrolyte getting on :
• SKIN: rinse the affected area immediately,
• EYES: rinse immediately and see a doctor.
IMPORTANT
When charging the battery, take all the normal precautions for electrical equipment.
As a small amount of hydrogen is given off when charging the battery, make sure that the garage is
adequately ventilated if carrying out this operation at home.
The charger plug must be connected to a socket with standardised earth.
No work must be carried out on the scooter if the charging plug is connected to the mains (no dismantling
of caps or protections, no washing etc....).
If work is absolutely necessary :
• disconnect the charger from the mains to avoid the risk of electrocution.
• disconnect the battery to avoid a short circuit which would cause irreparable damage to your
Scoot'elec (first, remove the negative lead - identified by green marks).
ELMANANG.DOC
5/24/2003
3
Presentation
Your electric scooter is equipped with an 18 volt D.C. motor supplied by a traction battery (the term battery
covers all the monoblocs), made up of three 6 volt CADMIUM - NICKEL type batteries.
An electronic control unit (ECU) records, manages and checks the drivers commands, use of electric
power and operational safety.
An onboard charger allows the traction battery to be recharged.
WARNING
Do not fit any electric accessories (for example radio, CB or alarm) which have not been approved by
PEUGEOT MOTOCYCLES as they could interfere with or damage onboard electronic systems.
Furthermore, during charging interference could affect radios or television sets within a 2m radius
around the scooter.
If you fit a windscreen -pay attention do not cut or pinch a electric cable . Dismantle the head light to lock
at the mounting of the windscreen
Driving
− Driving an electric scooter is similar to driving a combustion powered vehicle, but requires a few
specific precautions and getting used to.
− the maximum legal speed is 45km/h-28miles/h and the autonomy following a full charge gives
approximately one hour's driving .
To get the most out of your scooter's autonomy :
− adopt a relaxed style of driving avoiding harsh braking.
− to slow down, use the motor brake which can be obtained by releasing the accelerator handle;
furthermore, this deceleration allows energy to be recovered.
− make sure that tyres are at the right pressure (2.5 bars) and that the brake free travel is correctly
adjusted (page 18).
− preferably, carry out full charges, i.e., until the warning light goes out.
ELMANANG.DOC
5/24/2003
4
Driving battery
The NICKEL CADMIUM driving battery requires periodic maintenance signalled by the lighting up of the
"maintenance" warning light on the instrument panel.
This maintenance must be made two or three times a year
This maintenance operation can only be carried out by a PEUGEOT MOTOCYCLES Scoot'elec registered
dealer.
During charging: Warning - no flames or sparks should be used near the battery due to a small
amount of hydrogen being released.
Battery electrolyte is a corrosive, alkaline solution.
In the event of contact with the skin :
wash immediately with water.
In the event of contact with eyes :
wash immediately with water and see a doctor.
If liquid appears under the vehicle :
dilute with water and sponge away wearing rubber gloves. Inform your PEUGEOT MOTOCYCLES dealer.
Recycling of the three monoblocs making up the battery :
At the end of their life, these monoblocs should be taken to a dealer's who will deal with recycling them.
ELMANANG.DOC
5/24/2003
5
Battery charging
Connect the charge lead plug (located under the seat) to a 230V - 10A/16A mains socket with earth and
protected by differential circuit breaker of 30 mA.
The charge light
will light up on the instrument panel and a beep will be heard.
As soon as maximum capacity is reached, charging is stopped automatically and the light
Make sure the lead is replaced under the seat before using the vehicle.
will go out.
The use of an extension lead is not advised. If you have no other option, make sure a "STANDARDISED"
extension lead is used, i.e., a lead which can withstand at least 10 Amps and has an earth wire.
As the charge is controlled both in terms of time and temperature by the electronic control unit, it is not
advised to use a programmer.
Duration of complete charge (battery empty) approximately 5h.
Note:
If the temperature of the battery is high, charging will only begin after an automatically controlled cooling
will
period (resulting in charging time being increased by the same amount). The H warning light
flash on and off until charging is started automatically.
During charging, it is normal to witness a rise in temperature at the rear of the vehicle caused by the
cooling fan. Do not obstruct the air outlet underneath the red light (no cover, no cagoule to dry....).
Charging can be carried out at all times whatever is shown on the energy gauge or on the battery charge
warning light
(lit, off, flashing).
Nevertheless, you are advised to carry out a full charge as regularly as possible (until the warning light
goes out).
If the vehicle is not used for more than a week, several "charging and discharging" cycles may be
necessary for the full capacity of the battery to be reached.
Once the charge is complete, the lead can remain connected up to the next time it is used.
Rapid charge option
A specific external charger is necessary in order to carry out this type of charge.
The time saved compared to a normal charge is 50%.
A PEUGEOT MOTOCYCLES dealer is at your disposal for fitting a special socket on your scooter and to
supply you with this optional charger.
In this case, your charging location must be equipped with two 230V 10A/16A sockets.
Warning
− During charging, it is prohibited to carry out any work on the vehicle.
In particular: no washing, no dismantling, no movement (nor taking off stand).
− charging must be carried out in a well ventilated room and away from flames or sparks due to a
small amount of hydrogen being released.
In particular : do not carry out charging in a boiler room or near to an electric switch.
If liquid appears under the vehicle after charging, dilute with water and wipe away wearing compulsory
rubber gloves. Inform your PEUGEOT MOTOCYCLES dealer.
ELMANANG.DOC
5/24/2003
6
Battery maintenance
This maintenance is to be carried out by a Scoot'elec registered dealer when the battery maintenance
signals that it is necessary.
warning light
off
off
No maintenance necessary
off
slow flashing
Maintenance to be planned in 150 to 200km - 90 to 120 miles
depending on the type of use
off
rapid flashing
Maintenance compulsory
performance is dropping
lit
rapid flashing
Maintenance compulsory
vehicle blocked
Only handling mode is possible (see page 14)
Note :
If you do not carry out this maintenance, the electronic safety function will gradually reduce performance
until the scooter comes to a complete standstill. It will only start to function normally once this maintenance
has been carried out.
IMPORTANT
The battery guarantee is subject to this maintenance being carried out correctly. A specific procedure and
a product satisfying PEUGEOT MOTOCYCLES's standards are compulsory for this maintenance.
Your PEUGEOT MOTOCYCLES Scoot'elec registered dealer is trained in this technique and has the
necessary product for carrying out this operation.
Under no circumstances must you pour any liquid whatsoever (including water for the battery and acid
even less so) into the maintenance hole located under the seat as this could cause irreparable damage to
the batteries.
A safety element records in the ECU every time this hole is opened and in the event of this hole being
opened without authorisation, a warning is given on the instrument panel.
All the warning lights flasching
with “beep” “beep”
In order to carry out this maintenance operation, the dealer will have to immobilise your scooter during a
period of approximately 12 hours (for example one night).
This maintenance operation is necessary approximately three times per year for average use. This
frequency may vary depending on use. It is automatically controlled by the ECU.
ELMANANG.DOC
5/24/2003
7
Anti-theft advice
Your Scooter is equipped with several anti-theft devices :
− steering anti-theft device (see page 15).
− a coded anti-start device (see pages 13 and 19).
− a steel ring incorporated into the side of the vehicle.
Never leave the keys on your vehicle when parked.
Put your helmet in its housing and lock the steering.
Make sure you have the following information relating to the vehicle:
− engine, chassis numbers
− insurance certificate
− key numbers
− location of the manufacturer's plate (right hand side above the stand).
We advise that you purchase an additional good quality anti-theft device for attaching your scooter to a
fixed point using the ring bonded into the frame.
We have provided a place under the seat for storing a "U" type locking device. Your PEUGEOT
MOTOCYCLES dealer will be able to supply you with a locking device which will fit perfectly into this
storage space.
Braking
For your safety, we recommend that you monitor the functioning of the front and rear brakes.
We advise that you take your scooter to a PEUGEOT MOTOCYCLES dealer for adjustment and
maintenance operations.
Reduce speed by releasing the accelerator handle (the deceleration thus obtained allows energy to be
recovered).
Action the front and rear brakes.
WARNING : use of one brake only reduces braking efficiency. When going down a steep slope,
cut off acceleration completely and use both brakes to reduce speed and maintain
control of the vehicle.
Avoid using the brakes constantly, overheating will reduce braking efficiency.
ELMANANG.DOC
5/24/2003
8
Operating instructions
Speedometer (C)
The needle indicates speed of movement of the vehicle in km/h and miles/h.
The mileage counter shows the total distance travelled (in km).
Switch on and lock keys
2 keys identified by a number are supplied with the vehicle.
We recommend that they are kept separately and that the reference numbers are noted down.
The key is used to:
− switch on the scooter for starting
− lock the steering
− unlock the seat.
Starting switch
Motor off - Steering locked - only position in which the key can be introduced or withdrawn.
Motor off - Steering not locked - position for moving scooter in garage.
Position of electric contact.
All electric functions can be used.
Lighting switch
The front and rear lights are lit.
Lighting off : button pushed downwards.
Indicator switch
To signal a change in direction :
- right turn, push the switch to
- left turn, push the switch to
The indicators can be stopped by moving the switch back to the central position.
Besides a warning light lighting up on the instrument panel, a beeping noise confirms that the indicators
are working properly.
An increase in the frequency of flashing, indicates a faulty bulb.
Functioning instructions
Horn
To activate the horns, press the following buttons:
- pedestrian horn (so that pedestrians may be aware of your vehicle)
- road horn
ELMANANG.DOC
5/24/2003
9
Driver's cockpit
1
2
3
4
5
6
7
8
9
10
parking brake
rear brake lever
light switch
indicator switch
road horn button
drive mode switch: normal or handling (start)
pedestrian horn button
Kill switch (safety switch)
rotating accelerator handle
front brake lever
ELMANANG.DOC
5/24/2003
10
Instrument panel
A
Multi function key pad
1st function: coded anti start
entering confidential code(page 13)
changing confidential code(page 14)
2nd function: choice of driving mode (page 14)
ECONOMY MODE
NORMAL MODE
B
Mileage counter (km)
C
Speedometer (km/h and m/h)
D
Indicator light
E
Economy mode tell tale light
selection of ECO mode using the key pad (page 14)
light on = economy driving mode engaged
light off = normal driving mode engaged
Instrument panel
ELMANANG.DOC
5/24/2003
11
F
Plug charging tell tale light :
when driving:
slow flashing = reserve
Plan a battery charge
when recharging the battery :
light on = charging in process
light off = charging complete
G
Operating light :
Light on = normal driving mode (page 13).
Quick flashing = handling mode.
Slow flashing = vehicle locked by kill switch and (or) throttle grip not in off position.
Simultaneous flashing of G and H =
Vehicle immobilised by anti start code.
H
Defect warning light :
Slow flashing = temporary fault (page 14).
Light on = permanent fault or battery empty.
I
.
Battery maintenance light (page 7)
Quick or slow flashing = maintenance necessary.
J
Energy level indicator.
ELMANANG.DOC
5/24/2003
12
Checks to be carried out each time vehicle is used : (with vehicle on its stand)
−
− Disconnect the charge lead from the 230V mains socket if necessary and put it back into its housing.
− turn the starter key into the ON position.
− check that the lights, indicators and brake lights are working.
Make sure that the energy reserve is sufficient by checking the energy gauge (J).
Starting
1. Take the vehicle off its stand and sit down on the seat.
2. Turn the starter key to ON.
The vehicle is immobilised by the anti start code, the warning lights
flash slowly (if this is not the case, see a dealer).
3. Key in your confidential code number on the key pad.
Each time a key is pressed, a bleeping sound should be heard.
Note: you should not key in the code numbers too quickly, but leave a short interval between each.
Code correct :
All warning lights come on during 1 second (except indicators)
.
Code incorrect:
try your code again after 10 seconds.
After three attempts, the vehicle is blocked. In this case, wait 15 minutes and then try your code
again.
4. The vehicle is ready to move off in handling mode.
The warning light starts to flash quickly. (If this warning light flashes slowly : the safety button is
activated: switch it to the correct position or bring the throttle grip back to zero).
5. Press the driving mode button (start) handle turns when not in motion.
comes on permanently. The vehicle is in normal speed mode and will start to
The warning light
move as soon as the handle is turned.
Note :
In case of problems with the key pad, proceed as follows to key in your code.
- Press the driving mode button (START 6 page 10) as many times as the number you want to key in
(to key in the number 5, press 5 times).
- Confirm this number by putting on the rear or front brake (2 page 10).
- Key in the four figures of your code number in this way.
Note :
In case the start position is left on accidentally, the system will switch off automatically after 5 minutes. To
restart the vehicle, it is necessary to switch off and then turn back on after 2 seconds.
In the same way, if the scooter was turned ON during charging, then once the charge is over the system
cuts out completely.
In order to start, once the charger is disconnected, it is necessary to switch off and then on again after 2
seconds.
ELMANANG.DOC
5/24/2003
13
Handling mode
This is obtained :
− automatically on starting for your safety (see paragraph on Starting, page 13).
− on request, in alternation with normal mode by pressing the drive button (START) when the vehicle is
at a standstill. This functioning mode limits speed to approximately 7km/h-4 miles/h maximum when
turning the throttle grip. This will enable you to push and manoeuvre your vehicle in complete safety.
Driving
This vehicle has 2 modes of functioning :
− Economy mode - speed is reduced and consequently autonomy is increased (up to 60km-37miles).
Press the V button followed by button 1 on the key pad, the E tell tale comes on
.
− Normal mode - maximum speed is 45km/h-28 miles/h and autonomy corresponds to approximately
1 hour's driving.
Press the V button followed by button 2 on the key pad, the E
tell tale goes out.
Note 1:
Once the warning light F
starts to flash, this means that 20% of the energy remains. It is therefore
recommended (in order to increase autonomy) to change into economy mode by pressing the V key
followed by key n°.1. Charge the vehicle as soon as possible, otherwise vehicle performance will decrease
will come on showing that the battery is
until eventually it comes to a standstill. The warning light H
completely discharged.
Note 2:
If the warning light H
flashes slowly :
− temporary fault detected by the ECU which could lead to an automatic reduction in speed.
− you can continue to drive at reduced speed.
If the warning light H
stays on :
− permanent fault
Contact your dealer.
Parking
Switch off the vehicle (turn the key to the OFF position).
This stops the vehicle's electric functions and automatically activates the anti start code.
during 5 seconds. (If the warning
This is signalled by a rapid flashing of the warning lights
lights do not flash, see your dealer).
The vehicle will only restart after switching on again and once the confidential code number has been
keyed in (see paragraph on starting (page 13).
Note:
If you forget to switch off the vehicle, the electronic control unit will cut off all electric supply after 5
minutes.
In this case, to restart the vehicle, turn the key to the OFF position and turn back on after 2 seconds by
turning the key to the ON position.
Parking brake (1 page 10)
Locking
With the left brake handle squeezed (1 page 10), press the parking brake button and release the handle.
Unlocking
Squeeze the left brake handle and then release it in order to unlock the parking brake.
ELMANANG.DOC
5/24/2003
14
Operating instructions
Placing on stand
The stand is equipped with levers which facilitates this operation.
− Stand by the side of your scooter.
− Make sure the vehicle is in a vertical position by holding the handlebars and the handle located behind
the seat.
− With your foot, press down on the stand lever whilst gently pulling the vehicle to the rear by the
handlebars and the seat handle.
Warning
Once on its stand, make sure that the vehicle is stable so as to avoid any risk of its falling over which
might cause bodily harm or damage to the scooter.
Kill switch
− Pressing this button
(the warning lights
(8
page 10) stops
start to flash).
the
motor
and
prevents
the
vehicle
In order to use the vehicle again, it is necessary to :
−
−
−
−
moving the switch the button back to its original position.
switch off using the key and back on again after 2 seconds.
check that the accelerator handle is at rest.
key in the confidential code.
Steering anti-theft protection
To lock the steering :
turn the handlebars fully to the left, push whilst turning the key to the
The key can be withdrawn.
position.
Putting the key in the garage position enables the vehicle to be moved.
The key can not be withdrawn.
Housing for demi-jet helmet
Opening :
unlock and turn the steering to the right.
Press button A and tilt the cover forwards.
ELMANANG.DOC
5/24/2003
15
starting
Seat
Opening :
Put the start key into the lock at the rear left hand side, turn it a quarter turn towards the rear and raise the
seat.
Closing:
press down on the rear part of the seat: the key is not necessary.
The seat storage compartment gives access to :
−
−
−
−
the battery charging lead,
the extra charging plug (option),
the maintenance equipment (reserved for PEUGEOT MOTOCYCLES dealers),
the housing of the U type anti-theft device.
Lighting and indicators
Correct functioning of the lighting and indicating equipment constitutes an essential safety factor.
Before setting off and while driving the scooter, the driver must make sure that the various lights carry out
the function for which they are intended properly.
Light specifications
Driving light / dipped headlights
15W P26S
Parking light
N/A
Stop and rear light
21/5W BAY 15D
Indicators
10W BA 15S
Speedometer light
1.2W T5 (without cap)
Tell tales
2W T5 (without cap)
All bulbs are 12 volts
In case any of the lights do not function correctly, get in touch with a PEUGEOT MOTOCYCLES
distributor.
Changing bulbs
At the front :
:
Headlight
− remove the 4 side screws
− remove the upper screw
−
− tilt the whole headlight + casing assembly
− change the bulb
ELMANANG.DOC
5/24/2003
16
Adjusting the headlight: use the adjustment screw to adjust the vertical orientation of the headlight.
Indicators
− remove the screw (B) and the cover glass
− change the bulb
At the rear :
Red lights - stop - indicators
− remove the 2 screws (C) and the cover glasses
− change the bulb or bulbs
Maintenance and adjustments
Relay box, reduction box :
(1) Level screw
(2) Bleeding screw
Checking the oil level
Having positioned the vehicle on its stand on a level surface, unscrew and remove the screw (1).
The correct level is shown level with the screw thread (1).
Brakes
Adjustment
Adjustment operations are identical for the front and the rear.
Lever free travel :
Lever free travel is the distance moved by the lever before the brake starts to work.
Adjusting the free travel :
Free travel : 10 to 20mm, measured at the tip of the lever.
ELMANANG.DOC
5/24/2003
17
(1) Adjustment nut :
Unscrew = increase the free travel
Screw = reduce the free travel
If the free travel is not sufficient, this could lead to the linings rubbing slightly, which has a
negative effect on vehicle autonomy.
Wear zone on rear brake :
(1) Reference mark
(2) Arrow
If the arrow is opposite the mark with the brake fully applied, this means the brake shoes must be
replaced.
Tyre pressure
Check tyre pressure regularly and adjust it if necessary.
The following specifications apply :
Tyres
100/80 x 10
110/80 x 10
Inflation pressure when cold
Front
Rear
Note: Mpa = Megapascal
2.5 bars 0.25 MPa
2.5 bars 0.25 MPa
1 bar = 1.02 kg/cm² = 0.1Mpa
Incorrect tyre pressure leads to abnormal wear of the tread, is harmful to safety and reduces autonomy.
It is dangerous to drive with worn tyres (the use of worn tyres is illegal and affects steering, braking,
traction and road holding ability).
Wheels
This scooter is equipped with tyres without an inner tube. The inscription Tubeless on the side of the tyres
and on the wheel rims indicates that these parts have been specially designed for use without an inner
tube.
The wheel rims are fitted with corresponding valves. If they require replacing, only use tyres and rims
marked Tubeless.
Go to a PEUGEOT MOTOCYCLES dealer for any repair or replacement operations on the Tubeless tyres.
DANGER
Do not put an inner tube in a Tubeless tyre or Tubeless tyre on a standard rim (danger of bursting).
ELMANANG.DOC
5/24/2003
18
Coded anti-start
Your scooter is equipped with a coded anti-start system. This system prevents starting if the confidential
code is not keyed into the key pad first.
When your scooter is delivered, the anti-start system is activated under the code number "1111".
As the code number "1111" used for delivery is not confidential, we recommend that you change it as
soon as possible by following the procedure described below:
CHANGING THE ANTI-START CODE
−
−
−
−
−
Switch on the vehicle
Press the "V" button until you hear two beeps
Key in the activated code (for the first time of changing 1111)
Key in the code of your choice (4 figures imperative)
Key in this code a second time.
The new code (which is now confidential) is memorised. You must use this code to start your Scoot'elec
after each time you have turned off.
General comment
− A beep each time you key in a number tells you that the figure has been memorised.
− A short series of beeps tells you that an operation is valid.
− A long series of beeps tells you that the code is wrong or that the interval between keying in two figures
was too long. In this case, you must restart the operation.
− If the code was wrong, wait 10 seconds and then restart the operation.
CHANGING THE CODE
Former active code
ON
V
"Beep"
"Beep"
1
1
1
New code to be keyed in twice
1
"Beep" "Beep" "Beep"
5
"Beep"
"Beep"
"Beep"
4
3
2
"Beep" "Beep" "Beep"
5
"Beep"
"Beep"
"Beep"
4
3
2
"Beep" "Beep" "Beep"
"Beep
"Beep"
"Beep"
Operation confirmed
ELMANANG.DOC
5/24/2003
19
Performance and specifications table of the PEUGEOT electric scooter
Motor part
Motor
Battery
Charger
Transmission
Reduction box
Performances
Autonomy at steady speed 45km/h-28m/h
Direct current and separate excitation
3 Nickel-cadmium monoblocs - 100Ah - 6 Volts
1400 Watts - consumption 7 Amps maximum
Double stage : belt and gears
Capacity: 0.12 l Oil: ESSO GEAR OIL BV 75W - 80W
Maximum speed
10m from standing start
100m from standing start
Engine brake
Choice of driving mode
45 km-28miles ( in city 30 km-19miles)*
45km/h-28miles/h (in accordance with regulations)
3.2 seconds
12 seconds
Yes - energy recovery system
By the driver - normal (45 km/h-28miles/h) or ECO (30 km/h-19miles/h)
Charging time and maintenance
Complete charge time
95% charge time
Charge mode
Partial charge
Partial charge (with optional charger)
Battery maintenance
5 hours
2 hours
By onboard charger from a 230 V 10/16A socket with earth
10 minutes = 5.5km-3miles in ECO * mode
10 minutes = 11km -6miles in ECO * mode
According to control light
Cycle part
Chassis
Body work
Front suspension
Rear suspension
Front tyres (metric dimensions)
Rear tyres (metric dimensions)
Front and rear brakes
Double cradle
ABS "choc"
Telescopic fork
Hydraulic single shock absorber
100/80 x 10 Pressure 2.5 bars
110/80 x 10 Pressure 2.5 bars
Drum diameter 110 mm
Weight and dimensions
Weight
Wheel base
Height of seat
Overall length
Overall width
115 kg-250 pounds
1300 mm
783 mm
1755 mm
800 mm including both rear view mirrors
Equipment
Anti-theft devices
Electric horns (two)
Indicator sound repeater
Jet-in housing
Rear view mirrors
Handling speed
Parking brake
Rear foot rest
Optional equipment
Extra charger
Windscreen
Top-case
Bag hook
Electronic through coded anti-start system
Mechanical by locking the steering - steel ring incorporated into the
chassis
Road - pedestrian
Yes
Demi-jet helmet housing at the front of the vehicle 3kg maxi
2
Yes (7km/h-4miles/h maxi)
Yes
Yes
1400 W -230V
* for information only
ELMANANG.DOC
5/24/2003
20
Maintenance plan
at 500 km/310 m
when the maintenance
warning light
NORMAL
every 5000 km/3100 m
comes on
HEAVY DUTY
every 2500 km/1550 m
Battery maintenance
Diagnosis reading
Check control of commands accelerator, brakes
Check brake linings
Tyres: state and pressure
Functioning of electrical equipment
Tightening of nuts and bolts
Vehicle test
MOTOR
at 500 km
Every 20 000 km
310 m
Draining reduction Box
12 400 m
Every 40 000 km
24 800 m
Belt
R
Brushes
C
R
C : Check and replace if necessary
R : Replace
ELMANANG.DOC
5/24/2003
21