1
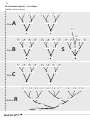
[en]
User manual
Please read this manual carefully and keep its instruction in mind when using your
Aspen5 paraglider
Contents:
1. Introduction......................................................1
2. Your paraglider.................................................1
2.1. Technical description....................................1
2.2. Technical data...............................................2
2.3. Materials.......................................................3
3. Certification.....................................................3
4. Adjusting your glider....................................4
4.1. Brake-line lengths........................................4
4.2. Addition of speed system.......................4
5. Operation in flight.........................................4
5.1. Standard flight regime............................4
5.1.1. Pre-flight inspection.................................4
5.1.2. Launch........................................................5
5.1.3. Flight...........................................................5
5.1.4. Landing.......................................................5
5.2. Fast descent................................................5
5.2.1. Big ears....................................................6
5.2.2. B-line stall.................................................6
5.2.3. Spiral dive................................................6
5.3. SIV manoeuvres...........................................7
5.3.1. Asymmetric collapse...............................7
5.3.2. Full-frontal collapse..................................7
5.3.3. Deep stall.................................................7
5.3.4. Full stall....................................................8
5.3.5. Negative spin...........................................8
6. Maintaining your glider.................................8
7. Repairing your glider......................................9
8. Checking your glider.......................................9
9. Enjoy your flying..........................................10
10. Line Map.......................................................11
Gradient s.r.o., Plzenska 221/130, 150 00 Praha 5, tel+fax +420257216319, www.gradient.cx, [email protected].
1.
1. Introduction
Congratulations on buying a new Aspen5 – GRADIENT’s latest high-performance wing in the
EN-C category. We believe you will be very happy with your new glider in terms of its flight
characteristics, exceptional performance and really nice handling.
After three years of popular acclaim, excellent reviews and over 1000 Aspens4 sold worldwide, Gradient is replacing the Aspen4 with a new glider, the Aspen5, the next generation in
the EN C category.
Our aim was to create a glider which would follow tumultuous development of paragliding
technology of last years and at the same time use the latest know-how in the development
of materials; glider which would bring further improvement of performance and still keep
pilot comfort, dynamics, handling and safety typical for Gradient´s gliders.
Using DD-System (DDS) together with the conception of clearly three-line layout, we
managed to keep the small number of carrying ribs and attachment points on the canopy
and this way to reduce the line consumption.
To develop the Aspen5 Gradient put the prototypes through their paces in a wide range of
flying conditions: easy soaring, soaring in strong winds, weak to moderate thermals as well
as extremely strong thermals in Kenya in Africa, Gradients favourite testing ground.
Aspen5 is designed as an EN-C category glider and thus is intended for experienced pilots,
who are capable of active flying. Outstanding performance, nice handling, predictable
behaviour and stable accelerated flight makes Aspen5 a very interesting solution for a really
wide range of XC pilots.
This manual provides information, which will help you fly safely and keep your wing in good
condition. If after reading this booklet you have any further questions or uncertainties,
please do not hesitate to contact our company or any authorised GRADIENT dealer and we
will gladly answer all your questions.
We would also welcome feedback from you about your new Aspen5.
2. Your paraglider
2.1. Technical description
The Aspen5’s ground plan has a slender, elliptical shape with a slight positive contortion of
the leading edge. This means that the “ears” (stabilo) of the canopy are slightly swept back in
flight. This modern design has a number of advantages.
The glider’s profile has been specially developed to deliver maximum stability over as wide a
speed range as possible. The position and size of the cell openings help support this objective.
The leading edge is reinforced using integrated nylon and elastic. This ensures optimal
inflation of the canopy and helps to retain the leading edge’s perfectly clean shape at
maximum speed.
Unique DD-System makes possible to use only 48 hanging loops on the canopy and less than
233m lines (size 26).
The layout of the line attachment points improve stability at maximum speed – an essential
feature of modern high-performance paragliders.
The well-proven three-rows and three-level line concept with only two main lines per a side
is used.
2.
The top-level and middle-level lines with progressively differing diameters are made from
special, very strong uncovered lines. All these lines have the advantage of splice loops, giving
maximum overall strength, durability and the lowest possible drag.
The sophisticated combination of Dyneema and Vectran lines with different behaviour of
shrinking characteristics maintain the right geometry of the suspension system for a long
time.
The main C-lines are connected to the karabiners through loops, allowing for easier
adjustment when your glider is serviced.
The Aspen5 is supplied with a well proven three-riser speed-system which gives great
acceleration and maximum speed.
A B
C
R
Gradient has paid attention to details too, including
new low-drag micro attachment points on the wing
tips, special karabiners, a new rucksack, inner bag
and riser bag, etc…
Length of the Aspen5 risers (mm):
Size 24
A
B
C
Non-accelerated
460
460
460
Accelerated
330
360
460
Size 26
A
B
C
Non-accelerated
480
480
480
Accelerated
325
358
480
Size 28
A
B
C
Non-accelerated
500
500
500
Accelerated
340
375
500
2.2. Technical data
Aspen5
Flat Area
Projected area
Span
Projected span
Aspect ratio
Projected aspect ratio
Max. chord
Min. chord
Number of cells
Line consumption
Weight of the glider
Take-off weight range
Optimal take-off weight
Certification EN
[m2]
[m2]
[m]
[m]
[m]
[m]
[m]
[kg]
[kg]
[kg]
24
26
28
23.30
19.64
12.07
9.44
6.25
4.54
2.36
0,79
64
222.34
4.8
77-90
80-86
25,50
21,49
12,63
9.88
6.25
4.54
2.47
0.82
64
232.6
5.1
85-103
92-100
27.74
23.38
13.17
10.30
6.25
4,54
2.58
0.86
64
242,6
5.4
98-118
105-115
C
C
C
Take-off weight is the weight of the pilot including equipment and paraglider (approx 22-27 kg)
Gradient s.r.o., Plzenska 221/130, 150 00 Praha 5, tel+fax +420257216319, www.gradient.cx, [email protected].
3.
2.3. Materials
Canopy
Upper sail-leading edge
NCV Skytex E44 - Everlast, 40 g/m2
Upper sail-rear part
NCV Skytex E25 - Universal, 38 g/m2
Bottom sail
NCV Skytex 70032 - Universal, 32 g/m2
Ribs
NCV Skytex, E29A - Hard, 40 g/m2
Reinforcements
Scrimm 180 g/m2, Dacron 160 g/m2
Reinforcements
Hahl Nylon rods Ø 2 mm, Laminated PES 60 g/m2
Suspension lines
Lines-top level
Liros Dyneema, Ø 0.6 mm, uncovered
Lines-top level
Liros Dyneema, Ø 0.7 mm, uncovered
Lines-top level
Cousin Vectran , Ø 0.7 mm, uncovered
Lines-middle level
Liros Dyneema, Ø 0.8 mm, uncovered
Lines-middle level
Liros Dyneema, Ø 0.9 mm, uncovered
Lines-middle level
Cousin Vectran, Ø 1.0 mm, uncovered
Lines-bottom level
Cousin Vectran, Ø 1.4 mm, uncovered
Lines-bottom level
Cousin Vectran, Ø 1.2 mm, uncovered
Lines-bottom level
Edelrid Aramid , Ø 0.9 mm, uncovered
Risers
Webbing
PAD, 1.6 x15 mm
Pulleys
Harken, USA; Rilay, AUS
Karabiners
Maillon Rapide, Inox Ø 3.5 mm
3. Certification
The Aspen5 is certified EN C in sizes 24, 26 and 28.
The EN certificate sticker for each Aspen5 is on the rib in the middle of canopy. Certification
is valid for use with all ABS harnesses. This type of harness allows a certain degree of
adjustment to be made to the length of the waist strap. Between 46 cm and 48 cm - with
regard to size of the glider - is the recommended distance between the karabiners.
In common with all other paragliders, when looser cross-bracing is used while flying the
Aspen5, the pilot’s weight-shift control is greater. The glider is also more sensitive to
movement in the surrounding air. When cross-bracing is tighter, the pilot feels subjectively
more stable, but turning by weight-shift is less effective.
Warning: The Aspen5 paraglider is only built for hill or tow launching. It is not built to
withstand jumping from a plane, balloon, building or for any jumps where there is a belated
opening of the canopy. Use of subsidiary motor (eg paramotoring) has not been tested for by
the manufacturer or by any other testing body.
4. Adjusting your glider
Before it reaches the customer every Aspen5 goes through a final check and test-flight
to verify that its characteristics and measurements correspond to the manufacturer’s
specifications. You may only make adjustments to brake-line lengths or to the speed system
of your Aspen5 – and only then in keeping with the recommendations of this manual.
4.
Other adjustments or changes to your Aspen5 lead to a loss of guarantee, airworthiness and
validity of the certification. Amateur modification may endanger yourself and other pilots. If
you have any suggestions for improvements let us know and our test-pilots will try out your
ideas without risk to yourself.
4.1. Brake-line adjustment
When you receive your new Aspen5 the main brake lines are adjusted to the length set
during the certification test. This length should suit most pilots and is indicated on the main
control line. It is of course possible to adjust the brake-line length to suit each pilot’s physical
build, height of harness hang points, or style of flying. We recommend that you act wisely
when adjusting brake-line length and change the length in small, successive steps.
If you need to adjust brakes back to the basic position and the marks on the main brake lines
are vague, use the following lengths for relevant size:
Aspen5 24: 230 cm; Aspen5 26: 240 cm; Aspen5 28: 250 cm.
Brake lines that are too short may:
1) lead to fatigue from flying with your hands in an unnatural position
2) impede recovery from certain unstable manoeuvres
3) will certainly reduce your glider’s speed range.
Brakes that are too long will:
a) hamper pilot control during launch
b) reduce control in extreme flying situations
c) make it difficult to execute a good flare when landing.
Each brake line should be tied securely to its control handle. Use knots which will guarantee
this, for example, a Double Dragon.
4.2. Addition of speed system
The Aspen5 is equipped with a very effective foot-operated speed system as standard.
Pressure on the foot stirrup shortens the A and B risers and by this reduces the angle of
attack of the canopy. The working range of the speed system pulleys is 16,5 cm (size 28).
Make sure you can use the whole of this range when you attach your speed stirrup. For some
pilots this will require the use of a two-step speed stirrup.
5. Operation in flight
This manual is intended as a guide to the characteristic features of your new Aspen5 paraglider.
Under no circumstances should it be used as a ‘learn-to-fly’ manual for paragliding or as a
substitute for a paragliding pilot’s training course.
5.1. Standard flight
5.1.1. Pre-flight check
A thorough pre-flight check is essential for safe flying and that’s why you should pay special
attention to it. Above all you should check that the canopy, lines and risers are free from
damage and tangles. Also, don’t forget to check your harness and your reserve parachute.
Before launch spread the canopy out into a slight arc and check that:
• all cell openings are free
• no lines are looped around or under the canopy
• no lines are tangled or have a knot in them
• any twigs, grass or other objects are not entangled in the lines or the canopy
• risers are not twisted
• control lines run freely through the pulleys
• knots on control handles are secure
• karabiners on risers are tightened
Gradient s.r.o., Plzenska 221/130, 150 00 Praha 5, tel+fax +420257216319, www.gradient.cx, [email protected].
5.
5.1.2. Launch
Launching the Aspen5 is straightforward, either by front launch or by reverse launch. A
dynamic pull of the front risers (A, coloured red) will bring the canopy simply and easily above
the pilot’s head. The canopy inflates from the centre equally and smoothly. The Aspen5 has
no tendency to outrun the pilot and quickly stabilises above the pilot. Once there, visually
check the canopy and the lines before taking off. Take off can be made easier by a light pull
on the brakes.
5.1.3. Flight
The Aspen5 is trimmed to fly at best glide when the brakes are fully up. Best sink rate is
achieved when both brakes are drawn down evenly to about 15-20% of their range.
Turbulent conditions
When flying through severe turbulence stabilise the canopy by simultaneously applying a
little brake to both sides. Flying with a little brake applied will also help to prevent deflations
and give you more feedback about what the air is doing and how the glider is reacting.
Responding correctly to the paraglider’s movement by means of the brakes and weight shift
is known as ‘active flying’. A pilot demonstrating good active-flying skills will significantly
reduce both the number and severity of collapses he or she experiences.
Turning
The Aspen5 is very comfortable and pleasant in turns. Handling characteristics are responsive
and accurate and demand no special habits or non-standard procedures. When developing
the Aspen5 special attention was devoted to the brake pressure. The result is that brake
travel and pressure have been optimised. Brake pressure is reassuringly progressive. In flight,
brakes are firm but responsive and precise and allow for perfect communication with the
canopy. You will find that a harness with fairly loose cross-bracing will help the glider turn.
In an emergency (eg a broken brake line) the glider can be steered with the rear risers or by
weight shift.
Using the speed system
Maximum speed is one of the strong points of Gradient paragliders and the Aspen5 is no
exception. Not only has the glider got a very high maximum speed, but unlike some other
paragliders the full speed range is useable. In spite of this exceptional stability at high
speed don’t forget that any collapse at full speed will be more severe than the same event
experienced at normal trim speed. Always keep both hands on the controls when flying fast
in turbulence and be ready to release the speed system immediately at the first sign of a
collapse. Handles on the C risers can help to active piloting mostly when pushing the speed
bar. Use the speed system very carefully or not at all at low altitude.
5.1.4. Landing
Landing the Aspen5 is very simple and should offer no difficulty. On your first flights you may
be surprised at how well it glides. Take account of this when making your landing approach!
Into wind, at about one metre above the ground pull the brakes down all the way. In nil-wind
conditions, or if forced to make an emergency landing downwind, you may prefer to take a
wrap of each control line to enable a more dynamic flare.
5.2. Rapid descent
Sooner or later every pilot will need to descend quickly. It might be because of a sudden and
unexpected change in the weather, reaching cloudbase and not wishing to enter cloud, or
simply because you need to finish your flight quickly. Additionally, if where you are landing
is thermic, it is often very difficult to land without using a rapid-descent method. There are
three main methods for achieving a rapid descent and they are: Big Ears, B-Line Stall and
Spiral Dive.
6.
Practise these manoeuvres under the supervision of an instructor and with a reserve
parachute. Never compromise your safety.
5.2.1. Big Ears
This is the easiest technique for a rapid descent. Depending on how much of the wing tip you
deflate, 3 m/s to 6 m/s sink rate can be achieved.
While in Big Ears your sink rate and forward speed can be further increased by using the
speed system. The Aspen5 can be steered while Big Ears are in by means of weight shift.
Initiation: Take hold of the outer A-lines (or alternatively outer B-lines) on both sides as high
as possible and pull them down smoothly. Hold them firmly. The effective area of the glider
is reduced equally on both sides of the wing. The size of the deflated area depends on how
deeply the lines are pulled down. Be sure to pull both sides equally.
Activation of big ears through outer B-lines is significantly smoother (less flutter of deflated
part of canopy).
Recovery: Under normal circumstances the Aspen5 will open automatically when the
A-lines are released. Opening may be accelerated by gently pumping the brakes (repeated
symmetrical braking on both sides). When opening big ears activated by B-lines, release
outer B-lines slowly, smoothly and symmetrically.
Caution: It should be realized, that due to the fact that Aspen5 has two main lines for each
side only, the big part of canopy will be folded. The bigger sink rate of the glider increases the
angle of attack. By pushing the speed bar, this effect is compensated.
5.2.2. B-Line Stall
Depending on how much the B-risers are pulled down, the sink rate is between 5 and 8 m/s.
Initiation: Take hold of the B-risers at the top and smoothly pull them down until the canopy
shows a spanwise crease where the B-lines attach to the sail. Your sink rate will increase
considerably while your forward speed will decrease to practically zero. Don’t be startled
when the airflow over the top surface is interrupted and the canopy enters a parachutal stall
without moving forward. It will soon stabilise above your head. Stability of the canopy in this
manoeuvre can be significantly improved when pulling the B-risers simultaneously down and
outward.
Recovery: On releasing the B-risers the Aspen5 automatically returns to normal flight
without staying in deep stall (sackflug) or shooting in front of the pilot. Let go of the risers
smoothly and symmetrically.
Caution: Due to the high aspect ratio of the glider and due to the special suspension
layout, the Aspen5 can show a quite demanding behaviour when executing the B-Stall. Do
everything symmetrically and at the same time. If the B-risers are released unevenly the
canopy can enter a turn. If the risers are released slowly and very unevenly you could enter
a spin. Because of this complexity we do not recommend to practice the B-stall with Aspen5.
5.2.3. Spiral Dive
The Spiral Dive is the most effective way of making a fast descent. Every pilot should be
able to perform a spiral dive and one day you may need to. When in a Spiral Dive always
stay aware of your altitude, which decreases very rapidly. The sink rate reached in a Spiral
Dive can be more than 16-18 m/s. During the manoeuvre the pilot and glider will experience
strong centrifugal forces. Forces of greater than 3G are possible – a great strain on the pilot
as well as the glider.
Initiation: Smoothly pull on one brake so that the glider goes from a normal 360-degree turn
into a steep turn and from there into a spiral dive. The transition into a spiral dive can be
made easier by weight shifting to the inner side of the turn. Keep an eye on the tension of
the brakes all the time: reduced tension signals an overload of the glider and danger of falling
into a negative spin.
Gradient s.r.o., Plzenska 221/130, 150 00 Praha 5, tel+fax +420257216319, www.gradient.cx, [email protected].
7.
Recovery: The Aspen5 recovers from a Spiral Dive automatically as soon as the brakes are
released. Release them smoothly and always finish a Spiral Dive with safe altitude!
Caution: When exiting the Spiral Dive make sure your position in the harness is neutral.
Recovery from a Spiral Dive can be delayed if you are weight shifting to the inner side of the
turn.
5.3. SIV manoeuvres
No matter what category of canopy you fly or what level of certification it has, in turbulence
or in strong thermals you may experience all kinds of collapses.
The Aspen5 behaves comfortably in these situations. Indeed not only does the glider deal
with extreme flight situations automatically, but it also offers – for its category – an aboveaverage degree of safety. Even so, you must follow all safety rules when practising SIV.
Always pay attention to your altitude.
Before performing any SIV manoeuvre remember:
Practise throwing your reserve on the ground, in a simulator, so that reserve deployment is
efficient and automatic.
Rapid altitude loss and considerable rotational forces may develop during unstable
manoeuvres. Take account of these factors when throwing your reserve.
5.3.1. Asymmetric Collapse – one side of the canopy collapses
Initiation: Take hold of the outer A-line on one side and pull them down smoothly. The wing
tip will collapse to form a characteristic Big Ear. The size of the ear depends on the depth to
which the lines are pulled. You can stop any turn tendency by applying the opposite brake
and by weight shifting onto the inflated side of the canopy.
Recovery: Under normal conditions the Aspen5 will re-inflate spontaneously when the pulled
lines are released. Inflation time and loss of altitude can be reduced by suitable piloting. To
stop any tendency to turn off course pull the brake on the inflated side (be careful not to
overreact and stall the inflated side) and weight shift to that side. If the collapse remains then
re-inflate the collapsed side by ‘pumping’ the brake on the collapsed side.
Caution: It is very important to execute this manoeuvre very carefully. Due to the high
compactness of the leading edge it is quite difficult to find a right degree of pulling of A-risers
down. This applies particularly to the asymmetric collapse of 75% at full speed. Therefore a
cross line was used for certification of Aspen5. In your own interest we don´t recommend to
perform 75% collapse at full speed without cross lines.
5.3.2. Full Frontal Collapse
Initiation: Take hold of both A-risers at the top and pull them down fluently until the leading
edge collapses.
Recovery: Recovery time depends on how much of the canopy has collapsed. In normal
conditions the Aspen5 will recover normal flight automatically as soon as the front risers are
released. Applying the brakes on both sides simultaneously can help re-open the paraglider.
Caution: It is very important to execute this manoeuvre very carefully. Due to the high
compactness of the leading edge it is quite difficult to find a right degree of pulling of A-risers
down. If you pull them down too quickly, a massive collapse could happen!
5.3.3. Deep Stall
Initiation: Pull both brakes smoothly until the sink rate increases markedly and the forward
speed reaches almost zero. The pull on the brakes should be controlled so that the canopy
stays inflated and doesn’t fall back into a full stall.
8.
Recovery: The Aspen5 cannot stay in deep stall flight, so after the brakes are released the
glider automatically returns to normal flight. If you need to, you can accelerate recovery by
pulling hard on both brakes, followed by a fast release. Or you can pull lightly on the A-risers.
Caution: If you pull too hard on the A-risers you may experience a full frontal collapse.
5.3.4 Full Stall
Initiation: Wind the control lines once or twice around your hands and pull both of them
down smoothly. Hold them down until the canopy falls behind the pilot and deforms into a
characteristic crescent shape. Hold your hands firmly (press them underneath the seat) and
be careful that you do not release the brakes prematurely or asymmetrically.
Recovery: The Aspen5 recovers from a full stall automatically once the brakes are smoothly
released. During correct recovery from a full stall the Aspen5 shows no extreme tendencies
such as diving in front of the pilot. If the brakes are released prematurely or too quickly
there is a possible tendency for the glider to dive ahead of the pilot. This can be corrected by
adequate simultaneous braking on both-sides.
Caution: When exiting a Full Stall, if the brakes are released asymmetrically the glider may
suffer a massive asymmetrical collapse followed by a tendency to enter a spin.
5.3.5 Negative Spin
Initiation: Slow down by braking to nearly minimum speed. Then pull a brake on one side
all the way down while simultaneously releasing the brake on the other side. Because the
stalled side falls back, the canopy suffers airflow disruption over one half of the wing which
results in a spin and a rapid loss of altitude.
Recovery: Under normal circumstances the Aspen5 is capable of recovering from a negative
spin automatically when the brakes are released.
Caution: In general, when there is a very fast or a long-lasting rotation and when the brakes
are released too quickly, the canopy may shoot in front of the pilot followed by a massive
asymmetrical collapse.
Warning: Whenever a paraglider is not in normal flight and airflow is disrupted there is
always a rapid increase in sink rate and therefore a substantial loss of altitude.
Remember: When practising SIV the wrong manoeuvre at the wrong time may change a
fairly easy situation into a dangerous problem. You are also exposing your glider to forces
that may damage it. Practise SIV manoeuvres only under the supervision of an instructor and
with a reserve parachute.
6. Maintaining your glider
If you handle your glider with care and store it in a suitable place it can last you a very long
time. On the other hand, neglecting maintenance, bad storage and the use of unsuitable
cleaning products can reduce the lifespan of your glider significantly or may even make it
dangerous.
You must keep to these rules:
Choose a suitable area for your launches. Lines caught on roots or rocks lead to unnecessary
strain on the attachment tabs during inflation. Snagging lines may rip the canopy tissue or
damage lines.
When landing, never let the canopy fall on its leading edge in front of the pilot. The effect
of these forceful collisions and the sudden pressure increase can severely damage the airresistant coating of the canopy as well as weaken the ribs and seams.
Gradient s.r.o., Plzenska 221/130, 150 00 Praha 5, tel+fax +420257216319, www.gradient.cx, [email protected].
9.
Protect the canopy from unnecessary strain. Inconsiderate handling of your glider – pulling
it over grass, soil, sand or rocks – will significantly reduce its lifetime and increase porosity.
When preparing the paraglider for a launch or when ground handling, be sure not to step on
any of the lines or the canopy.
Don’t tie any unnecessary knots in the lines. Packing methods where special knots are made
in the lines as used on parachutes and reserve parachutes are not suitable for packing the
lines used on paragliders.
Protect your canopy and lines from unnecessary exposure to sunlight. UV-rays can damage
many parts of a paraglider.
Try not to pack your glider when wet. If it’s unavoidable then dry it as soon as possible but
away from direct sunlight. Be careful to avoid storing your canopy wet - this is the most
common reason for cloth degradation, and is easily preventable.
Don’t let your glider come into contact with seawater. If it does, rinse the lines, canopy and
risers with fresh water and dry before storing.
After flight or when storing always use the inner protection sack.
When storing or during transport make sure your glider isn’t exposed to temperatures higher
than 50 degrees Celsius.
Never let the paraglider come into contact with chemicals. Clean the glider with clean
lukewarm water only.
When packing the glider we recommend concertina folding the reinforced leading edge to
avoid damaging the plastic reinforcements.
For long-term storage don’t pack the glider too tightly. Store it in a cold, dry and wellventilated room.
After tree- or water-landings always examine the glider carefully. If you suspect that the
flight features of your paraglider have changed, contact an authorised Gradient supplier as
soon as possible.
7. Checking your glider
After 150 flying hours or after latest two years your Aspen5 must be thoroughly checked and
tested by the manufacturer or by Gradient authorised service centre. This check is primarily
focused on:
• measuring of porosity
• measuring of tear strength of fabric
• sewing of panels, attachment points, cell openings, etc.
• condition of lines and risers
• strength of lines
• geometry of the suspension system
All data are recorded in the test report. On the basis of the real wing’s condition, the check
expert can define the next check interval; under normal circumstances is it two years.
8. Repairing your glider
Only small repairs – i.e. repairs that don’t change the airworthiness of the paraglider – may
be done by the user. These include: fixing small tears (but not seams) up to 10 cm; changing
damaged lines; and changing rubber line-fixation rings on the small karabiners.
10.
When repairing your paraglider on your own keep to the following rules:
When repairing the sail use a self-adhesive patch specified for this purpose. Every Aspen5
comes with a small amount of self-adhesive material which is enough for small repairs.
The only admissible repairs done on lines are those where the damaged lines are changed for
new ones. Lines must be exclusively supplied by Gradient, an authorised dealer or authorised
service centre. When ordering new lines use the codes in the attached line diagram. Use the
code ‘A5’ and size of the glider, followed by the line code. E.g. the outside long line in row A
for an Aspen5 28 is: ‘A5 28 A 1.2’.
An exception to this is an emergency repair of brake line while out flying. For this purpose
Gradient encloses a spare line with every Aspen5 with a prepared loop on one end. To get
the right length adjust it according to the same line on the opposite side of the canopy. As
soon as you can, change the line for an original one from your authorised Gradient service
centre.
After changing any lines a thorough pre-flight check must be done. If you’re not sure, entrust
the job to either the manufacturer or an authorised Gradient dealer.
If you have to replace any of the line-tidy rings (a spare ring is supplied with each Aspen5)
check that the lines haven’t been swapped accidentally and that they are returned to the
small karabiner in the correct order.
9. Enjoy your flying
Even though the Aspen5 has outstanding performance and stability it must be understood
that even the safest paraglider is an aircraft and that all air sports can be relatively dangerous.
Remember that your safety lies in your own hands and that “lucky pilots are well prepared
pilots”.
Never underestimate weather conditions. And never forget that you are flying for pleasure
and not to become a ‘fallen hero’. Remember this and the fun that only free-flying can bring
will be yours.
We believe that your sensible attitude and the flight characteristics of your Aspen5 will
combine to ensure you have many hours of fantastic flying.
GRADIENT wishes you many fabulous flights and happy landings.
Václav Sýkora
Designer
Cyprián Koreň
Designer
Gradient s.r.o., Plzenska 221/130, 150 00 Praha 5, tel+fax +420257216319, www.gradient.cx, [email protected].
Ondřej Dupal
Director
11.
10. Gradient Aspen5 – Line Map
Middle of the cannopy
3.1
Row
A
3.2
3.3
2.1
3.4
3.5
2.2
3.6
3.7
2.3
1.1
3.8
2.4
3.5
1.2
3.6
3.1
Row
B
3.2
3.3
2.1
3.4
3.5
2.2
3.6
2.3
1.1
3.1
Row
C
3.2
3.4
3.5
2.2
Brakes
R
3.1
3.2
S
2.4
3.6
3.3
2.3
2.1
2.2
1.1
3.7
2.3
1.1
3.1
3.8
1.2
3.3
2.1
3.7
3.8
2.4
1.2
3.2
2.1
3.3
3.4
2.2
3.6
3.7
2.3
1.1
R0
3.5
1.2
3.8
2.4
3.9
3.10
3.4

![[en] - User manual, [de] - Betriebshandbuch, [fr]](http://vs1.manualzilla.com/store/data/006912521_1-8302f7208a0db85345a8e06c74364fdf-150x150.png)


![[en] - User manual, [de] - Betriebshandbuch, [fr]](http://vs1.manualzilla.com/store/data/006911916_1-c9d681cd72beb3d6890eaa31d72ed1ef-150x150.png)


![[en] - User manual, [de] - Betriebshandbuch, [fr]](http://vs1.manualzilla.com/store/data/005845053_1-6d1995608e49c7f1600fcad0c20a630a-150x150.png)