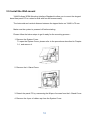
1
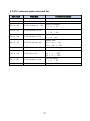
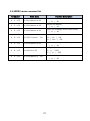
User Manual YUNO-151& YUNO-156 Copyrights this equipment does cause harmful interference to © 2014All rights reserved. The information in this radio or television reception, which can be document is subject to change without prior notice in determined by turning the equipment off and on, the order to improve reliability, design and function and user is encouraged to try to correct the interference does not represent a commitment on the part of the by one or more of the following measures: manufacturer. • Increase the separation between the equipment and the receiver. This document contains proprietary information • Connect the equipment into an outlet on a circuit protected by copyright. No different from that to which the receiver is connected. part of this manual may be reproduced by any • Consult the dealer or an experienced radio or mechanical, electronic, or other means in any form television technician for help. All rights are reserved. without prior written permission of the manufacturer. All trademarks are property of their respective owners NOTE: incidental, or FOR ANY IS RADIO NOT OR TV INTERFERENCE CAUSED BY UNAUTHORIZED In no event will the manufacturer be liable for direct, special, MANUFACTURER RESPONSIBLE Liability Disclaimer indirect, THE MODIFICATIONS consequential TO THIS DEVICE. SUCH MODIFICATIONS COULD VOID THE USER'S damages arising out of the use or inability to use the AUTHORITY TO OPERATE THE DEVICE. product or documentation, even if advised of the possibility of such damages. Regulatory Information CE Notice FCC Notice This device 2004/108/EC This equipment has been tested and found to comply complies and with 2006/95/EC EMC “Low Directive Voltage Directive” issued by the Commission of the with the limits for a Class A digital device, pursuant to European Community Part 15 of the Federal Communications Commission (FCC) Rules. These limits are designed to provide reasonable protection against harmful interference in a residential installation. This equipment generates, uses, and can radiate radio frequency energy and, if not installed and used in accordance with the instructions, may cause harmful interference to radio communications. However, there is no guarantee that interference will not occur in a particular installation. If i WEEE Notice Safety IMPORTANT SAFETY INSTRUCTIONS To disconnect the machine from the electrical Power Supply, turn off the power switch and remove the power cable plug from the wall socket. The wall socket must The WEEE mark applies only to countries within the be easily accessible and in close proximity to the European Union (EU) and Norway. machine. This appliance is labeled in accordance with Read European Directive 2002/96/EC concerning waste instructions for future reference. electrical and electronic equipment (WEEE). The Follow all warnings and instructions marked on the Directive determines the framework for the return and product. recycling Do not use this product near water. of used appliances as applicable these instructions carefully. Save these throughout the European Union. This label is applied Do not place this product on an unstable cart, stand, or to various products to indicate that the product is not table. The product may fall, causing serious damage to to be thrown away, but rather reclaimed upon end of the product. life per this Directive. Slots and openings in the cabinet and the back or bottom are provided for ventilation; to ensure reliable operation of the product and to protect it from overheating. These openings must not be blocked or covered. The openings should never be blocked by placing the product on a bed, sofa, rug, or other similar surface. This product should never be placed near or over a radiator or heat register, or in a built-in installation unless proper ventilation is provided. This product should be operated from the type of power indicated on the marking label. If you are not sure of the type of power available, consult your dealer or local power company. Do not allow anything to rest on the power cord. Do not locate this product where persons will walk on the cord. Never push objects of any kind into this product through cabinet slots as they may touch dangerous voltage points or short out parts that could result in a fire or electric shock. Never spill liquid of any kind on the product. ii Table of Contents Copyrights ............................................................................................................ i Liability Disclaimer............................................................................................... i Regulatory Information ........................................................................................ i FCC Notice ........................................................................................................................... i CE Notice .............................................................................................................................. i WEEE Notice ....................................................................................................................... ii Safety ................................................................................................................................... ii Table of Contents ............................................................................................... iii 1. Item Checklist .................................................................................................. 1 1.1 Standard Items .............................................................................................................. 1 1.2 Optional Items ............................................................................................................... 2 2. System View .................................................................................................... 3 2.1 Front View...................................................................................................................... 3 2.2 Rear View ....................................................................................................................... 4 2.3 Side View ....................................................................................................................... 5 2.4 Dimension ..................................................................................................................... 6 For YUNO-151 ............................................................................................................... 6 For YUNO-156 ............................................................................................................... 7 2.5 I/O View .......................................................................................................................... 8 3. System Assembly & Disassembly.................................................................. 9 3.1 Open the System Cover ............................................................................................... 9 3.2 Replace the Storage Disk Drive ................................................................................. 10 3.3 Replace the Memory ................................................................................................... 13 3.4 Install the Power Adapter ........................................................................................... 15 3.5 Install the Wall-mount ................................................................................................. 16 4. Peripherals Installation ................................................................................. 18 4.1 Install the Cash Drawer .............................................................................................. 18 4.2 Install the Attachment-type Customer Display (YUNO-VFD) ................................... 20 5. Specification .................................................................................................. 21 6. Configuration ................................................................................................. 23 6.1 X72 Motherboard......................................................................................................... 23 6.1.1 Motherboard Layout ............................................................................................ 23 6.1.2 Connectors & Functions ..................................................................................... 24 6.1.3 Jumper Settings .................................................................................................. 25 Appendix A: Driver Installation ........................................................................ 26 Appendix B: Customer Display Command Settings ....................................... 27 iii 1. Item Checklist 1.1 Standard Items a. System b. Power Adapter (65W) c. Power Cable d. RJ50-COMCable 100cm (x2), plus, RJ50-COMCable 50cm (x2) e. Manual CD 1 1.2 Optional Items YUNO supports full range of peripherals as listed below. Model # Description YUNO-VFD RS-232 interface Attachment-type (integrated) Customer Display YUNO-UPS Intelligent Uninterruptible Power Supply Module YUNO-WBM Wi-Fi Bluetooth Module 2.4/5GHz, 802.11ac, a/b/g, n 2 2. System View 2.1 Front View Number Description 1 Bezel Free Panel PC 2 L-Stand 3 System Cover Release Button 4 Base Plate 3 2.2 Rear View Number Description 5 Attachment-type Customer Display (YUNO-VFD) service door 6 System Cover 7 service door for peripherals 8 VESA mount (75mm x 75mm) 9 Rear Side Cable service door 10 L-Stand Cover 4 2.3 Side View Number Description 11 Power Button 12 1 x USB 2.0 13 1 x USB 3.0 5 2.4 Dimension For YUNO-151 6 For YUNO-156 7 2.5 I/O View Bottom-up View Right-side View Bottom-up View Number Description a DC-IN jack b Combo Audio jack (3.5mm 4 conductor) c COM1~4 (from right to left) (RJ50 Connector) d LAN (RJ45 Connector) e 4 x USB 2.0 (Type A) f Cash Drawer (RJ12 Connector) g mini DP (Display Port) h reserved for Wi-Fi /Bluetooth Right-side View Number Description i 1 x USB 3.0 (Type A) j 1 x USB 2.0 (Type A) 8 3. System Assembly & Disassembly 3.1 Open the System Cover Open the System Cover by pressing the System Cover Release Button. 9 3.2 Replace the Storage Disk Drive YUNO offers two 2.5" drive bays of height 7 mm each to allow you to equip it with a configuration of one primary HDD or SSD on the upper bay and one secondary SSD on the lower bay. *Please note that if you are replacing your only HDD or SSD, you will need to reinstall your operating system after replacing it. Make sure the unit is powered off before starting. Please follow the below steps to finish the replacement : 1. Remove the System Cover To open the System Cover, please refer to the procedures described in Chapter 3-1 and remove it. 2. Remove the old drive (if applicable). If you are removing a HDD or SSD, make sure all of the cables are disconnected from both the motherboard and the power supply. Rotate the Releasing Handler to unlock the storage disk drive and slide it out of the housing. 3. Insert your new drive. Remove it from the antistatic packaging and slide it into your target drive bay of the storage housing. 10 4. Secure the storage disk drive. Once the storage disk drive has been completely inserted, rotate the Releasing Handler to lock it properly. 5. Connect the storage disk drive to the motherboard. *If you are connecting your primary storage disk drive, the SATA cable should be plugged into the first SATA channel, which is labeled as SATA0. Refer to Chapter 6 about the motherboard configuration for detailed information. Secondary drive should be connected to the next available SATA1 channel. 11 6. Connect the power supply to the storage disk drive. HDD1 labeled on the motherboard provides power supply to the primary storage disk drive, while HDD2 is for the secondary storage disk drive. Make sure that all of your connections are secure. 7. Get ready to power on the system. Close up the System Cover. Reconnect the cable plug onto the wall socket and turn your YUNO on. 8. Finish the replacement. If you are replacing your primary drive, you'll have to reinstall your operating system. If you are adding a new drive, you'll need to format the drive before you can use it. 12 3.3 Replace the Memory Make sure the system is powered off before starting. Please follow the below steps to finish the replacement : 1. Remove the System Cover To open the System Cover, please refer to the procedures described in Chapter 3-1 and remove it. 2. Locate the memory slot at the left rear side of the system. 3. Flip the ejector clips outwards to remove the memory module from the memory slot. 4. Slide the memory module into the memory slot and press down until the ejector clips snaps in place. 13 5. Close up the System Cover. 14 3.4 Install the Power Adapter The system is equipped with a 65W power adapter. Please follow below procedures to get it plugged into the system. 1. To open the System Cover, please refer to the procedures described in Chapter 3-1, and remove it. 2. Locate the power connector on the I/O panel (please refer to Chapter 2-5) and connect the plug of power adapter directly to the DC-IN jack. Route the DC cord connection securely. 3. Remove the L-Stand Cover to locate the rest of DC cord properly. 4. After finish, slide in the L-Stand Cover and close up the System Cover. 15 3.5 Install the Wall-mount YUNO follows VESA Mounting Interface Standard to allow you to mount the elegant bezel-free panel PC to a stand or wall with four M4 screws easily. The horizontal and vertical distance between the tapped holes on YUNO is 75 mm. Make sure the system is powered off before starting. Please follow the below steps to get it ready for the mounting process : 1. Remove the System Cover. To open the System Cover, please refer to the procedures described in Chapter 3-1, and remove it. 2. Remove the L-Stand Cover. 3. Detach the panel PC by unscrewing the10 pcs of screws from the L-Stand Cover. 4. Remove the 4 pcs of rubber cap from the System Cover. 16 5. Get ready to the mounting process. Close up the System Cover and then mount it to a stand or wall with four M4 screws easily. 17 4. Peripherals Installation 4.1 Install the Cash Drawer You can install a cash drawer through the cash drawer port. Please verify the pin assignment before installation. Cash Drawer Pin Assignment Pin Signal 1 GND 2 DOUT bit0 3 DIN bit0 4 12V / 19V 5 DOUT bit1 6 GND Cash Drawer Controller Register The Cash Drawer Controller use one I/O addresses to control the Cash Drawer. Register Location : 48Ch Attribute : Read / Write Size : 8-bit BIT7 BIT BIT6 Attribute Reserved 7 X 6 5 4 X X 3 2 Read 1 0 X X BIT5 BIT4 Reserved BIT3 BIT2 Write BIT1 BIT0 Reserved Reserved Cash Drawer “DOUT bit0” pin output control Cash Drawer “DOUT bit1” pin output control Reserved Cash Drawer “DIN bit0” pin input status Reserved 18 BIT7: Reserved BIT6: Cash Drawer “DIN bit0” pin input status. = 1: the Cash Drawer opened = 0: the Cash Drawer closed or no Cash Drawer BIT5: Reserved BIT4: Reserved BIT3: Cash Drawer “DOUT bit1” pin output control. = 1: Opening the Cash Drawer = 0: Allow close the Cash Drawer BIT2: Cash Drawer “DOUT bit0” pin output control. = 1: Opening the Cash Drawer = 0: Allow close the Cash Drawer BIT1: Reserved BIT0: Reserved Note: Please follow the Cash Drawer control signal design to control the Cash Drawer. Cash Drawer Control Command Example Use Debug.EXE program under DOS or Windows98 Command Cash Drawer O 48C 04 Opening O 48C 00 Allow to close Set the I/O address 48Ch bit2 =1 for opening Cash Drawer by “DOUTbit0” pin control. Set the I/O address 48Ch bit2 = 0 for allow close Cash Drawer. Command Cash Drawer I 48C Check status The I/O address 48Ch bit6 =1 mean the Cash Drawer is opened or not exist. The I/O address 48Ch bit6 =0 mean the Cash Drawer is closed. 19 4.2 Install the Attachment-type Customer Display (YUNO-VFD) The Attachment-type Customer Display(YUNO-VFD) can be installed from the rear top side of the system. Make sure the unit is powered off before starting. Please follow the below steps to finish the installation : 1. Unscrew the two pcs of screws from the rear top service door and remove it. 2. Connect the Customer Display cable with the connector of the system. Locate this connection properly. 3. Insert the Customer Display in place and fasten the two pcs of screws to make it secure. 20 5. Specification Model Name YUNO Model Number YUNO-151 CPU support YUNO-156 Intel® Bay Trial-M SoC Processor J1900 (2M Cache, up to 2.42 GHz)) System memory 1 x SO-DIMM DDR3L 1067/1333MHz, Max 8GB LAN controller Audio controller RTL8111G PCI-E Gigabit LAN Realtek ALC662 HD Audio CODEC with 2-Channel Audio 2W Speaker x 2 BIOS Phoenix uEFI BIOS LCD Panel LCD size 15.0" (Innolux G150XGE-L05) 15.6" (Innolux N156BGE-L41) Brightness 250 cd/m² 200 cd/m² Maximal resolution 1024 x 768 1366 x 768 Aspect Ratio 4:3 16:9 Backlight Type LED LED QM (Shanghai) Technology, QM (Shanghai) Technology, Model: PIF15003 Model: PIF15601 10 10 3M Dori1 SiS 9275 USB USB Touch Sensor P-CAP Touch Touch Screen Controller IC Interface Storage 1st HDD / SSD 1 x 2.5" 7mm SATA HDD or SATA MLC SSD 2nd SSD 1 x 2.5" 7mm SATA MLC SSD Side I/O Power button 1 x with power indicator (blue color when power ON) USB 1 x USB 2.0 and 1 x USB 3.0 21 Rear Bottom I/O DC-IN jack 1 x radio jack connector for 19V DC input Audio jack 1 x 4-conductor 3.5mm audio jack for MIC-in and Line-out Serial / COM 4 x RJ50 connector with RJ50 to DB9 cable for RS-232 port - COM1/COM2: RS232, wake on ring (S1, S3, S4, S5) support - COM3/COM4: RS232, powered COM with BIOS select none (Default setting)/ +5V (Default) / +12V for DB9 pin9 by BIOS setting. LAN 1 x RJ45 port for Gigabit Ethernet, support Wake on LAN USB 4 x USB 2.0 Cash Drawer 1 x RJ12, support 12V / 24V DC Cash Drawer Display Port 1 x mini Display Port (supporting active converter cable to VGA, DVI, HDMI) Power Power Adapter External 19V / 3.42A 65Watt Adapter Peripherals Customer Display Attachment-type Customer Display (YUNO-VFD option) (Serial COM6) UPS Module Intelligent UPS Module (YUNO-UPS option) Communication Wireless LAN 2.4/5GHz, 802.11ac, a/b/g, n Wi-Fi Bluetooth Module (YUNO-WBM option) Certifications EMI FCC Class B / CE / LVD Safety UL Environment Operating temperature 0℃ ~ 35℃ (32℉ ~ 95℉) Storage temperature -20℃ ~ 60℃ (-4℉ ~ 140℉) Humidity 5% ~ 80%, non-condensing Dimension (W x D x H) Weight (N.W./G.W.) OS support LCD 90 degree : LCD 90 degree : 360.1 x 171.5 x 316.1 mm 402.2 x 171.5 x 295.3 mm 10kg / 11kg 11kg / 12kg Windows® 7 Professional for Embedded Systems, Windows® Embedded POSReady 7, Windows® Embedded 8 Industry Retail * This specification is subject to change without prior notice. 22 6. Configuration 6.1 X72 Motherboard 6.1.1 Motherboard Layout 23 6.1.2 Connectors & Functions Connectors Functions LVDS1 50-pin connector LVDS2 40-pin connector HDD1 SATA power connector HDD2 SATA power connector INT_SP Speaker connector DIMM1 DDR3 SO-DIMM CRT1 VGA connector (internal) JP5 LCD Enable Level Select JP6 LCD Power Select JP7 RJ12 Power Select SW4 Power button DC-IN DC-IN jack CN11 3.5mm 4 conductor Audio jack (Combo MIC-in and Line-out) COM1,COM2,COM3,COM4 RJ50 Serial Ports LAN_CON1 LAN port USB_CON1 USB2.0 port0/1 USB_CON2 USB2.0 port2/3 RJ12 Cash Drawer MINI_DP1 mini DP (Display Port) USB30_1 USB3.0 port0/1 USB20_3 USB2.0 port4/5 Internal External 24 6.1.3 Jumper Settings LCD Enable Level Select JP5 (1-2)(2-3) Function +5V 1 2 3 +3.3V (Default) 1 2 3 LCD Power Select JP6 Function (1-2)(2-3) +5V 1 2 3 +3.3V (Default) 1 2 3 RJ12 Cash drawer Power Select JP7 (1-2)(2-3) Function ■■ +19V (Default) 1 2 3 +12V 1 2 3 SHORT ■■ OPEN 25 Appendix A: Driver Installation To download the most recent drivers and utilities, and obtain advice regarding the installation of your equipment, please visit the AURES Technical Support Website: www.aures-support.fr(French) www.aures-support.fr/UK(English) www.aures-support.fr/GE(German) 26 Appendix B: Customer Display Command Settings 1. FEATURES (1) Data can be displayed on 20 columns x 2 lines. (2) Blue-green color and large characters are easy to eye. (3) The commands modes, fonts, baud rate and other parameters are selected by software. (4) CD5220 / UTC / EMAX / ADM / EscPOS / DSP-800 emulation command sets. (5) User-defined characters can be downloaded (for EscPOS /CD5220/DSP-800 command). (6) Provides an interface based on RS-232C or USB (baud rate: 4800, 9600, 19200, 38400, 115200 bps). (7) Powered by 5V. 27 2. GENERAL SPECIFICATIONS No Item Description 1 Display method Vacuum fluorescent display 2 Number of character 40 characters ( 20 columns x 2 lines) 3 Character font 5 x 7 dot matrix 4 Display color Blue green 5 Brightness ~ 500 cd/m² Character type 96 alphanumeric 13 kinds of international character set 6 1 kind of user define character 7 Character size 9.03 mm x 5.25 mm 8 Power supply 5V 9 Power consumption 2.3W (Max.) 10 MTBF 25,000 hours 11 Module dimensions 146 (W) x 49.2 (H) x 15.2 (D) mm 12 Weight 85g 13 Operating temperature 0 ~ 45℃ 14 Operating Humidity 30% ~ 85% 15 Storage Temperature -10 ~ 50℃ 16 Storage Humidity 10% ~ 90% 28 3. INTERFACE 3.1 RS-232C Specifications Data transmission Serial Synchronization Asynchronous Handshaking DTR / DSR Signal level MARK = -3 to –15 V (logic “1”) SPACE = +3 to +15 V (logic “0”) Baud rates 4800,9600,19200,38400 or 115200 bps Parity and bit length Stop bits None parity, 8 data bits or Even parity, 7 data bits 1 or more 29 4. CONNECTOR AND JUMPER CN6 CN2 4.1 RS232C connecter (CN6) Connector type: JST/ZH/1.5mm/6P Pin assignment 1 6 No Signal Direction 1 TXD From display to PC/Host 2 RXD From PC/Host to display 3 RTS From display to PC/Host 4 CTS From PC/Host to display 5 GND - Signal ground 6 Vin - Power 5 Vdc 4.2 USB connecter (CN2) Connector type: JST/ZH/1.5mm/4P Pin assignment Function Description 1 4 No Signal Direction Function Description 1 GND - Signal ground 2 USBD+ - USB data signal + 3 USBD- - USB data signal - 4 5Vdc 5V From PC/Host Power 5 Vdc 4.3 ON/OFF Switch Connector Type: JST/XH/2.5mm/2P Location SHORT OPEN J1 RS232 enable RS232 disable J2 USB enable USB disable 30 5. COMMAND 5.1 CD5220 Standard Mode Command List Command Code (hex) Function Description ESC DC1 1B 11 Overwrite mode ESC DC2 1B 12 Vertical scroll mode ESC DC3 1B 13 Horizontal scroll mode 1B 51 41 data x m 0D Set the string display mode,write string to upper line m ≦ 20 ESC QB ....CR 1B 51 42 data x m 0D Set the string display mode, write string to lower line m ≦ 20 ESC QD ....CR 1B 51 44 data x m 0D Upper line message scroll continuously m ≦ 40 ESC [ D 1B 5B 44 Move cursor left BS 08 Move cursor left ESC [ C 1B 5B 43 Move cursor right HT 09 Move cursor right ESC [ A 1B 5B 41 Move cursor up ESC [ B 1B 5B 42 Move cursor down LF 0A Move cursor down ESC [ H 1B 5B 48 Move cursor to home position HOM 0B Move cursor to home position ESC [ L 1B 5B 4C Move cursor to left-most position CR 0D Move cursor to left-most position ESC [ R 1B 5B 52 Move cursor to right-most position ESC [ K 1B 5B 4B Move cursor to bottom position ESC l x y 1B 6C x y Move cursor to specified position 1 ≦x≦ 20 ,row position 1 ≦y≦ 2 ,column position ESC @ 1B 40 Initialize display CLR 0C Clear display screen , and clear string mode CAN 18 Clear cursor line, and clear string mode 1B 2A n Brightness adjustment 1≦n≦4 ESC QA ....CR ESC * n 31 ESC & s n m [a (P1..pa)]x (m-n+1) ESC ? n ESC % n ESC _ n Define download characters. 1B 26 1 n m [a(p1..pa)] 32 ≦ n ≦ m 255 1 ≦a ≦ 5 x (m-n+1) p1..p5 =row1..row5 1B 3F n Deletes download characters. 32 ≦ n ≦ m 255 1B 25 n Select/cancel download character set. n = 0 , Cancel n = 1 , Select 1B 5F n Set cursor on/off n = 1 , cursor on n = 2 , cursor off ESC f n 1B 66 n Select international fonts set, refer *2 ESC c n 1B 63 n Select code, refer *3 1B 3D n Select peripheral device, display or printer n bit 0 = 1 select printer n bit 1 = 1 select display ESC = n 32 *REMARK : *1 The parameter of international fonts set control by command “ESC f n” Parameter “n” International font set “A” U.S.A. “G” Germany “I” Italy “J” Japan “U” U.K. “F” France “S” Spain “N” Norway “W” Sweden “D” Denmark I “E” Denmark II “L” Slavonic “R” Russia *2 The parameter of the code table control by command “ESC c n” Parameter “n” International font set “A” Compliance with ASCII code “J” Compliance with JIS code “L” Compliance with SLAVONIC code “R” Compliance with RUSSIA code 33 5.2 UTC standard mode command list Command Code (hex) Function Description EOT n 04 n Display Dimming n = 20h, 40h, 60h, FFh BS 08 Back space HT 09 Horizontal tab LF 0A Line feed CR 0D Carriage return DLE 0F Display position DC1 11 Over write display mode DC2 12 Vertical scroll mode DC3 13 Cursor on DC4 14 Cursor off CAN 18 Clear to end of line EM 19 Clear to end of display FS 1C Flashing text start GS 1D Flashing text end US 1F Reset display RS 1E Home and clear display ESC d 1B 64 Change to UTC enhanced mode 34 5.3 UTC enhanced mode command list Command Code (hex) Function Description SI 0F Flashing text start SO 0E Flashing text stop ESC u A ..CR 1B 75 41 data x m ESC u B ..CR 1B 75 42 data x m 0D Bottom line display 0 ≦ m ≦ 20 ESC u D ..CR 1B 75 44 data x m 0D Upper line message scroll continuously 0 ≦ m ≦40 ESC u E ..CR 1B 75 45 “hh:mm” 0D Display time ‟00‟≦ hh ≦ „23‟ ‟00‟≦ mm ≦ „59‟ ESC u F ..CR 1B 75 46 data x m 0D Upper line message scroll once pass ESC u H ..CR 1B 75 48 n m 0D Change attention code 32 ≦ n ≦ 255 32 ≦ m ≦ 255 ESC u I ..CR 1B 75 49 data x m 0D Two line display 0 ≦ m ≦ 40 ESC RS CR 1B 0F 0D Change to UTC standard mode 0D Upper line display 0 ≦ m ≦ 20 35 5.4 AEDEX mode command list Command Code (hex) Function Description ! # 1 ....CR 21 23 31 data x m 0D Upper line display 0 ≦ m ≦ 40 ! # 2 ....CR 21 23 32 data x m 0D Bottom line display 0 ≦ m ≦ 40 ! # 4 ....CR 21 23 34 data x m 0D Upper line message scroll continuously 0 ≦ m ≦ 40 ! # 5 ....CR 21 23 35 “hh:mm” Display time „00‟≦ hh ≦ „23‟ 0D ‟00‟≦ mm ≦ „59‟ ! # 6 ....CR 21 23 36 data x m 0D Upper line message scroll one pass 0 ≦ m ≦ 40 Change attention code 32 ≦n ≦255 32 ≦ m ≦ 255 ! # 8 ....CR 21 23 38 n m 0D ! # 9 ....CR 21 23 39 data x m Two line display 0 ≦ m ≦ 40 0D 36 5.5 PD3000 mode command list Command Code (hex) Function Description DC2 12 Vertical Scroll Mode DC1 11 Normal Display Mode EOT 04 Brightness Control BS 08 Back Space HT 09 Horizontal Tab LF 0A Line Feed CR 0D Carriage Return DLE 10 Digit Select DC3 13 Cursor On DC4 14 Cursor Off US 1F Reset ETX 03 Down Load Font ENQ d1~d45 CR 05 d1~d45 0D Message Scroll SOH 01 Data to Peripheral 21 23 02 Data to Display ! # STX 37 5.6 ADM788 mode command list Command Code (hex) Function Description CLR 0C Clear display CR 0D Carriage return SLE1 0E Clear up line and move cursor to upper line left most end SLE2 0F Clear low line and move cursor to lower line left most end DC0 n 10 n Set period to upper line last n position 31H ≦ n ≦ 44H DC1 n 11 n Set line blanking , n = 31H up line n = 32H low line DC2 n 12 n Clear line blanking , n = 31H up line n = 32H low line SF1 1E Clear field 1 and move cursor to field 1 fast position SF2 1F Clear field 2 and move cursor to field 2 fast position 38 5.7 DSP-800 mode command list Command Code (hex) Function Description EOT SOH I n ETB 04 01 49 n 17 Select international character set. EOT SOH P n ETB 04 01 50 n 17 Move cursor to specified position. 31H ≦ n ≦ 58H EOT SOH C n m ETB Clear display range from n position to m position and move cursor to n 04 01 43 n m 17 position. 31H ≦ n ≦ m ≦ 58H Save the current displaying data to EOT SOH S n ETB 04 01 53 n 17 layer for demo display. 31H ≦n ≦ 33H Refer*1 EOT SOH D n m ETB Display the saved data 31H ≦ n ≦ 37H 04 01 44 n m 17 31H ≦ m ≦ 37H Refer*2 EOT SOH A n ETB 04 01 41 n 17 Brightness adjustment. 31H ≦ n ≦ 34H EOT SOH F n ETB 04 01 46 n 17 Blink display screen. 0 ≦ n ≦ 255 EOT SOH & n [px5] ETB 04 01 26 n p1...p5 17 Define download characters 20H < n ≦ FFH EOT SOH ? n ETB 04 01 3F n 17 Delete download characters. 20H < n ≦ FFH EOT SOH = n ETB 04 01 3D n 17 Select peripheral device. n = 31H,select printer n = 32H,select display EOT SOH % ETB 04 01 25 17 Initialize display EOT SOH @ ETB 04 01 40 17 Execute self-test 39 n *REMARK : *1 Using commands “EOT SOH S n ETB”, the value (Hex) of parameter. n Layer 31h Save data in layer 1 32h Save data in layer 2 33h Save data in layer 3 *2 Using commands “EOT SOH D n m ETB”, the value (Hex) of parameter. WinPOS extended “select mode” from 33h to 37h n Select layer m Select mode 31h Demo layer 1 31h Demo mode 1 32h Demo layer 2 32h Demo mode 2 33h Demo layer 3 33h Demo mode 3 34h Demo layer 1 + 2 34h Demo mode 1 + 2 35h Demo layer 1 + 3 35h Demo mode 1 + 3 36h Demo layer 2 + 3 36h Demo mode 2 + 3 37h Demo layer 1 + 2 + 3 37h Demo mode 1 + 2 + 3 40 5.8 EPSON Esc / pos command list Command Code (hex) Function Description HT 09 Move cursor right. BS 08 Move cursor left. US LF 1F0A Move cursor up. LF 0A Move cursor down. US CR 1F 0D Move cursor to right-most position. CR 0D Move cursor to left-most position. HOM 0B Move cursor to home position. US B 1F 42 Move cursor to bottom position. US $ x y 1F 24 x y Move cursor to specified position. 1 ≦ x ≦ 20 1 ≦ y ≦ 2 CLR 0C Clear display screen. CAN 18 Clear cursor line US X n 1F 58 n Brightness adjustment. 1 ≦ n ≦ 4 US E n 1F 45 n Blink display screen. 0 ≦ n ≦ 255 ESC @ 1B 40 Initialize display. 1B 74 n Select character code table. 0 ≦ n ≦ 7, 12, 16, 19, 40 ESC t n Refer*2 ESC R n 1B 52 n Select international character set. 0 ≦ n ≦ 10 Refer*1 US r n 1F 72 n Select/cancel reverse character. 0 ≦ n ≦ 1 US MD1 1F 01 Specify overwrite mode. US MD2 1F 02 Specify vertical scroll mode. US MD3 1F 03 Specify horizontal scroll mode. 1B 26 1 n m [a(p1..pa)]x m-n Define download characters. 32 ≦ n ≦ 255 1≦ a ≦ 5 ESC & s n m [a(p1..pa)]x m-n p1..p5 =row1..row5 ESC ? 1B 3F n Delete downloads characters. 32 ≦ n ≦ 255 41 Select/cancel download character set. ESC % 1B 25 n n = 0 , Cancel n = 1 , Select ESC = n 1B 3D n Select peripheral device. n bit 0 = 1 select printer n bit 1 = 1 select display US : 1F3A Set starting/ending position of macro definition. US ^ n m 1F 5E n m Execute and quit macro. 0 ≦n≦255 , 0 ≦m≦255 US @ 1F 40 Execute self-test. US T h m 1F 54 h m Display time 0 ≦h≦23 , 0≦m≦59 US U 1F 55 Display time continuously 1F 43 n Select / cancel cursor display n = 1 , cursor on n = 0 , cursor off US C n *REMARK : *1 Select international character set n International font n International font 0 U.S.A. 8 Japan 1 France 9 Norway 2 Germany 10 Denmark II 3 U.K. 11 Slavonic 4 Denmark I 12 Russia 5 Sweden 13 Portuguese 6 Italy 14 Greek 7 Spain 15 Reserved *2 Select character code table n Code table n Code table 0 Page 0, (PC437,USA standard Euro.) 6 Page 6,(Slavonic) 1 Page 1,(Katakana for Japan) 7 Page 7,(Russia) 2 Page 2,(PC850,Multilingual) 19 Page 19,(PC858, Euro) 3 Page 3,(PC860, Portuguese) 16 Page 16,(WPC1252) 4 Page 4,(PC863,Canadian-French) 12 Page 12,(Greek) 5 Page 5,(PC865,Nordic) 42 6. CHARACTER SET 6.1 International Font 6.1.1 USA, standard character set (20h – 7Eh) 00 01 02 03 04 05 06 07 20H 30H 40H 50H 60H 70H 43 08 09 0A 0B 0C 0D 0E 0F 6.1.2 Other character sets Country\Hex 23 24 40 5B 5C U.S.A France Germany U.K Denmark I Sweden Italy Spain Japan Norway Denmark II Slavonic Russia 44 5D 5E 60 7B 7C 7D 7E 6.2 Code Page 6.2.1 Page 0 (PC437: USA, Standard Europe) (80H – FFH) 00 01 02 03 04 05 06 07 80H 90H A0H B0H C0H D0H E0H F0H 45 08 09 0A 0B 0C 0D 0E 0F 6.2.2 Page 1 (Katakana) (80H – FFH) 00 01 02 03 04 05 06 07 80H 90H A0H B0H C0H D0H E0H F0H 46 08 09 0A 0B 0C 0D 0E 0F 6.2.3 Page 2 (PC850: Multilingual) (80H – FFH) 00 01 02 03 04 05 06 07 80H 90H A0H B0H C0H D0H E0H F0H 47 08 09 0A 0B 0C 0D 0E 0F 6.2.4 Page 3 (PC860: Portuguese) (80H – FFH) 00 01 02 03 04 05 06 07 80H 90H A0H B0H C0H D0H E0H F0H 48 08 09 0A 0B 0C 0D 0E 0F 6.2.5 Page 4 (PC863: Canadian-French) (80H – FFH) 00 01 02 03 04 05 06 07 80H 90H A0H B0H C0H D0H E0H F0H 49 08 09 0A 0B 0C 0D 0E 0F 6.2.6 Page 5 (PC865: Nordic) (80H – FFH) 00 01 02 03 04 05 06 07 80H 90H A0H B0H C0H D0H E0H F0H 50 08 09 0A 0B 0C 0D 0E 0F 6.2.7 Page 6 (Slavonic) (80H – FFH) 00 01 02 03 04 05 06 80H 90H A0H B0H C0H D0H E0H F0H 51 07 08 09 0A 0B 0C 0D 0E 0F 6.2.8 Page 7 (Russia) (80H – FFH) 00 01 02 03 04 05 06 07 80H 90H A0H B0H C0H D0H E0H F0H 52 08 09 0A 0B 0C 0D 0E 0F 6.2.9 Page 19 (PC858 Euro) (80H – FFH) 00 01 02 03 04 05 06 07 80H 90H A0H B0H C0H D0H E0H F0H 53 08 09 0A 0B 0C 0D 0E 0F 6.2.10 Page 16 (WPC1252) (80H – FFH) 00 01 02 03 04 05 06 07 80H 90H A0H B0H C0H D0H E0H F0H 54 08 09 0A 0B 0C 0D 0E 0F 6.2.11 Page 12 (Greek) (80H – FFH) 00 01 02 03 04 05 06 07 80H 90H A0H B0H C0H D0H E0H F0H 55 08 09 0A 0B 0C 0D 0E 0F 6.2.12 Page 26 (WPC-1257) (80H – FFH) 00 01 02 03 04 05 06 07 80H 90H A0H B0H C0H D0H E0H F0H 56 08 09 0A 0B 0C 0D 0E 0F 6.2.13 Page 64 (ISO8859-7) (80H – FFH) 00 01 02 03 04 05 06 07 80H 90H A0H B0H C0H D0H E0H F0H 57 08 09 0A 0B 0C 0D 0E 0F 6.2.14 Page 66 (PC857: Turkish) (80H – FFH) 00 01 02 03 04 05 06 07 80H 90H A0H B0H C0H D0H E0H F0H 58 08 09 0A 0B 0C 0D 0E 0F