1
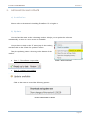
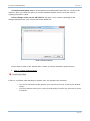
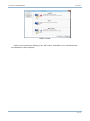
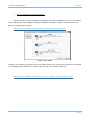
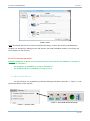
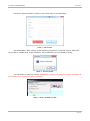
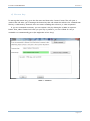
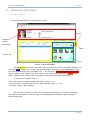
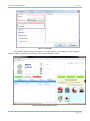
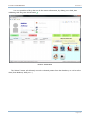
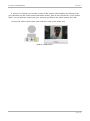
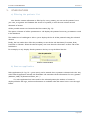
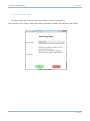
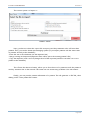
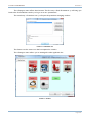
FRAMIGEST USER MANUAL Version 4 Applies to FramiGest 1.3 and higher This document explains the features and utilization of the patients’ management software developed by FRAMIRAL: FramiGest. FramiGest USER MANUAL Version 4 Contents I. OVERVIEW ............................................................................................................... 2 II. INSTALLATION AND UPDATE ................................................................................. 3 a) Installation .................................................................................................................................. 3 b) Update ....................................................................................................................................... 3 III. a) b) c) d) USE OF THE SOFTWARE ........................................................................................ 5 Starting the software ............................................................................................................... 5 Choosing the database ........................................................................................................... 5 New practitioner ....................................................................................................................... 8 License key .............................................................................................................................. 11 IV. a) b) c) d) MANAGING THE PATIENT .................................................................................. 12 The patient .............................................................................................................................. 12 Pathologies ............................................................................................................................. 16 Prescriptions ............................................................................................................................ 17 Survey ...................................................................................................................................... 18 V. a) b) c) d) OTHER FEATURES .................................................................................................. 20 Filtering the patients ‘list ...................................................................................................... 20 Start an application .............................................................................................................. 20 Send a bug report................................................................................................................. 21 The menu ................................................................................................................................. 22 Page 1 FramiGest USER MANUAL I. Version 4 OVERVIEW For years, our company has been developing its own softwares to control the various medical devices we design (Multitest Equilibre, Subjective Visual Vertical, Framiscope, Rotational Chair, NystamoGraphy Video, Dynamic Visual Acuity). In order to facilitate and speed up the access to patient records, and thus ensure traceability, FRAMIRAL designed the software FRAMIGEST. This intuitive and user-friendly software allows you to quickly enter the contact information of all your patients, print a summary sheet, and centralizing all the data from any other FRAMIRAL software. Operating under Microsoft SQL Server, the database ensures a fast processing, and a capacity of several thousand entries. Its network features facilitates the management of the patient from various PC (Secretary, practitioner), while maintaining data integrity. Finally, features such as the integrated photo of the patient via webcam, or the management of various diseases and prescriptions, make this software complete and essential, and provide the opportunity to easily sort patients for statistics, exports, etc ... Page 2 FramiGest USER MANUAL II. Version 4 INSTALLATION AND UPDATE a) Installation Please refer to the manual « Installing FramiGest 1.3 or higher ». b) Update You can find this menu on the welcoming window. It helps you to update the software automatically as soon as a new version is available. You just have to click on the “?” menu (top of the window), and then click on the “Check for updates” button. Then, the updating status is showing at the bottom of the window. Case 1 : The software is up to date Case 2 : Updates are available FIGURE 1- CHECK FOR UPDATES Click on the status to reveal the following options: FIGURE 2- UPDATES READY TO INSTALL Page 3 FramiGest USER MANUAL Version 4 « Download and update now » will download and automatically install the new version of the software. Once you select this option, let run the automatic update process, and don’t click on anything else until it’s done! « Show changes of the version XX.XX.XX » will open a new window explaining all the changes made between your version and the XX.XX.XX one. FIGURE 3- CHANGE OF VERSION You just have to click on the “Update Now” button to start the automatic update process. Case 3 : Update checking failed : If there is a problem while checking for update, here are possible case scenarios: o You are not connected to the internet. (you can start a browser to check your internet access) o You have internet access, but a strong firewall policy prevents any software to access to internet. Page 4 FramiGest USER MANUAL III. Version 4 USE OF THE SOFTWARE a) Starting the software Run the software by clicking on the icon set up on the desktop, or via the “Start” menu, « All Programs », « Framiral » then “FramiGest”. FIGURE 4 – DESKTOP ICON Note: FramiGest is designed to be left running all day. It is advised not to close it every time you are done with a patient. Open FramiGest in the morning, and close it before turning down your computer. b) Choosing the database The first window then opens. It allows you to log in as a practitioner (or else) to maintain the patients’ traceability. Click on the database management button (shown by « 1 » on this screenshot) to open the database menu. 1 Use of FramiGest with a single computer : FramiGest will be used on a single computer, the database will be local. Choose LocalDB. FIGURE 5 – CONNECT TO A DATABASE Page 5 FramiGest USER MANUAL Version 4 FIGURE 6 - LOCALDB Confirm your selection by clicking on the “OK” button. FramiGest is now connected to the local database (same computer). Page 6 FramiGest USER MANUAL Version 4 Use of FramiGest on several computers : When used on 2 or more computers, FramiGest will access a database set up on one of them (see Install Manual). The computer hosting the database will be the “master”. Our technicians will help you mapping your network. When running FramiGest on the master PC, select the option Client-Server FIGURE 7 - CLIENT - SERVER Confirm your selection by clicking on the “Ok” button. After a few seconds, the software is connected to the database (this database is visible on the network, and located on this PC). When running FramiGest from another PC (not the master), select the option “Client” Page 7 FramiGest USER MANUAL Version 4 FIGURE 8 - CLIENT Note: The master PC has to be turned on before the clients, to allow the access to the database. Confirm you selection by clicking on the “Ok” button. The main FramiGest window is now listing all the computers on the network. Be sure to select the master PC ! Example: Computer A, B and C are connected on the local network. The database is located on Computer A. Therefore : - On Computer A, FramiGest is set up as ClientServer ; On Computers B et C, FramiGest is set up as Client. c) New practitioner You can create a new practitioner profile by clicking on the menu “Account” -> “New” or with the shortcut button on the top left. FIGURE 10 – PRACTITIONER MANAGING BUTTONS FIGURE 9 – « ACCOUNT » MENU Page 8 FramiGest USER MANUAL Version 4 Fill up the requested fields. « Name » and « First name » are mandatory. FIGURE 11 – NEW ACCOUNT This information is then used by all the Framiral programs to create PDF reports. When the new profile is created, click on the Ok button. The practitioner is now available in the list. FIGURE 12 – NEW USER CREATED You can delete or edit any account. WARNING, deleting a practitioner account will delete all the patients’ files associated to the practitioner! FIGURE 13 - EDITER / SUPPRIMER LE COMPTE Page 9 FramiGest USER MANUAL Version 4 That’s it! You can now log in by selecting your name in the list, and click on the OK button to open the patients managing section of the software. FIGURE 14 – SELECTED PRACTITIONER – OK Page 10 FramiGest USER MANUAL Version 4 d) License key To manage the license key, go to the «?» menu and choose the “License” menu. This will open a window that will allow you to manage the license key that will unlock the software for a limited time. This key is delivered by Framiral when our team is installing the software, or when requested. If you are connected to internet, you can request a key by clicking the « Make a request » button. Then, either Framiral will send you your key by email or you can « Check if a key is available » to automatically get it (this might take a few days). FIGURE 15 – LICENSE KEY Page 11 FramiGest USER MANUAL IV. Version 4 MANAGING THE PATIENT a) The patient The management interface is divided into 5 parts. Survey Patient’s contact information Filters Patients ‘list Apps FIGURE 16 – PATIENTS ‘MANAGEMENT The patients ‘list is located in the yellow part (as well as the “add” and “delete” buttons). You can apply filters (blue part), to sort the list (by pathologies, chronology, name alphabetical order, first name alphabetical order, prescription etc…). The red part is the patient’s contact information (select a patient in the patients ‘list). The orange part is a button that will open the survey section (select a patient in the patients ‘list). The green part lists all the available applications. To create a new patient, click on: - The « New Patient » button located in the yellow section, or on - the first button on the left of the tool bar, (blue silhouette with a +), or on - the « File » menu, « New patient ». This will open a window, in which you can fill up the mandatory new patient’s information (last name and practitioner). The first name is recommended, the identifier is optional (helps to identify homonyms). Page 12 FramiGest USER MANUAL Version 4 FIGURE 17 - NEW PATIENT The patient is then created, and appears in the list, following the sorting. Its name and first name are the only information filled up in the contact information area. FIGURE 18 - NEW PATIENT SELECTED IN THE LIST Page 13 FramiGest USER MANUAL Version 4 It is now possible to fill up the rest of the contact information, by clicking on a field, then validating with the green check button . FIGURE 19 - EDITING FIELDS The “delete” button will definitely erase the selected patient from the database, as well as all its data (from Multitest, VNG, etc…). Page 14 FramiGest USER MANUAL Version 4 If you have a webcam, you can take a photo of the patient with FramiGest, by clicking on the grey silhouette (top left of the contact information section), then on the webcam icon. A new window opens. You can select the video input (your webcam) and click on the “photo” button, then “Ok”. You can also select a picture from your hard drive. Click on the folder icon. FIGURE 20 – PATIENT’S PHOTO Page 15 FramiGest USER MANUAL Version 4 b) Pathologies You can manage the patient’s pathologies, thanks to a non-exhaustive list, by clicking on the green « Patient’s diseases X » button. The following window opens: FIGURE 21 – PATHOLOGIES MANAGEMENT You just have to select the pathologies associated with the patient. If you can’t find the pathology, you can create a new one. You can also edit or delete pathologies from the list. You can then filter your patients in the filter section of the main page. Page 16 FramiGest USER MANUAL Version 4 c) Prescriptions Like the pathologies section, you can manage the patient’s prescriptions by clicking on the green « Patient’s prescriptions X ». The following window opens: FIGURE 22 – PRESCRIPTIONS MANAGEMENT The prescription list appears (sorted by date), and you can read the information in the section below the list by clicking on a prescription. You can click on the « Add a prescription » button to fill up a new prescription: In the new window, you have to fill up all the fields. The prescribers are listed in the combo-box. If you cannot find the prescriber, you can create a new on by clicking on the new prescriber button (located on the top right). FIGURE 23 - NEW PRESCRIPTION Page 17 FramiGest USER MANUAL Version 4 d) Survey Using the European Evaluation of Vertigo (EEV), FramiGest offers a survey section. To access it, you have to click on the following icon, located on the right of the filter section. This will slide out the survey section. FIGURE 24 – SURVEY SECTION ICON FIGURE 25 – SURVEY SECTION In this section, you can: - Save a new survey; - Display the results of one or several surveys; - Delete an existing survey; - Print an empty survey for the patient to fill up (in the waiting room for example); - Print an existing survey result, or a comparative result. To save a new survey, you just have to select the patient’s answers. Once the questions are answered, the graph will update and be displayed. In the “display” column, you can check as many graphs as you want. The three most recent selected graphs will be displayed at the same time, to compare the results. Page 18 FramiGest USER MANUAL Version 4 Understand the graph: The smaller the area, the better the patient feels. 3 1 1 2 1 FIGURE 26 – EMPTY SURVEY FIGURE 27 - 3 GRAPHS To delete a survey, click on the survey in the list, then click on the “delete” button. (This will delete the selected survey, NOT the ones checked in the “Display” column). When printing an empty survey, the practitioner contact information will be filled up, as well as the current date. Every other field is left empty. You can print a result with one to three graphs, by checking the graphs to display in the “display” column. When 3 graphs are selected, the printed report displays the three graphs, sorted by chronological order: 1 being the oldest, 3 the most recent. The last graph offers a comparison. The survey answers are the ones from the most recent survey. Page 19 FramiGest USER MANUAL V. Version 4 OTHER FEATURES a) Filtering the patients ‘list Now that the contact information is filled up for every patient, you can sort the patients ‘list as you want, to organize and facilitate the search of a patient, in a list that can contain several thousands of entries. All the possible actions are located in the blue section (fig. 16). The option « Patients of all the practitioners » will display the patients from every practitioner saved in the database. The combo-box « Pathologies » allows you to display the list of all the patients having the selected disease. Finally, the last combo-box offers the possibility to sort the list with the Name, First name, Date, Profession or Gender. Select the desired option, and write down the characters to filter with in the field below. For example, to only display female patients in the list, set up the filters like this: FIGURE 28 – FEMALE PATIENTS b) Start an application Side applications (cf.: fig. 16 – green area) can be started when a patient is selected in the list. Any side Framiral application started with FramiGest will centralize all the information for every patient (Multitest, VNG, VS, Rotational Chair, etc…). If a side application has been used for the selected patient, the number of sessions is displayed below the logo, and more information is available when the mouse hovers over the app’s button. Page 20 FramiGest USER MANUAL Version 4 c) Send a bug report To send a report, go to the «? » menu, then click on « Send a bug report ». This will open a new window. Select the severity and add a comment. Then click the “OK” button. FIGURE 29 – BUG REPORT Page 21 FramiGest USER MANUAL Version 4 d) The menu FramiGest has a menu bar at the top, like most software. In FramiGest, you can find three menus (File, Settings, and “?”): FIGURE 30 – MENU BAR In the “File” menu, you will find the « New patient » and « Delete » buttons. We have already discussed their action. The « Export » option opens the following window: FIGURE 31 - EXPORT This tool can be used to create a compressed folder (.export) containing the patients you choose to export (All, or the selection), in the selected folder. Page 22 FramiGest USER MANUAL Version 4 The reverse option is « Import » : FIGURE 32 – IMPORT Here, you have to select the .export file to import, and the practitioner who will have those patients. Then, you can the homonyms managing options (if you import patients with the same name as patients already in the database): - Erase the one in the database (use the imported one) - Merge existing and imported (imported data will be put in the existing patient’s file) - Copy the imported, with a new id (change the id of the imported patient to consider it as a new patient in the database) The « Force the release » button, allows you to force he use of a patient even if the patient is used by someone else on the network. This action can use concurrency problems. Use with caution. Finally, you can print the contact information of a patient. This will generate a .PDF file, when clicking on the “Print patient file” button. Page 23 FramiGest USER MANUAL Version 4 The « Settings » menu offers three buttons. The first one, « Switch Practitioner », will bring you back to the first FramiGest window, to log in as a new practitioner. The second one, « Prescriber List », will open the prescriber managing window. FIGURE 33 – PRESCRIBERS ‘LIST The features are the same as in the Prescription list window. The « Settings » menu allows you to manage the side application list: FIGURE 34 - SETTINGS Page 24 FramiGest USER MANUAL Version 4 You can delete an application, or add a new one by finding the right .EXE file of the application. Note: Only Framiral Application should be added. The last menu («? »), offers the possibility to manage the license key, updates and bug reports. Page 25 FramiGest USER MANUAL Version 4 Table of Illustrations Figure 1- Check for updates ................................................................................................................................ 3 Figure 2- Updates ready to install ..................................................................................................................... 3 Figure 3- change of version ................................................................................................................................. 4 Figure 4 – Desktop Icon ........................................................................................................................................ 5 Figure 5 – Connect to a database ...................................................................................................................... 5 Figure 6 - LocalDB .................................................................................................................................................. 6 Figure 7 - Client - server ....................................................................................................................................... 7 Figure 8 - Client ...................................................................................................................................................... 8 Figure 9 – « Account » menu ................................................................................................................................ 8 Figure 10 – Practitioner managing buttons ....................................................................................................... 8 Figure 11 – New account ...................................................................................................................................... 9 Figure 12 – New user created............................................................................................................................. 9 Figure 13 - Editer / supprimer le compte.......................................................................................................... 9 Figure 14 – Selected practitioner – ok ........................................................................................................... 10 Figure 15 – License key ..................................................................................................................................... 11 Figure 16 – Patients ‘management .................................................................................................................. 12 Figure 17 - New patient .................................................................................................................................... 13 Figure 18 - New patient selected in the list ................................................................................................... 13 Figure 19 - Editing fields ................................................................................................................................... 14 Figure 20 – Patient’s photo ............................................................................................................................... 15 Figure 21 – Pathologies management ............................................................................................................ 16 Figure 22 – Prescriptions management ........................................................................................................... 17 Figure 23 - New prescription ............................................................................................................................ 17 Figure 24 – Survey section icon ........................................................................................................................ 18 Figure 25 – Survey section ................................................................................................................................ 18 Figure 26 – Empty survey .................................................................................................................................. 19 Figure 27 - 3 graphs .......................................................................................................................................... 19 Figure 28 – Female patients ............................................................................................................................. 20 Figure 29 – Bug report ...................................................................................................................................... 21 Figure 30 – Menu bar ........................................................................................................................................ 22 Figure 31 - Export ............................................................................................................................................... 22 Figure 32 – Import .............................................................................................................................................. 23 Figure 33 – Prescribers ‘list ............................................................................................................................... 24 Figure 34 - Settings ............................................................................................................................................ 24 Page 26 FramiGest USER MANUAL Version 4 FRAMIRAL 107, Avenue Jean Maubert 06130 GRASSE – Le Plan FRANCE Tel: 0033.422.480.107 Fax: 0033.956.372.472 Email: [email protected] Page 27