1
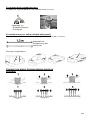
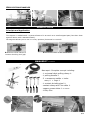
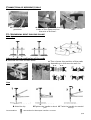
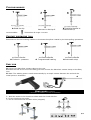
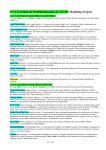
USER
MANUAL
GYSLINER GYSLINER 39.02 GYSLINER 39.04
GYSLINER PRO 230 GYSLINER PRO 400
GYSLINER COMBI 230 PRO
SUMMARY
ASSEMBLY .................................................................................................. 2
COMPOSITION ............................................................................................. 3
STRAIGTHENING LEVER AND BARS ................................................................. 3
Choose your bar or your lever ............................................................. 3
Choose the right straightening process .................................................. 4
Examples of application ...................................................................... 6
MAGNETIC EARTH ......................................................................................... 6
MANUSPOT .................................................................................................. 6
Connections of the different tools .......................................................... 6
Universal dent pulling clamp................................................................. 7
Pulling handles ................................................................................... 8
Contact shrinking tool.......................................................................... 8
Easy Gun ........................................................................................... 8
MINI PULLER ................................................................................................ 8
V7-190914
No contractual illustrations
ASSEMBLY
ASSEMBLAGE DE LA GYSLINE
M8 x 16
X51
M6 x 10
X21
M6 x 20
X22
16 M8x16
16 M8
M8 x 45
X4
M6
M8
X43
X55
12 M8x16
12 M8
16 M6x20
4 M6x10
4 M8x45
20 M6
4 M8
23 M8x16
26 M8
6 M6x10
6 M6
In option
11 M6x10
6 M6x20
18 M6
Stand n°2
In option
ref. 052284
2 cross-bars
ref. 98359
COMPOSITION
COMBI 230 PRO / 39.02 / 39.04 / PRO 230 / PRO 400
XXXXX
050747
050679
050686
050693
050716
050723
051171
050792
049758
049734
049741
049666
051515
052451
1
1
1
1
1
1
1
1
1
1
1
1
1
1
1
Generator
Workstation
Manuspot (with Easy gun)
Straightening lever
Straightening bar 80 cm
Pulling bar
Double pats kit
Re-inforcing Bar 1200 mm
3 traction rods
Hooks 4 claws
Hooks 6 claws
Hooks 8 claws
Steel magnetic mass
Box of steel consumables
Set of 2x 55mm extension joints
+ COMBI 230 PRO ONLY
052284
050921
050945
050051
050938
051683
1
1
1
1
1
1
Stand for dent puller
Mini puller
Alu hook 2
Inertia hammer for glue puller
Alu hook 1
Alu earth gun
STRAIGHTENING LEVER AND BAR
CHOOSE YOUR BAR OR YOUR LEVER
-
STRAIGHTENING POWER
Straightening lever
ref.050686
For areas when the sheets
are thin. Ex: door, fender…
REDRESSAGE
Straightening bar
ref.050693
To straighten or maintain a
sheet under stress after
using the pulling bar
+
Pulling bar
ref.050716
To straighten or maintain a
sheet under stress after using
the pulling bar
3/8
For angles and rounded corners
Change the original pads for the double ones (ref.050723)
Adaptable on:
- Straightening bar
- Pulling bar
For wide areas (ex. utility vehicle side panel)
Replace the original traction bar (0,8m) by the 1,2 m bar
(ref.050730)
Adaptable on:
Straightening bar
Pulling bar
Exemple of application:
CHOOSE THE RIGHT STRAIGHTENING PROCESS
Principles
4/8
Comparison
Rings or wavy wire?
Rings
Wavy wire
x50 ref.049727
Use
To straighten all the
bumps, middle to big
bumps
To straighten light and middle
bumps
Advantages
- Versatility
- Pulling strength
- Ideal for sills
- Fast set-up
- Ideal for rounded areas
(example : wheel arch ...)
Disadvantages
Long set-up
Standard space between
welded points
To be used with
Traction rod + hooks ( 4 –
6 - 8 claws)
Hooks (4 - 6 - 8 claws)
Possible tools
-
Lever
Straightening bar
Pulling bar
-
Lever
Straightening bar
Pulling bar
Straight or twisted rings?
Straight rings
X100 ref.050648
Use
To straighten a flat or
rounded surface
Twisted rings
X50 ref.050631
To pull in the plane of the edge
Set up:
Rings
To weld the rings, use the ring « accessory welder » of the Manuspot (page 6)
Advice
It is possible to weld the rings at a
slight angle and to manually
position them vertically
afterwards.
When the straightening is finished, twisting the rings will enable to easily remove them.
Wavy wire
To weld the wavy wire, use wavy wire « accessory welder » for Manuspot (page 6)
To unweld the wavy wire, use pliers to move the wire sideways until the weld breaks
off.
Note: the rings or wavy wires can be reused, and should only be replaced if worn out.
5/8
APPLICATION EXAMPLES
MAGNETIC EARTH
Principle and Application
This system « welded earth » system allows to fix an earth on a small stripped part (less than 2mm
against 20mm with a standard earth).
Its magnets allows you to use it in every position (horizontal or vertical)
Weld the earth thanks to
contact shrinking tool (p8)
Screw the earth to the metal sheet
MANUSPOT ref.050679
Manuspot: Complete concept including:
- 1 universal dent pulling clamp
- 1 pulling handle
- 2 « accessory welder » tools:
wavy
+ rings
- 1 contact shrinking tool
- contact clamp with 3m cable
- copper grease tube
ref.050440
- 1 Easy Gun
6/8
CONNECTION OF DIFERENT TOOLS
Connect the contact clamp as follows:
Connect to the
generator
Add copper grease on the
inside of the clamp and on
the axis of the tool.
Fit the clamp on the
tool
II- UNIVERSAL DENT PULLING CLAMP
Principle
Adjustment and positioning of the pads
Unscrew the nuts on both sides
Then choose the position of the pads
depending on the area to work on
Use
Weld the tip
Consumables:
Tighten the handle to dent
pull
Twist the handle to unweld
the tip
3 electrodes for Manuspot handles ref.050822
7/8
PULLING HANDLES
Pull back the
hammer to dent pull
Weld the tip
Consommable :
Twist the handle to
unweld the tip
5 électrodes de tirage ref.050839
CONTACT SHRINKING TOOL
Essential tool for the finishing enables to eliminate the spikes created by the dent pulling operations.
Contact + pressure
Programmed heating
Automatic stop
EASY GUN
Connect the Manuliner contact clamp to the unit.
Install the tool at the end of the Easy gun then connect the Manuliner contact clamp to the Easy
Gun.
Weld: The welding point is made automatically by a simple contact between the tool and the
metal piece to straighten.
M
INI PULLER ref 051003
(+alu hook 1 ref 050938 + alu hook 2 ref 050945)
1- Weld the studs to the aluminium sheet with the Combi 230 Pro.
2- Fix the hooks on the studs.
3- Pull on the hooks with the Mini Puller (diagram)
8/8