1
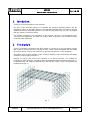
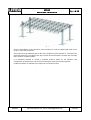
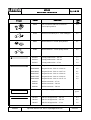
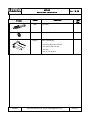
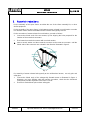
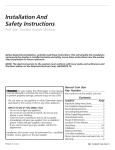
LIBERA
USER’S MANUAL
© 2002 Litec s.r.l. – Italy
All rights reserved. No parts of this manual can be reproduced, without
permission of Litec s.r.l.
Cod. LLTCMT15IT1 – Version 2
LIBERA
MANUALE D’USO E DI MONTAGGIO
Pag. 2 di 23
INDICE
1.
2.
3.
4.
5.
6.
7.
8.
9.
10.
11.
12.
13.
14.
Introduction. ............................................................................................. 3
The structure. ............................................................................................ 3
Component elements................................................................................. 5
Site safety conditions.................................................................................. 8
Assembly instructions.................................................................................. 9
Libera assemblying like composite truss...................................................... 11
Corners. ................................................................................................. 13
Handling and maintance.......................................................................... 17
Perimeter closures.................................................................................... 18
Assembly of the covering fabric.............................................................. 19
Hoisting up the structure. ...................................................................... 22
Dismantling of the structure................................................................... 23
Useful advice....................................................................................... 23
Contacts. ............................................................................................ 23
This user manual refers to the product “Libera” manufactured by the company Litec s.r.l. of
Marcon (Venice - Italy).
Litec products are identified by the presence of a self-sticking label on all manufactured parts, as
illustrated above.
Emissione
10/06/2003
LITEC s.r.l. – Via Venier, 52 – 30020 Marcon (VE)
http://www.litectruss.com - mail to: [email protected]
LLTCMT15IT1
Versione 2
LIBERA
MANUALE D’USO E DI MONTAGGIO
Pag. 3 di 23
1. Introduction.
Thank you for having selected a Litec structure.
The aim of this assembly manual is to describe the principal assembly phases, and the
operational set-up of the entire structure. The supporting designs which accompany the text,
illustrate the various installation phases. In the case that any sections are not clear, we suggest
that you contact our Technical Office.
The hoisting equipment is not considered in this manual, since it is not furnished by Litec.
Concerning this equipment, we attest and certify to what is reported in the instructions which
accompany that equipment
2. The structure.
Libera is a structure composed of flat FL76 trusses. It is based on a truly innovative concept,
with a special modular truss for the sliding of fabric, which combined together with the trusses
of the same group, allow for the creation of a “space frame structure” of any dimension.
The special screw couplers and the “gates”, allow for doubling of the load bearing truss where
particular carrying loads require this.
Planned for various uses and for the hanging on of various elements, it is suitable for
positioning to fixed structures. Hoisted up with a multidirectional type framework system (fig. 1),
it combines with and integrates perfectly well with the Litec MT52, MT40 and Varitower 40
hoisting towers (fig. 2).
Fig. 1
Emissione
10/06/2003
LITEC s.r.l. – Via Venier, 52 – 30020 Marcon (VE)
http://www.litectruss.com - mail to: [email protected]
LLTCMT15IT1
Versione 2
LIBERA
MANUALE D’USO E DI MONTAGGIO
Pag. 4 di 23
Fig. 2
Libera is assembled in a very short time. It was conceived, in order to support high loads and to
occupy a very reduced volume.
The maximum single extension span of the front, allowed for by this structure is 24 meters. The
applicable loads vary according to the way in which the structure itself is formed and according
to the number of hoisting towers.
It is absolutely essential to consult a qualified technical expert for the definition and
configuration of the structure, and for the arrangement of loads and anchoring points.
Further information is available upon request at our Technical Office.
Emissione
10/06/2003
LITEC s.r.l. – Via Venier, 52 – 30020 Marcon (VE)
http://www.litectruss.com - mail to: [email protected]
LLTCMT15IT1
Versione 2
LIBERA
MANUALE D’USO E DI MONTAGGIO
Pag. 5 di 23
3. Component elements.
Disegno
Codice
Peso
[Kg]
FL76300V
Ladder truss 76 cm x 300 cm
24,6
FL76200V
Ladder truss 76 cm x 200 cm
17,4
FL76100V
Ladder truss 76 cm x 100 cm
-
FL76047V
Ladder truss 76 cm x 47 cm
9,4
FL76300R
Ladder truss 76 cm x 300 cm with canopy rail
25,7
FL76200R
Ladder truss 76 cm x 200 cm with canopy rail
18,8
FL76100R
Ladder truss 76 cm x 100 cm with canopy rail
-
FL76047R
Reticular truss 76 cm x 47 cm with canopy rail
10,8
FL76111RH
Front / rear curved section with canopy rail
8,9
Fork connectors with M20 screw nuts + conical
spring washer
0,7
KHLF
Emissione
10/06/2003
Descrizione
LITEC s.r.l. – Via Venier, 52 – 30020 Marcon (VE)
http://www.litectruss.com - mail to: [email protected]
LLTCMT15IT1
Versione 2
LIBERA
MANUALE D’USO E DI MONTAGGIO
Disegno
Codice
Descrizione
Peso
[Kg]
KHLM
Fork connectors with M20 screw bolt +
conical spring washer
0,9
KHLP
Ø20 mm Cilindrical pin + 3 mm safety pin
0,2
KHLD
M20 screw nut + conical spring washer
0,1
KHLB
M20 screw bolt + conical spring washer
0,2
RAF300
Canopy tension tube - 300 cm
7,7
RAF200
Canopy tension tube - 200 cm
5,4
RAF047
Canopy tension tube - 47 cm
1,9
RAH414M1
Diagonal brace - 300 cm x 300 cm
5,6
RAH348M6
Diagonal brace - 300 cm x 200 cm
4,8
RAH289M3
Diagonal brace - 300 cm x 047 cm
4,1
RAH352M7
Diagonal brace - 200 cm x 300 cm
4,9
RAH272M5
Diagonal brace - 200 cm x 200 cm
3,9
RAH191M4
Diagonal brace - 200 cm x 0.47 cm
3,0
RAH047
Reinforce transom - 47 cm
-
RAH200
Reinforce transom - 200 cm
-
RAH300
Reinforce transom - 300 cm
-
HSC
Emissione
10/06/2003
Pag. 6 di 23
Covering canopy (provided in strips)
650
g/m2
RAL300
Tube for canopy tension – 300 cm
6,3
RAL200
Tube for canopy tension – 200 cm
4,2
RAL047
Tube for canopy tension – 47 cm
1,0
LITEC s.r.l. – Via Venier, 52 – 30020 Marcon (VE)
http://www.litectruss.com - mail to: [email protected]
LLTCMT15IT1
Versione 2
LIBERA
MANUALE D’USO E DI MONTAGGIO
Disegno
Codice
Descrizione
HRAT
Belt racthet
KHLG
M20 eye-bolt
TZHL01
Libera assembly Kit:
Pag. 7 di 23
Peso
[Kg]
-
0,4
-
- one plastic Ø40 mm hammer
- one wrench with fork end
- one lever
- one 30 mm spanner
Emissione
10/06/2003
LITEC s.r.l. – Via Venier, 52 – 30020 Marcon (VE)
http://www.litectruss.com - mail to: [email protected]
LLTCMT15IT1
Versione 2
LIBERA
MANUALE D’USO E DI MONTAGGIO
Pag. 8 di 23
4. Site safety conditions.
We recommend to respect the following safety conditions during assembly and dismantling of
the structure:
!
Skilled specialised workers, certified as having the necessary physical qualifications for the
activity must be employed.
!
Suitable and appropriate Individual safety elements must be employed: safety belts, helmets,
gloves, safety boots, etc., as specified in the safety plan.
!
For each team, the responsibilities and the tasks concerning the management and
conduction of the work must be well defined.
!
Climbing up on the structure by personnel without the appropriate and suitable equipment
must be strictly forbidden.
!
Non-authorised personnel must be strictly forbidden from entering the assembly/dismantling
site area, by using a suitable enclosure fence, together with obligatory identification signs.
!
Signs which indicate the risks and the precautions to be followed must be in place.
!
Circulation practicality must be assured for personnel and for traffic vehicles during
execution of the work.
!
All construction elements must be checked before use, and if necessary all non-suitable
items must be eliminated.
!
It is absolutely necessary to periodically check the anchoring points, the tightness and
closure of the screw nuts, the state of the joint connections, and all the structural elements,
especially after heavy adverse weather conditions.
!
No modification whatsoever must be made to the originally designed structure without the
authorisation of the designer.
!
It is necessary to assure that the executive designs, the necessary permission documents, and
the safety plans to be referred to in every eventuality not specifically cited, are present at the
work site.
Emissione
10/06/2003
LITEC s.r.l. – Via Venier, 52 – 30020 Marcon (VE)
http://www.litectruss.com - mail to: [email protected]
LLTCMT15IT1
Versione 2
LIBERA
MANUALE D’USO E DI MONTAGGIO
Pag. 9 di 23
5. Assembly instructions.
For the assembly of the space frame we advise the use of the Libera assembly kit, or other
similar equipment.
For the assembly of the space frame, joints between trusses oriented in one direction are made
in a different manner than those between trusses oriented orthogonally to them.
For the connection of trusses oriented in one direction, proceed as follows:
1.
Connect the forked ends of the two trusses, by first aligning the holes prepared for the
insertion of the screw bolt connectors.
2.
Then insert the screw bolt connector with an elastic washer.
3.
Insert a second washer and then screw the connector to the screw nut connector until the
forked ends of the connectors are oriented in the direction illustrated in figure 3.
Screw nut
connector
Screw bolt
connector
Washer
Fig. 3
For assembly of trusses oriented orthogonally to the unidirectional trusses, use only pins and
safety pins:
1. Connect the forked ends of the orthogonally directed trusses as illustrated in figure 4.
Whenever you have difficulty with this insertion procedure, check that the directional
arrangement and the alignment of the forks is correct.
2. The truss is fixed with two pins and two safety pins.
Emissione
10/06/2003
LITEC s.r.l. – Via Venier, 52 – 30020 Marcon (VE)
http://www.litectruss.com - mail to: [email protected]
LLTCMT15IT1
Versione 2
LIBERA
MANUALE D’USO E DI MONTAGGIO
Pag. 10 di 23
Pin
Safety pin
Fig. 4
At the suggestion of the designer, diagonal elements are positioned on certain frames in order
to maintain the trusses in a squared alignment.
For the assembly of these elements proceed as follows:
1.
Open both self-locking hook clamps on the diagonal element, by pressing down on the
handle.
2.
Position the diagonal element as illustrated in figure 5.
DIAGONAL BRACE
Fig. 5
3.
Put pressure on the back of both of the clamping hooks until you hear a closing click.
Emissione
10/06/2003
LITEC s.r.l. – Via Venier, 52 – 30020 Marcon (VE)
http://www.litectruss.com - mail to: [email protected]
LLTCMT15IT1
Versione 2
LIBERA
Pag. 11 di 23
MANUALE D’USO E DI MONTAGGIO
6. Libera assemblying like composite truss.
Libera system’s elements allow you to assembly a composite truss with rectangular section 76
cm x 52 cm.
To build up the truss, it suggests to operate as follow:
1. place a 47 cm gate (figure 15).
2. assembly the two forks female and one male as presented on picture 16.
Fig. 15
Fig.16
3. connect two Libera flat units, according to the draw (fig. 17).
Fig. 17
Emissione
10/06/2003
LITEC s.r.l. – Via Venier, 52 – 30020 Marcon (VE)
http://www.litectruss.com - mail to: [email protected]
LLTCMT15IT1
Versione 2
LIBERA
Pag. 12 di 23
MANUALE D’USO E DI MONTAGGIO
4. Complete the Libera module using a 47 cm gate (fig. 17).
5. fix the forks by cilindrical pins and safety pins and put a diagonal brace with click hands
(RAH191M4) as shown on figure 18.
Fig. 18
List of elements for a single module:
300x47
200x47
100x47
47x47
FL76300
2
0
0
0
FL76200
0
2
0
0
FL76100
0
0
2
0
FL76047
2
2
2
4
KHLM
4
4
4
4
KHLF
8
8
8
8
KHLP
8
8
8
8
RAH
RAH289M3
RAH191M4
0
0
Emissione
10/06/2003
LITEC s.r.l. – Via Venier, 52 – 30020 Marcon (VE)
http://www.litectruss.com - mail to: [email protected]
LLTCMT15IT1
Versione 2
LIBERA
MANUALE D’USO E DI MONTAGGIO
Pag. 13 di 23
7. Corners.
In the following pictures, you can find some examples of corners and connection with a QL52 leg
for structures assembled with Libera composite truss.
Two ways corner (vertical forks).
It considers as structure’s base module the one made by two 47 cm gates (FL76047V) and two
Libera flat modules with the right length, connected like already described;
•
connecting the terminal forks, disposed inside the corner, to the vertical forks of the
second module gate;
•
connecting, in the same way, the opposite gate using pins and safety pins;
•
closing the quadrilater by gate, interposing in each vertex a couple of forks (male and
female);
•
close the free end by nuts or screws.
Emissione
10/06/2003
LITEC s.r.l. – Via Venier, 52 – 30020 Marcon (VE)
http://www.litectruss.com - mail to: [email protected]
LLTCMT15IT1
Versione 2
LIBERA
MANUALE D’USO E DI MONTAGGIO
Pag. 14 di 23
Two ways corner for QL52 (plans forks).
Like the two ways corner with vertical forks, it refers to the base module already described. The
available forks for the connection are oriented in order to the vertical passing hole axis.
•
Take two gates with plan forks (FL76047P). to close the quadrilater;
•
joining two plates, up and bottom the gates;
•
fixing everything by bolts, screws and eye-bolts.
Three ways corner (vertical forks).
This corner is very similar to the two ways corner with vertical forks solution:
•
Emissione
10/06/2003
joining the two base modules by the forks on the inside corner
LITEC s.r.l. – Via Venier, 52 – 30020 Marcon (VE)
http://www.litectruss.com - mail to: [email protected]
LLTCMT15IT1
Versione 2
LIBERA
MANUALE D’USO E DI MONTAGGIO
Pag. 15 di 23
•
assembly, in the same way, the forks of a third module.
•
complete the quadrilater with a gate (FL76047V) located as already described before.
Four ways corner for QL52 (plan forks).
The procedure follows closely the three ways corner with vertical forks solution, but before
closing by nuts or bolts all the vertex’, fix QL52 truss fixed to the quadrilater base using three
forks (two males and one female or two female and one male in order to connections
previously realized). This system’s purpose is locating the forks to lodge the tower.
Three ways flat corner.
Emissione
10/06/2003
LITEC s.r.l. – Via Venier, 52 – 30020 Marcon (VE)
http://www.litectruss.com - mail to: [email protected]
LLTCMT15IT1
Versione 2
LIBERA
MANUALE D’USO E DI MONTAGGIO
•
•
Pag. 16 di 23
Connect longitudinally base module with two FL076, simply assembling the forks;
interpose two female and a male forks for each ends among the gate’s female forks
and the cross truss.
To stiffen the struscture, and the corner particularly, it suggests inserting a RAH047 among the
gates.
Sizes
In the following pictures there are two examples about the main sizes of the most common
Libera components.
Emissione
10/06/2003
LITEC s.r.l. – Via Venier, 52 – 30020 Marcon (VE)
http://www.litectruss.com - mail to: [email protected]
LLTCMT15IT1
Versione 2
LIBERA
MANUALE D’USO E DI MONTAGGIO
Pag. 17 di 23
8. Handling and maintance.
Recommendations for handling of the trusses:
•
Do not pile up more than twenty trusses one upon the other.
•
Handle the trusses with the fabric sliding track with special care, taking care not throw
them brusquely to the ground, nor to use a hammer directly on their upper edge during
assembly.
•
Do not directly strike either the forked ends of the trusses, or the screw bolt, or the screw
nut connectors with a metal hammer.
•
Always use the recommended equipment, which can be supplied upon request.
Recommendations for the maintenance of the trusses and the fabric sheets:
•
Periodically check the state of wear and tear of the equipment, both in conditions of
storage, as well as under conditions of use.
Emissione
10/06/2003
LITEC s.r.l. – Via Venier, 52 – 30020 Marcon (VE)
http://www.litectruss.com - mail to: [email protected]
LLTCMT15IT1
Versione 2
LIBERA
MANUALE D’USO E DI MONTAGGIO
Pag. 18 di 23
•
Periodically check the tightness of the closure of the bolts, which connect the trusses with
the fork connectors.
•
Periodically check the state of the fabric sliding track.
•
Keep the fabric sheets clean, and rolled up in order to avoid folds.
9. Perimeter closures.
The trusses on the two lateral sides of the structure are sufficiently locked closed by means of a
screw bolt together with its relative safety ring, as illustrated in figure 6.
Nut
Conical spring washer
Fig. 6
The front and back part of the space frame can be completed by:
a.
Simple closure of the structure obtained by placing a screw nut connector on the forked
ends of the trusses, as shown in figure 7.
Screw nut connectors
Fig. 7
Emissione
10/06/2003
LITEC s.r.l. – Via Venier, 52 – 30020 Marcon (VE)
http://www.litectruss.com - mail to: [email protected]
LLTCMT15IT1
Versione 2
LIBERA
MANUALE D’USO E DI MONTAGGIO
b.
Pag. 19 di 23
Using the special curved FL76111RH trusses, suitable for the guiding of the covering fabric
in a downward direction. These are connected to the structure in the same way as the
other trusses are connected. They must be prepared to accept the fabric tube by inserting
a pair of screw bolt and screw nut connectors into the correct hole (see fig. 8).
Fig. 8
10. Assembly of the covering fabric.
The Libera structure can be used as a covering system by using polyester fabric sheets
impregnated with PVC, produced in rectangular strips of suitable dimensions, with lengthwise
edges which allow for the sliding of the sheets within the guide tracks provided on the upper
part of the FL76R trusses.
1.
For insertion and fixing of the fabric sheets, proceed as follows:
2.
Place the fabric sheet at the front part of the assembled structure.
3.
Insert an aluminium tube, having a length corresponding to the width of the fabric sheet,
into the back pocket compartment of the fabric sheet (fig. 9).
Emissione
10/06/2003
LITEC s.r.l. – Via Venier, 52 – 30020 Marcon (VE)
http://www.litectruss.com - mail to: [email protected]
LLTCMT15IT1
Versione 2
LIBERA
MANUALE D’USO E DI MONTAGGIO
F ro
Re
a
Co
nt
c
ov
er
zo
Pag. 20 di 23
ne
rp
oc
ke
t
Al u
mi
niu
m
tub
e
ve
r
Fig. 9
4.
Insert the edges of the fabric sheet into the special guide tracks provided on the FL76R
trusses, and slide it along the track by gently pulling until it reaches the back part of the
covering structure (fig. 10).
Re
a
Insert the cover borders
into the provided rails
on the trusses
Co
v
Fro
nt
c
zon ove
r
e
rP
oc
ke
t
er
Insert the cover borders
into the provided rails
on the trusses
Fig. 10
5.
Insert the stretcher element into the front pocket compartment of the fabric sheet (fig. 11)
and connect it with two pins and two safety pins to the forked connectors provided for on
the front FL76111RH elements.
Emissione
10/06/2003
LITEC s.r.l. – Via Venier, 52 – 30020 Marcon (VE)
http://www.litectruss.com - mail to: [email protected]
LLTCMT15IT1
Versione 2
LIBERA
MANUALE D’USO E DI MONTAGGIO
Front pocket
carving ~100mm
Fr o
nt
co
ve
Safety pin
rz
Pag. 21 di 23
on
e
Pin
A
Stretching cover element
accepted into the pocket
Front pocket
carving ~100mm
A
Fig. 11
6.
Hook the other fabric stretcher element to the curved trusses at the back of the covering
structure by using two pins and two safety pins.
7.
If the fabric sheet is being used for the first time, it will be necessary to make notches on
the front and back pockets, in order to allow it to be fixed to the structure, and to allow for
positioning of the ratcheted belts, as illustrated in figures 11 and 12.
8.
Connect the tube within the fabric sheet back pocket, to the fabric stretcher tube found at
the back of the covering structure, by using two ratcheted belts (fig. 12) and then put the
fabric sheet under tension by tightening the belts.
Rear pocket
carving ~40mm
500
mm
Re
ar
c
ov
er
zo
n
Ratcheted belt
Safety pin
50
0
e
mm
Stretching cover tube
Pin
Ratcheted belt
A
Aluminium tube
into the pocket
Rear pocket
carving ~40mm
A
Fig. 12
Emissione
10/06/2003
LITEC s.r.l. – Via Venier, 52 – 30020 Marcon (VE)
http://www.litectruss.com - mail to: [email protected]
LLTCMT15IT1
Versione 2
LIBERA
Pag. 22 di 23
MANUALE D’USO E DI MONTAGGIO
11. Hoisting up the structure.
The structure can be hoisted up with the MT52, MT40 truss towers or with the Varitower 40,
preparing the fork connectors as indicated in the instruction manual concerning the towers and
the accessories.
In addition, the structure easily lends itself to being integrated into a multidirectional framing
system; in this case fastening and harnessing for hoisting can be carried out with the help of
eye-bolts screwed in place, in substitution for the side bolts (see fig. 13), or by direct hoist
harnessing on the truss itself.
And finally, the Libera structure can be hung from any point of the framework structure, by
simply substituting a pin, with a double eye-bolt, as illustrated in figure 14.
Fig. 13
Emissione
10/06/2003
Fig. 14
LITEC s.r.l. – Via Venier, 52 – 30020 Marcon (VE)
http://www.litectruss.com - mail to: [email protected]
LLTCMT15IT1
Versione 2
LIBERA
MANUALE D’USO E DI MONTAGGIO
Pag. 23 di 23
12. Dismantling of the structure.
Dismantling of the structure can be carried out by repeating in a reverse manner, the
operations which are described in the paragraphs concerning the assembly process.
The structure must be progressively dismantled in such a way so as to preserve its stability
during the execution of the work.
13. Useful advice.
•
It is possible to achieve a slightly convex conformation of the structure, by not using the
elastic washers on the lower connections of the trusses, so as to be able to more firmly
tighten the screw bolt and screw nut connectors, thus creating an angulation at the
attachment between the trusses.
•
In order to achieve a perfect alignment of the holes of the fork connectors, it is
advantageous to use the pointed punch tool which is provided in the Libera assembly kit.
•
If the insertion of the screw bolt fork connector into the hole between the ends of the truss
is difficult, proceed as follows. After you have checked on correct alignment, delicately hit
the connector with a rubber hammer until it is completely inserted, (or use a normal
hammer, placing a piece a wood between the hammer and the connectors), taking care to
not scratch the zinc galvanised coating.
14. Contacts.
Please contact our Technical Office for any need you may have.
Reference:
Tel. 041 596 00 00
Fax 041 595 10 82
mail to: [email protected]
Emissione
10/06/2003
LITEC s.r.l. – Via Venier, 52 – 30020 Marcon (VE)
http://www.litectruss.com - mail to: [email protected]
LLTCMT15IT1
Versione 2