1
boso_Profil_Man_3_(GB)_1002
03.02.2010
10:12 Uhr
Seite 1
INSTRUCTION MANUAL FOR USE AND INSTALLATION
The powerful software for the PC-supported
blood pressure control and observation of therapy.
Compatible with the following blood pressure meters:
boso-TM-2430 PC (2)
boso-TM-2420
boso-medilife PC (2, 3)
boso-medicus PC (2)
At the forefront of progress.
BOSCH + SOHN
GERMANY
boso_Profil_Man_3_(GB)_1002
03.02.2010
10:12 Uhr
Seite 2
boso_Profil_Man_3_(GB)_1002
03.02.2010
10:12 Uhr
Seite 3
The present edition of the installation- and users instructions for
the boso profile-manager 3 are valid as of version 3.4.0. For any
new information, please refer to file readme.txt on the installationCD.
The drive assembly letters in this instruction manual are exemplary
selected:
C:\ for the local non removable disc
D:\ for the CD drive assembly
The path data correspond to a standard installation under German
Windows XP operating system and may deviate under other operating systems or language versions.
Microsoft and Microsoft Windows are registered trade marks of
the Microsoft Corporation.
-3-
boso_Profil_Man_3_(GB)_1002
03.02.2010
10:12 Uhr
Seite 4
<Contents>
Scope of supply boso profile-manager 3..........................................7
System Requirements ........................................................................7
Before Installation...............................................................................8
● Data security................................................................8
● Working with the program .........................................8
Instructions for installation of boso profile-manager 3 ...................9
1. Installation of boso profile-manager 3 .....................9
2. Installation of a firebird-server .................................9
3. Convert data from profile-manager2......................13
Installation in a network ...................................................................17
Instruction to installation of USB-connecting cable......................18
Instructions for usage the boso profile-manager 3.........................22
● General instructions..................................................22
● Re-organisation of data ............................................23
♦ Patient............................................................................................24
● Select patient .............................................................24
● New.............................................................................24
● Edit .............................................................................25
● Delete..........................................................................25
● Print ............................................................................25
● Export .........................................................................25
● Import .........................................................................25
● Printout .......................................................................25
♦ Initialize TM 2430.........................................................................27
♦ Programming TM 2430.................................................................30
1. Standard cycles/intervals...........................................30
2. Sleeping button..........................................................30
3. Programmable cycles/intervals .................................31
● „Show measurements“ ...............................................31
● „Device number“........................................................31
● „Assign PC time“ .......................................................31
♦ Programming TM 2420.................................................................31
1. Standard cycles/intervals...........................................32
-4-
boso_Profil_Man_3_(GB)_1002
03.02.2010
10:12 Uhr
Seite 5
2. Programmable cycls/intervals ...................................32
● „Show measurements“ ...............................................32
● „Signal before measurement“ ....................................32
● „Device number“........................................................32
● „Assign PC time“ .......................................................32
♦ Setup
Profile.........................................................................33
Interface .....................................................................33
● Printout.......................................................................34
● Import/Export ............................................................35
● Physician ....................................................................36
● Limits..........................................................................36
●
●
♦ Edit
Exclude measurements .............................................37
Manual measurement values....................................38
● Transmit measurement values .................................38
● Transfer Measurements ............................................39
● Manual Export...........................................................40
● Profile SYS/DIA ........................................................40
● Profile MAP ...............................................................42
● Profile PP....................................................................43
● Statistics......................................................................45
● Morning blood pressure surge (MBPS)....................46
●
●
♦ Instructions for use (short version) ............................................47
♦ Warranty........................................................................................48
Appendix A
♦ What to do when there is a failure/problems .............................49
-5-
boso_Profil_Man_3_(GB)_1002
03.02.2010
10:12 Uhr
-6-
Seite 6
boso_Profil_Man_3_(GB)_1002
03.02.2010
10:13 Uhr
Seite 7
profile-manager 3, Scope of supply
1 Installation CD
1 Instruction manual
FOR USE AND INSTALLATION
INSTRUCTION MANUAL
for the PC-supported
The powerful software
therapy.
and observation of
blood pressure control
blood pressure
Compatible with the following
boso-TM-2430 PC (2)
boso-TM-2420
boso-medilife PC (2, 3)
boso-medicus PC (2)
meters:
progress.
At the forefront of
BOSCH + SOHN
GERMANY
System Requirements
Hardware:
- Pentium II or higher
- 8 MB RAM
- VGA Card
- 100 MB free Hard Disk Storage
- Series Interface (COM 1 - COM 4) or
- USB Interface
Software:
- Microsoft Windows XP
- Microsoft Windows Vista
- Microsoft Windows 7
-7-
boso_Profil_Man_3_(GB)_1002
03.02.2010
10:13 Uhr
Seite 8
Before Installation...
By choosing the profile-manager 3 you have decided on a software
which gives you optimum results with minimum input time. This
program has been devised to give an immediate overview of all
functions. There are no complicated menus. The setup of the profile-manager is designed as if it was a filing system with individual
files. For this reason the individual index / folders or program parts
are also called „files“ in the users instructions.
Data Security
To avoid loss of data it is strongly recommended to regularly backup the files ‘boso_tm+pm.gdb’ and ‘profman.ini’ out of folder
\Dokumente und Einstellungen \All Users\Anwendungsdaten\Boso\
Profman.
Working with the program
The program can be operated with the mouse and the full keyboard. The individual functions within the program are selected via
the keyboard by pressing the [Alt] key together with the relevant
underlined letter.
Requirements on the personal computer
Any computer used in the data evaluation must comply with the
European Standard 60601-1.
-8-
boso_Profil_Man_3_(GB)_1002
03.02.2010
10:13 Uhr
Seite 9
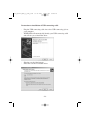
1. Installation of boso profile-manager 3
To install the boso profile-manager 3 please start file
D:\install.exe
manually or automatically after you have inserted the CD-ROM as
the installation-CD has an automatic start function.
Right after the start the appropriate language can be chosen from
following selection: German, English (A4), English (US-letter),
French, Spanish, Danish, Polish.
The installation-process runs automatically after the installation
path has been entered.
Before starting the boso profile-manager 3 the firebird server has
to be installed as described as follows in 2.
2. Installation of a firebird-server
Prior to the start of the boso profile-manager 3 the firebird-server
has to be installed.
IMPORTANT NOTICE:
Please check, whether a firebird-server has already been installed
on the computer.
-9-
boso_Profil_Man_3_(GB)_1002
03.02.2010
10:13 Uhr
Seite 10
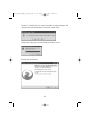
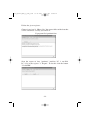
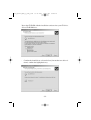
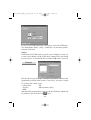
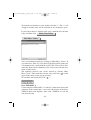
If there is a firebird-server already installed on your computer, the
question for installation must be answered with "NO":
Choose the language for installation of firebird-server:
Follow the installation
-10-
boso_Profil_Man_3_(GB)_1002
03.02.2010
10:13 Uhr
Seite 11
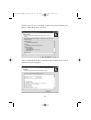
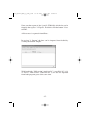
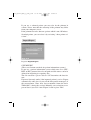
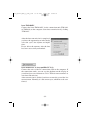
Please stay with all suggested components of the default setting.
Also the selection of additional tasks should not be changed (Except using Microsoft Vista: Deactivate the Click-box "Install
control panel applet?". Otherwise the control panel of Microsoft Vista will be blocked!)
-11-
boso_Profil_Man_3_(GB)_1002
03.02.2010
10:13 Uhr
Seite 12
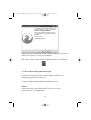
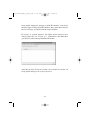
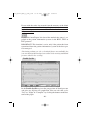
Finally you will see a catalogue of the selected installation parameters, which have to be installed.
After confirmation of these parameters the firebird-server will be
installed on your computer.
-12-
boso_Profil_Man_3_(GB)_1002
03.02.2010
10:13 Uhr
Seite 13
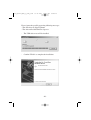
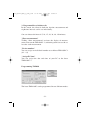
After successful installation of boso profile-manager3 and the firebird-server please re-start your computer.
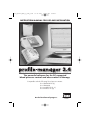
The software now can be started clicking onto the icon "Profman3"
ProfMan3
3. Convert data from profile-manager2
To convert existing data from a former dBase-database, the
following program has to be used:
C:\program files\profman3\konverter\konverter.exe
Notice:
Under operating system Microsoft Vista please execute
"konverter.exe" as administrator.
-13-
boso_Profil_Man_3_(GB)_1002
03.02.2010
10:13 Uhr
Seite 14
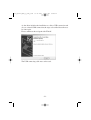
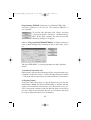
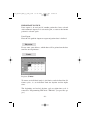
Follow the given registers:
Choose in register "1. dBase-files" the source folder of the data that
will be converted. Usually you find it in:
C:\program files\profman\data
Start the export of data "profman" (medicus PC 2, medilife
PC 2(3)) in the register "2. Export". To do this click the button
"CreatorPM"
-14-
boso_Profil_Man_3_(GB)_1002
03.02.2010
10:13 Uhr
Seite 15
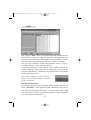
Now start the export of data "pm24" (TM2430) which also can be
found in the register "2. Export". To do this click the button "CreatorTM".
All data now is exported from dBase.
In register "3. Import" the data can be imported into firebird by
clicking the button "Import"
With both ticks "PM-version" (medicus PC 2, medilife PC 2(3))
as well as "TM-version" (TM-2430 PC 2) all data are imported
from both program-parts at the same time.
-15-
boso_Profil_Man_3_(GB)_1002
03.02.2010
10:13 Uhr
Seite 16
boso profile-manager3 manages patient-ID-numbers with maximum 10 digits. If the patient-ID-numbers have more than 10 digits
the last 10 digits are taken from the longer number.
In register "4. refresh database" the folder for the data has to be
chosen from the list. Usually it is: \Dokumente und Einstellungen\All Users\Anwendungsdaten\Boso\Profman
After this up-date all data of version 2 are available in version 3 of
boso profile-manager are ready to be used.
-16-
boso_Profil_Man_3_(GB)_1002
03.02.2010
10:13 Uhr
Seite 17
Installation in a network
•
•
•
Install the boso profile-manager3 and the Firebird Server on
each workstation and on the server computer.
After successful installation on the server computer the file
paths have to be adapted on each workstation computer
To adapt the paths the entry "DataBase=" in file C:\Dokumente
und
Einstellungen\All
Users\Anwendungsdaten\Boso\Profman\profman.ini has to be changed as follows:
standard entry: DataBase=localhost:C:\Dokumente und
Einstellungen\All Users\Anwendungsdaten\Boso\
Profman\BOSO_TM+PM.GDB
network entry: DataBase=IP_SERVER:C:\Dokumente
und Einstellungen\All Users\Anwendungsdaten\Boso\
Profman\BOSO_TM+PM.GDB
"IP_SERVER" stands for the IP-adress of your network-server.
Example for a network-entry:
DataBase=192.168.0.1:C:\Dokumente und Einstellungen\
All Users\Anwendungsdaten\Boso\Profman\
BOSO_TM+PM.GDB
-17-
boso_Profil_Man_3_(GB)_1002
03.02.2010
10:13 Uhr
Seite 18
Instruction to installation of USB-connecting cable
- Plug the USB-connecting cable into a free USB-connecting-jack at
your computer
- WINDOWS will automatically identify your USB-connecting cable
and will ask you to install the driver
- Skip the search of the internet
- Select the search of a suitable driver
-18-
boso_Profil_Man_3_(GB)_1002
03.02.2010
10:13 Uhr
Seite 19
Insert the CD-ROM with the installation software into your CD-drive.
Select CD-ROM drive.
- Confirm the found driver as shown below (if more than one driver is
found, confirm the highlighted one):
-19-
boso_Profil_Man_3_(GB)_1002
03.02.2010
10:13 Uhr
Seite 20
Please ignore the possibly appearing following messages:
- The driver has no digital signature
- The driver failed the Windows logo test
- The USB-driver now will be installed.
- Confirm "Finish" to complete the installation:
-20-
boso_Profil_Man_3_(GB)_1002
03.02.2010
10:13 Uhr
Seite 21
As the driver includes the installation as a direct USB-connection and
also as a virtual COM-connection, the steps as described above have to
be done again.
Please confirm at the end again with "Finish".
The USB-connecting cable now can be used.
-21-
boso_Profil_Man_3_(GB)_1002
03.02.2010
10:13 Uhr
Seite 22
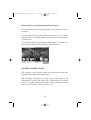
Instructions for usage the boso profile-manager 3
Select the relevant part of the program for your blood pressure instrument.
To start processing of data from boso-medicus PC 2 or bosomedilife PC 2(3), click the window on the left to start the program
"profman.exe"
To start processing of data from boso-TM2430PC 2, click the window on the right to start the program "profman24.exe"
GENERAL INSTRUCTIONS
The software can be operated either using the mouse or the computer keyboard (ALT+underlined letter).
The following instructions are done using screen shots of the
TM2430PC2-version. The medicus PC 2/ medilifePC 2(3)-version
may have slightly differing functions. Please mind the relevant
notes (set off with "Deviation profman.exe").
-22-
boso_Profil_Man_3_(GB)_1002
03.02.2010
10:13 Uhr
Seite 23
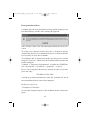
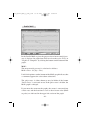
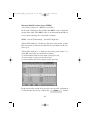
Re-organisation of data
6 months after the first installation of boso profile-manager3 you
find the following window after starting the program:
(This window won't occur after the Repair-routine has been executed)
To avoid severe damages of data base files, a frequent re-organisation of the data base is recommended. Please re-organise the data
base regularly at least after 6 months.
To commence the re-organisation of the data base please start the
program "repair.exe", which you can find in the folder of your boso
profile-manager3
(standard "C:\program files\profman3" or under the START-menue "all programs --> profman3 --> programs --> repair".
In case you re-organise the data base directly on your server computer, the entry
"CleanDate=27.04.2005"
will not be up-dated automatically in the file "profman.ini" out of
the installation folder of your client computer.
In this case, please set
"CleanDate=27.04.2099"
to avoid the frequent display of this reminder on the client-computer.
-23-
boso_Profil_Man_3_(GB)_1002
03.02.2010
10:13 Uhr
Seite 24
Patient
Select patient
To work with a patients data (show measurement values, transmit
data, modify patient's address) the relevant patient has to be selected by marking the name on the list and then click "Select Patient". You may also douple-click the name of the patient in the list.
With activated patient the colour of the button "Select Patient"
switches from red to black.
Using "Arrange according" the patients can be arranged according
to "Name" or according to the "Patient No."
If you have transmitted data of your patient information system
and the data is already entered in the boso profile-manager3, the
patient in progress is also activated in boso profile-manager3 automatically.
New
Click "New…" to enter a new patient into the database.
If you have patient data in your PIT, the data of the patient in progress will be entered automatically.
-24-
boso_Profil_Man_3_(GB)_1002
03.02.2010
10:13 Uhr
Seite 25
Edit
Click "Edit" to up-date existing data of a patient.
Delete
Click "Delete" to remove a patient's data definitely.
Print
Click "Print" to print all data of a particular patient.
Export
Click "Export" to transmit a complete set of data (patient's address including measurement values) to file. The data export is
entered into the file which has been registered under "Setup" -->
"Import/Export" using the filename <patientname>.txt
Import
Similary to "Export" you select "Import" to import patient data
into the boso profile-manager 3. All measuring data and the complete patient data of a patient from the export path registered under
"Setup" --> "Import/Export" are imported.
Printout
Click "Printout" to print only the pages which have been selected in "Setup" --> "Printout"
-25-
boso_Profil_Man_3_(GB)_1002
03.02.2010
10:13 Uhr
Seite 26
Initialize TM2430
(Deviation profman.exe: the function "initialize unit" is not available.)
Your bosoTM2430PC 2 can be identified with a 10-digit-number.
This offers the opportunity to assign the measuring data directly to
a specific patient in the software as soon as the measuring data is
transmitted from the BP-instrument to the computer.
To de-activate this function click "Setup" and then "selection of patient".
-26-
boso_Profil_Man_3_(GB)_1002
03.02.2010
10:13 Uhr
Seite 27
Default is "automatically by ID#".
Notice:
To use elder
boso-TM2430instruments with
serial number
<0713550
please select
"manual" in this
window.
To de-activate please click "manual" and enter with "OK".
Programming can be done as described below in "Programming
TM2430".
-27-
boso_Profil_Man_3_(GB)_1002
03.02.2010
10:13 Uhr
Seite 28
To initialize the blood pressure instrument, select a patient from the
list by marking the patient and clicking and "Select Patient" afterwards. The button "Select Patient" then will turn from red to black.
By clicking "Initialize unit" you enter the window "Programming"
Automatically the number of the selected patient will be shown in
the line "Patient number".
-28-
boso_Profil_Man_3_(GB)_1002
03.02.2010
10:13 Uhr
Seite 29
Here the "maximum pressure" can be defined in this window. This
limits the inflation of the BP-instrument to avoid harm of a patient.
PLEASE NOTE: If systolic blood pressure of a patient is about this
value, the BP-instrument cannot take a BP-value as an inflation of
Sys + 30mmHg is required to receive a reliable measurement. If
the limit is not high enough, the BP-instrument will show error.
All other programming opportunities match the functions described in the paragraph below "Programming TM2430" in this instruction manual.
By clicking "OK" the selection of the patient is confirmed. To
avoid mistakes, the memory will be deleted after each initialisation.
After the BP-instrument is brought back with the patient's measuring values, the data is transmitted from the BP-instrument to the
computer by clicking "read measurements". The data automatically is assigned to the relevant patient with this patient number.
-29-
boso_Profil_Man_3_(GB)_1002
03.02.2010
10:13 Uhr
Seite 30
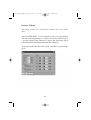
Programming TM2430 (Alternatively to Initialize TM 2430)
(Deviation profman.exe: the function "Programming TM2430" is
not available.)
To activate this function click "Setup" and then
"selection of patient". Default is "automatically by
ID#". If the mode "manual" has been selected the
following dialogue will appear.
Choose "Programming TM2420/TM2430" to change settings of
your 24-hour-bloodpressure-instrument such as date, time, cycles
etc.
The boso-TM2430PC 2 can be programmed in three different
modes:
1. Standard cycles/intervals
If this mode is chosen, the instrument will do a measurement every
15 minutes in the time 7:00 h – 22:00 h. During the period 22:00 h
– 7:00 h, the interval in between two measurements is 30 minutes.
2. Sleeping button
Using this mode the patient can decide himself by pressing the
black button "Auto" on the boso-TM2430PC 2 when to start the
night-cycle and when to start daytime cycle. This mode is very useful if a patient for example works on shift. He then can decide on
his own, when to start daytime-intervals of 15 minutes and when
to swap to night-time intervals of 30 minutes.
-30-
boso_Profil_Man_3_(GB)_1002
03.02.2010
10:13 Uhr
Seite 31
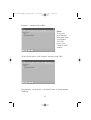
3. Programmable cycles/intervals
In this mode, the intervals both for daytime measurement and
night-time intervals can be set individually.
One can choose the interval 5, 10, 15, 20, 30, 60, 120 minutes.
"Show measurement"
Ticking "show measurement" activates the display of measurement values on the TM2430PC 2, so that the patient can see the value after each measurement.
"Device number"
You can assign an individual number to each boso-TM2430PC 2
(01 – 63)
"Assign PC time"
You can assign the date and time of your PC to the bosoTM2430PC 2.
Programming TM2420
The boso-TM2420PC can be programmed in two different modes:
-31-
boso_Profil_Man_3_(GB)_1002
03.02.2010
10:13 Uhr
Seite 32
1. Standard cycles/intervals
If this mode is chosen, the instrument will do a measurement every
15 minutes in the time 7:00 h – 22:00 h. During the period 22:00 h
– 7:00 h , the interval in between two measurements is 30 minutes.
2. Programmable cycles/intervals
In this mode, two different cycles and intervals can be set individually. One can choose the cycles "without", 1, 3, 5, 10, 15, 20, 30,
60 minutes.
"Show measurement"
Ticking "show measurement" activates the display of measurement values on the TM2420PC, so that the patient can see the value after each measurement.
"Signal before measurement"
Ticking "signal before measurement" activates a signal tone which
indicates the start of a measurement of the TM2420PC.
"Device number"
You can assign an individual number to each boso-TM2420PC
(01 – 63)
"Assign PC time"
You can assign the date and time of your PC to the bosoTM2420PC.
-32-
boso_Profil_Man_3_(GB)_1002
03.02.2010
10:13 Uhr
Seite 33
Setup
Click "Setup" to individually define the settings of your boso
profile-manager3 software.
Profile
The register "Profile" offers the opportunity to define colours,
different maximum values and other designs of the layout.
Interface
The register "interface" allows to choose the port (serial port or
USB) which connects the computer to the PC-connecting cable
(TM2430PC2) respectively the TM2020 or 2023 (TM2420). Default is USB.
Please note that there are two registers: one for TM2420 and one
for TM2430 to ensure the port is defined for the appropriate unit
(TM2420 or TM2430).
With the Test -button the availability of the selected port can be
examined.
-33-
boso_Profil_Man_3_(GB)_1002
03.02.2010
10:13 Uhr
Seite 34
If you use an USB-connecting cable please select the USB-interface through the setting "setup --> Interface" in your boso profilemanager3 software.
Notice:
If different boso-USB cables are used at one computer, please select the serial number of the USB cable connected to your blood
pressure device. As default the first available USB cable is selected.
Printout
Besides the two given layouts "Default" and "Profile" you have the
opportunity to define own layouts. Click "New" to create a layout
by clicking the various pages
- patient data
- PP
- Sys/Dia
- Measurement values
- MAP
that should be printed. Enter a title for the new Printout, which will
be printed if you click the icon
later.
-34-
boso_Profil_Man_3_(GB)_1002
03.02.2010
10:13 Uhr
Seite 35
If you use a coloured printer you may also do the printout in
colours. Please note that the colouring of the printout may differ
from your computer screen.
If the printout has to be done on a printer which is not a WindowsStandard-printer, you can select it by activating "show printer selection".
Import/Export
Register Import/Export.
GDT/BDT/HL7
(These are German standards for patient information systems)
If you use a patient information system which runs on a GDT-,
BDT- or HL7-protocol, the relevant paths and file names can be be
defined for importing or exporting data.
The file extension *.gdt or *.bdt or *.hl7 determines the data format.
Export of data only works if the imported patient is active. Export
automatically takes place if you exit the boso profile-manager3 (if
the measurement values have been transmitted from the bosoTM2430PC 2 during the session). Manually you can initiate an export of data if you click "man. Export" in the register "Edit"
-35-
boso_Profil_Man_3_(GB)_1002
03.02.2010
10:13 Uhr
Seite 36
IMPORTANT NOTICE:
Data export is de-activated if another patient has been selected
after automatic import. It is activated again, as soon as the former
patient is selected again.
Data-Export
Here the file path for import or export of patient data is defined.
Physician
Please enter your address, which then will be printed on the bottom line on all printouts.
Limits
Register „Limits“
To ensure an individual analysis, the limits can be defined for different cycles, i.e. an individual limit for daytime and for nighttime.
The beginning and end of daytime cycle or night-time cycle is
entered in "Programming TM-2420 / TM2430" (see previous pages)
-36-
boso_Profil_Man_3_(GB)_1002
03.02.2010
10:13 Uhr
Seite 37
EDIT
The register "Edit" shows all measurement data for the relevant
patient. Next to the time range in which the measurements have
been taken the instrument which took the measurements is indicated (if data have been imported, the word "import" is shown).
You can add comments to the measurement values as well as
exclude particular values from the analysis.
To add a comment to a measurement value, double-click the column "Comment" in the applicable line and enter your remark. Finish the with <Enter>. Comments are marked with a little pointer
in the profile diagrams.
(Deviation profman.exe: If all "All time
ranges" is activated, all data is assessed
for the evaluation.)
Exclude measurements
To exclude particular a measurement value, double-click the column "Exc(lude)" in the applicable line. Afterwards, the value is
still shown and marked with a little "x" in the column "Exc". This
value will not be used for calculation of statistics such as mean value, maximum or minimum etc.
-37-
boso_Profil_Man_3_(GB)_1002
03.02.2010
10:13 Uhr
Seite 38
To undo the exclusion of a value, double-click the "x". The "x" will
disappear and the value will be included in all calculations again.
If you want to delete a complete time range, mark the relevant time
.
range and then click
Delete Time Range
Man Meas. Values
You can add manual entries by clicking on "Man Meas. Values". If
you enter Date, Time, Sys, Dia and Pul, the boso profile-manager3
will automatically calculate MAP and PP. This value will be automatically shown in the chronologically correct line with the comment "manual entry".
The manually entered value can be deleted by clicking "Man.
Meas. Value". Then mark the relevant value and click < > in the
upper right corner on the pop-up window.
To add more measurements click < >.
boso-TM2430PC 2
Connect the boso-TM2430PC 2 via the PC-connection cable to the
computer. If the connection is successful, the display of the bosoTM2430 shows four hyphens. Now click "TM2430" to start the
data transmission.
-38-
boso_Profil_Man_3_(GB)_1002
03.02.2010
10:13 Uhr
Seite 39
boso-TM2420PC
Connect the boso-TM2420PC via the connection-unit (TM-2023
or TM2020) to the computer. Start data transmission by clicking
"TM2420".
After the data transmission is completed,
you have the opportunity to individually
select the cycles for daytime and nighttime.
Please delete the memory after the data
has been successfully transmitted.
boso-medicus PC 2, boso-medilife PC 2(3)
Connect the unit via the PC-connection cable to the computer. If
the connection works, you can see nine hyphens on the display of
your blood pressure instrument. Click "Transfer measurement" to
start data transmission.
After transmission is finished you have to enter the year of the last
measurement. Normally it is the current year, which has to be confirmed.
-39-
boso_Profil_Man_3_(GB)_1002
03.02.2010
10:13 Uhr
Seite 40
Please mind that after data transmission the memory of the blood
pressure instrument is still existing. So please delete the memory
on the blood pressure instrument after the data has been successfully transmitted.
If you click "man Export" the data of the marked time range is exported to the patient information system via the BDT-, GDT- or
HL7 protocol.
IMPORTANT: This function is active only if the patient has been
transmitted from the patient information system to the boso profile-manager3.
(Deviation profman.exe: the cycles day/night are not available, but
you can distinguish blood pressure taken in the morning and blood
pressure taken in the evening).
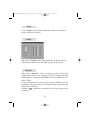
Profile Sys/dia
In the Profile Sys/Dia register the progression of blood pressure
and pulse are displayed in graph form. You can select the cycles
"Day" or "Night" or "Complete" by clicking the buttons on the bottom of the graph.
-40-
boso_Profil_Man_3_(GB)_1002
03.02.2010
10:13 Uhr
Seite 41
The pulse curve is either shown or may be hidden if the button
"Pulse Curve" is activated or not. If the pulse curve is hidden, the
BP-graph is enlarged.
Little black pointers on the bottom of the BP-graph indicate, that a
comment supports the value taken at that time.
"Comparable curve" gives you the opportunity to insert another
time range into the graph to directly compare the two curves.
If you move the cursor on the graphs, the cursor is converted into
a little cross and the date/time as well as the relevant value (BP or
pulse) are indicated in the upper left section of the graph.
In addition there is the option of a chosen time scale over which
measurements are to be displayed. This can be: Day, Week, Month,
Quarter and Year. This programme also gives you the choice of an
automatic Setting and Display measurement values at the most suitable time reference. To achieve this, select "Optimized".
On the bottom of the graph you can scroll to the left or to the right.
-41-
boso_Profil_Man_3_(GB)_1002
03.02.2010
10:13 Uhr
Seite 42
Profile MAP
In the Profile MAP register the progression of mean arterial pressure is displayed in graph form. You can select the cycles "Day" or
"Night" or "Complete" by clicking the buttons on the bottom of the
graph.
MAP:
The mean arterial pressure is calculated as follows:
MAP = Dia + 1/3 (Sys – Dia)
Little black pointers on the bottom of the MAP-graph indicate, that
a comment supports the value taken at that time.
The pulse curve is either shown or may be hidden if the button
"Pulse Curve" is activated or not. If the pulse curve is hidden, the
MAP-graph is enlarged.
If you move the cursor on the graphs, the cursor is converted into
a little cross and the date/time as well as the relevant value (MAP
or pulse) are indicated in the upper left section of the graph.
-42-
boso_Profil_Man_3_(GB)_1002
03.02.2010
10:13 Uhr
Seite 43
"Comparable curve" gives you the opportunity to insert another
time range into the graph to directly compare he two curves.
In addition there is the option of a chosen time scale over which
measurements are to be displayed. This can be: Day, Week, Month,
Quarter and Year. This programme also gives you the choice of an
automatic Setting and Display measurement values at the most suitable time reference. To achieve this, select "Optimized".
On the bottom of the graph you can scroll to the left or to the right.
Profile PP
In the Profile PP register the progression of pulse pressure is displayed in graph form. You can select the cycles "Day" or "Night"
or "Complete" by clicking the buttons on the bottom of the graph.
-43-
boso_Profil_Man_3_(GB)_1002
03.02.2010
10:13 Uhr
Seite 44
PP:
The pulse pressure is calculated as follows:
PP = Sys - Dia
Little black pointers on the bottom of the PP-graph indicate, that a
comment supports the value taken at that time.
The pulse curve is either shown or may be hidden if the button "Pulse
Curve" is activated or not. If the pulse curve is hidden, the PP-graph
is enlarged.
If you move the cursor on the graphs, the cursor is converted into a little cross and the date/time as well as the relevant value (PP or pulse)
are indicated in the upper left section of the graph.
"Comparable curve" gives you the opportunity to insert another
time range into the graph to directly compare he two curves.
In addition there is the option of a chosen time scale over which measurements are to be displayed. This can be: Day, Week, Month, Quarter and Year. This programme also gives you the choice of an automatic Setting and Display measurement values at the most suitable
time reference. To achieve this, select "Optimized".
On the bottom of the graph you can scroll to the left or to the right.
-44-
boso_Profil_Man_3_(GB)_1002
03.02.2010
10:13 Uhr
Seite 45
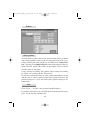
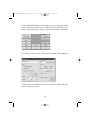
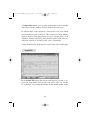
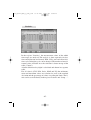
Statistics
In the register "Statistics" the measurement values of the whole
time range are analysed. The analysis is done separately for daytime and night-time and in total. With „Edit“ start and end of daytime cycle and night-cycle can be changed. The number of measurement values included in each evaluation is shown on top of the
table ("Count").
Also the difference day/night is calculated and shown in a separate
table.
For all criteria (SYS, DIA, Pulse, MAP and PP) the minimum,
mean and maximum values are calculated as well as the standard
deviation and the percentage of values exceeding the limits. The limits can be set individually in the register "Patient" and "Setup…".
-45-
boso_Profil_Man_3_(GB)_1002
03.02.2010
10:13 Uhr
Seite 46
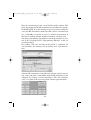
Morning Blood Pressure Surge (MBPS)
(Deviation profman.exe: MBPS not available)
In the table "Difference Day /Night" the MBPS-value is indicated
on top of the table. The MBPS-value is an indicator for the BP-increase in the morning. It is calculated as follows:
MBPS = mean SYS morning – mean SYS night low
"Mean SYS morning" is defined as the mean value of the systolic
BP-values that are measured within the first two hours of the daytime cycle.
"Mean SYS night low" is defined as the mean value of the 3 systolic BP-values that are identified as follows:
1) measurement before lowest night systolic pressure
2) lowest night systolic pressure measured
3) measurement after lowest night systolic pressure
In the lower right section of all registers you can start a printout of
each individual register by clicking the
button.
Print
-46-
boso_Profil_Man_3_(GB)_1002
03.02.2010
10:13 Uhr
Seite 47
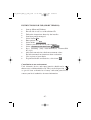
INSTRUCTIONS FOR USE (SHORT VERSION)
●
●
●
●
●
●
●
●
●
●
●
●
●
Start up Microsoft Windows
Execute file install.exe on Installation CD.
Follow the instructions shown by the installer.
Start boso profile-manager3
Select Patient New
Enter patient data
Edit
Select folder
Connect your boso device to your computer
Select Transmit measurement values
Press Start/Stop (only boso-medicus(2)/ boso-medilife
PC (2)(3)
After data transmission, check measurement values.
Exclude unwanted measurements from evaluation.
View register of your choice
To print-out Profile and Statistics, select icon
Contribution to our environment
Used electronic devices and empty batteries should not be
thrown away with household waste. They can be disposed of
as special waste or handed to a battery collection point. Please
contact your local authorities for more information.
-47-
boso_Profil_Man_3_(GB)_1002
1.
03.02.2010
10:13 Uhr
Seite 48
Warranty
Regardless of the legal terms and conditions of warranty, boso warrant that:
a)
The PC connection cable will be free from defects of manufacture within a period of 24 months from the date of purchase.
b)
The data carrier of the software will be free from material and processing defects within a period of 90 days from the date of purchase.
c)
Due to the warranty under 1.a) and b), boso is obliged to replace the
PC connection cable or the data carrier and the software free of charge
under the following conditions:
-
The customer/purchaser will give a written notice of the defect to boso
either within 24 months after the purchase date in case of a manufacturing defect of the PC connection cable; or within 90 days after the
purchase date in case of a material or processing defect of the data carrier of the software; and
the defective PC-connecting cable or the defective data carrier of the
software will be delivered to your dealer or to
boso
BOSCH + SOHN GmbH u. Co. KG
Bahnhofstr. 64
D-72417 Jungingen / Germany
-
d)
Further warranty than the warranty under 1.a) to 1.c) will not be granted by boso.
2.
Liability
a)
The software delivered to the customer/purchaser complies with the
up-to-date stand of development.
b)
Notwithstanding the provisions under 2.c) hereinafter, boso and their
dealers shall not be liable for any damage caused by the use of the software. This exemption of liability shall especially apply to incidental
and consequential damages, lost profits, damages caused by any loss
or any damage of data and any other economic or financial losses.
c)
However, the exemption of liability under 2.b) shall not be effective if
we are liable for a damage under the terms and conditions of the Product Liability Act or if a damage is caused by gross negligence or wilful misconduct by ourselves or one of our agents.
-48-
boso_Profil_Man_3_(GB)_1002
03.02.2010
10:13 Uhr
Seite 49
Appendix A - What to do when there is a failure / problem
Data cannot be entered in boso profile-manager3
-
-
Check all connections between the boso BP unit, PC adaptor
(PC connection cable) and your computer.
Ensure that the interface connection at the PC has not been reversed. Following this, check the configuration in the „Setup“ file (see page 33).
Check the display of the boso BP unit. If the battery symbol
is in the display, change the batteries.
If the problem cannot be remedied by following the above steps, or if
you have any queries concerning the Evaluation software, please
contact your authorised distributor for assistance.
-49-
boso_Profil_Man_3_(GB)_1002
03.02.2010
10:13 Uhr
Seite 50
Transfer successful. No measurements transmitted.
There are no measurements in the memory of the BP unit or previously stored measurements have already been deleted.
Please select a patient before switching to another page.
In order to insert a patient’s measurements, the individual person’s
name has to be selected prior to the transfer of measurements. Without appropriate selection it is not possible to transfer any relevant
measurements.
Device ID not recognized
Record ID not recognized
One of the records contains invalid characters
A check sum error has been occured.
There has been an error during data transmission. Repeat data transmission. If not successful please contact the authorized distributor.
Measurements have been deleted on account of data errors (i.e. leap
year?)
If measurements were entered on the 29 February in a leap year, but
only called up a year later, these measurements cannot then be allocated. These measurements will be read as invalid by the software and
are rejected.
-50-
boso_Profil_Man_3_(GB)_1002
03.02.2010
10:13 Uhr
Seite 51
Too early. Measurement device is sending data, please try again.
The Start key on the blood pressure monitor was pressed before the
measurement transfer had been started in the profile-manager.
Time over. Did you connect the device to the correct interface? Did
you press the START/STOP button?
Transmission is cancelled.
Proceed as described on page 39. If transfer is still not successful, proceed as detailed on page 33.
Data stream is interrupted. End-of-Transmission mark is missing.
Contact your authorized distributor.
-51-
03.02.2010
10:13 Uhr
Seite 52
BOSCH + SOHN GmbH u. Co. KG
Bahnhofstraße 64 · 72417 Jungingen · Germany
Telephone: +49 (0) 74 77 / 92 75-0 · Fax: +49 (0) 74 77 / 10 21
Internet: www.boso.de · e-Mail: [email protected]
02 / 2010
boso_Profil_Man_3_(GB)_1002