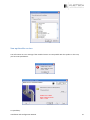
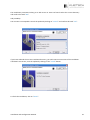
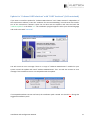
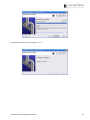
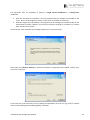
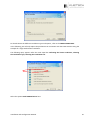
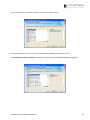
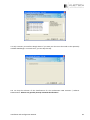
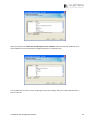
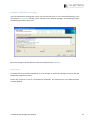
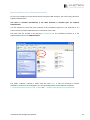
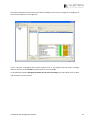
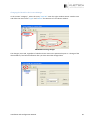
1
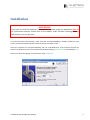
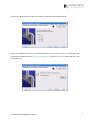
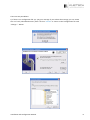
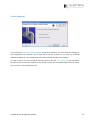
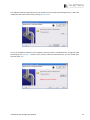
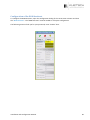
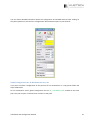
2008 Installation and Configuration Manual Solutions for CoCreate Modeling Installation and Configuration Manual for Solutions for CoCreate Modeling Content Introduction ............................................................................................................................................. 4 Installation ............................................................................................................................................... 5 ATTENTION! ......................................................................................................................................... 5 Update for "Cadenas PARTsolutions" with "PART Assistant" ............................................................. 9 Load Command ................................................................................................................................. 12 Update ................................................................................................................................................... 13 Non‐updateable version .................................................................................................................... 15 Update for "Cadenas PARTsolutions" with "PART Assistant" (Self‐contained) ................................. 17 PART Assistant including Cadenas PARTsolutions ................................................................................. 20 General .............................................................................................................................................. 20 Specific characteristics of the licence model and password assignment for the PART Assistant with Cadenas PARTsolutions ..................................................................................................................... 21 Recommended Installation Sequence for all Products with Cadenas PARTsolutions ...................... 22 Notice! ........................................................................................................................................... 22 Installation of Cadenas PARTsolutions .............................................................................................. 23 Scope of Delivery ........................................................................................................................... 23 Program Installation ...................................................................................................................... 23 Installation of Manufacturer Catalogs........................................................................................... 31 Please note!! ................................................................................................................................. 31 Manual Installation of the "PART Assistant Patches" ................................................................... 32 Activation of the Cadenas PARTsolutions License ............................................................................ 34 Changing the Hostid for the License Manager .............................................................................. 36 Using Cadenas PARTsolutions with the PART Assistant .................................................................... 37 Starting the PART Assistant ........................................................................................................... 37 Starting the PARTsolutions Integration ......................................................................................... 38 Updating the Parts Lists in the PART Assistant ............................................................................. 39 Parts Selection from the PARTsolutions Library ............................................................................ 40 Notice! ........................................................................................................................................... 40 Installation and Configuration Manual 2 Model Manager Support ............................................................................................................... 41 Further Questions about the Cadenas Installation ....................................................................... 41 First Steps .............................................................................................................................................. 42 Starting the Modules ......................................................................................................................... 42 Configuration ..................................................................................................................................... 44 Configuration of the BOM Assistant .................................................................................................. 46 Global Configuration for all Workstations in a LAN ...................................................................... 47 Extensions ...................................................................................................................................... 49 Commands ..................................................................................................................................... 49 List of Keywords .................................................................................................................................... 50 Installation and Configuration Manual 3 Introduction Ladies and Gentlemen; Thank you for opting for the construction solution by Ingenieurgemeinschaft Klietsch. This program is based on our long‐standing experience and our customers' feedback. This product was developed with the utmost care. However, if you still have problems with the installation or utilization of the software, please contact our support team at +49 271 / 23167‐0. If you prefer to contact us in writing, please send an e‐mail to [email protected]. The following chapters contain installation and configuration instructions. Siegen, April 2008 Installation and Configuration Manual 4 Installation ATTENTION! If you want to install the Cadenas "PARTsolutions", please install this application prior to the construction solutions. Please refer to the chapter "PART Assistant including Cadenas PARTsolutions" for this purpose. To install the construction solution, make sure that CoCreate Modeling is already installed on your system and that all required system and environment variables are set. Insert the "Solutions for CoCreate Modeling" CD into a CD‐ROM drive. If the autostart function for the drive is deactivated, start the installation by double‐clicking on "Install.exe" in the subfolder "nt". Select your desired language and confirm this with "Continue". Installation and Configuration Manual 5 Enter the modeling version for which you want to install the construction solutions. Select the installation directory in the following dialog. If you want to select an individual path instead of the standard directory "C:\Programs\Klietsch", click on the "Change" button and select the desired directory. Installation and Configuration Manual 6 The "load command" integrates the construction solutions into the modeling. In most cases, you should select "Enter load command". For a more exact description of the load command, refer to the chapter "Load command". If you have selected the menu point "Enter load command", you will be asked to state the configuration file of your Modeling in the next step. Installation and Configuration Manual 7 There are two possibilities: 1) If there is no configuration file yet, you get a message. If you submit the message, you can create this in a freely selectable directory with a click on "Create" or choose a valid configuration file with “Change…”‐ Button. Installation and Configuration Manual 8 2) However, if there are already one or several configuration files on your system, these are displayed in the selection list. If you want to select a different configuration file than the stated one, click on "Change" and select the corresponding file. The selected file must be a valid Modeling configuration file and loaded at the start of the Modeling! Confirm your entry with "Continue". Update for "Cadenas PARTsolutions" with "PART Assistant" If "Cadenas PARTsolutions" for the "PART Assistant" is installed on your system, you can perform an update to optimize your program. ATTENTION! If "Cadenas PARTsolutions" is not installed on your workstation but in a local network, you may only perform this update from one client. Otherwise, the original backup copies will be overwritten!!! Installation and Configuration Manual 9 Select the installation directory of "Cadenas PARTsolutions" and confirm this with "Continue". If the update is not compatible with your Cadenas version, a message appears and the update will not be installed. In the next step, your working environment will be tested and an overview of the installation displayed. If all details are correct, click on "Install" to install the construction solution. Installation and Configuration Manual 10 Now the software will be installed. After all files were copied, finish the installation with a click on "Finish". Installation and Configuration Manual 11 Load Command If you selected "Do not enter load command" during the installation, you must enter the changes to the configuration file manually. This manual entry may be necessary if you have e.g. installed additional modules or if the configuration file is administered centrally in the network. In order to enter the load command manually, look for the file "Inst_Log.txt" in the installation directory of the construction solution. At the end of this file you will find the load command, which you can enter in your configuration file. Installation and Configuration Manual 12 Update If you want to update an already installed version, please proceed as follows for the installation. If the update is available as a "*.zip" archive, unpack this archive into a directory of your choice. Do not open the file "install.exe" directly in the archive! In the first step, select your preferred language and then click on "Continue". In the next step, please state the Modeling version for which the update of the construction solution is to be installed. Installation and Configuration Manual 13 The update installation determines the last installed version and the pertaining directory. Check the installation path and confirm this by clicking on "Continue". If it is not possible to determine the installation directory and the installed version, change the path by clicking on the "Change …" button. Once you have selected a valid directory, you can confirm your selection with "OK". Installation and Configuration Manual 14 Nonupdateable version You will receive an error message if the installed version is incompatible with the update. In this case, you have two possibilities. 1st possibility: Installation and Configuration Manual 15 The installation parameters belong to an old version or were not found. Select the correct directory and confirm this with "OK". 2nd possibility: Your version is incompatible. Cancel the update by clicking on "Cancel" and confirm this with "Yes". If you have selected the correct installation directory, you will receive an overview of the installation. If all details are correct, start the update by clicking on the "Install" button. To finish the installation, click on "Finish". Installation and Configuration Manual 16 Update for "Cadenas PARTsolutions" with "PART Assistant" (Selfcontained) If you want to install the update for "Cadenas PARTsolutions" with "PART Assistant" independent of the construction solutions, insert the "Solutions for CoCreate Modeling" CD and cancel the installa‐ tion of the construction solutions. Open the CD drive with the Explorer and start the batch file "cadenas‐upd.bat" in the folder "nt". The installation program appears. Select your desired language and confirm this with "Continue". You will receive an error message if there is no copy of "Cadenas PARTsolutions" installed on your system. Cancel the update and install "Cadenas PARTsolutions" first. You will also receive an error message if the installed version is not compatible with the update. If a compatible Cadenas version was found, the installation path is stated. You should not change the suggested installation path! Installation and Configuration Manual 17 Make sure that the check mark at "Install update of the Cadenas PARTsolutions for the PART Assistant" is set and then click on "Continue". If the check mark was not set, you cannot click on the button "Install" in the next step. If all entries are correct, start the installation of the update by clicking on the "Install" button. Installation and Configuration Manual 18 Complete the installation by clicking on "Finish". Installation and Configuration Manual 19 PART Assistant including Cadenas PARTsolutions General The PART Assistant including Cadenas PARTsolutions is a bundle consisting of 2 products: • • PART Assistant Cadenas PARTsolutions Cadenas PARTsolutions is the standard parts library contained in the delivery and offers 3D models for standard parts from many different standards as well as hundreds of manufacturer catalogs. Cadenas PARTsolutions itself is not designed as an additional module for OneSpace Modeling, but instead installed as an independent application on the workplace system. The PART Assistant on the other hand is an activatable module integrated 100% in OneSpace Modeling and provides the interface to PARTsolutions among other things. If required, the PART Assistant can start the program Cadenas PARTsolutions, display the parts catalogs and load the selected parts into OneSpace Modeling. On the next pages, you will find information about the different license concepts as well as information about the recommended installation sequence and installation details. Installation and Configuration Manual 20 Specific characteristics of the license model and password assignment for the PART Assistant with Cadenas PARTsolutions Some specific characteristics must be considered for the CoCreate additional modules supplied with Cadenas PARTsolutions. This is due to the different license models of the products. At present, this concerns the following product as of version 3.50: • PART Assistant You basically receive a bundle consisting of 2 components with the PART Assistant: 1. Program part for OneSpace Designer Modeling 2. Program part Cadenas PARTsolutions (parts library) The program parts integrated in OneSpace Designer Modeling are still supplied as floating license, meaning the license is available on every workstation in the network. As many licenses as purchased can be used simultaneously. The CoCreate license server takes care of the necessary organization. Æ For assigning passwords, we need the hardware ID of your CoCreate license server, e.g. the MAC address or the number of your MSU dongle Things are different with the PARTsolutions standard parts library. This program part is a so‐called node‐locked license, meaning the licenses is tied to the workstation and is only available there. Æ For password assignment, we need the MAC address for each of the workstations selected for the PARTsolutions catalogs. (Coding on a USB dongle is also possible) The different license models result in the following possible application situations: 1. One PART Assistant license is available for each workstation With this constellation, each user can access the PART Assistant functions as well as the PARTsolutions catalogs 2. There are less PART Assistant licenses than workstations available With this constellation, the PART Assistant functions are available on each workstation and the PARTsolutions catalogs only on some select workstations. The function calls for the PARTsolutions catalogs work or not, depending on the respective situation. Installation and Configuration Manual 21 Recommended Installation Sequence for all Products with Cadenas PARTsolutions 1. Prerequisite for the installation of this additional product is a functioning installation of OneSpace Designer Modeling. 2. Request the passwords for the OneSpace Designer additional modules (PART Assistant) and the Cadenas PARTsolutions. Æ Please observe the different license models in this context and the correspondingly different details of the hardware IDs. 3. Install the Cadenas PARTsolutions using the installation program contained on the first DVD. Follow the instructions of the installation program as well as the additional installation notices on the following pages. 4. Install the OneSpace Designer Modeling additional modules with the installation program contained on the CD‐ROM. 5. No further details are required for the link between PART Assistant and PARTsolutions. The PART Assistant detects an available and usable PARTsolutions installation automatically. Notice! This installation sequence ensures that some data of the Cadenas installation is exchanged in the context of the PART Assistant installation. This is necessary for the correct display of screw thread surfaces. In the further course of this instruction manual, you will also find information, which helps you to correct the Cadenas installation manually. Installation and Configuration Manual 22 Installation of Cadenas PARTsolutions Scope of Delivery Delivery of the PART Assistant including Cadenas PARTsolutions should contain a Cadenas DVD set with the following DVDs: • • 1 program DVD 2 mechanical catalog DVDs The program DVD contains the installation program as well as the standard parts catalogs. The mechanical catalog DVDs contain the manufacturer catalogs: • • Mechanical Catalog DVD 1 / 2 ‐ Mechanical Catalog DVD 2 / 2 ‐ Catalog of manufacturers in D, A, CH Catalog of manufacturers throughout the world Program Installation Insert the program DVD into the DVD drive. If not started automatically, start the program "Start.exe" manually. The following program window appears after a short time: Installation and Configuration Manual 23 You principally have the possibility to perform a single license installation or a client/server installation. • • With the client/server installation, the main program and the catalogs are installed on the server. Only a small program for access to the server is installed on the clients. With the single license installation, the program and the catalogs are installed locally on the workstation by default. However, if you want to install the catalogs on a release or a network drive, follow the next steps. Set the option "Save standards and catalogs separately?" in the listed menu. Then select the software directory in which the software is supposed to be installed. Confirm your entry with "Continue". In the next step, state a directory for the catalogs and standards. Here you can e.g. select a network drive to make catalogs and standards globally accessible. Installation and Configuration Manual 24 For details about the different installation types and options, refer to the INSTALLATION HELP. In the following, we will only explain the peculiarities in connection with the PART Assistant using the example of a single workstation installation. The following query appears after the usual steps like confirming the license conditions, selecting the installation type, selecting the installation site: Select the option Install PARTsolutions here. Installation and Configuration Manual 25 Now a window appears with the selection of the desired CAD interface: Select no interface here, not even the one for OneSpace Modeling contained in the list! The same (do not make a selection) also applies for the selection of an EDM/PDM/PLM integration. Installation and Configuration Manual 26 Also skip the selection of the ERP integration without making a selection. Also skip the selection of the databases and database connections integration without making a selection. Now select the desired language for the program documentation. Please note that the documentation is not available in the full extend in all languages. Installation and Configuration Manual 27 It is only necessary to install the dongle driver if you want your license to be saved on the optionally available USB dongle. In normal cases, you can skip this step. You can skip the selection of the classifications for the combination PART Assistant / Cadenas PARTsolutions. Remove any possibly already activated classifications! Installation and Configuration Manual 28 Now you still have to select the standard parts to be installed. Select the desired standards here. The installation of the manufacturer catalogs takes place in a separate step. You normally do not have to enter anything for the proxy settings. Ask your system administrator if you are not sure. Installation and Configuration Manual 29 After a check and a control query, the installation process starts. This may take a few minutes. Installation and Configuration Manual 30 Installation of Manufacturer Catalogs Insert the Mechanical Catalog DVD 1/2 or 2/2 into the DVD drive. If not started automatically, start the program "Setup.exe" manually. After selection of the desired language, the following program window appears after a short time: Mark the catalogs to be installed and start the installation with "Continue". Please note!! Each DVD has to be installed separately. It is not possible to install the catalogs on DVD 2 with the installation programs on DVD 1. Please also note that in case of a retrospective installation the selection lists in the PART Assistant must be updated. Installation and Configuration Manual 31 Manual Installation of the "PART Assistant Patches" For the correct display of screw thread surfaces using the PART Assistant, you must install a patch for Cadenas PARTsolutions. This patch is installed automatically if the PART Assistant is installed after the Cadenas PARTsolutions. It is also possible to install the patch manually if the installation sequence is not observed or if a newer version of Cadenas PARTsolutions is installed at a later date. The patch files are located in the directory "nt\Cadenas" on the installation medium or in the download directory for the PART Assistant. The folder "Cadenas" contains a folder with the name "libs". 2 files are contained in further subfolders, which must be exchanged in the corresponding folders of the Cadenas installation. "..\Cadenas\libs\all\translators\m3d_sd.vbb" and "..\ Cadenas\libs\x86\com\proxymetadll.dll". Installation and Configuration Manual 32 Both files are also located in the corresponding subfolders of the Cadenas installation, e.g. with a standard installation in the path: "C:\Programs\cadenas\partsolutions\software\libs\..". First, save these two files in the Cadenas installation directories, e.g. by copying and/or renaming them. Then copy the two files from the directory "nt\cadenas" on the installation medium to the corresponding locations in the Cadenas installation path or copy the folder "libs" to the installation directory for the Cadenas software. This procedure exchanges the 2 files (in tiered subfolders). Installation and Configuration Manual 33 Activation of the Cadenas PARTsolutions License Cadenas PARTsolutions features a separate license manager, which works independently of the CoCreate license server. As part of your delivery, at latest, however, after requesting your password for Cadenas PARTsolutions, you should receive the Cadenas license file in a shape similar to "xyz.cnsldb", e.g. default.cnsldb . For activation, start the Cadenas license manager: After this call, the following window appears: With "Add file", select the available license file and add it to the list. Installation and Configuration Manual 34 The codes contained in the license file and their availability on the current computer are displayed in the overview windows on the right side. If your computer is equipped with several network cards, it may happen that the license manager does not use the correct hostid and that the license is not available. In the following chapter Changing the hostid for the license manager, we will explain how to select and activate the correct hostid. Installation and Configuration Manual 35 Changing the Hostid for the License Manager In the section "Category", select the entry "Local PC". Now the right window section switches over and offers the menu items "Type" and "Device" for selection of a new device address. IMPORTANT: Saving changes The changes you made, regardless of whether these concern the password import or a change of the device address, first become effective after you have saved the changed data. Installation and Configuration Manual 36 Using Cadenas PARTsolutions with the PART Assistant Prior to using the PART Assistant together with Cadenas PARTsolutions, you should complete the following points: • • • • • Installation of Cadenas PARTsolutions Correct licensing of Cadenas PARTsolutions Installation of the PART Assistant Correct licensing of the PART Assistant Poss. manual installation of the patch for Cadenas PARTsolutions Starting the PART Assistant 1. First you have to activate the module PART Assistant in the CoCreate module administration. 2. Start the PART Assistant with the new icon in the main command list. Installation and Configuration Manual 37 Starting the PARTsolutions Integration Click on the button PARTsolutions "Catalog" in the main menu pf the PART Assistant to start PARTsolutions. Afterwards, the PARTdataManager of PARTsolutions should start automatically. If not, this is a sign of a missing connection between PART Assistant and PARTsolutions. Please try the following steps in this case to solve the problem: • • • Check the version number of your PARTsolutions program (should be version 8.1.01). Check whether your PARTsolutions license is valid and active. Contact our support team. Normally, the PARTdataManager should start and show the integration menu for PARTsolutions after a short time in OneSpace Modeling. Installation and Configuration Manual 38 Updating the Parts Lists in the PART Assistant If the catalogs of the Cadenas installation were changed, e.g. through retrospective installation, the catalog information in the PART Assistant must also be updated. In such cases, you can match the catalog tables of the PART Assistant with the catalogs of Cadenas PARTsolutions by simply clicking on the command "Update catalogs". Installation and Configuration Manual 39 Parts Selection from the PARTsolutions Library With the button "Catalog", you can select a catalog from the installed libraries. With the menu item "Part", the selection process is started and a structured table of the selected catalog appears after a short time on the screen. Select the desired part here. A preview is displayed in the dialog window of the PART Assistant. Notice! The structure table can also be anchored in the structure list of OneSpace Modeling with a right click. Te datasheet of the selected part appears after selection as well as a table with the available variants. Select the desired variant, place the part with the placement options in the section "Position" of the PART Assistant in your 3D‐model. Installation and Configuration Manual 40 Model Manager Support The PART Assistant adds a special ID for the Model Manager or Work Manager for all imported parts. If a part was saved in the database and again selected later on with the PART Assistant/PARTsolutions, the part saved in the database is loaded automatically and no new part is generated. Further Questions about the Cadenas Installation Should you have further questions about the Cadenas installation, please refer to the installation manual. This is located on the Cadenas installation DVD. Installation and Configuration Manual 41 First Steps Starting the Modules Start your Modeling. If the load command was entered in the configuration file during installation, please proceed as follows to start the add‐ons. In the menu bar, go to the entry "Application" and then on "Modules …". In the dialog that opens now, select the tab "Klietsch". You might have to scroll to the right to see this tab. Now you will see a list of the available construction solution modules. If you want to start a module, simply put a corresponding check mark at the desired position. The selected modules are started immediately. If you want to start the modules automatically when starting the Modeling, click on the "Start …" button. Installation and Configuration Manual 42 The following dialog lists all available modules on the left side. Scroll all the way down. There you will find the construction solutions. Select the module which you want to start automatically at the start of the program and then click on "Add ‐>". Repeat this step for all desired modules. If you want to remove a module from the start entry, mark it and click on "Remove <‐". Confirm your entry with "OK". Now you can close the window "Modules". Installation and Configuration Manual 43 Configuration To configure the construction solution, select the "Toolbox" button in Modeling and afterwards the menu point "Construction solution". Alternatively, you can access the configuration via the menu point "Tools" Æ "Toolbox" Æ "Construction solutions". A menu appears on the left side. If you want to change the language of the Klietsch modules, select your preferred language in the field "Language". Activate "Only own parts", if you only want to use self‐imported profile data. Then the standard profile data of the construction solution are ignored. If you have not generated any own profiles yet, the standard profiles are displayed initially. You have the possibility to display program icons. This is especially recommended if you only have very little or no experience with the construction solutions so far. Please note that some menus are divided with this setting for a better overview. With the menu item "Assign part names", you define how the names of created profiles and parts are to be assigned. „"Standard" uses internal Modeling names, "from data" takes over the part names from the database, and "automatic" assigns both internal names as well as names from the database, if available. Installation and Configuration Manual 44 Via the "Info" button, you open an output dialog that shows you the installed version as well as all set paths and path variables. Save your entry by clicking on the green button. SolidSteel with displayed icons and classic menu. Installation and Configuration Manual 45 Configuration of the BOM Assistant To configure the BOM Assistant, open the configuration dialog of the construction solution and then the "BOM Assistant". The "BOM Assistant" must be loaded to call up the configuration. The following menu will ask you for your password; enter "enable" here. Installation and Configuration Manual 46 You can obtain detailed information about the configuration of the BOM Assistant after clicking on the yellow question mark. Then the configuration documentation opens in your browser. Global Configuration for all Workstations in a LAN If you want a uniform configuration of the parts list for all workstations in a LAN, please follow the steps listed below. For all workstations with a global configuration set the "KL_CUSTOMIZE_DIR" variable to the same path. This path may be a network drive as well as a UNC path. Installation and Configuration Manual 47 To set the variable, open the system properties with the WINDOWS button + "Break", switch to the tab "Extended", click on the button "Environment variables" and afterwards on "New" at "User variables". For the name of the variable, please state "KL_CUSTOMIZE_DIR" and as "variable value" the path to the configuration directory. Confirm your entries with "OK". Restart your Modeling to activate this setting. After you have set the variable, the file "stlpreferences.tmp" is created in the selected directory when calling up the "BOM Assistant" configuration for the first time. This file contains the current configuration and is valid for all workstations accessing this directory. If you want to manage all dialogs globally, you must state a global directory in the configuration at "Directory". You can once again state a network drive or a UNC path here. Installation and Configuration Manual 48 Extensions You have the possibility to integrate extensions in the shape of defined and adapted table heads. The extensions must be saved in a specific folder. The extension directory for the "BOM Assistant" is searched and created according to a defined search pattern. 1. 2. 3. 4. 5. 6. Global data directory Customize directory $SDSITECUSTOMIZEDIR $SDCORPCUSTOMIZEDIR $KL_EXTENSION_DIR Userprofiledir If the respective parent directory is not found, the system checks whether the next directory was set. In the located directory, the configuration creates a folder in accordance with the following scheme (if it has not already done so): "stlcust_" + Modeling version + "_" + construction solution version. Commands To check the selected configuration, enter the following command in the command line: „kl‐stl‐ debug‐settings". The current "BOM Assistant" configuration is saved as an "*.html" file on your computer. If you want to import available parts list dialogs, use the command "kl‐stl‐import‐definition". The parts lists to be imported must have the file ending "*.def". Installation and Configuration Manual 49 List of Keywords 3 3D models for standard parts Standard parts ∙ 20 F Finish Finishing the installation ∙ 11 First Steps ∙ 42 A Add load command ∙ 12 Available modules ∙ 43 G Global Configuration ∙ 47 B H Bundle ∙ 20 Hardware ID ∙ 21 Hostid ∙ 35 C CAD interface ∙ 26 Cadenas PARTsolutions ∙ 17 Update PART Assistant ∙ 9, 17 Checking the configuration ∙ 49 Classifications ∙ 28 Client/Server Installation ∙ 24 CoCreate additional modules ∙ 21 Commands ∙ 49 Configuration ∙ 44 Configuration Documentation ∙ 47 Configuration of the BOM Assistant ∙ 46 Content ∙ 2 I Importing available parts list dialogs ∙ 49 Installation ∙ 5 Installation process ∙ 30 Installed version Display info ∙ 44 Installing the update ∙ 18 K KL_CUSTOMIZE_DIR ∙ 47 D L Dongle drivers ∙ 28 E EDM/PDM/PLM ∙ 26 Entering the load command ∙ 7 ERP integration ∙ 27 Extension directory ∙ 49 Extensions ∙ 49 Language ∙ 5, 44 Libraries ∙ 40 License Activation ∙ 34 License File ∙ 34 License Management ∙ 34 M Manual Installation ∙ 32 Manufacturer Catalogs ∙ 31 Installation and Configuration Manual 50 Modeling version ∙ 13 S N Scope of Delivery ∙ 23 Several configuration files ∙ 9 Single License Installation ∙ 24 Specific characteristics of the license model and the password assignment ∙ 21 Standard profile data ∙ 44 Starting ∙ 42 Starting the Modules ∙ 42 Starting the PART Assistant ∙ 37 Starting the PARTsolutions Integration ∙ 38 Support ∙ 41 No configuration file available ∙ 8 Node‐locked license ∙ 21 Non‐updateable version ∙ 15 O Overview of the installation ∙ 16 P PART Assistant ∙ 20 PART Assistant including Cadenas PARTsolutions ∙ 20 Part names ∙ 44 PARTdataManager ∙ 38 Password ∙ 46 Password assignment ∙ 21 Patch ∙ 32 Profile data ∙ 44 Program icons Icons ∙ 44 Program Installation ∙ 23 R Recommended Installation Sequence ∙ 22 Retrospective installation ∙ 31 T Tab "Klietsch" ∙ 42 U Update ∙ 13 Update for "Cadenas PARTsolutions" with "PART Assistant" (self‐contained) ∙ 17 Update incompatible ∙ 15 Updating the Parts Lists ∙ 39 USB dongle ∙ 28 V Version is incompatible ∙ 16 Installation and Configuration Manual 51