1
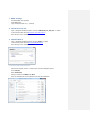
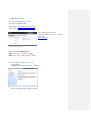
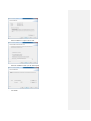
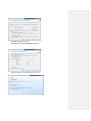
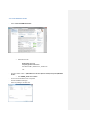
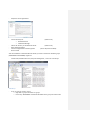
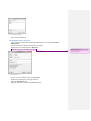
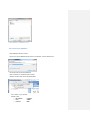
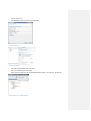
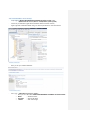
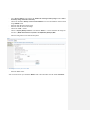
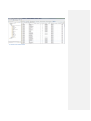
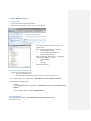
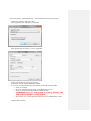
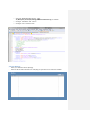
BEXIS 2.0.0
Installation Manual
Content
1.
BExIS Package .............................................................................................................................3
2.
.NET Framework 4.0 ....................................................................................................................3
3.
ASP.NET MVC 3 ...........................................................................................................................3
4.
DB2 Express 10.1 .........................................................................................................................4
4.1 Download Db2 Express C 10 ......................................................................................................4
4.2 Installation of Db2 Express C 10 .................................................................................................4
4.3 Install IBM Data Studio ..............................................................................................................7
4.4 CREATE Standard App User .......................................................................................................9
4.5 Create empty database ...........................................................................................................10
4.6 Create database from backup.................................................................................................. 12
5.
Setup Website with IIS 7............................................................................................................15
5.1 Active IIS7 ..............................................................................................................................15
5.2 Register .Net Framework 4.0 ...................................................................................................15
5.3 Create Website .......................................................................................................................15
5.4 Start Website ..........................................................................................................................17
6.
Errors ........................................................................................................................................18
ERROR [08004][IBM] SQL30061 .................................................................................................18
ERROR [08001][IBM] SQL30081n ...............................................................................................18
ERROR HTTP-ERROR 403.14......................................................................................................18
ERROR HTTP- ERROR 404.2........................................................................................................18
ERROR SQL1159 .......................................................................................................................18
1. BExIS Package
-
Download BEXIS 2.0.0 package
Unzip BEXIS 2.0.0
Copy Workspace folder to C:\ (default)
2. .NET Framework 4.0
-
Open ..\Required Installations\.NET 4 and start “dotNetFx40_Full_x86_x64” as admin
Or download it under this link Download .net Framework 4.0
follow the steps in the installation window
3. ASP.NET MVC 3
-
Open ..\Required Installations\MVC3 and start “MVC3” as admin
Or download it under this link Download ASP.NET MVC 3
follow the steps in the installation window
1 First step shows the prerequisites of mvc3
-
After the Prerequisites window a window open with some installation options
Go to Products
Select Frameworks
Here you need to found MVC3 and .NET 4
If this not installed click on the add button and start the installation
4. DB2 Express 10.1
4.1 Download Db2 Express C 10
Open one of the following links:
32Bit Version: Download DB2 Express-C 32Bit
64Bit Version: Download DB2 Express-C 64Bit
Log in with the IBM user account.
If you have no IBM user account, you need to
create one.
user registration
2Download Db2 Express C 10
Select and download DB2 Express-C
32Bit: db2_v1012_win_expc.exe (425MB)
64Bit: db2_v1012_winx64_expc.exe (507 MB)
4.2 Installation of Db2 Express C 10
-
Unzip package
Installation Manager starts after unzip is finished
-
Choose the installation type – typical is enough
-
Select Installation or response file or both
-
Select the installation folder (use the default path)
-
Use default
-
Define the db2admin password
please make a note of the db2admin password
-
After the installation you should see the this screen
4.3 Install IBM Data Studio
-
Select “Download IBM Data Studio”
o
Select the first one:
Data Studio client and
3rd-party product extensions*
Red Hat Linux®**, SUSE Linux**, Windows™
OR
-
-
Start the installer under “..\BExIS Released Versions\Release 2.0.0\Prerequisites\IBM Data
Studio”
o Start IBMIM_win32.exe as admin
Password from the IBM Account is required
The IBM Installation Manager
Select all packages and click next
-
Accept the license agreements
-
Choose directorys for
o Shared Resources
o Installation Manager
Choose the directory for the IBM Data Studio
Select wanted language
Choose Configuaration of the help system
Start to install
-
(default is ok)
(default is ok)
(Access help from the Web)
After the installation of Db2 and IBM Data Studio you need to check if the database groups
(DB2ADMNS and DB2USERS) registered:
-
Control Panel/Administrative Tools/Computer Management / Local Users and Groups
3 Db2 Groups
-
If not you need to create tis groups
o Right click on groups and select new groups
o First Group “DB2ADMNS” and add the db2admin to this group and select create
4 Create DB2ADMNS group
-
Second Group “DB2Users”
4.4 CREATE Standard App User
-
Go to Control Panel\All Control Panel Items\Administrative Tools and open Computer
Management
Go to Local Users and Groups and select the users folder
Right click on Users folder and open “New User…”
Define the bexis app user called „standard“
5 Create standard user
-
This user must be a member of the group DB2Admns
Right click on standard user and open properties
Select the “Member Of” tab
Select the Add Button and add the DB2ADMNS group
Kommentar [ST1]: Was ist mit dem
Password? Sollte das dann nicht auch auf
„1“ gesetzt werden?
6 Add standard user to Db2Admns group
4.5 Create empty database
- Open IBM Data Studio as admin
- by the first run the IBM Data Studio ask for a workspace, use the selected one
- On the left side you find all databases
- Over this there is a dropdown button “New”
- Select this button and choose “New Database”
-
Now connect to your instance
Default Values
o Host Name:
localhost
o Port:
50000
o Instance:
DB2
-
Choose Version 10.1
Add db2admin with password and test connection
7 Connect to Instance
8 Create new database
-
Call your Database BEXIS and select “Run”
Enter your db2admin password again
After successful create you will see the BEXIS database under your Instance in the left side
9 Db2 Instance with new BExIS database
4.6 Create database from backup
-
Unzip Backup “BEXIS.0.DB2.NODE0000.CATN0000.20130227113636” under
o ..\BExIS Released Versions\Release 2.0.0\Database_Backups\DB2\
Connect to your Database (right click on Database Name and choose connect)
Again right click on Database Name and go to “Back Up and Restore” and select Restore
10 Backup and Restore
-
Here you see your selected database
11 Retore Backup step 1
-
Go to your “..\BExIS Released Versions Folder”
o Here you see a File called “BEXIS.0.DB2.NODE0000.CATN0000.20130301190238”
o BEXIS
– Database Name
o 20130301
– date of the Image
o 190238
– time of the image
-
Go to “Restore Objects” and select in the “Method for selecting a backup image” Section “Enter
the backup image information manually”
Click on the Checkbox “Backup is from another database” and write the database name from the
image “BEXIS” inside
Select the date like this from the image
Select the time like this from the image
Click on the “Add…” Button
Click on “<Sepcify Backup location>” and click the “Browse…” Button and select the Image file
from the “..\BExIS Released Versions\Release 2.0.0\Database_Backups\DB2”:
After this configuration it must look like this picture
12 Configure the restore process from Db2
-
Select the “Run” Button
After successful restore your database “BEXIS” need to have all tables from the schema “Standard”
13 Database with standard tables
5. Setup Website with IIS 7
5.1 Active IIS7
-
Open Control Panel/Programs and Features
Click on the “Turn Windows features on/off” on the left side
-
-
-
At first select “Internet Information Service” and
open this node
Open “Web Management Tools ” and select
o
IIS Management Console
o
IIS Management Scripts and Tools
o
IIS Management Service
Open “World Wide Web Services” / “Application
Development Features” an select
o
.Net Extensibility
o
Asp
o
Asp .NET
Select the “OK” Button
5.2 Register .Net Framework 4.0
-
Update .Net 4.0 Framework in IIS7
o Open cmd as administrator
o %windir%\Microsoft.NET\Framework64\v4.0.30319\aspnet_regiis.exe –ir
- or run “aspnet_regiis.exe” as admin under “..\BExIS Released Versions\Release 2.0.0\Utils”
- Set ASP .NET4 to Network Service
Open IIS
- Select Application Pools and right click in “ASP .NET v4.0” and select “Set Application Pool
Defaults…”
- Process Model – Identity change to “NetworkService”
5.3 Create Website
- Copy the Application folder under X:\BExIS Released Versions\Release 2.0.0 to
C:\inetpub\wwwroot
- Open Control Panel / Administrative Tools / Internet Information Services (IIS) Manager
-
Create a new Website (right click on sites)
Select Application pool ASP .NET v4.0 integrated
-
Select physical path: C:\inetpub\ wwwroot\ Application
-
Confirm your selections by pressing the ok button
Stop Default Website and Run the BExISpp Website
If you create an empty database and want that the system build all needed tables
o Select your Website
o Go to the application settings and set “CreateDatabase” to “true“
o When you run the Website the database creates the tables
o ATTENTION!! If you are working with an existing database with
data inside the database will be cleared
o
-
After the first run, go to the application settings and set “CreateDatabase” to false
Configure db2 connection
o
o
o
Open file “DB2Dialect.hibernate.cfg” under
“C:\Workspace\General\Db\Settings\DB2Dialect.hibernate.cfg” in an Editor
Configure “Database” and “Server”
Configure “User” and “Password”
5.4 Start Website
-
Select your Website in the II7 (bexispp)
Select on the left side in the IIS Browse *:80 (http) or open the browser connect to localhost
6. Errors
ERROR [08004][IBM] SQL30061
- Check if database exist. If not create this database
- If you user more than one instances of db2 you need to add to port number to the server name in
the connection string
o Localhost:50001
ERROR [08001][IBM] SQL30081n
- Please check if the Database Instance is running.
- If not, start the instance
ERROR HTTP-ERROR 403.14
- .Net is not registered for IIS 7
- Open the BEXIS 2.0.0 folder and start aspnet_regiis.exe as admin
ERROR HTTP- ERROR 404.2
change apppool in II7 to integrated (asp.net 4)
ERROR SQL1159
- Initialization error with DB2 .NET Data Provider, reason code 10...
for user 'IIS APPPOOL\ASP.NET v4.0'
- has something to do with App pool identity. Set the app pool identity as "Network service", this
group has already read access to C:\Program Files\IBM\SQLLIB\BIN
- Open IIS
- Select Application Pools and right click in “ASP .NET v4.0” and select “Set Application Pool
Defaults…”
- Process Model – Identity change to “NetworkService”