1
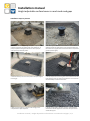
Installation manual
Height adjustable surface boxes in machined road gaps
General notice
•
•
•
•
•
Only height adjustable synthetic surface boxes should be installed in machined road gaps;
be aware that a height adjustable surface box always has to be installed 12 centimetres
lower than a fixed height surface box;
note that the gap has to be big enough; make sure that the plate compactor has enough
room to compact the surrounding area of the surface box unobstructed;
compact the foundation sufficiently;
compact the gravel and tarmac layers very good.
Installation
1. Pull the top part of the surface box at least 12 centimetres upwards.
2. Position the surface box at such a height that the top of the surface box is aligned with the
old tarmac surface.
3. Compact the ground layer thoroughly.
4. Fill the road gap with the support layer.
5. Tamp the surrounding area of the top part with the first tarmac layer.
6. Compress the top part of the surface box into the tarmac.
7. Clear the top part of the surface box so it can be pulled up.
8. Fill the road gap with the second tarmac layer.
9. Pull up the top part of the surface box again and tamp it with tarmac.
10. Compress the top part of the surface box into the road surface so the top of the surface box
is perfectly aligned with the road.
11. To implement ZTV Asphalt StB07 requirements, we recommend wrapping the top part with
TOK-tape so a durable elastic joint between surface box and road is created.
12. You could also consider using one of our height adjustable surface boxes with integrated
“Fugenring”. You can replace the ring with TOK-tape before compressing the surface box into
the road surface.
If these steps are carried out carefully the condition of the renovated road and installed surface box
will not change over time, even with high traffic.
Installation manual | Height adjustable surface boxes in machined road gaps | 1/3
Installation manual
Height adjustable surface boxes in machined road gaps
Installation steps in pictures
1. Make sure the hole is big enough. The plate compactor must
properly compact the surrounding area of the surface box. A
poorly compacted underground causes the road to prolapse
under pressure produced by traffic.
2. Pull the top part of the surface box at least 12 centimetres
upwards. Position the surface box at such a height that the top of
the surface box is aligned with the old tarmac surface. Compact the
ground layer thoroughly.
3. Insert the first layer of tarmac and spread it evenly throughout
the road gap.
4. Firmly compact the surrounding area of the surface box with the
hand compactor tool. The amount of compression is crucial for the
eventual stability of road and surface box.
5. After manual compaction, make sure the road gap is also
compacted with a plate compactor.
6. Fill the road gap with a new layer of tarmac, approximately 4
centimetres from the edge of the road surface. Tamp the tarmac
around the top part.
Installation manual | Height adjustable surface boxes in machined road gaps | 2/3
Installation manual
Height adjustable surface boxes in machined road gaps
7. Compress the top part with the plate compactor to ensure the
top of the surface box is at the same level as the road surface.
8. Clear the top part so it can be pulled up easily.
9. Fill the remaining gap with the last layer of tarmac. Then pull
the top part and tamp it with tarmac.
10. Complete the installation with the plate compactor. Now the
whole area is well compacted and the surface box is perfectly
aligned with the road surface.
11. A picture of a G+W height adjustable surface box,
professionally installed in a road gap.
12. After 8 years the surface box is still perfectly seated in the
renovated tarmac road.
Installation manual | Height adjustable surface boxes in machined road gaps | 3/3