1
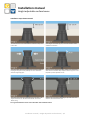
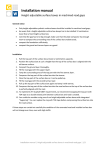
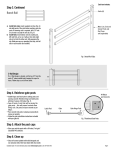
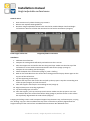
Installation manual
Height adjustable surface boxes
General notice
•
•
•
Heat resistance of synthetic housing: up to 240 °C
Observe ZTV Asphalt StB 07 guidelines
Be aware: height adjustable surface boxes need to be installed deeper than fixed height
surface boxes. Be sure to follow the minimum level of twelve centimeters (Image A).
Fixed height surface box
Height adjustable surface box
Installation
1. Calibrate the surface box.
2. Compact the underground sufficiently and make sure that it is even.
3. Place the support tile and surface box into the gravel layer. Make sure that the top of the
surface box is at least twelve centimeters below road surface (Image A, Image 1).
4. Compact the surrounding area thoroughly.
5. Check the depth of the surface box (Image 2), with a shelf e.g.
6. Mark on the road side where the surface box is being positioned. Spray release agent on the
top part of the surface box.
7. Lay the supporting tarmac layer.
8. Remove the layer from the surface box and pull up the top part. Tamp the surrounding area
of the top part (Image 3) and roll the tarmac.
9. Clear the top part and tamp the surrounding tarmac (Image 4).
10. Align lid description according regulations.
11. Lay the finishing layer of tarmac.
12. Clear the top part, pull it up and tamp it with tarmac. Make sure the top part is max. two
centimeters above the road surface before rolling (Image 5). Roll the tarmac so the surface
box is perfectly aligned with the road surface (Image 6).
Tamping and rolling creates a well compacted support layer between top- and bottom part, carrying
the “floating” top part. After installation the top of the surface box is perfectly aligned with the
height and slope of the road surface. No additional maintenance! No additional costs!
Installation manual | Height adjustable surface boxes | 1/2
Installation manual
Height adjustable surface boxes
Installation steps demonstrated
The surface box must be installed twelve centimeters deeper than
road surface.
Check height of extended top part; it should be between twelve
and fifteen centimeters.
Tamp the support layer which surrounds the surface box. Before
tamping the top part must be pulled up max. two centimeters
above the supporting layer.
Clear the top part directly after rolling. Create a four centimeters
wide and four centimeters deep slope around the top part so it can
be pulled up and tamped with tarmac.
Tamp the top part after laying the finishing layer of tarmac. The
top part should be max. two centimeters above road surface
before rolling.
Situation after a perfectly installed height adjustable surface box
settled in the finished tarmac road.
Go to gw-surfaceboxes.com for more information and installation videos.
Installation manual | Height adjustable surface boxes | 2/2