1
User’s manual
for your built-in electric oven
Model: EB8202ST
Version: 1.0 / 140709
EN
Safety instructions
Dispose of the dishwasher packaging material correctly.
All packaging materials can be recycled.
This icon indicates a hazardous situation.
Plastic parts are marked with the standard international
abbreviations:
(e.g. PS for polystyrene, padding material)
Observe these safety instructions and behave accordingly careful. Enter these warnings also to other users of the device.
This appliance is identified according to the European
guideline
2002/96/EC on waste electrical and electronic equipment -WEEE. The
guideline specifies the framework for an EU-wide valid
return and re-use of old appliances.
You‘ll find it especially with all descriptions of the steps that
might cause danger to persons arising.
!
This icon indicates a warning.
You can find it in the description of the steps that must be observed in order to damage to the unit can be prevented. Please include these safety instructions to all device users.
This icon indicates an information.
This symbol indicates useful tips and calls attention to proper
procedure and behavior. The observance of the notes marked
with this icon may save you many problems.
This device is intended solely for preparation of food in the household or similar conditions and is not suitable for commercial use. (Loss of warranty).
KKT KOLBE is not liable for damage caused by improper use, failure to follow
the operating instructions and inappropriate use!
2
Safety precautions
Warning
• When the oven is first switched on, it may give off an
unpleasant smell. This is due to the bonding agent
used for the insulating panels within the oven. This is
completely normal, if it does occur, you merely have
wait for the smell to clear before putting food into the
oven.
• The appliance and its accessible parts become hot during use.
• Care should be taken to avoid touching heating elements.
• Children less than 8 years of age shall be kept away unless continuously supervised.
• This appliance can be used by children aged from 8
years and above and persons with reduced physical,
sensory or mental capabilities or lack of experience
and knowledge if they have been given supervision or
instruction concerning use of the appliance in a safe
way and understand the hazards involved. Children
shall not play with the appliance. Cleaning and user
maintenance shall not be made by children without
supervision.
EN
!
• Care should be taken to avoid touching heating elements inside the oven.
• Do not allow children to go near the oven when it is
operating, especially when the grill is on.
• Ensure that the appliance is switched off before replacing the oven lamp to avoid the possibility of electric
shock.
• The means for disconnection must be incorporated in
the fixed wiring in accordance with the wiring specifications.
• Children should be supervised to ensure that they do
not play with the appliance.
• This appliance is not intended for use by persons (including children) with reduced physical, sensory or
mental capabilities, or lack of experience and knowledge, unless they have been given supervision or instruction concerning use of the appliance by person
responsible for their safety.
• Do not use harsh abrasive cleaners or sharp metal
scrapers to clean the glass of the oven.
• This can scratch the surface and may result in permanent damage to the glass.
• During use, the appliance becomes very hot.
• Do not use harsh abrasive cleaner or sharp metal scrapers to clean the oven door glass since they can damp
hands or feet.
• For oven: Oven door should not be opened often during the cooking period.
• The appliance must be installed by an authorized technician and put into use. The producer is not responsible for any damage that might be caused by defective
placement, and installation by unauthorized personnel.
• When the door or drawer of oven is open do not leave
anything on it, you may unbalance your appliance or
break the door.
touching onto the points that are exposed to the heat
directly.
• If you will not use the appliance for a long time, it is
advised to plug if off.
• If the supply cord is damaged, it must be replaced by
qualified persons in order to avoid a hazard.
• Excess spillage must be removed before cleaning and
shall specify which utensils can be left in the oven during cleaning.
• Only use the temperature probe recommended for the
oven.
• A steam cleaner is not to be used.
• Some parts of appliance may keep its heat for a long
time; it is required to wait for it to cool down before
3
Thank you!
Dear customer,
thank you for the trust placed in us and for the
purchase of this KKT KOLBE device. Your new appliance is designed for the requirements in yourhousehold.
Please read this user’s and instruction manual carefully, which describes the capabilities and operation of your KKT KOLBE-mounted device.
This manual is adapted to different types of devices,
so it is possible that you can find some descriptions
of functions that does not contain your device.
For damage to persons or objects caused by faulty
or improper installation of the device, the manufacturer accepts no liability.
The manufacturer reserves the right to make any
necessary modifications to the model types of devices that are used for ease of use and protect the
user and the device and correspond to a current
technical standards.
Your KKT KOLBE team
User’s manual
Model EB8202ST
Version 1.0
© KKT KOLBE.
KKT KOLBE is a registred trademark.
4
Table of content
6
2. The oven interior
2.1 Construction
2.2 Telescopic runners
2.3 Device fan
9
3. Application
3.1 Roast
3.2 Grilling & baking
3.3 Baking
3.4 Boiling down
3.5 Unfreezing
3.6 Application table
10
4. Programming
4.1 Setting the clock
4.2 Select type of heating
4.3 Adjust the cooking time
4.4 Delayed start
4.5 Minute minder
4.6 Key lock
12
5. Special features
5.1 Using the core probe
5.2 Temperature overview
14
6. Care and cleaning
5.1 Case front
5.2 SteamClean
5.3 Change door side
5.4 Oven racks
5.5 Telescopic runners
5.6 Change the oven light bulb
5.7 Oven glass
16
7. Trouble shooting
6.1 Content & accessoires
6.2 Roasting spit
6.3 Safety switch-off
6.4 What to do in case of problems
17
8. Installation and connection of the device
7.1 Installation in floor cabinet
7.2 Installation in a wall unit
7.3 Power supply
19
9. General information
9.1 Data sheet
23
EN
1. Using the device
1.1 Control panel
1.2 Energy saving tips
1.3 Types of heating / functions
5
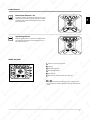
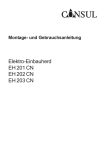
Using the device
Control panel
Temperature
Kindersicherung
Type of heating
Semi-automatic
„Duration“
Semi-automatic
„Stop“
Timer working
Time (Time of day, timer)
ns
io
ct
un
ef
m
Ti
In
D e cre
cr a s
ea e/
se
s
es
pr
Ex
re
s
Ca et “
ll : S
a a
pr ve
es /
et
/N
us
io
ev
Pr
„P
ex
t
h
Thermometer-Icon
Minute minder
(lights up as long as
on/off
appliance heats up)
itc
FSw
ON
/O
F
Ke
y
lo
ck
„P“ = Preset or
„d“ = Demo mode
Energy saving tips
• If possible, use dark black finished or silicone-coated enamelled tins, because they absorb the oven heat particularly
well.
• Only preheat the oven if this is specified in the recipe or in
the tables.
• When heating up the empty oven, much energy is needed.
It can therefore be saved by baking several dishes one after the other energy because the residual heat is used optimally.
• Switch off the oven about 10 minutes before the end of longer baking times to use the residual heat to finish cooking.
6
Types of heating
EN
Types of heating
Defrost
In this mode only air circulation without heating
is turned on. You can use it for gentle defrosting of
frozen food.
Top-/ bottom heating elements
Default Temperature: 200 °C
The top and bottom work together to provide
convectional cooking. The temperature can be set
within the range of 50-250OC. The default temperature is 220OC.
This is optional function that can be work with rotisserie motor.
Top and bottom heating elements with fan.
The upper and lower heaters are in operation. At the
same time the fan is running to stir up the heat. The
combination of fan and heating elements also offer
faster heat, saves up to 30-40% of the energy. The
dishes are lightly browned on the outside and still juicy
in the inside. Note: This function is suitable for grilling
or roasting large pieces of meat at a higher temperature.
Bottom heat + Circular heating element
with fan (pizza function)
Standard temperature: 190 °C
The bottom heating + circular heating with fan-mode
is for recipes with a damp pad and a crunchy batter,
such as pizza, quiche, fruit and cheesecake. Before
you start baking, you should preheat the oven.
7
Types of heating
Circular heating element with fan
Default temperature: 170°
An element around the convection fan provides an
additional source of heat for convection style cooking.
In convenction mode, the fan automatically turns on
to improve air circulation within the oven and creates
an even heat for cooking. The temperature can be set
within the range of 50 – 240 °C. The default temperature is 180 °C.
If possible, use this type of heating to cook food on
more than one layer.
Full-width grilling
Default Temperature: 240°
The inside radiant element and top element are working. The temperature can be set within the range of
180-240°C. The default temperature is 210°C.
Grill-/roast-system
Grill heating element and fan are on. This mode is
particularly suitable for grilling and roasting larger
joints of meat, and for browning and baking.
Note: If you grill with 165 degrees, the unit remains
clean, because fat begins to 'splash' only at 172 ° C.
Circular heating element with fan, combined
with grill and bottom heat
Circular heater and circulating fan are working. In addition, grill and bottom heat at low speed. Well suited
for dishes that require a long cooking time or requiring
cooking evenly on the entire plane.
8
Inside the oven
Bottom heat elements + fan
EN
The lower radiator and the air circulation fan are on.
Ideal for the preparation of pastries, cakes in shapes
and sheets. We recommend that you use one of the
lower rack levels.
Top heating element
Only the upper heater is in operation. Ideally suited
for food at the end of the actual cooking process a
bit "overbrowned" to.
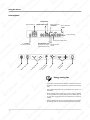
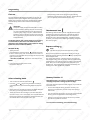
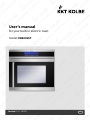
Inside the oven
1 Hook-in racks with rack levels
5
4
2
2
1
3
2
6
1
4
3
2 Lighting
3 Fan with ring heater
4 Grill heating element
2
5 Top element
1
6 Bottom heat radiator (under the oven floor)
1 to 4 :
Shelf levels for shelf unit, baking tray or roasting pan. Please note that the numbering of the rack levels from bottom
to top.
9
Application
Roasting
Baking
For roasting the top and bottom heat or hot air can be
used.
For baking, the top and bottom or the hot air may be
used. If in the baking table no special pastries types are
specified, select the information to a similar pastry or
cake.
• Tableware made of enamel, fire resistant glass, clay (clay
pot) or cast iron use.
• Are unfavorable Brattöpfe stainless steel because they
reflect the heat.
Top and bottom heat
• In the open dish of roast browns faster. For very large frying the rust is in conjunction with the drip pan.
• The top and bottom heat is particularly suitable for baking
dry cakes, bread and biscuit.
• A covered stays juicy roast and the oven does not pollute.
• Use dark baking tins. Light brown bakeware worse, because they reflect the heat.
Notes
• Use a rack level.
• Roasting times depend on the type, weight and quality of
the meat.
• Make bakeware on the rack.
• Always ensure sufficient liquid in the frying vessel or the
roasting pan so that any escaping fat and meat juices do
not burn (odors).
• The hot air is particularly suitable for baking on several
levels, for moist cakes and fruit cakes.
• Give first roast with the sideboard page in the frypot and
turn half way through cooking time.
• When roasting larger pieces of meat reinforced produces
steam, which condenses on the oven door. The function
is not affected. Please wipe dry after frying. Do not let the
roast cool in the closed oven.
Convection
• In moist cake (eg fruit cake) because of the formation of
steam max. Two plates slide.
• The baking time may vary for multiple sheets. May need to
be taken out a sheet sooner than the other.
• Biscuits as possible the same thickness and the same size
so that it browns evenly cook.
• If multiple cakes are baked at the same time, created in
oven more steam to the oven door can cause condensation. This can not be avoided.
Grilling and browning
For grilling and browning, use the full-width grill.
!
Caution: Risk of burns when operating the grill. The
extreme heat of the parts are very hot. Therefore,
use kitchen gloves and tongs.
• Constantly observe the grilling process. Food can burn
very rapidly by the intense heat.
• Always keep children away.
Notes
• Food is grilled in the closed oven door. Shortly preheat the
grill element.
• Brush in the grill with oil, so the grilled food does not stick.
• Laying Flat grilling on the grill and insert the drip pan to
catch the meat juices.
• Plain washers only once, larger pieces several times contact with barbecue tongs.
• Dark meat types tan better and faster than light meat from
pork or veal.
• After grilling, clean the oven and the accessories, so that
the dirt doesn’t stick firmly.
10
Boiling down
Use convection for boiling down.
• Prepare your glasses and food as usual. Only use conventional preserving glasses with rubber rings and glass lids.
Jars with screw or bayonet closure and metal tins are not
suitable. The glasses should be filled the same size and
with the same content.
• Use only fresh foods.
• For the necessary moisture, pour about 1 liter of water in
the drip pan and put into the glasses so that they do not
touch.
• Insert the roasting pan with glass bottom and adjust 180
°C and hot air.
• Watch the food until the liquid starts to pearl in the glasses. Then turn off the oven and leave the preserve still rest
for about 30 minutes.
Application
Defrost
EN
By air circulation at room temperature, thawing of food
gets accelerated.
Use the defrost function.
• To thaw, cream and butter cream cakes, pies and pastries,
bread and rolls, frozen fruits are suitable.
• For a uniform thawing, rotate or stir defrosted in between.
Application table
Food
Baking
Cake
Pie crust
Shortcrust
Pie
White bread made from dough
Pizza
Vegetable casserole
Roast
Roast pork ca.2 kg
Meat loaf ca.1,5 kg
Duck ca.2 kg
Gans ca.3 kg
Chicken ca. 1,3kg
Wild hare
Deer leg
Grilling
Pork chop
Sausages
Chicken halves
Fish
Insertion
Temperature in °C
Time
1
1
1
1
1
1
2
175
200
200
200
200
220
200
ca. 55-65
ca. 8-10
ca. 25-35
ca. 25-35
ca. 25-35
ca. 20-30
ca. 40-45
2
2
2
1
2
2
2
175
175
200
200
200
200
200
ca. 120
ca. 45
ca. 120-180
ca. 150-210
ca. 60-80
ca. 60-90
ca. 90-150
4
4
3
3
max.
max.
max.
max.
ca. 8-12
ca. 10-12
ca. 25-35
ca. 15-25
Please choose heating method according to the
previous description.
11
Programming
First use
The oven should be thoroughly cleaned first. The oven for
about 20 minutes at 200 degrees heat up (Procedure: See
below); in this manner all the fatty manufacturing residues
are eliminated, which could cause bad odors during the
baking.
!
Important:
The power supply must be switched off as a safety
precaution before cleaning the oven. For cleaning,
any acid or alkaline substance may be used (such
as lemon juice, vinegar, salt, etc.). Chlorine based
products, acids or abrasives are also to be avoided,
this is especially to pay attention for the cleaning of
enamelled walls.
For the first time or after a power failure it is neccessary
to set the built-in clock of the oven. Without set time
operation is not possible! After a power failure or during
initial start-time, an indicator flashes.
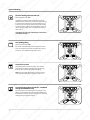
Set time of day
• Setting the time:
Press the button "clock functions"
until the clock icon
flashes. Use the "plus" and "minus" buttons to set the correct time. 5 seconds after the last change the set time value
lights up constantly.
→ The time is confirmed. The oven is now ready for use.
Notes
• In an interruption of the power circuit,
the clock is reset to 0.
Select a heating mode
The operating mode can be changed any time during
operation by pressing the and
keys. The temperature
you can adjust by the two buttons + and – keys.
Thermometer-Icon
The shining "thermometer symbol" indicates that the oven
is heating up to the set temperature. The indicator (black
"filling") indicates the Aufheizfortschritt. Once the icon is
"filled", the oven is finished preheating. If the device needs
to reheat, you will see that if the filling something disappears
from the top again.
Express cooking
Note:
This function only works when the oven is empty.
Once you have selected an appropriate mode, you can get
the empty oven by pressing the button
very quickly to the
desired temperature.
The "rising thermometer" indicates that the oven heats up
with a higher energy use very quickly. After the rapid heating
is finished, the oven operates again according to the selected
mode. Now you can also bring the food in the perfect preheated oven. The cooking process begins immediately, the
cooking time is thus significantly reduced.
Memory function P
• Turn on the oven with the main button.
With this function, you can store a frequently used mode
including temperature setting and time settings.
• Press the
and
keys so long until desired mode is
reached (see the icon for the heating left on the LED display).
Set mode, desired temperature and program, if you want the
electronic timer.
• At the same time you will also see the set default temperature (180 ° C) to the right of the function mode.
• These can now be set according to your own ideas (with
the + and – keys, in 5 ° C increments). Five seconds after the
last change is either the proposed or the temperature you
set and the device starts to work (warm-up).
• To save the complete setting, press the "memory" (P =
preset) for 2 secons until you hear a beep. The setting is
now stored.
• You can overwrite the memory at any time and any number
of times, ie be occupied with a new configuration.
• As long as you save a new setting, the memory contents
will remain available at all times.
To access the saved setting, proceed as following:
12
Programming
.
Beep tone
• Then press the button P. Now the appliance will start working in the stored configuration.
EN
• Turn on the oven with this button:
+
• Each operation of a switch or control surface is confirmed
by a beep. Also reaching the set temperature is displayed
by this acknowledgment.
• This acknowledgment can be turned off:
Turn the display on and off
• Do this, press the control surfaces "minus" and "plus"
simultaneously until you hear the buzzer. From now on, the
confirmation tone is off.
• Repeat this process for the acknowledgment tone again
turn.
+
• Click the button "Time functions" and the control surface
"minus" at the same time until the display disappears.
• Switching on display again: Press button "Time functions"
and the control surface "minus" at the same time until the
display reappears.
• When the oven is switched on the next time, the display
light will automatically reappear.
Key / child lock
3 seconds
• To lock the oven functions against use, you can call the
child or key lock function.
• Press the button
the display.
until the sign "child lock" appears in
+
P
Demo mode
The oven can also be turned into the so-called "demonstration mode. In this state, the device is indeed fully operable but
the heating system is deactivated.
• Choose the demo mode
Turn on the device with this button: . Now press the buttons "+" and "P" simultaneously until you hear the buzzer.
Now a "d" appears on the left side in the display. At first,
the default temperatures and heating modes will be shown
by the system.
• Leave the demo mode
Turn the device on with the button . Now press the buttons "+" and "P" so long until you hear the buzzer. The "d"
in the display will disappear.
• The oven can now only be controlled again when you turn
off the child lock.
• Press to turn off the button
disappears in the display.
until the sign "child lock"
13
Programming
2. Semi-automatic function „DURATION“
Time functions
The oven has an electronic clock which not only displays
the current time, but also the device can reliably according to your specifications automatically turn on and off.
+
The following functions are possible:
1. Minute minder
• This function reminds you after a certain period of time
reliably by a beep. This function may be used at any time
and independent of the other device functions.
2. Semi-automatic function „DURATION“:
• The oven starts to work immediately. After a set period it
will turn itself off.
3. Semi-automatic function „STOP“:
• The oven starts to work immediately and turn off at a
certain time.
4. Modes „DURATION“ and „STOP“ combined:
• With this function, you can turn the oven on and off automatically.
With this function, the oven will turn on immediately and
after a set (programmed) period of time off.
• Choose a desired heating type and a suitable temperature.
• Press the button "clock functions" until the icon "duration"
and time display will flash in the display.
• Set the desired time period with the control surfaces
+ and –.
• 5 seconds after the last input, the icon "duration"
and
the time display will light up continuously. The "time display" now shows the time remaining until the switch-off.
• After expiry of the period the icon "duration"
and the
time display (0:00) begins to flash and a beep sounds for 2
minutes. The oven will turn off the fan, heating and baking
space lighting.
• You can prematurely terminate the beep at any time by
pressing any switch or control surface.
1. Minute minder
+
This device has a reliable minute minder, which reminds
you for specified times according your cooking plan. This
is how you can turn it on:
• Press the button
so long until you can see the icon
"minute minder" and the time flashing.
• Set the desired period of time (1-99 minutes) with the
control surfaces "minus" and "plus". 5 seconds after the
last input, the icon "timer"
and the time light up continously. The time display will show the remaining time in
minutes until the beep.
3. Semi-automatic function „STOP“
+
With this function, the oven will turn on immediately and
afer reaching a preset time value
• Choose your desired heating type and a suitable temperature.
• After expiry of the period the icon "Timer" and the time
display will flash ("0:00") including a buzzer sounds.
• Select the button "time functions" until the icon "STOP"
and the time display flash in the display.
• You can prematurely terminate the beep at any time by
pressing any switch or control surface.
• Now set up the desired time with the buttons "+" and "–".
14
• 5 seconds after the last input the icon "STOP" and the time
display will appear continuously. The time display now
shows the time remaining until the switch-off.
• After reaching the point of time, the sign "STOP" and the
time display (0:00) starts to flash and a buzzer will ring.
and 10 minutes and fry complete this operation on time at
12:00 clock in order to switch it off afterwards.
• You can stop the beep anytime prematurely by pressing
any switch or control surface.
• The end of the cooking process is additionally indicated by
a beep which you can turn off at any time by pressing any
switch or control surface.
4. „STOP“ and „DURATION“ combined
+
With this function, the oven switches on and off automatically (functions "stop" and "permanent" combined).
• First select the desired type of heating and a suitable
temperature.
• Now as described in the previous points, the functions
"STOP" and "DURATION" will be set in combination.
• The oven now "knows" when the dish should be ready
("STOP" time) and how long it should be cooking ("DURATION" time).
• Exactly at this preperation time ("DURATION") the oven
will turn itself on the "STOP" and by reaching it off.
Procedure and example:
You want to leave in the morning 10 clock the house, but
serve after your return at 12:00 clock a roast chicken, whose
cooking time is 1 Sunde and 10 minutes.
Proceed as following:
• Choose a desired heating type and a suitable temperature.
• Set up the cooking duration. For example: 1 hour und 10
minutes (= 70 minutes).
• Set up the time, when the appliance should stop working.
For example: 12:00 o'clock.
• After a few seconds, the switch detects the input data and
the oven now "waits" for his dedication.
• At 10:50 clock, the oven will turn on the chicken for 1 hour
15
EN
Programming
Care and cleaning
Care and cleaning
!
• For cleaning, don’t use steam cleaners.
• Before cleaning the machine, let it cool down and unplug from the mains.
• Don’t use abrasive cleaning agents, abrasive scourers
or sharp objects.
Case front
Please use only commercially available agent according to
the manufacturer‘s instructions for cleaning and maintenance of the front surfaces.
Oven
• The oven is easier to clean when it is still slightly warm.
Simple remove grease splashes with rinse water.
• Use conventional oven cleaner for stubborn or severe
soiling. Rinse thoroughly with cold water to remove all
cleaning agents are removed completely.
• When using oven sprays, observe the manufacturer‘s
instructions. Painted, anodized, galvanized surfaces, aluminum parts and radiators may not come in contact due to
possible damage and discoloration with these sprays.
• Clean the accessories such as baking tray, drip pan, rust,
etc. with hot water and a little detergent.
Stainless steel surfaces can be cleaned and wiped dry
with mild detergents (eg soap) and a soft cloth. Aggressive
cleaning agents (eg vinegar-based cleaners), abrasives,
abrasive grit and sharp objects will damage the surface of the
device!
SteamClean-Function
Hinge support
Clip
This function facilitates the oven cleaning essentially,
because the dirt can be solved more easily by water vapor
and heat. Remove the accessories such as roasting pan,
baking sheet and rust.
• Pour down about 0.4 liters of water with a little detergent
into a glass and place it on the oven bottom.
• Close the oven. Select bottom heat heating at 50 °C.
• Switch off the unit after about 30 minutes and disconnect
the power. Remove soaked food debris with a cloth.
• Note the previous cleaning instructions for baked-on soils.
16
Remove the oven door
Fold down the oven door in the horizontal position.
Lift the bracket on the two door hinges to the front.
Slowly close the oven door until it stops. Then lift the door
until the hinges disengage.
The insertion is carried out in reverse order. At last, swing the
lever back to the hinge support.
Care and cleaning
Remove the hook in racks
EN
Remove accessories such as rust and baking sheet.
Hook in racks at the clamping point slightly push down (2 in
figure) and the oven wall down.
Swivel hook in racks inside and unhook at the top (1 in figure)
2
Insert hook in racks
Insert the siderails up in the holes and swing it down.
At the terminal point, push the spine down slightly and press
toward the side wall.
The hook in racks must engage tight.
1
Telescopic runners
To clean the side walls of the oven, the telescopic slide rails
can be removed. With a large screwdriver loosen the fastening
screws and remove the complete set.
The telescopic drawer slides do not immerse in water and
do not clean in the dishwasher, but cleaned with standard
cleaning agents outside.
!
Note: The roles must not be greased. After
cleaning, the telescopic slide rails and fix it down
with the screws.
Please note:
Telescopic slide rails can not be used with catalytic metal
sheets in the oven!
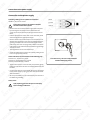
Replacing the lamp and clean the glass cap
In the lamp bulb is a particularly heat-resistant mold (230 V, 25 W).
To replace this, proceed as follows:
• Disconnect in any case the device from the power supply (pull
the plug or remove the fuse), because the wording could be live.
• To remove the glass cover, hold the lower end with one hand, insert
a flat sharp object, such as a knife between the glass and the frame.
• If necessary, replace the halogen bulb with a 25 watt, 230 V - 300
degree heat resistant - oven lamp.
• Always use a cloth when handling a halogen lamp, in order to avoid
oil stains on the surface.
• Reset the glass cover.
17
Troubleshooting
Oven door
The oven door is fitted with three successive positioned
glass panes. For cleaning the inner and middle glass plate
can be removed.
!
• Whenever the door of the oven is removed, the clips
should be opened.
• Do not use harsh abrasive cleaners or metal scrapers to
clean the oven door when scratched or could break the
glass.
Rinse the glasses with warm water and special glass
cleaner.
Polish them then only with a clean, soft cloth.
• If the door is installed, you can injure yourself when
removing parts (glass door or other).
Change door side
• Fully open the oven door (a).
• Press the lever of the upper hinge locking (b) (where the
door firmly hold) tilt slightly and after the lower unlock (c)
was dissolved, carefully remove.
• If you change the door hinge, so you need to rotate the
door and lock on the other side until the bottom and then
the top.
• To reattach the oven door, please place only the hinge
down into the small hole insert and lock.
• Then the hinge locks up.
• Check to see if the hinge is properly locked into place and
close the oven door.
!
18
Note:
If the oven door is not properly mounted or
is locked, it can fall off!
a
b
Troubleshooting
EN
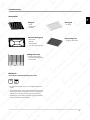
Accessoires
Grill grid
Roast grid
• Grills
• for frying
• Cake mold
• Griddle
Universal baking tray
• Great cake
• biscuits
Deep baking tray
• For gravy and sauces
• Frozen foods
• Fat / juice collection pan
Baking sheet trays
• These can be easily removed for cleaning of the
furnace walls.
Rotisserie
It can only be used in the following two modes:
• It consists of a skewer, 2 tines, a removable handle and a
cradle.
• To use the rotisserie, insert it into the hole in the rear wall
of the furnace. Place the deep pan on level 1 (lowest level)
while you are using the rotisserie. (optional accessory)
• The baking tray, the deep pan and the grill grid should be
correctly inserted into the side rails.
19
Troubleshooting
What to do in case of problems?
Unqualified persons should perform the repairs on this unit
because of electric shock and short circuit hazard. Repairs generally only be carried out by a licensed professional.
The oven doesn’t heat up.
Device fuse tripped in the house installation?
Temperature controller and the function selector switch set
correctly?
The device fuse keeps blowing.
Call an authorized customer service or a licensed electrician.
Lighting has failed.
The replacement of lighting is described in the previous chapter.
„AUTO“ flashes in the display of the timer (on some
models only).
Hand button to switch the oven to manual operation.
I’m not satisfied with the baking results.
The hints and tips have been followed in this manual?
20
Installation and connection of the device
The device may only be connected by a qualified person. The furnace must be installed
according to the instructions. Remove the
protective strip from the door. After installing,
remove the protective strip from the interior
surfaces of the oven.
EN
Installation in a floor cabinet
Phase
Ground
Neutral
Safety instructions for the installer
!
• The installation must garantee protection
against electrical shocks.
• The unit in which the appliance is installed must
meet the requirements of DIN 68930 in terms of
stability.
1. Pay attention to the requirements for the minimum distance.
2. Secure the device to the cabinet with screws on both sides.
21
Connection to the power supply
Connection to the power supply
Foll owing cable types are suitable for the device:
H05 RR-F , Min 1.1m 3x 2.5mm
!
2
During this operation, the appliance must be
disconnected from the mains!
phase
ground
neutral
• Remove the cover from the bottom right of the rear panel
by loosening the two clamp screws. Remove the two
screws on the strain relief clip to the right of the terminal
block.
• Pull the replacements mains cable. Lower the outer jacket
of the new pipe to the appropriate length.
• Remove about 12 mm wide and press on end sleeves on individual wires insulation. Insert the new cable through the
opening provided in the rear wall and through the strain
relief clamp. The outer covering of the cable is in the strain
relief clamp on the side of the terminal block to go through
at least 1 to 2 mm.
• Then tighten the two screws of the clamp.
• Check the effectiveness of the strain relief by pulling on the
line in an appropriate intensity.
Connect the wires to each terminal in the following way:
Connection L – brown wire / phase
Connection - green/gelbe wire / ground
Connection N - blaue Ader / neutral
• Tighten the connector screws securely and check by gently
pulling on each wire if the wire was reliably detected by the
terminal.
• Cover mount with two screws. When the oven is connected
to the power supply by a plug, this must remain accessible
after installation.
• We accept no liability in case of accident by non-existent or
for defective grounding.
Safety notes:
!
22
After replacing, perform the power cord safety
test according to VDE 0701!
From the factory, the unit is shipped with a
standard EURO-plug device.
General information
Data sheet
Manufacturer
KKT KOLBE
Model
EB8200ED
Mains voltage
220-240V ~50/60Hz or 50Hz
Volume
53/58 Liter
Power consumption
2.750 W – 3.300 W
Temperature
60 – 250 °C
Energy efficiency class*
A
Weight
Net
38,0 kg
– with packaging
41,8 kg
Dimensions (B x H x T) outside
594 x 556 x 594 mm
front
558 x 583 x 560 mm
insert dimensions
* On a scale from A (less efficient) (very efficient) to G
Top/bottom heat 1.0 kWh cooking time / standard load 39.4 min;
Convection / hot air 0.88 kWh cooking time / standard load 36.8 min;
Power consumption 3.5 KW
23
Thank you for reading.
We wish you much success and
joy with your device.
Version: 1.0 / 140709