1
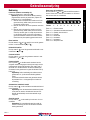
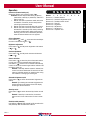
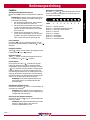
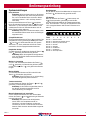
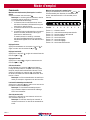
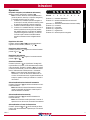
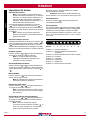
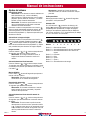
Gebruiksaanwijzing
Bedienungsanleitung
Mode d’emploi
Istruzioni
Manual de instrucciones
Compact LCD 7” uni
V2.1
ORLACO PRODUCTS BV
Albert Plesmanstraat 42, 3772 MN Barneveld
PO Box 193, 3770 AD Barneveld
The Netherlands
Phone: +31 (0) 342 404555
Fax:
+31 (0) 342 404556
E-mail: [email protected]
Internet: Http://www.orlaco.nl
All data subject to change without notice. All dimensions are for
commercial purpose only. The camera monitor systems by Orlaco are
entirely conform the latest CE, ADR, VDE and EMC specifications and
are produced conform the ISO 9001 - 2000
4 quality system.
e
NEDERLANDS/ENGLISH/DEUTSCH/FRANÇAIS/ITALIANO/ESPAÑOL
User Manual
NEDERLANDS/ENGLISH/DEUTSCH/FRANÇAIS/ITALIANO/ESPAÑOL
ORLACO
UM V2.1
Inhoud/Content/Inhalt/Index/Indice/
Contenido
Nederlands
Bediening
Systeem
3
4
English
Operation
System settings
5
6
Deutsch
Funktion
Systemeinstellungen
7
8
Français
Commande
Réglages du système
9
10
Italiano
Operazione
Impostazioni del sistema
11
12
Español
Funcionamiento
Ajustes del sistema
13
14
2
Gebruiksaanwijzing
Powersave (Camera-verwarming uit)
Schakel de powersave in met knop 8
.
Opmerking: Monitor onthoudt de laatste instelling
(ingeschakeld, stand-by of powersave) Tijdens het
opstarten zijn er 3 mogelijkheden:
1. Monitor was in de powersave mode en zal 2 sec.
geactiveerd zijn (beeld check) alvorens naar de
powersave mode te gaan.
2. Monitor was aan en zal na het opstarten weer aan
gaan.
3. Monitor was in de stand-by mode en zal 2 sec.
geactiveerd zijn (beeld check) alvorens naar de
stand-by mode te gaan. In zowel de powersave en de stand-by mode, zal de LCD automatisch
geactiveerd worden wanneer de camera selectie
draad met een plusspanning geactiveerd wordt.
Kleur instellen
Druk de toetsen 4
en 5
tegelijk in en stel de gewenste kleur in met insteltoets 6
of 7
.
Power save uit /inschakelen
Druk de toetsen 4
en 5
gedurende 60 seconden in
om de “Power save” toets uit te schakelen en 120 seconden om hem weer in te schakelen.
Objec t s in
monitor are
closer than
they appear
Toetsen
C3
C2
C1
1
2
3
4
5
6
Toets nr. 1 = Camera selectie
Toets nr. 2 = Automatische helderheid aan/uit
Toets nr. 3 = Standby functie aan/uit
Toets nr. 4 = Contrast
Toets nr. 5 = Helderheid
Toets nr. 6 = Insteltoets Toets nr. 7 = Insteltoets +
Toets nr. 8 = aan/power save
7
8
NEDERLANDS
Bediening
Helderheid instellen
Druk op toets 5
en stel de gewenste helderheid in met
insteltoets 6
of 7
.
Contrast instellen
Druk op toets 4
en stel het gewenste contrast in met
insteltoets 6
of 7
.
Camera selectie
Door op toets 1
te drukken wordt het beeld van de
volgende camera weergegeven waarbij het lampje van de
geselecteerde camera gaat branden. Door toets 1
2
seconden in te drukken worden de aanstuurdraden van
de camera’s weer geactiveerd en gaat de indicatie LED bij
knop 1 uit.
Opmerking: Indien handmatig een andere camera
geselecteerd is, zijn de aanstuurdraden gedeacti-
veerd.
Een aanstuurdraad activeert een gewenste camera,
bijvoorbeeld d.m.v. richtingaanwijzer of achteruitversnelling.
Automatische helderheid aan/uit
Druk op toets 2
om de automatische helderheid aan of
uit te schakelen.
Opmerking: Door de automatische helderheid te activeren past de monitor de helderheid van het LCD display aan afhankelijk van de hoeveelheid omge-
vingslicht.
Stand-by aan/uit
Druk op toets 3
om de stand-by functie aan- of uit te
schakelen.
Opmerking: Bij ingeschakelde stand-by treedt de monitor in werking als één van de aanstuurdraden
wordt geactiveerd.
UM V2.1
3
Gebruiksaanwijzing
NEDERLANDS
Systeem
Vertraging
Opmerking: Als een camera wordt aangestuurd door
een knipperend signaal (richtingaanwijzer) dan moet
de vertraging geactiveerd worden om een knipperend
beeld te voorkomen. Fabrieksinstelling: Camera 1 en
2 met vertraging, camera 3 zonder vertraging. De
vertraging kan niet worden geactiveerd als de betreffende camera al wordt aangestuurd door een knipperend signaal.
Selecteer de betreffende camera met toets 1
. Activeer
de vertraging door toets 3
40 seconden in te drukken
(led van aan/uit toets knippert 1x). Door deze handeling te
herhalen wordt de vertraging weer gedeactiveerd.
Spiegelbeeld activeren
Selecteer de gewenste camera met toets 1
. Activeer
spiegelbeeld door toetsen 1
en 3
20 seconden
tegelijk in te drukken (led van aan/uit toets knippert 1x).
Door deze handeling te herhalen wordt het spiegelbeeld
weer gedeactiveerd.
Omgekeerde weergave
Druk de toetsen 1
en 2
tegelijk gedurende 40 seconden in om een omgekeerde weergave te activeren.
Opmerking: Als omgekeerde weergave wordt geactiveerd dan wordt het beeld van de camera op de kop
weergegeven op de monitor.
Normaal/Breedbeeld
Druk de toets 5
gedurende 60 seconden in om de
monitor in te stellen op normaal of breed beeld.
LED indicatie
Als de LED bij toets 1
(geselecteerde camera) en toets
8
(aan/powersave) samen knipperen dan wordt het
beeld uitgeschakeld omdat de omgevingstemperatuur
onder de -40°C of boven de +75°C is.
Bij temperaturen onder -25°C start de monitor niet meer
op.
Objec t s in
monitor are
closer than
they appear
Toetsen
C3
C2
C1
1
2
3
4
5
6
7
8
Toets nr. 1 = Camera selectie
Toets nr. 2 = Automatische helderheid aan/uit
Toets nr. 3 = Standby functie aan/uit
Toets nr. 4 = Contrast
Toets nr. 5 = Helderheid
Toets nr. 6 = Insteltoets Toets nr. 7 = Insteltoets +
Toets nr. 8 = aan/power save
Referentielijn aan/uit schakelen
Druk de toetsen 2
en 3
tegelijk gedurende 10
seconden in om de referentielijn aan of uit te schakelen.
Stel de referentielijn met toets 6
of toets 7
op de
gewenste positie.
Monitor 50/60Hz
Druk toets 4
gedurende 60 seconden in om de monitor
in te stellen op 50 Hz of 60Hz.
Opmerking: Deze instelling is alleen noodzakelijk in
combinatie met een navigatiesysteem.
Toetsenbord uitschakelen
Druk de toetsen 1
en 5
tegelijk gedurende 15
seconden in om het toetsenbord uit te schakelen.
Opmerking: Als het toetsenbord uitgeschakeld is staat de monitor continue ingeschakeld en is verdere
handmatige bediening onmogelijk.
Handmatig Camera selectie In/uitschakelen
Druk de toetsen 1
en 4
tegelijk gedurende 40
seconden in om de handmatige camera selectie uit of in te
schakelen.
Opmerking: De gebruiker heeft de mogelijkheid om
m.b.v. toets 1
handmatig de stuurdraden te over
rulen. In sommige situaties is dit echter niet ge-
wenst, zoals prioriteit bij veiligheidscameras. Daarom
kan de handmatige selectie uitgeschakelt worden.
LET OP: bij uitgeschakelde handmatige camera selectie hebben de stuurdraden altijd prioriteit.
UM V2.1
4
User Manual
Powersave (Camera heating off)
Switch the monitor on by pressing button 8
.
Remarks: Monitor keep the last setting in memory
(switched on, stand-by or powersave) There are 3
ways to start up:
1. Monitor has been in powersave mode and will be
activated for 2 seconds (screen check) before
switching to powersave mode.
2. Monitor has been on and will after start up be on.
3. Monitor has been in stand-by mode and will be
activated for 2 seconds (screen check) switching
to stand-by mode.In both modes (powersave or
stand-by), the LCD will be automaticly activated
when the camera selection wire is supplied.
Colour adjustment
Press buttons 4
and 5
the colour with buttons 6
Objec t s in
monitor are
closer than
they appear
Buttons
C3
C2
C1
1
2
3
4
5
6
Button no 1 = Camera selection
Button no 2 = Automatic brightness on/off
Button no 3 = Standby function on/off
Button no 4 = Contrast
Button no 5 = Brightness
Button no 6 = Adjustment Button no 7 = Adjustment +
Button no 8 = On/power save
7
8
ENGLISH
Operation
at the same time and adjust
or 7
.
Brightness adjustment
Press button 5
and adjust the brightness with buttons
6
or 7
.
Contrast adjustment
Press button 4
and adjust the contrast with buttons
6
or 7
.
Camera selection
Press button 1
to show the picture from each camera
in order; the LED of the selected camera will light up.
Hold button 1
pressed in for 2 seconds to activate the
control circuits of the cameras again and the indicator LED
for button 1 goes out.
Remark: If manually another camera is selected, the
control circuits are deactivated. A control circuit activates an individual camera, for example, when using
the indicators or changing to reverse gear.
Automatic brightness on/off
Press button 2
to switch the automatic brightness on
and off.
Remark: By activating the automatic brightness the
monitor adjusts the brightness of the LCD display
according to the environment.
Stand-by on/off
Press button 3
to switch the stand-by function on and
off.
Remark: If stand-by is switched on, the monitor starts to work if one of the control circuits is activated.
Disable/enable powerkey
Hold buttons 4
and 5
pressed for 60 seconds to disable powerkey and 120 seconds to enable it.
UM V2.1
5
User Manual
ENGLISH
System settings
Delay activation
Remark: If one camera is controlled by an inter-
mittent signal (e.g. from an indicator light), the delay must be activated to prevent the picture from flickering. Factory settings: Camera 1 and 2
delay on, camera 3 delay off. The delay cannot be
activated if the respective camera is already control
led via an intermittent signal.
Select the respective camera with button 1
. Activate
the delay by holding button 3
pressed for 40 seconds
(The LED for the on/off button will flash 1x). Repeat this
operation to deactivate the delay.
Mirror image activation
Select the respective camera with button 1
. Activate
the mirror image by holding buttons
1
and 3
pressed in at the same time for 20
seconds (the LED for the on/off button will flash 1x).
Repeat this procedure to deactivate the mirror image.
Inverted image
Hold buttons 1
and 2
pressed at the same time for
40 seconds to activate inverted image.
Remark: If inverted image is activated, the picture
from the camera is shown upside down on the monitor.
Cinema/wide
Hold the button 5
pressed for 60 seconds to switch to
wide screen cinema.
LED indication
If the LED for button 1
(camera selection) and 8
(monitor on/powersave) flash together quickly, the image
is switched off as the ambient temperature is below -40°C
or above +75°C. At temperatures below -25°C the monitor
does not start anymore.
Objec t s in
monitor are
closer than
they appear
Buttons
C3
C2
C1
1
2
3
4
5
6
7
8
Button no 1 = Camera selection
Button no 2 = Automatic brightness on/off
Button no 3 = Standby function on/off
Button no 4 = Contrast
Button no 5 = Brightness
Button no 6 = Adjustment Button no 7 = Adjustment +
Button no 8 = On/power save
Marker on/off
Hold buttons 2
and 3
pressed at the same time
for 10 seconds to switch the marker on and off. Set the
marker to the required position with button 6
or button
7
.
Monitor 50/60Hz
Hold button 4
pressed for 60 seconds to set the monitor to 50 Hz or 60Hz.
Remark: This setting is only necessary in combina
tion with a navigation system.
Switch off the keyboard
Hold buttons 1
and 5
pressed at the same time for
15 seconds to switch off the keyboard.
Remark: If the keyboard is switched off, the monitor
is continuously switched on and further operations
are not possible.
Manual Camera selection On/ Off
Hold buttons 1
and 4
pressed at the same time for
40 seconds to switch on/ off the manual camera selection
mode.
Remark: The user has for example the choice to overrule manually by pressing button 1
. In some
cases this is however not suitable, such as priority
on security cameras. For this reason, it is possible to
switch off the manual camera selection mode.
Warning: by switching off the manual cam.selection
mode the control wire has always priority.
UM V2.1
6
Bedienungsanleitung
Stromsparmodus (Kameraheizung aus)
Mit der Taste 8
wird der Stromsparmodus eingeschaltet.
Bemerkung: Der Monitor hat eine Speicher-Funktion,
d. h. der Monitor speichert die letzte Einstellung vor
Ausschalten der Zündung.
1. War der Monitor eingeschaltet, dann schaltet er
sich nach Einschalten auch wieder ein.
2. War der Monitor ausgeschaltet, dann durchläuft
er nach Einschalten erst einen Funktionstest (Monitor leuchtet 2 Sekunden auf) und schaltet
dann wieder ein.
3. Einstellung vor ausschalten der Zündung.
Sowohl im Stromsparmodus als auch im Stand By-Modus wird das LCD automatisch aktiviert
wenn auf dem blauen Draht Spannung liegt.
Sparstand ein- ausschalten
Die Tasten 4
und 5
während 60 Sekunden drücken
um den Sparstand auszuschalten und 120 Sekunden um
ihn wieder einzuschalten.
Objec t s in
monitor are
closer than
they appear
Tasten
C3
C2
C1
1
2
3
4
5
6
Taste Nr. 1 = Kamera auswahl
Taste Nr. 2 = Automatische Helligkeit ein/aus
Taste Nr. 3 = Stand-by Funktion ein/aus
Taste Nr. 4 = Kontrast
Taste Nr. 5 = Helligkeit
Taste Nr. 6 = Einstelltaste Taste Nr. 7 = Einstelltaste +
Taste Nr. 8 = Stromsparmodus
7
8
DEUTSCH
Funktion
Farbe einstellen
Die Tasten 4
und 5
gleichzeitig drücken und die
gewünschte Farbstärke mit der Einstelltaste 6
oder 7
einstellen.
Helligkeit einstellen
Taste 5
drücken und die gewünschte Helligkeit mit der
Einstelltaste 6
oder 7
einstellen.
Kontrast einstellen
Taste 4
drücken und den gewünschten Kontrast mit
der Einstelltaste 6
oder 7
einstellen.
Kamera wählen
Durch drücken der Taste 1
wird das Bild von jeder
Kamera der Reihe nach angezeigt, wobei die LED der
ausgewählten Kamera leuchtet. Durch drücken der Taste
1
für 2 Sekunden wird die manuelle Umschaltung der
Kameras deaktiviert und die LED-Anzeige erlischt. Die
Umschaltung der Kamera wird nun wieder über die Steuerleitung der Kameras vorgenommen. Die Steuerleitung
des Monitors dienen der automatischen Einschaltung der
Kamera z. B. der Ansteuerung durch den Blinker.
Anmerkung: Ein Ansteuerungskabel aktiviert die
gewünschte Kamera, zum Beispiel Blinker oder Rückwärtsgang.
Automatische Helligkeit ein/aus
Drücken Sie die Taste 2
zum ein- und ausschalten der
automatischen Helligkeit.
Anmerkung: Durch Aktivierung der automatischen
Helligkeit passt der Monitor, je nach Umgebung, die
Helligkeit des LCD-Displays an.
Stand-by ein/aus (Kamera-heizungen)
Drücken Sie die Taste 3
zum ein- und ausschalten der
Stand-by-Funktion.
Anmerkung: Bei eingeschaltetem Stand-by wird der
Monitor in Betrieb gesetzt, wenn eines der
Ansteuerungskabel aktiviert wird.
UM V2.1
7
Bedienungsanleitung
DEUTSCH
Systemeinstellungen
Delay aktivieren
Anmerkung: Wird eine Kamera durch ein Blinksignal
(Blinker) angesteuert, dann muss Delay aktiviert wer
den, um ein blinkendes Bild zu verhindern. Werkseinstellung: Kamera 1 und 2 mit Delay, Kamera 3
ohne Delay.
Die entsprechende Kamera mit Taste 1
auswählen.
Durch 40 sekunden Drücken der Taste 3
(LED ein/ausTaste blinkt 1 x) wird die Delay-Funktion aktiviert. Durch
wiederholtest Drücken der Tastenkombination wird die
Delay-Funktion wieder deaktiviert.
Anmerkung: Delay kann nicht aktiviert werden, wenn
die betreffende Kamera bereits durch ein Blinksignal
angesteuert wird.
Spiegelbild aktivieren
Die entsprechende Kamera mit Taste 1
auswählen. Das
Spiegelbild wird durch gleichzeitiges Drücken der Tasten
1
und 3
für 20 Sekunden aktiviert (LED ein/ausTaste blinkt 1 x). Durch wiederholt drücken der Tastenkombination wird das Spiegelbild wieder deaktiviert.
Umgekehrte Anzeige
Zum Aktivieren einer umgekehrten Anzeige die Tasten 1
und 2
gleichzeitig 40 Sekunden lang drücken.
Anmerkung: Wenn die umgekehrte Anzeige aktiviert
wird, wird das Bild der Kamera auf dem Monitor auf
dem Kopf gestellt.
Kino/Weitwinkel
Um das Monitor bild auf Kino/Weitwinkel zu bringen muss
die Taste 5
60 Sekunden lang gedrückt werden.
LED-Anzeige
Wenn die LEDs bei den Tasten 1
(Kamera taste) und
8
(Stromsparmodus) gleichzeitig schnell blinken,
wird das Bild ausgeschaltet da die Umgebungstemperatur
unter -40°C oder über +75°C liegt. Bei Temperaturen unter
-25°C springt das Monitor bild bei dem Einschalten nicht
mehr an.
Objec t s in
monitor are
closer than
they appear
Tasten
C3
C2
C1
1
2
3
4
5
6
7
8
Taste Nr. 1 = Kamera auswahl
Taste Nr. 2 = Automatische Helligkeit ein/aus
Taste Nr. 3 = Stand-by Funktion ein/aus
Taste Nr. 4 = Kontrast
Taste Nr. 5 = Helligkeit
Taste Nr. 6 = Einstelltaste Taste Nr. 7 = Einstelltaste +
Taste Nr. 8 = Stromsparmodus
Marker ein-/ausschalte
Zum Ein- oder Ausschalten des Markers die Tasten 2
und 3
gleichzeitig 10 Sekunden lang drücken. Marker
mit der Taste 6
oder 7
in die gewünschte Position
bringen.
Monitor 50/60Hz
Zum Einstellen des Monitors auf 50 Hz oder 60 Hz die
Taste 4
60 Sekunden lang drücken.
Anmerkung: Diese Einstellung ist nur in Verbindung
mit einem Navigationssystem erforderlich.
Tastatur ausschalten
Zum Ausschalten der Tastatur die Tasten 1
und 5
gleichzeitig 15 Sekunden lang drücken.
Anmerkung: Ist die Tastatur ausgeschaltet, dann ist
der Monitor dauerhaft eingeschaltet und eine weitere Bedienung nicht möglich.
Manuelle Kamerawahl ein/ ausschalten
Um die manuelle Kamerawahl ein- oder auszuschalten
müssen die Tasten 1
und 4
gleichzeitig 40 Sekunden
lang gedrückt werden.
Anmerkung: Der Benutzer hat die Möglichkeit, mittels Taste 1 die Steuerkabel manuell zu überfahren. In einigen Situationen ist dies aber unerwünscht, wie z.B. Priorität bei den Sicherheitskameras. Daher kann die manuelle Wahl ausgeschaltet werden.
UM V2.1
8
Mode d'emploi
Moniteur marche/économie (Chauffage de la caméra
éteint)
Allumer le moniteur avec la touche 8
.
Remarque: Le moniteur garde en mémoire le dernier
ajustement (marche, stand-by ou économie).
Il y a 3 possibilités de démarrage:
1. Le moniteur était en mode économie et sera ac tivé durant 2 secondes (vérification d’écran) puis
retournera en mode économie.
2. Le moniteur était allumé et sera rallumé après le
démarrage.
3. Le moniteur était en mode stand-by et sera activé
durant 2 secondes (vérification d’écran) puis
retournera en mode stand-by.
En mode économie ou stand-by, le moniteur
sera activé immédiatement dès qu’une tension
d’alimentation apparaît sur le fil de sélection de la
caméra.
Réglage Couleur
Appuyer simultanément sur les touches 4
et 5
régler la couleur avec les touches 6
ou 7
.
Réglage Luminosité
Appuyer sur la touche 5
touches 6
ou 7
.
Réglage Contraste
Appuyer sur la touche 4
touches 6
ou 7
.
Mise en/ hors service de la touche écono.
Appuyer simultanément sur les touches 4
et 5
durant 60 secondes pour désactiver la commande de la
touche “marche/économie” et 120 secondes pour la
réactiver.
Objec t s in
monitor are
closer than
they appear
C3
C2
C1
Touches
1
2
3
4
5
6
7
8
FRANÇAIS
Commande
Touche n° 1 = sélection caméra
Touche n° 2 = luminosité automatique marche/arrêt
Touche n° 3 = fonction stand-by marche/arrêt
Touche n° 4 = touche contraste
Touche n° 5 = touche luminosité
Touche n° 6 = touche de réglage Touche n° 7 = touche de réglage +
Touche n° 8 = touche marche/économie
et
et régler la luminosité avec les
et régler le contraste avec les
Sélection Caméras
Le fait d’appuyer sur la touche 1
permet d’obtenir
l’image de chaque caméra l’une après l’autre et la petite
lampe de chaque caméra sélectionnée s’allume. Si vous
appuyez 2 secondes sur la touche 1 , vous réactivez
les fils de commande des caméras et le témoin DEL de la
touche 1 s’éteint.
Remarque: Un fil de commande active la caméra souhaitée, par exemple le clignotant ou la marche arrière.
Luminosité automatique marche/arrêt
Appuyer sur la touche 2
pour mettre en ou hors service
la fonction luminosité automatique.
Remarque: Si la luminosité automatique est activée, le moniteur adapte la luminosité de l’affichage
LCD à l’environnement.
Stand-by marche/arrêt
Appuyer sur la touche 3
pour mettre en ou hors service la fonction stand-by.
Remarque: Si la fonction stand-by est branchée, le
moniteur fonctionne si l’un des fils de commande est
activé.
UM V2.1
9
Mode d'emploi
FRANÇAIS
Réglages du système
Activer Temporisateur (Retard)
Remarque: Si une caméra est commandée par un signal intermittent (clignotant), le retard (delay) doit
être activé pour empêcher que l’image ne clignote.
Réglage d’usine: Caméra 1 et 2 avec retard, caméra 3
sans retard.
Sélectionner la caméra souhaitée avec le bouton 1
.
Activer le temporisateur (retard) en appuyant sur la touche
3
pendant 40 secondes (la DEL de la touche marche/
arrêt clignote 1x). Pour désactiver le temporisateur (retard), répéter cette opération.
Remarque: Le temporisateur ne peut pas être activé
si la caméra en question est déjà commandée par un
signal intermittent.
Activer Image réfléchie
Sélectionner la caméra souhaitée avec la touche 1
.
Activer l’image réfléchie en appuyant simultanément sur
les touches 1
et 3
pendant 20 secondes (la DEL du
bouton marche/arrêt clignote 1x). Pour désactiver l’image
réfléchie, répéter cette opération.
Affichage inversé
Appuyer simultanément sur les touches 1
et 2
pendant 40 secondes pour activer un affichage inversé.
Remarque: Si l’affichage inversé est activé, l’image de
la caméra est renversée sur le moniteur.
est possible de dés-/activer le mode manuel de sélection de la caméra.
Cinema/ wide
Appuyez sur la touche 5
pendant 60 secondes pour
passer en mode écran cinema et écran large.
Témoin DEL
Si la DEL de la touche 1
(sélection caméra) et 8
(moniteur marche/ économie) clignotent rapidement en
même temps, l’image s’éteint en raison d’une température
ambiante inférieure à -40°C ou supérieure à +75°C. Sous
-25°C le démarrage du moniteur est rendu impossible.
Objec t s in
monitor are
closer than
they appear
C3
C2
C1
Touches
1
2
3
4
5
6
7
8
Touche n° 1 = sélection caméra
Touche n° 2 = luminosité automatique marche/arrêt
Touche n° 3 = fonction stand-by marche/arrêt
Touche n° 4 = touche contraste
Touche n° 5 = touche luminosité
Touche n° 6 = touche de réglage Touche n° 7 = touche de réglage +
Touche n° 8 = touche marche/économie
Dés-/ activer Marqueur
Appuyer simultanément sur les touches 2
et 3
pendant 10 secondes pour activer ou désactiver le marqueur.
Régler le marqueur avec les boutons 6
ou 7
dans
la position souhaitée.
Moniteur 50/60Hz
Appuyer sur la touche 4
pendant 60 secondes pour
régler le moniteur sur 50Hz ou 60Hz.
Remarque: Ce réglage est uniquement nécessaire en
combinaison avec un système de navigation.
Désactiver le clavier
Appuyer simultanément sur les touches 1
et 5
pendant 15 secondes pour désactiver le clavier.
Remarque: Si le clavier est désactivé, le moniteur
fonctionne en continu et toute autre commande est
impossible.
Dés-/ activater le mode manuel de sélection de la
caméra
Appuyez sur les touches 1
en 4
simultanément
pendant 40 secondes pour dés-/activer le mode de sélection de la camera.
Remarque: L’utilisateur a par exemple, à l’aide de la
touche 1
, la possibilité d’outrepasser manuellement les fils de controle. Dans certaines situations
ceci peut ne pas être souhaitable, comme dans le cas
de priorité d’une caméra de sécurité. C’est pourquoi il
UM V2.1
10
Istruzioni
Risparmio energetico (raffreddamento telecamera)
Attivare il monitor premendo il pulsante 8
.
Note: il monitor mantiene l’ultima impostazione in
memoria (attivato, stand-by o risparmio energetico).
È possibile eseguire l’avvio in 3 modi:
1. Il monitor è in modalità risparmio energetico e
si attiva per 2 secondi (controllo schermo) prima
di passare alla modalità risparmio energetico.
2. Il monitor è attivato e dopo l’avvio rimane tale.
3. Il monitor è in modalità stand-by e si attiva per 2
secondi (controllo schermo) prima di passare
alla modalità stand-by. In entrambi le modalità
(risparmio energetico o stand-by), lo schermo
a cristalli liquidi si attiverà automaticamente quando la telecamera viene collegata tramite cavo.
Objec t s in
monitor are
closer than
they appear
C3
C2
C1
Pulsanti
1
2
3
4
5
6
7
8
Pulsante n°1 = selezione telecamera
Pulsante n°2 = attivazione/disattivazione luminosità
automatica
pulsante n°3 = attivazione/disattivazione funzione standby
Pulsante n°4 = contrasto
Pulsante n°5 = luminosità
Pulsante n°6 = regolazione Pulsante n°7 = regolazione +
Pulsante n°8 = attivo/risparmio energetico
ITALIANO
Operazione
Regolazione del colore
Premere i pulsanti 4
e5
contemporaneamente e
regolare il colore tramite i pulsanti 6
o7
.
Regolazione della luminosità
Premere il pulsante 5
e regolare la luminosità tramite i
pulsanti 6
o7
.
Regolazione del contrasto
Premere il pulsante 4
e regolare il contrasto tramite i
pulsanti 6
o7 .
Selezione telecamera
Premere il pulsante 1
per visualizzare l’immagine di
ogni telecamera in ordine, il LED della telecamera selezionata si accenderà. Premere il pulsante 1
per 2 secondi
per attivare nuovamente i circuiti di controllo delle telecamere e l’indicatore del LED del pulsante 1 si disattiva.
Nota: se viene selezionata manualmente un’altra
telecamera, i circuiti di controllo si disattivano. Un
circuito di controllo attiva una singola telecamera, ad
esempio, quando si usano gli indicatori o si attiva la
retromarcia.
Attivazione/disattivazione luminosità automatica
Premere il pulsante 2
per attivare o disattivare la luminosità automatica.
Nota: attivando la luminosità automatica il monitor
regola la luminosità del display a cristalli liquidi in
base all’ambiente circostante.
Attivazione/disattivazione stand-by
Premere il pulsante 3
per attivare e disattivare la
funzione stand-by.
Nota: con la funzione stand-by azionata, il monitor è
operativo se uno dei circuiti di controllo viene attivato.
Attivare/disattivare il tasto di alimentazione
Premere i pulsanti 4
e5
per 60 secondi per disattivare il tasto di alimentazione e premere per 120 secondi
per attivarlo.
UM V2.1
11
Istruzioni
ITALIANO
Impostazioni del sistema
Attivazione della differita
Nota: se una telecamera viene controllata da un
segnale intermittente (ad esempio, da un indicatore
luminoso), è necessario attivare la differita per im
pedire lo sfarfallio dell’immagine. Impostazioni predefinite: differita attivata sulle telecamere 1 e 2,
differita disattivata sulla telecamera 3.
Selezionare la telecamera interessata con il pulsante
1
. Attivare la differita premendo il pulsante 3
per
40 secondi (il LED del pulsante attivazione/disattivazione
lampeggerà una volta). Ripetere l’operazione per disattivare la differita.
Nota: la differita non può essere attivata se la telecamera interessata è già controllata tramite un
segnale intermittente.
Attivazione immagine speculare
Selezionare la telecamera interessata con il pulsante 1 .
Attivare l’immagine speculare premendo i pulsanti 1
e
3
contemporaneamente per 20 secondi (il LED del
pulsante attivazione/disattivazione lampeggerà una volta).
Ripetere la procedura per disattivare l’immagine speculare.
Immagine capovolta
Premere i pulsanti 1
e2
contemporaneamente per
40 secondi per attivare l’immagine capovolta.
Nota: se l’immagine capovolta è attivata, l’immagine trasmessa dalla telecamera viene mostrata sul monitor capovolta.
Attivazione/disattivazione marker
Premere i pulsanti 2
e3
contemporaneamente per
10 secondi per attivare e disattivare il marker. Impostare il
marker nella posizione richiesta tramite il pulsante 6
o
7 .
Per questa ragione, è possibile disattivare la modalità
selezione telecamera manuale.
Avvertenza: disattivando la modalità selezione telecamera manuale, il cavo di comando ha sempre la priorità.
Cinema/panoramica
Premere il pulsante 5
per 60 secondi per attivare la
visualizzazione panoramica.
LED di indicazione
Se il LED del pulsante 1
(selezione telecamera) e 8
(attivazione/risparmio energetico monitor) lampeggiano
rapidamente in contemporanea, l’immagine scompare
poiché la temperatura ambiente è inferiore a -40°C o superiore a +75°C. Alle temperature inferiori a -25°C il monitor
non si avvia.
Objec t s in
monitor are
closer than
they appear
C3
C2
C1
Pulsanti
1
2
3
4
5
6
7
8
Pulsante n°1 = selezione telecamera
Pulsante n°2 = attivazione/disattivazione luminosità
automatica
Pulsante n°3 = attivazione/disattivazione funzione standby
Pulsante n°4 = contrasto
Pulsante n°5 = luminosità
Pulsante n°6 = regolazione Pulsante n°7 = regolazione +
Pulsante n°8 = attivo/risparmio energetico
Monitor 50/60Hz
Premere il pulsante 4
per 60 secondi per impostare il
monitor a 50 Hz oppure a 60Hz.
Nota: tale impostazione è necessaria solamente se
combinata al sistema di navigazione.
Disattivazione della tastiera
Premere i pulsanti 1
e5
contemporaneamente per
15 secondi per disattivare la tastiera.
Nota: se la tastiera è disattivata, il monitor rimane
attivo in modo continuo e non è possibile eseguire
altre operazioni.
Attiva/disattiva selezione telecamera manuale
Premere i pulsanti 1
e4
contemporaneamente per
40 secondi per attivare/disattivare la modalità selezione
telecamera manuale.
Nota: l’utente può ad esempio scegliere l’esclusione manuale premendo il pulsante 1 . In
alcuni casi questa procedura non è consigliabile,
quale priorità sulle telecamere di sicurezza.
UM V2.1
12
Manual de instrucciones
Ahorro de energía (Calefacción de la cámara
desactivada)
Active el monitor pulsando el botón 8
.
Observaciones: El monitor memoriza guarda el
último ajuste (activado, en espera o ahorro de
energía). Existen 3 formas de iniciarlo:
1. El monitor ha permanecido en modo de ahorro de
energía y se activará durante 2 segundos (com
probación de pantalla) antes de pasar al modo de
ahorro de energía.
2. El monitor ha permanecido activado y se activará
después del inicio.
3. El monitor ha permanecido en espera y se
activará durante 2 segundos (comprobación
de pantalla) pasando al modo en espera. En am
bos modos (ahorro de energía o espera), la pan talla LCD se activará automáticamente en cuanto
el hilo de selección de cámara recibe una señal.
Ajuste del color
Pulse los botones 4
y5
al mismo tiempo y ajuste el
color con los botones 6
ó7
.
Ajuste del brillo
Pulse el botón 5
ó7
.
Desactivación/activación de la tecla del modo de ahorro
de energía
Mantenga los botones 4
y5
pulsados durante 60
segundos para desactivar la tecla del modo ahorro de
energía y 120 segundos para activarla.
Objec t s in
monitor are
closer than
they appear
Botones
C3
C2
C1
1
2
3
4
5
6
7
8
ESPAÑOL
Funcionamiento
Botón nº 1 = Selección de cámara
Botón nº 2 = Activación/desactivación de brillo automático
Botón nº 3 = Activación/desactivación de la función de espera
Botón nº 4 = Contraste
Botón nº 5 = Brillo
Botón nº 6 = Ajuste Botón nº 7 = Ajuste +
Botón nº 8 = Activación/ahorro de energía
y ajuste el brillo con los botones 6
Ajuste del contraste
Pulse el botón 4
y ajuste el contraste con los botones
6
ó7 .
Selección de cámara
Pulse el botón 1
para mostrar la imagen de cada
cámara por orden; el LED de la cámara seleccionada se
encenderá. Mantenga pulsado el botón 1
durante
2 segundos para activar los circuitos de control de las
cámaras de nuevo y el LED del botón 1 se apagará.
Observación: Si se selecciona manualmente otra
cámara, los hilos de control se desactivarán.
Un hilo de control activa una cámara individual,
por ejemplo, cuando utilice los intermitentes o cambie
a marcha atrás
Activación/desactivación de brillo automático
Pulse el botón 2
para activar o desactivar el brillo
automático.
Observación: Mediante la activación del brillo automático, el monitor ajusta el brillo de la pantalla
LCD en función del entorno.
Activación/desactivación del modo de espera
Pulse el botón 3
para activar o desactivar la función de
espera.
Observación: Si se activa la función de espera, el monitor comenzará a funcionar si uno de los hilos
de control se activa.
UM V2.1
13
Manual de instrucciones
ESPAÑOL
Ajustes del sistema
Activación de retardo
Observación: Si una cámara se controla mediante una
señal intermitente (p.ej., una luz indicadora), deberá activarse el retardo para evitar que la imagen
parpadee. Ajustes de fábrica: Cámaras 1 y 2 retardo
activado, cámara 3 retardo desactivado.
Observación: El retardo no podrá activarse si la cá
mara correspondiente ya está siendo controlada mediante una señal intermitente.
Seleccione la cámara correspondiente con el botón 1
.
Active el retardo manteniendo pulsado el botón 3
durante 40 segundos (el LED del botón de activación/
desactivación parpadeará 1x). Repita esta operación para
desactivar el retardo.
Activación de la imagen reflejada
Seleccione la cámara correspondiente con el botón 1
.
Active la imagen reflejada pulsando los botones 1
y
3
al mismo tiempo durante 20 segundos (el LED del
botón de activación/desactivación parpadeará 1x). Repita
este procedimiento para desactivar la imagen reflejada.
Imagen invertida
Pulse los botones 1
y2
al mismo tiempo durante
40 segundos para activar la imagen invertida.
Observación: Si la imagen invertida se activa, la
imagen de la cámara se mostrará al revés en el
monitor.
Activación/desactivación del marcador
Pulse los botones 2
y3
al mismo tiempo durante
10 segundos para activar ó desactivar el marcador. Ajuste
el marcador en la posición que deseada con el botón 6
ó el botón 7
.
Advertencia: al desactivar el modo de selección
manual de cámara, el cable de control tiene siempre
prioridad.
Visión panorámica
Mantenga pulsado el botón 5
durante 60 segundos
para pasar a visión panorámica.
Indicador LED
Si el LED del botón 1
(selección de cámara) y del
botón 8
(activación del monitor/ahorro de energía)
parpadean juntos rápidamente, la imagen se apagará
puesto que la temperatura ambiente está por debajo de
-40 °C ó por encima de +75 °C. A temperaturas por debajo
de -25 °C el monitor no se enciende.
Objec t s in
monitor are
closer than
they appear
Botones
C3
C2
C1
1
2
3
4
5
6
7
8
Botón nº 1 = Selección de cámara
Botón nº 2 = Activación/desactivación de brillo automático
Botón nº 3 = Activación/desactivación de la función de espera
Botón nº 4 = Contraste
Botón nº 5 = Brillo
Botón nº 6 = Ajuste Botón nº 7 = Ajuste +
Botón nº 8 = Activación/ahorro de energía
Monitor 50/60 Hz
Pulse el botón 4
durante 60 segundos para ajustar el
monitor a 50 Hz ó a 60 Hz.
Observación: Este ajuste sólo es necesario en
combinación con un sistema de navegación.
Desactivación del teclado
Pulse los botones 1
y5
al mismo tiempo durante
15 segundos para desactivar el teclado.
Observación: Si el teclado se desactiva, el monitor
estará activado de forma continuada y no podrán
realizarse más operaciones.
UM V2.1
Activación/desactivación de selección manual de
cámara
Pulse los botones 1
y4
al mismo tiempo durante
40 segundos para activar/desactivar la selección manual
de cámara.
Observación: El usuario tiene la opción de anular manualmente los hilos de control, pulsando el botón
1 . En algunos casos esto no se recomienda, como
en la prioridad en las cámaras de seguridad. Por esta
razón se puede desactivar la selección manual de cámara.
14
NEDERLANDS/ENGLISH/DEUTSCH/FRANÇAIS/ITALIANO/ESPAÑOL
Notities/Notes/Notizen/Note/Notas
ORLACO
Orlaco is een productiebedrijf wat zich gespecialiseerd heeft in
camera systemen voor voertuigen.
Op onze locatie te Barneveld beschikken wij over een productieafdeling, magazijn, ontwerpafdeling, servicedienst, showroom en
inbouwstation voor montage van de systemen.
Ons uitgangspunt is het ontwerpen en produceren van zichtverbeterende en efficiency verbeterende systemen voor de professionele transportmarkt.
Deze gebruiksaanwijzing is ter beschikking gesteld door Orlaco
Products BV ©. Niets uit deze uitgave mag gekopieerd worden of
overgenomen worden zonder toestemming van Orlaco Products
BV.
Orlaco ist ein Produktionsbetrieb, der sich auf Videoüberwachungssysteme spezialisiert hat.
An unserem Standort in Barneveld verfügen wir über eine
Konstruktionsabteilung, Produktionsabteilung, ein Lager, einen
Servicedienst, Ausstellungsraum und eine Einbaustation für die
Montage der Systeme.
Unser Ausgangspunkt ist die Konstruktion und Herstellung die
Sicht und die Effizienz verbessernde Systeme für den professionellen Markt.
Diese Gebrauchsanweisung wurde von der Orlaco Products
BV © zur Verfügung gestellt. Nichts aus dieser Ausgabe darf
ohne vorherige schriftliche Einwilligung der Orlaco Products BV
vervielfältigt, übernommen oder veröffentlicht werden
Orlaco is a production company specialised in making camera
monitor systems.
At our factory in Barneveld, we have a design department, production department, warehouse, service department, showroom
and installation centre for fitting our systems.
Our objective is to design and produce camera systems for the
professional market that improve the driver’s view and increase
operating efficiency.
These instructions for use have been set by Orlaco Products BV
©. Nothing from this publication is allowed to be copied or taken
without authorisation of Orlaco Products BV.
Orlaco est une compagnie de production spécialisée en faisant
des systèmes de caméra.
À notre usine dans Barneveld, Pays-Bas, nous avons un centre
de département de conception, de département de production,
d’entrepôt, de service après vente, de salle d’exposition et d’installation pour adapter nos systèmes.
Notre objectif est concevoir et produire les systèmes améliorants
pour le marché professionnel qui améliorent la vue du conducteur et augmentent l’efficacité de fonctionnement.
Ce manuel d’instructions a été mis à disposition par Orlaco
Products BV ©. Aucun extrait ne peut être recopié ou emprunté
sans l’accord d’Orlaco Products BV.
Date:
Name:
Initials:
Orlaco è un’azienda specializzata nella produzione di sistemi
telecamere monitor.
Presso la fabbrica di Barneveld, disponiamo di un reparto
progettazione, un reparto produzione, un magazzino, un reparto
assistenza, uno showroom e un centro installazione per montare
i nostri impianti.
Il nostro obiettivo è di progettare e produrre impianti telecamera
destinati al mercato dei professionisti, al fine di migliorare la
visibilità per il conducente e aumentare l’efficienza operativa.
Orlaco pone una particolare attenzione sulla correttezza della
propria documentazione. Tuttavia, non si assume la responsabilità riguardo a tali dati e/o della scorretta interpretazione di
tali informazioni. Chiediamo all’utente di considerare tutti i dati
come informazioni che devono essere sempre esaminate da uno
specialista qualificato.
Le presenti istruzioni sono fornite da Orlaco Products BV ©. È
vietata la riproduzione di questa pubblicazione senza l’autorizzazione da parte di Orlaco Products BV.
Orlaco es una empresa de fabricación especializada en sistemas
de cámaras y monitor.
En nuestra fábrica de Barneveld, contamos con un departamento
de diseño, un departamento de producción, un almacén, un
departamento de servicio, una sala de exposición y un centro de
instalación para instalar nuestros sistemas.
Nuestro objetivo es diseñar y fabricar sistemas de cámaras para
el mercado profesional que mejoren la visibilidad de conductor y
aumenten la eficiencia operativa.
Orlaco se preocupa mucho y pone especial atención en la
exactitud de su documentación. No obstante, no nos hacemos
responsables de estos datos y/o de la interpretación incorrecta
de esta información. Le pedimos que considere todos estos
datos como informativos y que deje que un técnico especializado
realice las comprobaciones.
Estas instrucciones de uso han sido establecidas por Orlaco
Products BV ©. No está permitido copiar ni tomar nada de esta
publicación sin la autorización de Orlaco Products BV.
Dealer