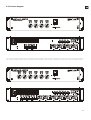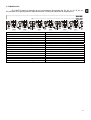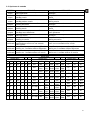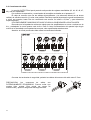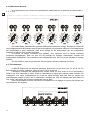
1
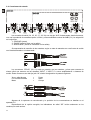
USER MANUAL MANUAL DE INSTRUCCIONES NOTICE D'UTILISATION BEDIENUNGSANLEITUNG Graphic Symbol Explanation The lightning flash with arrowhead symbol, within an equilateral triangle, is intended to alert the user to the presence of uninsulated “dangerous voltage” within the product’s enclosure that may be of sufficient magnitude to constitute a risk of electric shock to persons. The exclamation point within an equilateral triangle is intended to alert the user to the presence of important operating and maintenance (servicing) instructions in the literature accompanying the appliance. The lightning flashes printed next to the OUTPUT terminals of the amplifier are intended to alert the user to the risk of hazardous energy. Output connectors that could pose a risk are marked with the lightning flash. Do not touch output terminals while amplifier power is on. Make all connections with amplifier turned off. WARNING: To prevent fire or shock hazard, do not expose this equipment to rain or moisture. IMPORTANT SAFETY INSTRUCTIONS 1. 2. 3. 4. 5. 6. 7. 8. Read these instructions. Keep these instructions. Heed all warnings. Follow all instructions. Do not use this apparatus near water. Clean only with dry cloth. Do not block any ventilation openings. Install in accordance with the manufacturer’s instructions. Do not install near any heat sources such as radiators, heat registers, stoves, or other apparatus (including amplifiers) that produce heat. 9. Do not defeat the safety purpose of the polarized or grounding type plug. A polarized plug has two blades with one wider than the other. A grounding type plug has two blades and a third grounding prong. The wide blade or the third prong are provided for your safety. If the provided plug does not fit into your outlet, consult an electrician for replacement of the obsolete outlet. 10. Protect the power cord from being walked on or pinched particularly at the plugs, convenience receptacles, and at the point where they exit from the apparatus. 11. Only use attachments/accessories specified by the manufacturer. 12. Unplug the apparatus during lightening sorts or when unused for long periods of time. 13. Refer all servicing to qualified personnel. Servicing is required when the apparatus has been damaged in any way, suck as power supply cord or plug is damaged, liquid has been spilled or objects have fallen into the apparatus, the apparatus has been exposed to rain or moisture, does not operate normally, or has been dropped. 14. Disconnecting from mains: Switching off the POWER switch (19) all the functions and light indicators of the amplifier will be stopped, but fully disconnecting the device from mains is done unplugging the power cord from the mains input socket (50). For this reason, it always shall remain readily operable. 2 INSTRUCTION MANUAL 1. IMPORTANT REMARK 04 2. INTRODUCTION 04 3. INSTALLATION 06 3.1. Placement and mounting 3.2. Mains connection 3.3. Multi-function 3.4. Input connections 3.5. Input options 3.6. Output connections 3.7. Output options 4. OPERATION AND USAGE 4.1. Start up 4.2. Input attenuation 4.3. Remote control 4.4. Connection of the VCA control 4.5. Indicators 06 06 07 08 09 10 11 11 11 12 12 13 13 5. CLEANING 13 6. DIAGRAMS 14 6.1. Function list 6.2. Function diagram 6.3. Configuration diagram 6.4. Technical characteristics 6.5. Block diagram 14 15 58 59 60 All numbers subject to variation due to production tolerances. ECLER SA reserves the right to make changes or improvements in manufacturing or design which may affect specifications. 3 1. IMPORTANT REMARK Congratulations! You are the owner of a carefully designed and manufactured equipment. We thank you for having purchased our MPA R power amplifier. It is VERY IMPORTANT that you read this manual before connecting the amplifier in order to obtain its maximum performance. We recommend our authorised Technical Services whenever any maintenance task should be needed so that optimum operation shall be achieved. MPA R series amplifiers come with a 3-year warranty. 2. INTRODUCTION MPA4-80R The MPA4-80R amplifier station consists of four 80W/4 amplifiers which can be configured through a set of switches found on the rear panel. This allows multiple amplification setups useful in many situations, for example: Four mono amplifiers for four different mono inputs. When setup this way, the MPA R is able to amplify four different audio signals, each one having a dedicated volume control. Four mono amplifiers for one common mono input. The amplifier operates now with just one input signal for all amplifiers, but preserves the ability to control each channels volume independently. This setup is useful when distributing signals to different zones. Four mono amplifiers for one common stereo input. This setup is similar to the previous example but the input is now a stereo signal. The amplifier adds both stereo channels together converting them into a mono signal. Two stereo amplifiers for two different stereo inputs. Each stereo channel offers a dedicated volume control. Useful for addressing two zones with two different stereo signals. Two stereo amplifiers for one common stereo input. This setup is similar to the previous example but the input is now a single stereo signal which is fed to both amplifiers. Two bridged amplifiers for two different mono inputs. Now you get a typical stereo amplifier configuration. With a bridged amplifier you obtain doubled output power with a load of at least 8. Two bridged amplifiers for a common mono input. The MPA R operates now with a single mono signal for two mono amplifiers, each one with its own volume control. Two bridged amplifiers for a common stereo input. This setup is similar to the previous example but the input is now a stereo signal. The amplifier adds both stereo channels together converting them into a mono signal. One stereo amplifier and one bridged amplifier for a common stereo input. Useful for setups where a stereo amplifier drives the mid-range and high frequency speakers while a second, bridged amplifier drives a subwoofer. 4 MPA6-80R The MPA6-80R amplifier station consists of six 85W/4 amplifiers which can be configured through a set of switches found on the rear panel. This allows multiple amplification setups useful in many situations, for example: Six mono amplifiers for six different mono inputs. When setup this way, the MPA R is able to amplify six different audio signals, each one having a dedicated volume control. Six mono amplifiers for one common mono input. The amplifier operates now with just one input signal for all amplifiers, but preserves the ability to control each channel volume independently. This setup is useful when distributing signals to different zones. Six mono amplifiers for one common stereo input. This setup is similar to the previous example but the input is now a stereo signal. The amplifier adds both stereo channels together converting them into a mono signal. Three stereo amplifiers for three different stereo inputs. Each stereo channel offers a dedicated volume control. Useful for addressing three zones with three different stereo signals. Three stereo amplifiers for one common stereo input. This setup is similar to the previous example but the input is now a single stereo signal which is fed to all three amplifiers. Three bridged amplifiers for three different mono inputs. Useful for addressing three zones with three different mono signals. Each bridged channel offers a dedicated volume control. With a bridged amplifier you obtain doubled output power with a load of at least 8. Three bridged amplifiers for a common mono input. The MPA operates now with a single mono signal for three mono amplifiers, each one with its own volume control. Three bridged amplifiers for a common stereo input. This setup is similar to the previous example but the input is now a stereo signal. The amplifier adds both stereo channels together converting them into a mono signal. Four mono amplifiers and one bridged amplifier for one common mono input. Useful for setups with four amplifiers for mid-range speakers and tweeters and an extra (bridged) amplifier for a subwoofer. 5 3. INSTALLATION 3.1. Placement and mounting The amplifier is presented as a 2 unit high 19'' rack module. It is supplied with plastic washers in order not to damage the unit when tightening the screws. Always fix the amplifier to a 19” rack through the front ears using all corners and four screws. For portable, mobile, or other applications where the rack assembly may be moved, we recommend supporting the rear of the amplifier using support rails. It is important that the amplifier, as a heat source, is not placed next to other equipment nor exposed to high temperatures. 3.2. Mains connection The amplifier operates on alternate currents, depending on the country 110-120, 220-240V 50/60Hz (see characteristics in the back of the unit). The power consumption at maximum performance is 561VA for the MPA4-80 R and 860VA for the MPA6-80 R. It's important that your mains installation is adequately rated to these power demands. The amplifier should have an earth connection in good conditions (earth resistance, Rg=30 or less). The environment must be dry and dustless. Do not expose the unit to rain or water splashes, and do not place liquid containers or incandescent objects like candles on top of the unit. Do not obstruct the ventilation grids with any kind of material. In case there is some type of intervention and/or connection-disconnection of the amplifier, it is most important to previously disconnect the mains power supply. There are no user or serviceable parts inside the amplifier. You should avoid that the supply cable twists with the shielded signal cables, as this could lead to unwanted hum. In order to protect the unit from an eventual electrical overload or momentary power peaks from the internal circuits it carries a fuse. Should it ever blow up, unplug the unit from mains and replace it with an identical one. If the new fuse blows again contact immediately with our Authorized Technical Service. CAUTION: YOU MUST NEVER USE A HIGHER VALUE FUSE. 6 3.3. Multi-function Depending on the input switches on the MPA R (28, 29, 30, 31, 32, 33, 40, 41, 42) located on the rear panel, four different amplification configurations can be achieved: MPA4-80R - 4 mono amplifiers with following possibilities: 4 different mono inputs 1 common mono input for all 1 common stereo input for all MPA6-80R - 6 mono amplifiers with following possibilities: 6 different mono inputs 1 common mono input for all 1 common stereo input for all - 2 stereo amplifiers with following possibilities: 2 different stereo inputs 1 single stereo input for both - 3 stereo amplifiers with following possibilities: 3 different stereo inputs 1 single stereo input for both - 2 bridged amplifiers with following possibilities: 2 different mono inputs 1 common mono input 1 common stereo input - 3 bridged amplifiers with following possibilities: 3 different mono inputs 1 common mono input 1 common stereo input - Combinations between mono, stereo and bridged - Combinations between mono, stereo and bridged 7 3.4. Input connections The signal input connections (34, 35, 36, 37, 38, 39) are electronically balanced XLR-3 sockets, with input impedance higher than 20k and a nominal sensitivity of 0dBV(1V). Pin assignment: 1. GROUND 2. PHASE (in phase with the output) 3. NON PHASE (inverted phase) The following diagram shows the connection of balanced and non-balanced audio sources: The “STACK” (20, 21) are in parallel with the inputs and are used to supply the same "INPUT 1, INPUT 2" input signal to other amplifiers or sound systems. This signal output connectors are of jack 1/4" type. The pin assignment is as follows: HOT or direct signal COLD or inverted signal GROUND > > > Tip Ring Body Some of the connection options and the corresponding switch settings are described later in paragraph 3.5. Depending on the chosen option, the "SP" indicators will only light for the active channels. 8 3.5. Input options OPTION 1 mono 2 mono 3 mono 4 stereo 5 stereo 6 bridged 7 bridged 8 bridged 9 combination 10 combination 11 combination MPA4-80R 4 mono amplifiers for 4 different mono signal 4 mono amplifiers for a common mono input 4 mono amplifiers for a common stereo input 2 stereo amplifiers for 2 different stereo inputs 2 stereo amplifiers for a common stereo input 2 bridged amplifiers for 2 different mono signals 2 bridged amplifiers for a common mono signal 2 bridged amplifiers for a common stereo signal 1 bridged amplifier and 2 mono amplifiers for a common mono input 1 bridged amplifier and 1 stereo amplifier for 2 different stereo inputs 1 bridged amplifier and 1 stereo amplifier for a common stereo input 1 MPA4-80R INPUT SIGNALS 1 2 3 4 5 I1 I2 I3 I4 I5 6 I6 CH1 IN1 2 I - - - - - IN1 3 L R - - - - IN1+IN2 4 L1 R1 L2 R2 L3 R3 IN1 5 L R - - - - IN1 6 I1 - I2 - I3 - IN1 7 I - - - - - IN1 8 L R - - - - IN1+IN2 9 I - - - - - IN1 N. - 10 L1 R1 L2 R2 L3 R3 IN1+IN2 11 L R - - - - IN1+IN2 MPA6-80R 6 mono amplifiers for six different mono signal 6 mono amplifiers for a common mono input 6 mono amplifiers for a common stereo input 3 stereo amplifiers for three different stereo inputs 3 stereo amplifiers for a common stereo input 3 bridged amplifiers for three different mono signals 3 bridged amplifiers for a common mono signal 3 bridged amplifiers for a common stereo signal 1 bridged amplifier and 4 mono amplifiers for a common mono input 1 bridged amplifier and 2 stereo amplifier for three different stereo inputs 1 bridged amplifier and 2 stereo amplifiers for a common stereo input MPA6-80R MPA4-80R INPUT SELECTORS CH2 CH3 CH4 CH5 IN2 IN3 IN4 IN5 LINK LINK LINK LINK CH1 CH1 CH2 CH3 LINK LINK LINK LINK CH1 CH1 CH2 CH3 IN2 IN3 IN4 IN5 LINK LINK LINK IN2 CH1 CH2 CH3 IN3 IN5 LINK LINK CH3 CH1 LINK LINK CH3 CH1 LINK LINK LINK LINK CH1 CH1 CH2 CH3 IN3 IN4 IN5 LINK LINK LINK IN2 CH1 CH2 CH3 CH6 IN6 LINK CH4 LINK CH4 IN6 LINK CH4 - MPA4-80R MODE ST-BR CH1-2 CH3-4 CH5-6 ST ST ST ST ST ST ST ST ST ST ST ST ST ST ST BR BR BR - BR BR BR - BR BR BR BR ST ST BR ST ST BR ST ST LINK CH4 IN6 LINK CH4 9 3.6. Output connections The OUTPUTS section at the rear panel has screwable terminals (43, 44, 45, 46, 47, 48), one for each amplifier. The attenuation controls and the output configurations are described later in paragraph 3.7. The cable which connects the speakers to the amplifier should be high quality and as short and thick as possible. This is important when covering long distances; For up to 10m we recommend a cable section not smaller than 2.5mm². For longer distances we recommend 4mm². ALWAYS USE CLASS 2 WIRING FOR THE SPEAKERS CONNECTION. Remember that the minimum load impedance for stereo or mono amplifiers is 4. In bridged mode the impedance must be not less than 8. For a reliable operation under any circumstance connect lower load impedances than just specified. Attention: use only the indicated terminals when using the amplifiers in bridge mode. Connect the terminal blocks securely, removing the cable cover 5÷7mm from the end. CAUTION: The output connectors are HAZARDOUS LIVE. Be sure to avoid leaving wires exposed. This can cause short-circuit and risk of electric shock. 10 3.7. Output options OPTION 1 mono 2 stereo 3 bridged 4 combination MPA4-80R 4 mono amplifiers 2 stereo amplifiers 2 bridged amplifiers 1 bridged amplifier and 2 mono amplifiers for a common mono input 5 combination 1 bridged amplifier and 1 stereo amplifiers for 2 different stereo amplifiers N. 1 2 3 4 5 N. 1 2 3 4 5 ACTIVE VOL CH1,2,3,4 CH1,2,3,4 CH1,3 CH1,3,4 CH1,3,4 ACTIVE VOL CH1,2,3,4,5,6 CH1,2,3,4,5,6 CH1,3,5 CH1,3,4,5,6 CH1,3,4,5,6 MPA6-80R 6 mono amplifiers 3 stereo amplifiers 3 bridged amplifiers 1 bridged amplifier and 4 mono amplifiers for a common mono input 1 bridged amplifier and 2 stereo amplifiers for 3 different stereo amplifiers MPA4-80R CH 1 CH 2 +++++ BRIDGED + BRIDGED + BRIDGED - CH 3 CH 4 +++++ BRIDGED ++++- MPA6-80R CH 1 CH 2 CH 3 CH 4 +++++++++ BRIDGED - + BRIDGED + BRIDGED +++ BRIDGED ++- CH 5 CH 6 +++++ BRIDGED ++++- WARNING: The output TERMINALS, marked with this symbol are HAZARDOUS LIVE terminals. The external wiring connected to these TERMINALS must be installed by an INSTRUCTED PERSON or using ready made leads or cords. 4. OPERATION AND USAGE 4.1. Start up To switch the unit on just push the switch labelled POWER (19) and the integrated pilot-light will light up. We highly recommend the "safe power-up sequence": First the sound sources, then mixer, equalizers and active filters and, finally, power amplifiers. Powering off should be done by following the exact reverse sequence in order to avoid any possible peaks reaching the next device, and consequently protecting the loudspeakers, which are specially sensitive to these peaks. NOTE: Fully disconnecting the device from mains is done unplugging the power cord from the mains input socket (50). For this reason, it always shall remain readily operable. 11 4.2. Input attenuation These are rotary trimmers located on the front panel (1, 2, 3, 4, 5, 6). These attenuators allow the connection of different mixers, an independent volume control and the connection of speakers not able to handle the amplifiers maximum output power, thus avoiding the risk of damaging them with the mixers or preamps volume control. Inside the device's packaging you will find a little plastic bag containing transparent caps, which protect the input attenuation settings from unwanted manipulation. These caps are transparent in order to let you visualize the current settings. Once inserted, they cannot be removed with bare fingers, for this purpose, a small screwdriver is needed. 4.3. Remote control The MPA R rear panel offers one terminal per amplifier to remotely control the volume, (22, 23, 24, 25, 26, 27) using the built-in “VCA” circuit. The combined usage of the rotary potentiometers located at the front panel and the remote VCA control determines the final value of the signal’s attenuation for each input channel. Therefore, a certain value can be fixed for the signal attenuation using the rotary so that the remote control via VCA will not exceed this value and viceversa, that is, the two controls are connected in series. This functionality can be useful in installations where users with little experience are in charge of volume adjustment. 12 4.4. Connection of the VCA control As already mentioned in the introduction of this manual, the signal attenuation level for each of the input channels can be set using the following methods: a) Using a remote potentiometer with nominal resistance between 10k and 50k. b) Using a device that generates a control voltage from 0 to 10V DC. c) Using remote relays/dry contacts. NOTE: it is possible to connect a maximum of 16 inputs to one control potentiometer. It is necessary that the ground terminals of all amplifiers are connected. The connection cables can be up to 500m long if a section of 0,5mm2 is used. Consult the available accessories at your ECLER dealer or at www.ecler.com. Remember that the VCA circuit is disabled by default. If you need to use it, you have to activate it using the internal jumpers (see configuration diagram). 4.5. Indicators The SP signal presence indicators (7, 8, 9, 10, 11, 12) light up when the input signal reaches approximately -40dBV. The CLIP indicators (13, 14, 15, 16, 17, 18) light up when the output signal for the speakers is -1,5dB below the actual clipping threshold. This clipping system watches for eventual supply voltage variations, thus giving always an accurate clipping indication, regardless of mains voltage deviations. It is normal that when operating at high output power, the CLIP indicators light up in synchronisation with the low frequencies, which carry the most energy. Nevertheless, you should avoid that the CLIP indicators are lit continuously. 5. CLEANING The front panel should not be cleaned with dissolvent or abrasive substances because silk-printing could be damaged. To clean it, use a soft cloth slightly wet with water and neutral liquid soap; dry it with a clean cloth. Be careful that water never gets into the amplifier through the holes of the front panel. 13 6. DIAGRAMS 6.1. Function list 1. Channel 1 volume, CH1 2. Channel 2 volume, CH2 3. Channel 3 volume, CH3 4. Channel 4 volume, CH4 5. Channel 5 volume, CH5 6. Channel 6 volume, CH6 7. Input 1 Signal presence, SP 8. Input 2 Signal presence, SP 9. Input 3 Signal presence, SP 10. Input 4 Signal presence, SP 11. Input 5 Signal presence, SP 12. Input 6 Signal presence, SP 13. Channel 1 Clip indication, CLIP 14. Channel 2 Clip indication, CLIP 15. Channel 3 Clip indication, CLIP 16. Channel 4 Clip indication, CLIP 17. Channel 5 Clip indication, CLIP 18. Channel 6 Clip indication, CLIP 19. Power switch and pilot light, POWER 20. Jack connector to other amplifiers, STACK INPUT 1 21. Jack connector to other amplifiers, STACK INPUT 2 22. Screwable terminal for remote control 1, CH 1 23. Screwable terminal for remote control 2, CH 2 24. Screwable terminal for remote control 3, CH 3 25. Screwable terminal for remote control 4, CH 4 26. Screwable terminal for remote control 5, CH 5 27. Screwable terminal for remote control 6, CH 6 28. Channel 1 / Channel 1+ 2, IN1/IN1+IN2 29. Channel 2 / link channel 1, IN2/LINK CH1 30. Channel 3 / link channel 1, IN3/LINK CH1 31. Channel 4 / link channel 2, IN4/LINK CH2 32. Channel 5 / link channel 3, IN5/LINK CH3 33. Channel 6 / link channel 4, IN6/LINK CH4 34. XLR input connector 1, INPUT 1 35. XLR input connector 2, INPUT 2 36. XLR input connector 3, INPUT 3 37. XLR input connector 4, INPUT 4 38. XLR input connector 5, INPUT 5 39. XLR input connector 6, INPUT 6 40. Stereo / bridge channel 1-2 41. Stereo / bridge channel 3-4 42. Stereo / bridge channel 5-6 43. Output terminals channel 1, CH1 44. Output terminals channel 2, CH2 45. Output terminals channel 3, CH3 46. Output terminals channel 4, CH4 47. Output terminals channel 5, CH5 48. Output terminals channel 6, CH6 49. Fuse holder 50. Mains socket 14 6.2. Function diagram 15 Explicación de los Símbolos Gráficos El símbolo del relámpago con una flecha en la punta y dentro de un triangulo equilátero, tiene el propósito de alertar al usuario de la presencia de un voltaje peligroso y sin aislar dentro del aparato, y de una magnitud tal que puede constituir riesgo de descarga eléctrica para las personas. El símbolo de exclamación dentro de un triangulo equilátero, tiene el propósito de alertar al usuario de la presencia de instrucciones importantes sobre la operación y mantenimiento en la información que viene con el producto. Los símbolos de relámpagos dibujados cerca de los terminales de salida se utilizan para alertar al usuario del riesgo de descargas peligrosas. Los conectores de salida que podrían plantear algún riesgo se indican con este símbolo del relámpago. No toque los terminales de salida mientras que el amplificador esté encendido. Hacer todas las conexiones con el amplificador apagado. ADVERTENCIA: para prevenir choques eléctricos o riesgo de incendios, no exponer este equipo a la lluvia o la humedad. INSTRUCCIONES IMPORTANTES DE SEGURIDAD 1. 2. 3. 4. 5. 6. 7. Lea estas instrucciones Guarde estas instrucciones Preste atención a todas las advertencias Siga todas las instrucciones No utilice este aparato cerca del agua Límpielo solamente con un paño seco No bloquee ninguna abertura para ventilación. Instálelo de acuerdo con las instrucciones del fabricante 8. No lo instale cerca de fuentes de calor como radiadores, estufas u otros aparatos que produzcan calor, incluidos amplificadores. 9. No elimine el propósito de seguridad del cable de corriente polarizado o con conexión de tierra. Un cable polarizado tiene dos bornes, uno más ancho que el otro. Un enchufe con conexión a tierra, tiene dos bornes y un tercer borne conectado a tierra. Este tercer borne está previsto para su seguridad. Si el cable proporcionado no entra en su enchufe, consulte con un técnico electricista para reemplazar ese enchufe obsoleto. 10. Proteja el cable eléctrico de ser aplastado, en especial en la zona de los conectores, los receptáculos de los mismos y en el punto en el que el cable sale del aparato. 11. Utilice solamente los accesorios especificados por el fabricante. 12. Desconecte el aparato durante las tormentas eléctricas o cuando no lo vaya a usar durante periodos largos de tiempo. 13. Para cualquier reparación, póngase en contacto con un servicio técnico cualificado. La reparación es necesaria cuando el aparato no funciona con normalidad o ha sido dañado por cualquier motivo, ya sea porque el cable o el enchufe estén dañados, porque se hayan derramado líquidos o hayan caído objetos dentro del aparato, o porque el aparato haya sido expuesto a la lluvia o se haya caído. 14. Desconexión de la red: apagando el interruptor de POWER (19) todas las funciones e indicadores del amplificador se pararán, pero la completa desconexión del aparato se consigue desconectando el cable de red de su conector (50). Por esta razón, éste siempre debe tener fácil acceso. 16 MANUAL DE INSTRUCCIONES 1. NOTA IMPORTANTE 18 2. INTRODUCCIÓN 18 3. INSTALACIÓN 20 3.1. Ubicación y montaje 3.2. Conexión a red 3.3. Multifunción 3.4. Conexiones de entrada 3.5. Opciones de entrada 3.6. Conexiones de salida 3.7. Opciones de salida 4. OPERACIÓN Y USO 4.1. Puesta en funcionamiento 4.2. Atenuadores de entrada 4.3. Control remoto 4.4. Conexionado del control VCA 4.5. Indicadores 20 20 21 22 23 24 25 25 25 26 26 27 27 5. LIMPIEZA 27 6. DIAGRAMAS 28 6.1. Lista de funciones 6.2. Diagrama de funciones 6.3. Diagrama de configuración 6.4. Características técnicas 6.5. Diagrama de bloques 28 29 58 59 60 Todos los datos están sujetos a variación debida a tolerancias de producción. ECLER S.A. se reserva el derecho de realizar cambios o mejoras en la fabricación o diseño que pudieran afectar las especificaciones. 17 1. NOTA IMPORTANTE ¡Enhorabuena!. Vd. posee el resultado de un cuidadoso diseño y una esmerada fabricación. Agradecemos su confianza por haber elegido nuestra etapa de potencia MPA R. Para conseguir la máxima operatividad del aparato y su máximo rendimiento, es MUY IMPORTANTE antes de su conexión, leer detenidamente y tener muy presentes las consideraciones que en este manual se especifican. Para garantizar el óptimo funcionamiento de este aparato, recomendamos que su mantenimiento sea llevado a cabo por nuestros Servicios Técnicos autorizados. La serie de amplificadores MPA R tiene una garantía de 3 años. 2. INTRODUCCIÓN MPA4-80R La MPA4-80R está formada por cuatro amplificadores de 80W/4 configurables mediante los conmutadores situados en el panel posterior, permitiendo múltiples posibilidades de trabajo de entre las que destacamos: 4 Amplificadores en mono para 4 señales mono diferentes. De esta forma el MPA R está preparado para trabajar con cuatro señales distintas disponiendo cada una de ellas de su propio control de volumen. 4 Amplificadores en mono con una entrada en común. El amplificador trabaja solamente con una señal de entrada pero conserva la posibilidad de ajustar de forma independiente el nivel de cada uno de los cuatro canales, es una aplicación ideal para realizar una distribución de sonido a distintas zonas. 4 Amplificadores en mono con una entrada en estéreo común. Aplicación idéntica a la anterior pero teniendo como entrada una fuente de sonido estéreo, el amplificador realiza la suma de los dos canales de la fuente para convertirla en una señal mono. 2 Amplificadores estéreo con dos entradas estéreo diferentes. Disponiendo cada una de ellas del control de volumen de cada canal estéreo. Útil para sonorizar dos zonas con dos señales estéreo diferentes. 2 Amplificadores estéreo con entrada estéreo común. Aplicación idéntica a la anterior pero con la misma señal estéreo de entrada en los dos amplificadores. 2 Amplificadores en puente con dos señales mono diferentes. Disponemos de un amplificador estéreo convencional. Con un amplificador trabajando en puente obtendremos el doble de potencia con una impedancia de carga mínima de 8. 2 Amplificadores en puente con una señal mono en común. El MPA R trabaja con una sola señal de entrada para dos amplificadores mono con posibilidad de controlar los volúmenes de forma independiente. 2 Amplificadores en puente con una entrada estéreo común. Aplicación idéntica a la anterior pero teniendo como entrada una fuente de sonido estéreo, el amplificador realiza la suma de los dos canales de la fuente para convertirla en una señal mono. 1 Amplificador estéreo y 1 amplificador en puente con una entrada estéreo común. Útil para instalaciones con un amplificador estéreo con cajas de medios y agudos y un segundo amplificador en puente para una caja de subgraves. 18 MPA6-80R La MPA6-80R está formada por seis amplificadores de 85W/4 configurables mediante los conmutadores situados en el panel posterior, permitiendo múltiples posibilidades de trabajo de entre las que destacamos: 6 Amplificadores en mono para 6 señales mono diferentes. De esta forma el MPA R está preparado para trabajar con seis señales distintas disponiendo cada una de ellas de su propio control de volumen. 6 Amplificadores en mono con una entrada en común. El amplificador trabaja solamente con una señal de entrada pero conserva la posibilidad de ajustar de forma independiente el nivel de cada uno de los seis canales, es una aplicación ideal para realizar una distribución de sonido a distintas zonas. 6 Amplificadores en mono con una entrada en estéreo común. Aplicación idéntica a la anterior pero teniendo como entrada una fuente de sonido estéreo, el amplificador realiza la suma de los dos canales de la fuente para convertirla en una señal mono. 3 Amplificadores estéreo con tres entradas estéreo diferentes. Disponiendo cada una de ellas el control de volumen de cada canal del estéreo. Útil para sonorizar tres zonas con tres señales estéreo diferentes. 3 Amplificadores estéreo con entrada estéreo común. Aplicación idéntica a la anterior pero con la misma señal estéreo de entrada en los tres amplificadores. 3 Amplificadores en puente con tres señales mono diferentes. Podremos disponer de tres zonas con tres señales mono diferentes y con posibilidad de ajustar el volumen de forma independiente en cada una de ellas. Con un amplificador trabajando en puente obtendremos el doble de potencia con una impedancia de carga mínima de 8. 3 Amplificadores en puente con una señal mono en común. El MPA R trabaja con una sola señal de entrada para tres amplificadores mono con posibilidad de controlar los volúmenes de forma independiente. 3 Amplificadores en puente con una entrada estéreo común. Aplicación idéntica a la anterior pero teniendo como entrada una fuente de sonido estéreo, el amplificador realiza la suma de los dos canales de la fuente para convertirla en una señal mono. 4 Amplificadores mono y 1 amplificador en puente con una entrada mono común. Útil para instalaciones donde se necesiten 4 amplificadores de una potencia determinada (para cajas de medios y agudos) y un amplificador en puente para caja de subgraves. 19 3. INSTALACIÓN 3.1. Ubicación y montaje El amplificador se presenta en módulo rack de 19" y dos unidades de altura, se suministra con arandelas de plástico con el fin de poderlo montar en un rack sin dañar el aparato. Fije siempre el amplificador al rack de 19” a través de las orejas frontales mediante tornillos y usando las cuatro esquinas. Para su uso portátil, móvil u otras aplicaciones en las cuales el rack pueda ser desplazado, se recomienda sujetar la parte posterior del amplificador mediante raíles de soporte. Es muy importante que, como elemento generador de calor que es, el amplificador no esté completamente encerrado ni expuesto a temperaturas extremas. 3.2. Conexión a red El amplificador se alimenta con corriente alterna, según el país, de