1
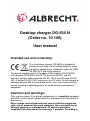
Standladegerät DG-630 N
(Art.- Nr. 10 106)
Bedienungsanleitung
Verwendungszweck des Standladers und Konformität:
Das Standladegerät DG-630N ist zum Aufladen von bis zu 9
Stück Nickel-Metall-Hydrid Akkus im Batteriefach der AlbrechtHandfunkgeräte AE 2980, AE 2990 AFS und ähnlicher Geräte
vorgesehen.
Das Gerät erfüllt die Schutzforderungen der EMV-Direktive 2004/108/EG, der LVD
Direktive 73/23/EWG und der R&TTE Direktive 99/5/EC der Europäischen Union,
sowie die technischen Normen für Amateurfunk EN 301 783-2 und CB Funk EN 300
433 –2 bzw. EN 300 135-2 und ist mit dem CE- Zeichen gekennzeichnet. Defekte
Geräte dürfen, falls sie entsorgt werden sollten, nicht in den Hausmüll, sondern nur
über die kommunalen Sammelstellen zum umweltgerechten Recycling abgegeben
werden.
Vorsichtsmaßnahmen und Warnhinweise:
Bitte verwenden Sie das Ladegerät nur dann, wenn Sie das Batteriefach
vollständig mit NiMH (Nickel-Metall-Hydrid) Akkus bestückt haben und beachten
Sie die Hinweise dieser Anleitung.
Normale Batterien, wie z.B. Alkali-Mangan-Zellen dürfen niemals aufgeladen
werden. Es besteht Verletzungs- und Explosionsgefahr! Auch dürfen niemals
Akkus verschiedener Kapazitäten oder verschiedener Marken gemischt
benutzt werden. Alle Akkus sollten völlig identisch sein und auch möglichst
gleich alt sein. Sie müssen nach Herstellerangaben schnellladefähig sein (dies
trifft für die meisten neueren Akkutypen zu).
Was Sie nie machen dürfen: Stellen Sie nie ein Funkgerät ohne eingesetzte Akkus
in den Standlader. Der Standlader ist nur zum Aufladen von Akkus vorgesehen und
kann das Funkgerät nicht betreiben. Ohne Akkus im Batteriefach kann die höhere
Ladespannung das Funkgerät beschädigen.
Wie funktioniert das Ladegerät:
Das Standladegerät hat eine intelligente Ladeschaltung mit einem speziell für
Schnell-Akkuladung entwickeltem Prozessor, der automatisch den Ladezustand
Ihrer Akkus erkennt und zum richtigen Zeitpunkt abschaltet. Dies ist der Punkt, an
dem der Innendruck der Akkus größer wird und die Spannung ein Maximum
durchlaufen hat (die sogenannte Delta-U-Erkennung).
Die Ladezeit ist damit von der Kapazität Ihrer Akkus abhängig. Standardakkus mit
1000 mAh sind bereits nach weniger als 3 Stunden, Akkus mit höherer Kapazität
nach entsprechend längerer Zeit zu etwa 90 % vollgeladen. Danach schaltet das
Gerät auf die sogenannte Erhaltungsladung um.
Es fließt dabei nur noch ca. 5 % des Maximalladestroms. Diesen Strom (ca. 20 mA)
können
Akkus
über
beliebig
lange
Zeiten
vertragen,
ohne
Überladungserscheinungen zu zeigen. Mit dieser Erhaltungsladung werden Ihrem
Akku auch die fehlenden letzten 10 % Kapazität innerhalb 1-4 Stunden nach Ende
der Schnellladung zugeführt.
Anschließen des Ladegeräts:
Steckernetzteil in 230 V-Steckdose stecken, Anschlusskabel in die rückseitige
Strombuchse des Standladers einstecken. Bei korrekter Installation leuchtet jetzt die
linke rote Leuchtdiode PWR.
Bitte benutzen Sie nur das original mitgelieferte Steckernetzteil für 220/230 V AC.
Andere Netzteile haben möglicherweise falsche Daten für die Akkuladung und
können zu gefährlichen Überladeeffekten führen. Ein direkter Anschluss an
Fahrzeugbordnetze ist nicht möglich, da für das Aufladen von 9 x NiMH Akkus 12
Volt nicht ausreichen.
Tipp für Einsatz im KFZ, Truck oder auf Booten: Wenn Sie Akkus unbedingt
unterwegs im KFZ oder LKW aufladen wollen, können Sie auch ein handelsübliches
Notebooknetzteil bzw. Notebook- 12 V Adapter, eingestellt auf 20..22 V DC an der
Buchse des DG 630 N anschließen! Die Polarität des DC Steckers am Notebook
Netzteil spielt dabei keine Rolle.
Starten des Ladevorgangs:
Legen Sie die Akkus in den Batteriekasten ein und folgen Sie den Markierungen im
Batteriekasten für die richtige Kapazität. Testen Sie, ob die Akkus guten Kontakt
haben, indem Sie den Batteriekasten kurz auf das Funkgerät aufschieben und durch
Einschalten die Funktion prüfen.
Jetzt können Sie den komplettierten Batteriekasten (alleine oder mit Funkgerät
zusammen) in den Standlader einsetzen, so dass die Ladekontakte auf der
Unterseite des Akkus die Stromzuführungskontakte im Standlader berühren. (Es
empfiehlt sich, ab und zu die Kontakte mit einem trockenen Lappen zu reinigen).
Sobald der Kontakt hergestellt ist, beginnt die rechte Leuchtdiode auf dem
Standlader (CHARGE) zu leuchten. Die Schnellladung mit ca. 420 mA hat
begonnen.
Automatische Erkennung defekter Akkus:
Sollte Ihr Akkupack defekte Akkus enthalten, die einen Zellenkurzschluss haben,
wird der Standlader Ihnen das gleich zu Anfang signalisieren: Die Ladekontrolle
leuchtet dann nicht kontinuierlich, sondern blinkt von Anfang an. Bitte entnehmen
Sie dann den Akku und ersetzen Sie defekte Zellen gegen baugleiche neue Zellen.
Einzelne Akkuzellen kann man leicht selbst mit einem Voltmeter prüfen: Ladefähige
Zellen müssen bereits nach wenigen Sekunden im Standlader schon wieder eine
messbare Spannung von ca. 1.2 Volt abgeben. Defekte Zellen mit Kurzschluss
zeigen keine Spannung an.
Gleichzeitig Laden und Empfang ?
Gleichzeitiges Laden bei eingeschaltetem Funkgerät sollte man möglichst
vermeiden, denn die Ladezeit wird einerseits spürbar verlängert und zum anderen
schaltet nach einigen Stunden der Sicherheitstimer die Schnellladung ab und die
Erhaltungsladungs-Phase beginnt. Dabei wird der Akku möglicherweise (je nach
Lautstärke) wieder entladen. Wird allerdings ab und zu das Funkgerät zum Funken
aus der Halterung entnommen und anschließend wieder in den Ladeschacht
gestellt, beginnt die Schnellladung wieder und schaltet ab, sobald eine zu 90 % volle
Batterie erkannt wird oder 3 Stunden vergangen sind.
Dieser Vorgang wiederholt sich dann ggf. mehrfach. Eine verlässliche Aussage,
dass Sie immer einen vollen Akku haben, ist bei gleichzeitigem Laden und Betrieb
daher nicht möglich.
Der Sicherheitstimer in Ihrem Standlader soll verhindern, dass ein Akku, der ständig
aus dem Lader herausgenommen und unmittelbar danach wieder hineingestellt
wird, überladen wird, denn die automatische Erkennung des Delta- U- Punktes ist in
solchen Fällen nicht immer möglich, besonders wenn das Gerät nur für kurze
Sendevorgänge immer wieder entnommen wird.
Automatische Erhaltungsladung:
Am Ende der automatischen Ladung beginnt die rechte Ladekontrolle zu blinken.
Dies ist das Zeichen dafür, dass Ihr Akku zu etwa 90 % vollgeladen ist und nun
schonend mit der Erhaltungsladung weitergeladen wird. Der Akku kann bei
blinkender Diode beliebig lange in dem Ladegerät bleiben, sie haben dann jedes
Mal die Gewähr für einen maximal vollen Akku, wenn Sie Ihn aus dem Standlader
entnehmen.
Nützliche Tipps:
Die früheren Nickel-Cadmium-Akkus waren bekannt für ihren Memoryeffekt, der
aber bei NiMH Akkus deutlich seltener auftritt. Werden sie immer nur kurzzeitig
benutzt und dann wieder voll aufgeladen, kommt es nach einiger Zeit zu einer
immer kleiner werdenden Betriebszeit: der Akku gewöhnt sich quasi an die kurze
Betriebszeit und ist dann nicht mehr in der Lage, länger Strom zu liefern. Was
können Sie dagegen tun?
Benutzen Sie, so oft es geht, Ihren Akku bis zur vollständigen Entleerung.
Gewöhnen Sie sich nicht an, das Funkgerät gleich wieder zum Laden in den
Standlader zu stellen! Besonders praktisch ist ein Zweitakku, den man immer
vollgeladen mitnehmen kann und genau im richtigen Augenblick wechseln kann!
Servicehinweis:
Bei in Deutschland gekauften Geräten wenden Sie sich im Fall von Problemen an
die Alan-Servicehotline unseres Servicepartners PST professional support
technologies GmbH, Breitscheider Weg 117a, 40 885 Ratingen. Senden Sie kein
Gerät ein, ohne die Hotline vorher zu kontaktieren, denn dort wird man Ihnen ggf.
eine Servicestelle nennen, die Ihnen schneller weiterhelfen kann. Bei in anderen
Ländern gekauften Geräten wenden Sie sich bitte an den dortigen Händler.
Hotline:
[email protected]
Telefon 01805 012204 (14 Cents/min über das
deutsche Festnetz und max. 42 Cents/min über deutsche Mobilfunknetze)
Servicedownload:
Hier finden Sie jederzeit alle technischen Unterlagen zu unseren Geräten:
http://service.alan-electronics.de
© 2011 Alan Electronics GmbH
Desktop charger DG-630 N
(Order no. 10 106)
User manual
Intended use and conformity:
The stand-alone charger DG-630N is intended to
charge up to 9 nickel-metal hydride batteries inside
the battery compartment of Albrecht radios AE 2980,
AE 2990 AFS and similar devices.
The device complies with the European EMC directive 2004/108/EG,
LVD directive 73/23/EWG and R&TTE directive 99/5/EC and the
technical amateur radio standards EN 301 783-2 and CB radio EN 300
433 –2 and/or EN 300 135-2 and carries the CE mark. Do not dispose of
defective devices with the household waste; return for environmentally
correct recycling to collecting points for waste electric and electronic
equipment.
Cautions and warnings:
Only use the charger if the battery compartment is completely equipped
with NiMH (nickel-metal hydride) batteries and observe all instructions in
this manual.
Never charge conventional batteries such as alkaline manganese
cells; risk of personal injury and explosion! Never mix batteries of
different capacity or manufacturers. All batteries should be
completely identical and of the same age, if possible. According to
the manufacturer the batteries must be certified for boost-charging
(this applies to most of the newer battery types).
Never do this: Never place a radio without batteries in the stand-alone
charger. The stand-alone charger is only intended to charge batteries
and cannot operate the radio. Without batteries the higher charging
voltage can damage the radio.
Charger operation:
The stand-alone charger comes with intelligent charging circuit with a
processor, which was especially developed for boost charging and
detects the charge status of the battery to switch off at the right time.
This is the point when the internal pressure of the battery increases and
the voltage is at its peak (the so-called Delta-U detection).
The charging duration depends on the battery capacity. Standard
batteries with 1000mAh are already fully charged after less than 3 hours,
batteries with higher capacity achieve 90% after the respective duration.
At this point the charger switches to the so-called trickle charge.
Now only approx. 5% of the maximum charging current is drawn.
Batteries can tolerate this current (approx. 20mA) indefinitely, without
being overcharged. This trickle charge also adds the missing last 10%
capacity within 1-4 hours after the boost charge.
Connect charger:
Connect the mains adaptor to a 230V wall outlet and connect the cable
to the power jack at the rear of the stand-alone charger. After correct
installation the left-hand red PWR LED lights up.
Only use the supplied original mains adaptor for 220/230VAC. Other
power adaptors may have different specifications and may cause
dangerous overcharge effects. Direct connection to vehicle onboard
power is not possible, since for charging 9 x NiMH batteries 12V is not
sufficient.
Tip for use in vehicles, trucks or boats: Use a commercially available
12V notebook adaptor, set to 20…22VDC and connect to the power jack
of the DG 630 N if it is unavoidable to charge batteries in vehicles! The
polarity of the DC plug of the notebook adaptor is of no consequence.
Start charging:
Insert the batteries in the battery compartment and observe the correct
capacity as marked inside the compartment. Ensure that the batteries
make good contact by attaching the battery pack to the radio and
switching it on.
Now place the assembled battery pack (with or without the attached
radio) in the stand-alone charger; the charging contacts at the bottom of
the battery must be in contact with the power supply contacts in the
stand-alone charger (we recommend to clean the contacts from time to
time with a dry cloth). The right-hand LED on the stand-alone charger
(CHARGE) lights up as soon as contact is made. Boost charge with
approx. 420mA starts.
Defective battery auto detection:
The stand-alone charger signals right at the beginning if your battery
pack contains defective batteries with an internal short circuit: the charge
LED does not light up, but flashes. Remove the battery and replace
defective cells with identical new cells. Individual battery cells can easily
be tested with a voltmeter: chargeable cells must supply a measurable
voltage of approx. 1.2V after being connected for a few seconds to the
stand-alone charger. Defective cells with internal short-circuit show no
voltage.
Charging and receiving at the same time?
Avoid simultaneous charging with the radio switched on, since the
charging time is considerably longer and on the other hand the safety
timer will turn off the boost charge to start trickle charge. This may
discharge the battery (depending on volume setting). However, removing
the radio from time to time and replacing it in the charger restarts the
boost charge and switches off after 90% battery capacity is detected or
after 3 hours.
This process can be repeated. Reliable information that your battery is
fully charged is thus for continuous charging and operation not possible.
The safety timer in your stand-alone charger prevents overcharging of a
battery, which is constantly removed and replaced, since Delta-U point
auto detection in this case is not always possible, especially if the radio
is repeatedly removed for short-term transmissions.
Automatic trickle charge:
At the end of the automatic charge the right-hand LED starts flashing.
This means, that the battery is charged to approx. 90% and charging
carries on with trickle charge. The battery can stay indefinitely in the
charger while the LED is flashing; this ensures maximum battery
capacity when removing the battery from the stand-alone charger.
Useful hints:
Former nickel-cadmium batteries were known for their memory effect,
which occurs considerably less often in NiMH batteries. Using them for a
short time and recharging them to full capacity leads to a shorter and
shorter operating time: you could say that the battery gets used to the
short operating time and is not able to supply power over a longer period.
This is what you can do.
Use your battery, as often as possible, until it is fully discharged. Do not
accustom yourself to immediately replacing the radio in the stand-alone
charger! A second battery is very convenient, which can be taken along
and be replaced at the right time!
Service:
In case of problems with devices bought in Germany contact the Alan
Service Hotline of our service partner PST professional support
technologies GmbH, Breitscheider Weg 117a, 40 885 Ratingen. Do
not return a device without contacting the hotline first; they may be able
to give information about a service point, which can help you faster. In
other countries contact the local dealer.
Hotline:
[email protected]
Phone +44 1793 882431
Service downloads:
Here you find all technical documentation for our devices:
www.alan-uk.com
© 2011 Alan Electronics GmbH
Chargeur autonome DG-630 N
(référence : 10 106)
Guide d'utilisateur
Usage prévu et conformité :
Ce chargeur autonome DG-630N est destiné à
charger jusqu'à 9 piles nickel-hydrure métallique
placées dans les radios AE 2980 et AE 2990 AFS
d'Albrecht et autres appareils similaires.
Il est conforme aux directives européennes 2004/108/EG relative à la
compatibilité électromagnétique, 73/23/EWG relative aux appareils à
basse tension et 99/5/EC relative aux équipements hertziens et aux
équipements terminaux de télécommunications. Il est conforme aux
normes de radio amateur EN 301 783-2, CB Funk EN 300 433 –2 et/ou
EN 300 135-2 et porte la marque CE. Ne jetez pas vos appareils
électriques et électroniques avec vos ordures ménagères, mais
déposez-les auprès des installations de collecte prévues à cet effet afin
de les recycler sans nuire à l'environnement.
Précautions et avertissements :
Utilisez ce chargeur uniquement lorsque l'appareil à recharger ne
contient que des piles NiMH (nickel-hydrure métallique) et respectez
toutes instructions rapportées dans ce guide d'utilisateur.
Ne l'utilisez jamais pour recharger des piles classiques telles que
des piles alcaline-manganèse, vous vous exposez à des risques de
blessure corporelle et d'explosion ! Ne combinez pas des piles de
capacité et de marque différentes. Dans la mesure du possible,
utilisez uniquement des piles identiques et de même âge. Le
fabricant recommande de n'utiliser que des piles certifiées pour un
chargement rapide (ce qui est le cas de la plupart des nouveaux
types de pile).
Ne faites jamais cela : ne connectez jamais une radio sans pile au
chargeur autonome. Celui-ci n'étant pas conçu pour alimenter
directement une radio, mais uniquement pour charger les piles, la forte
tension délivrée risque d'endommager la radio.
Utilisation du chargeur :
Ce modèle de chargeur intègre un processeur assurant une charge
rapide puis l'arrêt automatique de la charge dès que la pile est
suffisamment chargée. La détection de ce point de déconnexion,
appelée détection Delta-U, se base sur l'augmentation de la pression
interne de la pile alors que la tension de charge est maximale.
La durée de charge varie avec la capacité de la pile. Des piles standards
de 1000mAh sont totalement chargées en moins de 3 heures. Pour des
piles de plus grande capacité, 90% de la charge maximale est obtenue
après leur durée respective.
À ce moment, le chargeur bascule automatiquement en mode charge
d'entretien et ne fournit plus que 5% du courant de charge maximal. Les
piles peuvent accepter un si faible courant (environ 20 mA) indéfiniment,
sans jamais atteindre le niveau de surcharge. En charge d'entretien, 1 à
4 heures sont nécessaires pour compléter le chargement des piles à
100 %.
Branchement du chargeur :
Branchez l'extrémité appropriée de l'adaptateur d'alimentation sur une
prise secteur 230 V et branchez l'autre extrémité à l'arrière du chargeur.
Si les branchements sont corrects, le témoin de marche LED (PWR), sur
la gauche du chargeur, s'allume.
Utilisez uniquement l'adaptateur 220/230 V, courant alternatif, fourni. Les
spécifications techniques des autres adaptateurs peuvent ne pas
correspondre et entraîner des effets de surcharge dangereux. Le
branchement direct sur la prise d'un véhicule n'est pas possible, la
tension de 12 V fournie ne suffisant pas pour charger 9 x piles NiMH.
Conseil pour une utilisation en voiture, en camion ou en bateau : si
vous devez absolument charger des piles alors que vous vous trouvez
dans un véhicule, branchez le chargeur sur la batterie du véhicule via un
adaptateur 12 V pour ordinateur mini-portable et réglez celui-ci sur
20…22 V CC ! La polarité de la prise CC de l'adaptateur pour miniportable n'importe pas.
Début du chargement :
Insérez les piles dans le compartiment de piles en respectant le sens
des polarités indiquées à l'intérieur du compartiment. Vérifiez que les
piles sont correctement installées en connectant le bloc de piles à la
radio puis en allumant la radio.
Connectez le bloc de piles (avec ou sans la radio attachée) au chargeur,
en vérifiant que les bornes de chargement en bas du bloc de piles sont
bien en contact avec les bornes d'alimentation du chargeur (pensez à
nettoyer régulièrement ces bornes avec un chiffon sec). La connexion
est effective lorsque la LED sur la droite du chargeur (CHARGE)
s'allume. La charge rapide commence, avec un courant d'environ
420mA.
Détection automatique des piles défectueuses :
Si certaines piles du bloc d'alimentation que vous mettez à charger sont
en court-circuit interne, la LED de charge se met immédiatement à
clignoter pour vous le signaler. Retirez le bloc de d'alimentation et
remplacez les piles défectueuses par de nouvelles piles. Vous pouvez
facilement tester l'état de vos piles à l'aide d'un voltmètre : après
uniquement quelques secondes de charge, les piles en bon état affichent
déjà une tension de 1,2 V sur le voltmètre alors que les piles en courtcircuit interne n'affichent aucune tension.
Chargement et réception simultanée ?
Évitez de charger les piles de la radio alors que celle-ci fonctionne, le
temps de charge s'en trouverait considérablement allongé et le passage
automatique à la charge d'entretien risque de décharger alors les piles
(selon le niveau du volume sonore de la radio). Cependant, enlever de
temps en temps la radio du chargeur pour l'y remettre ensuite rétablit la
charge rapide avec le passage automatique à la charge d'entretien
lorsque les piles sont chargées à 90% de leur capacité maximale ou
après 3 heures.Vous pouvez répéter ce processus. L'indication que les
piles sont totalement chargées n'est pas fiable lorsque vous chargez les
piles et les utilisez en même temps.
Un dispositif de sécurité prévient toute surcharge des piles qui sont
constamment retirées puis remises sur le chargeur, la détection
automatique du point Delta-U n'étant alors pas toujours possible,
notamment lorsque vous retirez fréquemment la radio du chargeur pour
de courtes transmissions.
Charge automatique d'entretien :
À la fin du chargement automatique, le témoin LED, placé sur la droite
du chargeur, clignote. La pile est alors chargée à environ 90% de sa
charge totale et le chargeur se place automatiquement en mode charge
d'entretien. Tant que la LED clignote, vous pouvez laisser indéfiniment
les piles sur le chargeur. Vous êtes ainsi sûr de toujours disposer de
piles chargées au maximum de leur capacité.
Conseils utiles :
L'effet mémoire constaté avec les piles au nickel-cadmium se produit
beaucoup moins avec les piles NiMH. Utiliser ces piles juste quelque
temps et les mettre à recharger avant qu'elles ne soient complètement
déchargées réduit à chaque fois leur durée de fonctionnement après
chargement : c'est comme si la pile s'habitue à ne fonctionner qu'un
court instant et ne peut plus fournir une tension sur des périodes plus
longues. Ceci n'est bien sûr qu'une image.
Utilisez la pile jusqu'à la décharger complètement. Ne vous habituez pas
à mettre immédiatement la radio à recharger sur le chargeur ! Gardez
une seconde pile chargée à portée de la main pour remplacer celle
déchargée, le cas échéant !
Réparation :
En cas de problème avec l'un de nos produits achetés en Allemagne,
appelez le service d'assistance de notre service après-vente PST
professional support technologies GmbH, Breitscheider Weg 117a,
40 885 Ratingen. Ne nous retournez aucun appareil sans avoir appelé
auparavant notre service d'assistance, au cas où un autre service aprèsvente peut vous dépanner plus rapidement. Si vous avez acheté votre
appareil dans un autre pays que l'Allemagne, contactez votre revendeur
local.
Service d'assistance :
[email protected]
Téléphone +33 01 34214690-1
Service de téléchargement :
Pour télécharger la documentation technique de nos appareils, visitez la
page Web :
www.midlandradio.eu
© 2011 Alan Electronics GmbH
Caricabatteria da tavolo DG-630 N
(art. n. 10 106)
Manuale dell'utente
Destinazione d'uso prevista e dichiarazione di
conformità:
Il caricabatteria da tavolo DG-630N è progettato per
caricare fino a 9 batterie all'idruro di nichel metallico
all'interno del vano batteria dei ricetrasmettitori
palmari Albrecht AE2980, AE 2990 AFS e
apparecchiature simili.
Il dispositivo soddisfa i requisiti di sicurezza fissati dalle direttive
dell'Unione Europea EMC 2004/108/CE, LVD 73/23/CE, R&TTE 99/5/CE
nonché gli standard tecnici per apparecchiature amatoriali EN 301 783-2
e CB Funk EN 300 433 –2 e/o EN 300 135-2 ed è dotato di marcatura
CE. Non smaltire dispositivi difettosi nei rifiuti domestici, ma portarli nei
centri di raccolta di apparecchiature elettriche ed elettroniche per un
corretto smaltimento nel rispetto dell'ambiente.
Precauzioni e avvertenze:
Utilizzare il caricabatteria solo se il vano batteria è stato riempito
completamente con batterie NiMH (idruro di nichel metallico) e attenersi
alle istruzioni contenute in questo manuale.
Non caricare mai batterie convenzionali, come ad esempio pile
alcaline al manganese, poiché sussiste il rischio di esplosione e di
lesioni alle persone! Non mischiare mai batterie di capacità e
marche differenti. Tutte le batterie dovrebbero essere identiche e
possibilmente della stessa età. In base alle indicazioni del
produttore, tutte le batterie devono essere a carica rapida (la
maggior parte dei tipi di batterie più recenti possiede questa
capacità).
Da non fare: Non collocare mai una ricetrasmittente senza batterie sul
caricabatteria da tavolo. Il caricabatteria da tavolo è stato progettato solo
per caricare le batterie e non può alimentare la ricetrasmittente. Senza le
batterie, la maggiore tensione di carica può danneggiare la
ricetrasmittente.
Funzionamento del caricabatterie:
Il caricabatteria è dotato di un circuito di carica intelligente con un
processore specificatamente progettato per la carica rapida e rileva lo
stato di carica delle batterie in moda da spegnersi al momento giusto,
cioè il momento in cui la pressione interna della batteria aumenta e la
tensione raggiunge il picco (il cosiddetto riconoscimento Delta-U).
La durata della carica dipende dalla capacità della batteria. Batterie
standard da 1000 mAh sono completamente cariche già dopo meno di
tre ore, mentre batterie con capacità più elevata raggiungono il 90%
della carica dopo un tempo di carica rispettivamente più lungo. A questo
punto, il caricabatteria attiva la cosiddetta carica di mantenimento.
In questa modalità viene inviato circa il 5% della corrente di carica
massima. Le batterie possono tollerare tale corrente (circa 20 mAh) per
un periodo indeterminato senza essere sovraccaricate. Durante la
modalità di carica di mantenimento, viene aggiunto anche il restante
10% di capacità entro 1-4 ore dal termine della carica rapida.
Collegamento del caricabatteria:
Inserire la spina dell'alimentatore in una presa a muro da 230 V e
collegare il cavo di alimentazione alla prese jack situata sul retro del
caricabatteria da tavolo. Al termine dell'installazione, il LED rosso PWR a
destra si illuminerà.
Utilizzare solo l'alimentatore originale da 220/230 V CA fornito in
dotazione. Altri alimentatori potrebbero avere specifiche differenti e
potrebbero causare effetti pericolosi di sovraccarica. Un collegamento
diretto all'alimentazione elettrica di autoveicoli non è possibile, in quanto
12 V non sarebbero sufficienti per la carica di 9 batterie NiMH.
Consigli per l'uso su autoveicoli, camion e barche: Se è
assolutamente necessario caricare le batterie a bordo di un veicolo,
utilizzare un adattatore da 12 V per notebook facilmente reperibile sul
mercato, impostarlo su 20…22 V CC e collegarlo alla presa di
alimentazione del DG 630 N! In questo caso, la polarità della spina CC
dell'alimentatore non è determinante.
Avvio del processo di carica:
Inserire le batterie nel vano batteria rispettando la corretta capacità
indicata all'interno del vano. Accertarsi che le batterie abbiano un buon
contatto collegando il pacco batterie alla ricetrasmittente e accendendo
l'unità.
Inserire il pacco batterie montato (con o senza la ricetrasmittente
collegata) nel caricabatteria da tavolo; i contatti di caricamento sul fondo
del pacco batterie devono toccare i contatti di alimentazione del
caricabatteria da tavolo (consigliamo di pulire regolarmente i contatti con
un panno asciutto). Il LED destro sul caricabatteria da tavolo (CHARGE)
si illuminerà appena viene eseguito un contatto. In questo modo
comincia la carica rapida con circa 420 mAh.
Riconoscimento automatico delle batterie
difettose:
Se il pacco batterie contiene batterie difettose, ciò sarà segnalato dal
caricabatteria da tavolo all'inizio del processo di carica. In questo caso,
la spia LED di carica non s'illuminerà con luce fissa, ma lampeggerà.
Rimuovere il pacco batterie e sostituire la batteria difettosa con una
nuova dello stesso tipo. Singole batterie possono essere testate con un
voltmetro: batterie ricaricabili devono fornire una tensione di circa 1,2 V
già alcuni secondi dopo essere state collegate al caricabatteria. Batterie
difettose con cortocircuito non indicano nessuna tensione.
Carica e ricezione allo stesso tempo?
Evitare di caricare le batterie quando la ricetrasmittente è accesa, in
quanto da un lato ciò allungherebbe sensibilmente il tempo di carica e
dall'altro il timer di sicurezza spegnerebbe la carica rapida attivando la
carica di mantenimento. Questo potrebbe scaricare nuovamente le
batterie (a seconda del livello del volume). Tuttavia, rimuovendo solo
ogni tanto la ricetrasmittente dal sostegno per trasmettere e poi
ricollocandola sul caricabatteria, la carica rapida verrà nuovamente
avviata e si arresterà quando sarà raggiunto il 90% della piena capacità
delle batterie o dopo 3 ore.
Questo processo può essere ripetuto più volte. Quindi, caricando il
pacco batterie mentre si utilizza il dispositivo, non è possibile stabilire in
modo affidabile, se le batterie sono completamente cariche.
Il timer di sicurezza nel caricabatteria da tavolo previene la sovraccarica
di un pacco batterie che viene ripetutamente rimosso e riposizionato, in
quanto in questo caso il rilevamento automatico del punto Delta-U non
sempre è possibile, specialmente quando la ricetrasmittente viene
ripetutamente rimossa per effettuare brevi trasmissioni.
Carica di mantenimento automatica:
Al termine della carica automatica, la luce LED destra comincerà a
lampeggiare. Questo segnala che il pacco batterie ha raggiunto circa il
90% della carica totale e la carica proseguirà utilizzando la modalità di
carica di mantenimento. Se la luce LED lampeggia, il pacco batterie può
restare collegato al caricabatterie per un tempo indefinito; in questo
modo è assicurato il massimo livello di capacità delle batterie quando il
pacco batterie viene rimosso dal caricabatteria da tavolo.
Consigli utili:
Le vecchie batterie al nichel-cadmio erano conosciute per il loro effetto
memoria, un fenomeno che nelle batterie NiMH si verifica più raramente.
Se le batterie sono utilizzate per brevi periodi e poi ricaricate
completamente, la durata delle batterie diminuirà sempre di più: è come
se le batterie si abituassero ad un tempo di funzionamento breve e non
fossero in grado di fornire energia per periodi più lunghi. Cosa fare in
questi casi?
Se possibile, utilizzare sempre le batterie fino a quando sono
completamente scariche. Non abituarsi a collocare immediatamente la
ricetrasmittente sul caricabatteria da tavolo! È molto comodo avere un
pacco batterie di riserva che si può sempre portare con se e che può
essere sostituito al momento giusto!
Assistenza:
In caso di problemi con dispositivi acquistati in Germania, rivolgersi al
Servizio Assistenza Alan del nostro partner per l'assistenza PST
professional support technologies GmbH, Breitscheider Weg 117a,
40 885 Ratingen. Non inviare un dispositivo senza aver prima contattato
il servizio assistenza; potrebbero essere in grado di fornire informazioni
su un centro di assistenza dove ricevere aiuto in modo più rapido. Negli
altri paesi, contattare il rivenditore locale.
Servizio Assistenza:
[email protected]
Telefono +39 0522 509445
Servizio download:
Qui è possibile trovare tutta la documentazione tecnica per i nostri
dispositivi:
www.midlandradio.eu
© 2011 Alan Electronics GmbH
Cargador independiente DG-630 N
(Art. N° 10 106)
Manual de usuario
Uso pretendido y conformidad:
El objetivo del cargador independiente DG-630N es
cargar hasta 9 baterías de hidruro metálico de níquel
dentro del compartimiento de baterías de radios
Albrecht AE 2980, AE 2990 AFS y dispositivo
similares.
El dispositivo cumple con la directiva europea 2004/108/EG, directiva
LVD 73/23/EWG y directiva R&TTE 99/5/EC y los estándares técnicos
de radios amateur EN 301 783-2 y CB Funk EN 300 433-2 y/o EN 300
135-2, y lleva la marca CE. No deseche los dispositivos defectuosos con
los residuos domésticos; devuelva en los puntos de recolección para un
reciclado ecológico correcto para equipos eléctricos y electrónicos de
desecho.
Precauciones y advertencias:
Solamente utilice el cargador si el compartimiento de baterías está
completamente equipado con baterías de NiMH (hidruro metálico de
níquel) y cumpla todas las instrucciones en este manual.
¡Nunca cargue baterías convencionales, como células de
manganeso alcalinas; existe riesgo de lesiones personales y de
explosión! Nunca mezcle baterías de diferente capacidad o de
diferentes fabricantes. Todas las baterías deberían ser
completamente idénticas y tienen que tener la misma antigüedad,
de ser posible. De acuerdo con el fabricante, las baterías deben
estar certificadas para carga rápida (esto aplica para la mayoría de
los tipos más nuevos de baterías).
Nunca haga esto: Nunca coloque un radio sin baterías en el cargador
independiente. El objetivo del cargador independiente sólo es cargar
baterías y no operar el radio. Sin baterías, la tensión de carga más alta
puede dañar el radio.
Operación del cargador:
El cargador independiente viene con un circuito de carga inteligente, con
un procesador especialmente desarrollado para carga rápida, y detecta
el estado de carga de la batería para apagarlo en el momento adecuado.
Éste es el punto cuando la presión interna de la batería aumenta y la
tensión está en su pico (la llamada detección de Delta-U).
La duración de carga depende de la capacidad de la batería. Las
baterías estándar con 100 mAh ya están cargadas completamente
después de 3 horas; las baterías con mayor capacidad alcanzan el 90%
después de la duración respectiva. En este momento, el cargador
cambia a la llamada carga lenta.
Ahora sólo aproximadamente el 5% de la corriente máxima de carga se
consume. Las baterías pueden tolerar esta corriente (aproximadamente
20 mA) indefinidamente, sin que haya sobrecarga. Esta carga lenta
también agrega la capacidad de 10% faltante dentro de un período de 1
a 4 horas después de la carga rápida.
Conexión del cargador:
Conecte el adaptador de corriente al tomacorrientes de pared de 230 V;
y el cable, a la ficha de corriente en la parte posterior del cargador
automático. Después de una instalación correcta, se encienden las luces
PWR LED rojas de la izquierda.
Sólo utilice el adaptador de corriente original proporcionado para
220/230 VCA. Otros adaptadores de corriente pueden tener diferentes
especificaciones y pueden causar efectos de sobrecarga peligrosos. No
es posible la conexión directa a la corriente integrada del vehículo, dado
que no es suficiente para cargar las 9 baterías de NiMH de 12 V.
Consejo para uso en vehículos, camiones o embarcaciones: Utilice
un adaptador de computador portátil de 12 V disponible en el mercado,
fije en 20... 22 VCC, y conecte a la ficha de corriente del DG 630 N, si
es inevitable cargar baterías en vehículos. La polaridad del enchufe CC
del adaptador de computador portátil no es relevante.
Comienzo de carga:
Inserte las baterías en el compartimiento de baterías y cumpla con la
capacidad correcta como se indica dentro del compartimiento.
Asegúrese de que las baterías hagan buen contacto, conectando el
conjunto de baterías al radio y encendiéndolo.
Ahora coloque el conjunto de baterías montado (con el radio conectado
o sin éste) en el cargador independiente; los contactos de carga en la
parte inferior de la batería debe estar en contacto con los contactos de la
fuente de alimentación en el cargador independiente (recomendamos
limpiar los contactos ocasionalmente con un trapo seco). El LED
derecho en el cargador automático (CHARGE) se enciende tan pronto
como se hace contacto. La carga rápida comienza con
aproximadamente 420 mA.
Detección automática de baterías defectuosas:
El cargador independiente da un aviso justo al comienzo si su conjunto
de baterías contiene baterías defectuosas con un corto circuito interno:
el LED de carga no se enciende, pero parpadea. Quite la batería y
reemplace las células defectuosas con nuevas células idénticas. Las
células individuales de la batería pueden probarse fácilmente con un
voltímetro: células cargables deben proporcionar una tensión medible de
aproximadamente 1,2 V después de conectarse por unos pocos
segundos al cargador independiente. Las células defectuosas con corto
circuito interno no muestran tensión.
¿Carga y recepción al mismo tiempo?
Evite la carga simultánea con el radio encendido, ya que el tiempo de
carga es significativamente mayor y, por otro lado, el temporizador de
seguridad desactivará la carga rápida para comenzar con la carga lenta.
Esto puede descargar la batería (dependiendo de la configuración de
volumen). No obstante, quitar el radio ocasionalmente y reemplazarlo en
el cargador reinicia la carga rápida y lo apaga después de que se
detecta un 90% de capacidad de la batería o después de 3 horas.
Este proceso puede repetirse. De este modo, la información confiable de
que su batería está completamente cargada es para carga continua y
operación no posible.
El temporizador de seguridad en su cargador automático impide la
sobrecarga de una batería, que constantemente se quita y se
reemplaza, ya que la detección automática del punto Delta U, en este
caso, no es siempre posible; en especial si el radio se quita
repetidamente para transmisiones breves.
Carga lenta automática:
Al finalizar la carga automática, el LED derecho comienza a parpadear.
Esto significa que la batería está cargada en aproximadamente un 90%
y que continúa la carga lenta. La batería puede permanecer
indefinidamente en el cargador mientras el LED parpadee; esto asegura
una capacidad máxima de batería al quitarla del cargador independiente.
Consejos útiles:
Se conocen a las baterías de níquel-cadmio anteriores por su efecto
memoria que tiene lugar significativamente menos frecuentemente en
las baterías de NiMH. Utilizarlas por un período breve y recargarlas a su
capacidad completa conduce a un tiempo de operación cada vez más
acotado: se puede decir que la batería se acostumbra al tiempo de
operación breve y que no es capaz de proporcionar energía durante un
período mayor. Esto es lo que puede hacer.
Utilice su batería, tan frecuentemente como pueda, hasta que esté
completamente descargada. ¡No se acostumbre a reemplazar el radio
inmediatamente en el cargador independiente! Una segunda batería es
muy conveniente. ¡Puede llevarse y reemplazarse en el momento justo!
Mantenimiento:
En caso de problemas con los dispositivos adquiridos en Alemania,
póngase en contacto con la línea Alan Service Hotline de nuestro socio
de servicio PST professional support technologies GmbH,
Breitscheider Weg 117a, 40 885 Ratingen. No devuelva un dispositivo
sin haberse comunicado primero con la línea de asistencia técnica; ellos
le pueden proporcionar información acerca de un punto de servicio que
puede ayudarlo en forma más rápida. En otros países, póngase en
contacto con el distribuidor local.
Línea de asistencia técnica:
[email protected]
Teléfono 902 38 48 78
Descargas de mantenimiento:
Aquí encontrará toda la documentación técnica para nuestros
dispositivos:
www.albrecht.es
© 2011 Alan Electronics GmbH