1
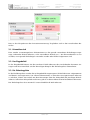
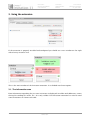
Invitation Benutzerhandbuch
User Manual
Verfasser:
Abgenommen:
Datum:
Sten Seifert
Johannes Waschke
27. Juni 2011
Invitation - Benutzerhandbuch
User Manual
Inhaltsverzeichnis
I. Deutsch
2
1. Produktübersicht
2
1.1. Beschreibung . . . . . . . . . . . . . . . . . . . . . . . . . . . . . . . . . . . . . . . . .
2. Installation und Konfiguration
2
2
2.1. Installation . . . . . . . . . . . . . . . . . . . . . . . . . . . . . . . . . . . . . . . . . . .
2.2. Konfiguration . . . . . . . . . . . . . . . . . . . . . . . . . . . . . . . . . . . . . . . . .
3. Benutzung
2
2
3
3.1. Hinweisbereich . . . . . . . . . . . . . . . . . . . . . . . . . . . . . . . . . . . . . . . .
3.2. Das Eingabefeld . . . . . . . . . . . . . . . . . . . . . . . . . . . . . . . . . . . . . . . .
3.3. Die Einladungsliste . . . . . . . . . . . . . . . . . . . . . . . . . . . . . . . . . . . . . .
4
4
4
II. English
5
1. Overview
5
1.1. Brief description
. . . . . . . . . . . . . . . . . . . . . . . . . . . . . . . . . . . . . . .
2. Installation and configuration
5
5
2.1. Installation . . . . . . . . . . . . . . . . . . . . . . . . . . . . . . . . . . . . . . . . . . .
2.2. Configuration . . . . . . . . . . . . . . . . . . . . . . . . . . . . . . . . . . . . . . . . .
3. Using the extension
5
5
6
3.1. The information area . . . . . . . . . . . . . . . . . . . . . . . . . . . . . . . . . . . . .
3.2. The input area . . . . . . . . . . . . . . . . . . . . . . . . . . . . . . . . . . . . . . . . .
3.3. The invitation list . . . . . . . . . . . . . . . . . . . . . . . . . . . . . . . . . . . . . . .
Seite 1/7
6
7
7
Invitation Benutzerhandbuch
User Manual
Verfasser:
Abgenommen:
Datum:
Sten Seifert
Johannes Waschke
27. Juni 2011
Teil I.
Deutsch
1. Produktübersicht
1.1. Beschreibung
Das Invitationprojekt ist eine Open Source Erweiterung für OntoWiki1 .
Der Grundgedanke der Extension ist es, das gemeinsame Arbeiten an Instanzen zu erleichtern,
indem dem Benutzer eine Einladungsfunktion für einzelne Instanzen zur Verfügung gestellt wird.
Diese ermöglicht es, bisher projektfremde Personen zur Bearbeitung einer einzelnen Instanz
einzuladen. Außerdem werden Funktionalitäten bereitgestellt, die es unangemeldeten Personen
erlaubt, einzelne Instanzen ohne Registrierung zu betrachten.
2. Installation und Konfiguration
2.1. Installation
Um die Erweiterungsontologie zu initialisieren, öffnen Sie bitte als Administrator eine beliebige
Instanzansicht. Die Invitationerweiterung prüft dann das Vorhandensein der konfigurierten Ontologie und legt diese gegebenenfalls neu an. Anschließend können alle Benutzer der OntoWikiInstallation die Erweiterung nutzen.
2.2. Konfiguration
Die Invitationerweiterung kann über die, in OntoWiki integrierte, Pluginkonfigurationsseite konfiguriert werden.
Folgende Einstellungsmöglichkeiten stehen zur Verfügung:
1
http://ontowiki.net/
Seite 2/7
Invitation Benutzerhandbuch
User Manual
Name
modeluri
invitationlimittime
invitationlimit
title
sender
smtp.server
smtp.config.auth
smtp.config.username
smtp.config.passwort
smtp.config.port
smtp.config.ssl
Verfasser:
Abgenommen:
Datum:
Sten Seifert
Johannes Waschke
27. Juni 2011
Erklärung
Name der Ontologie, die für die Invitationextension genutzt werden
soll
Zeitspanne, über die nicht mehr Einladungen versendet werden dürfen als in ”invitationlimit“ eingestellt wurden (in Minuten)
Anzahl der maximal versendbaren Einladungen innerhalb der in ”invitationlimittime“ konfigurierten Minuten
Titel, der jeder Einladungsmail gegeben wird
Absenderadresse jeder Einladungsmail
Hier kann der SMTP Server eingetragen werden, der für den Versand der Einladungen genutzt werden soll. Wird kein Server eingegeben, wird versucht direkt vom gleichen Server zu senden, auf dem
auch die PHP Installation läuft
Authentifizierungsmethode des SMTP Servers (erlaubt sind
”plain“,”login“ oder ”cram-md5“)
Benutzername des SMTP Nutzers, über den die Einladungen versendet werden sollen
Passwort für den SMTP Zugang
Port auf dem der SMTP Server läuft
SSL Authentifizierungsmethode am SMTP Server (erlaubt sind ”ssl“
oder ”tls“)
3. Benutzung
Ist die Erweiterung ordnungsgemäß installiert und eingerichtet, so findet man auf der rechten
Seite jeder Instanzansicht ein neues Fenster.
Seite 3/7
Invitation Benutzerhandbuch
User Manual
Verfasser:
Abgenommen:
Datum:
Sten Seifert
Johannes Waschke
27. Juni 2011
Dies ist das Hauptfenster der Invitationerweiterung. Es gliedert sich in drei verschiedene Bereiche.
3.1. Hinweisbereich
Hier werden zusammengefasste Informationen zu den gerade versendeten Einladungen angezeigt (inkorrekte E-Mail-Adressen, nicht versendbare E-Mails etc.). Der Hinweisbereich ist nur
sichtbar, wenn gerade Einladungen versendet wurden oder Fehler aufgetreten sind.
3.2. Das Eingabefeld
In das Eingabefeld können Sie die einzelnen E-Mail-Adressen der einzuladenden Personen eintragen und mit einem Klick auf den Hinzufügen-Knopf in die Einladungsliste übernehmen.
3.3. Die Einladungsliste
In die Einladungsliste werden die im Eingabefeld eingetragenen E-Mail-Adressen aufgenommen
und bereits vorausgewertet. Um nähere Informationen zu einer der vorausgewerteten Adressen
zu erhalten, fahren Sie einfach mit dem Mauszeiger über das Infosymbol der jeweiligen E-MailAdresse. Sollte kein Infosymbol erscheinen, gibt es zu dieser Adresse keine besonderen Hinweise.
Die Einladungsliste fasst maximal 5 unterschiedliche E-Mail-Adressen.
Seite 4/7
Invitation Benutzerhandbuch
User Manual
Verfasser:
Abgenommen:
Datum:
Sten Seifert
Johannes Waschke
27. Juni 2011
Teil II.
English
1. Overview
1.1. Brief description
The Invitation-project is an open source extension for OntoWiki2 .
The basic idea of this extension is to simplify the collaborative work on OntoWiki-Instances
through offering an invitation functionality. It enables users of OntoWiki to invite new persons to
edit single instances and provides means of viewing single instances without registering first.
2. Installation and configuration
2.1. Installation
To initialize the Invitation-Ontology you should be logged in with administration privileges and
open any instance, thus triggering the extension for checking for availability of the configured
ontology and creating it if necessary. Afterwards any user of the OntoWiki is able to use the
extension.
2.2. Configuration
You can configure the Invitation-extension through the plugin configuration provided by OntoWiki
itself. The following options are configurable:
Name Description
modeluri
invitationlimittime
invitationlimit
titel
sender
smtp.server
smtp.config.auth
smtp.config.username
smtp.config.passwort
smtp.config.port
smtp.config.ssl
2
Name of the ontology the Invitation-extension uses
Duration of time (in minutes) in wich not more than ”invitationlimit“
invitations are allowed to be sent
Maximal number of invitations that are allowed to be sent in the last
”invitationlimittime“ minutes
Title of every invitation e-mail
from-address of every invitation e-mail
If set, the given SMTP Server is used for sending the e-mails, otherwise the extension tries to send it via the server on wich the actual
PHP installation runs
Authentification method of the SMTP server (allowed are
”plain“,”login“ or ”cram-md5“)
Username for the SMTP server
Password for the given SMTP user
Port on wich the SMTP server runs
SSL authentification method for the SMTP server (allowed are ”ssl“
or ”tls“)
http://ontowiki.net/
Seite 5/7
Invitation Benutzerhandbuch
User Manual
Verfasser:
Abgenommen:
Datum:
Sten Seifert
Johannes Waschke
27. Juni 2011
3. Using the extension
If the extension is properly installed and configured you should see a new window on the right
side of every instance view.
This is the main window of the Invitation-extension. It is divided into three regions:
3.1. The information area
Here information regarding the just sent invitations is displayed (invalid e-mail-addresses, errors
during the sending of e-mails, etc.) It is only visible if the Invitation-extension has tried to send
some invitations or if errors occured.
Seite 6/7
Invitation Benutzerhandbuch
User Manual
Verfasser:
Abgenommen:
Datum:
Sten Seifert
Johannes Waschke
27. Juni 2011
3.2. The input area
You can type e-mail-addresses into the input area and add them to your invitation list with a click
to the ”add“-button.
3.3. The invitation list
Here your added e-mail-addresses are stored and pre-evaluated. To get further information for
one of the pre-evaluated addresses, just hover your cursor above the information symbol of that
address. If no symbol appears, there are no further information to that e-mail-address. The list
holds up to 5 different addresses.
Seite 7/7