1
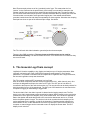
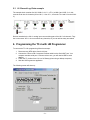
TC-4 4 Channel Thermocouple Interface
User Manual
TC-4 Manual 1.1.doc
1.
2.
3.
4.
Overview ............................................................................................................................... 3
Specifications........................................................................................................................ 3
Thermocouple Basics ........................................................................................................... 4
Connecting the TC-4............................................................................................................. 5
4.1
Connecting power ............................................................................................................. 5
4.2
Connecting Thermocouples .............................................................................................. 5
5.
The Innovate Log-Chain concept ......................................................................................... 6
5.1
Log-Chain of 4 channels consisting of TC-4 alone........................................................... 7
5.2
6-channel Log-Chain example with 2 AFR channels........................................................ 7
5.3
16-Channel Log-Chain example ....................................................................................... 8
6.
Programming the TC-4 with LM Programmer ...................................................................... 8
6.1
Changing the device name ............................................................................................... 9
6.2
Updating the firmware ....................................................................................................... 9
6.3
Configuring the Inputs ....................................................................................................... 9
7.
Kit Contents ........................................................................................................................ 10
Appendix A: Limited Warranty ...................................................................................................... 11
Revision History............................................................................................................................. 11
-2-
1. Overview
The TC-4 device is 4 channel thermocouple interface device for a MTS Log Chain. The TC-4 may
also be used as a stand-alone 4 channel MTS compatible thermocouple amplifier (see Chapter 2
for more details).
Each of the four inputs of the TC-4 can be user configured either EGT range (32..1999 degF,
0..1093 degC) or for CHT range to measure cylinder head temperatures (32..572 degF, 0..300
degC.
2. Specifications
Power
Power requirements
Power reversal protection
External Sensor power
see Note 1
8-36 Volt / 50mA
Yes
5V (+- 2.5%), 300mA max.
Serial Communication
Serial Port Speed
Packet/Logging Speed
Sample Resolution
19.2 kbit/sec
81.92 msec/sample packet
10 bits (0..5V at 0.1% resolution)
Input Specifications
Number of Channels
Thermocouple Type
Input measurement range
CHx+ max input voltages
CHx- max input voltages
Common Mode Rejection
Range
Input Impedance
4
Type K
0 to 300 degC (CHT Range) or
0 to 1093 degC (EGT Range)
- 2.5V to +7.5V
-2.5V to +7.5V
-2.5V to +7.5V
1 MOhm
Temperature
Max Operating Temperature
-20 to +80 deg Celsius
Mechanical
Size (W x L x H)
Weight
133 x 65 x 26 mm
114 grams
Note 1: Supply current does not included current of external sensors powered from the 5V output
-3-
3. Thermocouple Basics
Thermocouples are used to measure temperatures by relying on the phenomenon where a
junction of any two different metals ( Copper and Iron, for example ) will generate a small
voltage. This voltage is dependant upon which two metal are used, and the temperature of the
junction. This phenomena is known, formally, as the "Seebeck Effect". Because every junction
of different metals contributes its own voltage into the measurement, it is important to have as
few junctions between dissimilar metals as possible in order to record an accurate
measurement. This is why thermocouple wire is made completely of two different metals. The
"Type K" thermocouple to be used with the TC-4 kit is composed of Cromel and Alumel; one lead
being made of each ( the red and yellow leads ).
To make a thermocouple, strip approximately 3/4" of insulation form one end of the thermocouple
wire. Twist the two exposed metal ends together. You may optionally solder them, also. But
twist them first. Do not solder them in parallel. This will form what is called the "Hot junction".
This "Hot junction" is what you will connect to the surface that you want to measure. This is
usually either: a) under the copper gasket of a sparkplug for cylinder head temperature
(CHT) or, b) clamped to a primary header tube for exhaust gas temperature (EGT). Note that
clamping to the primary tube will NOT measure real EGT, but the surface temperature of the
header pipe. For real EGT measurements use an EGT probe that extends into the header itself.
There is also the "Cold junction." This is where the 2 leads of the thermocouple come together
again at the TC-4 terminals. The TC-4 has an internal temperature sensor at the T/C input
terminals. It uses this sensor to "offset" the effect of the "Cold junction" in the measurement.
This is called "Cold junction compensation". Once the effects of the cold junction are neutralized,
the TC-4 can accurately read the temperature of the "Hot junction" which is the twisted lead pair
at the opposite end of the thermocouple wire.
-4-
4. Connecting the TC-4
The TC-4 looks like this:
4.1
Connecting power
Connect switched 12V power (switched on when the cars ignition system is on) from the car to
the terminal marked 12V on the TC-4 connector.
Connect one of the terminals marked GND to a good ground on the car. The engine block will
supply a good ground connection.
4.2
Connecting Thermocouples
One thing that is counter intuitive for many people is that the negative side of a thermocouple
wire is always red. There are many different types of thermocouple wire; types K, J and T being
the most popular. All have a red negative lead and a yellow, black, or blue positive lead
respectively. When connection the thermocouple to the terminals on the TC-4, be sure to
connect the yellow lead to the + and red lead to the - terminals.
Several manufacturers offer EGT "thermocouple probes" which are actually inserted into the
exhaust gas stream through a hole in the headers or exhaust manifold. These provide a more
accurate measurement of exhaust gas temperature. They are commonly available in types K
and J. Only type K will currently work with the TC-4. To use a thermocouple probe, connect the
red and yellow leads of the thermocouple wire to the yellow and red leads of the thermocouple
probe. The junction is inside the probe. You can not use normal copper wire to connect the
thermocouple probe to the TC-4. You must use thermocouple wire to connect the probe. If you
do not, there will be an extra two-metal junction where the Copper wire meets the wires of the
probe. This extra junction will cause a large error in the temperature readings.
-5-
Most Thermocouple probes are of the “grounded junction” type. This means that the “hot
junction” is also connected to the probe’s body. As this body is connected for example to the
exhaust manifold, the sensor wires are essentially grounded through that. The same would be
true if a home-made thermocouple junction is used as described above by twisting the wires and
if that wire-twist is connected to some grounded engine part. If the twisted ends would be
grounded, untwist them first and clamp the separately but close together. Otherwise the clamping
metal part can short out part of the thermocouple voltage. See below:
The TC-4 will work with either isolated or grounded junction thermocouples.
There are four GND connections. The two closest to the 5V terminal can be used for
thermocouple shielding. The GND terminals next to the TC4- terminal are no-connects so they
are not to be used.
5. The Innovate Log-Chain concept
LogWorks 2.0 has the capability to log, display and analyze up to 32 engine parameters. Most
users will use less though. Each of the MTS components reads between 1 and 6 engine
parameters. To interface a multitude of MTS components to LogWorks with a single connection,
the Innovate LogChain concept was introduced.
The TC-4 can be used as a MTS component in a Log-Chain.
Each of the MTS components has two serial ports (except the LM-1, which has only one). One
serial port is designated as IN-port, the other as OUT port. The OUT-port of one device is
connected to the IN-port of the next device and so on. This way devices can be ‘daisy-chained’ to
build a log-chain for up to 32 channels total. The OUT-port of the last device is connected to the
computer for logging or downloading of logged data.
The device that’s first in the chain is special. It determines the logging sample rate. The first
device in the chain sends a data packet containing its channel data (a sample) to the next device
(downstream, left to right in the diagram) every 81.92 milliseconds. The next device appends its
data to that packet and hands that packet to the next device downstream and so on. At each
device the packet grows in length. The devices in the chain synchronize their sampling of the
engine parameters to the packets, so that all the channels in a packet together represent the
same instance in time. At the downstream end of the log chain (OUT-port of the last device) a
computer or external logger can be connected to store or display the stream data. The XD-1
display is such a device.
-6-
This also means that the complete channel data set is ONLY available at the end of the
log-chain. A datalogger capable of recording the log-chain data-stream therefore MUST be
placed at the end of the log-chain. This includes lap-top computers or other loggers.
Commands for individual devices are sent ‘upstream’. A device (incl. a computer or an XD-1) can
send commands to the devices upstream of itself, but not downstream. Commands can include
start-stop recording, calibration/configuration commands and so on. Only the device directly
upstream of the command originator of course will receive the command. This device then
decides, depending on the command, whether to execute the command and whether to pass it
on. An example of a case where the command is executed but not passed on is the start-stop
record command. The first upstream device capable of logging internally will execute the
command, but not pass it on.
As said before, the first device is special because it is the synchronization source for the entire
chain. By plugging its IN-port with the supplied terminator connector, a device can detect that
requirement when it powers up. The terminator connector just connects the transmit and receive
line of the IN-port together. Each device sends a special command out on it’s IN port when it
powers up. This command is ignored and not passed on by any device if received on it’s OUT
port. If the sending device immediately receives that command on its IN-port again, because the
terminator is plugged in, it assumes it is the first and special device in the chain. The LM-1,
having only one serial port, is ALWAYS a special device and MUST be connected to the
beginning of the chain.
The following are some examples of Log-Chains using the TC-4 and other MTS devices.
NOTE: The TC-4 does NOT need a terminator plug on it’s IN port. It
automatically detects if another device is plugged into it’s IN port and
terminates the IN port if nothing is plugged in.
5.1
Log-Chain of 4 channels consisting of TC-4 alone.
5.2
6-channel Log-Chain example with 2 AFR channels.
Notice that the LC-1’s are connected BEFORE the first TC-4. LC-1’s should always be
connected before the first non-LC-1 device (except if the first device is an LM-1).
-7-
5.3
16-Channel Log-Chain example
The example chain consists of a LM-1/LMA-2, a LC-1, a TC-4, a LMA-3 and 2 XD-1’s. In this
case the chain has 16 channels (6 from LM-1, 1 from LC-1, 4 from the TC-4 and 5 from the LMA3).
Devices attached to the LM-1’s analog input count as being part of the LM-1’s 6 channels. They
don’t count extra. XD-1’s do not contribute any channels, so you can add as many as needed.
6. Programming the TC-4 with LM Programmer
To connect the TC-4 for programming follow these steps:
1. Disconnect any MTS device from the IN port.
2. Connect the 2.5mm to DB 2 computer interface cable into the Serial OUT port. Your
computer needs a serial port. If it does not have one, you will need a USB to serial
adapter.
3. Power the TC-4 either from 12V or a 9V Battery (when using a desktop computer).
4. Start the LM Programmer application
The following screen will show up:
-8-
The LM Programmer software then shows in its first page the type and version number of the
firmware of the device.
6.1
Changing the device name
If multiple TC-4’s are used in a Log-Chain, each MUST be given a unique name so that
LogWorks can identify each TC-4. Just enter a name in the edit box in this page.
6.2
Updating the firmware
Click on the ‘Update Firmware’ button. You will be presented with a file dialog box that allows you
to select a firmware file. Firmware files end with the file extension .dld.
TC-4 firmware file names start with: TC4. The first part is followed by a dash, then a V, then the
version number without dots.
Example: TC-4 firmware version 1.00 alpha release would have the file name TC4-V100A.dld
TC4 firmware version 1.00 would have the file name TC4-V100.dld
After you opened the firmware file, this new firmware will be downloaded in the TC-4 device.
6.3
Configuring the Inputs
Click on the appropriate Input tab in the top of the window to configure one of the TC-4 inputs..
You can select for each input whether it is to be used for CHT or EGT range.
-9-
7. Kit Contents
TC-4 kit P/N: 3784
TC-4
Program Cable
P/N: 3746
Software CD
Terminal Block &
Hardware Kit
Daisy-Chain Cable
P/N: 3760
- 10 -
Appendix A: Limited Warranty
LIMITED WARRANTY
Innovate stands behind the quality of its products. Innovate makes the following warranty to
purchasers of its products: All new Innovate products carry a six-month warranty from the date of
purchase. If proof of purchase cannot be provided, warranty will be determined by date of
manufacture.
When Warranty Void
This warranty shall terminate and Innovate shall have no obligation pursuant to it if (i) your
Innovate product has been modified or repaired in a manner not previously authorized by
Innovate in writing, (ii) the identification markings on your Innovate product have been removed,
defaced, or altered; (iii) your Innovate product was subjected to accident, abuse, shipping
damage, or improper use; (iv) your Innovate product was not used or configured as specified in
the product manual; or (v) your Innovate product was subjected to operating conditions more
severe than those specified in the product manual.
Exclusions From This Warranty
Oxygen Sensors are excluded from this warranty.
Repairs Under This Warranty
In the unlikely event that your Innovate hardware product should prove defective during the
warranty period, contact Innovate Customer Support for a return material authorization (RMA) at
949-502-8400. Products returned for service must be securely packed to prevent damage and
shipped charges pre paid, along with proof of purchase and the return material authorization
number, to the Innovate repair location as instructed by Customer Service. Innovate within a
reasonable amount of time from its receipt of your product so shipped, will ship to you, at its
option, the repaired product or a new or reconditioned product of comparable or greater specified
functionality. All repaired or replacement products shall be warranted for the remainder of the
original product warranty.
Disclaimer
INNOVATE MAKES NO OTHER EXPRESS OR IMPLIED WARRANTY WITH RESPECT TO
YOUR INNOVATE PRODUCT OTHER THAN THE LIMITED WARRANTY SET FORTH ABOVE.
No Innovate dealer, agent, or employee is authorized to make any modification, extension, or
addition to this warranty, unless enforceable or unlawful under applicable law, INNOVATE
DISCLAIMS ALL IMPLIED WARRANTIES, INCLUDING THE IMPLIED WARRANTIES OF
MERCHANTABILITY, NONINFRINGEMENT, AND FITNESS FOR A PARTICULAR PURPOSE,
AND THE LIABILITY OF INNOVATE, IF ANY, FOR DAMAGES RELATING TO ANY
ALLEGEDLY DEFECTIVE PRODUCT SHALL UNDER ANY TORT, CONTRACT, OR OTHER
LEGAL THEORY BE LIMITED TO THE ACTUAL PRICE PAID FOR SUCH PRODUCT AND
SHALL IN NO EVENT INCLUDE INCIDENTAL, CONSEQUENTIAL, SPECIAL, OR INDIRECT
DAMAGES OF ANY KIND EVEN IF INNOVATE IS AWARE OF THE POSSIBILITY OF SUCH
DAMAGES. Some states do not allow limitations on how long an implied warranty lasts or the
exclusion or limitation of incidental or consequential damages, so the above limitations or
exclusions may not apply to you.
Revision History
1.0 6/27/06
Initial Release
1.1 9/14/07
Added Kit Contents
- 11 -