1
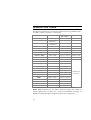
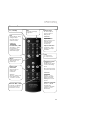
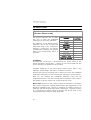
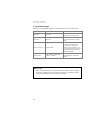
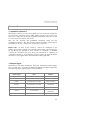
picture optimizer plus II (SDI) Video picture optimizer Supplement to the user manual from firmware version 3.0 English PICTURE OPTIMIZER PLUS II (SDI) This supplement to the instruction manual describes the changes and additions to function changes and -extensions for the picture optimizer plus II (SDI) and/or the new firmware version 3.0 in addition to the currently delivered instruction manual (version 1.02) “picture optimizer plus”. The firmware version 3.0 includes the basic improvements and new functions of the picture optimizer plus II (SDI), also applicable for the predecessor model picture optimizer plus. You can see which firmware is installed on your picture optimizer (plus) by accessing the 'version' point via the status menu (press [OK] key once). You can read more about firmware updates in the handbook. The new features are: Full HDTV support with the new predefined resolutions 720p, 1080i and 1080p at 50/60Hz. This feature is based on „true” scaling without horizontal interpolation in the output! 22 predefined resolutions for both PAL and NTSC: 9 resolutions can be selected directly via remote control, 13 further ones via navigation in the on screen menu. Each resolution is provided for both PAL and NTSC; in total 2 times 22 = 44 resolutions. Now also downscaling to plasma panels with 480-line resolution is possible. The complete rework of our scaling technology now guarantees the mathematically 100% correct scaling of the input signal. So the best possible result is obtained in the context of the customary to the market standards. Result is a pixel exact output picture with maximal granularity, matching international norms in all aspects. The output frame rates (frame rate conversion) have been maximised for all resolutions, so now maximum resolutions such as quadrupling with 50/72 Hz, wide-XGA with 100/90 Hz, DILA with 75/72 Hz or 1080p with 50/60 Hz (frame rate PAL/NTSC) are possible. The so called “pixel cropping“ is reduced to a minimum. The picture optimization functions have been further improved in many details. 20 Each of the 8 inputs of the picture optimizer plus II (SDI) can now individually be configured to the needs of the connected video sources. Next to picture parameters (e.g. brightness) also TV-Mode, the oversan function and the aspect ratio conversion can be predefined for each input separately. The new functions: Direct access to inputs using the remote control keys 1-8 “TV-Mode” “electronic lensshift” “overscan” “aspect ratio correction” “input alignment” new picture parameters: colour graduation- (hue / tint) & chroma delay correction “copy from fix” “RS-232 output commands” THE MOST IMPORTANT CHANGES WITHIN OPERATION & CONFIGURATION ARE: New key coding of the remote control: The resolutions can now be activated using the key combination “[option] + the corresponding number key“. For the new key coding please refer to the resolution table (page 22) Using the number keys now grants direct access to the inputs, no longer to the resolutions. The menu structure has changed: The former “customer menu“ is renamed to “expert menu“. The “input setup“ is restructured and separated into groups, “used input“ is now renamed to “active input“, “video fine adjust“ is now “input picture control“ and the remaining points such as “auto-input“ have now been summarized in the new menu point “general setup“. 21 RESOLUTION TABLE The following resolutions are now hard coded and can be modified using a so called “custom resolution“ if necessary. resolution HxV max. framerate PAL / NTSC * key combination Doubling 1440 x 576p 100 Hz / 120 Hz [option] + [1] 75 Hz / 90 Hz [option] + [2] 50 Hz / 72 Hz [option] + [3] Tripling Quadrupling 1440 x 864/720 p 1440 x 1152/960 p HDTV 720p 1280 x 720p 100 Hz / 120 Hz [option] + [4] XGA 1024 x 768p 100 Hz / 120 Hz [option] + [5] SXGA (5:4) 1280 x 1024p 75 Hz / 72 Hz [option] + [6] HDTV 1080i 1920 x 1080i 100 Hz / 120 Hz [option] + [7] custom 1: 480p 1440 x 480p 100 Hz / 120 Hz [option] + [8] custom 2: Wide-XGA 1280 x 768p 100 Hz / 90 Hz [option] + [9] Wide-VGA 852 x 480p 100 Hz / 120 Hz 540p 960 x 540p 100 Hz / 120 Hz 576p 720 x 576p 100 Hz / 120 Hz 576i 1440 x 576i 100 Hz / 120 Hz SVGA 800 x 600p 100 Hz / 120 Hz Wide-XGA 2 1365 x 768p 100 Hz / 90 Hz Wide-XGA 3 1366 x 768p 100 Hz / 90 Hz SXGA (4:3) 1280 x 1024 100 Hz / 120 Hz PDP 1 852 x 1024p 100 Hz / 120 Hz PDP 2 1024 x 1024p 100 Hz / 120 Hz DILA 1366 x 1024p 75 Hz / 72 Hz UXGA (4:3)** 1600 x 1200p 50 Hz / 50 Hz HDTV 1080p** 1920 x 1080p 50 Hz / 60 Hz activation via menu only *if distributed via DVI max. 50 Hz / 60 Hz, ** Distribution via analog outputs only Please note: Especially for the HDTV resolutions 720p and 1080i ew output signals with “tri-level sync“ (YUV-3 and RGsB-3) according to SMPTE standard have been integrated (read more on page 33). 22 REMOTE CONTROL on / standby dim controls the display brightness exit closes dialogs, saving changes and/or removes menu or status overview additional: tv-mode ON / OFF via [option] + [exit] the TV-Mode is activated, via [exit] deactivated again. numeric keys for direct input of specific values in dialog boxes additional: input selection direct access to the 8 inputs via the corresponding numeric key output resolution via [option] + [key] selection of output resolution menu 1 x: main menu 2 x: expert menu option [option] activates the “2nd function“ for several keys. aspect ratio conversion direct access to aspect ratio conversion. attention: The key [+78V] is now hard coded to the „overscan“ function. overscan ON / OFF via the key [+78V] the overscan function is switched on and off. navigation arrows navigation and adjustment of values in menus and dialog boxes [O.K.] also shows the on-screen status-info additional: [option] + [+]/[-] switches the VGABypass ([-]) and/or RGB-Bypass ([+])on and off electronic lensshift [option] + [▲]/[▼] activates the „electronic lensshift“ function up- and downwards. 23 OPERATION SELECTION OF THE IMAGE RESOLUTION (O U T P U T R E S O L U T I O N ) The picture optimizer plus (II) (SDI) has now in total 22 predefined resolutions for each PAL and NTSC. The selection of the desired output resolution can on the one hand be performed using a key combination [option] (= numeric key “0“) and the corresponding resolution key (please press keys consecutively within 5 seconds). resolution key combination Doubling [option] + [1] Tripling [option] + [2] Quadrupling [option] + [3] HDTV 720p [option] + [4] XGA [option] + [5] SXGA (5:4) [option] + [6] HDTV 1080i [option] + [7] custom 1: 480p [option] + [8] custom 2: Wide-XGA [option] + [9] ATTENTION: As there are only 9 keys (= 9 resolutions) for direct access of the output resolution, the key [9] (= “custom 2“) can be occupied with one of the remaining 13 resolutions via the menu. Therefore please go to the menu (press [menu] once), then to the submenu “output setup“ and select „resolution custom 2“. Activate this point by pressing [O.K.], select one of the 22 predefined resolutions using the [+] and [-] cursor keys and confirm with [O.K.] key. Now you can activate the predefined resolution using the key combination [option] + [9]. The currently active resolution can be seen in the display or via the “status info“ (press [O.K.] key once). Please note: As soon as you create a custom 2 resolution in the expert menu and/or change the originally listed values, the assignment for key [9] will be changed to this “custom 2“ resolution. A modified “custom 2“ resolution will vice versa be overwritten if selecting a “resolution custom 2“. If performing a factory reset all settings will be set back to the original values (see resolution table, page 22). 24 VIDEO SWITCHER Switching the inputs The selection of the active input and the switching is now done directly with the number keys [1] – [8] on the remote control (not, as before, with the [-] / [+] keys). The keys are assigned as shown in the chart to the right. Alternative selection via input menu is still possible. Key Input [1] SCART 1 [2] SCART 2 [3] FBAS 1 (SDI 1) [4] FBAS 2 (SDI 2) [5] S-Video 1 [6] S-Video 2 [7] YUV 1 [8] YUV 2 SDI inputs The picture optimizer plus II SDI and/or a device modified with the SDI upgrade kit integrate SDI 1 & 2 instead of the two FBAS 1 & 2 inputs. Please note that with the fully digital input signal SDI some picture parameter settings are not necessary and therefore deactivated. Switching to the bypass inputs The bypass inputs can now also be activated or deactivated directly with the remote control as well as with the input set-up menu. Please use the key combination shown on the right (please press keys consecutively within 5 seconds). Key combination [option] + [-] [option] + [+] Bypass VGA on / off RGB on / off 25 TV M O D E The “TV-Mode” is a new function. This optimization process is intended for use exclusively with video signals in the so-called “camera” or “video mode”. This is picture material that has been recorded with digital video technology, such as TV signals from sports transmissions, concerts, TV series, etc. The presentation problems typical for such signals – such as fraying edges and pixel distortions – are reduced considerably with the 'TV mode'. The “TV-Mode” is activated or deactivated with a key combination (please press keys consecutively within 5 seconds). Key combination Bypass [option] + [exit] TV-Mode on [exit] TV-Mode off In addition to that, the “TV-Mode” can be predefined for every input, i.e. it is defined in the input setup if the “TV-Mode” is always “on” or always “off” for the respective input (read more in the following under “configuration”). However the “TV-Mode” can be manually switched on or off regardless of this presetting. With every input switching the presetting is active again. Please note! Each time an input is switched, the resolution is changed, the format is converted or the unit is switched off, the “TV-Mode” is automatically deactivated. Use the “TV-Mode” ONLY for video signals in the camera mode; this mode causes a clear deterioration in the image presentation of film material (e.g. cinema film from a DVD)! Whether the “TV-Mode” is active or not, can be seen in the status info (press [OK] key once). 26 ELECTRONIC LENSSHIFT “Electronic lensshift” is a further new function. This function is provided for use by owners of a projector in connection with a masked screen. This can be used with a letterbox presentation (for example, in 21:9 format) to 'eliminate' the black bars. It works by shifting the picture content vertically to the upper or lower edge of the picture, which moves the black bar outside the visible area. Appropriate settings can then be made for masked screens in order to display only the active picture content without bars. The “electronic lensshift” is activated or deactivated with a key combination (please press keys consecutively within 5 seconds). key combination electronic lensshift [option] + [▲] vertical shift upwards [option] + [▼] vertical shift downwards [pass] vertical shift off Please note! Before activating the “electronic lensshift” function, please select the required aspect ratio, e.g. [-33V]. When the “electronic lensshift” is being activated, the displayed picture should have a clear contrast to the black bars (i.e. the picture should be as bright as possible). Otherwise, the function cannot “recognize” the bars. However should there be any problems, the “recognition tolerance” can be adjusted in the menu “output setup” under “lenshift background level” If the black bars are used for subtitles in films these will also be faded out. Each time an input is switched, the resolution is changed, the format is converted or the unit is switched off, the 'vertical switching' is once again deactivated. 27 OVERSCAN Due to the improved scaling always the full picture content is displayed without “cut off” on the edges. This may cause that errors on the picture edge are now shown if watching “inferior” video material. With the function “overscan“ you can variably “zoom into“ the picture from 99% to 80%, i.e. “cut off” from 1% to 20% of the picture edge and extend the remaining picture content to the full output size. Especially if watching TV and/or “older“ video material this function ensures an optimum rendition of picture contents. The function “overscan“ (standard value 97%) can be switched on and off via the [+78V] key Taste Overscan [+78V] Overscan ON / OFF (the former function of this key has been eliminated). Alike “TV-Mode“ the “overscan“ can be predefined for every input, i.e. it is defined in the input setup, if “overscan“ for the respective input is always set to “ON“ or „OFF“, to which extent it should “zoom into” the picture and/or how many pixels should be “cut off” the picture edge – the standard value is set to 97% (read more in the following under “configuration“). Please note: 28 By activating the function “overscan“ you leave the “perfect“ scaling. But if watching material with errors on the picture edge(s) this is an acceptable compromise. CONFIGURATION INPUT SETUP Each of the 8 inputs of the picture optimizer plus II (SDI) can now be individually configured to the needs of the video source connected. Next to picture parameters such as brightness and the picture position correction (input alignment) now also “TV-Mode”, the “overscan” function and the “aspect ratio conversion” can be adjusted separately for each input. This enables the comfortable switching from a 4:3 TV picture of a SAT box to the 16:9 rendition of a DVD player. All settings performed under input setup always refer to the currently active input and are automatically saved for this input. Please note: Each video source connected to the picture optimizer plus II (SDI) needs to be configured separately. Settings for e.g. “SCART 1“ are not valid for e.g. “YUV 2“. 29 Input picture control (former “Video Fine Adjust”) There are also changes and new parameters for fine adjustments. Adjustable values Hue Change / description (new parameter) Sets the colour graduation (hue / tint) in degrees on the color circle. The correction is done in steps of 1 degree. Gamma The gamma curve is now changed in finer steps (steps of 0.05). Color temperature It is now also possible to make increases and reductions in smaller steps (a step of 1 is approximately 250 Kelvin’s). Chroma delay (new parameter) This delays (shifts) the chroma (proportion of color) against the luminance (proportion of brightness) in steps of 1 unit each. (only for S-video and composite inputs) 30 Input Alignment It is now possible to adapt the picture size and picture position for each input separately for PAL and NTSC signals. This means that different connected video sources can be adapted to the playback unit in the best possible way. The following values can be changed in the input setup menu in the sub menu “input alignment”: horizontal and vertical position horizontal and vertical size Please note: The settings always apply for the input that is currently activated and the connected signal type (PAL or NTSC). If another input is to be set, this input must first be activated. If settings are to be made in another type of signal, the medium (e.g. DVD) must first be changed (from PAL to NTSC). The preset values match most video sources. Since there is no uniform standard here, however, it can be necessary to make a small adjustment for the units that you connect. These settings are saved separately for each of the 8 inputs, both for PAL and for NTSC signals. The values are not saved in the “preset“ function. 31 Input Presettings Here you can predefine different standard values for the active input. Presetting Adjustable values Function / description TV-Mode ON / OFF TV-Mode for this input always ON or always OFF Overscan ON / OFF Overscan function for this input always ON or always OFF Overscan Factor 100% - 80% Here you can define to which extent there should be „zoomed in“ and/or how many pixels should be “cut off” the picture edge: factor 100% means 0% “cut off”, 80% mean 20%. aspect ratio Pass, -33%V, -33& H&V, +33% V, -33%H Sets the aspect ratio predefined for this active input. Please note: 32 Each of the functions can be switched ON and/or OFF manually via direct access keys on the remote control. If switching inputs always the predefined values will be activated. OUTPUT SETUP resolution custom 2 The key [9] („custom 2“) can be occupied with one of the 22 resolutions of the picture optimizer plus II (SDI). Please activate the menu point with [O.K.], select one of the 22 predefined resolutions with the [+] and [-] cursor keys and confirm with [O.K.]. Now you can activate the predefined resolution using the key combination [option] + [9]. The currently active resolution can be seen in the display or via the “status info“ (press [O.K.] key once). Please note: As soon as you create a “custom 2” resolution in the expert menu and/or change the originally listed values, the assignment for key [9] will be changed to this “custom 2“ resolution. A modified “custom 2“ resolution will vice versa be overwritten if selecting a “resolution custom 2“. If performing a factory reset, all settings will be set back to the original values (see resolution table, page 22). Output signal Especially for the HDTV resolutions 720p and 1080i new output signals with “tri-level sync“ according to SMPTE standard have been integrated. The following output signal types are now available: Output signal Sync Remark RGBHV H/V-Sync VESA standard RGBs Common-Sync video standard RGsB Bi-Level-Sync on Green video standard RGsB-3 Tri-Level Sync on Green especially for HDTV resolutions YUV Bi-Level-Sync video standard YUV-3 Tri-Level Sync especially for HDTV resolutions DVI - digital 33 aspect V correction Several displays do not correspond to international standards for picture format rendition. They are using a proprietary procedure, that is likely to cause problems in conjunction with optimized video signals. In exceptional cases there can appear geometrical errors (e.g. distortion or upsetting) due to the picture otimizer aspect ratio conversion if using the standard predefined settings. Activating the function „aspect ratio correction“ (aspect V correction) alike errors can simply be eliminated by adjusting the conversion factor. lensshift backgroundlevel Here you can define the “black level value“ for recognition of the black bars in conjunction with the “electronic lensshift“ function. The brighter (=“more grey“) the bars in the video signal are “mastered”, the higher this value needs to be set in order to enable the function to recognize the bars. CUSTOM 1 / CUSTOM 2 function “copy from fix” With the „copy from fix“ functionality all predefined resolutions (22 each for PAL & NTSC) can be loaded into one of the four custom resolutions (two each for PAL & NTSC) and if necessary be adjusted there. So the picture optimizer plus II (SDI) can be perfectly customized to address all displays available on the market. 34 TIPS FOR THE OPTIMAL OUTPUT RESOLUTION To achieve the best possible results in video picture optimization, the picture optimizer plus II (SDI) should always be run with the resolution corresponding to the “native resolution“ of your display. Please proceed like this: Find out what the 'native resolution' (i.e. 'panel resolution') of your playback unit is (for example, 1280 x 768). This is not the same as the maximum possible resolution! Select the appropriate “custom resolution” from the internet at www.cinemateq.com (in the “Support Center” / custom resolutions section). Define your “Custom 1” or “Custom 2” resolution with these values as described in the handbook. You can find the best custom resolutions for units produced by various manufacturers in our 'Support Center'. These are pixel exact resolutions that have been determined and tested in co-operation with the manufacturer. Set the frame rate for this new 'Custom 1' or 'Custom 2' resolution (we recommend 60 or 75 Hz; please also check the handbook). In most cases, however, only a test can help here because not all units can work with higher frame rates. Plasma screens and some LCD and DLP projectors, for example, always operate at 60 Hz – higher or lower frame rates are converted internally by these units. This leads to a picture full of errors with strong “aliasing” effects. For PAL material the preferred selection should be 50 Hz in the first step. If the display shows no artifacts or similar, then you should proceed with this frame rate, otherwise switch to 60 Hz. Please take into account the type of video signal when making settings; NTSC (for the USA / Japan) or PAL (for Europe). Attention: Many plasma screens (PDP) show problems if addressed with their native resolution! In opposite to 480p / 576p or 720p , 768p (XGA 1024 x 768) is no official video or HDTV format. The picture is likely to “flicker“, show “tearing“ or only work with 60 Hz. In doubt the resolution “doubling“ distributed via the output “YUV“ as of today always should show a picture, maybe even 720p (also via YUV). 35