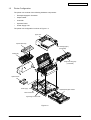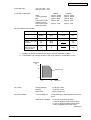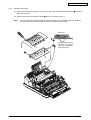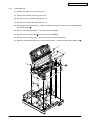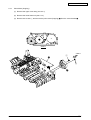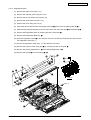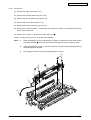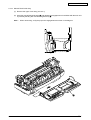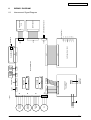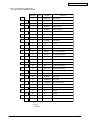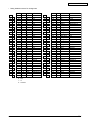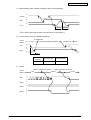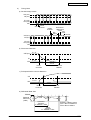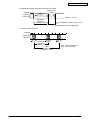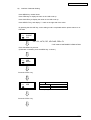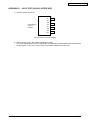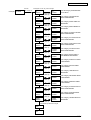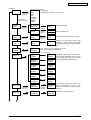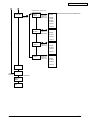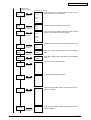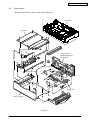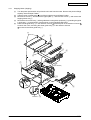
1
Oki Data CONFIDENTIAL
B4350/B4350n
Service Manual
060125A
Oki Data CONFIDENTIAL
Document Revision History
Rev.No.
Date
1
2004-04-01
42641101TH Rev.1
Corrected items
No.
Page
Description of change
ISSUE
Person in
charge
ME5 Ono
2/
Oki Data CONFIDENTIAL
PREFACE
This Maintenance Manual describes the field maintenance methods for B4350 Monochrome LED Page
Printers.
This manual is written for use by service persons. Please note that you should refer to the Printer Handbook
for the handling and operating methods of the equipment.
42641101TH Rev.1
3/
Oki Data CONFIDENTIAL
CONTENTS
1. CONFIGURATION .................................................................................................... 7
1.1 System Configuration ....................................................................................... 7
1.2 Printer Configuration ......................................................................................... 8
1.3 Optional Configuration ...................................................................................... 9
1.4 Specification ................................................................................................... 11
1.5 Safety Standards ............................................................................................ 13
1.5.1
1.5.2
1.5.3
Certification Label ...................................................................................................... 13
Warning Label ........................................................................................................... 13
Warning/Caution Marking .......................................................................................... 14
2. PARTS REPLACEMENT ........................................................................................
2.1 Precautions for Parts Replacement ................................................................
2.2 Parts Layout....................................................................................................
2.3 How to Change Parts......................................................................................
2.3.1
2.3.2
2.3.3
2.3.4
2.3.5
2.3.6
2.3.7
2.3.8
2.3.9
2.3.10
2.3.11
2.3.12
2.3.13
2.3.14
2.3.15
2.3.16
2.3.17
2.3.18
2.3.19
2.3.20
2.3.21
2.3.22
2.3.23
2.3.24
Upper Cover Assy .....................................................................................................
LED Head ..................................................................................................................
Operator Panel Assy .................................................................................................
Lower Base Unit ........................................................................................................
Pulse Motor (Main/Drum) ..........................................................................................
Pulse Motor (Registration) .........................................................................................
Pulse Motor (Hopping) ...............................................................................................
Face Up Stacker Assy ...............................................................................................
Eject Roller Assy .......................................................................................................
Motor Assy .................................................................................................................
Hopping Roller Shaft Assy .........................................................................................
Stacker Cover Assy ...................................................................................................
Registration Roller .....................................................................................................
Roller Transfer Assy ..................................................................................................
Fusing Unit ................................................................................................................
Back-up Roller ...........................................................................................................
Sensor Plate (Inlet) ....................................................................................................
Sensor Plate (Outlet), Sensor Wire Assy ..................................................................
Manual Feed Guide Assy ..........................................................................................
Sensor Plate (Paper Supply) .....................................................................................
GRV-2 PCB ...............................................................................................................
Power Supply Board and High Voltage/Sensor Board ..............................................
Cassette Guide L Assy ..............................................................................................
Cassette Guide R Assy .............................................................................................
15
15
17
20
21
22
23
24
25
26
27
28
29
30
31
32
33
34
35
36
37
38
39
40
41
42
43
44
3. ADJUSTMENT ........................................................................................................ 45
3.1 Maintenance Modes and Functions ................................................................ 45
3.1.1
3.1.2
3.1.3
User Maintenance Mode (Administrator Menu) ......................................................... 45
System Maintenance Mode (System Maintenance Menu) ........................................ 46
EEPROM Initial Setting Range for Events ................................................................. 48
3.2.1
Uploading/Downloading EEPROM data .................................................................... 49
3.2 Adjustment When Replacing a Part ................................................................ 49
4. PERIODICAL MAINTENANCE .............................................................................. 50
4.1 Periodical Replacement Parts ........................................................................ 50
42641101TH Rev.1
4/
Oki Data CONFIDENTIAL
4.2 Cleaning.......................................................................................................... 50
4.2.1
4.2.2
Cleaning of LED Lens Array ...................................................................................... 50
Cleaning Page Function ............................................................................................ 51
5. TROUBLESHOOTING PROCEDURES .................................................................
5.1 Troubleshooting Tips ......................................................................................
5.2 Points to Check before Correcting Image Problems.......................................
5.3 Tips for Correcting Image Problems ...............................................................
5.4 Preparation for Troubleshooting .....................................................................
5.5 Troubleshooting Flow .....................................................................................
5.5.1
5.5.2
5.5.3
52
52
52
52
53
53
LCD Status Message/Problem List ............................................................................ 53
LCD Message Troubleshooting ................................................................................. 59
Image Troubleshooting .............................................................................................. 67
6. WIRING DIAGRAM ................................................................................................
6.1 Interconnect Signal Diagram ..........................................................................
6.2 PCB Layout and Connector Signal List ..........................................................
6.3 Resistance Check ...........................................................................................
76
76
77
89
APPENDIX A RS-232C SERIAL INTERFACE (OPTION) ......................................... 91
APPENDIX B CENTRONICS PARALLEL INTERFACE ............................................ 96
APPENDIX C UNIVERSAL SERIAL BUS (USB) ..................................................... 105
APPENDIX D LOOP TEST (RS-232C INTERFACE) ............................................... 111
APPENDIX E DIAGNOSTICS TEST ........................................................................ 112
42641101TH Rev.1
5/
Oki Data CONFIDENTIAL
APPENDIX G HIGH CAPACITY SECOND PAPER FEEDER ................................. 138
1.
OUTLINE ...................................................................................................... 138
2.
3.
4.
1.1
1.2
Functions ................................................................................................................. 138
External View and Component Names ................................................................... 138
2.1
2.2
General Mechanism ................................................................................................ 139
Hopper Mechanism ................................................................................................. 139
3.1
3.2
3.3
Precautions Concerning Parts Replacement ..........................................................
Parts Layout ............................................................................................................
Parts Replacement Methods ...................................................................................
3.3.1
Stepping Motor (Hopping) .........................................................................
3.3.2
TQSB-2 PCB .............................................................................................
3.3.3
Hopping Roller Shaft Assy and One-way Clutch Gear ..............................
140
141
142
143
145
145
Precautions Prior to the Troubleshooting ................................................................
Preparations for the Troubleshooting ......................................................................
Troubleshooting Method ..........................................................................................
4.3.1
LCD Status Message List ..........................................................................
146
146
147
147
MECHANISM DESCRIPTION ...................................................................... 139
PARTS REPLACEMENT .............................................................................. 140
TROUBLESHOOTING.................................................................................. 146
4.1
4.2
4.3
5.
6.
CONNECTION DIAGRAM ............................................................................ 149
5.1
5.2
Interconnection Diagram ......................................................................................... 149
PCB Layout ............................................................................................................. 149
PARTS LIST ................................................................................................. 150
APPENDIX H NETWORK INTERFACE (OPTION) .................................................. 156
42641101TH Rev.1
6/
Oki Data CONFIDENTIAL
1.
CONFIGURATION
1.1
System Configuration
B4350 consists of control and engine blocks in the standard configuration, as shown in Figure 1-1.
In addition, the options marked with asterisk(*) are available.
LCD : 1
LED : 1
SW : 8
Operator Panel
Paper
Cassette
Drum Motor
Registration
Motor
Hopping Motor
Paper Feeding
Mechanism
(First Tray Unit)
Face Down
Stacker
LED Head
ID
Unit
Electrophotogarphic
Processing Unit
Fuser Unit
Halogen-Lamp
Power Supply
Board
AC
INPUT
High Voltage /
Sensor Board
FAN
*
High Capacity
Second Paper
Feeder
*
Multi Purpose
Feeder
*
ROM DIMM
Main Control Board
*
RAM
DIMM
IEEE1284
USB
Network
*
Network
Board
OR
RS232C
*
RS232C
Board
* : Optional
Figure 1-1
42641101TH Rev.1
7/
Oki Data CONFIDENTIAL
1.2
Printer Configuration
The printer unit consists of the following hardware components:
•
Electrophotographic Processor
•
Paper Feeder
•
Controller
•
Operator Panel
•
Power Supply Unit
The printer unit configuration is shown in Figure 1-2.
Upper cover
Operator panel assy
Toner-cartridge(Type 9)
(consumable)
Stacker assy
Image drum unit(Type 9)
(consumable)
Optional board
Power supply
Legal/universal paper cassette
Main control board
High Voltage / Sensor board
Figure 1-2
42641101TH Rev.1
8/
Oki Data CONFIDENTIAL
1.3
Optional Configuration
The options shown below are available for use with B4350. These are available separately from the
printer unit.
(1) High Capacity Second Paper Feeder
(3) RS-232C Serial Interface Board
42641101TH Rev.1
9/
Oki Data CONFIDENTIAL
(4) Network Interface Board(Soft NIC CARD)
(5) SDRAM DIMM
(i) 16MB
(ii) 32MB
(iv) 128MB
(iii) 64MB
(v) 256MB
(6) Flash DIMM
(i) 1MB
(ii) 8MB
(iii) 16MB
(7) Postscript 3 Emulation DIMM
42641101TH Rev.1
10 /
Oki Data CONFIDENTIAL
1.4
Specification
(1) Type
Desktop
(2) External dimensions
Height 8.5”
Width 14.0”
Depth 15.7”
(3) Weight
Approx. 9 kg
(4) Developing method
Exposing method
Dry electrophotography
LED stationary head
(5) Paper used
<Type>
• Standard paper
– Xerox 4200 (20 lbs)
• Application paper (manual face-up feed)
– Label
– Envelope
– OHP paper (transparency)
(215 mm)
(355 mm)
(400 mm)
<Size>
• Standard sizes
– Letter
– Legal*
[* Without Multi Purpose Feeder (Option)]
– Legal-13*
– Executive
– COM-9 **
– COM-10**
[** manual feed and Multi Purpose Feeder
– Monarch**
(option) only]
– DL**
– C5**
– A4
– A5
– B5 (JIS)
– A6
• Applicable sizes
– Width
: 3.5” to 8.5” (90 to 216 mm)
– Length
: 5.8” to 14” (148 to 355.6 mm)
<Thickness>
– Automatic feed : 16 to 28 lbs (60 to 105 g/m2)
– Manual feed
: Label, OHP paper (transparency)
Envelope (24 to 28 lbs)
(6) Printing speed
Continuous printing : 23 pages per minute with Letter size paper.
22 pages per minute with A4 size paper.
[Except, Multi purpose Feeder (14ppm) with
Letter size paper]
Warm-up time
: 35 seconds typical at room temperature
[68 F (20 C), AC 120/230 V].
First page print time : 6.0 seconds typical for the Letter size paper
(6.2 seconds for the A4 size) after warm-up.
(7) Paper feeding method
Automatic feed or manual feed
(8) Paper delivery method
Face down/face up
(9) Resolution
600 × 600 dots/inch
600 × 1200 dots/inch
42641101TH Rev.1
11 /
Oki Data CONFIDENTIAL
110~127 VAC ± 10%
220~240 VAC ± 10%
(10) Power input
(11) Power consumption
Peak
Typical operation
Idle
Power save mode
(Without option)
Power save mode
(With full option)
:
:
:
:
120VAC
Approx. 700W
Approx. 360W
Approx. 68W
Approx. 9W
230VAC
Approx. 700W
Approx. 360W
Approx. 66W
Approx. 10W
:
Approx. 13W
Approx. 14W
(12) Temperature and humidity
In operation Power off mode During Storage
1.
2.
Unit
Temperature
50-90
(10-32)
32-110
(0-43)
14-110
(–10-43)
°F
(°C)
Humidity
20-80
10-90
10-90
%RH
Maximum wet bulb
temperature
77
(25)
80.4
(26.8)
°F
(°C)
Minimum diference
between wet and dry
bulb temperatures
35.6
(2)
35.6
(2)
°F
(°C)
Storage conditions specified above apply to printers in packed condition.
Temperature and humidity must be in the range where no condensation occurs.
Temperature
(°C)
32
28
Operation range
10
20
80
Humidity (%)
(13) Noise
During operation
Standby
Quiet mode
: 53 dB (A) or less
: 38 dB (A) or less
: Back ground level
(14) Consumables
Toner cartridge kit
2,500 (5% duty) 6,000 (Optional 6K Toner 5%
duty)
Image drum cartridge
42641101TH Rev.1
25,000 (at continuouts printing)
17,000 (3 page/job) without Power Save
11,000 (1 page/job) without Power Save
7,000 (1 page/job) with Power Save
(Minimum)
12 /
Oki Data CONFIDENTIAL
1.5
Safety Standards
1.5.1
Certification Label
The safety certification label is affixed to the printer in the position described below.
ODA AC : 120V model
Serial No.
Made In China
1.5.2
Warning Label
The warning labels are affixed to the sections which may cause bodily injury.
Follow the instructions on warning labels during maintenance.
42641101TH Rev.1
13 /
Oki Data CONFIDENTIAL
1.5.3
Warning/Caution Marking
The following warning and caution markings are made on the power supply/sensor board.
CAUTION
ENGLISH
Heatsink and transformer core present risk of electric shock. Test before touching.
42641101TH Rev.1
14 /
Oki Data CONFIDENTIAL
2.
PARTS REPLACEMENT
The section explains the procedures for replacement of parts, assemblies, and units in the field. Only
the disassembly procedures are explained here. For reassembly, reverse the disassembly procedure.
2.1
Precautions for Parts Replacement
(1) Before starting to replace parts, remove the AC cord and interface cable.
(a)
Remove the AC cord in the following sequence:
i)
ii)
iii)
(b)
Turn off (“o”) the power switch of the printer
Disconnect the AC inlet plug of the AC cord from the AC receptacle.
Disconnect the AC cord and interface cable from the printer.
Reconnect the printer in the following procedure.
i)
ii)
iii)
Connect the AC cord and interface cable to the printer.
Connect the AC inlet plug to the AC receptacle.
Turn on (“l”) the power switch of the printer.
Disconnect
OFF
ON
Reconnect
(2) Do not disassemble the printer as long as it is operating normally.
(3) Do not remove parts which do not have to be touched; try to keep the disassembly to a minimum.
(4) Use specified service tools.
(5) When disassembling, follow the laid out sequences. Parts may be damaged if these sequences are
not followed.
(6) Since screws, collars and other small parts are likely to be lost, they should temporarily be attached
to the original positions during disassembly.
(7) When handling IC’s such as microprocessors, ROMs and RAMs, or circuit boards, do not wear
gloves that are likely to generate static electricity.
(8) Do not place printed circuit boards directly on the equipment or floor.
42641101TH Rev.1
15 /
Oki Data CONFIDENTIAL
[Service Tools]
The tools required for field replacement of printed circuit boards, assemblies and units are listed in Table
2-1.
Table 2-1 Service Tools
No.
Service Tools
Q’ ty
Application
1
No. 1-100 Philips screwdriver
1
2~2.5 mm screws
2
No. 2-100 Philips screwdriver
1
3~5 mm screws
3
No. 3-100 screwdriver
1
4
No. 5-200 screwdriver
1
5
Digital multimeter
1
6
Pliers
1
7
Handy cleaner
1
8
LED Head cleaner
1
42641101TH Rev.1
Remarks
Cleans LED head
16 /
Oki Data CONFIDENTIAL
2.2
Parts Layout
This section explains the layout of main components of the equipment.
[Lower base unit]
Stacker cover assy
Eject roller assy
Back-up roller
Pulse motor
(main/drum)
View A
Diselectrification bar
Pulse motor
(registration)
Registration
Transfer roller roller Assy
Pulse motor
(hopping)
Lower base unit
Manual feed guide assy
Toner cartridge (Type 9)
(consumable)
Stacker cover assy
Hopping roller shaft
Hopping roller rubber
LED head
Image drum unit (Type 9)
(consumable)
View A
Figure 2-1
42641101TH Rev.1
17 /
Oki Data CONFIDENTIAL
[Upper cover unit]
Upper cover
Figure 2-2
42641101TH Rev.1
18 /
Oki Data CONFIDENTIAL
[Base unit]
Operator panel assy
Face up stacker assy
Power supply/sensor board
(Low voltage)
High voltage /
sensor board
DC fan assy
Network Interface board
Main control board
Cassette guide (L) Assy
Cassette guide (R) Assy
Paper cassette
Figure 2-3
42641101TH Rev.1
19 /
Oki Data CONFIDENTIAL
2.3
How to Change Parts
This section explains how to change parts and assemblies listed in the disassembly diagram below.
In the parts replacement procedure, those parts marked with the part number inside ● with white letters
are RSPL parts.
Printer unit
Upper cover assy
(2.3.1)
Operator panel assy
(2.3.3)
Face up stacker assy
(2.3.8)
LED head
(2.3.2)
Manual feed guide assy
(2.3.19)
Lower base unit
(2.3.4)
Transfer roller
(2.3.14)
Pulse motor (main/drum)
(2.3.5)
Pulse motor (registration)
(2.3.6)
Pulse motor (hopping)
(2.3.7)
1
Eject roller assy
(2.3.9)
Hopping roller shaft assy
(2.3.11)
Stacker cover assy
(2.3.12)
Fusing unit
(2.3.15)
Motor assy
(2.3.10)
Back up roller
(2.3.16)
To 1
Sensor plate (inlet)
(2.3.17)
Registration roller
(2.3.13)
Sensor plate (outlet),
sensor wire assy
(2.3.18)
Sensor plate (paper supply)
(2.3.20)
GRV-2 PCB
(2.3.21)
2
Power supply board, high voltage / sensor board
(2.3.22)
To 2
Cassette guide (L)
(2.3.23)
Cassette guide (R)
(2.3.24)
42641101TH Rev.1
20 /
Oki Data CONFIDENTIAL
2.3.1
Upper Cover Assy
(1) With the power switch turned off, unplug the AC power cord from the outlet.
(2) Disconnect the interface cable 1.
(3) Press the button 2 on right side of the Upper cover and open the stacker cover assy 3.
(4) Take out the image drum unit 4.
(5) Remove one screw 5, and remove the I/F cover 6 from the back side of the printer.
(6) Open the manual feed guide assy 7. Unlock the latches at two locations on the front side. Lift the
front side of the upper cover 8 up and unlock the latches at two locations on the back side. Lift and
remove the upper cover assy 8.
Note : When removing or reinstalling the upper cover, be careful not to get the motor cables tangled
or caught.
5
6
LATCH
2
8
LATCH
1
4
3
7
42641101TH Rev.1
21 /
Oki Data CONFIDENTIAL
2.3.2
LED Head
(1) Press the button on right side of the upper cover and open the stacker cover assy 1.
(2) Open the hook section on the left side of the head holder and remove the LED head 2.
(3) Remove the head cable 3 from the head connector.
Note:
Be sure not to touch directly or push on the SLA part of the LED head.
SLA
(Seltoc Lens Array)
2
3
1
42641101TH Rev.1
22 /
Oki Data CONFIDENTIAL
2.3.3
Operator Panel Assy
(1) Unlock two latches on the upper cover from the rear side, lift the operator panel assy 1 from the
back and remove it.
(2) Remove the Sumi card (operator panel) 2 from the connector (CN1) 3.
Note :
You can remove the operator panel assy while the upper cover installed on the unit. However,
it is much easier to remove the panel assy after removal of upper cover.
Rear view
2
Unlock two latches with a tip of
screw driver. For the purpose,
insert a driver through faceup
paper outlet as shown.
1
3
42641101TH Rev.1
23 /
Oki Data CONFIDENTIAL
2.3.4
Lower Base Unit
(1) Remove the upper cover assy (see 2.3.1).
(2) Remove the operator panel assy (see 2.3.3).
(3) Remove the face up stacker assy (see 2.3.7).
(4) Remove the transfer roller assy (see 2.3.14).
(5) Remove the connecting cables 1, 2 and 3 of the pulse motors from the connectors (DM, RM, HM)
of the GRV-2 PCB 1.
(6) Remove the LED head cables 4 from the connector (HEAD).
(7) Remove the Thermistor cable 5 from the connector (THERM).
(8) Remove the connecting cable 8 of the heater from the connector (CN2).
(9) Open the manual feed guide assy, remove seven screws 7, then remove the lower base unit 6.
7
7
7
6
7
8
1
42641101TH Rev.1
5
4
2
3
1
24 /
Oki Data CONFIDENTIAL
2.3.5
Pulse Motor (Main/Drum)
(1) Remove the upper cover assy (see 2.3.1).
(2) Remove the lower base unit (see 2.3.4).
(3) Remove two screws 1 and remove the pulse motor (main/drum) 2 from the motor bracket 3.
View A
1
3
View A
1
2
42641101TH Rev.1
25 /
Oki Data CONFIDENTIAL
2.3.6
Pulse Motor (Registration)
(1) Remove the upper cover assy (see 2.3.1).
(2) Remove the lower base unit (see 2.3.4).
(3) Remove two screws 1 and remove the pulse motor (registration) 2 from the motor bracket 3.
View A
1
View A
3
2
42641101TH Rev.1
26 /
Oki Data CONFIDENTIAL
2.3.7
Pulse Motor (Hopping)
(1) Remove the upper cover assy (see 2.3.1).
(2) Remove the lower base unit (see 2.3.4).
(3) Remove two screws 1 and remove the pulse motor (hopping) 2 from the motor bracket 3.
View A
View A
3
1
1
2
42641101TH Rev.1
27 /
Oki Data CONFIDENTIAL
2.3.8
Face Up Stacker Assy
(1) Remove the upper cover assy (see 2.3.1).
(2) Remove the operator panel assy (see 2.3.3).
(3) Remove three screws 1 and remove both the shield plate 2 and face up stacker 3 together.
(4) Unlock the latches at two locations, and remove the face up stacker 3.
3
1
2
1
42641101TH Rev.1
28 /
Oki Data CONFIDENTIAL
2.3.9
Eject Roller Assy
(1) Remove the upper cover assy (see 2.3.1).
(2) Remove the operator panel assy (see 2.3.3).
(3) Remove the face up stacker assy (see 2.3.8).
(4) Remove the stacker cover assy (see 2.3.12).
(5) Disengage the eject roller assy 1 from the lower base 2 by pressing the latch section of the eject
roller assy 1 in the direction of the arrow shown below, and remove the eject roller assy 1.
1
2
LATCH
42641101TH Rev.1
29 /
Oki Data CONFIDENTIAL
2.3.10 Motor Assy
(1) Remove the upper cover assy (see 2.3.1).
(2) Remove the operator panel assy (see 2.3.3).
(3) Remove the face up stacker assy (see 2.3.8).
(4) Remove the lower base unit (see 2.3.4).
(5) Stand the lower base unit on its side as shown, and unlock two latches, then remove the motor assy
1.
(6) Remove screw 2 and remove the bracket-Motor-Sub 3 from the Motor bracket.
2
3
1
42641101TH Rev.1
30 /
Oki Data CONFIDENTIAL
2.3.11 Hopping Roller Shaft Assy
(1) Remove the upper cover (see 2.3.1).
(2) Remove the operator panel assy (see 2.3.3).
(3) Remove the face up stacker assy (see 2.3.8).
(4) Remove the lower base unit (see 2.3.4).
(5) Remove the motor assy (see 2.3.10).
(6) With the lower base unit 1 standing on its side, remove the one-way clutch gear 2 and the bearing
(A) 3.
(7) Remove the hopping roller shaft assy 4 (the bearing (B) 5 comes off, so be careful not to lose it).
2
3
1
4
5
42641101TH Rev.1
31 /
Oki Data CONFIDENTIAL
2.3.12 Stacker Cover Assy
(1) Remove the upper cover assy (see 2.3.1).
(2) Remove the operator panel assy (see 2.3.3).
(3) Remove the face up stacker assy (see 2.3.8).
(4) Remove the motor assy (see 2.3.10).
(5) Remove the reset lever R 1.
(6) Remove one screw, detach the reset spring 2 from the lower base unit 3, turn the reset lever L
4 in the direction of arrow A until it stops, and remove it in the direction of arrow B.
(7) Unlock two latches of the lower base unit 3, then remove the stacker cover assy 5.
Note :
When reinstalling the reset lever L 4, fit it onto the guide of the lower base unit 3, turn it in the
direction of arrow C while pressing down the shaft of back up roller, and engage the reset lever
L 4.
5
A
4
1
A
2
B
42641101TH Rev.1
4
C
3
32 /
Oki Data CONFIDENTIAL
2.3.13 Registration Roller
(1) Remove the upper cover (see 2.3.1).
(2) Remove the operator panel assy (see 2.3.3).
(3) Remove the face up stacker assy (see 2.3.8).
(4) Remove the lower base unit (see 2.3.4).
(5) Remove the motor assy (see 2.3.10).
(6) Unlock the latch at the left side of the paper guide (R) 1 and remove the paper guide (R) 1.
(7) With the lower base unit standing on its side, remove the one-way clutch gear 2 and the bearing 3.
(8) Remove the Registration Gear by unloking the latch of the Gear 4.
(9) Remove the Registration Bearing L 5.
(10) Press the registration roller 6 in the direction of arrow A and lift up the left side of it, then remove
the registration roller Assy 7.
(11) Pull out the registration roller Assy 7 in the direction of arrow B.
(12) Remove the pressure roller Assy gear 8 by unloking the latch of the gear 8.
(13) Remove the bearing-Registration L 9 and bearing Registration R 0.
(14) Remove the Spring A from the bearing 9, 0.
A
0
2
3
7
A
8
9
1
View A
View A
5
4
B
A
6
42641101TH Rev.1
33 /
Oki Data CONFIDENTIAL
2.3.14 Roller Transfer Assy
(1) With the power switch turned off, unplug the AC cord from the outlet.
(2) Open the stacker cover.
(3) Remove the spacer 1.
(4) Release the roller transfer assy 2 by unlocking two latches of the bearing TR (never apply excessive
force when unlocking the latch) and slide the roller transfer assy left to remove the gear from the
bracket.
(5) Lift the right side of the roller transfer assy 2, and shift it to the right side, then pull it out from the
main unit (at this time, the bearings 3 of the left side and holder-TR 4 of the right side of the roller
transfer assy 2 will also come off).
4
1
3
Latches
1
2
1
42641101TH Rev.1
34 /
Oki Data CONFIDENTIAL
2.3.15 Fusing Unit
(1) Remove the upper cover (see 2.3.1).
(2) Remove the operator panel assy (see 2.3.3).
(3) Remove the face up stacker assy (see 2.3.8).
(4) Remove the lower base unit (see 2.3.4).
(5) Remove the stacker cover assy (see 2.3.12).
(6) Remove the connecting cable 1 of the heater and connecting cable 2 of the thermistor from the
hooks of the lower base.
(7) Remove four screws 3, lift and remove the fusing unit 4.
Caution: Fusing unit may be hot. Use care when handling.
Notes : 1.
When reinstalling or removing the fusing unit, tighten or loosen the screws while holding
the fusing unit assy 4 down with your hand (it is being pushed up by back up roller).
2.
When reinstalling the screws 3, be sure to direct the screws into preexisting thread and
avoid damaging the threads.
3.
Do not apply excessive torque when tightening the screws 3.
3
3
4
1
2
42641101TH Rev.1
35 /
Oki Data CONFIDENTIAL
2.3.16 Back-up Roller
(1) Remove the fusing unit assy (see 2.3.15).
(2) Lift the left side of the back-up roller 1, and pull it out to the left side (at this time, two bearing Holders
(back-up) 2 and the bias springs (back-up) 3and the two ball-bearings 4, washer C 5 will also
come off).
2
4
5
1
3
2
4
3
42641101TH Rev.1
36 /
Oki Data CONFIDENTIAL
2.3.17 Sensor Plate (Inlet)
(1) Remove the upper cover (see 2.3.1).
(2) Remove the operator panel assy (see 2.3.3).
(3) Remove the face up stacker assy (see 2.3.8).
(4) Remove the lower base unit (see 2.3.4).
(5) Unlock the latch at the left side of the paper guide (R) 1 and remove the paper guide (R) 1.
(6) Press the clamps of three sensor plates (inlet and paper) 2, and remove them by pressing them
upward from the bottom. When removing the sensor plates, take care not to lose the springs.
2
1
Spring sensor write
2
2
Sensor plate (paper)
Spring sensor IN
Sensor plate (inlet)
Spring sensor IN
2
Sensor plate (inlet)
42641101TH Rev.1
37 /
Oki Data CONFIDENTIAL
2.3.18 Sensor Plate (Outlet), Sensor Wire Assy
(1) Remove the upper cover assy (see 2.3.1).
(2) Remove the operator panel assy (see 2.3.3).
(3) Remove the eject roller assy (see 2.3.9).
(4) Remove the face up stacker assy (see 2.3.8).
(5) Remove the lower base unit (see 2.3.4).
(6) Remove the fusing unit assy (see 2.3.15).
(7) Press the clamps of the sensor plate (outlet) 1, and remove the sensor plate by pushing it up.
(8) Turn the clamps of the sensor wire assy 2 remove the sensor wire assy from the lower base unit.
1
1
2
2
42641101TH Rev.1
38 /
Oki Data CONFIDENTIAL
2.3.19 Manual Feed Guide Assy
(1) Remove the upper cover assy (see 2.3.1).
(2) Open the manual feed guide assy 1, and release the engagement on both sides with the main unit
by carefully bending the manual feed guide assy 1.
Note :
When remounting, verify the proper the engagements as shown in the diagram.
Put the post into the groove.
Put the post into the groove.
1
42641101TH Rev.1
39 /
Oki Data CONFIDENTIAL
2.3.20 Sensor Plate (Paper Supply)
(1) Remove the upper cover assy (see 2.3.1).
(2) Remove the operator panel assy (see 2.3.3).
(3) Remove the face up stacker assy (see 2.3.8).
(4) Remove the lower base unit (see 2.3.4).
(5) Press the clamps of the sensor plate (paper supply) 1 to unlock the latch, and remove it from the
base plate 2.
1
View A
1
2
View A
42641101TH Rev.1
40 /
Oki Data CONFIDENTIAL
2.3.21 GRV-2 PCB
(1) Remove the upper cover assy (see 2.3.1).
(2) Remove the operator panel assy (see 2.3.3).
(3) Remove the face up stacker assy (see 2.3.8).
(4) Remove the lower base unit (see 2.3.4).
(5) Remove three screws 1 and two screws 2.
(6) Remove the connector FAN, and disconnect the fan motor 3.
(7) Remove the three connectors PW_1, PW_2 and HVIF.
(8) Remove the GRV-2 PCB 4 and plate earth A 5 and plate earth (Env) 6 .
Note :
When reinstalling the GRV-2 PCB 4 onto the base plate 7, insert the edge of the GRV-2 PCB
4 in two slots of the base plate 7.
1
3
5
6
4
2
7
42641101TH Rev.1
41 /
Oki Data CONFIDENTIAL
2.3.22 Power Supply Board and High Voltage/Sensor Board
(1) Remove the upper cover assy (see 2.3.1).
(2) Remove the lower base unit (see 2.3.4).
(3) Remove two screws 1 and the guide plate 2.
(4) Remove the AC inlet 3 from the guide plate 2.
(5) Remove the screw 4 and remove the grounding (earth) wire 5.
(6) Remove the connectors CN2 from power supply board 6 and CN1 from high voltage/sensor board 0.
(7) Remove ten screws 7, and remove the power supply board 6 and high voltage/sensor board 0.
(8) Remove the Insulation plate 8 from the base plate 9.
Notes : 1.
Be careful about the sensor (paper supply) when reinstalling the lower base.
2.
Make sure that no excessive force is applied to the power supply switch.
3.
When installing the power supply board onto the base plate, be careful not to bend the
base plate (it is desirable to place a block underneath it to prevent bending).
7
3
7
7
6
0
2
7
4
1
8
5
9
1
42641101TH Rev.1
42 /
Oki Data CONFIDENTIAL
2.3.23 Cassette Guide L Assy
(1) Remove the paper cassette.
(2) Remove the upper cover assy (see 2.3.1).
(3) Remove the lower base unit (see 2.3.4).
(4) Remove two screws 1, and remove the beam plates 2.
(5) Remove the cassette guide L Assy 3 by shifting it in the direction of the arrow as shown below.
(6) Remove the earth plate 4.
4
3
2
1
42641101TH Rev.1
43 /
Oki Data CONFIDENTIAL
2.3.24 Cassette Guide R Assy
(1) Remove the paper cassette.
(2) Remove the upper cover assy (see 2.3.1).
(3) Remove the lower base unit (see 2.3.4).
(4) Remove two screws 1, and remove the beam plates 2.
(5) Remove the cassette guide R Assy 3 by shifting it in the direction of arrow.
(6) Remove the earth plate 4 and the cassette lock spring 5.
4
5
3
1
2
1
42641101TH Rev.1
44 /
Oki Data CONFIDENTIAL
3.
ADJUSTMENT
This chapter provides explanations concerning the adjustment necessary when replacing a part. The
adjustment is made by changing the parameter value set in EEPROM on the main control board. The
parameter can be set by the key operation from the operator panel. This printer has three kinds of
maintenance modes, and it is necessary to select one of the modes when replacing any parts.
3.1
Maintenance Modes and Functions
3.1.1
User Maintenance Mode (Administrator Menu)
In order to enter Admin MENU, turn the printer on while holding down the ITEM+/ITEM- switch.
Function
There are seventeen functions as follows:
Category
OP MENU
42641101TH Rev.1
Item
Value
Functions
ALL
ENABLE
DISABLE
Sets All Category Enable/Disable of User Menu.
Set to Disable, User Menu is not shown. Subsequent Items are
not displayed if the Categories are disabled. Panel Lock is
available when this MENU is set to DISABLE.
INFO.
ENABLE
DISABLE
Sets Category INFORMATION MENU Enable/Disable.
Set to Disable, Category INFORMATION MENU of User Menu is
not displayed.
PRINT
ENABLE
DISABLE
Sets Category PRINT MENU Enable/Disable.
Sets to Disable, Category PRINT MENU of User Menu is not
displayed.
MEDIA
ENABLE
DISABLE
Sets Category MEDIA MENU Enable/Disable.
Sets to Disable, Category MEDIA MENU of User Menu is not
displayed.
SYS CONF
ENABLE
DISABLE
Sets Category SYSTEM CONFIG MENU Enable/Disable.
Set to Disable, Category SYSTEM CONFIG MENU of User Menu is
not displayed.
PCL MENU
ENABLE
DISABLE
Sets Category PCL EMULATION MENU Enable/Disable.
Set to Disable, PCL EMULATION MENU of User Menu is not
displayed.
PPR MENU
ENABLE
DISABLE
Sets Category PPR EMULATION MENU Enable/Disable.
Set to Disable, PPR EMULATION MENU of User Menu is not
displayed.
FX MENU
ENABLE
DISABLE
Sets Category FX EMULATION MENU Enable/Disable.
Set to Disable, FX EMULATION MENU of User Menu is not
displayed.
ESC/P
ENABLE
DISABLE
Sets Category ESC/P EMULATION MENU Enable/Disable.
Set to Disable, ESC/P EMULATION MENU of User Menu is not
displayed. (Displayed only for Domestic market)
PARALLEL
ENABLE
DISABLE
Sets Category PARALLEL MENU Enable/Disable.
Set to Disable, Category PARALLEL MENU of User Menu is not
displayed.
RS232C
ENABLE
DISABLE
Sets Category RS232C MENU Enable/Disable.
Set to Disable, Category RS232C MENU of User Menu is not
displayed. Displayed only if RS232C is intalled.
USB
ENABLE
DISABLE
Sets Category USB MENU Enable/Disable.
Set to Disable, Category USB MENU of User Menu is not
displayed.
NETWORK
ENABLE
DISABLE
Sets Category NETWORK MENU Enable/Disable.
Set to Disable, Category NETWORK MENU of User Menu is not
displayed.
Displayed only if a NIC is installed.
45 /
Oki Data CONFIDENTIAL
Category
Item
OP MENU
Value
Functions
MEMORY
ENABLE
DISABLE
Sets Category MEMORY MENU Enable/Disable.
Set to Disable, Category MEMORY MENU of User Menu is not
displayed.
ADJUST
ENABLE
DISABLE
Sets Category SYSTEM ADJUST MENU Enable/Disable.
Set to Disable, Category SYSTEM ADJUST MENU of User Menu is
not displayed.
MAINTE
ENABLE
DISABLE
Sets Category MAINTENANCE MENU Enable/Disable.
Set to Disable, Category MAINTENANCE MENU of User Menu is
not displayed.
USAGE
ENABLE
DISABLE
Sets Category USAGE MENU Enable/Disable.
Set to Disable, Category USAGE MENU of User Menu is not
displayed.
Detailed descriptions of these functions are provided in Appendix E, DIAGNOSTICS TEST.
3.1.2
System Maintenance Mode (System Maintenance Menu)
Note:
This mode is used only by maintenance personnel and it should not be released to the endusers.
The printer enters System Maintenance Menu when the power supply switch is turned ON while the
Menu/Item+/Value-/Cancel switches are held down.
Function
There are functions as follows:
Category
Item
Value
Functions
OKIUSER
OKIUSER
ODA
OEL
APS
JP1
JPOEM1
JPOEM2
OEMA
OEML
Sets brands;
JPOEM1:Japanese OEM(1)
JPOEM2:Japanese OEM(2)
OEMA:Overseas OEM for A4 default
OEML:Overseas OEM for Letter default
Selecting brand will automatically prompt reboot.
MAINTE
MENU
FL FORMAT
EXECUTE
Initializes Flash ROM forcedly.
Every Flash ROM installed is subject to initialization.
EEPROM
RESET
Initializes EEPROM.
Special items, such as MAC Address, are not initialized.
CONFIG
MENU
CODESET
TYPE1
TYPE2
Sets Russian/Greek and view/not view.
TYPE1: Not view Russian/Greek.
TYPE2: View Russian/Greek.
Use a panel that supports Russian/Greek to view Russian/Greek.
ENG STAT
ENG STAT
PRINT
Selecting by the Select switch, then pressing the On-line switch will
prompt initialization and printing Engine information.
PAGE PRT
PAGE PRT
ENABLE
DISABLE
Sets printing or not printing the total page count in PRINT MENU MAP.
42641101TH Rev.1
46 /
Oki Data CONFIDENTIAL
Category
EMULATE
Item
Value
PCL
ENABLE
DISABLE
IBM PPR
ENABLE
DISABLE
EPSONFX
ENABLE
DISABLE
PS3 EMU
ENABLE
DISABLE
ESC/P
ENABLE
DISABLE
PCL XL
ENABLE
DISABLE
Functions
Changes the default PDL for each brand. PDLs that are disabled in this
menu will not be displayed at EMULATE of User Menu or OP MENU of
Admin Menu. (No specific to PCL XL is provided; thus, when DISABLE
is set, there is not visual change.)
When print data in the PDL language set to DISABLE is received, the
printer will desplay INVALID DATA and discard received data.
PS3 EMU will be displayed only when PSE is installed.
For PN272/83, PCL cannot be set to DISABLE. (ENABLE must be set to
make it always usable. Even if set to DISABLE, received data will be
processed.)
LOOPTEST RS232C
EXECUTE
Displayed only if an RS232C is installed.
Loop Test runs Serial I/F function test without connecting the host PC.
The printer alone sends/receives “00”FFH” data.
Loop Test requires attachment of a Loop connector (pin2: TD and pin3:
RD are shorted) prior to execution.
A Loop count is displayed real-time on LCD, and if an error occurs, an
error message will be displayed.
This mode can be ended only by turning the power off. Following this
operation, the power is shut down; thus, the printer cannot go back in
Operation Mode or other Maintenance Mode.
COMT
PRT
CONT PRT
EXECUTE
PRINTING Rolling ASCII Continuous Print Continuously prints Rolling
ASCII patterns for various types continuos testing on the maker side.
(Noise test, engine test).
This mode can be ended by pressing the “ONLINE” SW.Following this
operation, the power turns off, thus, the printer cannot return to either
operation mode or any of other maintenance modes.
DOTSHIFT
TRAY1
-4.0mm
Set the dot shift for the horizontal direction when printing from Tray 1.
This area will not be initialized by the EEPROM reset operation.
˜
-0.5mm
0mm
+0.5mm
˜
+3.5mm
TRAY2
-4.0mm
˜
-0.5mm
0mm
+0.5mm
Set the dot shift for the horizontal direction when printing from Tray 2.
This item is displayed even when Tray 2 is not set. This area will not be
initialized by the EEPROM reset operation. (At first, it is initialized by
default.)
˜
+3.5mm
MPF
-4.0mm
˜
-0.5mm
0mm
+0.5mm
Set the dot shift for the horizontal direction when printing from MPF.
This item is displayed even when MPF is not set. This area will not be
initialized by the EEPROM reset operation. (At first, it is initialized by
default.)
˜
+3.5mm
MANUAL
-4.0mm
˜
-0.5mm
0mm
+0.5mm
Set the dot shift for the horizontal direction when printing from the
manual slot.
This area will not be initialized by the EEPROM reset operation. (At first,
it is initialized by default.)
˜
+3.5mm
NETWORK
Details depend on NETWORK.
ENG DIAG
Enters Engine Maintenance Menu.
Detailed descriptions of these functions are provided in Appendix E, DIAGNOSTICS TEST.
42641101TH Rev.1
47 /
Oki Data CONFIDENTIAL
3.1.3
EEPROM Initial Setting Range for Events
As for initialization of EEPROM, ranges differ the whole phenomenon.
"O" is initialized. "–" is not initialized.
Table 3-1 The Initial-Setting domain of EEPROM
No Events
1
2
3
4
5
6
User Maintenance
Menu EEPROM
RESET Operation
F/W Revision
check error at the
time of a power
on.
CU EEPROM area
mapping Revision
check error at the
time of a power
on.
Brands area check
error at the time of
a power on.(*1)
Engine
Maintenance
Menu ENGINE
RESET Operation
PU EEPROM area
mapping check
error at the time of
a power on.
CU EEPROM Area
Administrator Menu
/ System
Maintenance Menu
Area(*3)
PU EEPROM Area
Engine Maintenance Menu Area
Factory
Default
Area
User
Menu
Area
—
O
—
—
—
—
—
—
—
—
O
O
—
O
—
—
—
—
O
O
O
—
—
—
—
—
—
O
O
O
O
O
—
—
—
—
—
—
—
—
—
—
O
O
(*2)
O
—
—
—
—
—
O
(*3)
O
O
O
Brands
Area
F/W
Revision
Area
Drum
Page Toner Dot
Counter Counter Counter
(*1) The model (forcing) which operated before is for operating as another model (forcing), and a Brands check is
recognized as an error and resets change of the Brands point by the PJL command, operation at the time of
the power supply injection by new EEPROM, etc.
(*2) It restricts to the time when whose page counter is 500 or less sheets, and is reset by 0. (ENGINE RESET by
the PJL command is not this limitation.)
(*3) Although a DOT SHIFT setting menu exists in a system maintenance menu, since setting value preservation
area is arranged at PU EEPROM AREA, even when the system maintenance menu item is initialized, a DOT
SHIFT setup is not initialized. On the contrary, when PU EEPROM AREA is initialized, a DOT SHIFT setup is
also initialized.
42641101TH Rev.1
48 /
Oki Data CONFIDENTIAL
3.2
Adjustment When Replacing a Part
Adjustment is necessary when replacing any of the following parts.
Part Replaced
3.2.1
Adjustment
Image Drum Cartridge
Reset the image drum counter
(refer to User's manual).
Main Control Board
EEPROM data Upload / Download
Uploading/Downloading EEPROM data
When the controller printed circuit board is replaced, the contents of the old EEPROM shall be copied
to the new EEPROM on the new board to preserve customer settings. For the purpose, use the
Maintenance Utility.
A operation method of Maintenance Utility, please refer to Maintenance Utility Operating Specifications.
The maintenance utility is designed to be used only by field engineer and it should not be released to
the end-users.
42641101TH Rev.1
49 /
Oki Data CONFIDENTIAL
4.
PERIODICAL MAINTENANCE
4.1
Periodical Replacement Parts
The parts are to be replaced periodically as specified below:
Part name
Condition for replacement
Cleaning
Remarks
Toner cartridge 2.5K
About 2,500 sheets of paper have been printed.
(Type 9)
LED head
Consumables
Toner cartridge 6K
About 6,000 sheets of paper have been printed.
(Type 9)
LED head
Consumables
Image drum cartridge
About 25,000 sheets of paper have been printed.
(Type 9) See 1.4. (14)
4.2
Consumables
Cleaning
Remove any toner or dust accumulated inside the printer. Clean in and around the printer with a piece
of cloth when necessary. Use the handy cleaner (service tool) to clean inside the printer.
Note: Do not touch the image drum, LED lens array, or LED head connector block.
4.2.1
Cleaning of LED Lens Array
Clean the LED lens array or replace the toner cartridge when white lines or stripes (void, light printing)
are generated vertically down the page, as shown below.
Note: The LED lens array must be cleaned with an LED head cleaner included in the replacement toner
kit.
White lines or stripes
(void, light printing)
(1) Set the LED head cleaner to the LED lens array as shown in the figure, then slide the cleaner back
and forth horizontally several times to clean the head.
Note: Gently press the LED head cleaner onto the LED lens array.
LED head clean pad
LED lens array
(2) Throw the cleaner pad away.
42641101TH Rev.1
50 /
Oki Data CONFIDENTIAL
4.2.2
Cleaning Page Function
There is a charge roller cleaning function with this printer, which can be executed by the user.
(1) 1 Press the MENU key several times, and the LCD displays "MAINTE MENU".
2 Press the ITEM key, and the LCD displays "CLEANING PRINT".
3 Press the SELECT key. The printer enters the cleaning mode.
(2) The LCD displays "MANUAL" on the upper line, and on the lower line, "LETTER REQUEST" is
displayed, scrolling one character width at a time from right to left "LETTER" on the lower line may
instead be "A4" depending on the printer designation.
When the above messages appear on the LCD, the user can verify that the printer has entered the
cleaning mode and that it is requesting insertion of a letter (or A4) size paper into the manual
feederslot.
(3) Insert a sheet of paper into the manual feeder slot.
(4) Toner attached to the image drum is transferred onto the inserted sheet, and the sheet is ejected
with the toner residues printed. While this process is going on, the LCD displays "PRINT
CLEANING" message.
(5) The printer returns to "MAINTE MENU".
The LCD displays "CLEANING PRINT".
42641101TH Rev.1
51 /
Oki Data CONFIDENTIAL
5.
TROUBLESHOOTING PROCEDURES
5.1
Troubleshooting Tips
(1) Check the troubleshooting section in the Printer Handbook.
(2) Gather as much information about the situation as possible.
(3) Inspect the equipment under the conditions close to those in which the problem had occurred.
5.2
Points to Check before Correcting Image Problems
(1) Is the printer being run in proper ambient conditions?
(2) Are supplies (toner) and routine replacement part (image drum cartridge) being replaced properly?
(3) Is the printing paper normal (acceptable quality)?
(4) Is the image drum cartridge being loaded properly?
5.3
Tips for Correcting Image Problems
(1) Do not touch, or bring foreign matter into contact with the surface of the image drum.
(2) Do not expose the image drum to direct sunlight.
(3) Keep hands off the fuser unit as it heats up during operation.
(4) Do not expose the image drum to light for longer than 5 minutes at room temperature.
42641101TH Rev.1
52 /
Oki Data CONFIDENTIAL
5.4
Preparation for Troubleshooting
(1) Operator panel display
The failure status of the printer is displayed by the liquid crystal display (LCD) of the operator panel.
Take proper corrective action as directed by messages which are being displayed on the LCD.
For ODA/OEL/AOS
Status message display
Ready LED display
5.5
:
Off
:
Blinking
:
On
:
Undefined
Troubleshooting Flow
Should there be a problem with the printer, carry out troubleshooting according to the following procedure
flow:
Problems
Problems
indicated by LCD
message
Troubleshoot from the LCD
status message list.
See Section 5.5.1.
Image problems
(and problems which
are not indicated by
LCD message)
5.5.1
Carry out a detailed
troubleshooting with the
troubleshooting chart.
See Section 5.5.2.
Carry out a troubleshooting
with the troubleshooting chart.
See Section 5.5.3.
LCD Status Message/Problem List (ERROR CODES)
The status and problems which may be displayed by messages on the LCD are listed in Table 5-1.
42641101TH Rev.1
53 /
Oki Data CONFIDENTIAL
The following are the meaning of the symbols in the LCD display.
“TRAY2” is indicated only when the second tray is set, and “MPF” is displayed only when the
multipurpose feeder is set.
xxxx:
Emulation (AUTO, PCL, PSE, PPR, FX)
tttt:
Trays (TRAY1, TRAY2, MPF, MANUAL)
mmmm: Paper Size (LETTER, A4 SIZE, ..., B5 SIZE, A6 SIZE)
pppp: Media type (Plain, Transparency, ...)
cccc:
COVER (UPPER, TRAY2)
The following are indicated in the contents section of the displayed table.
(Job Account-related): Displayed only when the Job Account function is valid.
(PSE-related):
Displayed only when PSE is set.
(PSE stands for Postscript3 Emulation. Only when PSE is set.)
(TRAY2-related):
Displayed only when TRAY2 is set.
(RS232C-related):
Displayed only when an RS232C card is set.
(NIC items):
Displayed only when an NIC card is set.
Table 5-1 (1/5)
LCD
Status level
LED
Descroption
Normal
ON-LINE
xxxx
Light
Shows on-line status.
Normal
OFF-LINE
xxxx
No Light
Shows off-line status.
Normal
FILE
ACCESS
Varies
Accessing to an accounting file. (Job Account-related)
Normal
ARRIVE
xxxx
Varies
Data receiving, process not started yet. Displayed mainly during
PJL process without text print data or during job spooling.
Normal
ACTIVE
xxxx
Blink
Data receiving output processing
Normal
DATA
xxxx
Varies
Un-printed data remains in Buffer. Waiting for data to follow.
Normal
PRINTING
Varies
Printer is printing.
Normal
■
■kkk/lll
Varies
Printing a copy. kkk indicates the number of sheet being printed. lll
indicates the total number of sheets that have been printed.
The display for normal printing is applied when the number of
copies is one sheet. This item is displayed combined with a
different message in the first line.
Normal
FLUSHING
Blink
Job cancellation has been instructed. Data is being ignored till the
end of the job.
Normal
FLUSHING
(JAM)
Blink
Indicates a status of discarding data until the end of a job after a
job is cancelled when a jam is generated upon turning jam recovery OFF. MSG blinks only on the top LCD line.
Normal
FLUSHING
(DENIED)
Blink
Cancelled as permission for printing has not been received. (Job
Account-related)
1. MSG blinks only on the top LCD line when a job is received from
a user who has not received permission for printing.
Warning
FLUSHING
(LOG)
Blink
Indicates that a job has been cancelled as the area storing logs
inside the printer has been drained and furthermore, a “cancel job”
instruction appears when logs are full.
(Job Account-related) MSG blinks only on the top LCD line.
Normal
■
WARM UP
Varies
Indicates that the printer is now warming up. This item is displayed
combined with a different message in the first line.
Normal
■
PWR SAVE
Varies
A printer is in power save mode. Displayed combined with other
messages in the first line.
Warning
■
TONERLOW
Varies
or Blink
Toner amount is low. Displayed combined with other messages in
the first line. Normal operation is possible. Not displayed, when a
drum counter is in 200 or less state or a "CHG DRUM" state.
• In the case of “LOW TNR” of a menu is "STOP", TONER LOW
is usually detected from a state, LED is blinked, and it once
becomes OFF-LINE. It will be in an ON-LINE state by cover
opening and closing under push ON-LINE SW. If blink will be in
an ON-LINE state, it will usually return to a state.
42641101TH Rev.1
54 /
Oki Data CONFIDENTIAL
Table 5-1 (2/5)
LCD
Status level
LED
Descroption
Warning
■
TONEREMP
Varies
Toner near empty. (This state occurs after printing 100 sheets from
TONERLOW.)
Displayed combined with other messages in the first line.
Not displayed when “CHG DRUM” for drum life is displayed,
however. Possible to cancel print job or continue normal operation.
Warning
■
TONERSNS
Varies
Something is wrong with the toner sensor. Displayed combined
with other messages in the first line when the engine is set to
Shipping mode. Normal operation is possible.
Error, explained later, is displayed when the engine is set to
Factory mode.(ERR 163)
Warning
■
CHG DRUM
Varies
Drum cartridge life (Warning). Displayed combined with other
messages of the first line.
TONER EMP ERROR status code is set to 10969 in the state of
warning which has restored temporarily CHG DRUM ERROR
(40996) when the drum life has occurred at the same time by
cover open/close presses "ON-LINE" switch.
A status code is set to 10060 in the state of CHG DRUM independent warning.
Normal
PRINT
DEMO
Varies
or Blink
Demo page printing.
Normal
PRINT
FONTS
Varies
or Blink
Fonts sample printing.
Normal
PRINT
MENU MAP
Varies
or Blink
Menu map printing.
Normal
PRINT
FILELIST
Varies
or Blink
File list printing.
Normal
PRINT
CLEANING
Varies
or Blink
Cleaning page printing.
Warning
INVALID
DATA
Varies
Received invalid data. Prompts the user to press ON-LINE switch
to clear Warning display. Displayed when the printer receives an
unsupported PDL command.
Warning
■
ERR PSE
Blink
Interpreter detects an error due to following reasons.
Data received after this is ignored till the end of the job.
When the job is received completely, this is automatically cleared.
- The job has a grammatical error.
- The page is complicated, and VM was used up.
Warning
■
tttt EMPTY
Varies
Tray tttt has run out of paper. Handled as Warning until the user
designates the tray that has run out of paper. * Scroll display
Warning
■
TRAY2 COVER OPEN
Varies
Second Tray Cover Open
* Scroll display
Warning
■
Varies
FILE SYSTEM IS FULL
Warning
■
FILE IS WRITE
PROTECTED
Varies
An attempt to write in a write-protected file was made.
Because this is a transient warning, it is displayed until the job is
completed. then, cleared. * Scroll display
Warning
■
INVALD ID.JOB
REJECTED
Varies
Notifies a user that the job has been cancelled as permission for
printing has not been received. (Job Account-related) This is
displayed until the ON LINE key is pressed. * Scroll display.
Warning
■
LOG BUFFER FULL.
JOB REJECTED
Varies
Notifies a user that the job has been cancelled as the log buffer is
full. (Job Account-related) This is displayed until the ON LINE key
is pressed. * Scroll display.
Warning
■
FILE OPERATION
FAILED nnn
Varies
A FLASH error other than No.26 and No.27 has occurred.
Operation that does not use FLASH is possible. * Scroll display
Error
MANUAL
mmmm REQUEST
Light
Manual print request. Prompts the user to set paper indicated by
mmmm manually. * Scroll display
42641101TH Rev.1
Flash Full has occurred. This is a transient warning.
Displayed until the job is completed, then, cleared. * Scroll display
55 /
Oki Data CONFIDENTIAL
Table 5-1 (3/5)
Status level
LCD
LED
Descroption
Error
LOAD mmm
tttt EMPTY
No Light
Indicates that a print request was sent to the tttt tray that has
become empty. A message for setting mmmm paper.
TRAY1
TRAY2
MPF
* Scroll display.
Error
CLOSE COVER
TRAY2 COVER OPEN
No Light
Print request has been made to the 2nd tray route cover open. To
continue, close cover. * Scroll display
Error
CHANGE PAPER TO
mmmm/pppp
tttt MEDIA MISMATCH
No Light
The media type in the tray and the edit media type do not match.
TRAY1
TRAY2
MPF
* Scroll display
Error
CHANGE PAPER TO
mmmm/pppp
tttt SIZE MISMATCH
No Light
The paper size in the tray and the edit size do not match.
TRAY1
TRAY2
MPF
* Scroll display
Error
RS232C
OVERFLOW
No Light
RS232C Overflow has Occurred.
To continue, press ON-LINE switch(RS232C related)
Error
RS232C
OVER RUN
No Light
RS232C Over Run has Occurred.
To continue, press ON-LINE switch(RS232C related)
Error
RS232C
PRY ERR
No Light
RS232C Parity Error has Occurred.
To continue, press ON-LINE switch(RS232C related)
Error
RS232C
FRM ERR
No Light
RS232C Framing Error has Occurred.
To continue, press ON-LINE switch(RS232C related)
Error
NETWORK
INITIAL
Varies
Initializing (rebooting) a section related to NIC.
MSG blinks only on the top LCD line. (NIC-related)
Error
TONEREMP
CHG CART
No Light
Toner Low has passed, and almost no toner is left in the cartridge. For
temporary operation, open/close the cover or press “ON-LINE” switch, to
recover the printer operation. But basically you must change the toner
cartridge.
Displayed after printing 100 sheets after Toner Low was sensed, to
prompt the user to change the cartridge. after this, the printer
recovers with Cover Open/Close or when user presses “ON-LINE”
switch, then, after printing 30 pages, this message is displayed.
Even after this, the printer recovers when the user opens and
closes the cover, or he presses the “ON LINE” switch, but this
message is displayed for each sheet ejected.
During Change Drum Alarm, however, “CHG DRUM /(the lower line
spaces), not this message, is displayed, to prompt the operator to
replace the drum, and prevent him from replacing the toner.
Error
MEMORY
OVERFLOW
No Light
Memory capacity has overflowed due to the following reasons. To
continue, press ON-LINE switch. Install expansion RAM or decrease the data amount.
- Too much print data in a page.
- Too much Macro data.
- Too much DLL data.
- After frame buffer compression, overflow has occurred.
* Scroll display
Error
OPEN UPPER COVER
PAPER SIZE ERROR
No Light
Warns that paper of the inappropriate size has been fed from the
tray. Check whether Multi-feed has happened.
To continue for Recovery Print, open and close the cover.
* Scroll display
Error
CHECK tttt
PAPER JAM
No Light
Paper jam occurred when paper was being fed from tttttt tray.
TRAY1
TRAY2
MPF * Scroll display
Error
OPEN UPPER COVER
PAPER JAM
No Light
Jam has occurred in the paper path.
Paper Feed
Transport (Message of 10.5 is displayed)
* PN262 does not distinguish jam type or tray.
* Only Exit jam is identified.
* Scroll display
42641101TH Rev.1
56 /
Oki Data CONFIDENTIAL
Table 5-1 (4/5)
LCD
Status level
LED
Descroption
Error
OPEN UPPER COVER
EXIT JAM
No Light
Jam occurred when paper was exiting.
Open the cover and remove the paper inside the printer.
Close the cover to continue for Recovery Print. * Scroll display
Error
CHG DRUM
No Light
Notifies the user of the drum life. For temporary operation, open/
close the cover or press “ON-LINE” switch, to recover the printer
operation. But basically you must change the drum.
If Change Drum Alarm occurs at Toner Empty display timing, this
message is displayed. This prompts the user to replace the drum,
and prevent him from replacing the toner.
Error
CHECK IMAGE DRUM
DRUM MISSING
No Light
Indicates that the drum is not set properly.
Error
No Light
CLOSE COVER
UPPER COVER OPEN
The cover is open.
UPPER Stacker
* Scroll display
-
DL MODE
xxxx
Varies
Downloading via NIC. The download status is indicated in the
bottom line. Refer to the Network specifications for details. (NICrelated)
Error
POWER OFF/ON
NETWORK ERROR
No Light
Network error has occurred.
* Scroll display
-
REBOOT
X
No Light
This message is displayed when the printer is rebooted. The lower
display shows the code indicating the reason for the reboot.
Reason Codes (X):
0: Factor(s) other than those shown below
1: PJL command reception
2: Operation panel operation
3: PostScript quit operator
4: Specification mode via network
Fatal
ERR nnn
No Light
Note: The following error names are not displayed:
* Scroll display
020
CU ROM Hash Check Error 1
030
CU Slot1 DIMM RAM Check Error
034
RAM configration error
035
Slot1 RAM Spec error
040
CU EEPROM ERROR
041
CU FLASH ERROR
042
FLASH FILE SYSTEM ERROR
043
FLASH FILE SYSTEM VERSION MISMATCH
050
Operator Panel Error
051
CU FAN ERROR
063
HOST_IF_NO_DRIVER:PCI
070
CANT_HAPPEN
072
Engine communication error
073
H/W overrun detect
074
F/W Overrun detect
075
VIC Limutter
076
VIC decomp write error (reserved: for monochrome product only)
077
VIC illegal decomp error (reserved: for monochrome product only)
102
Engine RAM Error (Reserved)
103
Engine SRAM Error (Reserved)
106
Engine Control Error
120
PU Board Fan Motor Error
121
Power Supply LSI Error (Reserved)
42641101TH Rev.1
57 /
Oki Data CONFIDENTIAL
Table 5-1 (5/5)
LCD
Status level
122
ERR nnn
LED
No Light
Descroption
Power Supply Fan Motor Error (Reserved)
123
Humidity Sensor (Reserved)
124
Temperature Sensor (Reserved)
125
Multi purpose tray home error (Reserved)
130
LED Head Over Temperature
134
LED Head Missing, Color: Black (Reserved)
143
Drum Up/Down, Color: Black (Reserved)
163
Toner Sensor Error, Color: Black
170
Upper Thermistor, State: Short
171
Upper Thermistor, State: Open
172
Upper Heater Temp, State: High
173
Upper Heater Temp, State: Low
179
Fuser Mismatch (Reserved)
180
I/F Error, Loc: Envelop feeder
182
I/F Error, Loc: Tray2
187
I/F Error,Loc: Control Panel (Reserved)
190
System Memory Overflow
200
PU F/W download check SUM error (Reserved)
201
PU F/W Flash write error (Reserved)
202
PU F/W Flash data missing (Reserved)
203
IMAGE ACK illegal page ID
204
IMAGE SET Trans error (Reserved)
205
No page at DUP IN (Reserved)
206
No page at PPOUT
207
Illegal function call
208
Parameter error
210
EM Null page cargo
211
EM Null page
212
EM No video queue
213
EM Illegal sequence
001
INITIALIZING
No Light
Machine check Exception
002
DSI Exception
003
ISI Exception
004
Alignment Exception
005
Program Exception
006
Floating-point unavailable Exception
007
Instruction address breakpoint Exception
008
Thermal management interrupt Exception
009
Instruction TLB miss
010
Data TLB miss
011
Data TLB store miss
Normal
Indicates that the controller side is initializing.
Normal
EEPROM
RESET’NG
No Light
Indicates that EEPROM is initializing.
-
RAM CHK
********
No Light
Indicates that the RAM is being checked.
* is indicated after each time one-eighth of the total space is checked.
Normal
■■■■■■■■
■■■■■■■■
No Light
Displayed at power ON.
42641101TH Rev.1
58 /
Oki Data CONFIDENTIAL
5.5.2
LCD Message Troubleshooting
If the problems cannot be corrected by using the LCD status message/problem list, follow the
troubleshooting flowcharts given here to deal with them.
Trouble
No.
1.
The printer does not work normally after the power is turned on.
2.
Jam alarm
Flowchart number
1
Paper input jam
2-1
Paper feed jam
2-2
Paper exit jam
2-3
3.
Paper size error
3
4.
Fusing unit error
4
5.
SSIO (Synchronous Serial Input/Output) error I/F timeout
(no response) between the printer and an optional tray
(High Capacity Second Paper Feeder, Power Envelope Feeder).
5
Fan error
6
6.
42641101TH Rev.1
59 /
Oki Data CONFIDENTIAL
1
The printer does not work normally after the power is turned on.
• Turn the power off, then back on.
• Is all black message being displayed by the LCD display?
• No
■■■■■■■■
■■■■■■■■
Is the AC cord being connected properly?
• No
Connect the AC cord properly.
• Yes Is +5 V being applied between Pins 3 and 1 of PW_2 connector on the main control
board?
Pin 1 : 0 V
Pin 3 : +5 V
• No
Is the connection between PW_1/PW_2 connector on the main control board
and connector CN2 on the power supply board board being made properly?
No
• Yes
Correct the connection.
Replace the power supply board.
• Yes Is +3.3 V being applied between Pins 5 (GND) and 8 of IC13?
Pin 5 :0 V
Pin 8 :+3.3 V
• No
Replace the main control board.
• Yes Is the flexible cable for the operator panel assy being connected to the LCDPNL
connector on the main control board and the connector CN on the OPE board properly?
• No
Connect the flexible cable properly.
• Yes Replace the operator panel assy or flexible cable.
• Has the problem been solved?
• No
Replace the main control board.
• Yes End
• Yes
Is
• No
• Yes
42641101TH Rev.1
message being displayed by the LCD display?
Replace the main control board.
Is ON-LINE
XXX
• No
• Yes
INITIALIZING
message being displayed by the LCD display?
XXX: PCL, AUTO, PSE*, HEX DUMP, PPR, FX
* PSE means Postscript 3 Emulation.
Take actions according to the LCD status message/problem list (see Section
5.5.1 for corrective actions).
End
60 /
Oki Data CONFIDENTIAL
[JAM error]
2-1
Paper input jam
• Does the JAM error occur when the power is turned on?
• Yes
Is the paper at the inlet sensor?
• Yes Remove the paper.
• No
Is the operation of the inlet sensor plate normal (moves freely when it is touched)?
• No
• Yes
• No
Replace the inlet sensor plate.
Clean the inlet sensor on the high voltage/sensor board, or replace the high voltage/
sensor board.
Does the JAM alarm occur after paper feeding?
• Yes
Is the paper fed to the inlet sensor plate?
• Yes Is the operation of the input sensor plate normal (moves freely when it is touched)?
• No
Replace the inlet sensor plate.
• Yes Clean the inlet sensor on the high voltage/sensor board or replace the high voltage/
sensor board.
• No
• No
Replace the hopping roller rubber or paper cassette.
Is the hopping roller rotating?
• Yes
• No
Set the paper tray properly.
Is the hopping motor rotating?
• Yes
• No
Replace the one-way clutch gear of the hopping roller assembly.
Is HM connector on the main control board being connected properly?
• No
• Yes
Connect HM connector properly.
Is the coil resistance (normal resistance: both between
Pins 1 and 2, as well as Pins 3 and 4 are about 10.3 Ω) of
the hopping motor normal?
• No
• Yes
Exit roller
Replace the hopping motor.
Outlet sensor
Replace the main control board.
Heat roller
Transfer roller
Paper feeding direction
Paper sensor
42641101TH Rev.1
Toner Inlet
sensor sensor 2
Hopping
roller
Paper end sensor
Registration roller
Inlet sensor 1
61 /
Oki Data CONFIDENTIAL
[JAM error]
2-2
Paper feed jam
• Does the paper feed jam occur when the power is turned on?
• Yes
Is the paper on the paper sensor plate?
• Yes Remove the paper.
• No
Is the operation of the paper sensor plate normal (moves freely when it is
touched)?
• No
• Yes
• No
Replace the paper sensor plate.
Replace the high voltage/sensor board.
Has the paper reached the paper sensor plate?
• No
Is the hopping roller rotating?
• No
• Yes
• No
• Yes
Is the image drum cartridge being set properly?
Set the image drum cartridge properly.
Has the paper reached the outlet sensor plate?
• Yes
• No
• Yes
• No
Check the hopping roller assembly or tray or hopping motor.
Is the operation of the outlet sensor plate normal (moves freely when it is
touched)?
Replace the outlet sensor plate.
Clean the outlet sensor on the high voltage/sensor board or replace the high
voltage/sensor board.
Is the main/drum motor rotating?
• No
Is DM connector on the main control board being connected properly?
• No
• Yes
• No
• Yes
• Yes
Connect DM connector properly.
Is the coil resistance (normal resistance: both between Pins l and 2, as well as
Pins 3 and 4 are about 8.6Ω) of the main/drum motor correct ?
Replace the main/drum motor.
Replace the main control board.
Is the transfer roller rotating?
2-2-a
42641101TH Rev.1
62 /
Oki Data CONFIDENTIAL
2-2-a
• No
• Yes
Check the gears (transfer roller gear, idle gear and reduction gear).
Is the fusing unit being installed properly?
• No
• Yes
Install the fusing unit properly.
Is the image drum cartridge being set properly?
• No
• Yes
Set the image drum cartridge properly.
Clean the paper sensor on the high voltage/sensor board or replace the high voltage/sensor
board.
[JAM error]
2-3
Paper exit jam
• Does the paper exit jam error occur when the power is turned on?
• Yes
Is the paper on the outlet sensor plate?
• Yes Remove the paper.
• No
In the operation of the outlet sensor plate normal (moves freely when it is touched)?
• No
• Yes
• No
Clean the outlet sensor on the high voltage/sensor board or replace the high voltage/
sensor board.
Is the face-up stacker pulled out completely from the printer or, pushed into the printer
completely?
• No
• Yes
Pull the face-up stacker out of the printer completely or push it into the printer completely.
Is the eject roller assembly being installed properly?
• No
• Yes
Install the eject roller assembly properly.
Has the coil spring come off the eject roller assembly?
• Yes
• No
Replace the outlet sensor plate.
Install the coil spring to the eject roller assembly.
Replace the eject roller assembly.
42641101TH Rev.1
63 /
Oki Data CONFIDENTIAL
3
Paper size error
• Is paper of the specified size being used?
• No
• Yes
Use paper of the specified size.
Are inlet sensor plates 1 and 2 operating properly (moves freely when they are touched)?
• No
• Yes
Replace the inlet sensor plate or clean the inlet sensor on the high voltage/sensor board.
Does the outlet sensor plate operate properly (moves freely when it is touched)?
• No
• Yes
Replace the outlet sensor plate or clean the outlet sensor on the high voltage/sensor
board.
Replace the high voltage/sensor board.
Exit roller
Outlet sensor
Heat roller
Transfer roller
Paper feeding direction
Paper sensor
42641101TH Rev.1
Toner Inlet
sensor sensor 2
Hopping
roller
Paper end sensor
Registration roller
Inlet sensor 1
64 /
Oki Data CONFIDENTIAL
4
Fusing unit error (ERROR 170) (ERROR 171) (ERROR 172) (ERROR 173)
• Turn the power off, then back on again.
• Yes
Is the thermistor open or shorted? Measure the resistance between thermistor contacts (heater
contacts 120V/2Ω or 240V/7Ω, and thermistor contacts 200KΩ at room temperature) (see
Figure 5-2).
• Yes Replace the fusing unit.
• No
Do the thermistor connector is connected to the main control board connector?
• No
• Yes
Is the heater of the fusing unit turned on (when the heater is turned on, light is emitted)?
• Yes
• No
Connect the thermistor connector property.
Check the thermistor connector or replace the main control board or the fusing unit.
Is the AC voltage being supplied to the connector for the heater of the power supply board?
(see Figure 5-2)
• No
• Yes
Replace the main control board or the power supply board.
Check the heater connector cord and the heater connector for poor contact .
Heater connector
Thermistor connector
Figure 5-2
42641101TH Rev.1
65 /
Oki Data CONFIDENTIAL
5
Synchronous serial I/O error or I/F timeout between printer and optional tray
(ERROR 180, 182)
• Is an option tray (High Capacity Second Paper Feeder or Multi Purpose Feeder) being used?
• Yes
Is the cable between the main control board and the optional tray being connected
properly?
• No
• Yes
Connect the cable properly.
Replace the main control board.
• Has the problem been solved?
• No
• Yes
• No
6
Check the problem by following the Multi Purpose Feeder maintenance manual
of Appendix F or the High Capacity Second Paper Feeder maintenance manual
of Appendix G.
End
Replace the main control board.
Fan error
(ERROR 120)
• Is the fan rotating?
• Yes
• No
Replace the main control board.
Is FAN connector on the main control board being connected properly?
• No
• Yes
Connect FAN connector properly.
Replace the fan or main control board.
42641101TH Rev.1
66 /
Oki Data CONFIDENTIAL
5.5.3
Image Troubleshooting
Procedures for troubleshooting for abnormal image printouts are explained below. Figure 5-3 below
shows typical abnormal images.
Problem
Flowchart number
Images are light or blurred entirely (Figure 5-3 A )
Dark background density (Figure 5-3 B )
Blank paper is output (Figure 5-3 C )
Black vertical belts or stripes (Figure 5-3 D )
Cyclical defect (Figure 5-3 E )
Prints voids
Poor fusing (images are blurred or peels off when the printed
characters and images on the paper are touched by hand)
White vertical belts or streaks (Figure 5-3 F )
1
2
3
4
5
6
7
8
A Light or blurred
images entirely
B Dark background
density
C Blank paper
D Black vertical belts
or stripes
E Cyclical defect
F White vertical belts
or streaks
Figure 5-3
42641101TH Rev.1
67 /
Oki Data CONFIDENTIAL
1
Images are light or blurred entirely.
• Is toner low (is the TONER LOW message displayed)?
• Yes
• No
Supply toner.
Is paper of the specified grade being used?
• No
• Yes
Use paper of the specified grade.
Is the lens surface of the LED head dirty?
• Yes
• No
Clean the lens.
Is the LED head being installed properly (check the
HEAD connector of the main control board and PC
connector on the LED head for proper connection)?
• No
• Yes
PC connector
Is the contact plate of the transfer roller in contact with the
contact assembly of the power supply/sensor board properly (see Figure 5-5)?
HEAD Main control board
Adjust the contact plate of the transfer roller to make a proper contact with the high
voltage/sensor board and shaft of the transfer roller.
Are the contact of the developing roller and the contact of the toner supply roller of the image
drum cartrige in contact with the contact assembly properly (see Figure 5-4 A and B )?
• No
• Yes
LED head cable
Install the LED head properly.
• No
• Yes
LED head
Adjust the contacts of the developing and toner supply roller to make a proper contact
with the contact assembly.
Replace the transfer roller.
• Has the problem been solved?
• Yes
• No
End
Replace the image drum cartridge.
• Has the problem been solved?
• Yes
End
Note:
• No
After replacing the image drum cartridge, reset the drum counter (see User's
Manual).
Is the tension between the back-up roller (7.52kg) and the surface of back-up roller normal?
• No
• Yes
42641101TH Rev.1
Replace the back-up roller or bias spring.
Replace the main control board or high voltage/sensor board.
68 /
Oki Data CONFIDENTIAL
2
Dark background density
• Has the image drum been exposed to external light?
• Yes
• No
Install the image drum in the printer and wait about 30 minutes.
Perform the cleaning page function (see Section 4.2.2).
• Has the problem been solved?
• Yes
• No
End
Is the heat roller of the fusing unit dirty?
• Yes
• No
Clean the heat roller.
Is the contact of the cleaning roller of the image drum cartridge in contact with the contact
assembly properly (see Figure 5-4 C )?
• No
• Yes
Adjust the contact of the cleaning roller to make a proper contact with the contact
assembly.
Replace the image drum cartridge.
• Has the problem been solved?
• Yes
End
Note:
• No
3
After replacing the image drum cartridge, reset the drum counter (see User's
Manual).
Replace the main control board or high voltage/sensor board.
Blank paper is output.
• Is the LED head being connected properly (check the HEAD connector on the main control board and
PC connector on the LED head)?
• No
• Yes
Connect the LED head properly or replace the head cable.
Is the contact of the image drum cartrige in proper contact with the ground contact properly (see
Figure 5-4 C )?
• No
• Yes
Adjust the ground contact (Drum) of the contact assembly.
Replace the LED head.
• Has the problem been solved?
• Yes
• No
End
Replace the main control board or high voltage/sensor board.
42641101TH Rev.1
69 /
Oki Data CONFIDENTIAL
4
Black vertical belts or stripes
• Perform the cleaning page function (see Section 4.2.2).
• Has the problem been solved?
• Yes
• No
End.
Replace the image drum cartridge.
• Has the problem been solved?
• Yes
End
Note:
After replacing the image drum cartridge, reset the drum counter (see User's
Manual).
• Clean the LED lens array of the LED head.
• Has the problem been solved?
• Yes
• No
End.
Replace the LED head.
• Has the problem been solved?
• Yes
• No
5
End
Replace the main control board or high voltage/sensor board.
Cyclical defect
Frequency
Remedy
Image drum
3.71" (94.2mm)
Replace or clean the image drum cartridge.
Developing roller
1.86" (47.12mm)
Replace the image drum cartridge.
Toner supply roller
2.96" (75.27mm)
Replace the image drum cartridge.
Charging roller
1.21" (30.63mm)
Replace the image drum cartridge.
Cleaning roller
0.93" (23.56mm)
Replace the image drum cartridge.
Transfer roller
1.95" (49.6mm)
Replace the transfer roller.
Heat roller
2.44" (62.0mm)
Replace the fusing unit assy.
Back-up roller
2.73" (69.4mm)
Replace the back-up roller.
Notes:
42641101TH Rev.1
After replacing the image drum cartridge, reset the drum counter (see User's Manual).
70 /
Oki Data CONFIDENTIAL
6
Prints voids
• Is the contact plate of the transfer roller in proper contact with the high voltage/sensor board (see Figure
5-5)?
• No
• Yes
Adjust the contact plate so that it touches the high voltage/sensor board and the shaft
of the transfer roller properly.
Replace the transfer roller.
• Has the problem been solved?
• Yes
• No
End
Is the tension between the back-up roller (7.52kg) and the surface of back-up roller normal?
• No
• Yes
Replace the back-up roller or bias spring.
Are the contacts of the toner supply roller, developing roller, image drum and charging roller
in proper contact with the contact assy (see Figure 5-4 A , B , C , D , E )?
• No
• Yes
Adjust the contacts so that they touch the contact assy properly.
Replace the image drum cartridge.
• Has the problem been solved?
• Yes
End
Note:
• No
After replacing the image drum cartridge, reset the drum counter (see User's
Manual).
Is the LED head being installed properly (check HEAD connector on the main control board
and PC Connector on the LED head)?
• No
• Yes
Install the LED head properly.
Replace the LED head or the head cable.
• Has the problem been solved?
• Yes
End
• No
Replace the main control board or high voltage/sensor board.
42641101TH Rev.1
71 /
Oki Data CONFIDENTIAL
7
Poor fusing (images are blurred or peels off when the printed characters and images on the paper are touched by hand)
• Is paper of the specified grade being used?
• No
• Yes
Use paper of the specified grade.
Is the tension between the back-up roller (7.52kg) and the surface of back-up roller normal?
• No
• Yes
Replace the back-up roller or bias spring.
Is the connector of the fusing unit assy on the power supply board being connected properly?
• No
• Yes
Connect the fusing unit connector properly.
Replace the fusing unit assy.
• Has the problem been solved?
• Yes
• No
End
Replace the main control board or power supply board.
42641101TH Rev.1
72 /
Oki Data CONFIDENTIAL
8
White vertical belts or streaks
• Are the LED lens dirty?
• Yes
• No
Clean the LED lens.
Is the contact plate of the transfer roller in proper contact with the high voltage/sensor board
(see Figure 5-5)?
• No
• Yes
Adjust the contact plate to make a proper contact with the high voltage/sensor board.
Replace the transfer roller.
• Has the problem been solved?
• Yes
• No
End
Is the tension between the back-up roller (7.52kg) and the surface of back-up roller normal?
•No
• Yes
Replace the back-up roller or bias spring.
Is the LED head being installed properly (check HEAD connector on the main control board
and PC connector on the LED head)?
• No
• Yes
Install the LED head properly.
Replace the LED head.
• Has the problem been solved?
• Yes
• Yes
End
Replace the image drum cartridge.
• Has the problem been solved?
• Yes
End
Note:
• No
After replacing the image drum cartridge, reset the drum counter (see User's
Manual).
Replace the main control board or high voltage/sensor board.
42641101TH Rev.1
73 /
42641101TH Rev.1
A
ller
g Ro
n
i
p
e lo
Dev
ler
Rol
g
C
n
ler
ani
Rol
Cle
y
l
pp
r Su
B
e
n
To
D
E
er
e Roll
Charg
rum)
Ground (D
Contacts
Oki Data CONFIDENTIAL
Figure 5-4
74 /
Oki Data CONFIDENTIAL
Contact plate
for transfer roller
Contact
High voltage/sensor board
Figure 5-5
42641101TH Rev.1
75 /
RM
DM
FAN
Pulse Motor
(Registration)
42641101TH Rev.1
Pulse Motor
(Main)
FAN
CN2
to Fuser Unit
(supplies AC)
CN1
High Voltage / Sensor Board
CN1
HVIF
S11
S10
S9
S8
S7
S5/S6
THERM
HEAD
LCDPNL
to Thermister in Fuser Unit
TR
CH
GND
CB
DB
SB
LED Head Unit
Assy
CN Operator Panel
High Voltage Output
Network I/F
Interconnect Signal Diagram
PW_2
CN2
6.1
Power Supply Board
(Low Voltage)
PW_1
*1
OPTION
CN1
Network Board
WIRING DIAGRAM
ROM DIMM
ROM-DIMM
RAM DIMM
*1
Main Control Board
CENT
USB
*1
2ND
TRAY
ENVE
LOPE
Centronics I/F
USB I/F
RAM-DIMM
Second *1
Paper
Feeder
Multi *1
Purpose
Feeder
6.
AC
Input
HM
Pulse Motor
(Hopping)
*1: Option
Oki Data CONFIDENTIAL
76 /
Oki Data CONFIDENTIAL
6.2
PCB Layout and Connector Signal List
(1) Main Control Board (GRV-2 PCB)
Printer front side
LED Head
Operator panel
Printer front side
Contact face
Contact face
Printer front side
14 – 1
1– 26
42641101TH Rev.1
77 /
Oki Data CONFIDENTIAL
(2) Power Supply Board/High Voltage and Sensor Board
CN1
CN2
PS1
PS2
PS3
CN1
PS4
SW2
PS5
PS6
42641101TH Rev.1
78 /
Oki Data CONFIDENTIAL
•
HEAD Connector Pin Assignment
(To LED head)
1
2
3
4
5
6
7
8
9
10
11
12
13
14
15
16
17
18
19
20
21
22
23
24
PIN NO.
I/O*
Signal
Function
1
C
SG
Ground for Logic
2
O
HDCLK-P
Clock
3
C
HDCLK-N
Clock
4
C
SG
Ground for Logic
5
O
HDLD
Load
6
O
HDSTB1
Hsync/CSN
7
O
HDDATA3
Data 3
8
O
HDDATA2
Data 2
9
O
HDDATA1
Data 1
10
O
HDDATA0
Data 0
11
O
HDSTB0
Strobe/SI
12
O
HDSTB3
SCLK
13
O
HDSTB2
SO
14
O
+3.3V
+3.3V for Logic
15
C
0VPHD
Ground for LED
16
O
HEAD
+5V for LED
17
C
0VPHD
Ground for LED
18
O
HEAD
+5V for LED
19
C
0VPHD
Ground for LED
20
O
HEAD
+5V for LED
21
C
0VPHD
Ground for LED
22
O
HEAD
+5V for LED
23
C
0VPHD
Ground for LED
24
O
HEAD
+5V for LED
* O: Out
C: Common
42641101TH Rev.1
79 /
Oki Data CONFIDENTIAL
•
LCDPNL Connector Pin Assignment
(To Operator Panel)
1
2
3
4
5
6
7
8
9
10
11
12
13
14
PIN NO.
I/O*
Signal
Function
1
O
+5V
+5V
2
O
LED-P
LED ON
3
I
SW-DATA1
Switch Data 1
4
I
SW-DATA0
Switch Data 0
5
O
LCD_D3
LCD Data 3
6
C
SG
Ground
7
O
LCD_D2
LCD Data 2
8
O
LCD_D1
LCD Data 1
9
O
LCD_D0
LCD Data 0
10
O
LCD_IRN
LCD Register Select
11
O
LCD_WRN
LCD Write/Read
12
O
LCD_E
LCD Enable
13
I
SW-DATA2
Switch Data 2
14
I
SW-DATA3
Switch Data 3
* I: In
O: Out
C: Common
42641101TH Rev.1
80 /
Oki Data CONFIDENTIAL
•
2NDTRAY Connector Pin Assignment
(To 2nd Tray)
PIN NO.
I/O*
Signal
Function
5
8
1
O
OPPAP-N
Paper Sensor 1
2
7
2
O
OPSCK-N
Clock
1
4
3
O
OPSD-N
Data
3
6
4
I
OPSDP-N
OPT send data
5
C
OVP
Analog Ground
6
O
+38V
+38V
7
C
SG
Logic Ground
8
O
+5VA
+5V
* I: In
O: Out
C: Common
42641101TH Rev.1
81 /
Oki Data CONFIDENTIAL
•
HVIF Connector Pin Assignment
(To High Voltage Unit/Sensor Board)
1
2
3
4
5
6
7
8
9
10
11
12
13
14
15
16
17
18
19
20
21
22
23
24
25
26
27
28
29
30
PIN NO.
I/O*
Signal
Function
1
I
WRSNS-N
Write Sensor
2
I
IN1SNS-N
Paper Sensor 1
3
I
TONER-N
Toner Sensor
4
I
IN2SNS-N
Paper Sensor 2
5
I
PAPER-N
Paper Out Sensor
6
C
SG
Ground
7
O
SBPWN-P
SB2 Output
8
O
CB2PWN-P
CB2 Output
9
O
DB1PWM
DB1 Output
10
C
SG
Ground
11
O
CB1PWM
Cb1 Output
12
C
SG
Ground
13
I
TRI_FB
TR1 Current Feedback
14
I
TRV_FB
TR1 Voltage Feedback
15
I
DB2_V_FB
DB2 Voltage Feedback
16
I
CHI
CH Current Feedback
17
I
CH_V_FB
CH Voltage Feedback
18
I
DB_I
DB Current Feedback
19
I
SB_V_FB
SB2 Voltage Feedback
20
C
SG
Ground
21
O
CHPWM-P
CH Output Control
22
O
DB2PWM
DB2 Output
23
O
TR2PWM-P
TR2 output
24
O
TR1PWM-P
TR1 Output Control
25
O
+5V
+5V
26
O
+5V
+5V
27
C
SG
Ground
28
C
SG
Ground
29
I
OUTSNS-N
Out Sensor
30
I
CVOPN-N
Cover Open
* I: In
O: Out
C: Common
42641101TH Rev.1
82 /
Oki Data CONFIDENTIAL
• PW_1 Connector Pin Assignment
(To Power Supply Unit)
PIN NO.
I/O*
Signal
Function
1
1
I
+38V
+38V
2
2
I
+38V
+38V
3
3
C
0VP
Analog Ground
4
4
C
0VP
Analog Ground
5
5
I
0VPHD
Ground for LED
6
6
I
0VPHD
Ground for LED
7
7
I
HEAD
+5V for LED
8
8
I
HEAD
+5V for LED
* I: In
O: Out
C: Common
•
PW_2 Connector Pin Assignment
(To Power Supply Unit)
PIN NO.
I/O*
Signal
Function
1
1
C
SG
Ground for Logic
2
2
C
SG
Ground for Logic
3
3
I
+5V
+5V for Logic
4
4
I
+5V
+5V for Logic
5
5
O
HEATON_N
Heater On
* I: In
O: Out
C: Common
•
THERM Connector Pin Assignment
(To Thermistor)
PIN NO.
I/O*
Signal
Function
1
1
O
+5V
+5V
2
2
I
THERM
Heater
* I: In
O: Out
42641101TH Rev.1
83 /
Oki Data CONFIDENTIAL
•
OPTION Connector Pin Assignment
(To Option Board [Network or RS232C])
41
43
45
47
49
51
53
55
57
59
61
63
65
67
69
71
73
75
77
79
42
44
46
48
50
52
54
56
58
60
62
64
66
68
70
72
74
76
78
80
01
03
05
07
09
11
13
15
17
19
21
23
25
27
29
31
33
35
37
39
02
04
06
08
10
12
14
16
18
20
22
24
26
28
30
32
34
36
38
40
Pin No. I/O*
Signal
01
C SG
02
C SG
03
O PPGNT0-N
04
I/O PPDVSL-N
05
I/O PPTRDY-N
06
I/O PPFRM-N
07
NC
08
NC
09
NC
10
O OPSCC_RXD
11
O OPSCC_DSR
12
I/O PPC_BE3
13
I/O PPC_BE1
14
I
PRINT0-N
15
O PERIWR-N
16
O NICFROM_CS
17
I/O SDT22
18
I/O SDT20
19
C SG
20
C SG
21
I/O SDT18
22
I/O SDT16
23
I/O SDT25
24
I/O SDT27
25
I/O SDT29
26
I/O SDT31
27
I/O SDT9
28
I/O SDT11
29
I/O SDT13
30
I/O SDT15
31
I/O SDT6
32
I/O SDT4
33
I/O SDT2
34
I/O SDT0
35
I
OPNIC-N
36
O RESET-N
37
NC
C SG
38
39
C SG
40
O +5V
Function
Pin No. I/O*
Signal
Ground
41
C SG
Ground
42
C SG
Bus Grant (PCI)
43
I/O PPPERR-N
Device select (PCI)
44
I/O PPSERR-N
Target Ready (PCI)
45
I/O PPSTOP-N
Frame (PCI)
46
I/O PPIRDY-N
N.C.
47
I/O PPPAR
N.C.
48
NC
N.C.
49
NC
RXD (RS232C)
50
OPSCC_TXD
I
DSR (RS232C)
51
I
OPSCC_DTR
Command/Byte Enable 3 (PCI) 52
O PPCLK0
Command/Byte Enable 1 (PCI) 53
I/O PPC_BE2
Interrupt (PCI)
54
I/O PPC_BE0
FlashROM Write Enable
55
I
PPREQ0-N
FlashROM Chip Select
56
O PERIRD-N
AD Bus 22
57
I/O SDT23
AD Bus 20
58
I/O SDT21
Ground
59
C SG
Ground
60
C SG
AD Bus 18
61
I/O SDT19
AD Bus 16
62
I/O SDT17
AD Bus 25
63
I/O SDT24
AD Bus 27
64
I/O SDT26
AD Bus 29
65
I/O SDT28
AD Bus 31
66
I/O SDT30
AD Bus 9
67
I/O SDT8
AD Bus 11
68
I/O SDT10
AD Bus 13
69
I/O SDT12
AD Bus 15
70
I/O SDT14
AD Bus 6
71
I/O SDT7
AD Bus 4
72
I/O SDT5
AD Bus 2
73
I/O SDT6
AD Bus 0
74
I/O SDT1
NIC Detect
75
I
OPNICSW-N
Reset
76
I
OPSCC-N
N.C.
77
C SG
Ground
78
C SG
Ground
79
O +5V
+5V
80
O +5V
Function
Ground
Ground
Parity Error (PCI)
System Error (PCI)
Stop (PCI)
Initiator Ready
Parity (PCI)
N.C.
N.C.
TXD (RS232C)
DTR (RS232C)
Clock (PCI)
Command/Byte Enable 2 (PCI)
Command/Byte Enable 0 (PCI)
Bus Request (PCI)
FlashROM Read Enable
AD Bus 23
AD Bus 21
Ground
Ground
AD Bus 19
AD Bus 17
AD Bus 24
AD Bus 26
AD Bus 28
AD Bus 30
AD Bus 8
AD Bus 10
AD Bus 12
AD Bus 14
AD Bus 7
AD Bus 5
AD Bus 3
AD Bus 1
NIC Push Switch
RS232C Detect
Ground
Ground
+5V
+5V
* O : Out
I : In
C : Common
•
FAN Connector Pin Assignment
(To Fan)
PIN NO.
I/O*
Signal
Function
1
1
O
FANPOW
Power Supply for Fan driving
2
2
C
SG
Ground
3
3
I
FANALM-P
Fan Alarm
* I: In
O: Out
C: Common
42641101TH Rev.1
84 /
Oki Data CONFIDENTIAL
•
USB Connector Pin Assignment
(USB I/F)
PIN NO.
I/O*
Signal
Description
VCC
VCC
I/O
D-
D-
3
I/O
D+
D+
4
C
SG
Ground
1
3
1
I
2
4
2
* I: In
O: Out
C: Common
•
CENT Connector Pin Assignment
(IEEE1284 I/F)
Pin No. I/O*
Signal
Function
Pin No. I/O*
Signal
Function
1
19
1
I
STB-N
Strobe
19
C
SG
Logic Ground
2
20
2
C
DATA0-P
Data0
20
C
SG
Logic Ground
3
21
3
C
DATA1-P
Data1
21
C
SG
Logic Ground
4
22
4
C
DATA2-P
Data2
22
C
SG
Logic Ground
5
23
5
C
DATA3-P
Data3
23
C
SG
Logic Ground
6
24
6
C
DATA4-P
Data4
24
C
SG
Logic Ground
7
25
7
C
DATA5-P
Data5
25
C
SG
Logic Ground
8
26
8
C
DATA6-P
Data6
26
C
SG
Logic Ground
9
27
9
C
DATA7-P
Data7
27
C
SG
Logic Ground
10
28
10
O
ACK-N
Acknowledge
28
C
SG
Logic Ground
11
29
11
O
BUSY-P
Busy
29
C
SG
Logic Ground
12
30
12
O
PE-P
Paper End
30
C
SG
Logic Ground
13
31
13
O
SEL-P
Select
31
I
IPRIM-N
Iprime
14
32
14
I
AUTOFEED-N Auto Feed
32
O
FAULT-N
Fault
15
33
15
NC
N.C.
33
C
SG
Logic Ground
16
34
16
C
SG
Logic Ground
34
NC
N.C.
17
35
17
C
FG
Frame Ground
35
O
HILEVEL
High Level
18
36
18
O
5VA
+5V
36
I
SELIN-N
Select In
* O : Out
I : In
C : Common
42641101TH Rev.1
85 /
Oki Data CONFIDENTIAL
•
HM Connector Pin Assignment
(To Hopping Motor)
PIN NO.
I/O*
Signal
Function
1
1
O
HMPH1-P
Coil 1-P
2
2
O
HMPH1-N
Coil 1-N
3
3
O
HMPH2-P
Coil 2-P
4
4
O
HMPH2-N
Coil 2-N
PIN NO.
I/O*
Signal
1
1
O
RMPH1-P
Coil 1-P
2
2
O
RMPH1-N
Coil 1-N
3
3
O
RMPH2-P
Coil 2-P
4
4
O
RMPH2-N
Coil 2-N
PIN NO.
I/O*
Signal
1
1
O
DMPH1-P
Coil 1-P
2
2
O
DMPH1-N
Coil 1-N
3
3
O
DMPH2-P
Coil 2-P
4
4
O
DMPH2-N
Coil 2-N
* O: Out
•
RM Connector Pin Assignment
(To Resistration Motor)
Function
* O: Out
•
DM Connector Pin Assignment
(To Main Motor)
Function
* O: Out
42641101TH Rev.1
86 /
Oki Data CONFIDENTIAL
•
ROM_DIMM Connector Pin Assignment
01
03
05
07
09
11
13
15
17
19
21
23
25
27
29
31
33
35
02
04
06
08
10
12
14
16
18
20
22
24
26
28
30
32
34
36
Pin No. I/O* Signal
01
C SG
02
NC
03
NC
04
NC
05
NC
06
NC
07
NC
08
NC
09
NC
10
O +3.3V
11
NC
12
NC
13
NC
14
NC
15
C SG
16
C SG
17
NC
18
NC
19
NC
20
NC
21
I/O DBUS11
22
I/O DBUS4
23
I/O DBUS3
24
I/O DBUS12
25
I/O DBUS10
26
I/O DBUS5
27
C SG
28
C SG
29
I/O DBUS2
30
O +3.3V
31
I/O DBUS9
32
I/O DBUS13
33
I/O DBUS1
34
I/O DBUS6
35
I/O DBUS8
36
I/O DBUS14
Function
Ground
N.C.
N.C.
N.C.
N.C.
N.C.
N.C.
N.C.
N.C.
+3.3V
N.C.
N.C.
N.C.
N.C.
Ground
Ground
N.C.
N.C.
N.C.
N.C.
Data Bus 11
Data Bus 4
Data Bus 3
Data Bus 12
Data Bus 10
Data Bus 5
Ground
Ground
Data Bus 2
+3.3v
Data Bus 9
Data Bus 13
Data Bus 1
Data Bus 6
Data Bus 8
Data Bus 14
37
39
41
43
45
47
49
51
53
55
57
59
61
63
65
67
69
71
38
40
42
44
46
48
50
52
54
56
58
60
62
64
66
68
70
72
Pin No. I/O*
Signal
37
I/O DBUS0
38
I/O DBUS7
39
C SG
40
C SG
41
O WBEN0
42
I/O DBUS15
43
O CPU_CS3-N
44
O CPU_OE-N
45
O ABUS14
46
O CPU_CS2-N
47
O ABUS15
48
O ABUS30
49
O ABUS16
50
O ABUS29
51
O ABUS17
52
O ABUS28
53
O ABUS18
54
O ABUS27
55
O ABUS19
56
O ABUS26
57
O ABUS20
58
O ABUS25
59
O ABUS21
60
O ABUS24
61
O +3.3V
62
O ABUS23
63
O ABUS22
64
O ABUS13
65
O ABUS11
66
O ABUS12
67
O ABUS10
68
O ABUS9
69
O ABUS8
70
O ABUS7
71
O RESET-N
72
C SG
Function
Data Bus 0
Data Bus 7
Ground
Ground
Write Enable
Data Bus 15
Chip select 3
Output Enable
Address Bus 14
Chip select 2
Address Bus 15
Address Bus 30
Address Bus 16
Address Bus 29
Address Bus 17
Address Bus 28
Address Bus 18
Address Bus 27
Address Bus 19
Address Bus 26
Address Bus 20
Address Bus 25
Address Bus 21
Address Bus 24
+3.3v
Address Bus 23
Address Bus 22
Address Bus 13
Address Bus 11
Address Bus 12
Address Bus 10
Address Bus 9
Address Bus 8
Address Bus 7
Reset
Ground
* O : Out
I : In
C : Common
42641101TH Rev.1
87 /
Oki Data CONFIDENTIAL
•
RAM_DIMM Connector Pin Assignment
01
03
05
07
09
11
13
15
17
19
21
23
25
27
29
31
33
35
02
04
06
08
10
12
14
16
18
20
22
24
26
28
30
32
34
36
Pin No. I/O* Signal
01
C SG
02
NC
03
NC
04
NC
05
NC
06
NC
07
NC
08
NC
09
NC
10
O +3.3V
11
NC
12
NC
13
NC
14
NC
15
C SG
16
C SG
17
NC
18
NC
19
PERIRD-N
20
NC
21
NC
22
O RAM_CS2-N
NC
23
24
O SAD3
25
O RAM_CLK1
26
O SAD2
27
C SG
28
C SG
29
O SAD4
30
O +3.3V
31
O SAD5
32
O SAD1
33
O SAD6
34
O SAD0
35
O SAD7
36
O SAD10
Function
Ground
N.C.
N.C.
N.C.
N.C.
N.C.
N.C.
N.C.
N.C.
+3.3V
N.C.
N.C.
N.C.
N.C.
Ground
Ground
N.C.
N.C.
N.C.
N.C.
N.C.
Chip select 2
N.C.
Address Bus 3
Clock
Address Bus 2
Ground
Ground
Address Bus 4
+3.3v
Address Bus 5
Address Bus 1
Address Bus 6
Address Bus 0
Address Bus 7
Address Bus 10
37
39
41
43
45
47
49
51
53
55
57
59
61
63
65
67
69
71
38
40
42
44
46
48
50
52
54
56
58
60
62
64
66
68
70
72
Pin No. I/O*
Signal
37
O SAD8
38
O SAD13
39
C SG
40
C SG
41
O SAD9
42
O SAD12
43
O SAD11
44
O RAM_CS1-N
45
PERIWR-N
46
O RAM_RAS-N
47
O RAM_CKE-N
48
C SG
49
O RAM_CLK1
50
O RAM_CAS-N
51
O RAM_DQM1
52
O RAM_WE-N
53
I/O SDT8
54
O RAM_DQM0
55
I/O SDT9
56
I/O SDT7
57
I/O SDT10
58
I/O SDT6
59
I/O SDT11
60
I/O SDT5
61
O +3.3V
62
I/O SDT4
63
I/O SDT12
64
I/O SDT3
65
I/O SDT13
66
I/O SDT2
67
I/O SDT14
68
I/O SDT1
69
I/O SDT15
70
I/O SDT0
71
I
OPRAM-N
72
C SG
Function
Address Bus 8
Address Bus 13
Ground
Ground
Address Bus 9
Address Bus 12
Address Bus 11
Chip select 1
Address Bus 14
Row Address
Clock Enable
Ground
Clock
Column Address Strobe
Byte Enable 1
Write Enable
Data Bus 8
Write Enable 0
Data Bus 9
Data Bus 7
Data Bus 10
Data Bus 6
Data Bus 11
Data Bus 5
+3.3v
Data Bus 4
Data Bus 12
Data Bus 3
Data Bus 13
Data Bus 2
Data Bus 14
Data Bus 1
Data Bus 15
Data Bus 0
RAM-DIMM Detect
Ground
* O : Out
I : In
C : Common
42641101TH Rev.1
88 /
42641101TH Rev.1
Hopping motor
Main/drum motor
4
3
2
1
4
3
2
1
4
3
2
1
Black
Brown
Yellow
Orange
Black
Brown
Yellow
Orange
Black
Brown
Yellow
Orange
Circuit Diagram
M
M
M
White
White
Yellow
Illustration
Between Pins 1 and 2: 10.3Ω
Between Pins 3 and 4: 10.3Ω
Between Pins 1 and 2: 8.6Ω
Between Pins 3 and 4: 8.6Ω
Between Pins 1 and 2: 7.9Ω
Between Pins 3 and 4: 7.9Ω
Resistance
6.3
Registration motor
Unit
Oki Data CONFIDENTIAL
Resistance Check
89 /
42641101TH Rev.1
Fan
Fusing unit
Unit
Red
1
+30 V
Black
2
0V
3
FANALM-N
4
3
2
1
Thermostat
Thermistor
Heater
Circuit Diagram
M
2
1
Illustration
3
4
Between Pins 1 and 2: 120V 2Ω
240V 7Ω
Between Pins 3 and 4: 200KΩ
(at room temperature)
Resistance
Oki Data CONFIDENTIAL
90 /
Oki Data CONFIDENTIAL
APPENDIX A
RS-232C SERIAL INTERFACE (option)
1) Connector
•
Printer side
:
•
Cable side
:
25-pin receptacle
Type DB-25S (made by Canon) or equivalent
25-pin plug
Type DB-25S (made by Canon)
Shell
Type DB-C8-J10-F2-1 (made by Nihon Kouku Denshi) or equivalent
Note: Plug shall be fixable with a lock screw.
2) Cable
•
Cable length :
6 ft (1.8 m) max. (cable shall be shielded)
Note: Cable is not provided.
3) Interface signal
Pin No.
Signal name
Abbreviation Signal direction
Functions
1
Frame Ground
FG
Frame Ground
2
Transmitted Data
TD
PR
Transmitted Data
3
Received Data
RD
PR
Received Data
4
Request to Send
RTS
PR
Stay space level
5
-
(Not connected)
6
-
(Not connected)
7
Signal Ground
SG
Signal Ground
9
(Not connected)
18
-
(Not connected)
19
-
(Not connected)
~
-
17
20
Data Terminal Ready
DTR
PR
Data terminal ready
~
21
-
(Not connected)
25
•
Connector pin arrangement
13
1
25
14
(View from the cable side)
When the Ready/Busy protocol is used for the buffer busy control method, the busy signal can be
set to Pin-20 (DTR) in the menu.
42641101TH Rev.1
91 /
Oki Data CONFIDENTIAL
4) Signal Level
• MARK polarity :
• SPACE polarity :
-3V to -15V (LOGIC = 1)
+3V to +15V (LOGIC = 0)
5) Interface Circuit
a)
Receiving Circuit
14C232 or equivalent
INPUT
OUTPUT
+12V
+3V
-3V
-12V
INPUT
b)
Sending Circuit
14C232 or equivalent
OUTPUT
INPUT
OUTPUT
+3V
45 ns
-3V
55 ns
+9V
-9V
Note: The signal levels described above is for the case where 3K Ω x 15pF is connected to the
terminal.
6) Receive Margin
37% min. at all reception rates.
7) Communications Protocol
a)
b)
READY/BUSY protocol
X-ON/X-OFF protocol
42641101TH Rev.1
92 /
Oki Data CONFIDENTIAL
8) Interface Parameter Setting
Press MENU key several times.
Press ITEM key to display the item on the LCD to set up.
Press VALUE key to display the value on the LCD to set up.
Press SELECT key, and display "*" mark on the right side of the value:
By pressing the ON LINE key, menu setting mode is completed and the printer returns to online state.
Ready
ON-LINE
XXX
XXX : PCL, AUTO, PSE*, HEX DUMP, PRR or FX
* PSE means POSTSCRIPT 3 EMULATION.
Press the MENU key 9 times.
Ready
Ready
RS232C
MENU
RS232C
"RS232C MENU" is displayed on the LCD.
Press the SELECT key.
Item
Contents of Display
ENABLE
DISABLE
RS232C I/F
Function
ENABLE
DISABLE
Factory Setting: ENABLE
Press the ITEM + key.
Ready
FLOW CTL
Item
Flow CTL
Contents of Display
Function
SPACE-READY
DTR HI
MARK-READY
DTR LO
XONXOFF
Sending at intervals of 1 sec.
RbstXON
Factory Setting: DTR HI
Press the ITEM + key.
42641101TH Rev.1
93 /
Oki Data CONFIDENTIAL
Ready
BAUDRATE
Item
Contents of Display
300
600
1200
2400
4800
9600
19200
38400
57600
76800
115200
Baud Rate
Function
300 baud
600 baud
1200 baud
2400 baud
4800 baud
9600 baud
19200 baud
38400 baud
57600 baud
76800 baud
115200 baud
Factory Setting: 9600 baud
Press the ITEM + key.
Ready
DATABITS
Item
Contents of Display
8 BITS
7 BITS
Factory Setting: 8 bit
Bit Length
Function
8 bits
7 bits
Press the ITEM + key.
Ready
PARITY
Item
Parity
Contents of Display
Function
No parity
NONE
Even parity
EVEN
Odd parity
ODD
Factory Setting: NONE
Press the ITEM + key.
Ready
42641101TH Rev.1
MIN. BUSY
Item
Minimum BUSY Time
Contents of Display
Function
200 ms
200 m SEC
1 sec (1000 ms)
1 SEC
Factory Setting: 200 m SEC
(PCL only)
94 /
Oki Data CONFIDENTIAL
Press the ITEM + key.
Ready
Item
RS232C I/F OFF-LINE RECEIVE
Contents of Display
Function
ENABLE
ENABLE
DISABLE
DISABLE
OFF REC
Factory Setting: ENABLE
Press the ON LINE key.
Setting completed.
Ready
ON-LINE
XXX
XXX : PCL, AUTO, PSE, HEX DUMP, PRR or FX
42641101TH Rev.1
95 /
Oki Data CONFIDENTIAL
APPENDIX B
CENTRONICS PARALLEL INTERFACE
1) Connector
• Printer side
:
• Cable side
:
36-pin receptacle
(single port) Type 57RE-40360-730B-D29A (made by Daiichi Denshi), CNAX05841A36AT (made by Ougat) or equivalent
36-pin plug
Type 57-30360 (made by Daiichi Denshi) or equivalent
Plug-552274-1 (AMP), 552073-1 (AMP) or equivalent
2) Cable
• Cable length : 6 ft (1.8 m) max.
(A Shielded cable composed of twisted pair wires is recommended for noise prevention.)
Note: Cable is not supplied with the printer, and is not available from Oki.
42641101TH Rev.1
96 /
Oki Data CONFIDENTIAL
3) Table of Parallel I/F Signals
Pin No.
Signal name
1
DATA STROBE
2
DATA BIT - 1
3
DATA BIT - 2
4
DATA BIT - 3
5
DATA BIT - 4
6
DATA BIT - 5
7
DATA BIT - 6
8
DATA BIT - 7
9
DATA BIT - 8
Signal direction
Functions
PR
Parallel data sampling strobe
PR
PR Parallel input and output data
10
ACKNOWLEDGE
PR
Completion of data input or end of a
function
11
BUSY
PR
During print processing or alarm
12
PAPER END
PR
End of paper
13
SELECT
PR
Select state (ON-LINE)
14
AUTOFEED
PR
Request to change mode
15
-
16
0V
Signal ground
17
CHASSIS
GROUND
Chassis ground
18
+5V
19
:
:
30
0V
31
INPUT PRIME
PR
Initializing signal
32
FAULT
PR
End of paper or during alarm
(Not used)
PR
50 mA max.
Signal ground
33
-
Signal ground
34
-
(Not used)
35
-
High level (3.3 kΩ)
36
SELECT IN
PR
Request to change mode
• Connector pin arrangement
42641101TH Rev.1
97 /
Oki Data CONFIDENTIAL
4) Signal Level
• INPUT
Low :
High :
• OUTPUT
Low :
High :
0 V to +0.4 V
+2.4 V to 5.0 V
0 V to +0.4 V
+2.0 V to 5.0 V
5) Specifications
Item
Description
Mode
Compatibility mode, Nibble mode, ECP mode
Data bit length
8 bits (in the compatibility mode)
Input prime
Valid/Invalid
Receive buffer
0.1M, 0.2M, 0.5M Bytes
Control
Handshaking control is performed in each mode.
Data received from the host is stored in the receive buffer.
Busy control is performed.
Signal lead control is performed.
6) Interface circuit
a)
Receiving circuit
LVC161284
b) Sending circuit
LVC161284
c) Other
+5V
35Pin
42641101TH Rev.1
98 /
Oki Data CONFIDENTIAL
7) Timing charts
a) Power-ON (Menu Setting: PARALLEL=ENABLE)
Power ON
Printer
Status
PError
nAck
Busy
nFault
Select
Power OFF
Notice of Transition to On-line
Initializing H/W
Initializing F/W
Idle
Initializing F/W
DISABLE
H
L
H
L
H
L
H
L
H
L
b) Power-ON (Menu Setting: PARALLEL=DISABLE)
Power ON
Printer
Status
PError
nAck
Busy
nFault
Select
Power OFF
Initializing H/W
H
L
H
L
H
L
H
L
H
L
c) Data Reception (Menu Setting: Ack/Busy Timing=Ack in Busy)
nStrobe
Busy
nAck
42641101TH Rev.1
H
L
H
L
H
L
T(ACK)
Menu Setting
(Ack Width)
NARROW
MEDIUM
WIDE
T(ACK )
0.5µs
1.0µs
3.0µs
99 /
Oki Data CONFIDENTIAL
d) Data Reception (Menu Setting: Ack/Busy Timing=Ack while Busy)
nStrobe
Busy
nAck
H
L
H
L
H
L
T(ACK)/2
T(ACK)/2
* The T (ACK) values are the same as those shown in the section c).
e) I-Prime (Not at menu-set I-PRIME=DISABLE)
I/F Initialization
Printer
Status
nInit
Busy
Idle
Clearing Send/Receive Buffer
Canceling Job
Idle
H
L
H
L
T(INIT)
f)
Menu Setting
(I-PRIME)
3 MICRON SEC
50 MICRON SEC
T(INIT )
2.0µs
33.3µs
Off-line
Notice of Transition to Off-line
Printer
Status
Busy
PError
nFault
Select
42641101TH Rev.1
Idle
Notice of Transition to On-line
Off-line
On-line
H
L
H
L
H
L
H
L
100 /
Oki Data CONFIDENTIAL
g) Paper-End
Notice of Transition to Paper-End Notice of Transition to On-line
Printer
Status
Busy
PError
nFault
Select
Idle
Paper-End
On-line
H
L
H
L
H
L
H
L
h) Warning (Paper-end state is excluded)
Notice of Transition to Warning
Printer
Status
Busy
PError
nFault
Select
42641101TH Rev.1
Idle
Notice of Transition to On-line
Warning
On-line
H
L
H
L
H
L
H
L
101 /
Oki Data CONFIDENTIAL
7)
Interface Parameter Setting
The following settings are possible by pressing the SELECT key, after selecting the display
contents of the LCD of the operator panel by using the ITEM+ and ITEM- keys.
Settings are retained even when the printer power is turned off.
By pressing the ON LINE key, menu setting mode is completed and the printer returns to online state.
Ready
ON-LINE
XXX
XXX : PCL, AUTO, PSE, HEX DUMP, PRR or FX
Press the MENU key 8 times.
Ready
PARALLEL
MENU
"PARALLEL MENU" is displayed on the LCD.
Press the SELECT key.
Ready
PARALLEL
Item
Contents of Display
ENABLE
DISABLE
PARALLEL I/F
Function
ENABLE
DISABLE
Factory Setting: ENABLE
Press the ITEM + key.
42641101TH Rev.1
102 /
Oki Data CONFIDENTIAL
Ready
BI–DIRCT
Item
Direction of Data Transfer
Contents of Display
Function
Bi-directional data transmission
ENABLE
Uni-directional data transmission
DISABLE
Factory Setting: ENABLE
Press the ITEM + key.
Ready
ECP
Item
Contents of Display
ENABLE
DISABLE
ECP Mode
Function
ENABLE
DISABLE
Factory Setting: ENABLE
Press the ITEM + key.
Ready
ACKWIDTH
Item
Contents of Display
NARROW
MEDIUM
WIDE
ACK Width in compatible
Function
0.5µs
1.0µs
3.0µs
Factory Setting: NARROW
Press the ITEM + key.
Ready
ACK/BUSY
Press the ITEM + key.
42641101TH Rev.1
Item
Output order of BUSY and ACK signal
Contents of Display
Function
IN
ACK IN BUSY:
BUSY=LOW➝the end of
ACK pulse
WHILE
ACK WHILE BUSY:
BUSY=LOW➝Center of
ACK pulse
Factory Setting: IN
103 /
Oki Data CONFIDENTIAL
Ready
Item
Contents of Display
3µ SEC
50µ SEC
DISABLE
I–PRIME
I-PRIME
Function
Enabled with the 3µs nlnit signal
Enabled with the 50µs nlnit signal
DISABLE
Factory Setting: DISABLE
Press the ITEM + key.
Ready
Item
PARALLEL I/F OFF-LINE RECEIVE
Contents of Display
Function
ENABLE
ENABLE
DISABLE
DISABLE
OFF REC
Factory Setting: DISABLE
Press the ON LINE key.
Setting completed.
Ready
ON-LINE
XXX
XXX : PCL, AUTO, PSE, HEX DUMP, PRR or FX
42641101TH Rev.1
104 /
Oki Data CONFIDENTIAL
APPENDIX C
Universal Serial Bus (USB)
Universal Serial Bus Specification Revision 2.0 full speed compliance.
1)
Connector
• Printer Side
• Cable Side
2)
: “B” Receptacle (Upstream Input to the USB Device)
: Series “B” Plug
Cable
• Cable Length
: Max 5m (A cable must be met USB Spec Rev 1.1 for normal operation)
Note: Cable is not provided.
3)
Table of USB I / F signals
Contact
Number
1
2
3
4
Shell
4)
5)
Signal Name
Vbus
DD+
GND
Shield
Connector pin arrangement
2
1
3
4
Mode & Class of Device
• Full - speed Driver
• Self - powered Device
6)
Data Signaling Rate
• Full - speed function - 12Mb/s
7)
Interface circuit
TxD+
TxD-
Full-speed
Buffer
Rs
3.3 V
1.5 kΩ
Rs
Rs = 22 Ω
42641101TH Rev.1
105 /
Oki Data CONFIDENTIAL
8)
Signal Level
• Input / Output Level
Parameter
Input Levels :
High (driven)
High (floating)
Low
Output Levels :
Low
High (driven)
Output Signal Crossover Voltage
Symbol
Min.
VIH
VIHZ
VIL
2.0
2.7
OL
OH
VCRS
0.0
2.8
1.3
Max.
Units
3.6
0.8
V
V
V
0.3
3.6
2.0
V
V
V
• Signaling Levels
Signaling Levels
Required
Acceptable
Differential "1"
(D+) - (D-) > 200mV and D+ > VIH (min) (D+) - (D-) > 200mV
Differential "0"
(D-) - (D+) > 200mV and D- > VIH (min) (D-) - (D+) > 200mV
Single-ended 0 (SE0) D+ and D- < VIL (max)
D+ and D- < VIH (min)
Data J state:
Differential "0"
Low-speed
Differential "1"
Full-speed
Data K state:
Differential "1"
Low-speed
Differential "0"
Full-speed
Idle state:
D- > VIHZ (min) and D+ < VIL (max)
D- > VIHZ (min) and D+ < VIH (min)
Low-speed
Full-speed
D+ > VIHZ (min) and D- < VIL (max)
D+ > VIHZ (min) and D- < VIH (min)
Resume state
Data K state
Start-of-Packet (SOP) Data lines switch from Idle to K state
End-of-Packet (EOP) SE0 for ≥ 1 bit time1 followed by a J state SE0 for ≥ 1 bit time1 followed by a J state
for 1 bit time
Disconnect
SE0 for ≥ 2.5µs
(at downstream port)
Connect
Idle for ≥ 2ms
Idle for ≥ 2.5µs
(at downstream port)
Reset
D+ and D- < VIL (max) for ≥ 10ms
D+ and D- < VIL (max) for ≥ 2.5µs
Bus State
Note:
42641101TH Rev.1
The width of EOP is defined in bit times relative to the device type receiving the EOP. The
bit time is approximate.
106 /
Oki Data CONFIDENTIAL
9)
Timing Chart
a) Packet Voltage Levels
VOH (min)
VIH (min)
VIL (max)
VOL (max)
VSS
Bus Idle
SOP
First Bit
of Packet
Last Bit
of Packet
VOH (min)
VIH (min)
Bus Driven to
J State at end
of EOP
Bus
SE0
Floats
Portion
Bus Idle
of EOP
VIL (max)
VOL (max)
VSS
b) Disconnect Detection
VIHZ (min)
D+ / D-
VIL
VSS
D- / D+
≥2.5µS
Device
Connected
DisConnect
Detected
c) Full-speed Device Connect Detection
D+
VIH
VSS
D- / D+
D≥2.5µS
Device
Connected
Connect
Detected
d) Differential Data Jitter
TPERIOD
Differential
Data Lines
(VCRS)
Crossover
Points
Consecutive
Transitions
N * TPERIOD + TxDJ1
TPERIOD = 12Mbps (±0.25%)
TxDJ1 = Min-3.5ns~Max3.5ns
TxDJ2 = Min-4ns~Max4ns
Paired
Transitions
N * TPERIOD + TxDJ2
42641101TH Rev.1
107 /
Oki Data CONFIDENTIAL
e) Differential-to-EOP Transition Skew and EOP Width
TPERIOD
Differential
Data Lines
Crossover
Points
Crossover Point
Extended
Diff. Data-toSE0 Skew
N * TPERIOD + TxDEOP
TxDEOP = -2ns~5ns
Source EOP Width: TFEOPT (160ns~175ns)
Receiver EOP Width: TFEOPR (80ns~)
f) Receiver Jitter Tolerance
TPERIOD
Differential
Data Lines
TxJR
TxJR1
Consecutive
Transitions
N * TPERIOD + TxJR1
Paired
Transitions
N * TPERIOD + TxJR2
42641101TH Rev.1
TxJR2
TxJR1 = Min-18.5ns~Max18.5ns
TxJR2 = Min-9ns~Max9ns
108 /
Oki Data CONFIDENTIAL
10)
Interface Parameter Setting
Press MENU key several times.
Press ITEM key to display the item on the LCD to set up.
Press VALUE key to display the value on the LCD to set up.
Press SELECT key, and display "*" mark on the right side of the value:
By pressing the ON LINE key, menu setting mode is completed and the printer returns to online state.
Ready
ON-LINE
XXX
XXX : PCL, AUTO, PSE*, HEX DUMP, PRR or FX
* PSE means POSTSCRIPT3 EMULATION.
Press the MENU key 9 times.
(If RS232C is installed, press the MENU key 10 times.)
Ready
USB
MENU
Press the ITEM + key.
Ready
USB
Item
Contents of Display
ENABLE
DISABLE
USB I/F
Function
ENABLE
DISABLE
Factory Setting: ENABLE
Press the ITEM + key.
42641101TH Rev.1
109 /
Oki Data CONFIDENTIAL
Ready
SOFT RST
Item
Contents of Display
ENABLE
DISABLE
Sets Soft Reset command
Function
ENABLE
DISABLE
Factory Setting: DISABLE
Press the ITEM + key.
Ready
Item
Contents of Display
ENABLE
DISABLE
OFF REC
USB I/F OFF-LINE RECEIVE
Function
ENABLE
DISABLE
Factory Setting: DISABLE
Press the ITEM + key.
Ready
Item
Contents of Display
ENABLE
DISABLE
USB S/N
USB Serial Number
Function
ENABLE
DISABLE
Factory Setting: ENABLE
Press the ON LINE key.
Setting completed.
Ready
ON-LINE
XXX
XXX : PCL, AUTO, PSE, HEX DUMP, PRR or FX
42641101TH Rev.1
110 /
Oki Data CONFIDENTIAL
APPENDIX D
LOOP TEST (RS-232C INTERFACE)
1) Connect the test connector
TD
RD
RTS
DB-25S made by
Cannon or
equivalent
CTS
CD
SSD
DTR
DST
2
3
4
5
8
11
20
6
Test Connector Connection Diagram
2) Select "LOOP Test" in the system maintenance mode.
The codes transmitted from the TD signals are comparatively checked with the data received from
the RD signals. If any error occurs, the error message is displayed on the LCD.
42641101TH Rev.1
111 /
Oki Data CONFIDENTIAL
APPENDIX E
1.
DIAGNOSTICS TEST
Maintenance Modes
• The maintenance modes consist of the user maintenance mode which are released to the user, and
the system and engine maintenance modes in the maintenance personnel level not released to the
user.
• Press the MENU key to update each category. The operation returns to the first category after
updating the last category, in a loop.
• Press the Enter key to execute the function being displayed.
• To exit from any of these modes during a category display, press the Recover or ON LINE key and
the operation mode will start.
1.1
Administrator Mode
• To enter the administrator mode, turn the power on while keeping the ITEM+/ITEM- key pressed
down.
• This mode uses the menu for function selection.
• The administrator mode provides the following functions.
(1) OP MENU
• This function sets each user menu Enable or Disable.
42641101TH Rev.1
112 /
Oki Data CONFIDENTIAL
LCD display OP MENU
Pressing Item+ or Item- key, menu is changed.
Press the
Item+ or Item- key.
ALL
ENABLE *
ALL
Press the Value+ DISABLE
Sets All Category Enable/Disable
of User Menu.
INFO.
Press the Value+ DISABLE
Sets Category INFORMATION
MENU Enable/Disable.
PRINT
Press the Value+ DISABLE
Sets Category PRINT MENU Enable/Disable.
MEDIA
Press the Value+ DISABLE
Sets Category MEDIA MENU Enable/Disable.
SYS CONF
Press the Value+ DISABLE
Sets Category SYSTEN CONFIG
MENU Enable/Disable.
PCL MENU
Press the Value+ DISABLE
Sets Category PCL EMULATION
MENU Enable/Disable.
PPR MENU
Press the Value+ DISABLE
Sets Category PPR EMULATION
MENU Enable/Disable.
FX MENU
Press the Value+ DISABLE
Sets Category FX EMULATION
MENU Enable/Disable.
ESC/P
Press the Value+ DISABLE
Sets Category ESC/P EMULATION MENU Enable/Disable.
PARALLEL
Press the Value+ DISABLE
Sets Category PARALLEL MENU
Enable/Disable.
RS232C
Press the Value+ DISABLE
Sets Category RS232C MENU
Enable/Disable.
USB
Press the Value+ DISABLE
Sets Category USB MENU Enable/Disable.
NETWORK
Press the Value+ DISABLE
Sets Category NETWORK MENU
Enable/Disable.
MEMORY
Press the Value+ DISABLE
Sets Category MEMORY MENU
Enable/Disable.
ADJUST
Press the Value+ DISABLE
Sets Category SYSTEM ADJUST
MENU Enable/Disable.
MAINTE
Press the Value+ DISABLE
Sets Category MAINTENANCE
MENU Enable/Disable.
USAGE
Press the Value+ DISABLE
Sets Category USAGE MENU Enable/Disable.
or Value- key.
INFO.
ENABLE *
or Value- key.
PRINT
ENABLE *
or Value- key.
MEDIA
ENABLE *
or Value- key.
SYS CONF
ENABLE *
or Value- key.
PCL MENU
ENABLE *
or Value- key.
PPR MENU
ENABLE *
or Value- key.
FX MENU
ENABLE *
or Value- key.
ESC/P
ENABLE *
or Value- key.
PARALLEL
ENABLE *
or Value- key.
RS232C
ENABLE *
or Value- key.
USB
ENABLE *
or Value- key.
NETWORK
ENABLE *
or Value- key.
MEMORY
ENABLE *
or Value- key.
ADJUST
ENABLE *
or Value- key.
MAINTE
ENABLE *
or Value- key.
USAGE
ENABLE *
or Value- key.
Press ONLINE key after items is changed.
INITIALIZING
ON LINE
XXX
42641101TH Rev.1
113 /
Oki Data CONFIDENTIAL
1.2
System Maintenance Mode
• To enter the system maintenance mode, turn the power on while keeping the Menu/ITEM+/VALUE/CANCEL keys pressed down.
• This mode adopts the menu for function selection.
• The system maintenance mode provides the following functions:
(1) Oki User
• Brands is set.
(2) Maintenance Menu
• Flash ROM Format.
• EEPROM reset to factory default.
(3) Configration Menu
• Changes operater panel Type1 or Type2.
(4) Engine Start Print
• Engine menu is printed.
(5) Page Count Display
• This function allows the selection to include (enable) or exclude (disable) the total number of
printed pages counted at the engine block at the time of menu printing.
(6) Emulate
• Emulate determines the default PDL for each brand.
(7) Loop Test
• The loop test is for testing the serial I/F functions without connecting the printer to the host.
• The data is sent and received by loop back in the loop test.
• The loop test is performed even when another interface is being selected in Menu level-2.
• Installation of the loop connector is necessary for the loop test (refer to Appendix C, LOOP TEST
(RS-232C INTERFACE)).
(8) Rolling ASCII Continuous Printing
• The rolling ASCII pattern is printed continuously for various engine tests.
• Press the ON LINE key to cancel this mode.
(9) Network
(10) ENG DIAG
• This function can enter the Engine Maintenance Mode.
42641101TH Rev.1
114 /
Oki Data CONFIDENTIAL
LCD display
Press the Value+ or Value- key.
OKIUSER
Press the Item+
or Item- key.
If the Menu key is
pressed menu change.
MAINTE
MENU
Press the Item+
or Item- key.
ODA *
OEL
APS
JP1
JPOEM1
JPOEM2
OEMA
OEML
FL FORMAT
EXECUTE
EEPROM
RESET
CONFIG
MENU
ENG STAT
PRINT
PAGE PRT
ENABLE *
Press the Item+
or Item- key.
Press the
ONLINE key.
Press the Value+
or Value- key.
EMULATE
Press the Item+
or Item- key.
LOOPTEST
Press the Item+
or Item- key.
CONT PRT
EXECUTE
A
Press the
Select key.
CODESET
TYPE1 *
Sets brands.
Selecting by the Value+ or Value- key.
Press the
Select key.
Formats flash ROM.
(Same as Power On.)
Press the
Select key.
CODESET
Press the Value+ TYPE2
or Value- key.
INITIALIZING
PAGE PRT
DISABLE
INITIALIZING
PRINTING
XXX
Changes operater panel Type1 or Type2.
Selecting by the Select switch, then
pressing the On-line switch will prompt
initialization and printing Engine information.
Sets printing or not printing the total
page count in PRINT MENU MAP.
Pressing Item+ or Item- key, menu is changed.
Changes the default PDL for each brand.
PDLs that are disabled in this menu will
not be displayed at EMULATE of User
Menu or OP MENU of Admin Menu.
PCL
ENABLE *
PCL
DISABLE
IBM PPR
ENABLE *
IBM PPR
DISABLE
EPSONFX
ENABLE *
EPSONFX
DISABLE
PS3 EMU
ENABLE *
PS3 EMU
DISABLE
ESC/P
ENABLE *
ESC/P
DISABLE
PCL XL
ENABLE *
PCL XL
DISABLE
RS232C
EXECUTE
Loop Test runs Serial I/F function test
LOOPTEST without connecting the host PC. This
nnnnnn
mode can be ended only by turning the
power off.
CONT PRT
PRINTING
Press the
Select key.
CONT PRT Rolling ASCII Continous Print
CANCELED
B
42641101TH Rev.1
115 /
Oki Data CONFIDENTIAL
A
B
Pressing Item+ or Item- key,
menu is changed.
DOTSHIFT
Press the Item+
or Item- key.
TRAY1
-1.0mm *
Press the
Value+ or
Value- key.
-4.0mm
Sets dot shift in the horizontal direction.
˜
-1.5mm
-1.0mm
-0.5mm
0.0mm
+0.5mm
˜
+3.5mm
TRAY2
+0.5mm *
Press the
Value+ or
Value- key.
-4.0mm
˜
-0.5mm
0.0mm
+0.5mm
˜
+3.5mm
MPF
0.0mm *
Press the
Value+ or
Value- key.
-4.0mm
˜
-0.5mm
0.0mm
+0.5mm
˜
+3.5mm
MANUAL
0.0mm *
NETWORK
Press the
Value+ or
Value- key.
-4.0mm
˜
-0.5mm
0.0mm
+0.5mm
˜
+3.5mm
ENG DIAG
Press the
MENU key.
Press the ONLINE key.
INITIALIZING
ON LINE
XXX
42641101TH Rev.1
116 /
Oki Data CONFIDENTIAL
1.3
Engine Maintenance Mode
• To enter engine maintenance mode, enter system maintenance mode and press the Item+ key when
"ENG DIAG" is displayed.
• This mode adopts the menu for function selection.
• The method for exit from this mode depends on the setting.
• The engine maintenance mode provides the following functions:
(1) Head Drive Time Setting
• Sets the drive time of the LED head.
(2) 600 x 1200 DPI strobe time
• Do not change the default setting.
(3) Printing Start Position Setting
• Sets the printing start position.
(4) Length Shift
(5) Dot Shift
(6) Drum Count Total Display
• Displays on the LCD the total number of drum revolutions of the unit, counted at the engine block.
(7) Drum Count Display
• Displays on the LCD the total number of EP drum revolutions counted at the engine block.
(8) Factory Adjustment (for High Capacity Second Paper Feeder/Power Envelope Feeder)
• Do not change the default settings since these are factory settings and were set at the factory.
(8) Engine Reset
• No items subjected to, All except counters are subjected to reset, As a common spec.
42641101TH Rev.1
117 /
Oki Data CONFIDENTIAL
LCD display
Press the Value+ or Value- key.
LED HEAD
0
*
Press the Value+
or Value- key.
If the Item+ key is
pressed menu change.
STRB TIM
0.50
*
OPT HEAD
ODD/EVN*
PRINTPOS
0 mm
*
Press the Value+
or Value- key.
Press the Value+
or Value- key.
Press the Value+
or Value- key.
Sets the LED head’s drive time.OPT HEAD
-16
-15
˜
-1
0
+1
*
˜
+15
0.50
0.54
0.42
0.46
*
Sets the strobe time in 600 × 1200DPI mode in the value relative to that om 600 × 600DPI mode.
OPT HEAD
STEP3
Sets the type of LED HEAD installed.
0 mm *
+0.5mm
Sets the print start position.
˜
+3.5mm
-4.0mm
˜
-0.5mm
LENSHIFT
0 mm
*
Press the Value+
or Value- key.
0 mm *
+0.5mm
Sets image stretch/shrink correction (Micro-tuning in
LSYNC cycle).
˜
+3.5mm
-4.0mm
˜
-0.5mm
DRUM CNT
T nnnnnn
Displays Drum Count Total.
Displays on the LCD the total drum rotations counted by the engine.
DRUM CNT
nnnnnn
Displays Drum Count.
Displays on the LCD the total EP drum rotations counted by the engine.
PAGE CNT
nnnnnn
Displays Page Count.
Displays on the LCD the total number of printed pages that are counted by the Engine.
DOT CNT
T nnnnnn
Displays Page Dot Counter Total.
Displays on the LCD the printer’s total number of printed dots that are counted by the
Engine.
DOT CNT
nnnnnn
Displays Page Dot Counter.
Displays on the LCD the number of printed dots since a new toner cartridge has been
installed.
T1 POS
0 mm
*
Press the Value+
or Value- key.
0 mm *
+1 mm
Sets the amount of feeding paper from the default tray.
(Sets the amount to TOF position).
˜
+7 mm
-8 mm
˜
-1 mm
42641101TH Rev.1
118 /
Oki Data CONFIDENTIAL
If the Menu key is
pressed menu change.
T2 POS
0 mm
*
Press the Value+
or Value- key.
Press the Value+ or Value- key.
0 mm *
+1 mm
Sets the amount of feeding paper from the 2nd tray.
(Sets the amount to TOF position).
˜
+7 mm
-8 mm
˜
-1 mm
T2 TBL
No. 3 *
EF POS
0 mm
*
Press the Value+
or Value- key.
Press the Value+
or Value- key.
No. 1
No. 2
No. 3 *
Selects the download table for the 2nd tray.
0 mm *
+1 mm
Sets the amount of feeding paper from Multi Purpose
Feeder. (Sets the amount to TOF position.)
˜
+7 mm
-8 mm
˜
-1 mm
EF TBL
No. 3 *
CH ADJ
ENABLE *
SB2 ADJ
ENABLE *
CH VOLT
0
*
SB2 VOLT
0
*
CH V ADJ
0
*
CH V MAX
0
*
42641101TH Rev.1
Press the Value+
or Value- key.
Press the Value+
or Value- key.
Press the Value+
or Value- key.
Press the Value+
or Value- key.
Press the Value+
or Value- key.
Press the Value+
or Value- key.
Press the Value+
or Value- key.
No. 1
No. 2
No. 3 *
Selects the download table for the Multi Purpose Feeder.
CH ADJ
DISABLE
Sets CH’s voltage setting adjustment logic Enable/Disable.
SB2 ADJ
DISABLE
Sets SB2’s voltage setting adjustment logic Enable/Disable.
+3
+2
+1
0
-1
-2
-3
Changes the CH’s default voltage.
+3
+2
+1
0
-1
-2
-3
+5
+4
+3
+2
+1
0
-1
-2
-3
-4
-5
0
-1
-2
*
Changes the SB2’s default voltage.
*
Changes the CHSUB’s default voltage (for the drum rotations at 18PPM).
*
*
Changes the CHSUB’s default voltage (for the drum rotations at 8PPM).
119 /
Oki Data CONFIDENTIAL
CH V MIN
0
*
Press the Value+
or Value- key.
If the Menu key is
pressed menu change.
TR1 CRNT
0
*
ENGINE
TEST
ENGINE
Press the RESET
MENU key.
+2
+1
0
-1
*
Press the Value+ or Value- key.
Press the Value+
or Value- key.
Press the Select
key.
Press the Select key.
+3
+2
+1
0
-1
-2
-3
Changes TR1_1’s current for reading the TR resistance
value.
*
EP TEST
OFF *
OFF
*
Press the Value+ PAPER
CONNECT
or Value- key.
Sets continuous print for running print evaluation at factory.
PRT DUTY
1/1
*
1/1
Press the Value+ 1/10
1/20
or Value- key.
1/50
Sets Duty for motor acceleration testing at factory.
MODE
00
*
00
Press the Value+ 01
02
or Value- key.
˜
FD
FE
FF
INITIALIZING
Upon Completion
of processing
ON LINE
*
Used to start up Soft Logical
analyze mode, etc. for engine
debug mode.
Used in the Engine unit.
XXX
Press the ONLINE key.
INITIALIZING
ON LINE
XXX
42641101TH Rev.1
120 /
Oki Data CONFIDENTIAL
APPENDIX G HIGH CAPACITY SECOND PAPER FEEDER
1.
OUTLINE
1.1
Functions
The printer is mounted on top of this High Capacity Second Paper Feeder. The High Capacity Second
Paper Feeder supplies paper automatically through the operation of pulse motor (hopping), which is
driven by signals sent from the printer.
The main functions are the followings:
• Paper that can be used:
[Paper Type]
• Standard paper:
• Special paper:
• Cut sheet size:
• Special size:
Xerox 4200 (20-lb)
OHP sheets (for PPC), Label sheets (PPC sheets); use of envelopes or
thick paper is not possible.
A4, A5, B5, Letter, Executive, Legal13, Legal14
Paper width:
148 to 216mm
Paper length: 210 to 355.6mm
[Weight]
• 16-lb to 24-lb (60 to 90 g/m2)
• Paper setting quantity: 500 sheets of paper weighing 64 g/m2
1.2
External View and Component Names
Upper Plate
Sheet Guide Assy
Guide R (2nd) Assy
Front Cover Assy
Cassette Assy
Guide L (2nd) Assy
Front Plate
Figure 1-1 External View and Component Names
42641101TH Rev.1
138 /
Oki Data CONFIDENTIAL
2.
MECHANISM DESCRIPTION
2.1
General Mechanism
The High Capacity Second Paper Feeder feeds the paper into the printer by receiving the signal from
the printer, which drives the pulse motor inside the High Capacity Second Paper Feeder, and this motion
is transmitted to rotate the one-way clutch of the hopping frame assembly. The paper is delivered from
the hopper into the printer through the turning of the hopping roller and feed roller.
Once delivered into the printer, the paper is then controlled and fed through by pulse motor (registration)
of the printer.
2.2
Hopper Mechanism
The hopper automatically feeds the printer with the paper being set, single sheet at a time. When the
paper is loaded in the paper cassette, it is then transported by the pulse motor, carrying forward only a
single sheet caught by the brake shoe at a time.
Feed Roller
Hopping Roller
Pulse Motor
One-way Clutch Roller
Transfer Roller
Back-up Roller
Handling Hall
Hopping Roller
42641101TH Rev.1
139 /
Oki Data CONFIDENTIAL
3.
PARTS REPLACEMENT
This section covers the procedures for the disassembly, reassembly and installations in the field.
This section describes the disassembly procedures, and for reassembly procedures, basically proceed
with the disassembly procedures in the reverse order.
3.1
Precautions Concerning Parts Replacement
(1)
Parts replacements must be carried out, by first turning the printer power switch off “O” and
removing the printer from the High Capacity Second Paper Feeder.
(2)
Do not disassemble the High Capacity Paper Feeder if it is operating normally.
(3)
Establish the extent of disassembly suitable for the purpose of the procedure, and do not
disassemble any more than necessary.
(4)
Only specified service tools may be used.
(5)
Disassembly must be carried out according to the prescribed procedures. Parts may be damaged
if such procedures are not followed.
(6)
Small parts such as screws and collars can easily be lost, therefore these parts should be
temporarily fixed in the original location.
(7)
When handling printed circuit boards, do not use any glove which may generate static electricity.
(8)
Do not place the printed circuit boards directly on the equipment or floor.
[Service Tools]
Table 3-1 shows the tools required for the replacement of printed circuit boards, assemblies and units
in the field.
Table 3-1 Service Tools
No.
Service Tools
Q’ty
Application
1
No. 1-100 Philips
screwdriver
1
2 ~ 2.5 mm screws
2
No. 2-100 Philips
screwdriver
1
3 ~ 5 mm screws
3
No. 3-100 screwdriver
1
4
Digital multimeter
1
5
Pliers
1
42641101TH Rev.1
Remarks
140 /
Oki Data CONFIDENTIAL
3.2
Parts Layout
This section describes the layout of the main components.
Cassette Assy
Upper Plate
Hopping Roller
Assy
Guide R (2nd) Assy
(includes stepping motor
and GRT PCB)
One-way Clutch Gear
Hopping Frame Assy
Stepping Motor
Guide L (2nd) Assy
Figure 3-1
42641101TH Rev.1
141 /
Oki Data CONFIDENTIAL
3.3
Parts Replacement Methods
This section describes the parts replacement methods for the components listed in the disassembly
order diagram below.
High Capacity Paper Feeder
Stepping motor (hopping) (3.3.1)
GRT PCB (3.3.2)
Hopping roller shaft assy and One-way clutch gear (3.3.3)
42641101TH Rev.1
142 /
Oki Data CONFIDENTIAL
3.3.1
Stepping Motor (Hopping)
(1)
(2)
(3)
(4)
(5)
Turn the printer power switch off, pull out the AC cord from the outlet. Remove the printer off High
Capacity Second Paper Feeder.
Take the paper cassette assy 1 out of High Capacity Second Paper Feeder.
Remove six screws 2 and remove the upper plate 3. Remove two screws 5 and remove the
hopping frame assy 6.
Remove the front cover assy 4 off the guide boss on the guide L (2nd) assy 7 by bending the guide
L (2nd) assy 7 in the direction of arrow shown in the magnified view below.
Pull the sheet guide assy 8 in the direction of arrow a and also push in the direction of arrow b
to unlock the notch, and bring the sheet guide assy 8 in the direction of arrow
c to remove the sheet guide assy 8.
2
3
2
8
5
6
2
C
5
7
0
(See Detail A)
A
c
b
a
1
Notch
Guide Boss
42641101TH Rev.1
4
4
143 /
Oki Data CONFIDENTIAL
(6)
Remove three screws 9 which are holding the guide R (2nd) assy 0 to the bottom plate A.
Remove the screw B which is keeping the rear cover C and guide R (2nd) assy 0. Remove the
guide R (2nd) assy 0.
(7) Remove the protect (M) D, guide bracket E, planet gears F and planet gear bracket G.
(8) Remove the E-ring H which is keeping the sheet link I on the guide R (2nd) assy 0, and pull out
the hinge stand J.
(9) Remove three remaining screws K which are keeping the motor on the motor bracket L, and
remove the connector off the Stepping Motor M.
(10) Remove two screws N on the Stepping Motor M.
Detail A
Note : The guide bracket E must be attached
as shown in the following illustration:
0
No jutting of the gear shaft G is
allowed into the oval hole E.
I
Q
R
Turn E clockwise for screw
looseness to affix firmly.
J
P
S
K
O H
E
C
L
B
M
E
G
F
C
The upper plate 3 must be attached as shown in the following
illustration.
A
9
3
0
9
42641101TH Rev.1
144 /
N
Oki Data CONFIDENTIAL
3.3.2
TQSB-2 PCB
(1)
(2)
(3)
Remove the pulse motor (see 3.3.1).
Remove the connectors Q, R from the GRT PCB P.
Remove the screw S and remove the GRT PCB P.
Note : Refer to Detall A in the previous page.
3.3.3
Hopping Roller Shaft Assy and One-way Clutch Gear
(1)
(2)
(3)
Follow up to step (3) of 3.3.1 and remove the hopping frame assy.
Remove the screw 1 and remove the earth plate 2. Remove the sensor lever (T) 7 and remove
the transion spring D and remove the ground plate 6. Remove the gear 3 and remove the metal
bush 5 and hopping roller shaft assy 4.
Remove the E-ring A and remove the one-way clutch gear B on the right side of the feed roller
0.
Note : The metal bush C also comes off. Be careful not to lose it.
5
4
3
1
2
A
C
B
6
7
0
9
8
D
Shaft
The tension lever and the sensor lever need concurrent replacing.
42641101TH Rev.1
145 /
Oki Data CONFIDENTIAL
4.
TROUBLESHOOTING
4.1
Precautions Prior to the Troubleshooting
(1)
(2)
(3)
4.2
Go through the basic checking items provided in the Printer Handbook.
Obtain detailed information concerning the problem from the user.
Go through checking in the conditions similar to that in which the problem occurred.
Preparations for the Troubleshooting
(1)
Display on the Operator panel
The status of the problem is displayed on the LCD (Liquid Crystal Display) on the Operator panel.
Go through the appropriate troubleshooting procedures according to the messages displayed on
the LCD.
[For ODA
Status message display
Ready LED display
42641101TH Rev.1
: OFF
: BLINKING
: ON
: Undefined
146 /
Oki Data CONFIDENTIAL
4.3
Troubleshooting Method
When a problem occurs, go through the troubleshooting according to the following procedure.
Problem occurs
Problem displayed by
the LCD message
4.3.1
Troubleshooting
according to the LCD
Status Message List
(see 4.3.1)
Carry out detailed
troubleshooting
according to the
Troubleshooting Flow
(see 4.3.1)
LCD Status Message List
The listing of the statuses and problems displayed in the form of messages on the LCD is provided in
Table 4-1.
Table 4-1
Classification
Jam error
(feeding)
LCD Status Message
OPEN UPPER
COVER
PAPER JAM
CHECK TRAY2
PAPER JAM
Jam error
(ejection)
OPEN UPPER
COVER
EXIT JAM
Paper size error
Tray paper out
OPEN UPPER
COVER
PAPER SIZE
ERROR
LOAD mmmm
TRAY2 EMPTY
Description
Recovery method
Notifies of occurrence of • Check the paper in the High Capacity
jam while the paper is Second Paper Feeder.
being fed from High Carry out the recovery printing by
Capacity Second Paper opening and closing the cover, and
turn the error display off.
Feeder.
• When the problem occurs frequently,
Scroll disply.
go through the Troubleshooting.
Notifies of occurrence of • Check the paper in the printer. Carry
jam while the paper is out the recovery printing by opening
being ejected from the and closing the cover, and turn the
error display off.
printer.
Scroll disply.
Notifies of incorrect size • Check the paper in the High Capacity
paper feeding from High Second Paper Feeder.
Capacity Second Paper Also check to see if there was a
feeding of multiple sheets.
Feeder.
Carry out the recovery printing by
opening and closing the cover, and
Scroll disply.
turn the error display off.
Notifies of no paper state • Load the paper in High Capacity
of the High Capacity Second Paper Feeder.
Second Paper feeder.
mmmm : Papre size
(A4, Letter, Legal, Scroll disply.
etc.)
Paper size
request
CHANGE PAPER
TO mmmm/pppp
TRAY2 SIZE
MISMATCH
mmmm : Papre size
(A4, Letter, Legal,
etc.)
pppp : Media Type
(Plain, Transparency,
etc.)
42641101TH Rev.1
Notifies of correct paper • Load the requested size paper in the
size for the High capacity High Capacity Second Paper
Feeder.
Second Paper Feeder.
Scroll disply.
147 /
Oki Data CONFIDENTIAL
• ( JAM error )
Paper Inlet Jam
• Does paper jam at the inlet when the power is turned on?
• YES
Is the paper located above the sensor plate (inlet)?
• YES
• NO
Is the sensor plate (inlet) operating normally?
• NO
• YES
• NO
Remove the paper.
Replace the sensor plate (inlet).
Replace the power supply/sensor board or inlet sensor.
When the paper is fed in, does the paper inlet jam occur?
• YES
Is the paper being fed to above sensor plate (inlet)?
• YES
Is the sensor plate (inlet) operating normally?
• NO
• YES
• NO
• NO
Replace the hopping roller shaft assy or paper cassette.
Set the paper properly.
Is the pulse motor turning?
• YES
• NO
Clean the inlet sensor on the power supply/sensor board or replace the
power supply/sensor board or inlet sensor.
Are the hopping roller and feed roller rotating?
• YES
• NO
Replace the sensor plate. (inlet)
Replace the hopping roller shaft assy or one-way clutch gear on the feed roller
assy.
Is the connector being connected properly?
• NO
Connect the connector properly.
• YES Check the coil resistance (approx. 4.3Ω) of the pulse motor.
Is it normal?
• NO
Replace the stepping motor.
• YES Replace the GRT PCB.
42641101TH Rev.1
148 /
Oki Data CONFIDENTIAL
5.
CONNECTION DIAGRAM
5.1
Interconnection Diagram
Stepping motor
2 M-T3
1 M-T4
4 M-T1
3 M-T2
"MOTOR"
M
GRT PCB
OPTPSIN-N
OPTSCLK-N
OPTSD-P
OPTSDR-N
OVP
+ 30V
OVL
+ 5V
1
2
3
4
5
6
7
8
"PU"
To Printer
5.2
PCB Layout
CONTROLLER
42641101TH Rev.1
PU
OSC
PU
MOTOR
MOTOR
DRIVER
SEN1
GRT PCB
SEN2
149 /
Oki Data CONFIDENTIAL
6.
PARTS LIST
5
6
1
2
4
3
Figure 6-1 High Capacity Second Paper Feeder
42641101TH Rev.1
150 /
Oki Data CONFIDENTIAL
Table 6-1 High Capacity Paper Feeder
No.
Description
OKI-J Part No.
Q’ty
1
Hopping roller shaft assy
50409501
1
2
One-way clutch gear
51401101
1
3
Pulse motor
56512201
1
4
GRT PCB
42372702
1
5
Cassette assy (2nd tray)
50107304
1
6
DIN8P-DIN8P Connector Cord
42372601
1
42641101TH Rev.1
Remark
151 /
Oki Data CONFIDENTIAL
2nd Tray ASSEMBLY
SECTION1
CABINET & CASSETTE ASSEMBLY
SECTION2
MECHANICAL ASSEMBLY
SECTION1
CABINET & CASSETTE ASSEMBLY
42641101TH Rev.1
152 /
Oki Data CONFIDENTIAL
28
8
SECTION1 CABINET & CASSETTE ASSEMBLY
1
28
7
2
4
29
29
i
i
5
6
3
42641101TH Rev.1
153 /
Oki Data CONFIDENTIAL
SECTION2 MECHANICAL ASSEMBLY
21
9
11
27
10
12
26
13
25
23
22
14
C
C
A
A
B
24
iii
18
B
16
ii
15
17
19
20
42641101TH Rev.1
154 /
Oki Data CONFIDENTIAL
Table 6-2 2nd Tray Parts List
No.
Description
OKI Parts No.
Q'ty/U
500
1000
1
Plate, upper
1PP4122-1401P001
1
3
5
2
Sheet guide assembly
3PA4122-1370G001
1
3
5
3
Front cover assembly
1PA4122-1369G001*
1
3
5
4
Inner guide assembly
3PA4122-1371G001
1
3
5
5
Cassette assembly (2nd tray)
50107304
1
3
6
6
Separation frame assembly
53345801
1
6
12
7
Cover, rear
1PP4122-1323P001
1
3
5
8
Stick finger
4PB4122-1441P001
1
3
5
9
Hopping flame assembly
1PA4122-1366G001
1
3
6
10
Bush, metal (ADF)
4PP3522-3568P001
1
3
5
11
Gear (z70)
4PP4122-1207P001
1
3
5
12
Lever, sensor (p)
3PP4122-1331P001
1
3
5
13
Feed roller assembly
50222501
1
3
5
14
Cable & connector
3YS4111-3528P001
1
3
5
15
Stepping motor
56512201
1
3
6
16
Bracket
4PP4122-1384G001
1
3
5
17
Gear (z24)
4PP4122-1383P001
2
3
5
18
Gear (z87/z60)
4PP4122-1226P001
1
3
5
19
Plate, bottom
2PP4122-1389P001
1
3
5
20
2nd cassette guide (L) assy
1PA4122-1365G001
1
3
6
21
Hopping roller assembly
50409501
1
3
6
22
2nd cassette guide (R) assy
42337801
1
3
6
23
One-way clutch gear
51401101
1
6
12
24
Board GRT
42372702
1
3
6
25
Spring, Tension
41804801
1
3
6
26
Lever, sensor (T)
42372601
1
3
6
27
DIN8P-DIN8P Connector Cord
42372601
1
3
6
28
Connection Cord
40890502
2
3
6
29
Spring-Release
41204801
2
6
12
* For the rev. no. of the Parts List for the Front cover assembly should be applied No.6.
The No.6 includes a change of Release spring [P152, No.29]
** For the rev. no. of the Parts List for the Cassette assembly (2nd tray) should be applied No.10.
The No.10 includes a change of cassette and Tale Guide.
Addition of notch
Addition of groove
Tale Guide
Addition of projection part
Addition of latch
Cassette
Note : Cassette and Tale Guide need concurrent replacing.
42641101TH Rev.1
155 /
Oki Data CONFIDENTIAL
APPENDIX H NETWORK INTERFACE (OPTION)
1)
Connector
•
2)
Cable
•
3)
8-pin modular jack
10BASE/T
Signal
Contact No.
4)
Plug
Jack
Polarity
1
Power feeder3
–
+
2
Power feeder3
–
–
3
Send
Receive
+
4
Receive
Send
+
5
Receive
Send
–
6
Send
Receive
–
7
Power feeder2
Power feeder2
–
8
Power feeder2
Power feeder2
+
Appearance
1pin
5)
Physical dimensions
a) Transmission method by CSMA/CD
b) Transmission protocol
Packet type
Support
Remarks
Ethernet ll
IEEE802.3
IEEE802.3+IEEE802.2
IEEE802.3+IEEE802.2+SNAP
42641101TH Rev.1
156 /
Oki Data CONFIDENTIAL
6)
List of protocols
Protocol
7)
Print
Configuration
Etc.
TCP/IP
LPR
IPP
FTP
SMTP/POP3
HTTP(Except IPP)
HTTP
Telnet
FTP
NetBEUI
SNMP
DHCP/BOOTP
RARP
AutoIP
DNS
UPnP
SLP
TCP, IP, ICMP, ARP
UDP
NetBEUI
SMB, CIFS
WINS
NetBIOS
NetWare
Q-Server over IPX
Q-Server over IP
R-Printer
N-Printer
NCP
SNMP
SPX, IPX, SAP, RIP
EtherTalk
PAP
NBP
ELAP, AARP, DDP, AEP, ZIP,
RTMP, ATP
TCP/IP
a) Support OS
SunOS 4.1.1, SunOS 4.1.2, SunOS 4.1.3
Solaris 2.1, Solaris 2.2, Solaris2.4, Solaris2.5
HP-UX 9.X
Windows3.0+TCP/IP
Windows3.1+TCP/IP
Windows3.11+TCP/IP
Windows95/98
WindowsNT 3.5+TCP/IP
WindowsNT 3.5.1
WindowsNT 4.0
Windows2000
WindowsXP
42641101TH Rev.1
157 /
Oki Data CONFIDENTIAL
b) LPR
The LPR is an application to process the print data.
The LPR of this system supports multiple clients. Furthermore, it provides multiple connections for
one client.
Item
Factory default
Number of clients connected 1 to 8 clients
First command
character
Setup range
1 to 8 clients
Description
indicates the number of clients which
can be connected simultaneously.
Allows simultaneous connection of a
maximum of four clients.
LPR option
Objective
Support
H
Specify by default.
Host name of the machine to which the LPR is called.
Host name printed on the banner sheet
P
Specify by default.
Log-in name of the user having called the LPR.
User name printed on the banner sheet
J
Specify by -J option.
Job name printed on the banner sheet
Default: File name
C
Specify by -C option.
Job type printed on the banner sheet
Default: System name
L
Specify by default.
Specify literal banner sheet printing.
Cancel the specification by -h option.
f
Specify the number of volumes by Name of the data file to be printed.
-# option.
The number of character strings of this command varies
according to the number of volumes. (Not supported)
U
Specify by default.
Name of the file to be deleted with completion of printing
–
I
Specify by -i option.
Number of indent characters in the output line
–
W
Specify by -w option.
Specify page width.
–
M
Specify by -m option.
Specify sending of a mail with completion of printing
–
S
Specify by -s option.
Specify the symbolic link to the data file.
Specify by -1/-2/-3/-4 options.
Specify the font.
1/2/3/4
–
c) FTP
FTP is an application to process the print data.
The FTP of this system supports multiple of clients. Furthermore, it provides multiple connections
for one client.
Item
Number of clients connected
42641101TH Rev.1
Factory default Setup range
1 to 8 clients
Description
Indicates the number of clients which can be
connected simultaneously. Allows simultaneous connection of a maximum of four clients.
158 /
Oki Data CONFIDENTIAL
d) Telnet
Telnet is an application to reference and change the menu of the Network/Printer.
The TELNET of this system supports simultaneous connection of multiple clients for the personal
user. Furthermore, it provides multiple connections for one client. But it cannot provide two or more
simultanepus connections for super users.
Item
Factory default Setup range
Number of connected clients
Description
1 client
Indicates the number of clients which can be
connected simultaneously. Allows simultaneous connection of a maximum of four clients.
Terminal mode
VT-100
VT-100
Indicates the control mode of the terminal of
the connected client. Only the VT-100 alone
is the support terminal mode.
Number of columns
80 columns
80 columns
Indicates the number of the digits of the terminal of the connected client. The number of
the support digits is fixed at 80.
Number of rows
25 rows
25 rows
Indicates the number of the digits of the terminal of the connected client. The number of
the support digits is fixed at 25.
Expiration of idle time
300 sec.
60 to 7200 sec.
Indicates the time when the idle time of the
connected clients expires.
e) HTTP
The HTTP is an application to reference and change the menu of the Network/Printer.
The HTTP of this system supports simultaneous connection of multiple clients for the personal user.
Furthermore, it provides multiple connections for one client.
Item
HTTP Version
Factory default Setup range
1.0
1.0
Description
Indicates the version of the HTTP being implemented.
f) SNMP
SNMP is an application to reference and change the menu of the Network/Printer.
The SNMP of this system supports simultaneous connection of multiple clients for the personal user.
Furthermore, it provides multiple connections for one client.
42641101TH Rev.1
159 /
Oki Data CONFIDENTIAL
8)
Netware
a) Support OS
Netware File Server 2.2C, 3.X,4.X,5 (Bindery Model/ NDS support)
b) R-printer
The R-printer is an application to process the print data.
The R-printer of this system supports multiple print serves. Furthermore, it provides one connection
for one printer server; it does not allow multiple connections for one printer server.
Item
Shipment from factory
Number of
connected
print serves
Print Server
Name
Printer
Name
Job Time
out
42641101TH Rev.1
OIxxxxxx
Etherxxxxxx
Setup range
1 to 8 servers
"Indicates the number of print
servers which can be connected
simultaneously. Each print server
need not be started in advance.
Even when the printer is ready for
operation, connection is achieved
only by starting the print server."
Maximum four
servers
*Maximum 31
characters
Indicates the name of the connected
print server. Each print server name
can be registered up to a maximum
of 31 characters.
The default xxxxxx of the print server
name is set to the lower three bytes
of the MAC address of the print
server.
Overseas: Olxxxxxx
OEM: Etherxxxxxx
The print server name must be
preset on a NetWare server using a
Novell tool.
Takes the form of the above server
name followed by -prn1, by default.
(Print Server Name)-prn1
10
Description
4-255 seconds
A timeout value that functions only
when a specific size job is received.
160 /
Oki Data CONFIDENTIAL
c) Q-Server
The Q-Server is an application to process the print data.
The Q-Server of this system supports multiple file serves. Furthermore, it allows connection of
multiple print servers for one file server.
Item
Shipment from factory
Number of
connected
print serves
Print Server
Name
Printer
Name
OIxxxxxx
Etherxxxxxx
Setup range
Description
1 to 8 servers
Indicates the number of print
servers which can be connected
simultaneously. Each print server
need not be started in advance.
Even when the printer is ready for
operation, connection is achieved
only by starting the print server.
Maximum four
servers
*Maximum 31
characters
Indicates the name of the connected
print server. Each print server name
can be registered up to a maximum
of 31 characters.
The default xxxxxx of the print server
name is set to the lower three bytes
of the MAC address of the print
server.
Overseas: Olxxxxxx
OEM: Etherxxxxxx
The print server name must be
preset on a NetWare server using a
Novell tool.
(Print Server Name)-prn1
Takes the form of the above server
name followed by -prn1, by default.
File Server
Name
NULL
Maximum four
servers
*Maximum 47
characters
Entered with the name of a
connecting file server. The file
server is that whose settings have
been set using a Novell tool. The
entry of this file server name is
optional. When the field is left blank,
SoftNIC can automatically discover
and connect a file server to connect
to.
Password
for File
servers
NULL
Maximum 31
characters
Entered with a password for the
connection to a file server. The
password must be preset on a
NetWare server using a Novell tool.
When this field, which is optional, is
left blank, no password is used for
connection to a file server. In such
cases, the password for the file
server must not be set on the file
server.
Job Polling
Rate
4
2-255 seconds
Specified with a time interval for
checking whether a job occurs.
When this field, which is optional, is
left blank, the default four seconds
takes effect.
42641101TH Rev.1
161 /
Oki Data CONFIDENTIAL
9)
EtherTalk
a) Support OS
System7.0, 7.1, 7.1.X
System7.5, 7.5.1, 7.5.2, 7.5.3, 7.5.5
MAC OS7.6, 8.X, 9
b) PAP
The PAP is an application to process the print data.
Item
Factory default Setup range
Description
Number of connected clients 1 client
1 client
Printer name
One item by max. Indicates the printer name which can be set
32 characters
on the printer.
B4300
Zone name
Indicates the number of clients which can be
connected simultaneously. Simultaneous
connection is possible up to one client.
One item by max. Indicates the zone to which the printer be32 characters
longs.
10) NetBEUI
a) Support OS
Windows95/98
WindowsNT4.0
Windows2000
b) NetBIOS
Item
Factory default
Setup range
Description
Host name
OLxxxxxx
MLxxxxxx
1 to 15 characters
Indicates the NetBIOS Host name.
OL: Overseas machines
ML: Japan Domestic machines
xxxxxx is the last six digits of the
MAC address.
Work Group name
Print Server
1 to 15 characters
Indicates the NetBIOS
Work Group name.
11) OKI Original Port
The OKI Original Port provides special processing which is beyond the scope of normal menu
operation.
Item
Description
Initial recognition
Executes the processing of finding out the printer by the setup utility when the printer is connected to the network.
Flash Down Load
Provides download processing of the program for the flash ROM.
PJL command /response
Serves as a PJL port to send and receive the PJL command.
42641101TH Rev.1
162 /
Oki Data CONFIDENTIAL
12) Others
a) Hot Protocol
The Hot Protocol provides a function of simultaneous meeting of requests for connection from
multiple clients using different transport layer protocols.
b) Multi-user
The Multi-user provides a function of simultaneous meeting of requests for connection from multiple
clients using the same transport layer protocol.
c) Permissible connection
Number of connections
Total number of connections
10
Number of connections for simultaneous use of management
APs (Telnet, SMP, Web, OKI Original Port)
2
Number of connections for simultaneous use of printing APs
8
Remarks
13) Setup
Each setup item can be set by the menu and network management tool.
Management
Classification
Setup item
Menu change tool change
Description
Network valid/invalid
Common
Valid/invalid for entire network
Frame type
TCP/IP
X
Frame type for transmission
and reception
TCP/IP valid/invalid
TCP/IP valid/invalid
IP address
IP subnet mask
Default gateway
Netware
NetBEUI
AppleTalk
42641101TH Rev.1
Netware valid/invalid
Netware valid/invalid
Netware mode
X
Network address
X
Q-server print server name
X
Q-server connection file server
name
X
Q-server polling rate
X
NDS Tree name
X
NDS Context name
X
R-Printer printer name
X
R-Printer connection print
server name
X
NetBEUI valid/invalid
R-Printer/Q-server
X
NetBEUI valid/invalid
Net BIOS Host name
X
NetBIOS Work Group name
X
EtherTalk valid/invalid
X
printer name
X
Ether Talk zone nameSpecify
by -1/-2/-3/-4 options.
X
Name of the zone to which the
printer belongs
Ether Talk Printer name
X
Name of the printer
EtherTalk valid/invalid
163 / 163
No.
1
2
3
4
5
6
7
8
9
10
11
12
13
14
15
16
17
18
19
20
21
22
23
24
25
26
27
28
29
30
31
32
33
34-a
34-b
35
36
37
38
39
40
41
42
43
44
45
46
47
48
49
50
51
52
53
54
Parts No.
51112301
53342401
51607402
51228901
42174301
51607501
42174201
41279501
41279601
41279401
41281201
41280401
41279301
41279701
42208501
40438001
41301801
41584101
41536201
41584201
42208601
50805901
42551201
50924201
42126101
51229201
51010701
40771401
41027701
42468801
51010903
52203802
42209201
42209202
40772501
42145701
42145703
42145801
42145802
42129101
42129102
42146701
42146501
56639709
42146601
42266803
42660001
42596601
42657501
42352501
42196001
42196101
42121701
42121801
42121901
50517201
53347201
Name
Hopping Roller Shaft
Rubber-Hopping Roller
Bearing
One-way Clutch Gear
Roller-Regist
Bearing(Registration)
Roller-Pressure
Holder-Regist L
Holder-Regist R
Gear-Pressure
Bearing-Pressure
Spring-Tension
Plate-Contact PA
Bearing-Regist L
Gear-Regist
Roller Assy.-Transfer
Bearing TR
Roller-Back up
Spring Bias
Holder-BU
Bearing-Ball
Lever-Reset L Assy.
Reset Lever R
Arm-Switch
Reset Spring
Idle Gear
Idle Gear
Sensor Plate(Inlet)
Lever-Eject Sensor Assembly
Sensor Wire Assembly
Toner Sensor(Adhesion)
Diselectrification Bar Shaft
Diselectrification Film
Heat Assy
Heat Assy
Roller Assy.-Eject
Cover Assy.-Front
Cover Assy.-Front
Cover Assy.-Stacker
Cover Assy.-Stacker
Holder-Head
Holder-Head
Film-FG
Spring-Head
FUJI-CARD(24P)
Contact-Head
LED Head Unit-51MXF3
Frame Subassy.-Lower
Damper Oil
Bracket-Motor(Caulking)
Bracket-Sub-M
Motor-Pulse(Main)
Motor-Pulse(Regist)
Gear-M3
Gear-M2
Gear-R2
Washer C
FG Plate OP
Remarks
110V/120V
230V
Beige
Black
Beige
Black
Beige
Black
No.
55
56
57
58
59
Parts No.
42209101
42200501
40828301
42209401
42209402
42209501
61
42209502
62 51608801
63 51023601
64 51019701
65 51011501
66 42146301
67 43006722
68-a 41991601
68-b 42510301
69 42284101
70 56640903
71 42101001
72 42283501
42209604
73
42209605
74 42146201
75 42146901
42146801
76
42146802
42147010
77
42147013
42147201
78
42147208
42129601
79
42129602
90 42406701
91
92 40771901
93 42318001
94 51252001
95 42797101
96 41415801
97 42679901
98 42661401
99 42657701
100 42658001
101 42657601
102
103
104
105
106 42408001
60
Name
Guide-Paper R(Adhesive)
Plate-Base Assy.
Polyethylene Tape
Guide-Paper H
CS-RING(CS3-SUS)
Cassette guide L Assy.
Cassette guide L Assy.
Cassette guide R Assy.
Cassette guide R Assy.
Beam Plate
FG Plate(bm)
Sensor Plate(Paper Supply)
Cassette Sensor Plate
Insulator
Board GRR-2
Power Supply Unit
Power Supply Unit
Board-HLB
Sumi-Card(30P)
Cord Assy.(13p-5P,8p)
Fan Motor
Cassette Assy.-Paper
Cassette Assy.-Paper
Plate-Guide
Plate-Shield
Face Up Stacker Assy.
Face Up Stacker Assy.
Frame Assy.-OP Panel
Frame Assy.-OP Panel
Cover-Upper Assy.
Cover-Upper Assy.
Cover-IF
Cover-IF
Holder-Tr_R
Spacer-Tr_L
Plate-Earth_(CTR)
Plate-Earth-ENV
Damper-Gear
Spring-Sensor_In
Spring-Write-Sensor
Plate-Damper(Caulking)
Guide-Paper
Gear-Reg(One-way)
Motor-Pulse(Hopping)
Gear-R2(Z58/20)
Film-Support(Head)
Film-Support(OP)
Core
Core
FUJI-CARD(14P)
Remarks
L=90mm
Beige
Black
Beige
Black
F/W Rev 2.25
100V/110V/120V
230V
Beige
Black
Beige
Black
Beige
Black
Beige
Black
Beige
Black