1
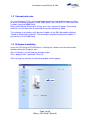
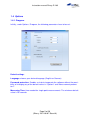
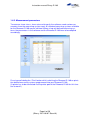
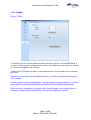
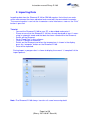
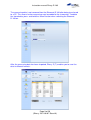
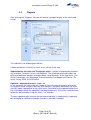
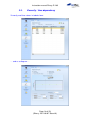
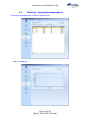
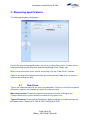
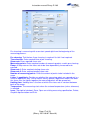
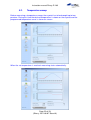
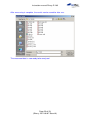
Instruction Manual
Rhesy S for Rheomat R 180
proRheo GmbH
Bahnhofstr. 38
D - 75382 Althengstett
Tel. +49-(0)7051-92489-0
[email protected]
www.proRheo.de
Instruction manual Rhesy R 180
Index
1.
Introduction.......................................................................................................... 3
1.1. Hardware requirements ................................................................................ 3
1.2. Transmission rate ......................................................................................... 4
1.3. Software Installation ..................................................................................... 4
1.4. Options ......................................................................................................... 5
1.4.1. Program ................................................................................................ 5
1.4.2. Measurement parameters ..................................................................... 6
1.4.3. Julabo ................................................................................................... 7
2. Importing Data ..................................................................................................... 8
3. Analysis ............................................................................................................. 11
3.1. Tabular ....................................................................................................... 12
3.2. Diagram ...................................................................................................... 13
3.3. Viscosity / time dependancy ....................................................................... 14
3.4. Viscosity / temperature dependancy .......................................................... 15
4. Measuring specifications ................................................................................... 16
4.1. Flow Curve ................................................................................................. 16
4.2. Temperature sweep (Rhesy T) ................................................................... 18
5. Starting a measurement .................................................................................... 20
5.1. Flow curve .................................................................................................. 20
5.2. Temperature sweep ................................................................................... 22
6. Application example .......................................................................................... 24
6.1. Silicone oil .................................................................................................. 24
6.2. Liquid soap ................................................................................................. 25
7. Tips and tricks ................................................................................................... 26
8. Safety guidelines ............................................................................................... 27
9. Support / Service ............................................................................................... 29
Page 2 of 29
(Rhesy 2011-06-07 Stand A)
Instruction manual Rhesy R 180
1. Introduction
Rhesy S is software for processing rheologic data provided from one of the viscometers Rheomat R 180, R 180T, RM 180 and RM 225. The software enables you to
save, interpret or convert to ASCII or EXCEL format. There are also various evaluation possibilities available.
Furthermore the software enables you to define and save measuring templates
meaning routine measurements can be easily repeated. Included on the installation
CD you will find some examples of measurement data that has been recorded using
the Rheomat R 180.
Rhesy T additionally offers the possibility to automatically measure temperature
sweeps, so that the dependency of viscosity / temperature can be examined.
1.1. Hardware requirements
Machines supported:
Intel or Intel-compatible Pentium class processor from 166 MHz
64 MB RAM
CD-ROM Drive
Rhesy S: 1 free serial or USB port
Rhesy T: 2 free serial or USB ports
Windows 98 / ME / NT 4.0 / 2000 / XP / 7
Mouse
Please make sure that your operating system has been updated appropriately.
Using the serial port: Identify and note the COM port that the laboratory viscometer
Rheomat R 180 is connected to. This information will be needed after the software
has been installed.
Using the USB port: Plug the USB to serial cable into a free USB port. A suitable
cable can be ordered separately (Item No: 401 0920). Install the necessary drivers
according to the supplied instructions. Identify and note the COM port that the cable
has been assigned by checking the System Properties / Hardware / Device manager
Note: Rhesy S is supplied with a serial connection lead as standard. The communication between the PC and the Rheomat R 180 viscometer is possible using this lead
only. When using the Rheomat R 180 via USB, the supplied serial cable has to be
connected to the “Serial to USB” cable.
Page 3 of 29
(Rhesy 2011-06-07 Stand A)
Instruction manual Rhesy R 180
1.2. Transmission rate
On your Rheomat R 180, set the required transmission rate for data communication
to one of the following speeds (2400, 4800, 9600) The RHEOMAT R 180 comes with
a factory setting of 9600 Baud.
When switching the Rheomat R 180 on, press the “automatic” button. By entering
code 33 you can then enter the desired connection speed e.g. 9600
The software also functions with previous models of the RM 180 made by MettlerToledo or Rheometric Scientific. The connection speed of the previous models is
permanently set to 2400 Baud.
1.3. Software Installation
Insert the CD into your CD-ROM drive. Installing the software can be achieved by
double clicking the Program icon.
After installation, you will find the software under:
Start / program files / proRheo / Rhesy S
After starting the software the following window should appear:
Page 4 of 29
(Rhesy 2011-06-07 Stand A)
Instruction manual Rhesy R 180
1.4. Options
1.4.1. Program
Initially, under Options / Program, the following parameters have to be set:
Default settings
Language: choose your desired language (English or German)
Password protection: Enables assistants to operate the software without the possibility of changing any of the default values in “Options” and “Measurement parameters”.
Measuring Time: time needed for single point measurements. The minimum default
value is 20 seconds.
Page 5 of 29
(Rhesy 2011-06-07 Stand A)
Instruction manual Rhesy R 180
1.4.2. Measurement parameters
To measure shear stress, shear rate and viscosity the software needs various parameters from the measuring system used. All standard measuring systems available
for the Rheomat R 180 are pre- defined. When using self defined measuring systems, the parameters in the software and the Rheomat R 180 have to be adapted
accordingly.
Pressing and holding the “Print“-button whilst switching the Rheomat R 180 on prints
the defined measuring systems programmed into your Rheomat R 180.
(A printer has to be connected via the printer port of the Rheomat R 180 for this function to work!!)
Page 6 of 29
(Rhesy 2011-06-07 Stand A)
Instruction manual Rhesy R 180
1.4.3. Julabo
(Rhesy T only)
The default transfer rate for communication with the cryostat is set to 4800 Baud. If
changes to the cryostat itself have been made, then please ensure that these changes are also changed in the software.
Check which COM port has been used to connect the cryostat and enter the correct
port here.
You can test the communication between Rhesy T and the cryostat by pressing the
“Test” button.
Latency: enter the time needed before starting a flow curve measurement. (Time between cryostat reaching temperature and specimen fully reaching temperature)
When all values have been set, please click “Save changes“ to ensure that these
values are saved and can be used the next time the software is started.
Page 7 of 29
(Rhesy 2011-06-07 Stand A)
Instruction manual Rhesy R 180
2. Importing Data
Importing data from the Rheomat R 180 or RM180 requires that at least one automatic measurement has been absolved and saved with the connected viscometer.
The measuring data is sent via the viscometers serial interface as soon as the “Print”
button is pressed.
Tutorial:
- Connect the Rheomat R 180 to your PC as described under point 1
- Please ensure that the Rheomat R 180 has already absolved at least 1 measuring in automatic mode and that data has been saved within the Rheomat.
- Switch off the Rheomat.
- Go to “Read Data” in the software.
- Click on “Connect to Rheomat”
- Switch on the Rheomat and when the temperature is shown in the display
press the “computer” button on the Rheomat R 180.
- Data will be imported.
During import, a progress bar is shown to display the current “% complete” of the
import process.
Note: The Rheomat R 180 always transfers all saved measuring data!
Page 8 of 29
(Rhesy 2011-06-07 Stand A)
Instruction manual Rhesy R 180
The measuring data is not removed from the Rheomat R 180 after being transferred
to a PC. This means further measurings can be added to the viscometer. To delete
the stored data, press and hold the “Arrow” button when switching the Rheomat
R 180 on.
After the measuring data has been imported, Rhesy S (T) enables you to save the
data in different formats:
Page 9 of 29
(Rhesy 2011-06-07 Stand A)
Instruction manual Rhesy R 180
- Excel-File: Every data set is stored on a separate sheet.
-
As a file, useable for the Rhesy internal evaluation functions, or as a ASCII
file for transferring the data to other programmes. The later two formats
create a separate file for every dataset imported.
Page 10 of 29
(Rhesy 2011-06-07 Stand A)
Instruction manual Rhesy R 180
3. Analysis
To open a dataset, click on the Folder icon located at the top right of the window and
choose your desired file.
Page 11 of 29
(Rhesy 2011-06-07 Stand A)
Instruction manual Rhesy R 180
In the lower comment field, comments can be added. These will be saved within the
file for future reference.
The other icons allow you to print and import data from earlier Rhesy versions. Later
enabling you to save in the newer format.
3.1.
Tabular
Under the “Data“ tab, all data that has been collected is shown. This data can also be
printed or saved in Excel format.
Rheologic note: Please note that all measuring data should have a torque reading
of min 0.5 mNm and max 9.5 mNm. If this not the case, then the measuring system
or the shear rate my have to be adjusted. Further information can be found in the
instruction manual of the Rheomat R 180.
Page 12 of 29
(Rhesy 2011-06-07 Stand A)
Instruction manual Rhesy R 180
3.2.
Diagram
After clicking the “Diagram“ tab you will receive a graphic display of the measured
values.
This tab offers the following possibilities:
Choosing between viscosity or shear stress via the shear rate.
Approximation function und Thixotropic plane: 4 various interpretation functions
are available: Ostwald, Casson und Bingham. The thixotropic plane describes the
difference between upwards and downwards ramp directions of the flow curve. (For
further information see: Rheologie, Praxisorientierte Grundlagen und Glossar, Vincentz Verlag, ISBN: 3-87870-449-6
Upwards / downwards points - from / to:
In this example, the measuring was made up from 15 measuring points where the
first 8 points show a larger shear rate than normal. From point 8 onwards the shear
rate falls again, going back to the initial value. Calculation of the approximation function is based on either the upward or the downward curve. The curves used for calculation can be limited by using the “from” / “to” function.
The best approximation function for the measuring data is automatically suggested,
but changing to a different rheologic function is possible if needed.
Page 13 of 29
(Rhesy 2011-06-07 Stand A)
Instruction manual Rhesy R 180
3.3.
Viscosity / time dependency
Viscosity and time values in tabular form:
… and as a diagram….
Page 14 of 29
(Rhesy 2011-06-07 Stand A)
Instruction manual Rhesy R 180
3.4.
Viscosity / temperature dependency
Viscosity and temperature values in tabular form:
… and as a diagram….
Page 15 of 29
(Rhesy 2011-06-07 Stand A)
Instruction manual Rhesy R 180
4. Measuring specifications
The following window should open:
Usually the measuring specifications are set for creating flow curves. In some cases
step measuring may be required, and can be defined in the “Steps” tab.
When using a constant shear rate for measuring, use the “Flow Curve” function.
Open an existing measurement definition by clicking on the Folder icon, or create a
new one by clicking the disk.
4.1.
Flow Curve
Type in the required name for the measuring definition. Please assure that no special
characters (spaces are allowed) are within the chosen name
Measuring system: Choose the type of measuring system by clicking on the
“Choose measuring system” button and select the system in use.
Type of Rheomat: Choose which Rheomat is being used with the software from the
pull down menu. (Rheomat R 180, R 180T, RM180 or R 225)
Page 16 of 29
(Rhesy 2011-06-07 Stand A)
Instruction manual Rhesy R 180
Pre shearing is measuring with a constant speed right from the beginning of the
measuring process.
Pre shearing: Tick the box if pre shearing is required. Un-tick if not required.
Time duration: Enter required time of pre shearing.
Shear rate: Enter required shear rate.
Measuring points: Enter required number of measuring points used in pre shearing.
Ramp: A ramp causes the shear rate to be time-dependently increased or de
creased.
Shear rate 1: Enter required starting shear rate.
Shear rate 2: Enter required ending shear rate.
Number of measuring points: Enter the amount of points to be included in the
ramp.
Linear / Logarithmic: Decides on whether the measuring points are spaced out in a
linear or logarithmic way. Linear means evenly spaced, logarithmic means the lower
the shear rate, the tighter together the measuring points will be spaced out.
Holding time: Holding time is the time at which the shear rate is constant between
both of the ramps.
Temperature: The measuring starts when the entered temperature (minus tolerance)
is reached.
Icons (Top right of window): Save, Open an existing measuring specification, Delete,
Graphic representation and Print.
Page 17 of 29
(Rhesy 2011-06-07 Stand A)
Instruction manual Rhesy R 180
Graphic representation:
4.2.
Temperature sweep (Rhesy T)
Type in the required name for the measuring definition. Please assure that no special
characters ( spaces are allowed ) are within the chosen name
Measuring system: Choose the type of measuring system by clicking on the
“Choose System” button and select the system in use.
Type of Rheomat: Choose which Rheomat is being used with the software from the
pull down menu. (Rheomat R 180, RM180, R 180T or R 225)
Page 18 of 29
(Rhesy 2011-06-07 Stand A)
Instruction manual Rhesy R 180
The following phases can be defined:
Pre Heat, upward ramp, holding time and downward ramp
Properties:
Please choose if the measuring system should run all the time or only when a measuring point is reached.
Time duration: As soon as the Julabo has reached the required temperature, a
measuring will take place after the pre-defined time has lapsed.
Icons (Top right of window): Save, Open an existing measuring specification, Delete
and Print.
Page 19 of 29
(Rhesy 2011-06-07 Stand A)
Instruction manual Rhesy R 180
5. Starting a measurement
The following window appears when starting a measurement:
Specimen number: Enter a freely customizable number.
Choose a measuring specification. The measuring system is defined in the measuring specifications (point 4) and is automatically chosen.
Before measuring, the Rheomat has to be connected to the software by clicking on
“Connect to Rheomat”. Switch on the Rheomat and when the temperature is shown
in the display, press the “computer” button on the Rheomat R 180.
The word “Computer operation” will show on the display of the Rheomat R 180 and a
window “Viscosity- and temperature values tabular” will appear.
5.1.
Flow curve
To start a measuring click on “Start measurement“
If a target temperature has been defined, measuring waits until the actual temperature is within the pre-defined tolerance. After reaching the temperature, the set Julabo holding time is waited for, before the specimen is completely tempered.
Page 20 of 29
(Rhesy 2011-06-07 Stand A)
Instruction manual Rhesy R 180
Before changing to measure the flow curve, the Julabo stops briefly and then starts
again.
After measuring is complete, the results can be saved for later use.
Page 21 of 29
(Rhesy 2011-06-07 Stand A)
Instruction manual Rhesy R 180
5.2.
Temperature sweep
Before measuring a temperature sweep, the cryostat has to be brought up to temperature. During this time the desired temperature is shown on the cryostat and the
programmed temperature curve is shown on screen.
When the set temperature is reached. measuring starts automatically.
Page 22 of 29
(Rhesy 2011-06-07 Stand A)
Instruction manual Rhesy R 180
After measuring is complete, the results can be saved for later use.
The measured data is now ready to be analysed.
Page 23 of 29
(Rhesy 2011-06-07 Stand A)
Instruction manual Rhesy R 180
6. Application example
6.1. Silicone oil
Measuring specification: flow curve, upward ramp only with pre shearing.
Results:
Page 24 of 29
(Rhesy 2011-06-07 Stand A)
Instruction manual Rhesy R 180
6.2. Liquid soap
Measuring specifications:
Result:
The viscoelastic nose is clearly visible at the start of the upward ramp.
Page 25 of 29
(Rhesy 2011-06-07 Stand A)
Instruction manual Rhesy R 180
7. Tips and tricks
Error whilst starting the software:
¾ Update the MDAC components.
No connection between the Rheomat R 180 and the Software
¾ Check connection rate: soft- and hardware settings the same?
¾ Cable: original cable in use?
¾ COM Port- settings correct?
¾ Check if software has accidentally been started more than once.
No Licence
¾ Re- install software
Program will not start
¾ Check operating system.
¾ Update your operating system.
For further questions:
proRheo GmbH
D- 75382 Althengstett
Tel +49 – (0) 7051 – 924890
Fax +49 – (0) 7051 – 9248929
[email protected]
Page 26 of 29
(Rhesy 2011-06-07 Stand A)
Instruction manual Rhesy R 180
8. Sicherheitshinweise
Die Einhaltung dieser Sicherheitshinweise entbindet den Verwender grundsätzlich nicht von seiner Pflicht, eigenverantwortlich für Sicherheit, Gesundheit und Umweltschutz zu sorgen, um mögliche Gefährdungen oder Belastungen für sich oder Dritte auszuschließen oder auf ein akzeptables Restrisiko zu beschränken.
Der Betrieb des Gerätes in feuchten und nassen Bereichen sowie in Bereichen mit aggressiver chemischer Atmosphäre ist verboten.
Der Betrieb im Freien ist verboten.
Das Gerät und insbesondere die elektrische Ausrüstung vor eindringender
Feuchtigkeit schützen!
Vorsicht: Gefährliche Spannung!
In dem Gerät können gefährliche Spannungen (230 V Wechselspannung) verwendet werden.
Die Netzzuleitung steht unter gefährlicher Spannung.
Das Gerät darf nur an Netz-spannungen mit 230 V Wechselspannung
und einer Netzfrequenz von 50 Hz angeschlossen werden.
Flüssigkeiten und Aerosole dürfen nicht in die elektrischen Betriebsmittel eindringen.
Bei Gefahrensituationen schalten Sie sofort den Netzschalter aus.
Durch ausschalten des Netzschalters wird das Gerät spannungsfrei geschaltet
Die Netzzuleitungen und die Signalkabel können durch eine nicht sachgerechte Leitungsverlegung eine gefährliche Stolpergefährdung darstellen.
Verlegen Sie die Kabel geschützt und außerhalb des Verkehrsbereiches
Instandhaltungsmaßnahmen an der elektrischen Ausrüstung und den mechanischen Komponenten des Geräts wie Wartungen, Inspektionen und Instandsetzungen dürfen nur von befähigten Personen durchgeführt werden.
Die Geräteoberflächen dürfen niemals mit ungeeigneten Flüssigkeiten und
Lösemitteln (brennbare, explosionsfähige oder anlösende Chemikalien wie
Alkohole oder Nitro-verdünnungen) gereinigt werden.
Verschmutzungen an den Oberflächen dürfen nur mit einem trockenen oder
nebelfeuchten Lappen entfernt werden, der mit einem geeigneten Industrieoder haushaltsüblichen Allzweckreiniger benetzt wurde.
Betreiben Sie das Gerät nur an vor mechanischen Gefährdungen geschützten Aufstellungsorten.
Achten Sie beim Transport des Gerätes auf eine geeignete Ladungssicherung und Verpackung.
Page 27 of 29
(Rhesy 2011-06-07 Stand A)
Instruction manual Rhesy R 180
Nach erheblichen mechanischen Beschädigungen muss für das Gerät eine
fachgerechte Instandhaltung eingeleitet werden.
Verhindern Sie den Umgang und den Betrieb des Geräts durch unbefugte
Personen.
Das Gerät muss regelmäßig, mindestens jedoch nach vier Jahren, auf die
Einhaltung der berufsgenossenschaftlichen Vorschrift BGV A 3 überprüft
werden.
Insbesondere müssen Durchgängigkeitsprüfungen des Schutzleitersystems
durchgeführt werden.
Das Gerät darf nicht in explosions-gefährdeten Bereichen oder in aggressiven chemischen Atmosphären betrieben werden.
Der Verwender darf die elektrischen Betriebsmittel nicht öffnen oder Schutzverkleidungen oder Schutzabdeckungen entfernen.
Das Gerät darf nur innerhalb von trockenen Räumen bei normaler Raumtemperatur und Luftfeuchtigkeit betrieben werden.
Sehr kalte Geräte müssen vor dem Anschluss an die Netzspannung mindestens 6 Stunden in normaler Raumtemperatur gelagert werden.
Bei Nichtbeachtung dieses Hinweises kann die elektrische Ausrüstung durch
Kondenswasserbildung innerhalb des Gerätes Schaden nehmen oder eine
erhebliche Gefährdung durch den elektrischen Strom für den Betreiber auftreten.
Die Netzzuleitungen und die Signalleitungen dürfen mechanisch nicht durch
Zug, Druck oder Abscheren belastet werden.
Die Manipulation von Sicherheitseinrichtungen wie z. B. der Feinsicherungen
ist grundsätzlich verboten.
Beim Ausfall von Sicherheitseinrichtungen darf das Gerät bis zu einer bestimmungsgemäßenen Instandhaltung nicht weiter betrieben werden.
Das Gerät darf nicht betrieben werden, wenn erhebliche Sicherheitsmängel
aufgetreten sind.
Nach dem Auftreten von erheblichen Mängeln muss das Gerät energiefrei
geschaltet werden und ein Wiedereinschalten bis zur fachgerechten Instandhaltung wirksam verhindert werden.
Das Gerät muss im Brandfall mit geeigneten Löschmitteln gelöscht werden.
Geeignete Löschmittel sind: ABC-Pulver, CO2 oder AB-Schaum
Beachten Sie beim Löschereinsatz einen Sicherheitsabstand zu den elektrischen Betriebsmitteln von mindestens 1 m.
Beachten Sie die einschlägigen Brandschutzbestimmungen sowie die Brandschutzordnungen Ihres Betriebes.
Page 28 of 29
(Rhesy 2011-06-07 Stand A)
Instruction manual Rhesy R 180
9. Support / Service
Please fill in the form and send in via fax to the following number:
+49 - 7051 – 92489-29
Company
__________________________________________________________________
Name
__________________________________________________________________
Section
__________________________________________________________________
Telephone
__________________________________________________________________
Fax
__________________________________________________________________
email
__________________________________________________________________
Address
__________________________________________________________________
Address
__________________________________________________________________
Please contact us regarding the following unit:
Serial number _____________________________________
Service / Calibration
Technical questions
[email protected]
www.proRheo.de
Page 29 of 29
(Rhesy 2011-06-07 Stand A)