1
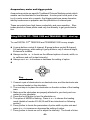
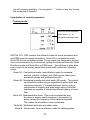
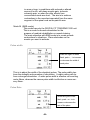
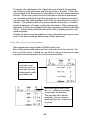
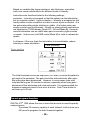
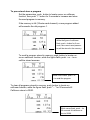
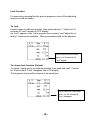
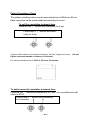
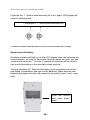
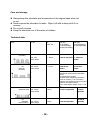
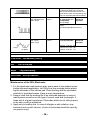
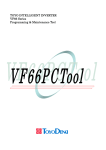
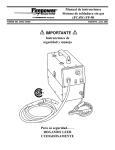
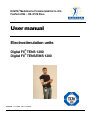
DAVITA® Medizinische Produkte GmbH & Co. KG • Postfach 2004 • DE-47518 Kleve User manual Electrostimulation units Digital Fit® TENS 1200 Digital Fit® TENS/EMS 1200 Version 1.0 vom 14.01.2008 -1- INDEX Precaution………………………………………..………2 Introduction………………………………………….. …3 Overview of Instrument………………………………...4 Effective use………………………………………….…5 Using DIGITAL FIT® TENS 1200 and TENS/EMS 1200 – Start-up…………. …………...…..6 Introduction of control parameters..……………. …….7 Pre-set program function…………………….………..10 Lock function…………………………………. ……….12 Patient compliance time………………………. ……..13 Replacement of battery……………………… …… …14 Care and Storage……………………………… … ....15 Technical data…………………………………… ……15 Maintenance of the GELElectrodes…………………. 16 Immediate Maintenance…………………………….....17 Basic equipment of the Instruments…………………..17 Guarantee……..………………………………….. ……18 Application and programs ……………………………..18 Precaution Warning! People with pacemakers, intra cardiac defibrillators or other active implants, pregnant women, and children must not use the Digital Fit 1200 Do not use the Digital Fit 1200 if you are connected to high frequency surgical equipment, since this may cause burn injuries on the skin under the electrodes, as well as problems with the stimulator. Do not use if you have serious arterial circulatory problems in the lower limbs. Do not use after trauma or a recent operation. Keep out of reach from children Note The stimulator should only be used with skin electrodes intended for nerve and muscle stimulation. The electrodes should only be placed on healthy skin. Avoid skin irritation by ensuring good contact between electrodes and skin. Hypersensitivity can occur in rare cases. If skin irritation should occur, treatment with the Digital Fit 1200 should be temporarily discontinued. If condition -2- persists, seek medical advice. Switch off stimulation before removing the electrodes from the skin. If an electrode comes off, shut off the stimulator before picking it up. Getting electrical stimulation through the fingers is unpleasant but not harmful. Be careful with stimulating in the heart region. Use the Digital Fit 1200 only as stated in the operating instructions. Inspect the equipment prior to use. Never use more than one stimulator at the time. Never open the battery lid during stimulation. The stimulator meets the requirements of MDD 93/42/EEC, including the EMC requirements. This, however, is no guarantee that the equipment will not be affected by electromagnetic disturbances. If the stimulator is not used for some time (approximately 3 months), the batteries should be removed from the stimulator. Introduction Electrical stimulation has successfully been used in pain relief and physical therapy for a long time. It sends tiny electrical impulses to the nerve endings through the skin. These impulses help to change the original pain message to the brain and by that process it eliminates the sensation of pain. It is also assumed that the TENS stimulation causes release of endorphin into the body and by this release pain is sometimes reduced for hours after using the device. DIGITAL FIT® TENS/EMS 1200 stimulator also contains EMS mode for muscle training. The main objective with EMS mode is to create muscle contractions or vibrations through sending the electric pulse to the muscle for the purpose of re-educating the muscle. -3- Overview of Instrument This user manual is valid for the electro stimulation unit DIGITAL FIT® TENS 1200 and the unit DIGITAL FIT® TENS/EMS 1200. The differences between the units are the different programs the instruments contain. From the handling of the units there is no difference! Socket for electrode wire On/off A group buttons to control channel A B group buttons to control channel B Buttons cover Timer FUNCTIONS OF BUTTON Digital Fit 1200 has the feature to control channel A and channel B individually. Therefore there are 2 groups of function control buttons for each A and B channel. -4- Effective use Advice on skin care Be sure to place the electrodes on healthy skin only. Wash skin thoroughly, and then dry it before applying the electrodes in order to ensure good conductivity. Apply the whole surface of the electrodes firmly to the skin. Do not use the electrodes when the lose adhesion quality. In case of skin redness under the electrodes after a stimulation session, do not start a new stimulation session in the same place if skin redness is till evident. Always make sure to turn the power off before attaching or removing the electrodes from your skin. Electrode placement To receive maximum results from your stimulator, it is important to place the electrodes properly. As every patient react differently to electrical stimulation and individual needs may differ from the conventional settings, the user must therefore try several sites before deciding on an optimal placement site. The following sections are the recommended electrodes placed positions which may provide more successful treatment. Painful area This is the most commonly used placement technique. Electrodes are placed close to or around the localized area of pain so that the electricity flows through it. This is achieved by placing an electrode on each side of the inflicted area. This works well if the pain is localized on an extremity or deep within the tissue. Peripheral nerve The electrodes may also be placed over a peripheral nerve which has a cutaneous distribution in the painful area. For example, pain experienced on the dorsum of the lateral aspect of the hand and the first and second digits can be treated with electrodes placed over the superficial radial nerve along its course on the lateral aspect of the lower one third of the forearm. -5- Acupuncture, motor and trigger points Acupuncture points are specific Traditional Chinese Medicine points which asserts can be stimulated to treat disease. A motor point is the point of entry of a motor nerve into a muscle. And trigger points are areas characterized by tenderness on palpation and the production of referred pain. These are points have high tissue conductivity and more sensitive. Electrodes placed on these points need only low intensity to get good stimulation. Using DIGITAL FIT® TENS 1200 and TENS/EMS 1200 – start up To use DIGITAL FIT® TENS1200 and TENS/EMS 1200 is very simple: A group buttons control A channel, B group buttons control B channel. For saving energy, while setting A group buttons, only A channel bright, B channel is invisible. Always use the↑or↓to locate on the different options of mode, width, rate, call/mem and mA (output intensity). Always use + or – to increase or decrease the setting of option. Step by step: 1. Connect a pair of electrodes to an electrode wire, and the electrode wire to a channel socket on the stimulator. 2. The next step is to place the electrodes on the skin surface of the treating area. 3. Make sure the electrodes are properly attached to your body and connected to your stimulator. 4. Press the on/off button to turn the stimulator on. 5. The option of MODE is flashing. Press + or – to choose the treating mode (details of modes N1~N4, B and M are introduced on following section). 6. Press↓button to locate the parameters of pulse width or pulse rate and press + or – to increase or decrease the setting of option. 7. Press↓button to locate on mA to adjust the intensity. The levels of inten-6- sity will increase gradually. You may push “ – “ button at any time to stop the increasing of intensity. Introduction of control parameters Treating mode: While the mode selection flash, push + or - to choose the treating mode DIGITAL FIT® 1200 contains five different modes for nerve stimulation and one EMS mode for muscle stimulation. Mode N1 is conventional mode, Mode N2~N4 are modulated modes. These modes are designed to prevent nerve accommodation by continuously cycling the treatment intensity. Mode B is Burst mode and Mode M is an EMS mode. And all these modes allow users to set the necessary parameters (pulse width, pulse rate, intensity) range. Mode N1: Conventional mode, most effective mode for neuralgia, athrosis, arthritis, lumbago, with CNS injuries, labor pains, menstrual cramps and postoperative pain. Mode N2: Modulated intensity and pulse width (SD mode). The individual stimulation pulses vary as regards both pulse width and stimulation intensity. It is widely believed, that by using a combination of intensity and pulse width setting, electrical impulses are capable of stimulating different groups of nerve fiber. Mode N3: Modulated rate mode. This mode simulates the way the nervous system sends impulses to the muscle, by slowly varying the frequency of the electrical impulses. This makes the stimulation more comfortable. Mode N4: Modulated both rate and width mode. Mode B: Burst mode, the most effective mode for radiating pains -7- in arms or legs, in conditions with reduced or altered sense of touch, with deep muscle pain, ischemic extremity pain, or when the after effects from conventional mode are short. The aim is to achieve contractions in the muscles innervated from the same segment of the spinal cord as the painful area. Mode M (EMS mode): This mode has only the DIGITAL FIT TENS/EMS 1200 unit This is a mode for muscle stimulation for the purpose of medical rehabilitation or muscle training. The main objective with EMS mode is to create muscle contractions or vibrations. Place electrodes on the muscle you want to activate. Pulse width While the figure of width flash, push +, - to increase or decrease the width of each pulse This is to adjust the width of the electrical pulses. The pulse width destines the strength and sensation of stimulation. A wider setting will deliver a stronger stimulation. A wider pulse width is effective on recruiting motor fibers, whereas the narrow pulse width is effective on more sensory fibers. Pulse Rate While the figure of rate flash, push + or - to increase or decrease the rate of the pulse. -8- The pulse rate, displayed in Hz, depicts the rate at which the impulses are released to the electrodes and through those to the skin. Pulse rate setting needs to be determined in accordance to the electrode placement chosen. When using contiguous and dermatome electrode placement (i.e. stimulating directly through the area of pain or localized enervation), a quick pulse rate (setting greater than 80Hz on the pulse rate control) is desired. The patient should not perceive individual impulses, but rather have the sensation of steady, continuous stimulation. When using point treatment, it has been suggested that slow impulses be utilized (less than 10Hz). At this setting the patient should be able to slightly perceive individual impulses. Despite the above recommendations, every individual may require variations to the above settings, determined by their physician. Rise time, time on and rest time These parameters are for Mode M (EMS mode) only. After setting pulse width and pulse rate, user has to set the rise time, the time on and rest time. Usually the rest time is 3 times of rise time in order to prevent muscle tiredness of a continuous stimulation. For EMS mode, user has to set rise time, time on and rest time after setting pulse width and pulse rate Intensity While this figure flash, push the + or - buttons to increase or decrease the intensity. The intensity will increase gradually, you may stop increasing by push – buttons at any time. -9- Based on variables like tissue resistance, skin thickness, enervation, each user reacts individually to the different levels of intensity. Instructions are therefore limited to the following settings: sensation – intensity is increased so that the patient can feel stimulation, but no muscles contract. Light contraction – intensity is increased so that hardly visible muscle contraction not able to move a joint is effected. At a low pulse rate setting single twitching is visible. At a higher pulse rate simply muscle tonus is increased. Usually no strong muscle contractions are employed in TENS therapy (Mode N1 ~ N4 and Mode B). However, muscle contraction can be useful when pain is caused by tight muscles or spasm. In this event, set EMS mode (Mode M) in order to release the spasm. In all cases, if the user feels that stimulation is uncomfortable, reduce intensity or cease stimulation. Timer (minutes) Timer setting The initial treatment should be kept short (<30 mins.) to allow the patient to get used to the sensation. The pain should be relieved shortly after intensity setting has been determined. However, in some cases, pain relief may take as long as 30 minutes to achieve, especially when using point placement of the electrodes and a low pulse rate. It is recommended the maximum treatment period of one hour at a time. Push Timer button to set timer up to 99 min. Pre-set program function DIGITAL FIT® 1200 allows the user to store the favourite or most frequently used programs. It provides 32 memory capacity of each channel, total to store up to 64 favourite programs for both channels together. - 10 - To pre-set and store a program Set the parameters, push↓button to locate cursor on call/mem function, then push “+” button for 2 seconds to increase and store the used program in memory. If the memory is full (32 sets each channel), a new program added will overwrite the old program 1. While the figure of call/mem flash, push + button for 2 seconds, the current used parameTo recall a programin stored memory ter will be stored theinmemory. To recall a program stored in memory, push↓button to locate cursor on call/mem function, while the figure flash, push + or – to recall the stored program. While cursor flash, push + or To clear programs – to recall the program To clear all programs stored in memory, push↓button to locate on call/mem function, while the figure flash, push “ – “ for 30 seconds till Call/mem return to 00/00. While cursor flash, push – for 30 seconds till call/mem return to 00/00. - 11 - Lock Function For preventing misusing/lost the pre-set programs, some of the adjusting functions could be locked. To Lock Locate cursor on call/mem position, then push and hold “+” button for 30 seconds till “Lock” appear on LCD display. As “Lock” appears, only “call a program from memory” and “adjust the intensity” functions are workable. Other parameters could not be adjusted. While call/mem cursor flash, push + for 30 seconds till “lock” appear. To release lock function (Unlock) To unlock, locate cursor on call/mem position, then push and hold “-” button for 30 seconds till “Lock” disappear from LCD display. The programs stored will be cleared at the same time. While call/mem cursor flash, push - for 30 seconds till “lock” disappear. - 12 - Patient Compliance Timer The patient compliance timer can be accumulated up to 999 hours 50 min. Each using time will be accumulated automatically to record. To call the cumulative treatment time: Press the two “+” buttons simultaneously for 5 sec. Press these 2 “+” buttons simultaneously for 5 sec. 4 figures will be shown on the bottom left corner, the first 3 figures are hours, the last figures represent decade of minutes (10 minutes). Ex. the accumulative time of 06 23 is 62 hours 30 minutes. To delete record of cumulative treatment time: Press the two “-” buttons simultaneously for 5 sec., the cumulative time will return to 00 00. Press these 2 “-” buttons simultaneously for 5 seconds - 13 - Quit and return to treating mode Press the two “+” buttons simultaneously for 5 sec. again, LCD display will return to treating mode. Press these 2 “+” buttons simultaneously for 5 sec. again * The patient compliance timer will keep the record even when the battery has no charge. Replacement of battery A battery indicator will light up on the LCD display when the batteries are almost drained. As long as stimulation feels the same as usual, you can continue the treatment. It is time to replace the batteries when stimulation starts diminishing or the stimulator stops working. Turn the stimulator off. Remove the battery cover by pushing the convex and sliding it downwards, and take out the batteries. Make sure the new batteries are placed correctly with respect to the polarity (note + and – symbols) . Push this convex and slide downward. - 14 - Care and storage Always keep the stimulator and accessories in the original case when not in use. Never expose the stimulator to water. Wipe it off with a damp cloth if necessary. Do not pull on wires Keep the stimulator out of the reach of children Technical data Mode Pre-set mA (under 500Ω) Rate (Hz) Width (μS) 1-2 (1Hz/Step) 50-300 (25μS/step) 10-180 (5Hz/Step) 300-350 (50μS/step) 180-200 (10Hz/Step) Rate: 2 Hz Width: 125μS 0 – 80mA 1-200 Hz adjustable 50 – 350μS adjustable Rate: 100Hz Width: 125μS 0 – 25 mA 10-200 Hz adjustable N1 (Constant) N2 (StrengthDuration) 50-175 μS adjustable The individual stimulation pulses vary as regards both pulse width and stimulation current. The variations are random. The pulse width multiplied by stimulation current is constant ( I x W =Constant ). Under this set constant, the range of output variations are limited as follow: 50μS < Pulse Width< 350μS; 1mA < I < 50 mA N3 (Modulate Rate) Rate: 100Hz Width: 125μS. 0-80mA 100-200 Hz adjustable N4 (Modulate Rate-Duration) 0-50mA 20-200 Hz adjustable: Rate: 100 Hz Width: 150μS - 15 - 50-350μS adjustable 150-350μS adjustable During the beginning of 3 Sec., the P/W increased from 50μS to the control set value and the P/R decrease from the control set value to 10Hz. And then during next 3 Sec. P/F increased and P/W decreased. Rate: 2 Burst/second Width: 150μS 0-80mA 0.5- 5 Bursts per sec- 150-350 μS ond adjustable adjustable 0.5-5 (0.5/Step) 7 pulses per burst ( frequency fixed on 100Hz) 0.5-5 Bursts adjustable per second. Rate: 100 Hz Width: 175μS 0-80mA 10-100 Hz adjustable Rise time: 1-20 Sec. (A) Work time: 0.5-2 Sec. (B) Rest time: 0-50 Sec. ( C ) M (EMS) Waveform: Memory: 100-350 μS adjustable Asymmetric bi-phase square with zero net DC each channel could store 32 set treatment programs Power Source: 4 pcs AA battery (1.5V x 4) Size: Weight: 130 x 70 x 30 (mm) 115g (without battery) Timer counter: Store up to 999 hours Maintenance of the GEL-Electrodes 1. For the electrodes maintenance apply some water to the adhesive electrodes after each application. Let it dry for a few seconds before attaching the electrode to the silicone pad. Close the bag with the electrodes carefully to avoid desiccation. Keep at room temperature. 2. Keep in mind that the working life of an electrode depends on correct maintenance as well as on the type of current used and its strength. A clean skin is of great importance. Electrodes which do not stick properly to the skin, must be reattached. 3. Apply only to healthy skin. In case of allergies or skin irritation, stop treatment and consult a doctor. (A pair of electrodes should be used by one person only). - 16 - Immediate Maintenance An immediate maintenance to be carried out by DAVITA® or authorized trained staff is required in the following cases: Mechanical strain, e.g. the instrument was dropped and, therefore, dam damaged; the instrument was overheated after leaving it near a source of heat; suspicion that water has entered the instrument; case or other instrument’s parts are damaged, broken or missing; the unit does not seem to work properly. NOTE: We recommend to have controls carried out exclusively by DAVITA® or by authorized trained staff. The instrument to be serviced can be sent directly to the customer service of the manufacturer or to the dealer. Customer service centre: DAVITA® Medizinische Produkte GmbH & Co. KG Telephone: +49 (0) 1805 – 911270 • Telefax: +49 (0)1805 – 911275 E-Mail: [email protected] • www.davita.de Basic Equipment of the Instruments DIGITAL FIT® TENS 1200, Art.No. : 30037 1 pce. instrument 1 pce. out put cable set for TENS and TENS/EMS 1200, Art.No.: 31013 4 pces. self-adhesive gel-electrodes 5 x 5 cm for TENS and TENS/EMS 1200, Art.No.: 31011 4 pces. batteries, 1,5 volt 1 pce. packing case 1 pce. instruction manual DIGITAL FIT® TENS/EMS 1200, Art.No. : 30038 1 pce. instrument 1 pce. out put cable set for TENS and TENS/EMS 1200, Art.No.: 31013 4 pces. self-adhesive gel-electrodes 5 x 5 cm for TENS and TENS/EMS 1200, Art.No.: 31011 4 pces. batteries, 1,5 volt 1 pce. packing case 1 pce. instruction manual - 17 - Guarantee DAVITA® guarantees for this instrument for a period of 24 months after date of sale. Wear parts, such as batteries and gel-electrodes are excluded from the guarantee. The guarantee is valid for material defects and manufacturing faults and includes the provision of spare parts as well as labour. Guarantee expires if the instrument has been damaged, or used improperly or unauthorized intervention was carried out. Keep the purchase receipt as proof and submit it together with your claim for guarantee. DAVITA® will only fulfil the guarantee upon receipt of your purchase proof. Applications and programs Regarding the examples for possible applications of the electrodes please look at the German version of the User manual at page 27 – 33. The preset programs for the DIGITAL FIT® TENS 1200 you can find on page 13 of the German user manual and the programs of the DIGITAL FIT® TENS/EMS 1200 at page 15. The names of the programs are as follows: 1) Preset TENS-Programs 01/16, 02/16 and 03/16: high frequency, conventional TENS programs for immediate pain relief via blocking the pain forwarding 04/16 and 05/16: low frequency conventional TENS programs for a longer persistent pain relief 06/16 and 07/16: Burst programs for a better blood circulation against acute pain. 08/16, 09/16 and 10/16: modulated TENS-programs to prevent a habituation regarding the TENS-therapy which can appear by the conventional programs 11/16: Conventional TENS-program against arthritis. 12/16: Modulated TENS-program against shoulder and neck pain 13/16: Modulated program against back pain (lumbago) 14/16: Program against knee pain 15/16: Modulated program against karpaltunnel syndrome 16/16: Modulated program against hip and sciatica pain P2) Preset TENS and EMS Programs 01/16 and 02/16: high frequency conventional TENS programs for immediate pain relief 03/16: low frequency conventional TENS programs for a longer persistent pain relief - 18 - 04/16: Burst program for a better blood circulation against pain. 05/16: modulated TENS-program to prevent a habituation regarding the TENS-therapy 06/16: Conventional TENS-program against arthritis. 07/16: Modulated TENS-program against shoulder and neck pain 08/16: Modulated program against back pain (lumbago) 09/16: Modulated program muscle atrophy arms 10/16: Modulated program muscle atrophy legs 11/16: Program for mobilisation of wrist, elbow and knees after immobilization. 12/16: Program for reducing the spasticity 13/16: Program for strengthen the arms 14/16: Program for strengthen the legs 15/16: Program for endurance 16/16: Program for muscle relaxion and blood circulation DAVITA® Medizinische Produkte GmbH & Co. KG Postfach 2004 • D-47518 Kleve Telefon: +49 (0) 1805 – 911 270 • Telefax: +49 (0) 1805 – 911 275 E-Mail: [email protected] •www.davita.de Rev. Nr. 1101081 - 19 -