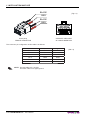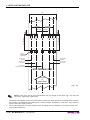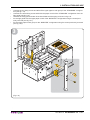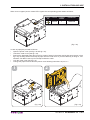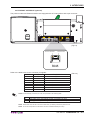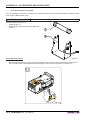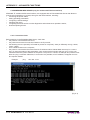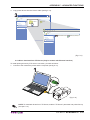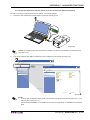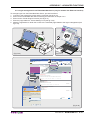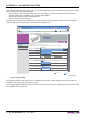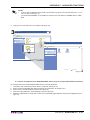
1
TO
R
P
p us EM
a h
O
p
e S
P
VE
r 1
u
s s
e h to to
PA
le S
re s
c 2
P
m el
te
o ec ER
d to
v
:
p re e t t
a m
h
p
e
e o
r v
e
KPM300H-TF
USER MANUAL
PAP
ER
EN
D
OEM
Commands reference: DOMC-0005E
All rights reserved. Total or partial reproduction of this manual in whatever form, whether by printed or
electronic means, is forbidden. While guaranteeing that the information contained in it has been carefully
checked, CUSTOM ENGINEERING SPA and other entities utilized in the realization of this manual bear no
responsibility for how the manual is used.
Information regarding any errors found in it or suggestions on how it could be improved are appreciated.
Since products are subject to continuous check and improvement, CUSTOM ENGINEERING SPA reserves
the right to make changes in information contained in this manual without prior notification.
Copyright © 2009 CUSTOM ENGINEERING S.p.a. – Italy
CUSTOM ENGINEERING SPA
Str. Berettine 2 - 43010 Fontevivo (PARMA) - Italy
Tel.: +39 0521-680111 Fax: +39 0521-610701
http: www.custom.biz
Customer Service Department:
Email: [email protected]
PRINTER COMPONENTS
A. KPM300H-TF - Front external view
1 - Printing head set
2 - Printer frame
3 - LINE FEED key
4 - FORM FEED key
5 - S1 key
6 - S2 key
7 - Status led
8 - Triple Feeder unit
9 - Paper input 1
10 - Paper input 2
11 - Paper input 3
1
2
7
8
ER
:
ER
P
A he
P tt
c
VE le
O se ove e
v
EM to m o
R 1 re em
O S o r er
T sh r t to ap
u e
2 p
P ap
S d
p
h e
s t
u c
P ele
s
PAP
END
3
4
5
6
9
8
7
User Manual
KPM300H-TF
B. KPM300H-TF – Side external view
3
TO
4
R
P
p us EM
a h
O
p
e S
P
VE
r 1
u
s s
e h to to
PA
le S
r
c 2 em se
PE
te
le
t
o
R
d o
v c
:
p re e t t
a m
h
p
e
e o
r v
e
1 - Paper outfeed
2 - Cutter cover
3 - Release lever
4 - Closing carter
ER
PAP
1
2
KPM300H-TF
User Manual
D
EN
C. KPM300H-TF – External connectors view
1 - USB connector
2 - RS232 connector
3 - ETHERNET connector (optional)
4 - SD/MMC card (optional)
5 - Power Supply connector
1
2
3
4
User Manual
5
KPM300H-TF
D. KPM300H-TF - Inside view of sensors position
1 - Head temperature sensor
2 - Cutter position sensor
3 - Opening/closing front cover sensor
4 - Paper out presence
5 - Printing head set open
6 - Sensor of paper presence or notch sensor
6
6
TO
R
P
p us EM
a h
O
p
e S
P
VE
r 1
s us
e h to to
PA
le S
r
c 2 em se
PE
te
le
t
o
R
d o
v c
:
p re e t t
a m
h
p
e
e o
r v
e
6
ER
PAP
D
EN
1
2
3
4
4
5
6
6
KPM300H-TF
User Manual
6
TABLE OF CONTENTS
INTRODUCTION
MANUAL CONTENTS ...................................................................................................................................... 1
EXPLANATORY NOTES USED IN THIS MANUAL ......................................................................................... 1
GENERAL SAFETY INFORMATION................................................................................................................ 1
UNPACKING THE PRINTER ........................................................................................................................... 2
PRINTER FEATURES ...................................................................................................................................... 3
PRINTER DESCRIPTION ................................................................................................................................ 4
1. INSTALLATION AND USE
1.1 CONNECTIONS ......................................................................................................................................1-1
1.1.1 Power Supply ..................................................................................................................................1-1
1.2 SELF-TEST .............................................................................................................................................1-3
1.3 CONFIGURATION...................................................................................................................................1-4
1.3.1 Ethernet setup (only for models with Ethernet interface) ................................................................1-5
1.3.2 Printer setup ....................................................................................................................................1-7
1.4 HEXADECIMAL DUMP ...........................................................................................................................1-8
1.5 CALENDAR CLOCK................................................................................................................................1-9
1.6 PAPER SPECIFICATIONS ....................................................................................................................1-10
1.6.1 Specifications for ticket with barcode (only for printer models with barcode reader) ....................1-10
1.6.2 Specifications for ticket with notch ................................................................................................ 1-11
1.6.3 Specifications for ticket with labels ................................................................................................1-13
1.6.4 Specifications for ticket with gap ...................................................................................................1-13
1.6.5 Specifications for ticket with RFID Tag (only for printer models with RFID reader) .......................1-14
1.7 MAINTENANCE ....................................................................................................................................1-15
1.7.1 Changing the paper roll .................................................................................................................1-15
1.7.2 “BURSTER” configuration .............................................................................................................1-16
1.7.3 “CUT AND DROP” configuration ...................................................................................................1-19
1.7.4 Paper jam ......................................................................................................................................1-22
Paper jam inside the Triple Feeder Unit .................................................................................................1-22
Paper jam inside the printer ...................................................................................................................1-22
1.7.6 Cleaning the printing head ............................................................................................................1-25
1.7.6 Cleaning the plastic window for barcode reading (only for printer models with barcode reader)..........1-26
2. INTERFACES
2.1 RS232 SERIAL ........................................................................................................................................2-1
2.2 ETHERNET INTERFACE (optional) ...................................................................................................2-3
2.3 USB INTERFACE ...............................................................................................................................2-4
3. TECHNICAL SPECIFICATIONS
3.1 TECHNICAL SPECIFICATIONS..............................................................................................................3-1
3.2 DIMENSIONS ..........................................................................................................................................3-3
4. CHARACTER SETS
4.1 CHARACTER SETS IN ESC/POSTM EMULATION .................................................................................4-1
4.2 CHARACTER SETS IN SVELTA EMULATION .......................................................................................4-2
APPENDIX A - ACCESSORIES AND SPARE PARTS
A.1 ACCESSORIES ..................................................................................................................................... A-1
A.1.1 Power Supply ................................................................................................................................. A-1
A.1.2 External paper roll holder .............................................................................................................. A-2
A.1.3 FanFold Holder ............................................................................................................................. A-5
Assembly instructions ............................................................................................................................. A-9
A.2 SPARE PARTS......................................................................................................................................A-11
User Manual
KPM300H-TF i
TABLE OF CONTENTS
APPENDIX B - ALIGNMENT MANAGEMENT
B.1 TICKET ALIGNMENT ............................................................................................................................. B-1
B.1.1 Ticket alignment ............................................................................................................................. B-1
B.1.2 Enabling, calibrating and setting of parameters ............................................................................. B-1
B.2 COMMANDS .......................................................................................................................................... B-4
B.2.1 Ticket alignment ............................................................................................................................. B-4
B.2.2 Setting the alignment distance ....................................................................................................... B-4
B.2.3 Examples ....................................................................................................................................... B-4
B.3 PAPER CHARACTERISTICS ................................................................................................................ B-7
B.3.1 Position of the notch ...................................................................................................................... B-7
B.3.2 Dimension of tickets ....................................................................................................................... B-8
B.4 METHODS OF USAGE.......................................................................................................................... B-9
B.4.1 Command sequences .................................................................................................................... B-9
B.4.1.1 Alignment at the cut .................................................................................................................... B-9
B.4.1.2 Alignment at printing ................................................................................................................... B-9
B.4.1.3 Combined alignment ................................................................................................................... B-9
APPENDIX C - ADVANCED FUNCTIONS
C.1 PRINTER SET-UP ................................................................................................................................. C-1
C.1.1 Mass Storage activation ................................................................................................................ C-1
C.1.2 FTP Server activation (Only for models with Ethernet interface ) .................................................. C-1
C.2 EMBEDDED WEB SERVER (ONLY FOR MODELS WITH ETHERNET INTERFACE) ........................ C-2
C.2.1 Connection check .......................................................................................................................... C-2
C.2.2 Embedded Web Server access ..................................................................................................... C-3
C.2.3 Embedded Web Server functions .................................................................................................. C-4
C.3 LOCATOR (ONLY FOR MODELS WITH ETHERNET INTERFACE) .................................................... C-7
C.4 WINDOWS / LINUX DRIVERS .............................................................................................................. C-8
C.4.1 Driver download from Mass Storage ............................................................................................. C-8
C.4.2 Driver download from FTP Server (Only for models with Ethernet interface) ............................... C-9
C.4.3 Driver download from Embedded Web Server (Only for models with Ethernet interface) ........... C-11
C.5 LOGOS MANAGEMENT ..................................................................................................................... C-12
C.5.1 Logos management from USB Mass Storage ............................................................................. C-12
C.5.2 Logos management from FTP Server (Only for models with Ethernet interface) ........................ C-15
C.5.3 Logos management from Embedded Web Server (only for models with Ethernet interface) ...... C-17
C.5.4 Logos printing .............................................................................................................................. C-18
C.6 SETUP ................................................................................................................................................. C-19
C.6.1 “Setup.ini” file ............................................................................................................................... C-19
C.6.2 Enter Setup mode from USB Mass Storage ................................................................................ C-21
C.6.3 Enter Setup mode from FTP Server (Only for models with Ethernet interface) ........................... C-22
C.7 FONTS MANAGEMENT ...................................................................................................................... C-24
C.7.1 Fonts management from USB Mass Storage .............................................................................. C-24
C.7.2 Fonts management from FTP Server (Only for models with Ethernet interface) ......................... C-26
C.7.3 Fonts management from Embedded Web Server (only for models with Ethernet interface) ....... C-27
ii KPM300H-TF
User Manual
INTRODUCTION
MANUAL CONTENTS
In addition to the Introduction which includes a description of the explanatory notes used in the manual, general
safety information, how to unpack the printer and a brief description of the printer including its basic features,
this manual is organized as follows:
Chapter 1:
Contains the information required for correct printer installation and its proper use
Chapter 2:
Contains information on interface specifications
Chapter 3:
Contains technical specifications of the printer
Chapter 4:
Contains the character sets (fonts) used by the printer
EXPLANATORY NOTES USED IN THIS MANUAL
N.B.
Gives important information or suggestions relative to the use of the printer.
WARNING
Information marked with this symbol must be carefully followed to guard against damaging the
printer.
DANGER
Information marked with this symbol must be carefully followed to guard against operator injury
or damage.
GENERAL SAFETY INFORMATION
•
•
•
•
•
•
•
•
•
•
•
•
•
•
•
Read and keep the instructions which follow.
Follow all warnings and instructions indicated on the printer.
Before cleaning the printer, disconnect the power supply.
Clean the printer with a damp cloth. Do not use liquid or spray products.
Do not operate the printer near water.
Do not use the printer on unstable surfaces that might cause it to fall and be seriously damaged.
During the integration of the printer, we strongly warn to keep an adeguate paper loop outlet underneath
the presenter, in order to allow the receipt being properly printed out.
Only use the printer on hard surfaces and in environments that guarantee proper ventilation.
Make sure the printer is placed in such a way as to avoid damage to its wiring.
Use the type of electrical power supply indicated on the printer label. If in doubt, contact your retailer.
Do not block the ventilation openings.
Do not introduce foreign objects of any kind into the printer as this could cause a short circuit or damage
parts that could jeopardize printer functioning.
Do not spill liquids onto the printer.
Do not carry out technical operations on the printer, with the exception of the scheduled maintenance procedures specifically indicated in the user manual.
Disconnect the printer from the electricity supply and have it repaired by a specialized technician when:
A.
The feed connector has been damaged.
B.
Liquid has seeped inside the printer.
C.
The printer has been exposed to rain or water.
D.
The printer is not functioning normally despite the fact that all instructions in the users ma
nual have been followed.
E.
The printer has been dropped and its outer casing damaged.
F.
Printer performance is poor.
G.
The printer is not functioning.
User Manual
KPM300H-TF 1
INTRODUCTION
UNPACKING THE PRINTER
Remove the printer from its carton being careful not to damage the packing material so that it may be reused if the printer is to be transported in the future.
Make sure that all the components illustrated below are present and that there are no signs of damage. If
there are, contact Customer Service.
1.
2.
3.
4.
5.
6.
7.
8.
9.
10.
Box
Packing frame
Printer
Fan Fold module
CD-rom
Installation instructions
sheet
User manual
Power supply cable
“BURSTER” configuration
kit
“CUT AND DROP” configuration kit
10
W
MO ARN
VIN ING
GP !
AR
9
TS
8
7
6
5
PA
PE
R
EN
D
T
O
P R
p us EM
a h
p
O
P er S1 V
s us to t E
e h
le S r o s PA
c 2 em e P
te
le E
d to ov c R
p re e t t :
a m
h
p
e
e o
r v
e
4
3
2
1
(Fig.1)
•
•
•
•
Open the printer packaging
Remove the upper packing frame content and remove the upper packing frame.
Take out the printer.
Keep the box, trays and packing materials in the event the printer must be transported/shipped in the
future.
2 KPM300H-TF
User Manual
INTRODUCTION
PRINTER FEATURES
KPM300H-TF is a very fast ticket printer, on high quality and full printing. The ARM processor (266MHz)
allows high and fast processing capability. The printer is available with optional barcode reader for reading
pre-printed modules and manages both paper roll and fan-fold. The printer offers a wide range of options in
addition to normal print features:
•
•
•
•
•
•
•
•
•
•
•
•
•
•
•
•
•
•
•
•
•
•
Ticket width: from 54 to 82.5mm (2mm step) setting from printer setup, with paper thickness from 100 to
250 gr/m2.
Resolution 204 dpi / enhanced quality head
Optionally equipped with barcode reader for reading pre-printed modules (Bar code UPC-A. UPC-E,
EAN13, EAN8, CODE39, ITF, CODABAR, CODE93, CODE128, CODE32, PDF417) and DATAMATRIX.
Optionally equipped with RFID Reader/writer (mifare/icode).
High printing speed.
Arm processor (266 MHz).
Interfaces : Serial RS232, USB, ETHERNET (optional).
ESC/POS™ emulation, SVELTA emulation.
Character set fonts (ESC/POS™ emulation: 3 standard and international; SVELTA emulation: 20 fonts)
and TrueType fonts management.
Completely or partially programmable fonts.
Double width/height, quadruple width/height, expanded, italic, rotated 90°, 180° and 270°.
Receive buffer: 64 Kbytes.
Definition of function macros for automatic operation repetition.
Internal programmable counter.
Graphic print mode.
Print density (from -50% to +50%).
Sensors: Black mark sensor available in 6 position and translucent gap, ticket sensor, hole mark sensor
(set by software)
Working with paper roll or Fanfold module
Paper cutter.
Optionally equipped with SD/MMC Multimedia Card for logo, font storage expansion.
Equipped with Real Time clock.
Options : Fan-Fold holder and external paper holder support.
User Manual
KPM300H-TF 3
INTRODUCTION
PRINTER DESCRIPTION
The printer is comprised of a metal frame, printing mechanism, a cutter, an ejector and a paper load unit with
three paper input (see fig.2 references 6,7,8). Located on the keypad (see fig.2) are the following keys: LINE
FEED (1), FORM FEED (2), S1 (3), S2 (4) and STATUS led (5).
• LF LINE FEED key
• FF FORM FEED key
• S1 key
• S2 key
When the LINE FEED key is pressed, the printer advances the paper so that it
may be inserted manually in the printing mechanism. During power-up, if the LINE
FEED key is held down, the printer enters the print setup routine. Following the
print-out of the setup report, the printer remains in standby until a key is pressed
or signals arrive from the serial port; each 8 characters it prints out hexadecimal
and ASCII codes (if the characters are underlined, the receive buffer is full); see
Receive buffer hexidecimal print-out.
When the FORM FEED key is pressed, the printer execute the form feed. During
power-up, if the FORM FEED key is held down, the printer executes the FONT
TEST.
Normally, when the S1 key is pressed, doesn’t execute any function. During
power-up, if the S1 key is held down, the printer initializes the notch sensor and
characterizes the paper.
If the Alignment is enabled, when the S2 key is pressed, the printer executes a
ticket alignment and performs a cut
5
4
1
2
3
ER
:
ER
P
A he
P tt
c
VE le
O se ve e
o
v
EM to em mo
R
r
1
e
O S o r er
T sh r t to ap
u e
2 p
P ap
S d
p
h e
s t
u c
P ele
s
PAP
END
(Fig.2)
6
7
8
N.B.: During power-up, do not press the S2 key because the printer enter in a test modality
that becomes unusable by keys; if this event occurs then turn off the printer and turn on without
pressing any key.
4 KPM300H-TF
User Manual
INTRODUCTION
• STATUS LED
STATUS LED
The Status led indicates printer status; the check is made on-line. Given in the
table below are the various LED signals and the corresponding printer status.
(Tab.1)
COLOR
DESCRIPTION
GREEN
Printer ON : no error
Communication status
GREEN
Nr. flashings
Description
1
Receive data
2
Reception errors (parity, frame error, overrun error)
3
Command not recognized
4
Command reception time out
Recovering error
YELLOW
Nr. flashings
Description
2
Heading over temperature
3
Paper end
4
Paper jam
5
Power supply voltage incorrect
6
Cover open
Unrecovering error
RED
Nr. flashings
Description
3
RAM error
4
EEPROM error
5
Cutter error
6
Cutter cover open
User Manual
KPM300H-TF 5
1. INSTALLATION AND USE
1.1 CONNECTIONS
(Fig.1.1)
6
4
3
1
Molex 39-30-0060
1.1.1 Power Supply
The printer is equipped with an external power supply outlet (see fig.1.1). The connector pin configuration is
as follows :
Model no. type:
Header :
Housing:
Molex 39-30-0060 (vertical)
Molex 39-01-2065
PIN
SEGNALE
1
+24V
2
+24V
3
+24V
4
GND
5
GND
6
GND
(Tab.1.1)
WARNING:
Respect power supply polarity.
This picture shows the power supply cable included in the printer packaging :
User Manual
KPM300H-TF 1-1
1. INSTALLATION AND USE
BLACK
(Fig.1.2)
RED
BLACK
RED
6 PIN (3X2)
FEMALE CONNETTOR
6
4
3
1
OPPOSITE VIEW SIDE
OF CABLE INSERTION
The connector pin configuration of this cable is as follows:
Female connector
Cable color
Signal
Pin 1
Red
+24V
Pin 2
Not connected
+24V
Pin 3
Red
+24V
Pin 4
Black
GND
Pin 5
Not connected
GND
Pin 6
Black
GND
NOTE: The red cable is for +24 Vdc.
The black cable is for signal ground.
1-2 KPM300H-TF
User Manual
(Tab.1.2)
1. INSTALLATION AND USE
1.2 SELF-TEST
During power-up, if the LF LINE FEED key is held down, the printer enters the autotest routine and prints out
the Setup report (see fig.1.3). The printer will remain in standby in Hexadecimal dump mode (see par.1.5)
until another key is pressed or characters are received through the printer communication port.
PRINTER SETTINGS
PRINTER TYPE .............................KPM300
Barcode Reader..............................Not Present
RFID Module...................................Not Present
Paper Guide Type...........................6 Sensors
PRINTING HEAD TYPE .................KPA80
INTERFACE ...................................RS232
PROGRAM MEMORY TEST..........OK
DYNAMIC RAM TEST....................OK
EEPROM TEST..............................OK
CUTTER TEST...............................OK
PRINTER HEAD Rav .....................561
HEAD VOLTAGE
[ V] = 24.29
HEAD TEMPERATURE [°C] = 30
POWER ON COUNTER
= 1843
PAPER PRINTED
[cm] = 76930
CUT COUNTER
= 5507
Printer Emulation .......................:
RS232 Baud Rate (1) ..................:
RS232 Data Length (1) ...............:
RS232 Parity (1) ..........................:
RS232 Handshaking (1) ..............:
Busy Condition (2) .......................:
USB Mass Storage ....................:
USB Address Number (3) ............:
Print Mode .................................:
Autofeed (4).................................:
Chars / inch (4) ............................:
Speed / Quality..........................:
Paper Width...............................:
Paper Threshold ........................:
Notch Position ...........................:
Notch Threshold (5).....................:
Notch Distance [mm] (5)..............:
Ticket Locking (5) ........................:
PaperEnd Buffer Clear ..............:
Print Density..............................:
[LF]
[FF]
[S1]
[S2]
ESC/POS (TM)
115200 bps
8 bits/chr
None
Xon/Xoff
RxFull
Enabled
7
Normal
CR disabled
A=15 B=20 cpi
Normal
82 mm
60%
Left Side
50%
+20.0
Enabled
Disabled
0%
enter Printer Setup
enter Ethernet Setup
enter Clock Setup
skip Setup
(Fig.1.3)
User Manual
KPM300H-TF 1-3
1. INSTALLATION AND USE
NOTE:
(1)
: Parameter valid only with serial interface.
: Parameter valid only with serial interface; using this parameter, it is possible to select whether the Busy signal is
activated when the printer is both in Off Line status and the buffer is full, or only if the reception buffer is full.
(2)
: This parameter is used to identify univocally the USB printer by a numerical address code, if on the PC are connected two printers that are the same models for example two USB printers.
(3)
(4)
: This parameter is displayed if the printer emulation is set to ESC/POSTM.
(5)
: If the “Notch Position” parameter is set to “Disabled” this parameter doesn’t appear in the “Printer Setup”.
Printer operating status is indicated in the configuration print-out in which, next to the name of the components displayed (see figure 1.3), the following information is given:
INTERFACE
is given the interface present (RS232).
PROGRAM MEMORY TEST
the message OK appears if functioning and NOT OK if faulty.
DYNAMIC RAM TEST
the message OK appears if functioning and NOT OK if faulty.
EEPROM TEST
the message OK appears if functioning and NOT OK if faulty.
CUTTER TEST
the message OK appears if functioning and NOT OK if faulty.
HEAD VOLTAGE
is given the voltage of the head.
HEAD TEMPERATURE
is given the temperature of the head.
POWER ON COUNTER
is given the number of power-ups made.
PAPER PRINTED
is given the number of centimeters of paper printed.
CUT COUNTER
is given the number of cuts made.
1.3 CONFIGURATION
In KPM300H-TF models with Ethernet interface, the printer permits the configuration of default parameters
divided into two groups:
- parameters for Ethernet setup;
- parameters for printer setup.
Both the groups of parameters are configurable in three different ways:
1. by entering the Setup Mode (see par.1.3.1 and par.1.3.2);
2. by entering the “Printer Setup” page and the “Ethernet Setup” page of the Embedded Web Server (see
par.C.2.3);
3. by editing the “Setup.ini” file from Mass Storage (see par.C.6.2) or by FTP Server connection (see
par.C.6.3).
In the Setup Mode, it’s possible to configure both the groups or skip one of them following the instructions
printed on the paper for the FORM FEED key and LINE FEED key functionality.
1-4 KPM300H-TF
User Manual
1. INSTALLATION AND USE
1.3.1 Ethernet setup (only for models with Ethernet interface)
After printing the Setup report with printer’s parameters (fig.1.3), press FF FORM FEED key to enter the
ETHERNET parameters (see fig.1.4).
The Ethernet configurable parameters are:
•
•
•
•
•
•
DHCP Client: DisabledD or Enabled.
FTP Server: DisabledD or Enabled
IP Address: printer IP network address; the network administrator assigns it.
Subnet Mask: this parameter identifies the local network address.
Default gateway: this parameter identifies the Gateway IP address used to send applications to the
external network.
Mac address: this is the number, provided by the constructor, that identifies the printer; this number is
univocal. This parameter can’t be modified by set up.
General notes:
The parameters marked with the symbol D are the default values.
Settings remain active even after the printer has been turned off.
Notch Position ...........................:
Nottch
h Th
Thresh
hold
ld (5).....................:
Notch
Not
tch Dist
stan
tance
ce [[mm
mm]] (5)..
....
....
....
....
....
....
..::
Tickkett L
Locki
king
g (5) ........................:
Pape
Pa
perE
rEnd
nd B
Buf
uffe
ferr Cl
Clea
earr ..............::
Print Density.
y .............................:
[LF]
[LF]
[FF]
[S1]
[S2]
[S
2]
Low Side
50%
50
%
+2
20.0
0.0
Enabl
bled
d
Disa
Di
sabl
bled
ed
0%
enterr Pr
ente
Prin
inte
terr Se
Setu
tup
p
enter Ethernet Setup
enter Clock Setup
ski
kip Setup
t
DHCP Client........................ : Disabled
FTP Server ........................ : Enabled
IP Address........................... : 192. 168. 10. 37
Subnet Mask ...................... : 255. 255. 240. 0
Default Gateway.................. : 192. 168. 1. 23
MAC Address .................... : 00-0E-E2-67-07-04
For advanced printer setup please connect
to the site http://192.168.10.37
DHCP Client........................ : Disabled
(Fig.1.4)
User Manual
KPM300H-TF 1-5
1. INSTALLATION AND USE
After printing the Ethernet parameters (fig.3.1), the first parameter to be modifies (DHCP Client) is printed. To
configure Ethernet parameter, press LF LINE FEED key to modify the parameter and press FF FORM FEED
key to move to the next parameter.
ATTENTION: any changes to network parameters will interrupt browser connection!!! If the server
not responding you MUST reconnect to the new IP address set.
The “IP Address” parameter is a number, in dotted decimal, composed by 4 bytes that identifies the IP address in 32 bit. Each byte is composed by three-digit number, of a maximum value of 255. (see fig.1.5).
DHCP Client ..........: Disabled
FTP Server.............:: Enabled
IP Address..............: 192. 168. 010. 037
(Fig.1.5)
To change this value is possible to modify the digits of each byte
192
1st byte
1° byte:
.
168
2nd byte
1
1st digit
where
1st digit:
2nddigit ; 3rd digit:
.
000
3rd byte
9
2nd digit
.
007
4th byte
2
3rd digit
0-2
0-9
The selected digit is highlighted (the number is written in negative mode).
Press FORM FEED key to modify the value of the highlighted digit; every single FORM FEED key pressure
increases of 1 his value. Once the value 9 (or 2) is reached the counting starts again from 0.
Pressing LINE FEED key to move the cursor on the next digit; if the cursor position is on the latest digit, proceed to next parameter pressing the LINE FEED key again.
For example to modify the value of “IP Address” parameter from 192.168.0.1 to 192.168.0.7 you have to
change the 3rd digit of 4th byte replacing 1 with 7.
3rd selected digit
192.168.010.037
NOTE: The first digit of each byte can assumes only values between 0-2 because the maximum
value is 255.
1-6 KPM300H-TF
User Manual
1. INSTALLATION AND USE
1.3.2 Printer setup
This printer permits the configuration of default parameters. The printer’s configurable parameters are:
•
•
•
•
•
•
•
•
•
•
•
•
•
•
•
•
•
•
•
•
•
•
•
Printer Emulation: SVELTAD, ESC/POSTM.
RS232 Baud Rate : 115200D, 57600, 38400, 19200, 9600, 4800, 2400, 1200.
RS232 Data length : 7, 8D bits/car.
RS232 Parity : NoneD, even, odd.
RS232 Handshaking : XON/XOFFD , Hardware.
Busy condition : RXFullD , OffLine/RXFull.
USB Mass Storage: DisabledD , Enabled.
USB Address Number : 0D, 1, 2, 3, 4, 5, 6, 7, 8, 9.
Print mode: NormalD or Reverse.
Autofeed: CR disabledD , CR enabled.
Chars/Inch: A=11 B=15 cpi, A=15 B=20 cpiD.
Speed/Quality : Normal, High quality , High SpeedD.
Paper width : 54mm, 56mm, 58mm, 60mm, 62mm, 64mm, 66mmD, 68mm, 70mm, 72mm, 74mm, 76mm,
78mm, 80mm, 82mm.
Paper Threshold(6) : 30%, 40%, 50%, 60%D, 70%, 80%, 90%.
Notch Position(7) : DisabledD, Left Side, Left Center. Right Side, Right Center, Up Center, Low Center, Tr.
Center.
Notch Threshold(8): 30%, 40%D, 50%, 60%, 70%, 80%, 90%.
Notch Distance Sign(5) : +D , Notch Distance [mm x 10](5)(9) : 0D, 1, 2, 3, 4, 5, 6, 7, 8, 9.
Notch Distance [mm x 1](5)(9) : 0D, 1, 2, 3, 4, 5, 6, 7, 8, 9.
Notch Distance [mm x .1](5)(9) : 0D, 1, 2, 3, 4, 5, 6, 7, 8, 9.
Ticket Locking(10): DisabledD, Enabled, By Printer, By Feeder, Complete.
PaperEnd Buffer Clear : DisabledD , Enabled.
Print Density: -50%, -37%, -25%, -12%, 0D,+12%, +25%, +37%, +50%.
General notes:
The parameters marked with the symbol D are the default values.
Settings remain active even after the printer has been turned off.
NOTE:
(6)
: This parameter indicates the threshold value under the sensor detect the paper.
: This parameter sets which sensor is used as notch sensor. There are two sensor operating mode:
reflection or transparence.
(7)
(8)
: This parameter is used to detect the presence of the notch. In order to better identify the optimum
threshold for the paper being used, a paper characterization function is also available in the setup.
(9)
: The “Notch distance” parameter represents the distance in mm from the upper margin of the ticket to
the black mark on the ticket. For example, to set notch distance to 15 mm, modify the following parameters
in order to obtain the desired values as indicated :
Notch Dist. [mm x 10]
:1
Notch Dist. [mm x 1]
:5
Notch Dist. [mm x .1]
:0
: The “Ticket locking” parameter is used to set the ticket block when the paper is inside the printer. To set the value
modify the parameter as follows:
(10)
By Printer:
The motor remain switched on also at the printing end.
By Feeder:
Stops the paper of the not active (idle) feeders; to prevent that the paper parked, in a idle feeder,
come dragged inside the printer.
Complete:
Stop the ticket is made by the printer and feeder; combination of the two preceeding effetcs.
User Manual
KPM300H-TF 1-7
1. INSTALLATION AND USE
After printing the Setup report with printer’s parameters (fig.1.3), press LF LINE FEED key to enter the Setup
mode (see fig.1.6).
Notch Position ...........................:
Notch Threshold (5).....................:
Notch
Not
tch Dist
stan
tance
ce [[mm
mm]] (5)..
....
....
....
....
....
....
..::
Tick
Ti
cket
et L
Loc
ocki
king
ng (5) ..
....
....
....
....
....
....
....
....
....
....
....
..::
Pape
Pa
perE
rEnd
nd B
Buf
uffe
ferr Cl
Clea
earr ..............::
Priintt Densitity.
y .............................:
[[LF]]
[FF]
[F
F]
[S1]
[S
1]
[S2]
Left Side
50%
+2
20.0
0.0
Enab
En
able
led
d
Disa
Di
sabl
bled
ed
0%
enter Printer Setup
p
ente
en
terr Et
Ethe
hern
rnet
et S
Set
etup
up
entter Cl
Clock
k Settup
skip Setup
[[LF]] to modifyy pa
p rameter
[FF] for next parameter
[S2] exitSetup
Printer Emulation................. : ESC/POS (TM)
(Fig.1.6)
After pressing LF key, the first parameter to be modified (Printer Emulation) is printed. To modify printer’s
parameters follow the instructions printed on the paper for the FORM FEED key and LINE FEED key functionality.
The settings made are stored in EEPROM (nonvolatile memory).
1.4 HEXADECIMAL DUMP
This function is used to diagnose the characters received through the communication port; the characters are
printed out both as hexadecimal codes and ASCII codes.
Once the self-test routine has finished, the printer enters Hexadecimal Dump mode. The printer remains in
standby until a key is pressed or characters are received through the communication port.
For every 8 characters received, the hexadecimal and corresponding ASCII codes are printed out (if the
characters are underlined, the receive buffer is full). Shown below is an example of a Hexadecimal Dump:
48
6D
20
6E
36
65
6D
75
65
61
66
20
37
66
6E
76
1-8 KPM300H-TF
78
6C
75
30
38
67
6F
77
61
20
6E
31
39
68
70
78
64
64
63
32
61
69
71
79
User Manual
65
75
74
33
62
6A
72
7A
63
6D
69
34
63
6B
73
69
70
6F
35
64
6C
74
Hexadeci
mal dump
functio
n 012345
6789abcd
efghijkl
mnopqrst
uvwxyz
1. INSTALLATION AND USE
1.5 CALENDAR CLOCK
The printer is equipped with a Real Time Clock. During power-up, held down the LINE FEED key to enter in
the printer configuration mode. Pressing the S1 key to enter in the clock configuration (see fig. 1.7).
Pressing the LINE FEED key to modify date / time; the printer will be print the upated the date and time.
Follow the instructions printed on the paper for the key functionality. The highlighted digit (the number is written in negative mode) indicates the digit to be modified. Pressing LINE FEED key to modify the value of the
highlighted digit; every single LINE FEED key pressure increases of 1 his value. Once the value 9 is reached
the counting starts again from 0.
Pressing FORM FEED key to move the cursor on the next digit; if the cursor position is on the latest digit you
can proceed to next parameter pressing the FORM FEE key again.
Pressing S2 key to exit and terminate the setting procedure.
CLOCK SETUP
[LF] to modify date/time
[FF] to next field
[S2] to exit
01/09/08
01/09/08
01/09/08
01/09/08
01/09/08
01/09/08
01/09/08
01/09/08
01/09/08
01/09/08
01/09/08
01/09/08
16:51:49
16:51:49
16:51:49
16:51:49
16:51:49
16:51:49
16:51:49
16:51:49
16:51:49
16:51:49
16:51:49
16:51:49
Date Time Setting :
01/09/08 16:51:49
(Fig.1.7)
User Manual
KPM300H-TF 1-9
1. INSTALLATION AND USE
1.6 PAPER SPECIFICATIONS
KPM300H-TF prints on ticket width from 54 to 82.5 mm adjustable by the user; this printer manages both
paper roll, fan-fold and ticket with notch.
The printer is available with optional barcode laser reader (CCD scanner) for reading pre-printed modules
and optional RFID reader/writer (mifare/Icode)
The following paragraphs give the specifi cations and dimensions for each ticket confi guration.
1.6.1 Specifications for ticket with barcode (only for printer models with barcode reader)
Margin of
the ticket
Paper Axis
NON-THERMAL SIDE
L
direction
of
paper feed
Place the barcode on the non-heat sensitive side of the ticket, 25mm far from the margin to allow a correct
reading when the ticket is aligned with the print (see fig.1.8).
35 mm
25mm
20mm
Minimum barcode width
where:
L
= represents the paper width used (54 ÷ 82.5 mm).
NOTE: See the table 3.2 of par. 3.1 for the main barcode specifications (if the printer is equipped
with the barcode reader).
1-10 KPM300H-TF
User Manual
1. INSTALLATION AND USE
1.6.2 Specifications for ticket with notch
Printer is provided with 5 sensors for the notch detection as shown in fig.1.9, where:
• L = left lateral sensor
• R = right lateral sensor.
The printer manages tickets with notch; place the notch on the heat sensitive side or on the non-heat sensitive
side of the ticket. “Notch Position” parameter (see printer setup) sets the positions for the notch as follows:
• Notch positioned on the heat sensitive side:
Notch position =
•
Up Center
Notch positioned on the non-heat sensitive side:
Notch position =
Low Center
Left Side
Right Side
or
or
Left Center
Right Center
L
R
direction
of
paper feed
TO REMOVE PAPER:
Push S1 to select the
paper to remove
Push S2 to remove
selected paper
(Fig.1.9)
Fig. 1.10 shows an example of paper roll with notch on the non-heat sensitive side (non-printable side),
where:
L
= represents the paper width used (54 ÷ 82.5 mm);
Dmin = indicates the minimum notch dimension;
D1
= indicates the minimum notch to notch distance.
User Manual
KPM300H-TF 1-11
1. INSTALLATION AND USE
L
33.75mm
33.75mm
D1 = 25.4mm
Dmin
Dmin
Dmin
Dmin
Dmin
9+10 mm
9+10 mm
9+10 mm
9+10 mm
9+10 mm
D1 = 25.4mm
mm
22.5mm
mm
22.5mm
Notch
Sensor axis
left side
Sensor axis
right side
Sensor axis
left center
Sensor axis
right center
Ticket axis /
Central sensor axis
NON-THERMAL SIDE
direction
of
paper feed
(Fig.1.10)
NOTE: If the notch was on the heat sensitive side, the image on the paper (fig.1.10) would be
mirrored in regard to the paper axis.
•
•
The printer automatically choice the sensor used to detect the paper presence according to the selected
notch sensor. For example, if the setting for the “Notch position” parameter is “Low side”, “High center” is
used to detect the paper presence.
For a correct alignment, the notch distance from the margin must be between -5 and 66mm (notch sensor/print head distance);
1-12 KPM300H-TF
User Manual
1. INSTALLATION AND USE
1.6.3 Specifications for ticket with labels
L
direction
of
paper feed
If the distance of notch position from the margin is negative, the notch is outside the printable ticket. For
example the printing on paper with labels (see fig.1.11).
Used for notch alignment
with negative distance
W
(Fig.1.11)
Ticket margin
where
L
= represents the paper width used (54 ÷ 82.5mm);
W
= indicates the minimum managed length 25.4mm (1”).
With KPM300H-TF is possible to print label; the minimum length is 25.4mm (1”).
1.6.4 Specifications for ticket with gap
The printer manages tickets with gap (central or lateral gap). Set the “Notch position” parameter (see printer
setup) with “Transparent Center” or “Transparent side” value for print and cut the ticket. Fig.1.12 shows an
example for credit card size ticket (84 x 54mm) with central gap.
Central gap
(Fig.1.12)
Ticket margin
where
L
= represents the paper width used (54 ÷ 82.5mm);
H
= indicates the managed minimum height (2mm)
D
= indicates the minimum width (10mm)
User Manual
KPM300H-TF 1-13
1. INSTALLATION AND USE
1.6.5 Specifications for ticket with RFID Tag (only for printer models with RFID reader)
The printer models equiped with RFID reader, manages ticket with RFID Tag. RFID (acronym for Radio Frequency IDentification) is a technology to identify automatically items using radio waves; this system is based
on wireless data capture from RFID tag using appropriate readers. The RFID tag, or transponder, is made up
of :
• the microchip that stores the data (including also a unique serial number written);
• an RFID antenna.
Under the paper guide (see fig. 1.13), an RFID transceiver module is mounted, provided with antenna, that
allows to send and receive RF data to and from the tag. For this application the ticket dimensions are not
binding but for good reading is important that the tag inside the ticket, after alignment, intersects the antenna
area. The fig.1.13 shows the antenna’s area and its position under the paper guide in the RFID printer model.
54mm
42mm
Printing line
Placement of
antenna for RFID
module
62mm
TO REMOVE PAPER:
Push S1 to select the
paper to remove
Push S2 to remove
selected paper
(Fig.1.13)
NOTE: Using ticket with RFID tag, the minimum managed length is a credit card size ticket (84x54
mm).
1-14 KPM300H-TF
User Manual
1. INSTALLATION AND USE
1.7 MAINTENANCE
1.7.1 Changing the paper roll
Every paper change verify that there aren’t paper off-cuts from the paper inlet and outlet; if this event happens remove the paper off-cuts before execute any other operation.
To change the paper roll, proceed as follows:
1. Position the paper roll so that it unrolls correctly as shown (see fig. 1.14);
2. Insert the end of the paper roll in the paper load opening on the triple feeder unit and wait for the paper
to load automatically (see fig. 1.15);
(Fig.1.14)
O
T
:
ER
P
A he
P tt
E c
V le
O se ve e
o
v
EM to m o
R 1 re em r
r e
S o
h t to p
s r
a
u e
2 p
P ap
S d
p
h e
s t
u c
P ele
s
PAPE
R EN
D
(Fig.1.15)
WARNING:
Before inserting the paper, make sure the cut is straight (see fig. 1.14).
User Manual
KPM300H-TF 1-15
1. INSTALLATION AND USE
1.7.2 “BURSTER” configuration
Printer is provided with a kit for the “BURSTER” configuration. The kit contains (see fig.1.16):
1. Upper paper outfeed mouth.
1
(Fig.1.16)
Assembly instruction
Open the printer cover as shown in fig.1.17 and fig.1.18.
1
P
s us
e
le
P
TO
TO
R
EM
R
P
p us EM
a h
O
p
e S
VE
r 1
to t
PA
h
o
r
c S2 em se
P
te
l
o ec ER
d to
v
:
p re e t t
a m
h
p
e
e o
r v
e
2
D
D
R EN
R EN
PAPE
PAPE
(Fig.1.17)
1-16 KPM300H-TF
p us
a h
O
p
e S
P
VE
r 1
s us
e h to to
PA
le S
r
c 2 em se
P
te
l
o ec ER
d to
v
:
p re e t t
a m
h
p
e
e o
r v
e
•
User Manual
(Fig.1.18)
1. INSTALLATION AND USE
•
3
TO
•
•
R
P
p us EM
a h
O
p
e S
VE
r 1
s us
e h to to
PA
le S
r
c 2 em se
P
te
l
o ec ER
d to
v
:
p re e t t
a m
h
p
e
e o
r v
e
•
Unscrew the two fixing screws and take off the upper paper mouth group of the “STANDARD” configuration (see fig.1.19).
Unscrew the central fixing screw and divide the paper mouth of the “STANDARD” configuration from the
light guide (see fig.1.19).
Unscrew the fixing pins and take off the fixed blade and the spring as shown in fig.1.20.
Fix the light guide with the upper paper mouth of the “BURSTER” configuration using the screw previously removed (see fig.1.21).
Fix the upper paper mouth group for the “BURSTER” configuration using the screws previously removed
(see fig.1.22).
P
•
ER
PAP
D
EN
(Fig.1.19)
User Manual
KPM300H-TF 1-17
P
TO
EM
R
5
(Fig.1.21)
1-18 KPM300H-TF
User Manual
p us
a h
O
p
e S
VE
r 1
s us
e h to to
PA
le S
r
c 2 em se
P
te
l
o ec ER
d to
v
:
p re e t t
a m
h
p
e
e o
r v
e
P
TO
R
P
p us EM
a h
O
p
e S
P
VE
r 1
s us
e h to to
PA
le S
re s
c 2
P
m el
te
o ec ER
d to
v
:
p re e t t
a m
h
p
e
e o
r v
e
1. INSTALLATION AND USE
4
PAPE
R EN
D
(Fig.1.20)
6
PAPE
R EN
D
(Fig.1.22)
1. INSTALLATION AND USE
1.7.3 “CUT AND DROP” configuration
Printer is provided with a kit for the “CUT AND DROP” configuration. The kit contains (see fig.1.23):
1. Label.
2. Upper paper outfeed mouth.
W
MO ARN
VIN ING
GP !
AR
1
TS
2
(Fig.1.23)
Assembly instruction
Open the printer cover as shown in fig.1.24 and fig.1.25.
1
EM
R
TO
P
TO
D
D
R EN
R EN
PAPE
PAPE
(Fig.1.24)
p us
a h
O
p
e S
P
VE
r 1
s us
e h to to
PA
le S
re s
c 2
P
m el
te
o ec ER
d to
v
:
p re e t t
a m
h
p
e
e o
r v
e
2
R
P
p us EM
a h
O
p
e S
P
VE
r 1
s us
e h to to
PA
le S
re s
c 2
P
m el
te
o ec ER
d to
v
:
p re e t t
a m
h
p
e
e o
r v
e
•
(Fig.1.25)
User Manual
KPM300H-TF 1-19
1. INSTALLATION AND USE
•
•
•
Unscrew the two fixing screws and take off the upper paper mouth group of the “STANDARD” configuration (see fig.1.26).
Using a clamp, remove the precut sheet metal on the printer cover (see fig.1.27).
Fix the upper paper mouth group for the “STANDARD” configuration in the upper holes on the printer
cover using the screws previously removed (see fig.1.28).
P
TO
R
P
p us EM
a h
O
p
e S
VE
r 1
s us
e h to to
PA
le S
r
c 2 em se
P
te
l
o ec ER
d to
ve t
:
p re
th
a m
p
e
e o
r v
e
3
D
ER
PAP
EN
(Fig.1.26)
5
4
(Fig.1.25)
(Fig.1.27)
1-20 KPM300H-TF
(Fig.1.28)
User Manual
1. INSTALLATION AND USE
6
TO
•
P
p us
a h
p
e S
r 1
s us
e h to
le S
r
c 2
te
d to
p re
a
p
e
r
•
Unscrew the two fixing screws on the cutter cover and take off the lower paper mouth of the “STANDARD” configuration (see fig.1.29).
Fix the lower paper mouth for the “CUT AND DROP” configuration using the screws previously removed
(see fig.1.30).
Close the printer cover and paste the label on the cutter cover as shown in fig.1.31.
P
•
ER
PAP
D
EN
(Fig.1.29)
7
8
MO
W
MO ARN
VIN ING
GP !
AR
VIN
GP
AR
TS
TS
(Fig.1.30)
(Fig.1.31)
User Manual
KPM300H-TF 1-21
1. INSTALLATION AND USE
1.7.4 Paper jam
Paper jam inside the Triple Feeder Unit
WARNING:
In case of paper jam inside the triple feeder unit:
• Do not carry out technical operations inside the triple feeder.
• Contact Customer Service
Paper jam inside the printer
NOTE: All figures reported in this paragraph, relative to paper jam inside the printer, are related to
the operations that will be made only on the printer so the triple feeder unit is not reported in these
figures.
1-22 KPM300H-TF
User Manual
1. INSTALLATION AND USE
When occurs a paper jam the “status LED” signals the corresponding printer status as follows:
STATUS
LED
COLOUR
FLASHING
NUMBER
DESCRIPTION
YELLOW
4
PAPER JAM
(Fig.1.32)
In case of paper jam proceed as follows:
• Open the printer cover (see fig.1.33 and fig.1.34).
• Unlock the cutter cover (see fig.1.35).
• Remove the damaged paper and check for scraps of paper in the printer and in that case remove it (see
fig.1.36); carefully remove all scraps of paper from the cutter zone. If you have difficulty in doing so, use
tweezers. DO NOT insert any kind of object inside the cutter.
• Lock the cutter cover (see fig.1.37).
• Change the paper roll and close the printer cover following instructions of par.1.7.1.
1
2
(Fig.1.33)
(Fig.1.34)
User Manual
KPM300H-TF 1-23
1. INSTALLATION AND USE
3
4
(Fig.1.35)
5
6
(Fig.1.37)
1-24 KPM300H-TF
(Fig.1.36)
User Manual
SEE PARAGRAPH 1.7.1
1. INSTALLATION AND USE
1.7.5 Cleaning the printing head
WARNING:
• Do not touch the head heating line with bare hands or metal objects.
• Do not perform any operation inside the printer immediately after printing because the head
and motor tend to become very hot.
P
P
TO
R
EM
p us
a h
O
p
e S
VE
r 1
s us
e h to to
PA
le S
r
c 2 em se
P
te
l
o ec ER
d to
ve t
:
p re
th
a m
p
e
e o
r v
e
First disconnect the power supply and proceed as follows:
• Open the printer cover (see previous paragraphs).
• Clean the printing head heating line using a non-abrasive cloth moistened with isopropyl alcohol (see
fig.1.38).
D
ER
PAP
EN
Alcol
isopropilico
(Fig.1.38)
User Manual
KPM300H-TF 1-25
1. INSTALLATION AND USE
1.7.6 Cleaning the plastic window for barcode reading (only for printer models with barcode reader)
TO
R
P
p us EM
a h
O
p
e S
P
VE
r 1
s us
e h to to
PA
le S
r
c 2 em se
P
te
l
o ec ER
d to
ve t
:
p re
th
a m
p
e
e o
r v
e
To clean the plastic window for barcode reading proceed as follows:
• Open the printer cover (see previous paragraphs).
• Wipe with a soft cloth to avoid scratching its surface. Do not use alcohol, solvents, or hard brushes (see
fig.1.39).
D
ER
PAP
EN
Alcol
isopropilico
(Fig.1.39)
1-26 KPM300H-TF
User Manual
2. INTERFACES
2.1 RS232 SERIAL
The printer has an RS232 serial interface and is connected by means of a 9 pin female connector (see fig.
2.1).
(Fig.2.1)
5
1
9
6
RS232
In the following table, the signals present on the connector are listed:
(Tab.2.1)
PIN
SIGNAL
IN/OUT DESCRIPTION
1
DCD
OUT
Data Carrier detect. Printer ON (active at level RS232 high).
2
TXD
OUT
Receive data. Serial output (from Host).
3
RXD
IN
4
N.C.
-
Not connected.
5
GND
-
Ground signal.
6
DSR
OUT
7
N.C.
-
8
RTS
OUT
9
N.C.
-
Transmit data. Serial data input (towards Host).
Data Set Ready. Printer on and operating (active at RS232 level high).
Not connected.
Clear to send. Ready to receive data (active at RS232 high level).
Not connected
User Manual
KPM300H-TF 2-1
2. INTERFACES
The following diagrams show examples of connections between the printer and the Personal Computer using
25 and 9 pin female connectors.
(Fig.2.2)
PRINTER
PC
PRINTER
PC
2-2 KPM300H-TF
User Manual
2. INTERFACES
2.2 ETHERNET INTERFACE (optional)
The printer models with Ethernet interface are equipped with an RJ45 interface with 8-pin connector.
(Fig.2.3)
ACTICITY INDICATOR
LINK INDICATOR
1
8
RJ45
Refer to the table below for the connector pin signals:
PIN
SIGNAL
1
ETX+
2
ETX-
DESCRIPTION
ETX+
ETX-
3
4
5
6
7
8
ERX+
Not connected
Not connected
ERXNot connected
Not connected
ERX+
N.C.
N.C.
ERXN.C.
N.C.
(Tab.2.2)
NOTE: The functionality of two leds, Sx e Dx, are specified in the following table:
LED
Sx
Dx
HW version 2.00 or later
Link (yellow color): the led light on when a connection is active
Rx/Tx (green color): the led light on when occurs a data reception or transmission
NOTE : Please note that, use the cross-cover cable when you directy connect the printer to a PC.
NOTE : To connect the printer to a hub device use an UTP Ethernet cable (Pin to Pin).
User Manual
KPM300H-TF 2-3
2. INTERFACES
2.3 USB INTERFACE
(Fig.2.4)
2
1
3 4
USB type B
Printers with USB serial interface conform to USB 1.1 standards and have the following specifications:
•
•
Communication speed 12 Mbit/sec
“Receptacle series B” - type connector.
Refer to the table below for the connector pin signals and connection to a device:
PIN
SIGNAL
1
VBUS
N.C.
2
D-
Data -
3
D+
Data +
4
GND
Ground signal
Shell
Shield
Cable shield
2-4 KPM300H-TF
User Manual
DESCRIPTION
(Tab.2.3)
3. TECHNICAL SPECIFICATIONS
3.1 TECHNICAL SPECIFICATIONS
Table 3.1 gives the main technical specifications for the printer model.
Standard interfaces
Communication speed
(Tab.3.1)
USB
RS232
ETHERNET(1)
12 Mbit/sec
from 1200 to 115200 bps
10 Mbit/sec (1)
Resolution
203 DPI (8 dot/mm)
Paper specifications
Type of paper
Thermal rolls Heat-sensitive side on outside of roll
Fan Fold thermal paper with notch
Paper roll size
54mm, 82.5mm
Recommended types of
paper
from 100 g/m2 to 250 g/m2
External roll diameter
max Ø300 mm (2)
Internal roll core diameter
25mm (+1mm)
Core thickness
2mm (+1mm)
Paper end
Not attached to roll core
Core type
Cardboard or plastic
Sensors
Ticket presence, head temperature, ticket presence on output,
black mark detector in 6 positions and translucent gap/hole mark detector
(setting by software), cover open, cutter compartment open,
external near paper end.
Printing method
Thermal, fixed head (8 dot/mm)
Printing mode
Normal, 90°, 180°, 270°
Printing format
Height/Width from 1 to 8, bold, reverse, underlined, italic
Character fonts
ESC/POSTM emulation: PC437, PC850, PC860, PC863,
PC865, PC858 (euro), 2 TrueType fonts (3)
SVELTA emulation : 20 embedded fonts, 2 TrueType fonts (3)
Receive buffer
64 Kbytes
Flash memory
16 Mbytes
Graphic memory
Memory Card SD/MMC (4)
Printing speed
Logos dynamic management (max 2MB graphics memory)
Capacity =
High quality
Normal
High speed
Head life
120 mm/sec
200 mm/sec
250 mm/sec
150 Km / 100M pulses
MCBF
MTBF
max 2 Gbytes
3 000 000 cutter number
666 000 hours
(5)
Mechanical Characteristics
Dimensions (6) (7)
Weight (6) (7)
Length [mm] =
Height [mm] =
Width [mm] =
303
123 (with cover closed)
182
5200 gr.
User Manual
KPM300H-TF 3-1
3. TECHNICAL SPECIFICATIONS
Power supply
24 Vdc ± 10%
Electrical input
Stand-by
0.2 A
Average
1.0 A
(8)
Environmental conditions
Operating temperature
0°C - 50°C
Relative humidity
10% - 85% w/o condensation
Storage temperature / Humidity
-20°C - +70°C / 10% - 90%
ESC/POSTM, SVELTA
Emulation
EMULATION ESC/POSTM
Character density
11 cpi
15 cpi
20 cpi
Number of columns
35
45
64
Chars / sec
2900
3800
5300
Lines / sec
83
83
83
2,25x3
1,75 x 3
1,25 x 3
Characters (L x H mm)
Normal
Character set
NOTE:
3
Only for printer models equipped with Ethernet interface.
For external rolls diameter higher to Ø100mm it’s recommended to use a paper
pretensioning device.
(3)
“Veramono.ttf” and “Mono.ttf” are installed on printer flash disk. It is possible to
install additional TrueType fonts (see par.C.7).
(4)
Only for printer models equipped with SD/MMC.
(5)
Electronic board.
(6)
Referred to model without paper holder support.
(7)
Referred to model in the STANDARD configuration.
(8)
Referred to a standard CUSTOM receipt (L=10cm, Density = 12,5% dots on).
(1)
(2)
Table 3.2 gives the main technical specifications of the barcode reader present in the printer models that will
be provided.
(Tab.3.2)
Barcode reader model
MR008
CX002
270 scans/sec
200 scans/sec
Electrical Characteristics
Scan rate
Optical Characteristics
Sensors
Linear CCD Sensor
Light source
Red Leds, 630 nm
Ambient light (Fluorescent lamp)
1500 LUX MAX
3000 LUX MAX
Performance
Resolution
5 mil. (0.127 mm)
Readable Barcode
3-2 KPM300H-TF
ALL UPC/EAN/JAN, Code 39, Code 39 Full ASCII, Code 128,
Code 93, Interleave 25, Industrial 25, Matrix 25, China Postage,
CODABAR/NW7, Code 11, MSI/PLESSEY, Code 32,
PDF417, DATAMATRIX
User Manual
3. TECHNICAL SPECIFICATIONS
Table 3.3 gives the transponder specifications for the printer model with RFID Reader/writer (mifare/icode).
(Tab.3.3)
ISO159693 (icode)
Supported transponders
ISO1443-MIFARE® (MIFARE Ultralight, MIFARE 1K, MIFARE 4K)
3.2 DIMENSIONS
In the following figures shows the dimensions of the printer.
150
31
5 - N°4 slots
110
150
M4 - N°4 holes
83,5
(82,5 paper width)
10
45
10
127
4,5
303
55
(54 paper width)
85
112
117
123
1,5
86,5
19,5
94,6
50,9
129
19,5
114,3
TO REMOVE PAPER:
Push S1 to select the
paper to remove
132
Push S2 to remove
selected paper
(Fig.3.1)
67,5
62
80
98
2
1
2
2
2,5 Paper Out
191
User Manual
KPM300H-TF 3-3
3. TECHNICAL SPECIFICATIONS
The figure 3.2 shows the dimensions of the printer with the “CUT AND DROP” configuration.
150
31
5 - N°4 slots
110
150
M4 - N°4 holes
83,5
(82,5 paper width)
10
45
10
127
4,5
303
55
(54 paper width)
85
112
42,5
90,4
117
123
1,5
62
80
98
2
2
1
2
10,1
191
19,5
94,6
50,9
114,3
TO REMOVE PAPER:
Push S1 to select the
paper to remove
67,5
132
Push S2 to remove
selected paper
(Fig.3.2)
3-4 KPM300H-TF
User Manual
129
19,5
3. TECHNICAL SPECIFICATIONS
The figure 3.3 shows the dimensions of the printer with the “BURSTER” configuration.
150
31
5 - N°4 slots
110
150
M4 - N°4 holes
83,5
(82,5 paper width)
10
45
10
127
4,5
303
55
(54 paper width)
85
112
42,5
117
123
1,5
86,5
19,5
94,6
50,9
129
19,5
114,3
TO REMOVE PAPER:
Push S1 to select the
paper to remove
132
Push S2 to remove
selected paper
67,5
62
80
98
2
1
2
2
2,5 Paper Out
191
(Fig.3.3)
User Manual
KPM300H-TF 3-5
3. TECHNICAL SPECIFICATIONS
Blank page
3-6 KPM300H-TF
User Manual
4. CHARACTER SETS
4.1 CHARACTER SETS IN ESC/POSTM EMULATION
The printer has 3 embedded fonts of varying width (11, 15 and 20 cpi) which may be accessed through
programming (section 1.2) or control characters (see Command Reference). Each of these fonts offers the
following code tables: PC437, PC850, PC860, PC863, PC865, PC858.
Shown below in figures 4.1 are examples of the 11 cpi character set.
PC437
(Usa,Standard,Europe)
PC850
(Multilingual)
PC860
(Portuguese)
PC863
(Canadian-French)
PC865
(Nordic)
PC858
(Euro symbol)
(Fig.4.1)
To print the Euro (€) symbol, the command sequence is: $1B, $74, $13, $D5 (see Command Reference).
In ESC/POSTM emulation, it is possible to use TrueType fonts. To be used, a TrueType font must be monospace type (every character of the font must have the same dimension). The check is made by the printer
when the font is selected.
TrueType fonts will be automatically scaled by the printer in order to obtain the same available width for the
embedded fonts (11, 15 and 20 cpi).
User Manual
KPM300H-TF 4-1
4. CHARACTER SETS
The quality of TrueType fonts and the correct positioning into the printable area will result from the font producers and the font implementation.
The available code tables are : PC437, PC850, PC860, PC863, PC865, PC858, PC866, PC852, WPC1252.
For the correct printing of the code tables, it is necessary that the selected TrueType font contains all the
characters in the tables. Otherwise, the ‘̆’ symbol will be printed instead the missing character.
All commands for printing configuration are usable both with TrueType fonts and with embedded fonts.
It is possible to address the TrueType font respects the UNICODETM standard (see www.unicode.org), by using UTF-8 or UTF-16 encoding.
4.2 CHARACTER SETS IN SVELTA EMULATION
In SVELTA emulation the printer has 20 embedded fonts of varying width which may be accessed through
control characters (see commands description in SVELTA emulation of Command Reference). The following
list shows the font availables and relative dimensions in dot:
•
•
•
•
•
•
•
•
•
•
•
•
•
•
•
•
•
•
•
Font HEL8PT8 (A)
Font HEL10PT8 (A)
Font HEL14PT8 (A)
Font HEL16PT8 (A)
Font 18x24
Font 14x24
Font 10x24
Font 8x12 (B)
Font 8x12-2 (B)
Font 12x12 (B)
Font 14x11 (B)
Font 16x24 (B)
Font 16x24_1 (B) (C)
Font 16x24_2 (B) (C)
Font 20x15 (B)
Font 28x20 (B)
Font 14x24_1 (B) (C)
Font 16x24CN (B) (C)
Font OCRB (20x32) (B)
Proportional Font with fixed height (H = 28 dot)
Proportional Font with fixed height (H = 34 dot)
Proportional Font with fixed height (H = 50 dot)
Proportional Font with fixed height (H = 55 dot)
(Font 18x24 in ESC/POS emulation)
(Font 14x24 in ESC/POS emulation)
(Font 10x24 in ESC/POS emulation)
Fixed Font
Fixed Font
Fixed Font
Fixed Font
Fixed Font
Fixed Font
Fixed Font
Fixed Font
Fixed Font
Fixed Font
Fixed Font
Fixed Font
For further informations to characters representations print directly the Font Test(D).
NOTE:
A proportional font is a font in which different characters have different pitches
(widths).
(B)
A fixed font is the opposite of a proportional font and is a fixed-pitch font.
(C)
The fonts with the same name and dimension contain different characters in different
positions from theirs.
(D)
During power-up, if the FORM FEED (FF) key is held down, the printer executes the
FONT TEST.
(A)
In SVELTA emulation, it is possible to use TrueType fonts. True Type fonts are printable with every angle of
rotation and in bold, reverse, italic and underlined mode.
It is possible to address the TrueType font respects the UNICODETM standard (see www.unicode.org), by using UTF-8 or UTF-16 encoding.
For the correct printing of the code tables, it is necessary that the selected TrueType font contains all the
characters in the tables. Otherwise, the ‘̆’ symbol will be printed instead the missing character.
4-2 KPM300H-TF
User Manual
APPENDIX A - ACCESSORIES AND SPARE PARTS
A.1 ACCESSORIES
A.1.1 Power Supply
The figure below illustrates the power supply provided by Custom to be used for printer operation.
Dimensions in mm:
(Fig.A.1)
BOTTOM VIEW
(Tab.A.1)
PPSPS-240-P24
Input specification
Switching power supply 24V 240W
AC Input
115V ~ 5.0A
230V ~ 2.5A
Output
specification
Protection
Environmental
condition
Input frequency
47Hz ÷ 63Hz
Output voltage
24V
Output current
Max. 10A
Efficiency
Typ. 83%
Power
Max. 240W
Over Load
Over 105% ~ 180% of rating, recovers automatically after
fault condition has been removed.
Over Voltage
27.6 ~ 33.6V
Short Circuit
Shutdown, recovers automatically after fault condition has
been removed.
Operating temperature
0°C ÷ 50°C
Humidity
10% ÷ 85% Rh (w/o condensation)
Storage temperature /
Humidity
-20°C ÷ +75°C /
10% ÷ 95% (w/o condensation)
User Manual
KPM300H-TF A-1
APPENDIX A - ACCESSORIES AND SPARE PARTS
A.1.2 External paper roll holder
An external paper roll holder kit (see fig.A.2) is available for the printer to make it possible to use larger-width
rolls of paper (Øext.150mm max).
PCXSP-KPM300
Paper roll holder kit with sensor
The kit includes (see fig. A.2):
• Paper roll pin (1);
• Paper holder support (2) with near paper end
sensor.
1
2
(Fig.A.2)
Assembly instructions
•
Remove the connectors’s cover from the triple feeder sensors board, located sideways in the triple feeder, by levering with a small slotted head screwdriver on the cover slit, as shown in the fig. A.3.
1
PAPE
R EN
D
TO
R
P
EM
pa us
h
OV
p
er S1
E
P
u
P
se sh to to
re se AP
le S
ER
m le
ct 2
ov c
ed to
:
t
pa re e th
e
pe mo
r ve
(Fig.A.3)
A-2 KPM300H-TF
User Manual
APPENDIX A - ACCESSORIES AND SPARE PARTS
Insert the pin in the paper roll.
Put the roll assembled to the pin on the support.
Connect the near paper end sensor of the support with printer, inserting the wiring connector in the relative triple feeder paper input that is used (see fig. A.4).
N.B.: To determine wich socket to connect the near paper end sensor of the support, refer to
the schema shown in dashed box in fig. A.4.
2
PAPE
R EN
D
•
•
•
TO
R
P
E
M
pa us
p h S OV
E
P
re 1
u
P
se sh to to
re se AP
le S
ER
m le
ct 2
ov c
ed to
:
t
pa re e th
e
pe mo
r ve
PAPER INPUT 1st
NEAR PAPER END 1
SENSOR CONNECTOR
PAPER INPUT 2nd
NEAR PAPER END 2
SENSOR CONNECTOR
PAPER INPUT 3rd
NEAR PAPER END 3
SENSOR CONNECTOR
(Fig.A.4)
N.B.: To load paper referred to the instructions indicated in par, 1.7.1 of this manual.
User Manual
KPM300H-TF A-3
APPENDIX A - ACCESSORIES AND SPARE PARTS
Dimensions (in mm)
(Fig.A.5)
Paper roll specifications
(Fig.A.6)
N.B.: For external rolls diameter higher to 100mm it’s recommended to use a paper pre tensioning device.
A-4 KPM300H-TF
User Manual
APPENDIX A - ACCESSORIES AND SPARE PARTS
A.1.3 FanFold Holder
It is available for the printer a FanFold paper holder (see fig.A.7) to make it possible to use to contain tickets
from 54mm to 82.5mm max.
PCXSP-KPM300-FF
FanFold Holder
The kit PCXSP-KPM300-FF includes (see fig.A.7):
1. Right internal width adjustment plate;
2. FanFold slot;
3. Left internal width adjustment plate.
1
2
3
(Fig.A.7)
User Manual
KPM300H-TF A-5
APPENDIX A - ACCESSORIES AND SPARE PARTS
Characteristics and dimensions
183,7
85 (ticket 82,5 max.)
160,5 (L ticket max 152,4 - 6”)
88
38,5
86,5
56,5 (ticket 54 min.)
(Fig.A.8)
Ticket specification:
min. 54
MAX. 82.5
min. 25.4
MAX. 152.4 (6’’)
(Fig.A.9)
A-6 KPM300H-TF
User Manual
APPENDIX A - ACCESSORIES AND SPARE PARTS
Paper instructions:
Before load the paper, position the internal width adjustment plates, (right and left), in the appropriate place
in relation to ticket width used (see following figures).
Using 80 - 82,5 mm ticket width :
• Unscrew the two screw located on the back (see fig.A.10);
• Remove the internal width adjustment plates, right and left, (see fig.A.11).
1
2
(Fig.A.10)
(Fig.A.11)
Using ticket width between 54 and 72 mm
The internal width adjustment plates (right and left) must be in the following position (see fig.A.12). Otherwise
unscrew the two screw located on the back (see fig.A.10) and fix the internal width adjustment plates, right
and left, as indicated in fig.A.12 with the two screws.
(Fig.A.12)
User Manual
KPM300H-TF A-7
APPENDIX A - ACCESSORIES AND SPARE PARTS
Using ticket width less than 54 mm or equal
• Unscrew the two screw located on the back (see fig.A.13);
• Interchange the width adjustment plates and position them in the internal slot as indicated in fig.A.14,
and fixing again with the two screws.
1
(Fig.A.13)
2
(Fig.A.14)
A-8 KPM300H-TF
User Manual
APPENDIX A - ACCESSORIES AND SPARE PARTS
Assembly instructions
The kit PCXSP-KPM300-FF is possible to use both on paper input and paper output (see fig.A.15):
• Fit in the buttonholes on the printer frame.
on paper output
(Fig.A.15)
User Manual
KPM300H-TF A-9
APPENDIX A - ACCESSORIES AND SPARE PARTS
Printer dimensions with PCXSP-KPM300-FF kit on paper output
303
184
191
112
30
27
129
117
19,5
50,9
19,5
114,3
TO REMOVE PAPER:
Push S1 to select the
paper to remove
5
88
132
Push S2 to remove
selected paper
10
45
10
127
31
150
5 - N°4 slots
110
M4 - N°4 holes
A-10 KPM300H-TF
10
45
User Manual
10
127
(Fig.A.16)
1,5
86,5
123
2,5
85
APPENDIX A - ACCESSORIES AND SPARE PARTS
A.2 SPARE PARTS
COMPONENT
CODE
Thermal paper roll 80mm
(Øext= 180mm, Øcore= 25mm, 165gr)
RCT80X180-25MM-165GR
Thermal FANFOLD module 155x165 (255
RCTFF-B-155-65-255GR-N
grams)
User Manual
KPM300H-TF A-11
APPENDIX B - ALIGNMENT MANAGEMENT
B.1 TICKET ALIGNMENT
B.1.1 Ticket alignment
Paper with an alignment notch can be used in order to handle tickets with pre-printed fields and a fixed
length.
To guarantee the alignment it is necessary that the “Notch Alignment” parameter is enabled from the key
setup (see setting configuration parameters), that the alignment sensor is calibrated and that the parameters
are set.The calibration of the sensor occurs automatically within the printer setup or pressing the S1 key during power-up..
B.1.2 Enabling, calibrating and setting of parameters
The printer manages tickets with notch; place the notch on the heat sensitive side or on the non-heat sensitive side of the ticket; in central position or in the side position (see par. 1.6 Paper Specifications).
To guarantee a correct alignment it is necessary that the “Notch Position” parameter is setted with the right
value because the printer must know which sensor utilize from notch searching.
All printer sensors are reflection sensors: this kind of sensor emits a band of light and detects the quantity of
light reflected to it.
The presence of the notch is therefore detected by the amount of light that returns to the sensor, taking into
account that the light is reflected by the white paper and absorbed by the black mark.
However is possible to use sensors coupled two by two ( transparence sensors), using the sensor’s transmitter with the receiver of the opposite: during this operating condition a beam of light is emitted by a sensor
and the quantity of light which reaches the opposite receiver is detected.
The presence of the notch so is detected evaluating the amount of light that arrives to the opposite sensor,
considering that the paper doesn’t allow the beam of light to reach the receiver, whereas a gap (like label
with gap ) or hole, lets the light to reach the receiver.
“Notch Position”
parameter
Using mode
Notch position on
ticket
Notes
Disabled
N.A.
N.A.
Alignment disabled
Low side
REFLECTION
Lateral non-thermal side
Using notch printed on ticket to align
Up side
REFLECTION
Lateral thermal side
Using notch printed on ticket to align
Low center
REFLECTION
Central non-thermal side
Using notch printed on ticket to align
Up center
REFLECTION
Central thermal side
Using notch printed on ticket to align
Tr. side
TRANSPARENCE
Lateral
Using ticket with gap or label with gap
Tr. center
TRANSPARENCE
Central
Using ticket with gap or label with gap
Calibration of the sensor occurs automatically and consists in adjusting the quantity of light emitted to adapt
it to the degree of whiteness of the paper used.
To start self-calibration, the “Notch Position ” parameter will be setted in a different value by “Disabled” value
from the printer setup (see setting configuration parameters) or pressing the S1 key during power-up.
The printer will perform some paper FEEDS, at the end of which it will print the calibraration result and the
value of the PWM duty-cycle of the alignment sensor driver so that it can be perform an optimal notch detection, for example:
Autosetting Notch
Threshold White
: OK
: 85.3%
The “Autosetting Notch” parameter indicates the operating condition of the self-calibration process; OK will
appear if it has been successful, but if it has failed the words NOT OK will appear.
User Manual
KPM300H-TF B-1
APPENDIX B - ALIGNMENT MANAGEMENT
Another parameter that needs to be set is the threshold:
: 40%
Notch Threshold..
It is used to detect the presence of the notch: if the voltage value read by the sensor exceeds the threshold
value set the notch is identified, otherwise the white paper is considered.
In order to better identify the optimum threshold for the paper being used, a paper characterisation function is
also available in setup.
Characterize Paper.
:Yes
By activating this parameter the outgoing voltage of the sensor will be presented in a graphic form as shown
in figure B.1 below:
PAPER CHARACTERIZATION
(Fig.B.1)
Notch Threshold
N.B.: The outgoing voltage of the sensor will be presented in a graphic as a percentage value.
N.B.: This characterization paper is made using the fan fold module packed with the printer.
The graphic shows the outgoing voltage of the sensor and the threshold value previously set. It is clear that
by adjusting the threshold value it is possible to find the best position that takes into account the signal peak
and the small oscillations around zero.
The ALIGNMENT POINT is defined as the position inside the ticket that is the desired alignment point.
The ALIGNMENT POINT can be defined over the notch or near this one; for this reason, the final parameters to be set in setup are:
Notch Dist. [mm x 10] . : 1
Notch Dist. [mm x 1] . : 5
Notch Dist. [mm x .1] . : 0
These parameters define the “Nocth Distance” that represents the distance from the notch to align or simply
identify the notch distance from the ticket margin; in the above example the notch distance is 15 mm.
B-2 KPM300H-TF
User Manual
APPENDIX B - ALIGNMENT MANAGEMENT
(Fig.B.2)
Alignment point
(ticket start position
Notch
Distance
NON-THERMAL
SIDE
THERMAL SIDE
Direction of
paper feed
Figure B2 shows how the “Notch Distance” parameter represents the distance that exists between the notch
and the desired alignment point. This parameter can have a minimum value of -5mm (negative value) and a
maximum of 67 mm. In reality the maximum distance corresponds to the mechanical distance between the
notch sensor and the head, and it is for this reason that higher values are not permitted.
L
direction
of
paper feed
To place the “ALIGNMENT POINT” before the notch, (or rather that the notch is external to the ticket used),
setting the “Notch distance” to a negative value (see fig.B.3).
Used for notch alignment
with negative distance
W
(Fig.B.3)
Ticket margin
where
L=
represents the paper width used (54 ¸ 82.5 mm);
W=
indicates the minimum managed length 25.4 mm (1”).
User Manual
KPM300H-TF B-3
APPENDIX B - ALIGNMENT MANAGEMENT
B.2 COMMANDS
B.2.1 Ticket alignment
The commands to manage ticket alignment are present only in ESC/POSTM emulation; in SVELTA emulation
are automatically performed with the printing commands <p> <P> <q> <Q>.
In ESC/POSTM emulation the two alignment available commands are : $1D $F6 and $1D $F8.
The command $1D $F6 performs an alignment to the print head: the paper is fed through until the print head
is at the ticket start.
The command $1D $F8 on the other hand refers to the cutter: the paper is fed through until the cutter is at
the set alignment point of the next ticket, so that a subsequent cut will occur precisely at the end of the ticket.
B.2.2 Setting the alignment distance
The “Notch Distance” parameter can be changed via the printer setup or by using the command $1D $E7 nH
nL. For further information refer to the command itself.
In SVELTA emulation the parameter used to set the alignment is not the “Notch Distance” modifiable in the
printer setup, but it is necessary setted using the command LHT.
B.2.3 Examples
N.B.: To a better comprehension, in the following figures, the Notch is indicated on the same
side of the printing text.
Example 1
To print a ticket’s sequence witch the cut is made over the notch it’s necessary set the notch distance to zero
as follows (this setting have effect after the ticket already in the printer):
TICKET
N
FIRST
LINE
SECOND LINE
{Set Notch Distance}
$1D,$E7,$00,$00,
{Print text}
‘TICKET 1’,$0A,’FIRST LINE’,$0A,’SECOND LINE’,$0A
{Cut alligment}
$1D, $F8,
{Cut}
ESC,’i’,
...
{Print text}
‘TICKET 1’,$0A,’FIRST LINE’,$0A,’SECOND LINE’,$0A
{Cut alligment}
$1D,$F8,
{Cut}
ESC,’i’,
...
TICKET
(N+1)
FIRST
LINE
SECOND LINE
(Fig.B.4)
B-4 KPM300H-TF
User Manual
APPENDIX B - ALIGNMENT MANAGEMENT
Example 2
To cut 10mm before the notch the command sequence is (this setting have effect after the ticket already in
the printer):
{Print text}
‘TICKET 1’,$0A,’FIRST LINE’,$0A,’SECOND LINE’,$0A
{Cut alligment}
$1D,$F8,
{Cut}
ESC,’i’,
...
TICKET
N
FIRST
LINE
SECOND LINE
10
{Print text}
‘TICKET 1’,$0A,’FIRST LINE’,$0A,’SECOND LINE’,$0A
{Cut alligment}
$1D, $F8,
{Cut}
ESC,’i’,
...
10
$1D, $E7, $00, $0A,
TICKET
(N+1)
FIRST
LINE
SECOND LINE
(Fig.B.5)
Example 3
To print over the notch the command sequence is (this setting have effect after the ticket already in the
printer):
{Set Notch Distance}
$1D,$E7,$00,$00,
{Print head aligment}
$1D, $F6,
{Print text}
‘TICKET 1’,$0A,’FIRST LINE’,$0A,’SECOND LINE’,$0A
{Cut}
ESC,’i’
...
{Print head aligment}
$1D, $F6,
{Print text}
‘TICKET N’,$0A,’FIRST LINE’,$0A,’SECOND LINE’,$0A
{Cut}
ESC,’i’
TICKET
N
FIRST
LINE
SECOND LINE
TICKET
(N+1)
FIRST
LINE
SECOND LINE
(Fig.B.6)
User Manual
KPM300H-TF B-5
APPENDIX B - ALIGNMENT MANAGEMENT
Example 4
TICKET
N
FIRST
LINE
SECOND LINE
15
{Set Notch Distance}
$1D,$E7,$00,$0F,
TICKET
(N+1)
FIRST
LINE
SECOND LINE
15
To print 15mm before the notch the command sequence is (this setting have effect after the ticket already in
the printer):
{Print head aligment}
$1D, $F6,
{Print text}
‘TICKET 1’,$0A,’FIRST LINE’,$0A,’SECOND LINE’,$0A
{Cut}
ESC,’i’
...
{Print head aligment}
$1D, $F6,
{Print text}
‘TICKET N’,$0A,’FIRST LINE’,$0A,’SECOND LINE’,$0A
{Cut}
ESC,’i’
(Fig.B.7)
B-6 KPM300H-TF
User Manual
APPENDIX B - ALIGNMENT MANAGEMENT
B.3 PAPER CHARACTERISTICS
B.3.1 Position of the notch
Figure B.8 shows a section of the printer and the distances between the head, the cutter and the notch sensor.
80
105
1,5
SENSOR
66
PRINT HEAD
CUTTER
24
(Fig.B.8)
User Manual
KPM300H-TF B-7
APPENDIX B - ALIGNMENT MANAGEMENT
B.3.2 Dimension of tickets
It is very important to well calibrate the height of the printer area, according to the distance between the two
edges of the notch. In order not to miss a notch (a ticket must therefore contain only one notch) the following
equation must be used:
INTER-NOTCH DISTANCE>PRINTED AREA HEIGHT
where
INTER-NOTCH DISTANCE = the distance between two notch edges
The picture in figure B.9 shows a sequence of printed tickets aligning each one at the cut. It can be noted
that increasing the printed area will result in superimposing what is to be printed at the subsequent notch.
The size of the print area can be enlarged until it renders the alignment feed void, but not beyond.
LEGEND:
A = Alignment feed
H = Printing area height
D = Inter-notch distance
D
A
H
DIRECTION
OF
PAPER FEED
(Fig.B.11)
N.B.: In ESC/POSTM emulation to prevent any jamming, after cut, the paper is not completely
recovered, but it remains outside the printing line of 10mm; so it’s very important to consider this
distance, in this emulation, during the ticket layout definition.
In SVELTA emulation, directly designed for ticketing, on the contrary the paper recovering is not
necessary, because after a cut non-printable areas are not produced.
B-8 KPM300H-TF
User Manual
APPENDIX B - ALIGNMENT MANAGEMENT
B.4 METHODS OF USAGE
B.4.1 Command sequences
It is possible, when printing sequences of tickets, to primarily identify two different methods of operation that
involve the alignment: ticket aligned at the cut, ticket aligned at printing and combined alignment.
B.4.1.1 Alignment at the cut
The sequence of commands to be entered when wanting to align a ticket at the cut is as follows:
1.
2.
3.
4.
Ticket general setting; formatting of characters, print density, margins etc.
Print ticket: Printing of text, logos or any other graphics.
Alignment at the cut command: $1D $F8.
Cut command.
B.4.1.2 Alignment at printing
Alignment at printing requires the following sequence of commands:
1. Ticket general setting; formatting of characters, print density, margins etc.
2. Print alignment commands: $1D $F6.
3. Print ticket: Printing of text, logos or any other graphics.
4. Cut command.
Unlike the previous case, the alignment feed takes place before the start of printing, so as to align the print
area in the position required.
B.4.1.3 Combined alignment
The combined alignment at printing and at the cut is the most alignment used on ticketing applications and
requires the following sequence of commands:
1. Ticket general setting; formatting of characters, print density, margins etc.
2. Print alignment commands: $1D $F6
3. Print ticket: Printing of text, logos or any other graphics.
4. Alignment at tha cut command.
5. Cut command.
This method of operation has favourable, compared with previously methods, because all printed thickets are
the same length apart from length of printable area.
User Manual
KPM300H-TF B-9
APPENDIX B - ALIGNMENT MANAGEMENT
Blank page
B-10 KPM300H-TF
User Manual
APPENDIX C - ADVANCED FUNCTIONS
C.1 PRINTER SET-UP
C.1.1 Mass Storage activation
One of the parameters related to printer configuration (see par.1.3.2), is “USB Mass Storage” (see fig.C.1).
The allowed values for “USB Mass Storage” parameter are Disabled (default value) and Enabled. It allows to
disable or enable the files sharing from Mass Storage with a USB connection between KPM300H-TF and a
computer.
RS232 B
Baud
dR
Rate
t (1) ..................:
RS232 Data Length ((1)) ...............:
RS232 Parity ((1)) ..........................:
RS232 Handshaking (1) ..............:
( )
Busy Condition (2)
........................:
......................:
USB Mass Storage ....................:
USB Address Numb
ber (3) ............:
Print Mode .................................:
( )
Autofeed (4)
.................................::
Chars / inch ((4)) ............................::
Speed / Quality ..........................:
115200 b
bps
8 bits/chr
None
Xon/Xoff
RxFull
Enabled
7
Normal
CR disabled
A=15 B=20 cpi
Normal
(Fig.C.1)
C.1.2 FTP Server activation (Only for models with Ethernet interface )
One of the Ethernet parameters related to printer configuration (see par.1.3.1), is “FTP Server” (see fig.C.2).
The allowed values for “FTP Server” parameter are Disabled (default value) and Enabled. It allows to disable
or enable the files sharing from FTP Server connection between KPM300H-TF and a computer.
DHCP Client........................ : Disabled
FTP Server ........................ : Enabled
IP Address........................... : 192. 168. 10. 37
Subnet Mask ...................... : 255. 255. 240. 0
Default Gateway.................. : 192. 168. 1. 23
MAC Add
(Fig.C.2)
00 0E E2 67 07 04
NOTE: To enter the printer’s Set-up mode and configure parameters value, follow the instruction of
par.1.3.
User Manual
KPM300H-TF C-1
APPENDIX C - ADVANCED FUNCTIONS
C.2 EMBEDDED WEB SERVER (only for models with Ethernet interface)
KPM300H-TF models with Ethernet interface, are equipped with an Embedded Web Server that allows to
execute some operations on printers, through a clear web interface, including:
• monitoring the printer status;
• setting operating parameters;
• configuring network settings;
• managing the logos;
• configuring the email service to make diagnostics and maintenance operations easier;
• download printing drivers.
C.2.1 Connection check
Before entering in the Embedded Web Server, check that:
• the printer is connected and turned on;
• the printer has a network connection based on the IP protocol;
• the following door are opened (if a Firewall is present on computer): 9100 (or differently set up). 15000,
15001, 15002;
• have a Web browser on the computer;
• the printer is connected to the network and its IP address and its Subnet Mask are set up in a correct
way. To check the setting of this parameters, open a new terminal window and type “ping” on the command bar followed by the IP address of the printer. The picture C.3 shows an example of a positive result
after the “ping” command. Otherwise, if connection isn’t possible, to its IP address, will appear an overdue request mistake.
Example:
ping
192. 168. 10. 37
(Fig.C.3)
C-2 KPM300H-TF
User Manual
APPENDIX C - ADVANCED FUNCTIONS
C.2.2 Embedded Web Server access
To enter the Embedded Web Server, type the IP address assigned to the printer into Web browser. For example, if IP address of the printer is 192.168.10.37, type in the Web browser:
http://192.168.10.37
On the screen will appear the internal default page that corresponds to the section “Device Info” (see
fig.C.4).
NOTE: To know the IP address of the printer, print the Set-up report of the printer (see par.1.3.1)
or use “Locator” (see par.C.3).
e KPM300-H - Windows Internet Explorer
http://192.168.10.37/index.htm
File
Edit
View
Favorites
Tools
Help
Page
KPM300-H
DEVICE INFO
│
PRINTER SETTINGS
│
Tools
PRINTER SUPPORT
Custom Web Site
KPM300H
Ticket Printer
DEVICE INFO
Cover Open
RealTime Status
Cover Open
Model Information
Paper End
Printer Parameter
Near Paper End
Network Settings
Paper rolling
Advanced Status
Paper End
Ticket Out
LF key pressed
FF key pressed
S1 key pressed
S2 key pressed
Over temperature
Supply Voltage error
Cutter error
Cutter Open
Memories Error
Paper Jam
14:35
Notch Search...
03‐09‐08
Done
Notch Error
Locale intranet
100 %
(Fig.C.4)
The Embedded Web Server has 3 sections present in every Web page as horizontal command bar in the upper part of the page (see fig.C.4). These sections are:
• Device Info
• Printer Settings
• Printer Support
To enter some sections and some configuration services, it is required the identification of the user and password. To make registration and to obtain the access to the restricted areas, when it is required insert the user
name and the password as indicated in the following table:
User Name
Custom
Password
AlwaysOn
(Tab.C.1)
NOTE: Respect capital and small letters as indicated in table C.1.
User Manual
KPM300H-TF C-3
APPENDIX C - ADVANCED FUNCTIONS
C.2.3 Embedded Web Server functions
Status Monitor
In the “Device Info” section, it is possible to display in real time the printer operating status using the following tools:
• RealTime Status.
• Model Information.
• Printer Parameter.
• Network Settings.
• Advanced Status.
In the page related to “Real Time Status” tool (the internal default page), it is possible to monitor in real time
(with a refresh adjustable from 5 to 15sec) and to configure some parameters. The printer picture in the
centre of the page and the colour of the lights and the text will signal every change of operating state of the
printer (see fig.C.5).
(Fig.C.5)
Printer settings
The “Printer Settings” section is a restricted one. To enter the section, it is required the identification of the
user and password (see par.C.2.2).
e KPM300-H - Windows Internet Explorer
http://192.168.10.37/download.htm
File
Edit
View
Favorites
Tools
Help
Page
KPM300-H
│
DEVICE INFO
│
PRINTER SETTINGS
PRINTER SETTINGS
│
│
Tools
PRI
PRINTER SUPPORT
Custom Web Site
KPM300H
Ticket Printer
?
Connect to 192.168.10.37
DEVICE INFO
RealTime Status
The server 192.168.10.37 at /SETPARAM.SSI requires a
username and password.
Model Information
Printer Parameter
Warning: This server is requesting that your username and
password be sent in an insecure manner (basic authentication
without a secure connection).
Network Settings
User name:
Password:
Remember my password
OK
C-4 KPM300H-TF
User Manual
Cancel
(Fig.C.6)
APPENDIX C - ADVANCED FUNCTIONS
The printer configuration tools are:
• Printer Setup.
• Network Setup.
• Email Setup.
• Email Log.
With these tools, it is possible to set up the same parameters of the printer that are configurable in the
printer’s Set-up mode (see par.1.3).
With the “Email Setup” tools it is possible to configure the automatically delivery of service email in order to
inform the user when a change occurs to operating status of the printer.
The service email can include a short configurable message and the information about the operating printer
status (see fig.C.7).
e KPM300-H - Windows Internet Explorer
http://192.168.10.37/index.htm
File
Edit
View
Favorites
Tools
Help
Page
KPM300-H
DEVICE INFO
│
PRINTER SETTINGS
│
Tools
PRINTER SUPPORT
Custom Web Site
KPM300H
Ticket Printer
PRINTER SETTINGS
Printer Setup
Network Setup
E-Mail Service Settings
SMTP Server Address
SMTP Server Port
smtp.custom.it
25
Email Setup
Email Log
E-mail To
E-mail From
E-mail Subject
[email protected]
[email protected]
test
Testo libero
E-mail Message
Include Printer Status
when Paper End is detected
when Near Paper End is detected
on Printer Power On
when Near Paper End is detected
on Cut
on LF key pressed
on FF key pressed
Send e-mail event
on S1 key pressed
on S2 key pressed
on Cut error
on Paper Jam
on Notch Align error
on Autoload
on Head Over Temperature error
(Fig.C.7)
on Supply Voltage error
Reset e-mail settings...
Done
Save e-mail settings
Locale intranet
100 %
Test page
The tools of the “Printer Support” section, are:
• Download Driver (see par.C.4).
• Advanced Function.
• Pictures settings (see par.C.5).
The page related to “Advanced Function” tool is a restricted one. To enter the page, it is required the identification of the user and password (see par.C.2.2).
User Manual
KPM300H-TF C-5
APPENDIX C - ADVANCED FUNCTIONS
e KPM300-H - Windows Internet Explorer
1
http://192.168.10.37/download.htm
File
Edit
View
Favorites
Tools
Help
KPM300-H
│
DEVICE INFO
│
PRINTER SETTINGS
Page
Tools
PRINTER SUPPORT
│
PRINTER SUPPORT
Custom Web Site
KPM300H
Ticket Printer
2
PRINTER SUPPOR
PRINTER SUPPORT
Download Driver
Download Driver
Download Driver
Advanced Function
Advanced
Picture
Settings
You can find on this section the printer drivers.
The drivers are stored inside the printer memory: is not needed an active internet connection
Function
Picture Settings
Kpm300h_rel_111_Win2K_2K3_XP.exe | | Release : 1.11 | | File Size : 37 KB
Description
Des
Microsoft Windows GPD Driver
Micro
Related product(s) : KPM300 H
Relate
Category : Drivers
Categor
Operative system(s) : Windows 2000 / XP / Vista
Download file >>
?
Connect to 192.168.10.37
Kpm300h_cupsdrv-1.00.tar.gz | | Release : 1.00 | | File Size : 12 KB
Description
CUPS (Common Unix Printer System) based printer drivers
Related product(s) : KPM300 H
Category : Drivers
Operative system(s) : Linux
Download file >>
The server 192.168.10.37 at /SETADV.SSI requires a
username and password.
Warning: This server is requesting that your username and
password be sent in an insecure manner (basic authentication
without a secure connection).
(Fig.C.8)
User name:
3
Done
Password:
Remember my password
OK
Locale intranet
100 %
Cancel
After making registration and obtaining the access to the restricted area (see fig.C.8), it is possible to test
some printer function (see fig.C.9), for demonstrative and service purpose, as:
• printing a test page, the font test and the logos test;
• the self-calibration of the notch sensors and the ticket alignment;
• reset to factory default.
e KPM300-H - Windows Internet Explorer
http://192.168.10.37/index.htm
File
Edit
View
Favorites
Tools
Help
Page
KPM300-H
DEVICE INFO
│
PRINTER SETTINGS
│
Tools
PRINTER SUPPORT
Custom Web Site
KPM300H
Ticket Printer
PRINTER SUPPORT
Advanced Function
Download Driver
Advanced Function
Warning : Use these function only when the printer is in standby!
All functions below, if used while the printer is executing a print job from communication port, may corrupt the printout.
Picture Settings
Test Page
Print Test Page
Exec Test Page
Logo Test
Print all Logos
Logo Description
Logo Test
Exec Logo Test
Font Test
Font Description
Font Test
ESC/POS - 11 CPI
Exec Font Test
Advanced Function
Notch Autoset
Characterize Paper
Align icket to print
Align ticket to cutter
Cut Paper
Reset To Factory Default
Done
C-6 KPM300H-TF
Exec Notch Autoset
Exec Paper Characterization
Exec Align
Exec Align to cut
Exec Paper Cut
Reset To Factory Default
Locale intranet
User Manual
100 %
(Fig.C.9)
APPENDIX C - ADVANCED FUNCTIONS
C.3 LOCATOR (only for models with Ethernet interface)
For the models with Ethernet interface, it is available an external software (see fig.C.10). The “Locator” is
able to execute a search of the printers connected to the network with an Ethernet cable, without knowing
the IP addresse of each printer.
(Fig.C.10)
For each printer detected, “Locator” allows to configure the following parameters (see fig.C.11):
• IP Address.
• Subnet Mask.
• Gateway.
• Printer friendly name.
(Fig.C.11)
User Manual
KPM300H-TF C-7
APPENDIX C - ADVANCED FUNCTIONS
C.4 WINDOWS / LINUX DRIVERS
C.4.1 Driver download from Mass Storage
To install printing drivers from USB Mass Storage, proceed as follows:
1. Connect the printer to a computer by an USB cable (see fig.C.12).
1
(Fig.C.12)
NOTE: To download drivers from USB Mass Storage, enable “USB Mass Storage” parameter
into printer Set-up (see par.C.1.1).
2. Open printer’s Flash Disk and enter the internal folders (see fig.C.13).
2
FLASHDRIVE (F:)
Windows can perform the same action each time you
insert a disk or connect a device with this kind of file:
Pictures
What do you want Windows to do?
Open folder to view files
using
Windows
Explorer
Open
folder
to view
files
using Windows Explorer
FLASHDRIVE (F:)
File
Edit
View
Favorites
Tools
Help
Back
Address
F:\
File and Folder Tasks
Always
ys do the selected action.
OK
Driver
Pictures
Other Places
Cancel
PicList.ini
My Computer
My Documents
Details
(Fig.C.13)
C-8 KPM300H-TF
User Manual
APPENDIX C - ADVANCED FUNCTIONS
3. Copy printer drivers into the “Driver” folder (see fig.C.14).
3
FLASHDRIVE (F:)
File
Edit
View
Favorites
Tools
Help
Back
Address
F:\
File and Folder Tasks
Driver
Driver
Pictures
Other Places
PicList.ini
My Computer
My Documents
Details
Driver
File
Edit
View
Favorites
Tools
Help
Back
Address
F:\Driver
File and Folder Tasks
KPM300H CUPSDrv-1.00.tar.qz
Kpm300h_rel_111_Win2K_2K3...
Other Places
My Computer
My Documents
Details
(Fig.C.14)
C.4.2 Driver download from FTP Server (Only for models with Ethernet interface)
To install printing drivers by FTP Server connection, proceed as follows:
1. Connect to the network the printer and the computer (see fig.C.15).
1
(Fig.C.15)
NOTE: To download drivers from FTP Server, enable “FTP Server” parameter into printer Set-up
(see par.C.1.2).
User Manual
KPM300H-TF C-9
APPENDIX C - ADVANCED FUNCTIONS
2. Type in the address bar “ftp://” followed by the IP address of the printer (see fig.C.16)
2
My computer
File
Edit
View
Favorites
Tools
Help
Back
Address
Address
192.168.10.37
ftp://192.168.10.37
ftp://192.168.10.37
Local Disk (C:)
ftp://192.168.10.37/
VOLUME (D:)
File and Folder Tasks
File
FLASH DRIVE (F:)
Other Places
Edit
View
Favorites
Tools
Help
Back
My Computer
Address
ftp://192.168.10.37
My Documents
Other Places
Details
Driver
Pictures
SMTP
WebPage
e Internet Explorer
My Documents
PicList.ini
User : Custom
Local Intranet
(Fig.C.16)
NOTE: To know the IP address of the printer, print the Set-up report of the printer (see par.1.3.1)
or use “Locator” (see par.C.3).
3. Copy printing driver from the “Driver” folder (see fig.C.17) to a local folder and install it.
3
ftp://192.168.10.37/
File
Edit
View
Favorites
Tools
Help
Back
Address
ftp://192.168.10.37
Other Places
Driver
e Internet Explorer
My Documents
Pictures
Driver
ftp://192.168.10.37/Driver/
File
SMTP
Edit
View
Favorites
Tools
Help
WebPage
Back
Address
ftp://192.168.10.37/Driver/
PicList.ini
Other Places
KPM300H CUPSDrv-1.00.tar.qz
Kpm300h_rel_111_Win2K_2K3...
e Internet Explorer
My Documents
Details
User : Custom
Local Intranet
User : Custom
Local Intranet
(Fig.C.17)
C-10 KPM300H-TF
User Manual
APPENDIX C - ADVANCED FUNCTIONS
C.4.3 Driver download from Embedded Web Server (Only for models with Ethernet interface)
To download printing driver from the Embedded Web Server, proceed as follows:
1. Connect to the network the printer and the computer (see fig.C.18).
2. Enter into the Embedded Web Server following the instruction of the par.C.2.2.
3. Enter into the “Printer Support” section (see fig.C.19)
4. Enter the page related to “Download Driver” tool (see fig.C.20)
5. Chose the printing driver and click on “Download file >>” (see fig.C.20).
KPM3
00-H
-
Wind
ows
http
://192.
Intern
168
KPM3
00-H
Cus
tom
Web
et Ex
.10.37
plo
/ind
rer
ex.htm
Site
DEVIC
E INF
O
│
PRINT
ER
SETTI
NG
S
│
ICE
INF
SUPP
OR
O
lTim
e Sta
tus
Mod
el Info
rma
tion
Prin
ter
Par
ame
Net
ter
wor
k Set
ting
Adv
s
anc
ed Sta
tus
1
PRINT
ER
DEV
Rea
T
KPM
3
et P 00H
ri
Tick
nter
Cover
Open
Cover
Open
Pap
er End
Near
Pap
er End
Pap
er roll
ing
Pap
er End
Ticket
Out
LF key
presse
d
FF
key
presse
d
S1
key
presse
d
S2
key
presse
d
Over
tem
peratu
re
Sup
ply
Voltag
e erro
Cutter
r
erro
r
Cutter
Open
Memo
ries
Error
Pap
er Jam
2
Notch
Notch
Sea
rch...
Error
(Fig.C.18)
(Fig.C.19)
3
e KPM300-H - Windows Internet Explorer
http://192.168.10.37/download.htm
File
Edit
View
Favorites
Tools
Help
KPM300-H
DEVICE INFO
│
PRINTER SETTINGS
│
│
Page
Tools
PRINTER SUPPORT
PRINTER
SUPPORT
Custom Web Site
KPM300H
Ticket Printer
4
PRINTER SUPPORT
PRINTER
SUPPOR
Download Driver
Advanced Function
Download
Driver
Picture Settings
Advanced Function
Download Driver
You can find on this section the printer drivers.
The drivers are stored inside the printer memory: is not needed an active internet connection
5
Kpm300h_rel_111_Win2K_2K3_XP.exe | | Release : 1.11 | | File Size : 37 KB
Description
Picture Settings
Microsoft Windows GPD Driver
Related product(s) : KPM300 H
Category : Drivers
Operative system(s) : Windows 2000 / XP / Vista
Download file >>
Download file >>
Kpm300h_cupsdrv-1.00.tar.gz | | Release : 1.00 | | File Size : 12 KB
Description
CUPS (Common Unix Printer System) based printer drivers
Related product(s) : KPM300 H
Category : Drivers
File Download - Security Warning
Operative system(s) : Linux
Download
nload file >>
Do you want to run or save this file?
Name: Kpm300h_rel_111_Win2K_2K3_XP.exe
Type: Application, 37.0KB
From: 192.168.10.37
Run
Done
(Fig.C.20)
Locale intranet
Save
Cancel
100 %
While files from the Internet can be useful, this file tyoe can
potentially harm your computer. If you do not trust the source, do not
run or save this software. What’s the risk?
User Manual
KPM300H-TF C-11
APPENDIX C - ADVANCED FUNCTIONS
C.5 LOGOS MANAGEMENT
With KPM300H-TF it is possible to store new logos in addition to default logos stored on Flash Disk. The
printer automatically provides to convert BMP image to the error-diffusion format in black and white.
In the models with the SD/MMC card (see fig.C.21), logos may be stored both on Flask Disk and on the
Memory Card. The use of the Memory Card allows to handle more logos (however, the max number of manageable logos is limited by the RAM memory reserved for logos management).
(Fig.C.21)
C.5.1 Logos management from USB Mass Storage
To add a new logo to the printer from USB Mass Storage, proceed as follows:
1. Connect the printer to a computer by an USB cable (see fig.C.22).
1
(Fig.C.22)
NOTE: To manage logos from USB Mass Storage, enable “USB Mass Storage” parameter into
printer Set-up (see par.C.1.1).
C-12 KPM300H-TF
User Manual
APPENDIX C - ADVANCED FUNCTIONS
2. Open printer’s Flash Disk and enter the internal folders (see fig.C.23).
2
FLASHDRIVE (F:)
Windows can perform the same action each time you
insert a disk or connect a device with this kind of file:
Pictures
What do you want Windows to do?
Open folder to view files
using
Windows
Explorer
Open
folder
to view
files
using Windows Explorer
FLASHDRIVE (F:)
File
View
Edit
Favorites
Tools
Help
Back
Address
F:\
Driver
File and Folder Tasks
Always
ys do the selected action.
OK
Pictures
Other Places
Cancel
PicList.ini
My Computer
My Documents
Details
(Fig.C.23)
3. Copy the new logo into the “Pictures” folder (see fig.C.24).
3
FLASHDRIVE (F:)
File
Edit
View
Favorites
Tools
Help
Back
Address
F:\
File and Folder Tasks
Driver
Picturess
Pictures
Other Places
PicList.ini
My Computer
My Documents
Details
Pictures
File
Edit
View
Favorites
Tools
Help
Back
Address
F:\Pictures
PSD
File and Folder Tasks
Ps
CERCHIO.BMP
PSD
PSD
Ps
Ps
EDGE.bmp
---LOGOATE...
PSD
PSD
Ps
PSD
Ps
Pict1.bmp
Ps
Pict2.bmp
Pict4.bmp
Other Places
PSD
My Computer
My Documents
Ps
Pict5.bmp
PSD
Ps
Pict6.bmp
PSD
Ps
Pict7.bmp
PSD
Ps
Pict8.bmp
Details
User: Custom
Local Intranet
(Fig.C.24)
User Manual
KPM300H-TF C-13
APPENDIX C - ADVANCED FUNCTIONS
NOTE: In models with SD/MMC card, it is possible to store the new logo both on SD/MMC
and on Flash Disk.
4. Add to the configuration file “PictList.ini”, a line with a number associated to the logo (to be used with
printer’s commands), a letter for the memory unit and the logo file name, as indicated in the instructions written inside the “PictList.ini” file (see fig.C.25).
4
FLASHDRIVE (F:)
File
Edit
View
Favorites
Tools
Help
Back
Address
F:\
File and Folder Tasks
Driver
Pictures
Other Places
PicList.ini
My Computer
My Documents
Piclist.ini
Details
(Fig.C.25)
ATTENTION: The configuration file “PictList.ini” on the printer’s Flash Disk, has to be modified
even if the new added logo is stored on SD/MMC (only for models with SD/MMC card).
To delete a logos stored in the KPM300H-TF, proceed as follows:
1. delete the selected logo from the “Pictures” folder on Flash Disk or SD/MMC card (only in models with
SD/MMC);
2. in the configuration file “PictList.ini”, delete the line related to the erased logo.
C-14 KPM300H-TF
User Manual
APPENDIX C - ADVANCED FUNCTIONS
C.5.2 Logos management from FTP Server (Only for models with Ethernet interface)
To add a new logo to the printer from FTP Server, proceed as follows:
1. Connect to the network the printer and the computer (see fig.C.26).
1
(Fig.C.26)
NOTE: To manage logos from FTP Server, enable “FTP Server” parameter into printer Set-up
(see par.C.1.2).
2. Type in the address bar “ftp://” followed by the IP address of the printer (see fig.C.27)
2
My computer
File
Edit
View
Favorites
Tools
Help
Back
Address
Address
ftp://192.168.10.37
192.168.10.37
ftp://192.168.10.37
Local Disk (C:)
File and Folder Tasks
VOLUME (D:)
FLASH DRIVE (F:)
Other Places
My Computer
ftp://192.168.10.37/
File
Edit
View
Favorites
Tools
Help
Back
Address
ftp://192.168.10.37
My Documents
Details
Other Places
Driver
Pictures
SMTP
WebPage
e Internet Explorer
My Documents
PicList.ini
User : Custom
Local Intranet
(Fig.C.27)
NOTE:
• To know the IP address of the printer, print the Set-up report of the printer (see par.1.3.1) or
use “Locator” (see par.C.3).
• In models with SD/MMC, it is possible to store the new logo both on SD/MMC and on Flash
Disk.
User Manual
KPM300H-TF C-15
APPENDIX C - ADVANCED FUNCTIONS
3. Copy the new logo into the “Pictures” folders (see fig.C.28).
3
ftp://192.168.10.37/
File
Edit
View
Favorites
Tools
Help
Back
Address
ftp://192.168.10.37
Driver
Other Places
Pictures
Pictures
e Internet Explorer
My Documents
SMTP
WebPage
ftp://192.168.10.37/Pictures/
File
Edit
View
Favorites
Tools
Help
Back
PicList.ini
Address
ftp://192.168.10.37/Pictures/
PSD
Other Places
e Internet Explorer
My Documents
Ps
CERCHIO.BMP
PSD
Ps
Details
User : Custom
Pict5.bmp
PSD
Ps
EDGE.bmp
PSD
Ps
Pict6.bmp
PSD
Ps
---LOGOATE...
PSD
Ps
Pict7.bmp
PSD
Ps
Pict1.bmp
PSD
Ps
Pict2.bmp
PSD
Ps
Pict4.bmp
PSD
Ps
Pict8.bmp
Local Intranet
User : Custom
Local Intranet
(Fig.C.28)
4. Add to the configuration file “PictList.ini”, a line with a number associated to the logo (to be used with
printer’s commands), a letter for the memory unit and the logo file name, as indicated in the instructions written inside the “PictList.ini” file (see fig.C.29).
4
ftp://192.168.10.37/
File
Edit
View
Favorites
Tools
Help
Back
Address
ftp://192.168.10.37
Other Places
Driver
Pictures
SMTP
WebPage
e Internet Explorer
My Documents
PicList.ini
t.ini
Piclist.ini
User : Custom
Local Intranet
Intrane
et
et
(Fig.C.29)
ATTENTION: The configuration file “PictList.ini” on the printer’s Flash Disk, has to be modified
even if the new added logo is stored on SD/MMC (only for models with SD/MMC).
C-16 KPM300H-TF
User Manual
APPENDIX C - ADVANCED FUNCTIONS
C.5.3 Logos management from Embedded Web Server (only for models with Ethernet interface)
To manage logos from the Embedded Web Server, proceed as follows:
1. Connect to the network the printer and the computer (see fig.C.30).
2. Enter into the Embedded Web Server following the instruction of the par.C.2.2.
3. Enter into the “Printer Support” section (see fig.C.31)
4. Enter the page related to “Picture Settings” tool (see fig.C.32)
5. Make the registration to obtain the access to the restricted page related to the logos management (see
fig.C.32).
KPM3
00-H
-
Wind
http
KPM3
00-H
ows
Intern
://192.
168
et Ex
.10.37
plo
/ind
rer
ex.htm
Cus
tom
Web
Site
DEVIC
E INF
O
│
PRINT
ER
DEV
ICE
1
SETTI
NG
S
│
PRINT
ER
INF
SUPP
OR
O
Rea
lTim
e Stat
us
Mod
el Info
rma
tion
Prin
ter
Par
ame
Net
ter
wor
k Sett
ings
Adv
anc
ed Stat
us
T
KPM
3
et Pr 00H
in
Tick
ter
Cover
Open
Cov
er Op
en
Pap
er End
Nea
r Pap
er End
Pap
er roll
ing
Pap
er End
2
(Fig.C.30)
Tick
et Ou
t
LF key
FF
S1
S2
key
presse
d
presse
d
key
presse
d
key
Ove
presse
d
r tem
peratu
re
Sup
ply
Voltag
Cut
ter erro
r
Cut
ter Op
en
e erro
r
Memo
ries
Error
Pap
er Jam
Not
ch Sea
rch...
Not
ch Err
or
(Fig.C.31)
3
e KPM300-H - Windows Internet Explorer
http://192.168.10.37/download.htm
File
Edit
View
Favorites
Tools
Help
KPM300-H
│
DEVICE INFO
│
PRINTER SETTINGS
Page
Tools
PRINTER SUPPORT
│
PRINTER SUPPORT
Custom Web Site
KPM300H
Ticket Printer
4
PRINTER SUPPORT
Download Driver
Download
Driver
Download Driver
Advanced Function
You can find on this section the printer drivers.
The drivers are stored inside the printer memory: is not needed an active internet connection
Advanced
Functio
Picture Settings
Picture Settings
Kpm300h_rel_111_Win2K_2K3_XP.exe | | Release : 1.11 | | File Size : 37 KB
Description
Microsoft Windows GPD Driver
Related product(s) : KPM300 H
Category : Drivers
Operative system(s) : Windows 2000 / XP / Vista
O
Download file >>
5
Connect to 192.168.10.37
Kpm300h_cupsdrv-1.00.tar.gz | | Release : 1.00 | | File Size : 12 KB
K
?
Description
CUPS (Common Unix Printer System) based printer drivers
Related product(s) : KPM300 H
Category : Drivers
Operative system(s) : Linux
Download file >>
The server 192.168.10.37 at /SETPICT.SSI requires a
username and password.
Warning: This server is requesting that your username and
password be sent in an insecure manner (basic authentication
without a secure connection).
User name:
Done
Locale intranet
100 %
Password:
Remember my password
OK
Cancel
(Fig.C.32)
User Manual
KPM300H-TF C-17
APPENDIX C - ADVANCED FUNCTIONS
After making registration (see par.C.2.2), the “Printer Settings” page will be displayed (see fig.C.33). It is possible to execute the following operations:
• add a new logo, associate the added logo to an unambiguous number and select the unit memory of
storage (Flash Disk or SD/MMC, for the model with SD/MMC);
• delete logos already stored into KPM300H-TF;
• execute a print with the logo test.
The new logo is automatically added to the “Pictures” folder (it will be therefore visible from Mass Storage
and from FTP server too) and then converted in the proper format.
e KPM300-H - Windows Internet Explorer
http://192.168.10.37/index.htm
File
Edit
View
Favorites
Tools
Help
Page
KPM300-H
DEVICE INFO
│
PRINTER SETTINGS
│
Tools
PRINTER SUPPORT
Custom Web Site
KPM300H
Ticket Printer
PRINTER SUPPORT
Picture Settings
Download Driver
Advanced Function
Warning : Use these function only when the printer is in standby!
All functions below, if used while the printer is executing a print job from communication port, may corrupt the printout.
Picture Settings
Add New Logo
Sfoglia...
Picture to Add
Logo Number
Logo Destination
Send Test
Flash Disk
Add New Logo
File System Free Space
Flash Drive
Memory Card
Free 1.02 Mb
Disk Not Found
Logo Test
Print all Logos
Logo Description
1 - Pict1.bmp
Logo Test
Exec Logo Test
Logo Test
Logo Description
Delete Logo
Done
1 - Pict1.bmp
Delete Selected Logo
Locale intranet
100 %
(Fig.C.33)
C.5.4 Logos printing
The logos stored into a unit memory and converted by the printer, can be printed by using the number associated to the logo during the conversion step.
The correspondence between file-name and logo-number is warrant by the configuration file “PIctList.ini” and
it is verifiable with the logo test.
C-18 KPM300H-TF
User Manual
APPENDIX C - ADVANCED FUNCTIONS
C.6 SETUP
In KPM300H-TF models with Ethernet interface, the printer permits the configuration of default parameters
for printer and network setup by editing the “Setup.ini” file on the flash drive.
C.6.1 “Setup.ini” file
The “Setup.ini” file is a configuration file in the Flash drive of KPM300H-TF that contains all the configurable
parameters listed in text format and divided into some sections (indicated in square brackets).
The available values for every parameter, are listed after the parameter name. The value marked with the
symbol ‘ * ’ is the default one.
To modify printer’s parameters, change the numeric value after the name of parameters. To set the parameter to the default value, change the numeric value with the symbol D.
After editing printer’s parameter, simply save the “Setup.ini” file to make the modifies activated.
The “Setup.ini” file permits the configuration of the following parameters:
[PRINT]
Printer Emulation:
0, 1*
0 = ESC/POSTM
1 = SVELTA
Print Mode:
0*, 1
0 = Normal
1 = Reverse
Autofeed:
0*, 1
0 = CR disabled
1 = CR enable
Chars / inch:
0, 1*
0 = A=11 B=15 cpi
1 = A=15 B=20 cpi
Speed / Quality:
0, 1, 2*
0 = High Quality
1 = Normal
2 = High Speed
Paper Width:
0, 1, 2, 3, 4, 5, 6, 7, 8, 9, 0 = 54 mm
10, 11, 12, 13, 14*
1 = 56 mm
2 = 58 mm
3 = 60 mm
4 = 62 mm
5 = 64 mm
6 = 66 mm
7 = 68 mm
8 = 70 mm
9 = 72 mm
10 = 74 mm
11 = 76 mm
12 = 78 mm
13 = 80 mm
14 = 82 mm
Paper Threshold:
0, 1, 2, 3*, 4, 5, 6
0 = 30 %
1 = 40 %
2 = 50 %
3 = 60 %
4 = 70 %
5 = 80 %
6 = 90 %
Notch Position:
0*, 1, 2, 3, 4, 5, 6
0 = Disabled
1 = Low Side
2 = Up Side
3 = Low Center
4 = Up Center
5 = Tr. Side
6 = Tr. Center
Notch Threshold:
0, 1*, 2, 3, 4, 5, 6
0 = 30 %
1 = 40 %
2 = 50 %
3 = 60 %
4 = 70 %
5 = 80 %
6 = 90 %
3 = - 12 %
4=0%
5 = + 12 %
6 = + 25 %
7 = + 37 %
8 = + 50 %
Notch Distance [mm]
PaperEnd Buffer Clear: 0*, 1
0 = Disabled
1 = Enabled
Print Density:
0 = - 50 %
1 = - 37 %
2 = - 25 %
0, 1, 2, 3, 4*, 5, 6, 7, 8
User Manual
KPM300H-TF C-19
APPENDIX C - ADVANCED FUNCTIONS
[INTERFACE]
RS232 Baud Rate:
1, 2, 3, 4, 5, 6, 7, 8*
1 = 1200 bps
2 = 2400 bps
3 = 4800 bps
RS232 Data Length:
0*, 1
0 = 8 bits/chr
1 = 7 bits/chr
RS232 Parity:
0*, 1, 2
0 = None
1 = Even
2 = Odd
RS232 Handshaking:
0*, 1
0 = Xon/Xoff
1 = Hardware
Busy Condition:
0*, 1
0 = RxFull
1 = OffLine/RxFull
USB Mass Storage:
0*, 1
0 = Disabled
1 = Enabled
USB Address Number: 0*, 1, 2, 3, 4, 5, 6, 7,
8, 9
0=0
1=1
2=2
3=3
[SVELTA]
Ticket X Dimension
Ticket Y Dimension
Notch Distance
Notch Width
Barcode Timeout
Ticket Offset X
Ticket Offset Y
[NETWORK]
DHCP Client:
0*, 1
0 = Disabled
1 = Enabled
FTP Server:
0*, 1
0 = Disabled
1 = Enabled
IP Address
Subnet Mask
Default Gateway
Domain Name System
TCP Printer Port
MAC Address (Read only)
C-20 KPM300H-TF
User Manual
4 = 9600 bps
5 = 19200 bps
6 = 38400 bps
7 = 57600 bps
8 = 115200 bps
4=4
5=5
6=6
7=7
8=8
9=9
APPENDIX C - ADVANCED FUNCTIONS
C.6.2 Enter Setup mode from USB Mass Storage
To configure printer and network parameters from USB Mass Storage, proceed as follows:
1. Connect the printer to a computer by an USB cable (see fig.C.34).
1
(Fig.C.34)
NOTE: To configure printer and network parameters from USB Mass Storage, enable “USB
Mass Storage” parameter into printer Set-up (see par.C.1.1).
2. Open the printer’s Flash Disk (see fig.C.35).
2
FLASHDRIVE (F:)
Windows can perform the same action each time you
insert a disk or connect a device with this kind of file:
Pictures
What do you want Windows to do?
Open folder to view files
using
Windows
Explorer
Open
folder
to view
files
using Windows Explorer
FLASHDRIVE (F:)
File
Edit
View
Favorites
Tools
Help
Back
Address
F:\
File and Folder Tasks
Always
ys do the selected action.
OK
Driver
Pictures
Other Places
Cancel
My Computer
Fonts
Piclist.ini
My Documents
Details
Setup.ini
(Fig.C.35)
User Manual
KPM300H-TF C-21
APPENDIX C - ADVANCED FUNCTIONS
3. Open the “Setup.ini” file (see fig.C.36).
3
FLASHDRIVE (F:)
File
View
Edit
Favorites
Tools
Help
Back
Address
F:\
File and Folder Tasks
Driver
Pictures
Other Places
My Computer
Fonts
Piclist.ini
My Documents
Details
Setup.ini
Setup.ini
(Fig.C.36)
4. Modify the printer’s parameters (see par.C.6.1). Save and close the “Setup.ini” file.
C.6.3 Enter Setup mode from FTP Server (Only for models with Ethernet interface)
To configure printer and network parameters from FTP Server, proceed as follows:
1. Connect to the network the printer and the computer (see fig.C.37).
1
(Fig.C.37)
NOTE: To configure parameters from FTP Server, enable “FTP Server” parameter into printer
Set-up (see par.C.1.2).
C-22 KPM300H-TF
User Manual
APPENDIX C - ADVANCED FUNCTIONS
2. Type in the address bar “ftp://” followed by the IP address of the printer (see fig.C.38)
2
My computer
File
View
Edit
Favorites
Tools
Help
Back
Address
Address
ftp://192.168.10.37
192.168.10.37
ftp://192.168.10.37
Local Disk (C:)
ftp://192.168.10.37/
VOLUME (D:)
File and Folder Tasks
File
FLASH DRIVE (F:)
Other Places
Edit
View
Favorites
Tools
Help
Back
My Computer
Address
ftp://192.168.10.37
My Documents
Other Places
Details
Driver
Pictures
SMTP
WebPage
Fonts
Piclist.ini
e Internet Explorer
My Documents
Setup.ini
User : Custom
Local Intranet
(Fig.C.38)
NOTE:
• To know the IP address of the printer, print the Set-up report of the printer (see par.1.3.1) or
use “Locator” (see par.C.3).
3. Open the “Setup.ini” file (see fig.C.39).
3
ftp://192.168.10.37/
File
Edit
View
Favorites
Tools
Help
Back
Address
ftp://192.168.10.37
Other Places
Driver
Pictures
SMTP
TP
WebPage
Fonts
Piclist.ini
e Internet Explorer
My Documents
Setup.ini
Setup.ini
User : Custom
Local Intranet
(Fig.C.39)
4. Modify the printer’s parameters (see par.C.6.1). Save and close the “Setup.ini” file.
User Manual
KPM300H-TF C-23
APPENDIX C - ADVANCED FUNCTIONS
C.7 FONTS MANAGEMENT
With KPM300H-TF it is possible to store new fonts in addition to default fonts stored on Flash Disk.
In models with the SD/MMC card (see fig.C.40), fonts may be stored both on Flash Disk and on the Memory
Card. The use of the Memory Card allows to handle more fonts (however, the max number of manageable
logos is limited by the RAM memory reserved for logos management).
(Fig.C.40)
C.7.1 Fonts management from USB Mass Storage
To add a new font to the printer from USB Mass Storage, proceed as follows:
1. Connect the printer to a computer by an USB cable (see fig.C.41).
1
(Fig.C.41)
NOTE: To manage fonts from USB Mass Storage, enable “USB Mass Storage” parameter into
printer Set-up (see par.C.1.1).
C-24 KPM300H-TF
User Manual
APPENDIX C - ADVANCED FUNCTIONS
2. Open printer’s Flash Disk and enter the internal folders (see fig.C.42).
2
FLASHDRIVE (F:)
Windows can perform the same action each time you
insert a disk or connect a device with this kind of file:
Pictures
What do you want Windows to do?
Open folder to view files
using
Windows
Explorer
Open
folder
to view
files
using Windows Explorer
FLASHDRIVE (F:)
File
Edit
View
Favorites
Tools
Help
Back
Address
F:\
Driver
File and Folder Tasks
Always
ys do the selected action.
OK
Pictures
Other Places
Cancel
Fonts
My Computer
Piclist.ini
My Documents
Setup.ini
Details
(Fig.C.42)
3. Copy the new font into the “Fonts” folder (see fig.C.43).
3
FLASHDRIVE (F:)
File
Edit
View
Favorites
Tools
Help
Back
Address
F:\
File and Folder Tasks
Driver
Pictures
Other Places
cList.ini
PicList.ini
My Computer
My Documents
Fonts
Details
F:\Fonts
File
Edit
View
Favorites
Tools
Help
Back
Address
F:\Fonts
Other Places
My Computer
My Documents
Vera
(TrueType)
VeraMono
(TrueType)
Details
User: Custom
Local Intranet
(Fig.C.43)
NOTE: In models with SD/MMC card, it is possible to store the new logo both on SD/MMC
and on Flash Disk.
User Manual
KPM300H-TF C-25
APPENDIX C - ADVANCED FUNCTIONS
C.7.2 Fonts management from FTP Server (Only for models with Ethernet interface)
To add a new font to the printer from FTP Server, proceed as follows:
1. Connect to the network the printer and the computer (see fig.C.44).
1
(Fig.C.44)
NOTE: To manage fonts from FTP Server, enable “FTP Server” parameter into printer Set-up
(see par.C.1.2).
2. Type in the address bar “ftp://” followed by the IP address of the printer (see fig.C.45)
2
My computer
File
Edit
View
Favorites
Tools
Help
Back
Address
Address
192.168.10.37
ftp://192.168.10.37
ftp://192.168.10.37
Local Disk (C:)
File and Folder Tasks
VOLUME (D:)
FLASH DRIVE (F:)
Other Places
ftp://192.168.10.37/
File
Edit
View
Favorites
Tools
Help
Back
My Computer
Address
ftp://192.168.10.37
My Documents
Other Places
Details
Driver
Pictures
SMTP
WebPage
Fonts
Piclist.ini
e Internet Explorer
My Documents
Setup.ini
User : Custom
Local Intranet
(Fig.C.45)
C-26 KPM300H-TF
User Manual
APPENDIX C - ADVANCED FUNCTIONS
NOTE:
• To know the IP address of the printer, print the Set-up report of the printer (see par.1.3.1) or
use “Locator” (see par.C.3).
• In models with SD/MMC, it is possible to store the new font both on SD/MMC and on Flash
Disk.
3. Copy the new font into the “Font” folders (see fig.C.46).
3
ftp://192.168.10.37/
File
Edit
View
Favorites
Tools
Help
Back
Address
ftp://192.168.10.37
Other Places
Driver
Pictures
SMTP
Web
WebPage
e Internet Explorer
My Documents
ftp://192.168.10.37/Fonts/
File
Fonts
Edit
View
Favorites
Tools
Help
Piclist.ini Back
Pic
Fonts
Address
Vai
ftp://192.168.10.37/Fonts/
Setup.ini
Other Places
192.168.10.37
My Documents
Vera
(TrueType)
VeraMono
(TrueType)
Details
User : Custom
Local Intranet
Intr
User: Custom
Local Intranet
(Fig.C.46)
C.7.3 Fonts management from Embedded Web Server (only for models with Ethernet interface)
To manage fonts from the Embedded Web Server, proceed as follows:
1. Connect to the network the printer and the computer (see fig.C.47).
2. Enter into the Embedded Web Server following the instruction of the par.C.2.2.
3. Enter into the “Printer Support” section (see fig.C.49)
4. Enter the page related to “Fonts Settings” tool (see fig.C.49)
5. Make the registration to obtain the access to the restricted page related to the fonts management (see
fig.C.49).
User Manual
KPM300H-TF C-27
APPENDIX C - ADVANCED FUNCTIONS
KPM3
00-H
- Wi
ndow
s Int
http
ern
://192.
168
et Ex
plo
.10.37
/ind
KPM3
00-H
rer
ex.htm
Cus
tom
Web
Site
DEVIC
E INF
O
│
PRINT
ER
SETTI
NG
ICE
S
│
PRINT
ER
DEV
O
1
SUPP
OR
INF
Rea
lTim
e Stat
us
Mod
el Info
rma
tion
Prin
ter
Par
ame
Net
ter
wor
k Sett
ings
Adv
anc
ed Stat
us
T
KP
Tick M30
et Pr 0H
inte
r
Cover
Open
Cov
er Op
en
Pap
er End
Nea
r Pap
er End
Pap
er roll
ing
Pap
er End
2
(Fig.C.47)
Tick
et Ou
t
LF key
FF
S1
S2
key
presse
d
presse
d
key
presse
d
key
Ove
presse
d
r tem
peratu
re
Sup
ply
Voltag
Cut
ter erro
r
Cut
ter Op
en
Memo
ries
Error
Pap
er Jam
e erro
r
Not
ch Sea
rch...
Not
ch Err
or
(Fig.C.48)
e KPM300-H - Windows Internet Explorer
3
http://192.168.10.37/download.htm
File
Edit
View
Favorites
Tools
Help
Page
KPM300-H
│
PRINTER SETTINGS
DEVICE INFO
│
│
PRINTER SETTINGS
Tools
PRI
│
PRINTER SUPPORT
Custom Web Site
KPM300H
Ticket Printer
4
PRINTER SUPPORT
Download Driver
Advanced
Funct
Download Driver
Advanced Function
You can find on this section the printer drivers.
The drivers are stored inside the printer memory: is not needed an active internet connection
Picture
Settings
Picture Settings
Fonts Settings
Kpm300h_rel_111_Win2K_2K3_XP.exe | | Release : 1.11 | | File Size : 37 KB
Description
Microsoft Windows GPD Driver
Related product(s) : KPM300 H
Category : Drivers
Operative system(s) : Windows 2000 / XP / Vista
Download file >>
5
Connect to 192.168.10.37
Kpm300h_cupsdrv-1.00.tar.gz | | Release : 1.00 | | File Size : 12 KB
?
Description
CUPS (Common Unix Printer System) based printer drivers
Related product(s) : KPM300 H
Category : Drivers
Operative system(s) : Linux
Download file >>
The server 192.168.10.37 at /SETPICT.SSI requires a
username and password.
Warning: This server is requesting that your username and
password be sent in an insecure manner (basic authentication
without a secure connection).
User name:
Done
Locale intranet
100 %
Password:
Remember my password
OK
C-28 KPM300H-TF
Cancel
User Manual
(Fig.C.49)
APPENDIX C - ADVANCED FUNCTIONS
After making registration (see par.C.2.2), the “Fonts Settings” page will be displayed (see fig.C.50). It is possible to execute the following operations:
• add a new font and select the unit memory of storage (Flash Disk or SD/MMC, for the model with SD/
MMC);
• delete fonts already stored into KPM300H-TF;
• execute a print with the font test.
The new font is automatically added to the “Pictures” folder and it will be therefore visible from Mass Storage
and from FTP server too.
e KPM300-H - Windows Internet Explorer
http://192.168.10.37/index.htm
File
Edit
View
Favorites
Tools
Help
Page
KPM300-H
DEVICE INFO
│
PRINTER SETTINGS
│
Tools
PRINTER SUPPORT
Custom Web Site
KPM300H
Ticket Printer
PRINTER SUPPORT
Font Settings
Download Driver
Advanced Function
Warning : Use these function only when the printer is in standby!
All functions below, if used while the printer is executing a print job from communication port, may corrupt the printout.
Picture Settings
Font Settings
Add New Font
Sfoglia...
Fontto Add
Font Destination
Send Font
Add New Font
File System Free Space
Flash Drive
Memory Card
Free 1.02 Mb
Disk Not Found
Font Test
Font Description
Vera.ttf
ESC/POS - 11 cpi
Flash Disk
Font Test
Exec Font Test
Print Embedded Font Charmap
Delete Existing Font
Font Description
Delete Font
Done
Vera.ttf
Flash Disk
Delete Selected Font
Locale intranet
100 %
(Fig.C.50)
NOTE: Uploading the new font directly from the “Font” folder of Microsoft® Windows® directory,
remember that the displayed font name into the “Font” folder may not match the real name of
the font file.
User Manual
KPM300H-TF C-29
APPENDIX C - ADVANCED FUNCTIONS
Blank page
C-30 KPM300H-TF
User Manual
Rev. 1.01
Part Number : DOME-KPM300H-TF
CUSTOM ENGINEERING SPA
World Headquarters
Via Berettine, 2 - 43100 Fontevivo
Tel. +39 0521 680111 - Fax +39 0521 610701
[email protected] - www.custom.biz
All rigths reserved
www.custom.biz