1
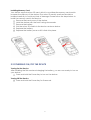
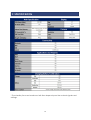
KAZAM Life B4
User Manual
0
ALL RIGHTS RESERVED
©2013 Kazam Mobile Ltd. All rights are reserved. Kazam, the Kazam logo and the Kazam icon
are trademarks of Kazam Mobile Ltd. No part of this document can be reproduced without
permission. All trademarks and brand names mentioned in this publication are property of
their respective owners.
While all the efforts have been made to ensure the accuracy of contents in this manual, we
presume no responsibility for errors or omissions or statements of any kind, whether such errors
are omissions or statements resulting from negligence, accidents, or any other cause. We
operate a policy of continuous development and reserve the right to make changes,
modifications and improvements to the device, device features/specifications or any of its
parts without prior notice.
Your device may have preinstalled bookmarks and links for third party internet sites and may
allow you to access third party sites. These are not affiliated with us, and we do not endorse
or assume liability for them. If you access such sites take precautions for security or content.
The limited warranty does not cover user manuals or any third party software, settings,
content, data or links, whether included in, or downloaded to the product, whether included
during installation, assembly, shipping or any other time in the delivery chain, or otherwise
and in any way acquired by you. To the extent permitted by applicable law(s), we do not
warrant that any of our software will meet your requirements, will work in combination with
any hardware or software applications provided by a third party, that the operations of the
software will be uninterrupted or error free or that any defects in the software are correctable
or will be corrected.
User Manual is provided to guide the user about the functionality of the device. It
does not constitute any certificate of technology. Some functions may vary due to
modifications and upgrades of software, or due to printing mistake.
1
SAFETY PRECAUTIONS
Please read the following safety guidelines before using the device.
Do not use the mobile phone while you are driving.
Do not place magnetic storage media near your mobile phone, as the
magnetic force from the device may erase the information stored on it.
Keep your mobile phone and its accessories away from children.
Mobile phones can interfere with the functioning of medical devices such as
hearing aids or pacemakers. People with active medical implants should
keep their mobile phone at least 15 cm away from the implant.
Permanent hearing loss may occur if you use earphones or headphones at
high volume.
Use a wireless hands-free system (headphone/ headset) with a low power
Bluetooth emitter.
Make sure the mobile phone has a low SAR.
Keep your calls short or send a text message (SMS) instead. This advice
applies specially to children adolescents and pregnant women.
Use mobile phone when the signal quality is good.
Notice:
Warranty is invalidated if the mobile phone or accessories are dismantled, the
manufacturer will not be liable to pay for damages.
Only use original batteries and charging devices.
Back up important data regularly and store it properly. The manufacturer is
not liable for any loss of data due to mis-operation, poor signal or power cut,
etc.
All screen images in this manual are for reference only, content displayed
may depend on the pre-setting of the service provider, the network operator
or the SIM card. If any functions referred to in this manual are different from
those of your device, please follow your device.
Do not put use it in a place with flammable gas such as a petrol pumps. The
temperature recommended for using the device is 10-55℃. Do not touch the
charger, power cable or socket with wet hands. This may cause an electric
shock.
Our cellular phones are in accordance with the communication industry standards
of PRC, and also according in accordance with standards of European, and are
approved for GSM networks.
Your phone may be used internationally with various networks depending on your
roaming arrangements with your service provider.
Only use the chargers listed in the manufacturer’s catalogue should be used. Using
any other charger may be dangerous and would also invalidate your warranty.
Line voltage must be exactly the one indicated on the charger’s serial plate.
Your phone is a radio transmitter which may interfere with electronic medical
equipment or implants, such as hearing aids, pacemakers, insulin pumps, etc. It is
recommended that a minimum separation of 15cm be maintained between the
phone and an implant.
2
If your mobile phone or any of its accessories do not function normally,
please contact Kazam customer support. The qualified personnel will assist
you, and if necessary will arrange for a repair.
3
TABLE OF CONTENTS
ALL RIGHTS RESERVED
SAFETY PRECAUTIONS
TABLE OF CONTENTS
1
2
4
1. UNDERSTANDING YOUR DEVICE
1.1.
GENERAL INFO
1.2.
DEVICE OVERVIEW
2. GETTING STARTED
2.1.
INSTALLING CARDS & BATTERY
2.2.
POWERING ON/OFF THE DEVICE
3. BASIC OPERATIONS
3.1.
CALLING
3.2.
MESSAGING
3.3.
PHONEBOOK
4. CALL HISTORY
5. SETTINGS
5.1.
PROFILES
5.2.
PHONE SETTINGS
5.3.
SOS SETTINGS
5.4.
CALL SETTINGS
5.5.
FAMILY NUMBER
5.6.
NETWORK SETTINGS
5.7.
CONNECTIVITY
5.8.
SECURITY SETTINGS
5.9.
RESTORE SETTINGS
6. PROFILES
5
5
5
6
6
7
8
8
9
10
11
12
12
12
12
13
13
13
14
14
15
15
7. MULTIMEDIA
7.1.
CAMERA
7.2.
IMAGE VIEWER
7.3.
VIDEO RECORDER
7.4.
VIDEO PLAYER
7.5.
AUDIO PLAYER
7.6.
SOUND RECORDER
7.7.
FM RADIO
8. EXTRAS
8.1.
CALENDAR
8.2.
ALARM
8.3.
CALCULATOR
8.4.
WORLD CLOCK
8.5.
TORCH LIGHT
15
15
15
16
16
16
16
17
17
17
17
17
19
19
9. SPECIFICATIONS
20
4
1. UNDERSTANDING YOUR DEVICE
1.1 GENERAL INFO
KAZAM Life B4 has a 2.2” VGA screen with 176*220 resolution. It has a fixed focus
front camera, an 800mAh battery and expandable memory. It supports MMS, SMS
and Bluetooth.
1.2 DEVICE OVERVIEW
1.
3.
5.
6a.
8.
10.
12.
14.
Charging Socket
Earpiece
Quick dial keys
Dial key
Keypad
Phone lock key
Battery cover
Camera lens
2.
4.
6.
7.
9.
11.
13.
15.
5
Volume keys
Display
End key
Up/down keys
Headset socket
Camera key
SOS key
Torch
2. GETTING STARTED
2.1 INSTALLING SIM CARDS & BATTERY
Please switch off your device before removing the battery, inserting a SIM or
memory card.
Installing Battery
To install the battery please follow the steps below:Remove the back cover of the device.
Hold the device with the front facing downwards.
Insert the battery ensuring it is the correct way round.
Replace the battery cover until it clicks into place.
Charging the Battery
The device prompts a warning tone and message indicating insufficient battery
when the battery power is low. Please follow the instructions below to charge your
device:Plug the connector of the charger into the micro USB port on the device.
Plug the charger into a standard AC wall outlet.
Charging…….
Fully Charged…….
It is recommended to fully charge the battery before using the device for the first
time.
Installing SIM Card
In order to install you SIM card, follow the steps below:Remove the back cover of the device.
Hold the device with the front facing downwards.
Remove the battery.
Insert the SIM card into the device as shown below.
Replace the battery.
Replace the battery cover until it clicks into place.
6
Installing Memory Card
Your device supports micro SD card, which is a multimedia memory card used to
increase the memory of the device. The micro SD card is small and should be
installed carefully to avoid any kind of damage. Please follow the steps below to
install the memory card in the device:
Remove the back cover of the device.
Hold the device with the front facing downwards.
Remove the battery
Slot the micro SD card into the device as shown below.
Replace the battery.
Replace the battery cover until it clicks into place.
2.2 POWERING ON/OFF THE DEVICE
Turning On the Device
After installing the SIM card and charging the battery, you are now ready to turn on
your device.
Press and hold the Power Key to turn on the device.
Turning Off the Device
Press and hold the Power Key for 3 seconds.
7
3. BASIC OPERATIONS
3.1 CALLING
Making Calls
If the icon
is visible in the information bar at the top of the screen, then you can
make or receive calls. To make a call, follow the steps below:
Direct dial
In standby mode, press the corresponding numeric keys to enter the phone
number that you want to dial, including necessary area codes. Short Press the
Right soft key [Clear] to delete.
International call
To make an international call, long press * key until the prefix symbol "+" of
international call displays in screen.
Dialling from contact list
Enter the Phonebook via the menu, use the Up/Down Navigator keys to scroll
to the desired contact, or press the first letter of the name of the desired
contact for quick search.
Dialling from call history
Enter the Call centre (press the Green key from standby or via the menu), use
the Up/ Down navigator keys to scroll to the desired contact, press the green
key to direct dial.
Answer/Reject an Incoming Call
When you receive an incoming call, details of the contact name/number are
displayed.
Press the call key or left soft key to answer the incoming call.
Press the power key once to reject the call.
Other Options during the call
To put a call on hold
If you are on a call you can put the call on hold by selecting Options - Hold.
In call options menu:Swap – Switch between active calls
Conference – Multi-call options. The availability of this option depends on your service
provider.
End single call - End the current call.
End all calls- End all active calls
New call – Launches the dialler and a new call can be initiated
Phonebook – Launched phonebook interface
Messages – Launches messaging menu
Sound recorder - Record the current call. Note - Recording of the call, in some countries
is illegal. Therefore, when you record calls, should seek prior approval from the other
party.
8
3.2 MESSAGING
Your device is capable of sending and receiving of SMS (Short Message Service)
and MMS (Multimedia Message Service).
Creating an SMS
From the main menu, select ‘Messages’ – ‘Write message’- ‘Text message’
Select ‘Options’ – ‘Send to’ to enter a number or select a recipient contact
Once recipient is specified, select ‘Options’ – ‘Send’ to send the message.
Creating an MMS
Your device comes preloaded with some MMS settings. Additional settings can be
added and activated by accessing: –
Settings -> Connectivity -> Data Accounts -> Options ->Add PS Account
A multimedia message or MMS can contain letters, pictures, audio files or video files.
To create and send a MMS follow the steps below:From the main menu, select ‘Messages’ – ‘Write message’- ‘Multimedia
message’
Select ‘Options’ – ‘Send to’ to enter a number or select a recipient contact
Select ‘Options’ to display MMS options where sounds, images and videos
can be attached to the message.
Once recipient is specified, select ‘Options’ – ‘Send’ to send the message.
Please note: In order to maximise the MMS feature on the KAZAM Life B4,
please use the feature when a memory card is inserted into the phone. This
expands the internal memory and allows you to send messages over 200kb.
Also, ensure the default memory in use is set to ‘Memory Card’ through the
following menu structure:Messaging – Message settings - Multimedia message – Common settings –
Preferred storage
Inbox
Received SMS and MMS messages are accessed here.
In message list, select Options – View Details to read the selected message or press
the left soft key [Options] to launch the following menu:
View details: view the current message
Reply by SMS: Reply SMS to the message sender directly.
Reply by MMS: Reply MMS to the message sender directly.
Call Sender: Select to call the sender number.
Forward: forward the current message to other number.
Delete: Delete the highlighted message.
Delete all: Delete all messages in inbox.
Save to phonebook: Save the information in the sender number to the phonebook.
3.3 PHONEBOOK
9
Contact details (name and number) are stored in the phonebook. You can save
information such as name and phone number.
To add a Contact
From the home screen press the right soft key [Names] or select ‘Phonebook’
from the main menu.
Select the ‘Add new contact’ option
Select ‘To SIM’ or ‘To Phone’.
Enter contact information (Name and number)
Select ‘Options’ – ‘Save’ to save the newly added contact.
Contact options
View: View the selected contact
Send text message: Send SMS to the selected contact
Send multimedia message: Send MMS to the selected contact
Call: Call the selected contact
Edit: You can edit the details of the highlighted contact
Delete: Delete the highlighted contact
Copy: Copy the highlighted contact to “SIM” or “phone”
Phonebook settings
Speed dial - Contacts can be assigned to numbered shortcuts.
‘Enable speed dial’ option to turn speed dial function on or off through the status
option. Select ‘Set number’, scroll to a key number (8 available, from 2 to 9), select
‘Edit’, scroll to the desired contact to set as speed dial number for the key and press
the OK key.
When a number is assigned to a speed dial and the function is enabled, you can
simply press and hold the corresponding numeric key on idle screen to dial the
assigned contact automatically.
Memory status: View the used memory of the SIM card and phone’s phone book. The
capacity of SIM card depends on different SIM card.
Copy contacts: Contacts can be copied between SIM and Phone memories
Move contacts: Contacts can be moved between SIM and Phone memories
Delete all contacts: Select to delete the contacts from SIM or the phone memory.
10
4. CALL HISTORY
All received calls, dialled numbers and missed calls as well as their call time
are recorded in the call history section of your phone.
Call history can be accessed by pressing the Green key from standby or
accessed through the ‘Call History’ item through the main menu.
If accessed through the menu item, the submenus are as follows:Dialled calls
Missed calls
Received calls
Delete call logs
Missed/dialled/Received
In the missed, dialled and received calls lists the following actions are applicable:Green key – Make a call to the highlighted number/contact
Centre key [OK] - View the details of highlighted call record
Left soft key to launch the options menu as displayed below
View: View the details of current call record.
Call: call current record.
Send text message: send SMS to the select number
Save to phonebook: Store the number as a phonebook entry.
Delete: Delete the current call record.
Delete call logs: You can select dialed calls/Missed calls/Received calls/All calls to
delete.
11
5. SETTINGS
5.1 PROFILES
The phone provides you with four profiles: general, silent, meeting, outdoor. The
profiles tailor the phone settings according to different environments by using a
range of different tones and alerts. These profiles can be personalised according to
your requirements.
5.2 PHONE SETTINGS
Time and date
Set home city: You can choose a home city from the list to set as the phone home
time zone.
Set time/date: Under this you can set the phone to the current date and time. The
phone allows you to set the date range of calendar 2000 to 2030.
Set format: Under this you can set the time and date display format
Language
Under this you can choose the language that the phone menus are displayed in.
Display
LCD backlight: Select the brightness (1-5 )and the timeout value of the backlight
Wallpaper: The standby image displayed for background wallpaper.
You can choose from the built-in wallpaper and an image saved on the phone
memory or memory card.
Screen auto lock
Under this you can set the time before the screen automatically locks. After the screen
has automatically locked press and hold the lock key, found on the right handset side
of the device, for 3 seconds.
Show date and time: You can set the idle screen time display on or off.
Flight mode
Switch between normal and flight mode. When flight mode is active all network and
data related functions will be restricted.
5.3 SOS SETTING
Four SOS numbers can be assigned to the smart SOS feature. When the SOS key, on
the back of the handset, is pressed for 3 seconds the first number is called. If there is
no answer from any of the assigned numbers after attempting to call each three times
then the specified message will be sent to all of the assigned numbers.
Status: The Smart SOS feature can be enabled and disabled through this menu option.
If the SOS key is pressed when the feature is not enabled, the option to enable the
SOS feature will be presented to the user.
SOS list: Select this to assign specific numbers or contacts that will be called when the
12
Smart SOS feature is activated
If the SOS key is pressed when no number is assigned (but the feature is enabled)
112 emergency number is automatically called.
SOS message: The message that is sent to the assigned contacts when they are not
available can be edited in this menu.
The phone has a message assigned by default which is ‘Emergency, call me!’
5.4 CALL SETTINGS
Call waiting
You can choose to Activate, Deactivate or Query status of this feature.
If activated, you will be notified when a call in received whilst another call is ongoing.
Call divert
This feature allows you to divert to your phone calls to your voice mailbox or another
phone number you specify. This function needs the support of network operator.
Call barring
Barring restrictions can be set on incoming and outgoing calls.
This function needs the support of network operator, please contact the network
operator.
Call restrictions can be set for activate, deactivate and query status
Advanced settings
Call time reminder
When set, an in call beep will sound after the selected time period. This can be after
a specified number of seconds or you can select a time period after which the beep
will sound.
Answer mode
Any key – When set, any key will answer incoming calls with the exception of the right
soft key and the end key.
Auto answer when headset - When set, incoming calls will automatically be answered
when a headset is inserted.
5.5 FAMILY NUMBER
Three individual contacts can be assigned to the quick dial keys found above the
keypad.
Once assigned, these contacts can be called by selecting the quick dial keys when
on idle screen.
5.6 NETWORK SETTINGS
Set network related settings such as network selection and the use of GPRS.
Automatic or manual network selection is available to determine the network that is
camped onto.
13
5.7 CONNECTIVITY
Data account
Preloaded MMS accounts are displayed.
These accounts can be manually edited, deleted and added.
Bluetooth
You can transfer data, such as music to other device using Bluetooth. Search the
device and accept/transfer data. The received data is automatically stored in the
directory.
Bluetooth options
Power: Switch Bluetooth on and off
Visibility: If your device is visible other Bluetooth devices can find the phone; if you
select off, other Bluetooth devices can’t find the phone.
My device: Select to add new equipment, search for Bluetooth devices within range
of the signal. After the Bluetooth device is found, you can select the the device you
wish to connect with.
My name: Modify the Bluetooth device name that other users can identify your device
with.
5.8 SECURITY SETTINGS
SIM security
You can set and enable the PIN code and PIN” codes
Note that, if the input PIN code wrong three times, the SIM card will automatically lock
and unlock and a PUK code will be required to unlock. Please contact your SIM card
provider for more details regarding PUK codes.
PIN lock
Under this you can enable or disable PIN password, PIN code on or off are required to
enter the correct PIN password. When open this feature, every time you turn the
phone prompts you to enter the PIN password.
Change PIN
If the current PIN password is already open, you can make changes to the PIN
password. First enter the old PIN password, after repeated twice to determine and
identify new password.
Change PIN2
PIN2 password is used to access a particular function (such as setting a fixed number,
set the call billing, etc.)
If PIN2 is entered incorrectly 3 times a PUK2 code will be required to unlock.
Phone security
A phone passcode can be set there you can set the phone to avoid unauthorized
use of your mobile phone.
Phone lock
Under this you can enable or disable phone password. To do so, the phone password
14
must be entered. The default code is 0000.
When this feature is enabled, every time you turn the phone on you are prompted to
enter the password.
Change password
You can make changes to the phone password. First enter the old phone password,
and then enter the newly selected password twice to confirm.
5.9 RESTORE SETTINGS
Reset the phone settings to default using this feature. The phone password is
required to use this feature.
Default password is 0000.
7. MULTIMEDIA
7.1 CAMERA
Your phone is fitted with camera which allows you to take photos. You can store the
pictures on the phone memory or on the inserted memory card.
In the multimedia menu, select the camera to launch the camera preview
screen.
Press the OK key to take photo, press the right soft key to return, press the left
soft key to launch the following options menu:Camera Options
Switch to video recorder: Switch to video preview screen.
Photos: Launches the image viewer list
Camera settings: Modify settings such as Anti-flicker and Delay timer.
Image settings: Image quality and image size can be modified
White balance: Image effect can be set
Scene mode: Select between automatic and night camera modes
Storage: Choose the default image saving location as phone memory or memory
card.
Restore default: Camera parameters can be restored back to their default values/
7.2 IMAGE VIEWER
This feature is convenient for users to view the photos stored in on the phone or
memory card. Press the OK key to open the picture or press the left soft key to open
the option menu:
15
View: Open the current image to view.
Image information: Display the current image information.
Send:Pictures can be sent via ”MMS” or "Bluetooth".
Use as: Picture can be set as idle screen wallpaper.
Rename: Change the name of the selected picture.
Delete:Delete the selected image.
Storage:Phone or memory card can be set as the default image viewer
7.3 VIDEO RECORDER
In the multimedia menu, select the video recorder to launch the video preview
screen
Press the centre key to start recording
Press up/down navigation key to adjust the focal distance
Press the left soft key the launch the options menu
Switch to camera: Switch to still camera
Camcorder settings: Anti-flicker settings can be modified.
Video settings: Can set the video quality
Storage: You can set phone or memory card as storage location for recorded videos.
7.4 VIDEO PLAYER
This feature can be used to play video files stored on the phone memory or inserted
memory card.
The supported video formats are 3gp, mp4 and .avi files.
In the multimedia menu, select the video player into the video list, press left soft key
open the option menu:
Play:Play the current video file
Send: Videos can be sent via ”MMS” or "Bluetooth"
Rename:Change the name of the selected video.
Delete:Delete the selected video.
Storage:Phone memory or memory card videos can be displayed by default
7.5 AUDIO PLAYER
Audio files saved in the phone or memory card can be played through this menu item.
7.6 SOUND RECORDER
Audio can be recorded through this feature.
Launch Sounds Recorder through the multimedia menu
Press the left soft key [Options]
Select ‘New Record’ and the recording starts.
Whilst recording is on progress, the left soft key will pause and resume the
recording and the right soft key will stop the recording.
16
The recorded audio files can also be renamed, sent and deleted when the options
in list view is accessed.
7.7 FM RADIO
You can use your mobile phone to listen to FM radio stations once a supported
headset is plugged into the handset. Please press the side key to adjust music
volume.
Ensure headset in inserted
Launch FM Radio form multimedia menu
Press middle key to switch radio on and off.
The up and down navigation keys manually scroll through radio frequencies.
The left and right navigation keys scroll through radio stations.
Radio options menu
Channel list – Radio stations names and frequencies can be saved. When in FM
Radio pressing the corresponding key will tune into the specified frequency.
Manual input – Radio frequency can be manually entered.
Auto search – Automatically searches and saves the found frequencies.
8. EXTRAS
8.1 CALENDAR
Calendar can be used to check the current date and plan events.
Calendar options
Jump to date: Jump the selected date.
Go to today: the date of the input query calendar information
Go to weekly/monthly view: can set the calendar display mode through week or
month.
8.2 CALCULATOR
Calculator helps you perform basic arithmetic functions, such as addition,
subtraction, multiplication and division.
The navigation keys correspond to the arithmetic function displayed in the
calculator display.
Left navigation key – Multiply
Right navigation key – Divide
Up navigation key – Add
Down navigation key – Subtract
Middle key - Equals
17
8.3 ALARM
Alarms can be set to sound at the specified time. To add a new alarm follow these
steps:Launch the alarm feature through the ‘Extras’ menu.
Highlight an alarm and select ‘Edit’.
In the status menu select ‘On’.
Select time for alarm to sound and repeat value.
Select ‘Options’ – ‘Save’ and alarm is set.
When an alarm is active a bell icon is displayed at the top of the idle screen and the
alarm will be checked in the list.
8.4 TORCH
Torch can be switched on through the torch menu or from an idle screen shortcut.
Torch menu
Launch the torch light through the ‘Extras’ menu
Highlight ‘Torch light’ and the middle key or the left soft key to toggle the
torch on and off.
Idle screen shortcut
On idle screen, press and hold the 0 key to switch the torch on and off.
8.5 SERVICES
The toolkit of the inserted SIM card can be accessed here. Please contact your
network provider for more information and supported services.
8.6 FILE MANAGER
Files saved on the phone or memory card can be viewed and used here.
File manager options
- Open: Open the file or folder.
- New Folder – Create a new folder in which files can be stored
- Rename – The selected file or folder can be renamed.
- Delete – The selected file or folder can be deleted.
- Use as - If the selected file is an audio files it can be set as the ringtone for incoming
calls. If the selected file is image file, it can be set as wallpaper.
- Sort by: can "name", “time” ,"size" , "type" or “none” .
- Send - The selected file can send by MMS or bluetooth
- Copy: you can copy the select file to other folders.
- Move: you can move the select file to other folders.
- Details: you can view the select file information.
18
9. SPECIFICATION
* The standby time and maximum talk time depend upon the network signals and
settings.
19
ACCESSORIES
Use only batteries, chargers, and accessories approved by the manufacturer with this
device. Use of any other types will invalidate the warranty and may be dangerous.
Check with your dealer for available accessories. You may opt to buy:
Extra Battery
Extra batteries of various capacities are available from our company or through your
dealer.
Charger Plug, charger cable
Charger plug used to connect with the charger cable for charging on wall outlets.
Also you can use the charger cable to connect with the other devices such as the
personal computers to charge the phone.
Charging time is about 2 to 3 hours. The charging condition is displayed on screen.
You may use your phone while charging.
Earphone
A mini, practical, hands-free device; you can use its button to answer and end calls.
Some models may also come with a volume control knob.
Do not plug or unplug the earphone when connecting dialed or incoming calls.
ENVIRONMENTAL CONCERN
Help us save the environment…GO GREEN!
All our endeavours are directed towards providing environmentally aware products
to you. The materials used in our devices are recyclable and can be reused to make
new products. We strive to make products that are safe for our consumers as well as
the environment.
Preserve natural resources for future generations by recycling your mobile phone. Your
mobile phone contains some metals which, when recycled properly, can be put back
into circulation, decreasing the need for new metal mining.
Recycling reduces the need for raw materials, saves energy, helps mitigate global
warming and reduces pollution, therefore preserving natural resources for the future.
Follow some simple steps and contribute towards saving the planet:
DO
Recycle your handset and its accessories.
To protect natural resources and to promote re-use of the material, kindly
separate batteries from other type of waste.
DONT
Do not dispose of your mobile and its battery in fire.
Do not dispose your mobile with the regular waste.
Do not over charge your handset. Remove the charger when battery is full.
This logo signifies that this product and/or its accessories should not be
disposed of with other household waste.
20
Hazards of improper handling, accidental breakage, damage and /or
improper recycling of hazardous elements, can result in the following:
Birth defects, brain, heart, liver, kidney and skeletal system damage. Significant
affect to the nervous and reproductive systems.
When burned, cancer-producing dioxins can be released into the air we
breathe; If thrown in landfills, leaching into groundwater affecting your local
community
In warm climates, the oxidation of mercury in the environment can be
accelerated, leading to the creation of oxidized Hg atoms that are known to
be associated with ozone depletion.
Improper recycling additionally results in data security issues, as private
electronic information remains on hard drive, if not properly removed before
disposal.
How to Recycle
Please get your electronics products recycled only through authorised recyclers,
approved by Pollution Control Board. We provide facility of recycling of our products,
for details please visit our website or call our customer care. Help us to GO GREEN.
Constitution of Hazardous Elements in your Device:
Your device does not contain the following hazardous elements in a proportion higher
than the limits provided hereunder: maximum concentration value of 0.1% by weight
in homogenous materials for lead, mercury, hexavalent chromium, polybrominated
biphenyls and polybrominated diphenyl ethers; and maximum concentration value
of 0.01% by weight in homogenous materials for cadmium.
21
EU Declaration of Conformity for
R&TTE Directive 1999/5/EC
We Kazam Mobile Limited
Of
Suite 4B, 43 Berkeley Square, London, W1J 5FJ, United Kingdom
Declare under our sole responsibility that the product
Product name: Smartphone
Trade name: KAZAM
Model name: Life B4
(Detailed description of product including name, type, model and supplementary
Information such as lot, batch or serial number, sources and number of items)
To which this declaration relates, is inconformity with the following standars
And/or other normative documents.
Standard
Report NO.
ETSI EN 300 328 V1.7.1 (2006-10)
RSZ131209005-22
ETSI EN 301 511 V9.0.2 (2003-03)
RSZ131209005-11
ETSI EN 301 489-1 V1.9.2 (2011-09)
RSZ131209005-02
ETSI EN 301 489-7 V1.3.1 (2005-11)
ETSI EN 301 489-17 V2.2.2 (2012-09)
EN 60950-1:2006 + A11:2009 + A1: 2010 +
RSZ131209005-03
A12:2011
EN 50360: 2001 + A1:2012
RSZ131209005-20
We hereby declare that (all essential radio test suites have been carried out and
that) the above named product is in conformity to all the essential requirements
Of Directive 1999/5/EC.
The Conformity assessment procedure referred to in Article 10 and detailed in Annex
[Ⅲ]or [Ⅳ]of Directive 1999/5/EC has been followed with the involvement of the
following Notified Body(ies):
SIEMIC, INC., 775 Montague Expressway, Milpitas, CA 95035, USA
Identification mark: 1313
the equipment will also carry the
(Notified Body number)
class 2 equipment identifier
Signature:
Printed name/title: Daniel Readman / Manager
Tel: +44 (0) 20 7491 6930
Address: Suite 4B, 43 Berkeley Square, London, W1J 5FJ, United Kingdom
SAR Information
Head: 0.310 W/kg@10g (CE)
Body: 0.289 W/kg@10g (CE)
Body-worn Operation
22
This device was tested for typical body-worn operations. To comply with RF exposure
requirements, a minimum separation distance of 1.5 cm must be maintained between
the user’s body and the handset, including the antenna. Third-party belt-clips, holsters,
and similar accessories used by this device should not contain any metallic
components. Body-worn accessories that do not meet these requirements may not
comply with RF exposure requirements and should be avoided.
Use only the supplied or an approved antenna. Unauthorized antennas,
modifications, or attachments could impair call quality, damage the phone, or result
in violation of regulations. Do not use the phone with a damaged antenna. If a
damaged antenna comes into contact with the skin, a minor burn may result. Please
contact your local dealer for replacement antenna.
23