1
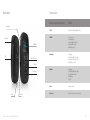
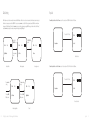
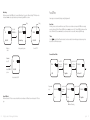
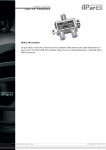
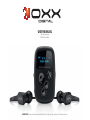
USER MANUAL Clip Multi-language, DAB+/FM mini Radio IMPORTANT: Please read the manual carefully before using the product and keep it for future reference. Content Unpacking3 Button Instruction 4 OLED Display 6 Operation Language Setting 8 Changing Language While Using Clip 9 Clock Setting 10 Key Lock 11 Scan DAB+ radio stations 12 Auto scan: 12 Manual scan: 12 DAB+ Radio Operation 12 Listen to the DAB+ radio 13 Save your favourite list of the DAB+ radio stations 13 Play the favourite DAB +-radiostation: 14 Exit the favourite mode 14 Pause or play the Clip Radio 15 Read Scrolling messages from DAB + Station 15 Prune Stations 15 Listen to FM radio 17 FM RADIO Operation 17 Scan FM radio station 17 Manual tuning 18 Pause or Play FM-radio 18 Power off timer 19 Deactivate Power Off Timer 20 Reset the DAB+ radio stations 20 Safety Information 21 Product specifikations 21 Unpacking Thank you for purchasing our product Clip Radio! The pack should contain: • 1 pc Clip radio • 1 pc USB cable charger • 1 pc User manual • 1 pc Stereo earpiece Optional: • 1 pc 3.5mm to 3.5mm line-in cable Note: The original earphone is specially made for Clip-radio. We do not guarantee it works perfectly with other brands of earphones. English 3 Button Instruction Function overview Controls, connectors and components Functions ON / OFF Switch on and switch off. Play or pause DAB+ or FM radio DAB / FM / ( ) As an enter button. To choose language mode To choose either DAB+ mode or FM mode. Save the favourite DAB+ radio station. Adjust FM frequency manually. Previous Button To select language Scan for the available DAB+ or FM radio stations. Choose the previous DAB+ or FM radio stations. Adjust FM frequency. Set the clock. Next Button To select language Scan for the available DAB+ or FM radio stations. Choose the next DAB+ or FM stations. Adjust FM frequency. Set the clock. Volume + To increase the volume level. Volume - / Lock To decrease the volume level, to lock and unlock the radio. Headphone socket Charging socket OLED Display ON/OFF DAB / FM / Save / Enter Next button Previous button Volume + 4 OXX Digital | User Manual: CLIP Multi-Language DAB+/FM mini Radio Volume - / Lock English 5 OLED Display OLED Display My Favourite Mode DAB+ Mode DAB+ Signal Battery DAB + First favourite DAB+ Channel F001DBC DAB+ Signal Power off timer DAB+ Station Name Scrolling Message 07DBC Battery We channel DAB+ stations name FM Signal FM Mode FM The 10th Stored FM Channel M9 105.5MHz METRO FINANCE FM Frequency 6 Battery OXX Digital | User Manual: CLIP Multi-Language DAB+/FM mini Radio RDS Stations Name NOTE: Minor interference may occur while OLED is on, OLED will turn off automatically after a short while, resuming display by pushing any buttons. English 7 Operation Language Setting Operation Language Setting First Time Using or After Reset the Clip Radio For the first time, user has to choose and set the operation language, OLED displays “Select Language” automatically, press DAB/FM to confirm, then press or for different languages (English, German, French, Italian, Norwegian, Danish , Swedish and Spanish), such as choosing “Deutsch” (German), then press “DAB/FM” to confirm. If no specific language has been chosen by user, DAB-398 will set the default language as English automatically after 10 seconds. Changing Language While Using Clip On the other hand, during idle situation (showing clock), press and hold DAB/FM to enter the “Select Language” menu, then press once again DAB/FM to confirm, and press or to choose different languages, press once again DAB/FM to confirm the chosen language. If accidentally entered the menu mode, simply press or and choose “Exit” to exit. Press DAB/FM to confirm. Select Language Then press to select First use to select language Press DAB/FM to confirm. Deutsch Choose 'German' DAB DAB+ DAB Loading....... Digital Radio Auto Loading DAB Radio 12:00 Press & hold DAB/FM for 2sec DAB+ 12:00 Select Language Idle mode showing clock Choose "Select Language" Press DAB/FM to confirm. Then press to select DAB+ Press DAB/FM to confirm. Then press to select DAB+ 12:00 Deutsch Choose "German" 12:00 Digital Radio When it completes it shows back 8 OXX Digital | User Manual: CLIP Multi-Language DAB+/FM mini Radio English 9 Clock Setting Key Lock In DAB+ station mode, the clock is normally synchronized with the DAB+ stations. If the clock does not show the correct time, follow the instructions below to adjust it: When the radio is paused, press and hold the DAB/FM for 2 seconds , and press or to choose “Set Time” for setting time, then press DAB/FM to confirm the time setting mode, OLED will display “Set Hour” press the or button to adjust the hour, confirming by pressing DAB/FM once again. And then it will show “Set Minute”, press the or button to adjust the minute, confirming and finishing by pressing DAB/FM again To enable key-lock: Press and hold the Volume – button for 2 seconds, the word “LOCKED” will scroll on the OLED screen. Press & hold “–“ for 2 sec DAB+ 12:00 Digital Radio Press & hold DAB/FM for 2sec Then press to select DAB+ 12:00 Press DAB/FM to confirm. Set Time DAB+ 12:00 Any situation Locked Set hour Shows it's locked Standby Mode Time setting mode Press or for setting Press or for setting Hour setting mode To disable key-lock: Press and hold the Volume – button for 2 seconds, the word “UNLOCK” will scroll on the OLED screen. Press & hold “–“ for 2 sec Then press DAB/ FM to confirm DAB+ 12:00 Set Minute DAB+ Then press DAB/ FM to confirm DAB+ 12:00 Any situation DAB+ Unlock Digital Radio Shows it's unlocked Minute Setting Mode 10 OXX Digital | User Manual: CLIP Multi-Language DAB+/FM mini Radio Done! English 11 DAB+ Radio Operation Listen to the DAB+ radio When the scanning is completed, DAB-398 radio will play the last available DAB+ radio station through searching. Press the button to choose the previous station or press the button to choose the next station. The name of the DAB+ radio station will appear on the OLED screen, (eg: “01DBC) Auto Scan For the first time, when you switch on the radio, the OLED screen will display the words “DAB Loading”, it will automatically scan for local DAB+ radio stations, then it will show “DAB Scanning…” Manual Scan In DAB+ radio mode press and hold the or for 2 seconds, the DAB+ radio station will be scanned, then it will show “DAB Scanning…” Save your favourite list of the DAB+ radio stations If you listen to certain stations regularly, you can save these as your favourite stations. There are five favourite lists that you can save. In DAB+ radio mode, press the or button to choose the station that you want to save, press and hold the DAB/FM button for 2 seconds, the words “ Store Mode” will appear on the OLED screen, then press DAB/FM button once to select the stored position and OLED will show “Store TO FX?” (X is a number, from 0 to 4), then press or to select the favourite list (F0-F4), after that press the DAB/FM button once to complete the saving, the word “Stored” will appear on the OLED screen. Repeat these steps to save other favourites When it is completed, the OLED screen will display the number of the available DAB+ radio stations (eg. “FOUND: 04”). After 5 seconds, it will play the last available radio station. If no stations are found, the words “NO DAB” will appear on the OLED screen. Auto Scan DAB DAB DAB DAB+ DAB + DAB Loading... DAB Scanning... Found 04 01DBC 01DBC Loading DAB+ stations Scanning stations Found 04 DAB+ Stations Playing DAB+ 01DBC Channel Press & hold DAB/FM for 2sec DAB+ Press DAB/FM again to confirm Store Mode To save “01DBC” station as a favourite channel DAB+ Store to F0? Enter Store Mode Asking station saving position Manual Scan DAB + Press & hold or for 2 sec 02DBC DAB+ station 12 OXX Digital | User Manual: CLIP Multi-Language DAB+/FM mini Radio DAB DAB+ DAB Scanning... Found 04 Scanning stations Found 04 DAB+ Stations Press to select position DAB Store to F1? Choose “ F1” as the storing position Press DAB/FM again to confirm DAB+ Stored “01DBC” station have been saved to “F1” English 13 Play the favourite DAB +-radiostation To select favourite mode, in DAB+ radio mode, press and hold the “DAB/FM” button for 2 seconds to enter then menu option, then press the or to enter the “Favourite mode”, press again DAB/FM once to confirm the favourite mode, press the or button to choose the favourite station. OLED will show “FX Empty” if cannot save any station (x = 0~4). If accidentally enter the menu again, press the or button to choose “Exit” to exit. Pause or play the Clip Radio In DAB+ radio mode, press the ON/OFF button to pause the radio. Then, the clock will appear on the OLED screen. It will be adjusted by the DAB+ radio station automatically. To resume the radio, press the ON/OFF button again. Show Time DAB + Press & hold DAB/FM for 2sec DAB+ 01DBC Favourit mode Under DAB+/DAB mode Choose favourite mode Press to choose next channel Press DAB/FM to reconfirm DAB+ DAB+ 12:00 F0 01DCB Digital Radio Choose F0 as favourite station Read Scrolling messages from DAB + Station While play DAB+ channel, if there are some messages from local stations, OLED will show the message, and DAB+ station name will be shown on the first line. DAB Radio Name F1 Empty No channel stored in F1 07DBC We Channel Scrolling Message Exit the favourite mode In Favourite mode, press and hold the “DAB/FM” button for 2 seconds, OLED will display “Normal Mode”, press “DAB/FM” once again to confirm exiting Favourite Mode DAB + Press & hold DAB/FM for 2sec 01DBC Under Favourite mode 14 OXX Digital | User Manual: CLIP Multi-Language DAB+/FM mini Radio DAB+ Press & hold DAB/FM to confirm DAB+ Normal tilstand 01DCB Choose Normal function back to normal function Prune Stations When some of the listed stations may no longer be available or stop broadcasting, the ‘Prune Stations’ function can delete those unavailable station as below: In DAB+ radio mode, press and hold ( ) button for 2 seconds to enter the menu option, press the or button to choose “Prune Station” and press DAB/FM( ), then press or to choose Yes, confirming it by press DAB/FM( ) English 15 FM RADIO Operation Prune Stations (continued) DAB + Press & hold for 2sec 01DBC While playing DAB+ Press to choose "Yes" DAB+ DAB+ Prune Station Yes Choose prune station Yes No FM FM FM Loading... M0 87.5MHZ FM TUNE Loading FM Stations M1 91.4MHZ Play the 1st stored station DAB+ No Choose "Yes" to confirm deleting stations 01DBC Scan FM radio station In FM radio mode, press and hold button for 2 seconds to scan the previous strongest signal FM station, press and hold for 2 seconds to scan the next strongest signal FM station. The OLED will show “FM Scanning…”, it will store to the current position after scan. FM M7 107.4MHZ Frequency under M7 Channel 16 Press to choose next channel Default is "No" Press to confirm DAB+ Listen to FM radio In DAB+ mode, press the DAB/FM button once to change to FM mode. The OLED will show “FM Loading…” then The FM radio frequency will appear on the OLED screen such as M0 88.0MHz. Press for previous channel and press for the next channel. Press to confirm OXX Digital | User Manual: CLIP Multi-Language DAB+/FM mini Radio Press & hold for 2 sec FM FM TUNE FM Scanning... M7 108.0MHZ Scanning for the next strongest signal FM stations Found frequency 108.0 MHZ and saved to M7 English 17 Manual tuning In FM radio mode, press and hold the DAB/FM button for 2 seconds until the “Manual Tuning” icon shown on the OLED screen, the flashing “TUNE” will be shown on the first line, press the and buttons to adjust the radio frequency, to finish manual tuning, press DAB/FM once to confirm. Flashing Press & hold DAB/FM for 2sec FM M0 88.0MHZ M0 Frequency channel Flashing Power Off Timer For power saving, users can set auto-power off by setting time, to avoid forgetting to turn power-off. FM TUNE FM TUNE Power off timer While listing to the radio, to activate the power off timer function, press On/Off button once to enter the idle mode, then press and hold DAB/FM button to enter setting menu, choose the last option “Auto Power Off” by pressing DAB/FM once, then press and buttons and choose “ON”, then press DAB/FM to confirm this power off time function, OLED will show “00:00”, then press and buttons to tune the time you would like to have auto power off, confirm by pressing DAB/FM once again Manual Tuning M0 88.0MHZ **Notice: Clock icon “ ” will show while this Power Off Timer function is activated. Once it has been activated, the function will keep looping as daily cycle depending on the set time, unless the Power Off Timer has been deactivated Entering manual tuning mode Turn while "TUNE" Turn on and Set Power Off Timer: Press or to choose "Yes" FM Press ON/OFF button once to enter idle mode DAB+ then press DAB/FM to confirm Press & hold for 2 sec. Then press to choose DAB12:00 DAB12:00 M0 89.3MHZ 01DBC Digital Radio Auto Power OFF Frequency tuned as 89.3 MHZ Press or to adjust Pause or Play FM-radio In FM radio mode, press the ON/OFF button once to pause the radio. Then, the time clock will appear on the OLED screen. To resume the radio, press the ON/OFF button again. DAB12:00 ON Press to confirm. Press to set the time Press to confirm DAB12:00 DAB 12:00 00 : 00 Digital Radio Power Off time setting 18 OXX Digital | User Manual: CLIP Multi-Language DAB+/FM mini Radio English 19 Deactivate Power Off Timer Under the idle mode, press and hold DAB/FM button to enter setting menu, choose the last option “Auto Power Off” by pressing DAB/FM once, then press and choose “OFF” to turn the function off, confirm by pressing DAB/FM once again to exit. **Notice: Clock icon “ ” will disappear while this function is off and the power off looping function will be off. Turn off the Power Off Timer Function: DAB12:00 Press & hold for 2 sec. Then press to choose Digital Radio DAB12:00 Auto Power Off Press to confirm. Press to set the time Safety Information 1) 2) 3) 4) 5) 6) 7) Do not listen at extremely high volumes. Doing so can damage your hearing. Do not expose the radio to extremely high or low temperature. Do not dispose the radio in a fire as it will result in an explosion. Do not expose the radio to liquids, moisture or humidity as it is not waterproof. Keep the radio away from sharp objects which will cause scratches and damages. Do not attempt to take apart the radio as it does not contain replaceable components. Do not store the radio in excessively dry, extremely temperature and dusty. DAB12:00 OFF Press to confirm DAB12:00 Digital Radio Product specifikations • • • • • • • • • • • Multi-Language’s Support (English, German, French, Italian, Norwegian, Danish, Swedish, Spanish) Build-in Polymer-Li rechargeable battery (Charging time: 4 hours) *8 hours DAB+ Radio playing time 22 hours FM Radio playing time 3.5mm plug in headset socket Frequency range: (Band III): 174 ~240 MHz Frequency range: (FM): 87.5~108.0 MHz Memory for saving 60 DAB+ stations Memory for saving 8FM radio stations. Dimension: 48 X 35 X 15 mm. Weight: 30 grams. * May vary with signal strength Reset the DAB+ radio stations When the Clip Radio is switched off, press and hold the DAB/FM button and the ON/OFF button at the same time for about 10 seconds to delete all the previously saved radio stations. When you switch on the radio again, it will automatically re-scan the new radio stations available. 20 OXX Digital | User Manual: CLIP Multi-Language DAB+/FM mini Radio English 21