1
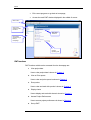
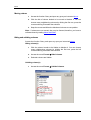
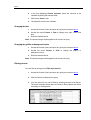
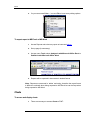
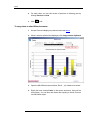
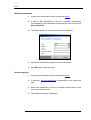
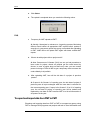
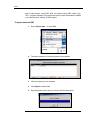
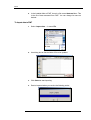
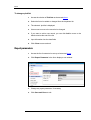
ODA Portfolio Monitoring Tool - PMT User Manual Version 2 August 2007 Table of content I. Introduction................................................................................... 3 Why Microsoft Access? ......................................................................3 What does PMT do? ............................................................................3 II. Project Profile .............................................................................. 4 Access to PMT .....................................................................................4 PMT Homepage....................................................................................4 Interface........................................................................................................ 4 PMT functions .............................................................................................. 5 View Project data.................................................................................6 Portfolio Data................................................................................................ 7 Find, Sort and Filter...................................................................................... 8 View Project Profile ...................................................................................... 9 III. Aggregating and Analysis functions ...................................... 12 Queries ...............................................................................................12 What is query? ........................................................................................... 12 Moving column ........................................................................................... 14 Hiding and unhiding columns ..................................................................... 14 Changing the font ....................................................................................... 15 Changing the gridline or background colour .............................................. 15 Filtering records.......................................................................................... 15 Sorting Columns......................................................................................... 16 Freezing or unfreezing columns................................................................. 16 Exporting a query to Excel or Word ........................................................... 17 Reports ...............................................................................................18 To access and view reports........................................................................ 18 Page set-up ................................................................................................ 19 To print reports ........................................................................................... 20 To export report to MS Excel or MS Word ................................................. 21 Charts .................................................................................................21 To access and display charts ..................................................................... 21 To copy charts to other Office documents ................................................. 24 Assess Project Performance............................................................25 Access to assessment function .................................................................. 25 Add new assessment ................................................................................. 26 Assess project(s)........................................................................................ 26 IV. Upload to PMT .......................................................................... 29 i AMT management and conditions ...................................................29 Conditions for AMT upload......................................................................... 29 To manage AMT files by quarter................................................................ 29 To upload data from AMT to PMT ....................................................30 To upload data ........................................................................................... 30 FAQ ............................................................................................................ 31 To export and import data from PMT to PMT..................................31 To export data from PMT ........................................................................... 32 To import data to PMT................................................................................ 33 V. PMT Set up................................................................................. 34 To set up linkage to database ..........................................................34 To set up the PMT..............................................................................36 To add or edit users ..........................................................................37 To access user setup ................................................................................. 37 To add a new user...................................................................................... 37 To edit an existing user .............................................................................. 38 To add or edit donors........................................................................40 To access donor setup ...............................................................................40 To add a new donor ................................................................................... 41 To edit or delete an existing donor............................................................. 41 Pick lists .............................................................................................42 To access pick lists .................................................................................... 42 To change a pick list................................................................................... 44 Report parameters.............................................................................44 Contacts .............................................................................................45 ii P M T Chapter 1 I. Introduction PMT is a monitoring tool designed to support Project Owners (PO) and Line Agencies (LA) to monitor their ODA portfolio. Why Microsoft Access? Microsoft Access is chosen for the fact that: It is a corresponding database system which can formulate a good environment for data management, perform complicated queries, make reports and coordinate with other Microsoft products; It can be easily upgraded to a bigger database system, such as Microsoft SQL Server, if required; and PMT versions can operate on Microsoft Access 2000, 2002, 2003 and XP. What does PMT do? PMT enables PO and LA to: Monitor current status of their ODA programs/projects; Review progress and performance effectiveness of an individual project as well as the whole portfolio; Make pre-formatted reports; Save soft copy of project reports; Automatically update information from quarterly progress monitoring reports prepared by PMUs using AMT; and Exchange information with other PMTs by exporting or importing information of portfolio, using XML-based data files. 3 P M T Chapter 2 II. Project Profile Access to PMT 1 Double click on the PMT icon 2 Type the username and password 3 Choose an appropriate language 4 Click OK to access the system Note: Please contact PMT administrator if you do not have the username and password PMT Homepage Interface PMT Home is the starting point of all actions. From here you can: • Have quick access to PMT functions; 4 P M T • Exit current programs or go back to homepage; • Access the main PMT window displayed in the middle of screen. Back button Have quick access to PMT functions Main PMT functions Exit current programs or go back to homepage Current reporting year PMT functions PMT functions which can be accessed from the homepage are: 1 View project data How to view project data is shown in Chapter 2 2 View or Print reports How to view and print reports is shown in Chapter 3 3 Run queries How to view and work with queries is shown in Chapter 3 4 Display charts How to display and work with charts is shown in Chapter 3 5 Assess Project Performance How to access project performance is shown in Chapter 3 6 Set up PMT 5 P M T How to set up PMT is shown in Chapter 5 7 Find out more about the PMT The link to window showing PMT version and contact address in case of technical assistance is shown below: 8 View the current reporting year Users can change the current reporting year so viewing data and reporting become more convenient. The current reporting year, by default, is the current system year. 9 Import data from AMT (Available on File menu) (Excel) How to input data from AMT(Excel) is shown in Chapter 5 10 Import and export data from PMT (Available on File menu) How to import and export data from PMT is shown in Chapter 5 11 Exit PMT By double clicking on Exit PMT in left or button screen. in the top right of View Project data With AMT providing quarterly progress monitoring information as input to the system, PMT functions to display and analyse these data in order to display and analyse the project achievement, actual implementation progress against its plan, and benchmark the whole portfolio. Therefore, ideally, PMT users can only display and aggregate information instead of modify the data input. 6 P M T Portfolio Data 1 2 There are two ways to view portfolio data: • From Homepage, click the link: View data or alternatively • From Shortcuts, click the link Data The main window of Data will be displayed containing links to Projects, Disbursement, Procurement, Social and Environment. Upon necessity, you can click on the desired link. 3 When accessed, data will be displayed in column showing data of all projects in portfolio. The information in each column is different in relevance to content. The example of Disbursement Data – ODA is shown below: 7 P M T 4 Like the example of Disbursement Data – ODA, many contents will be displayed by year for all projects having reports in corresponding years. You can check the data in previous or following reporting year by clicking the link Previous or Next located at the top of the window 5 To exit this window, you can go back to Homepage by clicking on the Back button on the toolbar or use Shortcut to access other functions of the PMT. Find, Sort and Filter When information is displayed so much that it is hard to find some specific detail, you can use the search button toolbar. or sort button and in Find The below example shows how to find a project through a part of project name, for instance, you are looking for a project with name consisting of “water”. 1 Access to Data – All projects as instructed above 2 Click on the column header to blacken the column Project name 3 Click the search button 4 In the filed Find What, enter “water” 5 In Match field, select “Any Part of Field” in toolbar to open search window. 8 P M T 6 Click the button Find Next and PMT will look for the first project with ‘water” in its name. 7 Click the button Find Next again to find more projects matching the searching criteria Sort You can use the button for ascending and descending sorting for any column in portfolio. 1 Click to blacken the column you want to sort 2 Click the button of ascending sort toolbar 3 The selected column is now sorted as desired. or descending sort in Filter The example below shows how to do a simple filtering; for instance, you are trying to filter project(s) whose name contains “upgrading” 1 Select and blacken the word “upgrading” in the project name column 2 Click the button 3 This returns list of project(s) whose name contains “upgrading” 4 Click the button to filter to remove filter View Project Profile 1 Access to Data - All projects as instructed above 2 Click on the row header to blacken the project in interest Double click on the row header 9 P M T 3 Double click on the row header 4 The window of project profile will be displayed 5 The window of Project information consists of 4 main parts Contents Main displaying window of project information Delete the project 6 • Links of project contents in the left of window • The main displaying window of project information • Button Delete Project • Button to close the window The content in the left of window is to support viewing detailed information of project. You can view project contracts by clicking the link Contracts 10 P M T 7 In this example, the list of project contracts is shown by year. You can view contracts of previous or following year by clicking the button Previous or Next 8 To view the detailed information of a contract in the list, you can click on More… to display the contract details 9 Click the Close button to exit. 11 P M T Chapter 3 III. Aggregating and Analysis functions Queries What is query? Query is to group information in predefined criteria, which can be displayed in ‘table’ format for easier analysis. 1 There are two ways to access the function Query: • From Homepage, you can click the link: Run a Query or alternatively • From Shortcut, you can click the link Queries 12 P M T 2 List of all available queries of PMT is displayed. 3 The queries are divided in groups; upon necessity you can click the relevant link. When clicking a query, the information window will be displayed in tables. The below example is to illustrate Disbursement – ODA: 4 Click the button on the Menu to go back to the main query window or the cross button the query window. to close 13 P M T Moving column 1 Access the function Query and open any query as instructed above 2 Click the title of column desired to be moved to blacken it. You can choose many neighbouring columns by clicking the first one, press the mouse and drag to broaden the selection 3 Keep the mouse and Move the blackened columns to new position. Note: If columns are not moved, they may be freezed; therefore, you have to unfreeze those by reading below instruction. Hiding and unhiding columns Access the function Query and open any query as instructed above Hiding column(s) 1 Click the column header to be hidden to blacken it. You can choose many neighbouring columns by clicking the first one, press the left mouse and drag to broaden the selection 2 Access the menu Format Æ Hide Columns 3 Selected columns are hidden. Unhiding column(s) 1 Access the menu Format Æ Unhide Columns 14 P M T 2 In the box displaying Unhide Columns, select the columns to be unhidden by ticking the relevant fields 3 Click button Close to exit 4 The selected columns are unhidden. Changing the font 1 Access the function Query and open any query as instructed above 2 Access the menu Format Æ Font to change font, style, colour and size 3 Enter the desired format. Note: The format change will be applied to all columns of query. Changing the gridline or background colour 1 Access the function Query and open any query as instructed above 2 Access the menu Format Æ Cells to change the gridline or background colour 3 Enter the desired format. Note: The format change will be applied to all columns of query. Filtering records You can filter by using the tool Filter by Selection. 1 Access the function Query and open any query as instructed above 2 Click the field to be filtered in the query 3 You can select all or a part of field by selecting the part to be filtered. The below example shows that user wants to filter projects with name consisting of “management”: 15 P M T in toolbar to perform Filter By Selection 4 Click the symbol 5 Click the symbol Remove Filter 1 Access the function Query and open any query as instructed above 2 Select a column to be sorted by clicking its column header 3 Click the symbol or 4 Click the symbol in tool bar to be back to normal. in toolbar to be back to normal. Sorting Columns to sort ascending or descending Freezing or unfreezing columns 1 Access the function Query and open any query as instructed above 2 Select a column by clicking its column header to be moved. You can choose many neighbouring columns by clicking the first one, press the mouse and drag to broaden the selection 3 Select Freeze columns of menu Format to freeze selected columns 16 P M T 4 The selected columns will be freezed and moved to leftmost. 5 In order to unfreeze columns, access Unfreeze All Columns of menu Format 6 After unfreezing, the position of columns will not be recovered like before. You can move columns depending necessity. Exporting a query to Excel or Word 1 Access the function Query and open any query as instructed above 2 Hide unnecessary columns or use filter function to have the query content as required 3 Access menu Tools, select Analyse it with Microsoft Office Excel or Publish it with Microsoft Office Word 4 Query will be exported in documents in desired format Note: Query is structured in ‘tables’, therefore the table format is difficult to maintain when being exported to MS Word but can be kept when being exported to MS Excel. 17 P M T Reports To access and view reports 1 2 There are two ways to access Reports of PMT: • From Homepage, click the link: View or Print reports • From Shortcut, click the link Reports The list of pre-formatted Reports is shown in the main window of PMT 18 P M T 3 Upon necessity, you can click the link of corresponding report 4 In some reports, there are requests to input some report parameters such as reporting year, project, sector, group sector… 5 After selection of report parameters, click Print Preview 6 Click the button in Menu to go back to the window of Reports or the cross button to close window. Page set-up 1 Access Reports and select any report as instructed above 19 P M T 2 Select Page Setup… from menu File 3 The window for Page set-up is displayed to enable user to change margin, orientation or grid settings 4 Click OK to save changes 1 Access Reports and select any report as instructed above 2 Set up page (is necessary) 3 Click button To print reports in tool bar to print report 20 P M T 4 Or you can access Print … in menu File to have more printing options. To export report to MS Excel or MS Word 1 Access Reports and select any report as instructed above 2 Set up page (is necessary) 3 Access menu Tools, select Analyse It with Microsoft Office Excel or Publish It with Microsoft Office Word 4 Reports will be exported in documents in desired format. Note: Reports are structured in ‘tables’ and string, therefore the report format is difficult to maintain when being exported to MS Excel but can be kept when being exported to MS Word. Charts To access and display charts 1 There are two ways to access Charts of PMT: 21 P M T 2 • From Homepage, click the link View charts or alternatively • From Shortcuts, click the link Charts The window of Charts is displayed Groups of charts Charts in dropdown list Main window to display charts 22 P M T 3 Select a desired chart by: • Clicking the relevant group • Select the chart from the dropdown list in selected group. 4 Depending on the chart type, you may have to provide more chart parameter(s) such as Sector Level1, Main source of funds, Project , etc 5 After selecting parameters, click Accept to see Charts in the below window 23 P M T 6 For each chart, you can view charts of previous or following year by clicking Previous or Next 7 Click to exit To copy charts to other Office documents 1 Access Chart and display any chart as instructed above 2 When a chart is selected and displayed, click Copy chart to clipboard 3 Open the MS Office document (Word, Excel,…) for charts to be saved 4 Right click and choose Paste in the above document, chart will be saved there. You can also edit charts after copying to Word, Excel as one MS Office object. 24 P M T Assess Project Performance Access to assessment function 1 In the Home page, click on the link Assess Project Performance 2 List of Assessments window is displayed List of all available assessments Add new assessment 25 P M T Add new assessment 1 Access to the assessment function as instructed above 2 If there is NO assessment in the list of available assessments corresponding to your assessment quarter and year, click on the button New assessment 3 The window allowing to add a new assessment is displayed 4 Please fill in all information needed for a new assessment 5 Click OK button to save and close 1 Access to the assessment function as instructed above 2 If necessary, add new assessment corresponding to your quarter and year 3 Select one assessment in the list of available assessments by click once on the desired record 4 The assessment window is displayed Assess project(s) 26 P M T List of all projects in the assessment List of all indicators to be assessed Click to know details of one project activity 5 To know about the assessment for one project, click on the project in the list of all projects. If your desired project has not appeared in the list, click on the Add Projects button to put your project in this assessment 6 If one project in the list of all projects is not needed in this assessment, click on Delete Project to remove that project out of the list 7 For each project, there are 5 assessment indicators, which are displayed with values for that project and average of the whole portfolio 8 Based on the values of 5 indicators, the assessor should mark for each indicator either Good, Satisfactory, Unsatisfactory or At Risk 9 After assessing for 5 indicators, the assessor should mark the overall project rating either Good, Satisfactory, Unsatisfactory or At Risk 10 After assessing for all projects, click Print button if you wanted a printed report 11 After assessing for all projects, click Export Data button to export this assessment to an XML file. This file then can be sent by email to the 27 P M T National ODA management agencies like MPI, MOF to report on the assessment of your portfolio. 12 Click Close button to close the assessment window 28 P M T 4 Chapter IV. Upload to PMT As mentioned above, PMT is a tool for data display and analysis. Therefore, data input for PMT is important to ensure that the tool has data for processing. Upload is automatically done by importing data from AMT report(s) (in Excel) sent from PMUs. AMT management and conditions Conditions for AMT upload Upload can be done only if AMT report(s) satisfy the followings: 1 Each AMT report has a unique project code in all portfolio; 2 Each AMT report has the reporting quarter and year in correspondence with actual reporting time; and 3 Each AMT report is updated with appropriate and adequate information up to the reporting time and verified by project owners. To manage AMT files by quarter 1 Usually, AMT report is saved in soft copy. The file name is recommended to give as followings: Donor (short name) – LA (short name) – Project (short name) – Reporting quarter – Reporting year.xls 2 AMT report should be saved by quarter. The file tree is recommended to be as followings: Reporting quarter – Reporting year – AMT reports 29 P M T E.g.: To upload data from AMT to PMT To upload data to PMT, user has to access its system menu, usually when subwindows are closed and only main window is displayed. To upload data 1 Select Get data from Excel in menu File 2 Use dialog box to go to folder of AMT reports satisfying conditions for upload 3 Click the AMT report to be updated. If you want to update many AMT reports as once, press Shift or Ctrl when clicking to select files 30 P M T 4 Click Select 5 The upload is completed when you receive the following notice: 1 Frequency for AMT uploads to PMT? FAQ A: Usually 4 times/year in relevance to 4 reporting quarters; Monitoring officers should collect all appropriate AMT reports before update to save time. In case some reports are wrong or amended after uploading to PMT, M&E officer will update PMT again with latest verified AMT reports. 2 What to do with project with no project code? A: Now Government of Vietnam (GoV) has not yet had procedure to issue code for project, almost all projects get the code issued by donors. In case a project does not have any code, you can contact person-in-charge of ODA in MPI to get a temporary code to ensure the code solidarity in all portfolio. 3 After uploading AMT, how will be old data of a project in previous quarter? A: If report is for Quarter I of reporting year, the old data of project of previous years is kept unchanged while the new data is recorded for the current reporting year. If report is for Quarter II, III or IV of reporting year, the old data of project of reporting year will be deleted and replaced by new data of AMT because AMT is to list all information of all quarters in the year. To export and import data from PMT to PMT Exporting and importing data from PMT to PMT is to support an agency using PMT to manage ODA programs and projects with aim to send information and 31 P M T data to other agency using PMT while not sending many AMT reports. E.g.: CPO - Irrigation manages 10 projects and wants to send information to MARD in one file instead of sending 10 AMT reports. To export data from PMT 1 Select Export data… in menu File 2 The below window is to choose projects to be extracted 3 Click the project(s) to be extracted 4 Click Export to export data 5 Exporting data is done when you receive the following notice: 32 P M T 6 In the installed folder of PMT, there is a file named data.xml then. This is the file of data extracted from PMT. You can change its name as desired. To import data to PMT 1 Select Import data … in menu File 2 Use dialog box to find the folder of file to be updated 3 Click Select to start importing 4 Data is imported when you receive the following notice: 33 P M T Chapter 5 V. PMT Set up To set up linkage to database For setting up linkage to database, System Administrator needs only perform it once and can change it in case address of current data files is changed. 3 1 Access by double clicking the icon PMT 2 Before entering username and password, click Setup… The below window is to select data file 34 P M T 4 Select data file for PMT 5 Click Next repeatedly until the screen of setup completion is displayed 6 Click Finish to complete the setup 7 Then you can use your username and password to access the program as instructed in Chapter 2 35 P M T To set up the PMT 1 The System Administrator accesses Setup the PMT in homepage 2 The PMT window displays list of content to be set up 36 P M T To add or edit users To access user setup 1 Access the list of setting up content as instructed above 2 Click the link Users in the list 3 The window of list of current users and buttons such as New, Edit, Find, Sort up and Sort down is displayed: To add a new user 1 Access the window of Users as instructed above 37 P M T 2 Click New to display a new window for adding 3 Fill in the compulsory information like User name, login name, password 4 If the new user is assigned for administration, tick the box Administrator 5 Click Add Modules and assign rights for the new user by selecting modules showing that the new user can modify or delete data 6 Click Save and Close To edit an existing user 1 Access the window of Users as instructed above 2 Select one user to be edited by clicking on the row header 38 P M T 3 Click Edit to display a window for editing user information 4 Like to add new user, you can modify the user information by filling in any to-be-modified content as desired or click Delete to delete this user 39 P M T To add or edit donors To access donor setup 1 Access the list of content to be set up as instructed above 2 Click the link Donors 3 The window of list of current donors and buttons such as Add, Delete, Find, Sort up and Sort down is displayed 40 P M T To add a new donor 1 Access the window of Donors as instructed above 2 Use mouse or click Add to move to the blank record at the end of the table 3 Input information of the new Donor such as Code, Donor Name (in English and Vietnamese) and its short name. 4 Select type of donor and country from the available list 5 Click Enter to save To edit or delete an existing donor 1 Access the window of Donors as instructed above 2 Use mouse to move to the record of donor to be Modified or Deleted 41 P M T 3 If you want to edit that donor, you just need to fill in the data fields with the new appropriate information 4 If you want to delete that donor, click Delete and say Yes to confirmation question Pick lists The below list of pick lists is used in PMT: • AMT Processes and AMT Process Date Types • Bid Review Method • Bidder Selection Method • Bidding Procedure • Contract Type • Country • Currency • Data Error Types • Document Types • Fund Types • Package Types • Project Status • Provinces and Regions • Sector Level 1 and Sector level 2 • Type of Donor To access pick lists 1 Access the list of content to be set up as instructed above 42 P M T 2 Click the link Pick lists 3 The window of Pick lists is displayed . 4 Select from in the dropdown list of Available Pick lists to display or edit 43 P M T To change a pick list 1 Access the window of Pick lists as instructed above 2 Select the list to be added or changed from the dropdown list 3 The selected pick list is displayed 4 Use mouse to move to the record to be changed 5 If you want to add a new record, you can click Add to move to the blank record at the end of the list 5 Input information into the data fields 6 Click Close to save and exit. Report parameters 1 Access the list of content to be set up as instructed above 2 Click Report Parameter in the list to display a new window 3 Change any report parameter if necessary 4 Click Save and Close to exit. 44 P M T Contacts Mr. Cao Mạnh Cường Head of General Division FERD/ MPI Tel: 0804 3016 Email: [email protected] Mr. Cao Thanh Phú Expert, General Division FERD/ MPI Tel: 0804 3115 Email: [email protected] 45