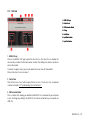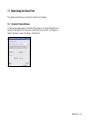
1
USER’S MANUAL
The information in this document is subject to change without notice and does not represent a commitment on the part of NATIVE INSTRUMENTS GmbH. The software described by this document is
subject to a License Agreement and may not be copied to other media. No part of this publication
may be copied, reproduced or otherwise transmitted or recorded, for any purpose, without prior written permission by NATIVE INSTRUMENTS GmbH, hereinafter referred to as NATIVE INSTRUMENTS.
All product and company names are ™ or ® trademarks of their respective owners.
Users Guide written by André Benedix
Version: 1.0 (10/2008)
Special thanks to the Beta Test Team, who were invaluable not just in tracking down bugs, but in
making this a better product.
Germany
NATIVE INSTRUMENTS GmbH
Schlesische Str. 28
D-10997 Berlin
Germany
[email protected]
www.native-instruments.de
USA
NATIVE INSTRUMENTS North America, Inc.
5631 Hollywood Boulevard
Los Angeles, CA 90028
USA
[email protected]
www.native-instruments.com
MASSIVE was designed and developed entirely by Native Instruments GmbH. Solely the name
Massive is a registered trademark of Massive Audio Inc, USA.
© Native Instruments GmbH, 2008. All rights reserved.
1.Welcome to the AUDIO 4 DJ!
Thank you for purchasing the AUDIO 4 DJ! With its set of professional features, the
AUDIO 4 DJ is the perfect match for your DJ and recording applications:
► Robust and portable design for the harshest traveling and live stage conditions
► 4 inputs and 4 outputs integrate the AUDIO 4 DJ into most DJ and recording setups
► 2 phono preamps let you connect turntables directly
► Low-latency drivers provide natural analog feel for your DJ software
► 24 bit converters for crystal-clear audio quality
► High output levels let you feed any external mixer or effects device
► Monitoring LEDs let you check the status of your system at a glance
Have fun with your AUDIO 4 DJ!
The team at NATIVE INSTRUMENTS
AUDIO 4 DJ – 2.Safety Considerations
The following sections contain important information regarding the use of the AUDIO 4 DJ
hardware. Please read them thoroughly before you start to use the AUDIO 4 DJ!
2.1 Warning
► The AUDIO 4 DJ hardware contains no user-serviceable parts. Do not open it or attempt to disassemble or modify any internal hardware. If there appears to be a hardware malfunction, immediately stop using the hardware and contact NATIVE
INSTRUMENTS.
► Do not expose the AUDIO 4 DJ to rain, and do not use it near water or in damp or wet
conditions. Also, never place anything on top of the controller, and be very careful that no
objects or liquids of any kind enter the unit.
► The AUDIO 4 DJ, in combination with an amplifier, headphones or speakers, can produce sound levels capable of damaging your ears. Do not use it for long periods of
time at high volume levels. If you experience any hearing problems or ringing in the
ears, consult a hearing specialist immediately.
► The AUDIO 4 DJ hardware is powered via USB. Operation can be guaranteed only as
a single device with a USB 2 controller or with a self-powered USB 2.0 hub.
2.2 Caution
► Before connecting the AUDIO 4 DJ hardware to other electronic components, turn
off the power for all devices. Before powering your system up or down, set all volume
levels to minimum. Gradually raise the volume controls while playing your instruments
to set the desired listening level.
AUDIO 4 DJ – ► Do not place the AUDIO 4 DJ hardware in an unstable position where it might accidentally fall to the ground.
► Before moving the AUDIO 4 DJ hardware, remove all connected cables.
► Never subject the unit to extreme temperatures (e.g. direct sunlight in an enclosed vehicle or near a heat source), or high levels of vibration.
► Do not use excessive force on the buttons, knobs, switches or connectors.
► When cleaning the AUDIO 4 DJ hardware, use a soft, dry cloth. Do not use paint thinner, solvents, cleaning fluids, or chemically-impregnated wiping cloths.
2.3 Important Notes
► Disclaimer: Native Instruments GmbH cannot be held responsible for damage or
data loss caused by improper use of, or modification to, the AUDIO 4 DJ hardware or
software. It is your responsibility to back up data you don’t want to lose.
► Specifications subject to change: The information contained in this manual is believed
to be correct at the time of printing. However, Native Instruments reserves the
right to make changes to the specifications of software and hardware at any time
without notice or obligation to update existing units.
► Nameplate location: The nameplate is located on the bottom of the AUDIO 4 DJ hardware and lists the Production ID.
► Disposal notice: Should this product become damaged beyond repair, or for some
other reason come to the end of its useful life, please observe all regulations of your
country that relate to the disposal of electronic products.
► Copyright: © Native Instruments GmbH 2008. All rights reserved. This publica-
tion may not be reproduced in whole or in part, summarized, transmitted, transcribed,
stored in a retrieval system, or translated into any language, in any form or by any
means without the prior written permission of Native Instruments GmbH.
► All product and company names are trademarks or registered trademarks of their respective owners.
AUDIO 4 DJ – 3.System requirements
For latest system requirements, compatibility and support of the latest operating systems
please see our website at:
www.native-instruments.com/audio4dj
AUDIO 4 DJ – 4.Installation
This chapter explains how to connect the AUDIO 4 DJ hardware to your computer and how
to install the drivers and software required to use it.
4.1 Installation of the AUDIO 4 DJ
To make use of the AUDIO 4 DJ, you need to install its driver first. The driver handles communication between the AUDIO 4 DJ hardware and your computer.
The driver itself is not accessible: like any other driver on your operating system, it is a
piece of software loaded in the background when your system starts up. The driver takes
care of all audio and MIDI signals coming from or going to the AUDIO 4 DJ hardware
through the USB2 connection.
!
Do not connect the AUDIO 4
DJ hardware until the driver
installer prompts you as the operating
system may install the wrong drivers.
Although the driver itself is inaccessible, you can edit some of its settings to modify its
behavior for your audio setup.
These settings can be edited. How to achieve this will be explained in detail in chapter
7 “AUDIO 4 DJ Software.”
AUDIO 4 DJ – 4.1.1 Installing the AUDIO 4 DJ Driver on Windows XP and Windows Vista
1.
Place the installation CD-ROM in your computer’s CD/DVD-ROM drive.
2.
Use the Windows Explorer to browse the content of the CD.
3.
Double-click the installer file named “AUDIO 4 DJ Driver Setup”.
4. Click “Next.”
5. To continue, you need to accept the license agreement first. After you have read the
license agreement, check the according checkbox and click “Next.”
AUDIO 4 DJ – 6. In the next dialog, choose the destination folder for the driver installation. To use the default path, just click “Next.” If you wish to select a custom path, click “Change”, browse
to the folder where you want to install the Audio 4 DJ Driver and click “Next.”
7. Now select the folder in the Windows Start dialog to place the Audio 4 DJ Driver
Setup. To use the default path, just click “Next.” To set a custom folder, type in a
name for it, then click “Next.”
AUDIO 4 DJ – 10
8. On the next dialog page, the Install Wizard will prompt you to start the installation
by clicking “Next.” To return to the previous dialog page, click “Back.” To abort the
installation procedure, click “Cancel.”
9. During the driver installation, a screen will appear with a message that the driver has
not passed Windows Logo Testing; this does not indicate a problem, simply click on
“Continue Anyway” to proceed with the installation.
10. After the installation has been performed successfully, click “Finish.”
11. After the TRAKTOR installer has finished running, please connect the AUDIO 4 DJ to
any available USB port on your computer, using the USB cable included in delivery.
Windows will identify the AUDIO 4 DJ and begin the final installation process. Choose
“No” if Windows asks you to search the Internet for a driver. Please note that as multiple driver components are installed, you will see the whole sequence of installer
screens repeated twice; this is not an error, just follow along and make the appropriate
choices to finish the installation.
!
You cannot install the AUDIO
4 DJ on a USB 1.1 port – a
USB 2.0 port is required.
AUDIO 4 DJ – 11
Accessing the AUDIO 4 DJ Software Tools on Windows
To access the AUDIO 4 DJ software tools on Windows, select
Windows Start > All Programs > Native Instruments > Audio 4 DJ Driver.
In this folder you will find the Settings Tool (explained in chapter 7.1 “Understanding the
Settings Tool”) and the Control Panel (explained in chapter 7.2 “Understanding the Control
Panel”).
Uninstalling the AUDIO 4 DJ Drivers on Windows
To uninstall the AUDIO 4 DJ drivers from your computer:
► Open C:\Program Files\Native Instruments\Audio 4 DJ Driver.
► Double-click the Unwise Tool to begin un-installation.
► Choose Automatic from the following dialog.
4.1.2 Installing the AUDIO 4 DJ Drivers on Mac OS X
1.
Place the installation CD-ROM in your computer’s CD/DVD-ROM drive. Its icon will
appear in the Mac OS X Finder.
2.
Double-click the “AUDIO 4 DJ” CD icon to display the content of the CD.
3.
Double-click the installer file.
!
Do not connect the AUDIO 4
DJ hardware until the driver
installer prompts you, as the operating
system may install the wrong drivers!
4. In the appearing dialog click “Continue” to proceed.
AUDIO 4 DJ – 12
5. Select a destination volume, then click “Continue” to proceed.
6. Click “Install” to install the driver in the default path or browse to select a custom
installation path by clicking “Change Install Location.” Then click “Install.”
7. The next screen informs you that your computer needs to be restarted when the installation is done. If you have any other applications running, you should close them
now. To continue, click “Continue Installation.”
AUDIO 4 DJ – 13
8. After a successful installation you will be prompted to restart your Mac. Click “Restart”
to restart your computer.
9. After restarting your computer, connect the AUDIO 4 DJ to a free USB 2.0 port of your
Mac, using the USB cable included in delivery.
Accessing the AUDIO 4 DJ Software Tools on Mac OS X
To access the AUDIO 4 DJ software tools, double-click
Applications/Audio 4 DJ Driver.
In this folder you will find the Settings Tool. Read more about the Settings Tool in chapter
7.1 “Understanding the Settings Tool.”
!
You cannot install the AUDIO
4 DJ on a USB 1.1 port – a
USB 2.0 port is required.
!
Please always refer to the
Readme file on the installation
CD, as it contains last minute information
that may not be available in the printed
manual.
Uninstalling the AUDIO 4 DJ Drivers on Mac OS X
To uninstall the AUDIO 4 DJ drivers from your computer, please delete the following files
manually:
/System/Library/PreferencePanes/NIUSBAudio.prefPane
/Library/Audio/MIDI Drivers/NIUSBMIDIDriver.plugin
/Library/Preferences/de.caiaq.NIUSBAudio.hwsettings.plist
/System/Library/Extensions/NIUSBAudioDriver.kext
/Library/StartupItems/NIUSBAudioDaemon
AUDIO 4 DJ – 14
4.2 Installation of the Settings Tool
This section describes the installation and the uninstall process of the Settings Tool.
Information on how to use the Settings Tool can be found in chapter 7.1 “Understanding
the Settings Tool.”
4.2.1 Installing the Settings Tool on Windows
This section describes the installation and the uninstall process of the Settings Tool on a
Windows PC.
Installing the Settings Tool
The Settings Tool will be installed along with the driver of the AUDIO 4 DJ. Please follow
the instructions on installing the AUDIO 4 DJ driver given in chapter 4.1.1 “Installing the
AUDIO 4 DJ Drivers on Windows.” There is no interaction required.
Uninstalling the Settings Tool
The Settings Tool can be uninstalled along with the driver of the AUDIO 4 DJ. Please follow
the instructions on uninstalling the AUDIO 4 DJ driver given in chapter 4.1.1 “Installing
the AUDIO 4 DJ Drivers on Windows.” There is no interaction required.
4.2.2 Installing the Settings Tool on Mac OS X
This section describes the installation and the uninstall process of the Settings Tool on
a Macintosh computer.
Installing the Settings Tool
The Settings Tool will be installed along with the driver of the AUDIO 4 DJ. Please follow
the instructions on installing the AUDIO 4 DJ driver given in chapter 4.1.2 “Installing the
AUDIO 4 DJ Drivers on Mac OS X.” There is no interaction required.
AUDIO 4 DJ – 15
Uninstalling the Settings Tool
To uninstall the Settings Tool from a Macintosh computer, please delete the file Applications/
Audio 4 DJ Driver/Settings Tool.
4.3 Installation of the Control Panel
This section describes the installation and the uninstall process of the Control Panel.
Information on how to use the Control Panel can be found in chapter 7.2 “Understanding
the Control Panel.”
4.3.1 Installing the Control Panel on Windows
This section describes the installation and the uninstall process of the Control Panel on
a Windows PC.
Installing the Control Panel
The Control Panel will be installed along with the driver of the AUDIO 4 DJ. Please follow
the instructions on installing the AUDIO 4 DJ driver given in chapter 4.1.1 “Installing the
AUDIO 4 DJ Drivers on Windows.” There is no interaction required.
Uninstalling the Control Panel
The Control Panel can be uninstalled along with the driver of the AUDIO 4 DJ. Please follow
the instructions on uninstalling the AUDIO 4 DJ driver given in chapter 4.1.1 “Installing
the AUDIO 4 DJ Drivers on Windows.” There is no interaction required.
4.3.2 Installing the Control Panel on Mac OS X
This section describes the installation and the uninstall process of the Control Panel on
Mac OS X.
AUDIO 4 DJ – 16
Installing the Control Panel
The Control Panel will be installed along with the driver of the AUDIO 4 DJ. Please follow
the instructions on installing the AUDIO 4 DJ driver given in chapter 4.1.2 “Installing the
AUDIO 4 DJ Drivers on Mac OS X.” There is no interaction required.
Uninstalling the Control Panel
There is no option to uninstall the Control Panel on Mac OS X automatically.
AUDIO 4 DJ – 17
5.Registration and Product Authorization
Registering the AUDIO 4 DJ is not mandatory. Nevertheless, registration is recommended,
as it can be helpful in case of a support inquiry or a theft. To register your AUDIO 4 DJ on
the NATIVE INSTRUMENTS website, use the serial number from the product activation
sticker inside your AUDIO 4 DJ product package.
To register your AUDIO 4 DJ:
► Open your standard internet browser
► Open the NATIVE INSTRUMENTS website:
www.native-instruments.com
► In the headline navigation, click on “Support”
► On the next page, click on “Product Activation”
► Since you only need to register the serial number, please read further in section B)
Serial Number Registration and click on the link labeled Register the serial number
here…
► If you never registered a NATIVE INSTRUMENTS product, choose Create User Account.
Choose Additional Product Registration if you already are a registered user of a NATIVE
INSTRUMENTS product.
► In any case, the following web pages will guide you step-by-step through the registration.
AUDIO 4 DJ – 18
6.AUDIO 4 DJ Hardware
The AUDIO 4 DJ provides the following features:
► 24 Bit/96 kHz Analog-Digital/Digital-Analog converters
► Low-latency drivers
► Hi-gain output levels on all channels.
► 4 audio inputs
► 4 audio outputs
► 1/4” headphone connector
► Status LEDs displaying the AUDIO 4 DJ’s settings and input/output activity
Read more about the AUDIO 4 DJ’s controls and connectors on the following pages.
6.1 Front Panel
1 - Headphone Volume
2 - Headphone Output
1 - Headphone Volume
Use this knob to adjust the level of the Headphone Output.
2 - Headphone Output
Connect your headphones to this ¼” socket.
AUDIO 4 DJ – 19
6.2 Rear Panel
1 - USB 2.0 Port
2 - Inputs A & B
3 - Outputs A & B
4 - Ground Screw
1 - USB 2.0 Port
Connects the AUDIO 4 DJ to your computer. The USB 2.0 connection handles data transmission and provides bus power to your AUDIO 4 DJ. This means you do not need an
external power supply.
2 - Inputs A & B
You can configure these inputs as 2 stereo pairs or 4 mono input channels.
3 - Outputs A & B
You can configure these outputs as 2 stereo pairs or 4 mono output channels.
4 - Ground Screw
Attach your turntable’s grounding wire to this screw to eliminate hum induced by ground
loops from the audio signal.
AUDIO 4 DJ – 20
6.3 Status LEDs
1 - CHANNEL A and CHANNEL B
2 - USB
3 - INPUT MODE (Channel A and Channel B)
1 - CHANNEL A and CHANNEL B:
These LEDs provide information about the AUDIO 4 DJ’s audio inputs and outputs: they
light up green to indicate that an audio signal is present. If the input signal is too loud
and causes clipping, the LEDs turn red.
2 - USB:
When the AUDIO 4 DJ is connected, this LED is lit green. If the USB status LED remains
black although you have connected the AUDIO 4 DJ to your computer, please refer to
chapter 10 “Troubleshooting” in this manual.
AUDIO 4 DJ – 21
3 - INPUT MODE (Channel A and Channel B):
Colored LEDs help you to identify the currently selected Input Mode.
Select one of the following Input Modes in the Audio 4 DJ Settings Tool, as explained in
chapter 7.1.2:
► Line Mode, applicable to line-level audio sources like CD/DVD Players, Keyboards or
other audio interfaces
► Phono Mode, applicable for turntables
6.4 AUDIO 4 DJ Technical Specifications
GENERAL INTERFACE SPECIFICATIONS
Input (A/D)
Output (D/A)
Channels
4
4
Sampling Rate
44.1, 48, 96 kHz
44.1, 48, 96 kHz
Bit Resolution
24
24
Converter
Cirrus Logic™
Cirrus Logic™
Computer Connection
USB 2.0, Bus-Powered
Dimensions
45 x 121 x 103 mm
Weight
521 g
AUDIO 4 DJ – 22
INPUT SPECIFICATIONS
Line
Phono
Cross Talk
87 dBu
87 dBu
Impedance
1 MOhm (unbalanced)
47 kOhm (unbalanced)
11,9 dBu
-29 dBu
THD+N
0.009%
0.062%
SNR
> 100 dBA (weighted)
> 91 dBA (weighted)
Frequency Response
10-40 kHz
10-40 kHz
±0.5 dB
±0.5 dB
Full Scale Level
(max.gain)
OUTPUT SPECIFICATIONS
Line
Cross Talk
87 dBu
Impedance
82 Ohms (Unbalanced)
Maximum Output
Level
+ 9,7 dBu
THD+N
0.008%
SNR
> 100 dB (weighted)
Frequency Response
10-40 kHz (±0.5 dB)
AUDIO 4 DJ – 23
7.AUDIO 4 DJ Software
This chapter shows you all features of the Settings Tool and Control Panel utilities that are
part of the AUDIO 4 DJ software installation.
7.1 Understanding the Settings Tool
The Settings Tool is a graphical representation of the AUDIO 4 DJ and allows you to change
its general settings.
7.1.1 Open the Settings Tool
► On Mac OS X, double-click on Applications/Audio 4 DJ Driver/Settings Tool to open
the Settings Tool.
► On Windows XP, click on Start > All Programs > Native Instruments > Audio 4 DJ
Driver > Settings Tool to open the Settings Tool.
%
It might be a good idea to create a dock element (Mac OS
X) or desktop shortcut (PC) for better
accessibility.
► On Windows Vista, click on Start > All Programs > Native Instruments > Audio 4 DJ
Driver > Audio 4 DJ Settings to open the Settings Tool.
AUDIO 4 DJ – 24
7.1.2 Overview
1 - AUDIO 4 DJ Logo
2 - Control Panel
3 - USB Connection Monitor
4 - NI Logo
5 - Info Window
6 - Input Mode Selector
7 - Input Gain Selector
1 - AUDIO 4 DJ Logo
Click on the AUDIO 4 DJ logo to open the About Screen. The About Screen displays the
driver version number, the firmware version number, the settings tool version number as
well as the credits.
In case of a support inquiry you may be asked for one or more of these details.
Click on the About Screen to close it.
2 - Control Panel
Click on the Control Panel button to open the Control Panel. The Control Panel is explained
in detail in chapter 7.2 “Understanding the Control Panel.”
3 - USB Connection Monitor
This is a status LED, showing you whether the AUDIO 4 DJ is connected to your computer
or not. To change any settings, the AUDIO 4 DJ must be connected to your computer via
USB 2.0.
AUDIO 4 DJ – 25
► The USB Connection Monitor LED is black if the AUDIO 4 DJ is not connected to your
computer.
► The USB Connection Monitor LED is lit green if the AUDIO 4 DJ is connected to your
computer.
4 - NI Logo
Click on the NI logo to open the About Screen. The About Screen displays the driver version number, the firmware version number, the settings tool version number as well as
the credits.
In case of a support inquiry you may be asked for one or more of these details.
Click on the About Screen to close it.
5 - Info Window
The Info Window displays helpful information about the different settings and features.
Hover over one of the features and you will see a description of the respective setting or
feature.
6 - Input Mode Selector
The Input Mode Selector lets you adapt input channel A and B to different signal sources
(see below). To select an Input Mode, click on its label. If Phono is selected, you can adjust input gain using the Input Gain Selector. Depending on what kind of signal source you
want to use, choose one of the following options:
► Line: Choose this if you use a digital vinyl system with control CDs.
► Phono: Use this if you want to record normal vinyl records, because this mode is optimized for best sound at the AUDIO 4 DJ.
7 - Input Gain Selector
In Phono Input Mode, use the Input Gain Selector to select the amount of pre-amplification
applied to the audio input signals. Use this for adjusting recording levels and for DVS systems without automatic input amplification. To select an Input Gain value, click its label.
!
This control is inactive in Line
Input Mode!
AUDIO 4 DJ – 26
7.2 Understanding the Control Panel
This chapter will introduce you to the Control Panel and its settings.
7.2.1 The Control Panel on Windows
On Windows operating systems, the Control Panel allows you to change the performance
settings of the AUDIO 4 DJ. To open the Control Panel, click on Start > All Programs >
Native Instruments > Audio 4 DJ Driver > Control Panel.
AUDIO 4 DJ – 27
7.2.2 Soundcard Latency Settings
Any signal going into the computer has to go through two buffers: once through the USB
bus and once through the ASIO driver. On every path, latency is created.
► Presets: Select a preset that has already preconfigured values for the USB and the
Audio Buffer Size. Choosing User defined Settings allows you to choose an USB Buffer
Size independently from the Audio Buffer Size.
► USB Buffer Size: If you have chosen User defined Settings, you can choose here an
USB Buffer Size value. Available values are 1, 2, 3, 4, 8 and 16 ms.
► Audio Buffer Size: If you have chosen User defined Settings, you can choose here and
Audio Buffer Size value. The values depend on the chosen USB Buffer Size value. If
you have chosen a high USB Buffer Size, the lower Audio Buffer Size values are not
available. If you have chosen the lowest USB Buffer Size value (1 ms), all options are
available: 2, 3, 4, 5, 6, 7, 8, 9, 10, 12, 16, 32 and 64 ms.
!
Small USB and Audio Buffer
settings stress your computer
more. Read more on latency in chapter
10.5 “What is Latency?”
► Click on OK to confirm your changes and to close the Control Panel.
7.2.3 Buffer Format
In this area of the Control Panel, you can select the sample rate that the AUDIO 4 DJ
handles audio streams at. The value selected here always applies to all audio input and
output streams.
To select a sample rate:
► Choose a sample rate from the Sample Rate menu. 44100 Hz is the most common
setting. Other available options are 48000 Hz and 96000 Hz.
► Click on OK to confirm your changes and to close the Control Panel.
!
The higher the chosen value, the
more CPU power is required for
handling audio.
7.2.4 About
Click on the About button to open the About Screen. The About Screen displays the driver
version number and the interface version number.
In case of a support enquiry you may be asked for one of these details.
Click on OK to close the About Screen.
AUDIO 4 DJ – 28
7.2.5 The Control Panel on Mac OS X
On Mac OS X, the Control Panel displays the firmware version, the driver version and the
number of USB streaming errors. It does not provide any options or settings, as these can
be configured from within the audio software you want to use the AUDIO 4 DJ with.
You can access the Control Panel by selecting it from the Mac OS X system preferences.
AUDIO 4 DJ – 29
8.Basic Setups
Learn more about how to connect and configure the AUDIO 4 DJ by having a look at the
typical setups described in the following.
8.1 Using the AUDIO 4 DJ as Default Audio Device
Using the AUDIO 4 DJ as standard sound card (Default Audio Device) of your operating
system will bring brilliance in your living room when listening to music or watching DVDs
via your computer.
8.1.1 Using the AUDIO 4 DJ in Windows
► Make sure the volume controls of the amplifier are completely turned down!
► Open Start > Control Panel > Sounds & Audio Devices.
► Click on the Audio tab.
► As Default Device for Sound Playback, choose one of the available channel pairs of
the AUDIO 4 DJ, e.g. AUDIO 4 DJ (CH. B, Out 3|4).
► Plug a RCA cable into Out 3/4 of the AUDIO 4 DJ and connect it to a free input pair
of your amplifier.
► Open an available music file or sound on your computer. It should get played back via
the AUDIO 4 DJ now.
AUDIO 4 DJ – 30
8.1.2 Using the AUDIO 4 DJ in Mac OS X
► Make sure the volume controls of the amplifier are completely turned down!
► Click on Applications/Utilities/Audio MIDI Setup or open the “Audio MIDI Setup” from
the Dock.
► In “Audio Devices”, choose “Audio 4 DJ” as Default Output.
► Click on Configure Speakers.
► Choose Stream 2 (Channel 3 & 4) as output.
8.2 Using the AUDIO 4 DJ with a CD Player
► Make sure the volume controls of the amplifier are completely turned down!
► In the Settings Tool, choose Line as Input Mode.
► Connect the RCA cable of your CD player to a free input pair of the AUDIO 4 DJ, e.g.
AUDIO 4 DJ (CH. A, In 1|2).
► Put a CD in your CD-Player and start playing it.
8.3 Using the AUDIO 4 DJ with a Turntable
► Make sure the volume controls of the amplifier are completely turned down!
► In the Settings Tool, choose Phono as Input Mode.
► Connect the RCA cable of your turntable to the input pair of channel A or B of the
AUDIO 4 DJ, e.g. AUDIO 4 DJ (CH. A, In 1|2).
► Connect your turntable’s ground wire to the AUDIO 4 DJ’s ground screw.
► Put a record on your turntable and start playing it.
AUDIO 4 DJ – 31
8.4 Using the AUDIO 4 DJ in a Recording Setup
Using the AUDIO 4 DJ as recording device, you can transfer your beloved vinyl records to
the digital era as well as capture your own vocal or instrument performance.
8.4.1 Using the AUDIO 4 DJ as Recording Device on a PC
► Open Start > Control Panel > Sounds & Audio Devices.
► Click on the “Audio” tab.
► As “Default Device for Sound Recording”, choose one of the available channel pairs
of the AUDIO 4 DJ you want to record from, e.g. AUDIO 4 DJ (CH. A, In 1|2).
► In your recording software’s Options dialog, choose the respective input.
► Adjust the recording level in your recording software and start recording.
8.4.2 Using the AUDIO 4 DJ as Recording Device on a Mac
► Click on Applications/Utilities/Audio MIDI Setup or open the Audio MIDI Setup from
the Dock.
► In “Audio Devices”, choose “Audio 4 DJ” as Default Input.
► Adjust the recording level in your recording software and start recording.
AUDIO 4 DJ – 32
9.Using the AUDIO 4 DJ in TRAKTOR
In the following sections you will learn how to set up and use the AUDIO 4 DJ for DJ’ing
with a software from NATIVE INSTRUMENTS’ TRAKTOR product line. Please note that
we will refer to all products from the TRAKTOR product line simply as TRAKTOR, because
the functionalities described here are identical in all current TRAKTOR products.
9.1 Using the AUDIO 4 DJ in TRAKTOR with the internal Mixer
► Open TRAKTOR.
► Open Preferences > Audio Setup > Soundcard.
► From the dropdown menu, choose the entry AUDIO 4 DJ.
► Now open Preferences > Audio Setup > Output Routing.
► Choose a channel pair for the Master output.
► Connect this output pair to your amplifier or powered speakers.
► For the Monitor output, choose channel pair Out 3|4, so that you can pre-listen to
tracks.
► Turn down the headphones volume on the AUDIO 4 DJ to a low level.
► Connect your headphones to the headphones output on the AUDIO 4 DJ.
► In TRAKTOR, turn down the Mix Knob to 0%.
► In TRAKTOR, adjust the headphones volume with the Vol Knob to a comfortable level.
► From the Browser List, drag tracks in both decks and hit the Play button.
► Drag the Crossfader all the way to the left (Deck A).
► Click on the Cue button of Deck B.
► You should hear the track playing on Deck B only in your headphones, while the track
in Deck A is playing over your speakers.
%
You can find more and detailed descriptions about the
TRAKTOR software in your TRAKTOR
product‘s user manual.
AUDIO 4 DJ – 33
9.2 Using the AUDIO 4 DJ in TRAKTOR with an External Mixer
► Open TRAKTOR.
► Open Preferences > Audio Setup > Soundcard.
► From the Device menu, select the AUDIO 4 DJ entry.
► Now open Preferences > Audio Setup > Output Routing.
► Choose External as Mixer Mode. The options below change accordingly.
► For Out Channel A, choose an output pair from the dropdown menu, e.g. Out 1 and
Out 2.
► Connect these outputs of the AUDIO 4 DJ to a free channel of your DJ mixer, e.g.
channel 1, using a RCA cable.
► For Out Channel B, choose another output pair from the dropdown menu, e.g. Out 3
and Out 4.
► Connect these outputs of the AUDIO 4 DJ to a free channel of your DJ mixer, e.g.
channel 2, using a RCA cable.
► Connect the master output of your DJ mixer to your amplifier or powered speakers.
► From the Browser List, drag tracks in both decks and hit the Play button.
► Drag the Crossfader of your DJ mixer all the way to the left (Deck A or Channel 1).
► Set the headphones mix knob/fader of your DJ mixer to 0%. If you do not find a headphones mix knob/fader, please consult the manual of your hardware mixer.
► Use the cue button/switch/fader of Deck B (Channel 2) of your DJ mixer. If you do not
find a cue button/switch/fader, please consult the manual of your hardware mixer.
► You should hear the track playing on Deck B only in your headphones, while the track
in Deck A is playing over your speakers.
► If you do not want to pre-listen via the opposite deck, you can also utilize another
%
You can find more and detailed descriptions about the
TRAKTOR software in your TRAKTOR
product‘s user manual.
channel pair for the preview deck of TRAKTOR.
AUDIO 4 DJ – 34
10.Troubleshooting
The information provided in this chapter should help you to solve most of the problems
that you may encounter while you are using the AUDIO 4 DJ USB 2.0 audio interface.
10.1Solving Hardware-related Problems
Native Instruments hardware products meet the highest professional standards.
All products are tested extensively in real life situations during the development phase.
However, if you encounter any problems with your hardware, please follow these steps for
troubleshooting:
► Verify that you have installed the latest driver and the latest software update.
► Check the Native Instruments website for information.
► Make sure that the AUDIO 4 DJ hardware is connected to an USB 2.0 port of your
computer.
► Make sure you are connecting directly to an USB port of the computer and not through
an USB hub.
► Try another USB cable.
► Disconnect any other USB devices from the computer (except keyboard/mouse).
► Try using any other USB ports on your computer.
If none of these tips helps, please contact our Technical Support team. The contact information is available under the following URL:
www.native-instruments.com/contactinfo
In case the AUDIO 4 DJ needs to be returned, the Technical Support team at Native
Instruments will assign you an RA (Return Authorization) number that is required to
handle your return.
!
Please contact our Technical
Support team prior to returning any item.
Packages returned without this RA number will not be correctly identified and as such
might not be processed properly.
AUDIO 4 DJ – 35
10.2How to check if the AUDIO 4 DJ Driver is installed correctly
10.2.1How to check if the AUDIO 4 DJ driver is installed correctly in Windows
Open Start > All Programs > Native Instruments > Audio 4 DJ Driver.
There you will find the helper applications Audio Statistics, Control Panel and the Settings
Tool. Make sure that the device is connected to the computer and open the Control Panel.
If all the drop-down menus are grayed out (i.e., there are no presets in the preset dropdown list, no sample rate values to choose from) there must be something wrong with the
connection. If the AUDIO 4 DJ Driver entry in the Native Instruments folder of the
Start Menu is missing, the driver is most probably not installed at all.
► If the driver is not installed, you can install it using the setup program as described
in chapter 4.1 “Installation of the AUDIO 4 DJ.”
► If the driver is not recognized, check your USB 2.0 connection as described in chapter 10.3 “USB Troubleshooting.”
As any other USB device, the driver installs exactly for one USB port. If you connect the
AUDIO 4 DJ to another port, a standard Windows dialog opens in which you can install
the driver to that port.
► If you have previously installed the driver on your computer once, Windows will find
the right drivers itself.
► If you did not install the drivers on your computer, Windows will install the wrong drivers.
► If you do not know whether or not you have previously installed the drivers of the
AUDIO 4 DJ to your computer, it is advisable, to start the setup program of the AUDIO
4 DJ. If the setup program states that it will first uninstall the drivers, you already have
installed the drivers on your computer. In this case you can connect the device to any
other USB port, and Windows will find the right driver when it installs the AUDIO 4
DJ on another USB port.
AUDIO 4 DJ – 36
10.2.2How to check if the AUDIO 4 DJ Driver is installed correctly in Mac OS X
In Mac OS X, look into the System Preferences for the NATIVE INSTRUMENTS USB Audio
Control Panel icon. Open this control panel to see if the device is found. If no device is
found, values will appear grayed out. If the NATIVE INSTRUMENTS USB Audio Control
Panel icon is missing here, the driver is probably not installed at all.
► If the driver is not installed, you can install it using the setup program described in
chapter 4.1 “Installation of the AUDIO 4 DJ.”
► If the driver is not recognized, check your USB 2.0 connection as described in chapter 10.3 “USB Troubleshooting.”
10.3USB Troubleshooting
If you experience problems that may be caused by the USB connection between the Audio
4 DJ and your computer, check the following chapters first; several possible sources for
USB issues are covered here.
10.3.1USB 2.0 required
The AUDIO 4 DJ is an USB 2.0 interface and will not work at all on an USB 1.0/1.1 port.
In addition, although the minimum power specified for a USB 2.0 port is 500 mA, we have
seen a few cases where the USB 2.0 ports on certain computers do not fulfill the minimum
requirements and therefore do not meet the official USB 2.0 specification. In this case you
may see a message saying that there is not enough power available to operate your device.
In this case you might encounter crackles or it may not work at all.
10.3.2Try another USB cable
A bad USB cable can be responsible for audio dropouts and other connectivity problems.
It is highly recommended that you try using a different cable if you are experiencing difficulties; make sure to use a cable bearing the official USB logo.
AUDIO 4 DJ – 37
10.3.3Using a powered USB 2.0 hub
It is best to connect the AUDIO 4 DJ directly to a USB 2.0 port on your computer. However,
in certain situations a powered USB hub can also be a solution if you are having problems
connecting your AUDIO 4 DJ to an onboard USB port. In this case you should avoid connecting other devices to the hub if possible, as each bus-powered device takes its share
from the total amount of power available.
10.3.4Recommended USB-ports (MacBook Only)
As general rule of thumb, do not use the right hand USB port on a MacBook Pro: This
port is connected to the same root hub as the trackpad. With the AUDIO 4 DJ plugged
into the right port, you can encounter audio problems like clicks or dropouts whenever the
trackpad is reactivated from standby mode.
MacBook Pro recommended USB port(s)
For the following laptops the use of USB audio devices on the right-hand USB port is not
recommended:
► MacBook Pro 15” 1.67GHz Intel Core Duo and Core 2 Duo
► MacBook Pro 15” 1.83GHz Intel Core Duo and Core 2 Duo
► MacBook Pro 15” 2.0GHz Intel Core Duo and Core 2 Duo
► MacBook Pro 15” 2.16GHz Intel Core Duo and Core 2 Duo
► MacBook Pro 15” 2.33GHz Intel Core 2 Duo
► MacBook Pro 17” 2.16GHz Intel Core Duo and Core 2 Duo
► MacBook Pro 17” 2.16GHz Intel Core 2 Duo
The 15” MacBook Pro models have 1 USB port on the left side, and one USB port on
the right side.
The 17” MacBook Pro models have 2 USB ports on the left side, and one USB port on
the right side.
AUDIO 4 DJ – 38
Due to the current USB configuration of the MacBook Pro under OS X, use of USB audio
devices is supported on the left-hand USB ports only (the port or ports next to the power
adapter cable). Use of audio devices on the right-hand USB port is not advised because
it may cause audio interrupts and/or dropped samples.
However, the use of an iLok dongle on the right-hand port has been qualified and is fully
supported.
!
These USB port recommendations are specific to USB audio
devices only. USB keyboard and control
surface products do not have a recommended USB port at this time.
MacBook 13.3” recommended USB port
For the following laptops the use of USB audio devices on the USB port closest to the
screen is not recommended:
► MacBook 13” White 1.83 GHz Intel Core Duo and Core 2 Duo
► MacBook 13” White 2.0 GHz Intel Core Duo and Core 2 Duo
► MacBook 13” White 2.16 GHz Intel Core 2 Duo
► MacBook 13” Black 2.0 GHz Intel Core Duo and Core 2 Duo
► MacBook 13” Black 2.16 GHz Intel Core 2 Duo
There are 2 USB ports on the left side of the MacBook models listed above.
Due to the current USB configuration of the MacBook under OS X, the use of USB audio
devices is supported on the front USB port only (the port farthest away from the screen).
Use of audio devices on the rear USB port is not recommended, because it may cause
audio interrupts and/or dropped samples.
However, the use of an iLok dongle on the rear port has been qualified and is fully supported.
!
These USB port recommendations are specific to USB audio
devices only. USB keyboard and control
surface products do not have a recommended USB port at this time.
AUDIO 4 DJ – 39
10.3.5Disable USB Energy Saving Mode (Windows only)
If the AUDIO 4 DJ is causing crashes or performing badly on a Windows machine, disable
power management to the USB hubs first; XP turns this on by default.
To disable power management for USB hubs, open the device manager (Control Panel >
System > Hardware) and right-click a USB hub to bring up its properties. On the power
management page, uncheck all boxes. Repeat for each hub and reboot.
10.3.6Update the Driver
► Click on the AUDIO 4 DJ logo in the Settings Tool to check the driver version number
and verify that you are using the latest driver.
► Check the Native Instruments website regularly for updates of the AUDIO 4 DJ driver.
10.4 How to avoid Ground Loops
Ground loops are a common problem within any environment where multiple electrical
devices are connected to the same power circuit. In complex setups the cause(s) of the
noise can be difficult to find. Ground loops are perceived usually as a hum or buzz in
your audio signal, but this can also transmit and amplify other sounds from the devices
connected to the circuit. For example, one very common problem is that you hear internal
clicking sounds created by your computer.
The cause of the noise is usually the computer and its internal devices, or devices connected to the computer like external hard drives. (Note that even if the power supply of
your notebook computer is not connected, your setup may still be vulnerable to ground
noise from an external device with its own power supply.) The cause can also be any other
device (such as a radio or television).
The reason why this noise is present at the monitor speakers input has to do with a loop
in the setup of your electrical and audio cable connections. Most likely this loop occurs
through the ground of one or more of these cables. With this in mind, the following points
should help to eliminate the ground loop.
AUDIO 4 DJ – 40
10.4.1Try to eliminate the loop
► As a first step, always connect your devices to the same power outlet (e.g. with a
multi-outlet power strip).
► Assuming that you have connected your audio interface, the next troubleshooting step
is to disconnect all devices that you are not currently using, but not the amplifier and/
or speakers. This also applies to other peripheral devices you may have connected to
your computer (external data storage, CD burners and especially radio or television
cables). In case the ground loop disappeared, you can add the devices one after the
other to see with the connection of which device it reappears.
► Another check is to see if the amplifier or active monitors create the ground loop.
Monitor your audio signal from the headphones output of the AUDIO 4 DJ via a headphone. Therefore the amplifier or the active monitors need to be physically disconnected from the AUDIO 4 DJ. In case the ground loop disappears, you need to lift the
ground on your amplifier or the active monitors. Contact the manufacturer of your
amplifier/speakers before lifting the ground to find out if ground lifting is supported
on your device.
► On laptops, low quality power supplies often lead to ground loop noise. Run your lap-
top on its battery, only to see if the ground loop disappears. In case the ground loop
disappears, you need to lift the ground on your laptop. Contact the manufacturer of
your laptop before lifting the ground to find out if ground lifting is supported on your
device.
► On desktop computers, the computer monitor (screen) might cause the ground loop.
Turn your monitor off and disconnect its power supply while you hear the ground loop.
In case the ground loop disappears, you need to lift the ground on your monitor.
Contact the manufacturer of your monitor before lifting the ground to find out if ground
lifting is supported on your device.
AUDIO 4 DJ – 41
10.4.2Break the loop with a DI box (AUDIO 4 DJ only)
If you cannot fix the ground noise problem by disconnecting equipment, you still have the
possibility of using a DI (direct input) box after the AUDIO 4 DJ outputs. Most of these
boxes have a ground lift switch on them. This can be used to break the ground loop and
eliminate the noise.
10.5What is Latency?
As with any digital device (including hardware signal processors) that converts audio to data
and back again, a computer adds a certain amount of delay (“latency”) when processing
audio signals. Fortunately, with today’s computers and low-latency sound card drivers, this
delay can be so small that you cannot hear it (as example: 3 milliseconds is about the
same delay caused by moving your head one meter further away from a speaker). However,
typical computers are generally not set up for low latency; attempting to play in real time
with the AUDIO 4 DJ will probably prove unsatisfying due to the delay.
Any computer-based audio system has some delay between the audio input and output.
As a result, if you are playing a MIDI keyboard through the AUDIO 4 DJ, you may hear an
annoying delay between the time you hit a key and the time you hear the sound. It is easy
to understand that this latency has be kept to a minimum in order to make instruments
and DJ applications playable. Even the most powerful computer can only do a certain
number of calculations per second; generating and processing sounds demands a lot from
a computer. On the other hand, it is important to minimize any computer-based delays in
order to achieve a playing experience without annoying delays in sound playback.
Fortunately, three main factors make delays virtually insignificant, assuming you have a
suitable computer setup.
► Today’s multi-gigahertz computers allow for very low latencies.
► The AUDIO 4 DJ includes drivers optimized for low latency.
► The AUDIO 4 DJ has been optimized to work as efficiently as possible.
AUDIO 4 DJ – 42
10.5.1How low can you go?
1.5 ms of latency approaches the theoretical minimum, because it will always take some
time to convert a human action into something digital and then to convert the digital action
back to analog sound. However, note that ultra-low latency settings (or higher sampling
rates) make your computer work harder, which can affect the performance. So, here are
some tips on living with latency.
10.5.2About Samples and Buffers
Audio cannot be handled continuously by a computer, but has to wait its turn while other
operations are being carried out. As a result, sound cards create a “buffer,” which can
hold a certain number of samples, where data can be stored and released as needed to
create a smooth flow of data. An analogy would be if you had a hose that does not deliver
water continuously, but in bursts. So you use a holding tank to store the water coming in
from the hose and have a valve in the tank that releases a steady amount of water in a
smooth, continuous flow.
If the tank (buffer) is large, then you can store more water in case the hose goes dry for a
bit. But it will take longer to fill the bucket, which is equivalent to latency. A smaller tank
takes less time to fill, but the hose needs to deliver water on a pretty continuous basis.
All ASIO audio interfaces and sound cards include a Control Panel in which you can adjust
latency. This may be given as the number of samples per buffer or just milliseconds.
The AUDIO 4 DJ provides you with six predefined settings (in milliseconds) to choose from
and the option to user-define the values.
Open Start > All Programs > Native Instruments > Audio 4 DJ Driver > Control Panel.
Read more about the Control Panel of the AUDIO 4 DJ in chapter 7.2 “Understanding
the Control Panel”.
AUDIO 4 DJ – 43
10.5.3Warning: Different Types of ASIO
It is extremely important to use the ASIO driver written for the AUDIO 4 DJ. There are
also generic ASIO drivers, typically called (for Windows) ASIO DirectX Full Duplex Driver
or ASIO Multimedia Driver. If you’re not sure which one to use, try them all, and choose
the one with the lowest latency. There should be an obvious difference when you use the
correct AUDIO 4 DJ driver.
10.6Using the AUDIO 4 DJ with a Laptop
10.6.1Check the Laptop’s Latency
First you should check if your computer can handle real-time audio processing without audio dropouts. Dropouts can be caused by certain components in your computer. A software
utility that can check your computer’s suitability for audio processing is available at:
www.thesycon.de/deu/latency_check.shtml
There is no software installation required, just launch the tool after downloading.
With your audio interface disconnected, the tool will report if your laptop can handle realtime audio streaming without audio dropouts.
In case your computer is unable to handle glitch free audio processing, the tool will show you
red latency bars and report this in the box on the bottom. Run it with both settings – audio
interface connected and disconnected – to find out about your computer’s capacities.
10.6.2Avoid Shared Memory
In general it is not recommended to use laptops with shared-memory graphic cards for
audio applications. A shared-memory graphic card accesses the same memory as the
CPU. Other graphic cards have their own, dedicated memory, so that the main memory
is reserved for other tasks (like audio processing). You will need memory and processing
power available for your audio project.
AUDIO 4 DJ – 44
10.6.3Avoid battery usage
It is not recommended to run the laptop on its battery, as the computer might slow the
clock rate of the CPU down.
10.6.4Disable devices
First, disconnect additional hardware (printers, scanners etc.) that you do not need while
you are working with your audio interface. Thus, the computer does not need to handle
devices that are currently not being used.
Additionally, laptops often are equipped with built-in devices that tend to disturb audio
processing. An example is a wireless LAN card. In case you experience serious dropouts,
you might need to disable these devices while working with your audio interface.
Disable devices in Windows XP
Right-click on My Computer > Properties > Hardware > Device Manager to open the device
manager. Double-click on a device to bring up its properties dialog. On the bottom of this
pane you can disable the device via the drop-down menu. Deactivate it and hit OK. You
should see a red cross over the device, which means that it has been deactivated.
Common built-in devices are: network adapters, wireless LAN cards, Bluetooth ports, infrared ports, printer ports etc. Try to disable the network adapter and wireless LAN card
first, as they are the most common problem causing devices in audio processing.
Make sure that you do not disable devices that are indispensable for your laptop to work
properly!
Here is a list of devices that you should not deactivate: System timer, Keyboard, System
CMOS/real time clock, Microsoft ACPI-Compliant System, Numeric data processor,
Primary IDE Channel, Secondary IDE Channel, Graphics Controller, Ultra ATA Storage
Controllers.
Disable devices on Macintosh OS X
If you have a wireless LAN card installed and Bluetooth running, turn them off while you
are using the AUDIO 4 DJ (you can turn this off in the Mac OS X Finder’s menu bar).
AUDIO 4 DJ – 45
10.7Clicks, Distortion and other audio interferences
10.7.1 Check your system specifications
If your system does not meet the requirements, you may experience pops, clicks and/or
distortion in audio playback.
For latest system requirements, compatibility and support of the latest operating systems
please see our website at:
www.native-instruments.com/audio4dj
10.7.2 Raise the audio latency
► Open the Control Panel of the AUDIO 4 DJ (PC) or the control panel of your audio
application (Mac OS X).
► Choose a preset with higher latency or, if using user defined settings, raise the USB
and Audio latency.
► Keep raising the latency until you do not encounter any more pops/ clicks and/or distortion.
10.7.3 Test with the built-in soundcard
► Disconnect the AUDIO 4 DJ.
► Connect your speaker setup to the built-in (onboard) sound card of your computer.
► Play back a track in your standard playback application, e.g. iTunes or Windows Media
Player.
► If playback is fine with your built-in (onboard) sound card, there may be an IRQ conflict
(Windows only) present on the slot or port the AUDIO 4 DJ is connected to. Attach the
AUDIO 4 DJ to another USB port.
AUDIO 4 DJ – 46
10.7.4 Physically re-configure the AUDIO 4 DJ
Try different USB ports
Connect the AUDIO 4 DJ to another USB port on your computer. Try all USB ports on your
computer until you find one that works best.
Check your IRQs (Windows only)
IRQ stands for Interrupt Request. This is the way in which Windows allocates resources to
the various devices and ports in your system. If your AUDIO 4 DJ is on a port that shares
an IRQ with other devices, you may have an IRQ conflict. This means your sound card is
not receiving the resources it needs to function properly. Here is how you detect an IRQ
conflict.
► Open Start > Run and type the word msinfo32 and press OK.
► Your system information window will appear.
► Click the Plus (+) sign next to Hardware.
► Click on IRQs.
► Your IRQs will be displayed in the window to the right.
► Your USB port will show up as USB universal host controller in the list.
► If the IRQ number listed next to any of these ports is sharing with other devices in your
system, you may have an IRQ conflict. Attach the AUDIO 4 DJ to another USB port.
► If this does not work, and your computer is a desktop, you may be able to change the
IRQ allocation from within the system BIOS (depending on your motherboard). However,
with most laptops it is not possible to change IRQ allocation. You may need to reinstall
your operating system for a better IRQ configuration.
AUDIO 4 DJ – 47
11.Optimizing your Computer
The following chapter collects some “tuning” tips that may help to improve your computer’s
performance. While faster computers may not need any of these tips, they can be essential
for getting good results on a computer with technical specifications on the lower end of
the system requirements.
11.1Windows XP Optimization
This chapter collects tips for tweaking the performance of a Windows PC.
11.1.1 Processor Scheduling
► Open Start > Control Panel and double-click System.
► Choose Advanced.
► Under Performance, choose Settings.
► Choose the Advanced tab.
► Under Processor Scheduling, select Background Services.
11.1.2 Visual effects
► Open Start > Settings > Control Panel and double-click System.
► Choose Advanced > Visual Effects tab.
► Choose Adjust for best performance.
11.1.3 Turn off desktop background image
► Right-/ Ctrl-Click Desktop > Properties > Desktop.
► At the top of the list under Background, choose None.
AUDIO 4 DJ – 48
11.1.4 Disable screen saver
► Right-/ Ctrl-Click Desktop > Properties > Screen Saver tab.
► Drop down the screen saver menu and choose None.
11.1.5 Disable Fast User Switching
► Choose Start > Settings > Control Panel > User Accounts.
► Click on Change the Way Users log On or Off and unselect Use Fast User Switching.
11.1.6 Switch off Power Schemes
► Choose Start > Control Panel > Power Options.
► Set Power Schemes to Always On.
► Drop down the menu for Turn off Monitor and select Never.
► Drop down the menu for Turn off hard discs and select Never.
11.1.7 Turn off Hibernation
► Open Start > Control Panel and double-click Power Options.
► Choose the Hibernate tab and unselect Enable Hibernation.
11.1.8 Disable system sounds
► Open Start > Control Panel and double-click Sounds and Audio Devices.
► Choose the Sounds tab.
► Drop down the sound scheme menu and select None.
11.1.9 Disable System Restore
► Open Start > Control Panel > System.
► Click on the System Restore tab.
► Select Turn off System Restore on all Drives.
AUDIO 4 DJ – 49
11.2Macintosh Optimization
This chapter collects tips for tweaking the performance of a Macintosh computer.
11.2.1 Log off additional users
If you have set up multiple user accounts on your computer, make sure your user account
is the only one logged in by logging off any additional users.
11.2.2Turn off the screen saver
► Open System Preferences > Energy Saver.
► Click on Show Details to display the energy saver details.
► Click on Sleep.
► Set the slider for Put the computer to sleep when inactive to Never.
► Set the slider for Put the display to sleep when inactive to Never.
11.2.3Do NOT put hard drive(s) to sleep
► Open System Preferences > Energy Saver.
► Click on “Show Details” to display the energy saver details.
► Click on “Sleep”.
► Uncheck “Put the hard disk(s) to sleep when possible.”
11.2.4Make the desktop static
► Open System Preferences > Desktop & Screen Saver.
► Choose the “Desktop” tab.
► Choose an image for your background.
► Unselect “Change Picture.”
AUDIO 4 DJ – 50
11.2.5Lock the Dock
► Open System Preferences > Dock.
► Drop down the menu next to Minimizing Using and select Scale Effect.
► Unselect “Animate opening applications” and “Automatically hide and show the
Dock”.
11.2.6Dismantle Dashboard (10.4 Tiger and above)
Search the internet for OS X Dashboard kill applications. There are several to choose from.
Some are simple applications that you double-click to stop and start the Dashboard, others are lines of code to be pasted into the Terminal.
11.2.7 Turn off Sharing
► Open System Preferences > Sharing.
► Click on the Services tab.
► Unselect Personal File Sharing and Internet Sharing (or Personal Web Sharing).
11.2.8Shut down all other applications
► If you have any other applications running, shut them down while using your audio
application.
► More tips on optimizing your operating system can be found on:
www.native-instruments.com/index.php?id=niosxtut
AUDIO 4 DJ – 51
12.Getting Help
Native Instruments provides various sources of support and information to registered
users.
12.1 Readme/Knowledge Base/Online Support
12.1.1 Readme
Always read the “Readme” file found on the installation CD. It contains important information and all last minute changes that could not be included in this manual.
12.1.2 Knowledge Base
You can access the Knowledge Base at
www.native-instruments.com/knowledgebase
To search the Knowledge Base you have to log into your user account first. For more
information about registering products please see chapter 5 “Registration and Product
Authorization”.
12.1.3 Online Support
You can reach the Online Support via
www.native-instruments.com/productsupport
The following form will ask you for all information about your hardware and software environment, to better facilitate the information to our support team. The entries you make
are furnished with cookies, so they should automatically be reproduced when you enter a
second support request.
AUDIO 4 DJ – 52
In your communication with the support team keep in mind that you should offer as much
information as possible about your hardware, your operating system and the software you
are running to give the possibility to help you.
In your description, you should mention:
► How to reproduce the problem
► What you have already done to try to fix the problem
► A description of your setup, including all hardware and software involved
► The exact model and technical specifications of your computer
12.2Forum
In the Native Instruments User Forum you can discuss directly with other users and
with experts from Native Instruments that moderate the forum.
The AUDIO 4 DJ Forum’s address is:
www.native-instruments.com/forum/forumdisplay.php?f=170
12.3Updates
Whenever you encounter problems, you should also check if you have the latest software
installed. Click on the AUDIO 4 DJ logo in the Control Panel to display the version number. Updates are released regularly to fix known problems and to constantly improve the
software.
AUDIO 4 DJ – 53