1
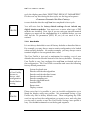
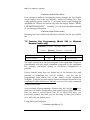
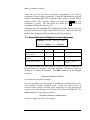
CDQPrima U S E R S
7
Chapter
G U I D E
Useful Stuff
Here’s some useful stuff that makes the
friendly than any other audio codec
CDQPrima
more user-
7 Useful Features
T
he CDQPrima has some features that, although not necessary for
day-to-day operation, may be of interest to even the casual user.
Many of these features are not available from any other codec
manufacturer.
7.1 User Profiles And Factory Defaults
[Common] Encoder
Anc Data
…
Version
Decoder Maint …
[User Profile]
[Set dflts]
Serial No
MENU NAVIGATION
!note:
RPRmt Ctl
…
Hot Key
[General]
G.722/H.221
(these selections under ‘General’)
COMMAND
WINDOWS RC
<System Setup><Defaults>
<Factorys>
CDF
Setup, Default
System
<System Setup><User Profile>
<load/save/reset>
CPU
DC
DESCRIPTION
Reset default parameters
Save, load or reset user
profile
It may sometimes be necessary to re-boot the CDQPrima. Re-booting is
as simple as turning the CDQPrima off and then on again. The
CDQPrima remembers the last configuration loaded, and will re-boot
using the last known configuration. Please remember that if an
invalid configuration was loaded before the re-boot, then the same
invalid configuration will be loaded after the re-boot.
7-1
CDQPrima U S E R S
G U I D E
7.1.1 Resetting Factory Defaults
If re-booting does not restore the CDQPrima to working order, it may be
necessary to return your CDQPrima to its factory default configuration.
Although not likely, it is possible to configure your CDQPrima in such a
way that it may not function properly. For example, it is possible to
configure ancillary data to ignore remote control. It is usually easier to
start over by reloading factory defaults than to figure out what is wrong
with the configuration.
Factory defaults can be reloaded from the keypad or by issuing a ‘1’
reset. This will restore all factory default settings and will restore a
default configuration that is known to work. The complete list of
factory default settings can be found in the Appendix of the CDQPrima
Technical Reference Manual, an abbreviated list is shown below. After a
‘1’ reset, your CDQPrima will be configured in loopback, 256 kb/s, and
will have no DIF modules installed. Information that is required by
the internal terminal adapter is not lost.
Parameter
Loopback bitrate (CBR)
Bitrate (EBR, DBR)
Algorithm (EAL, DAL)
Mode (EAM)
Sampling rate (ESR)
Encoder line format (ELI)
Decoder set to independent (DIN)
Loopback (CSL)
User password (MUP)
Super-user password (MSU)
Sine detector
Value
256kb/s
256 kb/s
MPEGL2
joint stereo
48
L1
NO
LB
A
A
OFF
Table 7-1 Summary of factory default settings
If the keypad is still responding, use the sequence
<Common><General><Set dflts><Factory>
to reset to the factory default condition. If the keypad is not
responding, perform a ‘1’ reset. Turn the CDQPrima OFF, then turn it
ON while holding the ‘1’ button. Continue to hold the ‘1’ button until
the display flashes “PARAMETER RESET REQUEST” and then release
This message will only appear for about a second so
you must keep your eyes on the display. The CDQPrima will continue
the boot cycle, but will load all factory default settings. During the boot
7-2
CDQPrima U S E R S
G U I D E
cycle the display must flash “RESETTING DEFAULT PARAMETERS”.
If it does not say this during the boot cycle, use the keypad sequence
<Common><General><Set dflts><Factory>
to reset defaults after the CDQPrima has completed its boot cycle..
!note:
You will note that the factory default settings do not include any
digital interface modules. You must now re-enter what type of DIF
modules are installed. Note, that if you are using an internal terminal
adapter you must tell the CDQPrima that it is installed before you can
dial, but the TA parameters (SPID, ID, etc.) do not need to be reentered.
7.1.2 User Profile
It is not always desirable to reset all factory defaults as described above.
For example, you may always want a certain configuration to be loaded
when resetting defaults. As another example, you may always want a
terminal adapter to be recognized after a reset.
The User Profile is just such a mechanism for creating a set of user
defaults that can be reloaded instead of the factory defaults. Creating a
User Profile is easy. Just configure the CDQPrima as desired and save
the configuration. The User Profile overwrites and saves the following
factory default parameters:
When creating
a User Profile,
be sure to
have a valid
configuration
loaded before
saving.
!note:
System loopback state
Encoder and decoder algorithm
Encoder and decoder line format
Encoder and decoder bit rate
Encoder sampling rate
Encoder algorithm mode
Installed DIFs
Buzzer state
Display contrast
Please note that it is possible to save an invalid configuration or to
blank the display using user profiles. We recommend saving a User
Profile only after a factory default reset. Then configuring any DIFs
used, set up and test the configuration you want to save, and only after
you are sure it works, re-save the User Profile. Saving a user profile is
easy. Use the CPU command or use the keypad sequence
7-3
CDQPrima U S E R S
G U I D E
<Common><User Profile><Save>.
In an operation similar to resetting the factory defaults, the User Profile
can be used to reset to the user defaults. Instead of holding the ‘1’ key
while applying power, hold the ‘U’ (8) button down while turning the
CDQPrima on. Release the button only after the display flashes “RESET
PARAMETER REQUEST”. Similarly, you can issue the CPU command
or use the keypad sequence
<Common><User Profile><Load>.
Resetting the User Profile loads all factory defaults into the user profile
list.
7.2 Function Key Programming (Model 230 or Windows
Remote Control only)
[Common] Encoder
… Virt Act
MENU NAVIGATION
[Hot Key]
Decoder Maint …
General
G.722/H.221 …
COMMAND
WINDOWS RC
CHK
Extra, Hot Key
<Common><Hot Key>
DESCRIPTION
Program function key
The eight function keys on the front panel of the CDQPrima 230 can be
programmed with any single command supported by the CDQPrima.
For example, one-button dialing or one-button configuration is
possible.
Factory default setup does not define any of the function keys and
pressing an undefined key will do nothing.
Any key can be
programmed with almost any of the remote control commands
available. Using the far-end remote control techniques discussed in the
CDQPrima Technical Reference Manual, you can even send commands
to the far-end codec.
As an example of programming a function key, let’s set the F 1 key to
perform a one-button configuration and connect (Speed Dial). Let’s say
that you want to invoke Speed Dial 127 (a Speed Dial entry you
previously created), but since you use this entry so often, you want to
do it with only one button press.
Using the keypad sequence
<Common><Hot Key><F1>.
7-4
CDQPrima U S E R S
G U I D E
Since the key has not been previously programmed, you will be
prompted to enter a single command. Using the alphanumeric keypad,
enter the command CSD 127 (remember that a space is entered with 4
presses of the “QZ1” button). When you press the ENTER key, the
command is saved. The next time you press the F 1 button, the
CDQPrima will Speed Dial entry 127.
Although only the CDQPrima 230 has physical function buttons, you can
program and use up to eight, single-click ‘hot keys’ that work with any
model when using the Windows Remote Control program.
7.3 Keypad Beeper And Display Contrast Adjustment
[Common] Encoder
Other 232
MENU NAVIGATION
Decoder Maint …
[Buzzer]
Fan
[Contrast]
COMMAND
WINDOWS RC
DESCRIPTION
<System Setup><Buzzer>
<Audible Alarm>
CBZ
N/A
Buzzer state
<System Setup><Buzzer>
<Pb Click>
MBX
N/A
Keypad beep state
<System Setup><Contrast>
CCV
N/A
Adjust LCD display
contrast
The keypad beeper provides positive audible feedback whenever a
keypad button is pressed. In some instances, however, it may be
necessary to silence this feature. The MBX command or the keypad
sequence
<Common><Buzzer><PB Click>
can be used to turn off the beeper.
It is also possible to use the beeper to produce an audible alarm if any
(user defined) trouble condition exists. Using the virtual action or
event-to-action feature of Prima Logic Language, you can program an
event to sound the beeper on either the local or far-end Prima LT. The
CBZ command or the keypad sequence
<Common><Buzzer><Audible Alarm>
is used to toggle the state of the beeper.
7-5
CDQPrima U S E R S
G U I D E
For ease of viewing at any angle, the contrast of the LCD display can be
adjusted over a wide range using the CCV command or the keypad
sequence
<Common><Contrast>.
7-6