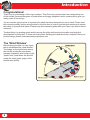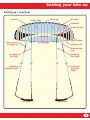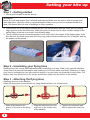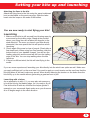
1
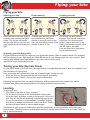
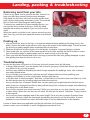
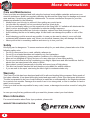
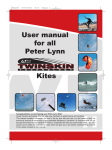
USER MANUAL
for all
4-line bridled foil kites
1
Introduction
Congratulations!
Thank you for purchasing a Peter Lynn product. This Peter Lynn product has been designed by one
of the world’s foremost designers of power-kites and buggy equipment and is constructed to give you
many years of fun and joy.
You are now the proud owner of a power kite, which has been designed for use on land. Please read
this manual carefully before using the kite for the first time in order to get the best result and to ensure
the safety of yourself and others. Please keep this manual together with your Peter Lynn kite for future
reference.
Traction kiting is a growing sports activity across the globe with product innovation and technical
development evolving fast. To learn more about this exciting sport and about the complete Peter Lynn
product range, please visit www.peterlynnproducts.com
The ‘Wind Window’
Before flying your kite it is very important to understand the ‘wind window’.
The image on the right shows where
the kite will create the most power
(straight downwind, also known as the
‘power zone’) and where the kite will
create the least power (edge of the
window and zenith).
2
Setting your kite up
Setting up - overview
top skin
leading edge
Velcro tag
air inlets
top bridle
top bridle loop
lower skin
Velcro outlets
trailing edge
sleeve on end
of flying line
bottom bridle
bottom bridle
loop
top flying
line (left)
top flying
line (right)
rear/brake
flying line (left)
rear/brake
flying line
(right)
left handle
right handle
3
Setting your kite up
Step 1 - Getting started
1. Find a good location to set the kite up.
WARNING!
Never fly a kite near power lines, railroads and airports. Make sure the area is clear of people and
other kite flyers. Never fly a kite on crowded beaches! Make sure you have a downwind area of at
least 100 meters which is clear of buildings or other obstacles.
2. Take the kite out of the bag and unfold the kite. Lay the kite down with the lower skin up, trailing
edge opposite to the wind direction. Make sure you put some sand or other suitable weight on the
trailing edge of the kite to prevent it from blowing away.
3. The four bridle loops are secured together in the Velcro tag in the centre of the leading edge of the
kite. Remove the bridle loops from the Velcro tag, make sure the bridles are free of tangles, and lay
the bridles on the ground.
Step 2 - Unwinding your flying lines
Starting at the kite, slowly walk backwards while unwinding your lines. Walk in the opposite direction
of the wind, this prevents line tangles and enables you to launch easier and faster. Always try to keep
your lines in a straight line, this prevents line tangles. Lay your lines out all parallel to each other. The
thicker (top) lines should be on the inside, and the thin (rear) lines should be on the outside.
Step 3 - Attaching the flying lines
Attaching the lines to the handles
Attach the flying lines to the handles by using larkshead knots, as shown below.
1. Make a larkshead in the
2. Slide the larkshead over the
sleeve on the end of the flying
end knot on the leader lines
line.
of the handles.
4
3. Tighten the larkshead and
slide it against the end knot.
Setting your kite up and launching
Attaching the lines to the kite
Attach the flying lines to the kite using the same larkshead
knot as described on the previous page. Slide the larkshead onto the loops on the ends of the bridles.
You are now ready to start flying your kite!
Launching
1. Make sure the kite is still secured from blowing away by
some sand on the trailing edge. Stand at the position
where your flying lines are at about 45 degrees to the
wind direction. The more you launch your kite directly
downwind, the more power the kite will produce when
launching.
2. Check again if the area is clear of people. Slowly take a
few steps back. When using four line handles, push the
bottom ends of your handles forward. You will see the
leading edge rise and the sand will fall from the trailing
edge of the kite. You can stop walking when the kite
launches.
3. If there is sufficient wind, the kite will start flying to the
zenith.
If you are more experienced, launching your kite directly into the wind is an option as well. Make sure
you apply sufficient pull on the rear lines! You need to apply so much tension on the rear lines that the
kite just takes off but can’t make any speed. When slowly reducing the tension on the brake lines the
kite will fly up to the zenith without generating a great amount of pull.
Launching with a helper
As an alternative to step 1-3, you may also ask someone
to hold the kite by the leading edge, so it is ready to fly off.
First let the kite fill with air, and then the helper guides it
upward on your command. Again make sure your lines are
at a 45 degree angle to the wind direction.
5
Flying your kite
Flying your kite
Steering your kite
Faster steering
Looping your kite
Once the kite is airborne, flying it
is pretty easy: almost like riding
a bike. Pull on the left handle
and the kite will turn left, pull the
right handle and the kite will turn
right.
To make your steering even
more responsive, twist your
handle so you pull more on the
rear line. Just pull the back of the
handle in about 10 cm.
Pull in one line and hold this
position. The kite will now make
a full loop. The lines are now
twisted, but no worries! Do not
swap your handles around, left is
still left, right is still right!
Loop the kite in the other direction to undo the twist.
Improving your kite flying skills
Frequent practice will help you improve your flying skills quickly. Start in medium winds. You probably
will find steering in very light winds the most difficult and in very strong winds the most nervous. After
starting with simple figure eight patterns, you can continue doing more
aggressive turns and looping the kite.
Tuning your kite (top/rear lines)
As with other forms of four line kites, the main tuning is by adjusting the relative rear line lengths to suit
the wind and your flying style.
First, make sure the top and rear lines are of equal length. Launch the kite.
• If the kite flies too far overhead the rear lines require shortening.
• If the kite doesn’t launch, the top lines require shortening.
Adjusting the top/rear lines can easily be done by adding extra knots in the leader lines on the
handles, and placing the larkshead knot of the flying line behind these knots.
Landing
To land your kite:
1. First check if the area is clear of people.
2. Fly the kite to the edge of the wind window, either to the
left or the right, and steer it down to the ground. Pull on the
rear lines so the kite will gradually land trailing edge down.
Secure the handles on a groundstake if possible, making
sure there is always more tension on the rear lines. Secure
the kite with some sand or other suitable weight.
Sometimes it may prove to be difficult to land foils, particularly in stronger winds, as the kite may
launch again. Therefore make sure that when the kite is on the ground there is no air inside it and the
kite is secured properly.
6
Landing, packing & troubleshooting
Removing sand from your kite
If there is any sand, mud or grass in the kite, remove it to
keep your kite flying properly and prevent damages.
If the sand is in the open cells, turn the kite upside down,
hold it by the trailing edge and shake it a bit. The sand will
fall out via the air inlets along the leading edge.
To remove any sand that is further towards the tips, you
can use the velcro outlets at the tips. Guide the sand
towards the small tip cell and let it get out via the velcro
outlet.
When the sand in your kite is wet, remove as much as possible; then dry your kite and repeat the action as described
above.
Packing up
1. You can leave the lines on the kite, or loosen the larkshead knots attaching the flying lines to the
bridle. Secure the bridle loops with the Velcro tag in the centre of the leading edge. This will prevent
the lines from getting tangled when unpacking the kite next time.
2. Wind the flying lines in figure-eights on to the winder or handles, to prevent tangles or twists.
3. Then make sure you remove all the sand and dirt from the kite and fold the kite from tips to centre,
then from trailing edge to leading edge until it is small enough to fit in the bag.
4. Place your kite with handles and lines in the bag to prevent the kite from getting damaged or parts
from getting lost when the kite is not in use.
Troubleshooting
In case the kite does not launch or fly the way it should, please check the following:
• Is there sufficient wind? Your kite needs a bit of wind to get going. Winds that are too light make it
very difficult to fly your kite properly.
• Are there any obstacles disturbing the wind? Large obstacles like buildings, trees, hills or dunes
can easily disturb winds.
• Are you holding your handles the right way around? Always make sure when grabbing your
handles, each handle is in the correct hand, and the right way up.
• Is the kite clear of sand and water? Wet kites, or kites with a lot of sand in them are hard to fly. Hold
the kite upside down by its trailing edge and shake the sand out.
• Are your bridles free of tangles? Bridle lines can also easily get caught behind the bridle loops or
parts of the kite. Untangle the bridle by taking off the flying lines, undoing the tangle and reattaching
your flying lines to the bridle loops.
• Are your top and rear lines tuned correctly? When your rear lines are too long, the kite can overfly
or steer slowly. When the rear lines are too short, the kite will not launch. Check the ‘Tuning’ section
in this manual.
• Are your flying lines untangled and of the same length? On a very rare occasion Dyneema lines
can stretch unevenly. Adjust the line length by adjusting the sleeves on the flying lines. It is also
possible to move the knots on either the bridle loops or the line attachments on the handles.
If none of these issues are applicable and the kite still does not fly properly,
please contact your local dealer or email: [email protected].
7
More information
Care and Maintenance
Peter Lynn kites are designed and built using the best and most reliable materials and proven construction techniques. Apart from regularly checking the kite and the flying lines for damage and normal
wear and tear, it requires no particular maintenance. To ensure a maximum life span for your kite,
please pay attention to the following:
• Always store your kite dry, to prevent it from getting any mould spots.
• Let your kite dry naturally, do not use devices such as a hair dryer.
• Do not unnecessarily leave your kite unpacked on the flying field. UV radiation will deteriorate the
fabric’s colour and strength. It is advisable to minimize sunlight exposure.
• Regularly check the bridle lines for knots or tangles, replace lines that show signs of wear.
• Avoid crashing the kite on its leading edge. A hard crash can damage the profiles or cells of the
kite.
• Avoid cleaning your kite as much as possible. In case you do want to clean it, use a soft cloth
moistened with lukewarm water only. Never use chemical cleaners, they will damage the fabric.
• Never put the kite in a washing machine and never try to iron your kite.
Safety
Kite flying can be dangerous. To ensure maximum safety for you and others, please take note of the
following safety rules:
• Do not fly near power lines, roads, airfields, railways etc.
• Do not fly on crowded beaches and certainly not over bystanders.
• Do not fly during lightning, stormy weather conditions or in offshore winds.
• Kites are not designed as ‘flying’ devices or for any other type of man-lifting activity.
• Do not use a kite that is too big considering your weight, experience and wind conditions. Ask for
advice from an experienced user when in doubt.
• Never attach yourself permanently to the kite and never jump off high places.
• This kite is a powerful traction kite and therefore not suitable for smaller children.
• If you are new to the sport, start using the kite in light to moderate winds only.
Warranty
This Peter Lynn kite has been designed and built for allround traction kiting purposes. Being made of
first class materials, it has been thoroughly tested and approved by Peter Lynn designers and testers.
The kite is warranted to be free of major defects in materials or workmanship to the original purchaser
for a period of six months. Damage as a result of use in too strong wind, or due to crashes on land or
water is not covered.
Peter Lynn shall not be responsible for any costs, losses, or damages incurred as a result of using this
product.
In case you may find any problems with your new kite, please contact your local dealer.
More information
For more information about Peter Lynn products, please visit:
WWW.PETERLYNNPRODUCTS.COM
8