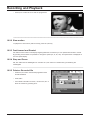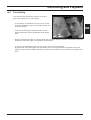
1
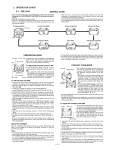
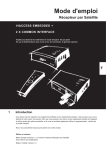
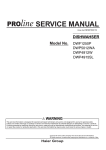
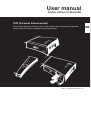
User manual
DIGITAL SATELLITE RECEIVER
PVR (Personal Videorecorder)
Please read through all the instructions first! Do not dispose of these instructions! The guarantee
bcomes invalid if the device is damaged through faulty operation!
Edition 11/2003 (GB), Version 2.0
GB
Page 2
Version 2.0
Introduction
1
Introduction
Thankyou for purchasing this digital satellite receiver. All Products have been manufactured to the
highest standards, fulfilling the highest standards at our ISO 9002 accredited manufacturing plants.
Before you begin the installation, please check again that your satellite system (antenna, LNB etc.) is
compatible for DIGITAL reception: 10.7 - 12.0 GHz LNB. If it is not possible to check this yourself,
contact an expert.
GB
Of course you will naturally wish to begin viewing your favourite programmes as quickly as possible this is why we designed the menu to fully meet your requirements as simply as possible. To ensure
you get the most out this product, we advise you to read through this booklet carefully.
NOTE:
To avoid technical differences between your TV set and this receiver it is suggested that you have
your TV user manual also at hand.
ATTENTION:
If you wish to receive encoded channels (Pay TV) then insert your Pay TV module(s) into the slot(s)
on the front of the receiver as shown in the diagram on page 8. More information to this theme can
be found on page 24, chapter 9.7.
If it is necessary to return your receiver, please send it together with all accessories and in its original
packaging. Include a copy of your invoice or receipt as well as a detailed description of the problem.
Please ensure you affix adequate postage to the package or refer all repairs to an authorised retailer.
We hope you enjoy using this product.
Version 2.0
Page 3
Contents
Chapter
Contents
Page
1
Introduction . . . . . . . . . . . . . . . . . . . . . . . . . . . . . . . . . . . . . . . . . . . . . . . . . . . 3
2
Contents . . . . . . . . . . . . . . . . . . . . . . . . . . . . . . . . . . . . . . . . . . . . . . . . . . . . . . .4
3
Important safety information . . . . . . . . . . . . . . . . . . . . . . . . . . . . . . . . . . . . . . .6
4
The Receiver and its functions . . . . . . . . . . . . . . . . . . . . . . . . . . . . . . . . . . . . .7
4.1
Remote Control . . . . . . . . . . . . . . . . . . . . . . . . . . . . . . . . . . . . . . . . . . . . . . . .7
4.2
Receiver - Connection to TV and dish . . . . . . . . . . . . . . . . . . . . . . . . . . . . . . .8
4.3
Receiver - Connection to other devices . . . . . . . . . . . . . . . . . . . . . . . . . . . . . .9
5
Installing the receiver . . . . . . . . . . . . . . . . . . . . . . . . . . . . . . . . . . . . . . . . . . . .10
6
Sarting up your receiver . . . . . . . . . . . . . . . . . . . . . . . . . . . . . . . . . . . . . . . . . .11
7
Using your receiver . . . . . . . . . . . . . . . . . . . . . . . . . . . . . . . . . . . . . . . . . . . . .12
7.1
Channel Selection . . . . . . . . . . . . . . . . . . . . . . . . . . . . . . . . . . . . . . . . . . . . .12
7.2
Volume/Mute . . . . . . . . . . . . . . . . . . . . . . . . . . . . . . . . . . . . . . . . . . . . . . . . .12
7.3
Radio Operation . . . . . . . . . . . . . . . . . . . . . . . . . . . . . . . . . . . . . . . . . . . . . .13
7.4
Selecting Audio Mode (incl. Dolby Digital) . . . . . . . . . . . . . . . . . . . . . . . . . . .13
8
Channel Lists and Information . . . . . . . . . . . . . . . . . . . . . . . . . . . . . . . . . . . . .13
8.1
Channel Lists and Sort Manager . . . . . . . . . . . . . . . . . . . . . . . . . . . . . . . . . .13
8.2
Electronic Programme Guide and Programme contents . . . . . . . . . . . . . . . . .15
8.2.1
Comprehensive Information on Channel Contents . . . . . . . . . . . . . . . . . . . . .15
8.2.2
Content information of current channel . . . . . . . . . . . . . . . . . . . . . . . . . . . . . .15
9
Programming your Receiver in the Main Menu . . . . . . . . . . . . . . . . . . . . . . . .16
9.1
General Settings. . . . . . . . . . . . . . . . . . . . . . . . . . . . . . . . . . . . . . . . . . . . . . . 16
Favorite List Manager . . . . . . . . . . . . . . . . . . . . . . . . . . . . . . . . . . . . . . . . . . 16
Channel Manager. . . . . . . . . . . . . . . . . . . . . . . . . . . . . . . . . . . . . . . . . . . . . . 18
Parental Lock. . . . . . . . . . . . . . . . . . . . . . . . . . . . . . . . . . . . . . . . . . . . . . . . . 21
Antenna Positioner . . . . . . . . . . . . . . . . . . . . . . . . . . . . . . . . . . . . . . . . . . . . .22
System Information. . . . . . . . . . . . . . . . . . . . . . . . . . . . . . . . . . . . . . . . . . . . . 23
Common Interface Manager. . . . . . . . . . . . . . . . . . . . . . . . . . . . . . . . . . . . . . 24
HDD Manager. . . . . . . . . . . . . . . . . . . . . . . . . . . . . . . . . . . . . . . . . . . . . . . . 24
Reinstallation. . . . . . . . . . . . . . . . . . . . . . . . . . . . . . . . . . . . . . . . . . . . . . . . 25
Page 4
Version 2.0
Contents
Chapter
Contents
10
Recording and Playback . . . . . . . . . . . . . . . . . . . . . . . . . . . . . . . . . . . . . . . . . 26
10.1
Page
10.1.1
Instant Recording . . . . . . . . . . . . . . . . . . . . . . . . . . . . . . . . . . . . . . . . . . . . . 26
10.1.2
Recording with Timer. . . . . . . . . . . . . . . . . . . . . . . . . . . . . . . . . . . . . . . . . . . 26
10.1.3
EPG Recording. . . . . . . . . . . . . . . . . . . . . . . . . . . . . . . . . . . . . . . . . . . . . . . 27
10.2
HDD Recorded List. . . . . . . . . . . . . . . . . . . . . . . . . . . . . . . . . . . . . . . . . . . . 27
10.2.1
Playback of recorded files. . . . . . . . . . . . . . . . . . . . . . . . . . . . . . . . . . . . . . . . 27
10.2.2
Slow Motion. . . . . . . . . . . . . . . . . . . . . . . . . . . . . . . . . . . . . . . . . . . . . . . . . . 28
10.2.3
Fast Forward and Rewind. . . . . . . . . . . . . . . . . . . . . . . . . . . . . . . . . . . . . . . 28
10.2.4
Stop and Pause. . . . . . . . . . . . . . . . . . . . . . . . . . . . . . . . . . . . . . . . . . . . . . . 28
10.2.5
Delete a Recorded File. . . . . . . . . . . . . . . . . . . . . . . . . . . . . . . . . . . . . . . . . 28
10.3
GB
Recording. . . . . . . . . . . . . . . . . . . . . . . . . . . . . . . . . . . . . . . . . . . . . . . . . . . .26
Time Shifting. . . . . . . . . . . . . . . . . . . . . . . . . . . . . . . . . . . . . . . . . . . . . . . . . 29
11
Trouble Shooting. . . . . . . . . . . . . . . . . . . . . . . . . . . . . . . . . . . . . . . . . . . . . . . . 30
12
Disposal. . . . . . . . . . . . . . . . . . . . . . . . . . . . . . . . . . . . . . . . . . . . . . . . . . . . . . . 30
Technical Date . . . . . . . . . . . . . . . . . . . . . . . . . . . . . . . . . . . . . . . . . . . . . . . . . .31
Version 2.0
Page 5
Important Safety Information
3
Important Safety Information
This device is solely for receiving satellite programmes and must only be used according to its intended purpose, as described in these instructions. Please ensure that the receiver is kept out of reach of children. The following additional instructions must also be adhered to in order to protect your health and to safeguard your device
against damage.
WARNING:
Never remove the housing or parts of it!
Prevent all moisture and foreign bodies from penetrating the device!
CAUTION:
Do not cover up the ventilation openings on the device, risk of fire from overheating!
CAUTION:
Only use original spare parts or those recommended by your specialist dealer,
otherwise there is a risk of injuries and damage to property! The guarantee expires if
you fail to observe this!
ATTENTION:
Switch off the device during thunderstorms and if it is not to be used for a long time!
Remove the antenna cable too during thunderstorms!
ATTENTION:
Only ever use a clean cloth, slightly moistened with clean water to clean the receiver,
do not use any chemical additives!
Page 6
Version 2.0
The Receiver and its Functions
4
The Receiver and its Functions
4.1
Remote Control
ON/OFF Button
Electronic Programme Guide
Button
Menu Button
Back Button
Last Channel
Timer Function
Audio-Modus (Channel Assignment)
Menu
Radio Button
EPG
Mute
Back
Menu
Last
Exit
i
Subt
Mute Button
GB
Exit Menu
Programme Information
Subtitle
Timer
Volume
Audio
Contiuous Page (Favourite)
Select Button
Select Button (continue)
Select Button (back)
Select Button (down)
OK Button
Previous Page (favourite)
Numeric Pad
Delete Button
Time Shift Button
Time Shift
Rec
List
Instant Record Button
Del
List Button
NOTE:
Ensure that you insert the batteries in the remote control
with the correct polarity (+/-)!
Version 2.0
Page 7
The Receiver and its Functions
4.2
Receiver - Connection to TV and Dish
Front of Receiver
ON/OFF
button
Common Interface
Slots for Conditional Access
Module (CAM)
Eject Button
Wahlschalter
(Programme)
4 digit LED Programme
Number Display
CAM module for Pay TV viewing
(not included in this receiver set)
Antenna
TV
Rearside of Receiver
Scart-connection TV
Audio connection Audio-connector
for Hi-Fi-system (Digital Audio, SPDIF)
(analog)
F-type connector
IF-Input
Antenna cable
(coaxial) for
Digital signal
DIGITAL
AUDIO
WARNING:
WARNUNG:
TV
95V-264V
50/60Hz MAX35W
IF INPUT
+13V/+18VDC
400mA MAX.
L
CAUTION
AUDIO
RS 232
R
VCR
IF OUTPUT
Mains connection
(95 V - 250 V)
Page 8
Version 2.0
The Receiver and its Functions
4.3
Receiver- Connection to other devices
Rearside of Receiver
DIGITAL
AUDIO
WARNING:
WARNUNG:
TV
95V-264V
50/60Hz MAX35W
GB
IF INPUT
+13V/+18VDC
400mA MAX.
L
CAUTION
AUDIO
RS 232
R
IF OUTPUT
VCR
RS 232 for
connection
to PC
IF-Output for
Other-Receiver
F-type connector
Scart-connection
Video-Recorder
Mains connection
(95 V - 250 V)
Version 2.0
Hi-Fi
system
Hi-Fi
system
(digital)
(analog)
Video
Recorder
Receiver
(analog)
Page 9
Installating your Receiver
5
Installing the Receiver
ATTENTION:
Never place the device close to heat sources or in a place where there is strong radiation
from the sun.
Lay all the cables so that they cannot be damaged, e.g. on sharp edges.
Only connect the device to a mains with 95 V – 264 V~, 50/60 Hz supply.
ATTENTION:
Only connect the device to the mains after correctly linking it to the video recorder,
television and any other additional receiver (analogue).
• Use a double-shielded coaxial cable for the coaxial connection cable from the LNB to the
receiver.
ATTENTION:
When fitting the F-connector ensure that no protruding wires from the metal braiding come
into contact with the inner conductor (see Fig.). There is a risk of a short cut and damage to
the receiver on contact!
Wire mesh
Bent wire
Core
• Tighten the lock nut of the F-connector by hand. Ensure that the lock nut is notover-tightened.
The receiver has already been pre-programmed in the factory; this means that you can
receive hundreds of programmes immediately. You can of course alter this programming or
replace it completely. In order to use all the benefits of the user menu (e.g. channel & programme information), you must make several adjustments which are described in detail in
the following chapters.
Page 10
Version 2.0
Setting Up the Receiver
6
Setting up the Receiver
Menu Title
Menu Contents
• Switch on your television and set it to receiver reception
(AV or SCART input).
• Press the On / Off button on the receiver or on the
remote control.
The receiver display indicates with ON that it is ready
for use. You will see the following image on the screen:
GB
• Set your language. The orange dialogue block shows
you how to do this and which remote control buttons
you require.
Orange on-screen prompt
Cursor Buttons
The following display shows you what to do next.
If you have pressed the OK button, you will see the “General Settings“ menu. The screen menu shows you the
buttons which you can use - and which function they have.
Example:
“BACK“ – return to the previous screen menu.
“Exit“ – return to the TV display.
“Menu“ – go to the main menu.
General Settings
1. Time Zone
Set your time zone by selecting a country in your time
zone.
2. Sommerzeit
Select “On” under 2 for summer time and “OFF“ for
wintertime.
3. Bildschirmformat
Enter the screen format of your television.
4:3
Version 2.0
16:9
Page 11
Using your Receiver
General Settings
4. TV Signal
select the optimal video format for your television.
Refer to the manual of your TV set for this information.
5.+ 6.+ 7. Languages
Specify the required language
8. DiSEqC
Set 8 ”DiSEqC 1.2“ ON, if your parabolic antenna has a
control motor, which can receive and implement the
receiver’s control signals (more details under Item 9.5:
Antenna Positioner).
ATTENTION:
• If DiSEqC is set to 1.2, the function of DiSEqC 1.0 (A, B, C, D) is no longer guaranteed
After completing these initial steps it is possible to view the preprogrammed channels. To do this you must
first activate the preprogrammed settings:
• Press the Exit button to load the settings you have programmed. After a short period you will be able to receive TV programmes.
If you wish not to use the preprogrammed settings then it is possible, by pressing the Menu button, to change to
the Hauptmenü (see chapter 9) and customize the settings yourself.
7
Using your Receiver
7.1
Channel Selection
• Use the number buttons to enter the number of the
required channel or select it from a channel list.
NOTE:
The channel number has four digits.
You can also enter from one to three-digit number
(e.g. 1, 13, 203), and press the OK button to confirm.
• Press the UP or DOWN button, to get to the next highest or next lowest channel.
• Press the LAST button, to return to the last viewed channel/programme.
Each time you change the channel, the screen shows you the channel name and number, the time and the time
at which the current and following programmes start. You can diplay this information yourself by pressing the
INFO button.
7.2
Volume and Mute
• Use the volume buttons on the remote control to adjust the volume.
15
If you do not make any changes for several seconds, the display disappears.
• Press the Mute button (see 4.1, page 7), to switch off the sound:
• Press this button again, to cancel the mute setting (switch on sound).
Page 12
Version 2.0
Using your Receiver
7.3
Radio Operation
In addition to the TV channels, many broadcasters also transmit their radio programmes in digital Hi-Fi quality.
• Press the Radio button (see 4.1, page 7), to switch from TV mode to radio mode.
• Press the Radio button again to switch back from radio mode to TV mode.
7.4
GB
Selecting Audio mode (incl. Dolby Digital)
• Press the AUDIO button. Use the > button to select one of the languages offered by the broadcaster (BL).
• Press the UP / DOWN button and set one of the following options:
Stereo – sound from left and right
Mono (L) – sound only from the left
Mono (R)– sound only from the right
AC3 – Dolby Digital
• Press the AUDIO button again or the EXIT button, to quit this menu.
NOTE:
The real purpose of this function is to transmit various language channels to the TV image. However, several
channel operators use this facility to transmit various radio programmes. Limited reception can result from this.
8
Channel Lists and Sort Manager
8.1
Channel Lists and Sort Manager
Digital television offers hundreds of channels. Your receiver enables you to select channels using your own personal channel lists so that you do not lose track and above all can quickly change to the channel you want.
The manufacturer has already pre-set several hundred broadcasters, which are listed in the “Overall Video List“
and in the “Overall Radio List“. Apart from the overall lists, you can prepare five “personal lists “ and name them
as you wish. You can easily program the “Personal Lists“; the instructions are in Chapter 9.2. Proceed as follows to change form one list to another even when a channel is running:
• Press the OK button, while you are watching a channel.
• Press the green button (Timer), if you want to change
the user list.
One of the channel lists is overlaid on the screen and the
current channel is marked. Use the UP/ DOWN buttons or
the < > buttons to select another channel. If you press the
OK button, the television switches to the selected channel.
Press the red button (audio) on the remote control, to call
up the sorting manager.
You can now sort the channels in the list using the sorting
manager as follows:
Version 2.0
Page 13
Using your Receiver
• Während Sie die Programmliste sehen, drücken Sie die
INFO-Taste (i). Zusätzlich erscheint nun eine technische
Information zum eingestellten Sender, das Fernsehbild
wechselt in den Kleinbildmodus.
• Drücken Sie die INFO-Taste erneut, um zur
Programmliste zurückzukehren.
Press the red button (audio) on the remote control, to call
up the sorting manager.
You can now sort the channels in the list using the sorting
manager as follows:
Sortier-Manager
1. Alphabetically (A – Z)
Sorts the channels in the list alphabetically from A to Z.
2. Alphabetically (Z – A)
Sorts the channels in the list alphabetically from Z to A.
3. FTA / Scrambled Program
Sorts the channels in the list according to free and
scramble channels (FTA = Free-to-air).
4. Satellite
Sorts the channels in the list according to satellite. You can select four satellites (e.g. Satellite 1: Astra,
Satellite 2: Hotbird ...). After sorting, all the Astra channels are at the beginning of the list, followed by all the
Hotbird channels, etc.).
5. Anbieter
Sorts the channels in the list according to service provider. You can select four providers (c.f. “Satellite“ ).
6. Theme
Sorts the channels in the list according to channel content (topics). You can choose four theme (c.f. “Satellite“),
to which you can assign the following topics:
· Movie / Drama
· News / Current affair
· Show / Game Show
· Sports
· Children’s / Youth
· Music / Ballet / Dance
· Arts / Culture
· Soc. / Pol. / Econ.
· Education / S c i e n c e
· Leisure / Hobbies
· Special
ATTENTION:
We suggest, only sort your „Personal Lists“ and not the factory preset list. In order to bring the factory pre
sets back to the original order, it is necessary to carry out a Reinstallation (Chapter 9.9). You would then lose
your personal lists.
Page 14
Version 2.0
Using your Receiver
8.2
Electronic Programme Guide and Programme contents
NOTE:
Information on programme content is not broadcast by all TV broadcasters!
8.2.1
Comprehensive Information on Channel Contents
GB
The Programmführer (EPG) shows the programmes which
will be shown within the next 7 days.
• Press the EPG button, while you are watching a chan
nel (EPG = Electronic Programme Guide).
The channel guide now shows the channel in mini-image
mode on the television.
Next to this you will see a list with all today’s programmes
just like in a television magazine.
• Use UP / DOWN to select the programme for which
you would like to read the detailed programme
information.
• Press the INFO button, to display detailed programme channel information.
• Press the > button, if you want to view the list of programmes on the next or following days.
8.2.2
Content Information of Current Channel
• Press the INFO button, while you are watching a
programme.
Your screen displays your channel name and number, the
time and the current and following programme with the
starting time (as shown in the Figure under 7.2).
• Press the INFO button again to display detailed
mation about the current programme.
infor-
• Now press the > button, to receive this information for
the programme which follows.
• Press the INFO or EXIT button to quit this menu.
Version 2.0
Page 15
Programming your Receiver
9
Programming your Receiver in the Main Menu
• Press the „Menu“ button to open the Main Menu
In order to receive additional or other channels than those
of the pre-programmed broadcasters, you can install the
broadcasters yourself. In addition, you can also use a
large number of service functions, from antenna positioning to programme lists through to access authorisation.
Follow the instructions in the orange coloured dialog box
at the bottom of the screen.
Main Menu
1. General Settings
You already used this menu item when starting up the
receiver (Chapter 5). Of course, you can change the
settings at any time to e.g. adjust to a new device location.
NOTE:
When changing from summer to winter time and vice
versa, you must enter the change under menu item 1.
Main Menu
2. Favorite List Manager
It is necessary to programme a “Personal list“, in order to
be able to use all receiver’s service functions offered.
5 lists are already installed under the names List A to List
E.
2.1 Edit List Name
Enter a name under “1. Edit List Name“. Name it according to content, for example “News“ or “Sport“, or according to the user the list – your imagination is set no
limits.
Menu item 1 allows you to change the name chosen at
any time.
Page 16
Version 2.0
Programming your Receiver
2.2 Add/Remove Channels
Here, you can create your own personal list by
adding and removing channels.
• Use UP/DOWN to move the required channel in the
overall video list (right-hand side) and confirm your
selection with “OK“.
The channels have been copied into your personal list.
Here it has the current list number (four digits).
In order to include a radio broadcaster in your personal
list you have to first change form the “Overall Video
List“ to the “Overall Radio List“ using the Radio button.
The rest of the steps are identical to those above.
GB
If you want to delete a channel from your list:
• Use the Timer button to enter the personal list and then use the UP/DOWN buttons to move to the required
channel. Confirm the deletion of this channel with “OK“.
2.3 Edit Channel Name
If you wish to edit the name of your favorite list
this function allows you to create and make changes.
2.4 Rearrange Channels
If you want to change broadcaster’s position within
the list to that of your television magazine, you can
do this using the menu item 4. To do this, mark a
broadcaster, shift it to the new position and confirm
with “OK“.
2.5 Remove Channels of Total List
In order to create space in the overall list to search for new broadcasters, individual broadcasters which
are not needed can be moved from the overall list into the “Recycled“
Version 2.0
Page 17
Programming your Receiver
Main Menu
3. Channel Manager
You can use the channel manager to load new broad
casters into your receiver’s memory.
To make these adjustments you require data which you
can obtain from your specialist dealer for example or
from trade magazines.
3.1 Automatischer Suchlauf
Quite a lot of data is already pre-programmed for the automatic search. Standard satellite equipment
uses so-called universal LNBs with a local oscillator frequency of 9750 MHz for the lower band and
10600 MHz for the upper band. The receiver’s basic settings contain this data, as well as the ASTRA
and HOTBIRD satellites. You only have to adjust this data in the menu if your satellite equipment devi
ates from this or you want to enter other settings.
During the search you will see a bar on which you can follow the search through the frequency.
• With the cursor buttons select a satellite with
which you would like to carry out a search.
A tick appears next to the chosen satellite.
• Press the green „edit“ button to carry out the
edit function. With the cursor buttons toggle
through the settings.
• Press the „Back“ button in order to select
another satellite.
Satellite Information:
LNB Lo-Frequency
Here you can set the LO frequency.
DiSEqC
With the help of the follwing DiSEqC table set your specific DiSEqC parameters.
22 kHz
If no DiSEqC controlled sat-system is being used then the „upper/lower Band“ parameter must be set to
manual. This is done be turning the 22 kHz either on or off.
Page 18
Version 2.0
Programming your Receiver
DiSEqC- Control and 22 kHz- Switch Signal
GB
0/12 V Output
This model has no option for this function.
Channel Search
Here, you can set which ind of channels should be searched e.g. All, Free-To-Air, Encoded etc.
• If you are happy with your selection, press the red button to start the search.
3.2 Manual Search
This menu is divided into two sections on the real screen, move from one part to the other using
“BACK“.
1.-8. Punkt
You should leave the settings for this menu to a
professional, unless you yourself are almost a
professional.
9. Netzwerksuche
Each individual transponder provides
the information forthe complete satellite
system (Prerequisite: The provider
always keeps the list up to date). When
entering a transponder and with network
s e a r c h “ O N “ i t a u t o m a t i c a l l y searches for
all transponders, which belong to this network.
However, the network definition varies
among the different satellite operators so
that all the channels of a satellite or only
selected channel clusters are taken into
consideration.
10.-11. Punkt
You should leave the settings for this menu to a professional,
unless you yourself are almost a professional.
12.-14. PID (Packed Identifier)
The PID number is the identifier for video and audio signals in
the digital data stream of the DVB MPEG-2 signals. Due to
poor labelling, some channels cannot be identified, wither
during automatic, nor during manual search. In this case, you
can enter the PID numbers so that you can receive these
channels too.
Version 2.0
Page 19
Programming your Receiver
3.3 Transponder Editor
Here satellite data can be changed, added to or deleted. This function is only intended for service purpo
ses and absolutely no influence on the operation of your receiver.
NOTE:
If all the data for a satellite is deleted, the satellite itself is also deleted.
• Press the „OK“ button in the Channel Manager
menu in order to get into the „Transponder Editor“
menu.
• Move with the cursor tasten up and down and con
firm with „OK“ which satellite you wish to change.
• Press „OK“ once more to change the data. By
pressing the „OK“ button, the selected transponder (TP) will be marked in yellow. You can now
use the numeric buttons to change the frequency.
• Now press the right cursor button (RE) in order to
change the Horizontal/Vertical (H/V) frequencies.
The area to change is marked in yellow and with
the UP/Down buttons you can select between horizontal and vertical.
• To change the Symbol Rate, press the RE button
again and with the numeric buttons input the new
number.
You can change errors at any time by pressing the „Back“ button.
• Press „OK“ to fix the new parameters
• Press the „Back“ button twice to exit the Transponder Editor and get back to the Channel Manager Menu.
Page 20
Version 2.0
Programming your Receiver
3.4
Channel data transfer
This menu item has been included to assist the
specialist trade. It is used to transfer self-selected
preferential programming from a master device to
several slave devices. This preferential programming takes into consideration the uniform interests of a group of customers, e.g. special regional
or ethnic characteristics.
GB
Master and slave receivers are linked to each
other via RS 232 interfaces for transmission of
the program data.
• Connect your receiver with the appropriate set
(Receiver or PC) via RS 232 Interface and cable.
• Choose the function you wish to use and press „OK“ in order to start the transfer.
3.5 Reinstallation
ATTENTION:
If you have changed or deleted the pre-programmed data you can reset the device back to the factory
settings. To do this, you will need the password (9 8 1 5).
Main Menu
4. Parental Lock
Various functions of the receiver require a password to be entered, this was set to 0 0 0 0 in the factory.
You can protect the device with an access block to prevent unauthorised use of your receiver.
4.1 Channel Lock
To stop uncontrolled viewing of certain channels, first choose the list by toggling with the LE/RI buttons
and confirm with „OK“. The chosen list appears and using the cursor buttons select the channels you
wish to „lock“. A padlock symbol appears next to the channel name when the „OK“ button is
pressed. Confirm your new settings by pressing the „Exit“ button.
4.2 Access Lock
You can protect the device with an access block to
prevent unauthorised use of your receiver. Toggle
with the LE/RI buttons. Each time your receiver is
turned on you will be asked to input your password.
4.3 Change Password
If you have forgotten your number it is possible to
use the factory preset number: 9 8 1 5 .
ATTENTION: Keep this number secure from
prying eyes!
Version 2.0
Page 21
Programming your Receiver
Main Menu
5. Antennensteuerung
The settings described in the following require very
specialist knowledge and skills. Therefore, please con
tact an experienced professional.
Prerequisites:
Parabolic antennae have a control motor, which can
receive and implement the receiver’s control signals.
The antenna is correctly adjusted mechanically so that
it can precisely follow the satellites’ orbits. This is
necessary to receive the strongest possible signal.
HINWEIS:
In the „General Settings“ menu, the DiSEqC option should be set to „1.2“ when you have an antenna with motor
positioner. If you do not have a motorized antenna then it is possible to test the signal strength whilst installing
your receiver using the „Antenna Positioner“ option.
5.1 Set-up Limit
Hier werden die räumlichen Grenzen festgelegt, die sich innerhalb der Parabolantenne bewegen können,
ohne ein Hindernis zu berühren.
5.1.1- 5.1.4
The spatial limits within which the parabolic antenna
can move without touching a hindrance are specified in the “1. Set-Up Limits “ sub-menu.
To do this, the antenna is first moved as far as possible in the eastern direction and this position then
fixed with “Set East Limit “. Then, again using menu
item 1, it is moved and the western direction and
fixed with “Set West Limit“. If the structural circumstances change the set positions can be deleted
using “Disable Limits“ and then reset later.
5.1.5 Go to Reference
This function resets the antenna’s control motor to the delivered condition (zero position – middle).
5.2 Select Satellite
Toggle with the L/R buttons to choose a satellite. The satellite number changes automatically as you toggle. The satellite receiver ‘knows’ where the different satellites are in relation to each other. Therefore it is
enough when one specific satelite is chosen, the strongest signal acheived and saved. With the calculate
command all other satellite positions will be configured.
5.3 Satellite number
To change satellite, toggle with L/R buttons and confirm with „OK“ or press „Back“ to return to the original
number.
5.4 Select Transponder
Select with the L/R buttons which transponder you wish.
5.5 Move East/West
Here you can set the spacial limits of the antenna with the L/R buttons which in turn moves the antenna
left and right. Press „OK“ to confirm the position.
Page 22
Version 2.0
Programming your Receiver
5.6 Search East/West
The antenna finds it´s own position in East/West
5.7 Save Satellite
All paramters are saved when „OK“ is pressed in this function
5.8 Calculate new Position
The position of a satellite can be worked out here. Confirm with „OK“ or retain the position by pressing
the „Back“ button.
GB
Main Menu
6. System Information and Software Update
Under this menu item you will find information about
the software version of your receiver and can update
the software version.
The software version is updated by downloading the
new software via satellite. Prerequisite for this is
that a more up to date version is available.
Please note that the software download can only take
place at a certain time of the week. For more information regarding his please refer to the website:
www.radix-sat.de.
• Confirm the „Air Download Start“ with „OK“.
• With the numeric buttons type your password in
order to authorize the software download.
Im folgenden Menü sehen Sie die Einstellungen des Receivers für das Herunterladen der neuen Softwareversion und können bei Bedarf noch Änderungen vornehmen.
The following menu will appear. Here you have the
opportunity to change parameters as in the previous
chapters.
• Press „OK“ to initiate the software download.
Version 2.0
Page 23
Programming your Receiver
The receiver first checks whether a more up-to-date
software version is available.
If this is not the case, “No available software found!
Please try again later on“ is displayed.
After successfully downloading a new software version
“Software update completed!!!“ is displayed and the
receiver automatically restarts.
Main Menu
7. Common Interface
Your receiver is fitted with two PCMCIA slots, which enable the use of two CI-CA modules. You can use
these modules to view the pay by view, not free encoded channels, which are transmitted by satellite in the
same way as the uncoded channels.
In addition to the CI-CA module, in order to be able to view an encoded channel you also require a
multi access module with a CI slot and the channel provider’s relevant smart card.
When you have then paid the subscription or a one-off charge for the channel provider’s smart card, the CICA module in your receiver can compare the transmitted code with the smart card in the multi access
module. If they match the channel is deciphered and you can view the channel.
Please ask your specialist dealer about multi-access modules and smart cards on offer and the charges.
• If you want to see which CI-CA modules are installed
in your receiver, or if you want to make adjustments
to the CI_CA modules, press “Menu“ and then select
Item 7 “Common Interface Manager“. You will then
see the following display:
If a CI_CA module has been installed, the receiver
automatically determines the type of module and dis
plays it in this menu.
When selecting a module you have access to the
various options available to this type of module. These
include permits, advance booking, details of channel
packages, etc.
Main Menu
8. HDD Manager
This menu shows he information of the HDD and how
to manage it
• Press „OK“ to call up HDD information in manu item
no. 1.
Page 24
Version 2.0
Programming your Receiver
8.1 HDD Information
In HDD Information you can call up information
such as HDD Firmware, HDD-size and the amount
of free space on the harddisk.
GB
8.2 Format
•
To format the disk, press „OK“ in this menu item.
•
Enter your personal password or the factory pre
set password (9 8 1 5)
All saved material on the disk will be deleted.
Newly installed harddisks should be formatted by this
method. The file structure of this STB receiver/recorder is different from that of a PC.
NOTE:
Do not turn off the recevier during formatting.
8.3 HDD Standby Timer Setting
This menu is used to save power consumed by the
HDD. If this is set to 10 minutes, the HDD goes into
Standby mode after 10 minutes of non-use.
• Toggle with L/R buttons to adjust this parameter.
Main Menu
9. Reinstallation
If you have changed or deleted preset data and wish to reset the receiver to the factory presets:
• Choose this option with „OK“ and enter the password: 9 8 1 5 .
NOTE:
By performing a Reinstallation you will loose all favorite list settings and all other setting performed
since the first start-up.
Version 2.0
Page 25
Recording and Playback
10
Recording and Playback
This receiver can record programmes digitally and play them back
10.1
Recording
10.1.1 Instant Recording
• To make an instant recording, press „Rec“ and
recording will begin.
A recording icon will appear in the top right hand corner of
the screen when a recording is in progress.
• To stop recording, press „OK“. When the information
menu is displayed in the lower half of the screen press
„OK“ to stop recording or „Exit“ to continue recording.
10.1.2 Recording with Timer (Timer Funktion)
You can use the timer function so that your receiver automatically switches on or off or changes the channel at
a preset time so that you can record a progrtamme using a connected video recorder. You can also use this
function to automatically change channels if you don´t want to miss the start of a programme but want to watch
another channel until then.
The timer function allows you to set a list with all the required timer settings in which you can set the date and
time for the receiver to be switched on and off, the channel and if necessary the daily or weekly repeat of each
switching operation.
If you are currently watching a channel and timer switching operation is pending, the receiver reminds you byoverlaying a massage that the timer switching operation will take place in one minute. When this time is reached,
the receiver switches over to the required channel and „Rec“ is displayed on the front display. After the preset
time has expired, the receiver switches back to the original channel.
How to programme the timer:
• Press the „Timer“ button.
If you have not yet specified the actual date or time you
will now be asked to. Use the numeric keys. As soon as
you have done this the following screen will be displayed:
This list shows all of the programmed recordings. All settings can be changed or deleted. In the column „Modus“
you can see if the timer function is set for once only, daily
or weekly.
Page 26
Version 2.0
Recording and Playback
• With „OK“ you can enter a new timer setting. You will
then see the following display:
In this menu you can enter all the settings for the timed
switching operation. Then, select menu item 8 and confirm
with „OK“ to return to the list
• To delete an entry from the list, select it using the
UP/DN buttons and then press L/R. Confirm your
selection with „OK“
GB
• Press „Exit“ to return to TV mode.
10.1.3 EPG Recording
Press „EPG“ to display the Electroic Programme Guide.
Select a programme you would like to record by using
UP/DN buttons and press the „Timer“ button. When EPG
record information is displayed, press „OK“ to reserve the
recording. The selected programme will now appear in the
Recording list.
10.2
HDD Recorded List
Press the „list“ button to display the recorded list.
10.2.1 Playback the recorded file
• Move to a recorded file in the list that you would lik eto
playback using the cursor keys.
• Press „OK“ to begin playback
Version 2.0
Page 27
Recording and Playback
• Press „Info“ to either show or hide the progress bar
10.2.2 Slow motion
To playback in slow motion (without sound), press the „DN“ key.
10.2.3 Fast forward and Rewind
Der Faktor wird auf dem Front-Display angezeigt.With the L/R buttons you can operate fast forward or rewind.
By pressing several times it is possible to change the speed (2x, 4x, 8x, 16x). The speed factor is displayed on
the front panel display.
10.2.4 Stop und Pause
Mit „OK“ halten Sie die Wiedergabe an. Drücken sie „AUF“ Taste zur Unterbrechung / Fortsetzung der
Wiedergabe.
10.2.5 Delete a Recorded file
• Press the „List“ button. Choose the programme which
should be deleted.
• Press „DEL“.
• If the delete information is shown, confirm with „OK“ or
abort the function by pressing „Exit“
Page 28
Version 2.0
Recording and Playback
10.3
Time Shifting
Tme shift gives the opportunity to follow a running programm with a delay of up to 120 minutes.
• If, for example, your telephone rings ad you do not wish
to miss the programme, press the „Time-Sift“ button and
the picture freezes.
GB
• To resume to watching the programme after the call,
press the RE button and the programme will be played
back.
• During the delayed play-back you can also pause the programme with the UP button. The Picture freezes. By
pressing the UP button again, the programme is played back
• In order to stop Time-Shifting, press the „OK“ button. The choice menu appears.
By pressing the „OK“ button again, the Time Shifting function is stopped and the programme saved in the
temporary memory will be deleted. Alternatively, press the „Exit“ button to carry on with the Time-shifting play
back.
Version 2.0
Page 29
Trouble Shooting
10
Troubleshooting
NOTE:
Large quantities of data are transmitted and processed simultaneously in digital receiver technology.
Switching from one channel to another therefore takes a bit longer than you are used to with an analogue
device.
A sand timer or the message “please wait” appears during the waiting time.
Malfunction
Noise, but screen menu visible
11
Possible cause
Corrective measures
Satellite equipment defective or
incorrectly set, LNB defective
Check the cable and the connector, Reorientate the antenna, check
the LNB
High signal losses at the cable
Replace the satellite cable or use a
signal amplifier
Defective LNB
Replace LNB
Plug-in connector faulty
(water, corrosion)
Repair link
No stereo sound
Wrong cable between the TV and
the receiver
Check the scart cable
Remote control doesn’t react
Batteries empty
Replace the batteries
Remote control not pointed in the
direction of the device when used
Correct the position of the remote
control
Recycling and Disposal
The device, the packaging (e.g. polystyrene) and the batteries must not be disposed on in the normal domestic
waste. Dispose of all the materials separately according to your local regulations at allocated locations. Please
find out about the applicable regulations (environmental agency, etc.).
Page 30
Version 2.0
Technical Data
Version 2.0
Page 31
Imprint:
User Manual for PVR (Personal Video recorder)
All rights reserved to make changes without prior notice
Edition 11/2003 (GB), Version 2.0