1
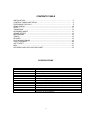
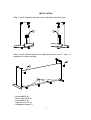
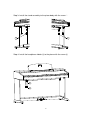
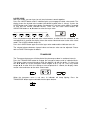
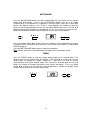
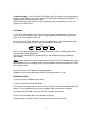
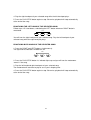
DP-90 DIGITAL PIANO
USER’S MANUAL
00021545
Version 02/2012
1
In order to fully appreciate all the impressive features of this digital
piano, please take a few minutes to read the following pages of
instruction.
RISK OF ELECTRIC SHOCK
DO NOT OPEN
CAUTION: TO REDUCE THE RISK OF ELECTRIC SHOCK, DO NOT REMOVE COVER OR
BACK NO USER-SERVICEABLE PARTS INSIDE REFER SERVICING TO QUALIFIED SERVICE
PERSONNEL
INSTRUCTIONS PERTAINING TO A RISK OF FIRE, ELECTRIC SHOCK OR
INJURY:
The lightning flash with arrowhead symbol, within an equilateral triangle, is intended to
alert the user to the presence of un-insulated or “dangerous voltage” within the product’s
enclosure that may be of sufficient magnitude to constitute a risk of electric shock to
persons.
The exclamation point within an equilateral triangle is intended to alert the user to the
presence of important operation and maintenance or servicing instructions.
CAUTION
Any changes or modifications in construction of this device which are not expressly
approved by the party responsible for compliance could void the user’s authority to
operate the equipment.
WARNING
When using electrical products, basic safety precautions should always be followed,
including the following:
SAFETY
Power Source - The product should always be connected to a power supply only of the
type described in the operating instructions or as marked on the product.
Periods of Nonuse - The power-supply cord of the product should be unplugged from the
outlet when left unused for a long period of time.
2
SERVICE AND MODIFICATION
This product should be serviced by qualified service personnel when,
• the power supply cord or the plug has been damaged,
• liquid has been spattered into the unit or it has been exposed to rain,
• the instrument does not appear to operate normally or exhibits a marked change in
performance.
• the instrument has been dropped or the cabinet has been damaged.
• Do not attempt to open the piano or make any change in the circuits or parts of the unit.
HANDLING AND TRANSPORT
• Never apply excessive force to the controls, connectors or other parts of the instrument.
• Always unplug cables by gripping the plug firmly, not by pulling on the cable.
• Disconnect all cables before moving the instrument.
• Physical shocks caused by dropping, bumping, or placing heavy objects on the
instrument can result in scratches and/or more serious damage.
• Carefully check the amplifier volume control before starting to play. Excessive volume
can cause permanent hearing loss.
CLEANING
• Clean the cabinet and panel with a soft nonabrasive dry cloth. Do not use paint thinner
or petrochemical based polishes.
• To maintain the luster of the keys and buttons wipe with a clean, slightly damp cloth, and
then polish with a soft dry cloth.
LOCATION
Do not expose the instrument to the following conditions to avoid deformation,
discoloration, or more serious damage:
• Direct sunlight (near a window)
• High temperatures (near a heat source, outside, or near a window)
• Excessive humidity
• Excessive dust
• Strong vibration
• Leave enough space around the piano for it to be properly ventilated.
• This instrument contains digital circuitry and may cause interference if placed too close
to radio or television receivers. If interference occurs, move the instrument further away
from the affected equipment.
• Avoid placing vinyl objects on top of the instrument, vinyl can stick to and discolor the
surface.
POWER
• Turn the power switch off when the instrument is not in use.
• To avoid damage to the instrument and other devices to which it is connected, turn the
power switches of all related devices off prior to connection or disconnection of MIDI
cables.
• Turn the power off if the main cable is damaged or the instrument is spattered with liquid.
• Do not switch the unit on and off in quick succession, this places an undue load on the
electronic components.
• Unplug the AC power cord during an electrical storm.
• Avoid plugging the AC power cord into the same AC outlet as appliances with high
power consumption, such as electric heaters or refrigerators.
3
CONTENTS TABLE
INSTALLATION …………………………………………….……………..……………. 5
CONTROL PANEL AND PEDAL ………………………………………..……………. 8
PREPARING FOR PLAY ……………………….………………………..……………. 9
DEMO SONGS …………........................................................................................ 10
VOICE …………………………................................................................................ 11
TRANSPOSE …………………............................................................ ................. 12
KEYBOARD MODE ……………………………………..………………..……………. 13
SOUND EFFECT ………......................................................................................... 14
METRONOME ………............................................................................................. 15
TEMPO ………………............................................................................................. 15
RECORD ………………………………………………………………....…………….. 16
PLAY ALONG SONGS ........................................................................................... 18
FUNCTION MODE.................................................................................................. 20
SOFT RESET ......................................................................................................... 22
MIDI ………............................................................................................................. 23
APPENDIX: MIDI APPLICATION CHART ............................................................. 24
SPECIFICATIONS
KEYBOARD
VOICES
VOICE MODE
SOUND EFFECTS
CONTROL BUTTONS
SETUP
DEMONSTRATION
TEACHING
RECORDING
DISPLAY
AUXILIARY JACKS
PEDALS
AMPLIFIER
DIMENSIONS
88-note, Hammer-Action keyboard
15 Voices, 5 buttons + a variation button
Upper, Layer, duet
Reverb and Chorus
Transpose, Tempo, Setup, Metronome, Demo, +/-,
Tuning, Octave, Touch response, Volume balance
10 orchestra songs; each voice has a demo music piece
58 Lesson songs, right / left hand training
2 tracks
3 X 7-segment LED
Headphone x 2, Line Out, Line in, MIDI In/Out, USB
Sustain Pedal, Sustenuto Pedal, Soft Pedal
10W x 2
1377mm x 510mm x 862mm
4
INSTALLATION
Step 1: Install the pedal cross bar to the side board with the screw
Step 2: Install the back board to the side board with the screw
complete the stand assembly.
Screw M6X20 (8)
Tape screw 4X16 (4)
Screw M4X15 (2)
Tape Screw 4X12 (2)
Headphone Holder (1)
5
and
to
Step 3: Install the stand assembly to the piano body with the screw
Step 4: Install the headphone holder ⑤ to the piano with the screw ④
6
Step 5: Plug the pedal cable to the socket on the piano bottom.
Step 6: Place the piano in its final position, on the bottom the pedal board is a turn
down knob. Turn the Pedal Brace Knob down to firmly touch the floor.
Step 7: Locate the Power Cord and plug it into the Receptacle on the bottom of the
Piano. Plug the Power Cord into an appropriate wall socket.
FRONT
Hol es f or Headphone
Hanger Cl i p t o
atta ch to the
bot t omof t he pi ano
2.
Place the piano in its final position, on the bottom the pedal board is a
turn down knob. Turn the Pedal Brace Knob down to firmly touch the
floor.
3.
Locate the Power Cord and plug it into the Receptacle on the bottom of
the Piano. Plug the Power Cord into an appropr iate wall socket.
NOTES: Unplug the piano during lightning storm or when unused for long periods
of time. Avoid plugging the AC adaptor into the same AC outlet as appliances with
high power consumption, such as electric heaters or ovens.
7
CONTROL PANEL AND PEDAL
FRONT CONTROL PANEL
Voice Select
Display
Master Volume
Setup, Demo, Metro, Trans, Tempo
▲,▼
Record
Song
Reverb, Chorus, Layer, Duet
See detailed description of the control panel in the following chapters.
POWER SWITCH - The power switch is located to the left of the keyboard. Press the
button to turn the power on and off. The red power indicator in the left of the front cross
bar lights up when the power is on.
Note: When you turn the power off, do not turn it back on immediately. Wait at least five
seconds to turn the power back on so that the electronic circuits can properly reset.
BOTTOM PANEL
The socket board located on the front-left of the bottom
L
LI NE I N
R
LI NE OUT
L
R
MI DI
IN
OUT
USB
PEDAL
The headphone jack board is located on the front-left of the bottom.
See detailed description of the panel in the PREPARING FOR PLAY chapter.
PEDAL
1. SOFT PEDAL - When the left pedal is engaged the piano volume is reduced and the
timbre slightly altered on the notes that are played.
2. SOSTENUTO PEDAL: The function of it is similar with the sustain pedal. When playing
notes then middle pedal is engaged, the notes will be sustained. Sustain effect does not
apply to the notes played after pressing pedal, even though the pedal keeps down.
3. SUSTAIN PEDAL - When the right pedal is engaged the piano keys will continue to
sustain as they are played. Thereby the piano note will decay gradually as if you were
continuing to hold down the piano keys.
8
PREPARING FOR PLAY
MASTER VOLUME
Turn this knob to the right to increase the overall volume of the piano, and to the left to
decrease the volume. Slide the knob to the middle position before turn on the power,
MI N
MAX
MAST ER
VOLUME
The Following Facilities Could be Set Up for Your Application:
MUSIC STAND
When use it, rise up the music stand and support it by the hugged bracket.
HEADPHONES
The piano has two stereo headphone jacks on the front-left of the bottom. You can play in
total silence, without disturbing others in the room, by plugging a set of headphones into
one of the appropriate sockets. When headphones are plugged into jack, the speakers
will turn off. Two sets of headphones may be used simultaneously.
LINE IN
These stereo audio input jacks will amplify the supplied signal through the internal sound
delivery system. They can be used to hook up items such as CD players, MP3 player or
Cassette player.
LINE OUT
These stereo audio output jacks supplies the piano’s output signal to external
amplification, such as home stereo, PA system or other stand alone amplifiers.
MIDI IN / MIDI OUT
This piano contains MIDI in and MIDI output ports. MIDI jacks allow communication with
other products equipped with MIDI interfaces. Please see the MIDI section of this manual
for further details.
USB
The USB connector allows you to connect the piano directly to your computer’s USB port.
Please see the MIDI section of this manual for further details.
9
DEMO SONGS
There two types of demonstration song built-in the piano.
THE PIANO piano has 10 Orchestra demonstration songs for your listening enjoyment.
The voice demo presents selected voice with a short piece of music.
VOICE DEMONSTRATION
Press and hold down a voice select button then press the DEMO button, a piece of music
will play with the voice selected. Use the VOICE select button, VARIATION Button or the
▲,▼ button to change the voice for demonstration. The display shows the voice number.
Press the DEMO button again to stop the voice demo playing.
VOI CE
DEMO
PI ANO
E. PI ANO
HARPSI CHORD
ORGAN
STRI NGS
VARI ATI ON
ORCHESTRATION DEMONSTRATION
There are 10 demos. Press the DEMO button and the indicator lights up. All demos will
play back from No. 1 in loop. The display shows the demo song number with “d-“ prefix in
front. Press the ▲,▼ button to select demo song. Press the DEMO button again to stop it.
DEMO
10
VOICE
When the piano is turned on, the LED display shows the voice number. The default voice
setting is 01 Grade Piano.
SELECT A SOUND
There are 15 voices numbered 1-15 and selected by the voice quick select buttons and a
VARIATION button. Each voice select button refers to a category of instrument voice.
Press the VARIATION button to select a voice in the category. The VARIATION button
indicator is dual color. When voice changes in the category, the color of the VARIATION
indicator also changes with corresponding voice number in the display. Use the ▲,▼
button can select voice in the voice select mode as well and the relevant indicator will light
up.
VOI CE
PI ANO
E. PI ANO
HARPSI CHORD
ORGAN
STRI NGS
VARI ATI ON
Note: Though only 15 voices can be selected by key, 128 MIDI voices and a percussion
sound kit are built-in in the piano. They are available for playing complete MIDI music
through MIDI/USB connection.
GROUP
PIANO
E.PIANO
HARPSICHORD
ORGAN
STRINGS
VOICE LIST
No.
VOICE
MIDI No.
01
Grand Piano
0
02
Grand Piano 2
1
03
Honky Tonk
3
04
E.Piano 1
4
05
E.Piano 2
5
06
Vibraphone
11
07
Harpsichord
6
08
Clavinet
7
09
Nylon Guitar
24
10
Church Organ
19
11
Jazz Organ *
16
12
Rock Organ
18
13
Strings Ensemble
48
14
Slow Strings
49
15
Synth Strings
50
* Jazz Organ: The sound vibration is slower when press the key softer and the sound
vibration is faster when hit the key harder.
11
LAYER VOICE
With layer mode, you can layer (or mix) two instrument sounds together.
Press the LAYER button and its indicator lights up to engage the dual voice mode. The
display shows the layered voice number (the default layered voice is strings). If press the
LAYER button and a voice select button simultaneously, the layer voice mode is engaged
as well but the LAYER indicator flashes. Then, use the voice select button, the
VARIATION button or ▲,▼ button to select the layer voice.
VOI CE
PI ANO
E. PI ANO
HARPSI CHORD
ORGAN
STRI NGS
VARI ATI ON
LAYER
Press any button except ▲▼ and voice select buttons, or after finish the selection or not
manipulate for 3 second, the display shows the master voice and return to the voice select
mode. The LAYER indicator keeps on.
Press the LAYER Button again to exit the layer voice mode and the indicator turns off.
The volume balance between layered voice and master voice can be adjusted. Please
refer to FUNCTION chapter for details.
TRANSPOSE
The Transpose feature can shift the pitch of the piano up or down in semitone intervals.
Press the TRANSPOSE button to engage the transpose feature and its indicator blinks.
The display shows current transpose value (the default is 0) with the prefix “t” in front. Use
the ▲,▼ button to set the transpose value ranged -6 to 6, e.g. t-5. Press any button
except ▲▼, or after finish the setting or not manipulate for 3 second, the display shows
master voice and return to the voice select mode.
TRANSPOSE
When the transpose value is not zero, its indicator will keep lighting. Press the
TRANSPOSE button again to disable the transpose feature.
TRANSPOSE
12
KEYBOARD MODE
There are two modes of the keyboard: full keyboard and duet keyboard.
FULL KEYBOARD
The full keyboard is standard mode as shown below.
C1
C3
C2
C5
C4
C6
C7
C8
DUET KEYBOARD
The keyboard is spited to A2- E6 and F2 – C6 two sections. Two sections have the same
voice (master voice) and volume.
In this mode, the right pedal becomes the sustain pedal for the right section of the
keyboard and the left pedal becomes the sustain pedal for the left section of the keyboard.
A2
C3
C5
C4
E6 F2
Left Section
C3
C4
C5
C6
Right Section
The middle pedal (Sostenuto) is disabled.
Press the DUET and its indicator lights up to indicate this mode engaged. The display
shows the voice number. The default setting of it is the same as master voice.
VOI CE
PI ANO
E. PI ANO
HARPSI CHORD
ORGAN
STRI NGS
VARI ATI ON
DUET
Press the DUET Button again to exit the duet keyboard mode and the indicator turns off.
13
SOUND EFFECT
REVERB
Reverb simulates effect of playing in a big room or hall where the sound reverberates off
the walls and ceiling.
Press the REVERB button and its indicator lights up to engage the reverb effect.
If press the REVERB button and ▲ or ▼ button simultaneously, the reverb effect is
engaged as well but the REVERB indicator blinks and the display shows the current
reverb level with the prefix “r” in front, e.g. r08. Then, use the ▲,▼ button to change the
reverb level ranged 0 – 16.
REVERB
Press any button except ▲▼, or after finish the operation or not manipulate for 3 second,
the display shows master voice and return to the voice select mode. The REVERB
indicator keeps on.
CHORUS
The Chorus effect adds depth and spaciousness to the selected keyboard voice.
Press the CHORUS button and its indicator lights up to engage the Chorus effect.
If press the CHORUS button and ▲ or ▼ button simultaneously, the Chorus effect is
engaged as well but the CHORUS indicator blinks and the display shows the current
chorus level with the prefix “c” in front, e.g. c08. Then, use the ▲,▼ button to change the
Chorus level ranged 0 – 16.
CHORUS
Press any button except ▲▼, or after finish the operation or not manipulate for 3 second,
the display shows master voice and return to the voice select mode. The CHORUS
indicator keeps on.
Each voice has its own reverb and chorus default setting. The sound effects adjustment
applies to two voices in the dual voice and duet keyboard mode.
14
METRONOME
Press the METRONOME button; the built-in metronome will start to play with the current
tempo and beat pattern. If press the METRONOME button and ▲ or ▼ button
simultaneously, the metronome is engaged as well the display shows the current beat
pattern (the default setting is 4/4). There is a doc between the number of beat per
measure and the note definition of note. e.g. the picture below refers to 3/4. Use the ▲,▼
button to change the beat pattern in sequence of 1/4, 2/4, 3/4, 4/4, 5/4, 6/4, 6/8 and 12/8.
When the metronome sounds, the beat indicator will flash per the beat pattern.
METRONOME
TEMPO
Press any button except ▲▼, or after finish the selection or not manipulate for 3 second,
the display shows the master voice and return to the voice select mode. The Metronome
indicator keeps on.
Press the METRONOME button again to stop the metronome.
Note: Reverb and chorus sound effect does not apply to the metronome sound.
TEMPO
Press the TEMPO button to enter the tempo setting mode and its indicator blinks. The
display shows current tempo value (the default is 120) followed by a dot mark. Use the
▲,▼ button to change the tempo ranged 40 – 240; press ▲ and ▼ buttons
simultaneously to recall the default tempo 120. If you press and hold down the ▲ or ▼
button, the tempo will change continuously until release the button. Press any button
except ▲▼, or after finish the setting or not manipulate for 3 second, the display shows
master voice and return to the voice select mode.
TEMPO
15
RECORD
The Overture features a two track recorder that lets you record what you play on the
keyboard and then play it back. Two tracks mean that you can “overdub” one part on top
of another, using a different voice if you like.
The recorder feature is a useful addition to any keyboard study program since it lets you
hear exactly how you sound from the listener’s perspective. It can also be just plain fun.
This recorded information is nonvolatile and therefore will not be lost when the power is
turned off. The 2 tracks can playback separately or together as a complete song. The
record function records all settings exactly as you selected and performed them.
RECORDING
1. Prepare: Prepare to record by setting the voice, tempo, reverb level, or other
parameters as desired.
2. Select a track: There are two tracks available for recording. The tracks are assigned
by engaging the TRACK 1 or TRACK 2 buttons.
Press and hold down the REC button, then press the track button that you want to record
in. The corresponding track indicator and the REC indicator will blink, and the four dots of
the beat indicator will blink with the current tempo to show that the recorder is on standby.
RECORD
TRACK 1
PL AY / STOP
TEMPO
TRACK 2
REC
Note1: The contents of a track will be erased as soon you select that track for recording.
Note2: If you already have recorded on the other track, its track indicator will also be lit
and the recorded music will play as a reference for you while you record the new track. If
you do not wish for the previously recorded track to play while you are recording, press
the corresponding track button to turn the indicator light off.
RECORD
PL AY / STOP
TRACK 1
TRACK 2
REC
3. Metronome: Press the METRONOME button to enable the metronome as a reference,
if so desired. The four beat indicators flash, the metronome sounds without any beat
pattern, just giving the tempo. You can adjust the metronome’s beat pattern and tempo as
usual before recording. However, these cannot be changed during recording.
Note1: The metronome sound will not be recorded.
Note2: If one track has been recorded, when record another track, its tempo and beat
pattern will follow the setting of the first track recorded. If you change the tempo now, the
new tempo will be applied for both tracks. Cannot change the beat pattern.
4. Record: If the TRACK 1 or TRACK 2 buttons are selected and blinking, the recording
will begin as soon as you play the keyboard or press the PLAY/STOP button.
While recording, the recording track indicator keeps blinking and the REC indicator it lit
solid.
16
5. Stop Recording - Press the PLAY/STOP button, the REC button or the recording track
button to stop recording. The REC indicator turns off and the recorded track indicator is lit
solid to show the track now contains data.
NOTE: When the record memory is full, recording will stop automatically and “FUL” will
appear on the LED display.
PLAYBACK
1. The Track LED indicators will show which tracks contain recorded data. If you do not
wish to hear one of the two Tracks, press the corresponding TRACK button to turn that
track off. Its LED indicator will turn off.
2. Press the PLAY/STOP button to hear the recorded track(s). The PLAY indicator lights
up and the beat indicators will flash per the beat pattern and tempo.
RECORD
PL AY / STOP
TRACK 1
TRACK 2
REC
You can change the tempo of your recorded track by pressing the TEMPO button while
the recording is being played back.
You may also accompany the recorded tracks on the keyboard while the recording is
playing back.
Note: If the metronome is turned on before pressing the PLAY/STOP button to play back
the recorded music, the metronome will sound with proper tempo and beat pattern which
performed during your recording. When the playing back stop, the metronome will return
to its original setting.
3. Press the PLAY/STOP button to stop the playback.
Playback will also stop automatically when the recording reaches its end.
ERASING TRACKS
To erase the music recorded on the tracks:
1. Press and Hold the REC button down.
2. Press the track button that you which to erase while you continue to hold down the REC
button. This will immediately erase the existing data from your previous recording.
3. Release the REC button (the track and REC indicators are blinking).
4. Press the track button again (the indicators will go off).
5. Repeat Steps 1 through 4 until all the tracks that you desire are erased.
17
PLAY ALONG SONGS
There are 58 songs built into the Overture for your musical enjoyment. These songs have
separate left and right-hand parts that can be turned on and off as required so you can
practice the corresponding part on the keyboard.
SELECTING A SONG
Press the SONG button. The song indicator will turn on and the song number will appear
on the LED display. Both Right and Left indicator are OFF. Use the ▲,▼ buttons to select
a song.
SONG
LEFT
SONG
RIGHT
If you want to play slower or faster than the preset tempo, press the TEMPO button and
use the ▲,▼ buttons to set the tempo adjustment coefficient based on the original tempo
of the song. The range is 50% to 150%. Press the ▲ and ▼ buttons simultaneously to
recall the default rate for the selected song. After 3 second, the display will return to the
song number.
TEMPO
LISTENING TO THE ENTIRE SONG
1. Press the PLAY/STOP button to hear both hand parts playing the entire song.
PL AY / STOP
2. Press the PLAY/STOP button again to stop. Otherwise, playback will stop automatically
at the end of the song.
PRACTICING THE RIGHT HAND OF THE SELECTED SONG
1. Press the RIGHT button to mute the right hand part. The right indicator lights up,
SONG
LEFT
SONG
RIGHT
2. Press the DEMO button if you want to hear the only the right-hand part before
practicing it. Press the DEMO button again to stop.
3. Press the PLAY/STOP button. Its indicator lights up and you will hear the metronome
“count in” the song. You will then hear the left-hand part
3. The default status of the metronome is ON. Press the METRONOME button if you want
to disable the metronome sound in the right / Left hand mode. But, in the both hand mode,
it cannot be close.
18
4. Play the right-hand part of your selected song while the left-hand part plays.
5. Press the PLAY/STOP button again to stop. Otherwise, playback will stop automatically
at the end of the song.
PRACTICING THE LEFT HAND OF THE SELECTED SONG
Follow steps 1-5 listed above, substituting the LEFT button whenever RIGHT button is
SONG
mentioned.
LEFT
SONG
RIGHT
You will hear the right-hand part of your selected song. Play the left-hand part of your
selected song while the right-hand part plays.
PRACTICING BOTH HANDS OF THE SELECTED SONG
1. Press the RIGHT and LEFT buttons simultaneously.
The right and left indicators will both turn on.
SONG
LEFT
SONG
RI GHT
2. Press the PLAY/STOP button. Its indicator lights up and you will hear the metronome
“count in” the song.
3. Play the left-hand and right-hand parts of your selected song.
The metronome will continue to play to assist you in keeping time.
4. Press the PLAY/STOP button again to stop. Otherwise, playback will stop automatically
at the end of the song.
19
FUNCTION MODE
The Function Mode gives you access to other features on your piano.
Press the SETUP button to enter the functionality setup mode. Press the SETUP button
repeatedly to change the item to manipulate. Press the ▲,▼ button to select option or set
value for the item. When enter to the next item by pressing the SETUP button, the setting
for the last item will be fixed. Press any button except ▲,▼ and SETUP button, the
Function mode will exit and return to voice select mode.
The following functions can be selected in the Function Mode:
TOUCH MODE SELECT
The piano adopts velocity sensitive keyboard which response your touching force on the
key with the volume change.
When entering this mode by pressing the SETUP button, the display shows “tch”.
SETUP
There are 4 types of the touch sensitivity:
Standard - The standard setting which is the most similar to an acoustic piano and the
default setting Displayed as “Std”.
Soft - Generate the same volume by softer touching, displayed as “SFt”.
Hard - Generate the same volume by harder touching, displayed as “Hrd”.
Fixed - Non-touch-sensitive keyboard. The volume is fixed for instruments such as organ
or harpsichord, and for playing some contemporary music.
, displayed as “no”.
Use the ▲,▼ button to select desired type.
MASTER TUNING
This function allows you to adjust the piano’s pitch to match recordings or other
instruments in an ensemble.
When entering this mode by pressing the SETUP button, the display shows “tun”. Use the
▲,▼ button to set desired tuning value ranged -64 to 64. Press ▲ and ▼ buttons
simultaneously to recall the default setting 0.
SETUP
20
OCTAVE
The octave shift function will transpose the entire piano one octave down or up.
When entering this mode by pressing the SETUP button, The display shows “Oct”. Use
the ▲,▼ button to set desired octave shift range is -2 to 2. The default setting is 0.
SETUP
VOLUME BALANCE
The Volume Balance function will set volume balance between the master and second
voice in the dual voice mode.
When entering this mode by pressing the SETUP button, the display shows “bLn”. The
format of the setting is “The second volume-The master volume” , each parameter is
ranged 1 – 9; 1 refers to the min. volume and 9 refers to the max. volume.
The default setting of the volume is balanced as 5-5.
Use the ▼ button to reduce the second volume while the master volume will increase, for
example 4-6, 3-7 ……1-9.
Use the ▲ button to increase the second volume while the master volume will decrease,
for example 6-4, 7-3……9-1.
Press ▲ and ▼ buttons simultaneously to recall the default setting 5-5.
SETUP
LOCAL OFF
“Local Off” is a special mode of piano performance when the piano is connected with
another MIDI device or computer. When “Local” is “On”, performance on the piano will
sound by built-in speakers while the performance message is transmitted via MIDI out.
When “Local” is “Off”, performance on the piano will not sound but the performance
message is transmitted via MIDI out. It is useful to use the piano as keyboard and sound
by another MIDI device.
When entering this mode by pressing the SETUP button, the display shows “Loc”.
Use the ▼ button to turn “Local” off and use the ▲ button to turn “Local” on. The default
setting is “On”.
SETUP
Note: When Local is off, the metronome will sound as normal.
21
STORE
Normally, when turn on the power, all settings are default and user settings are volatile. If
the “Store” feature is engaged, when turn on the power, the latest user customized
settings will be recalled which include: layer and duet voice, volume balance, touch mode,
song number, sound effects setting etc.
When entering this mode by pressing the SETUP button, the display shows “Sto”.
Use the ▼ button to set the store feature off and use the ▲ button to set it on. The default
setting is Off.
SETUP
Note: The record contents are always nonvolatile.
BRIGHTNESS
This function allows you to adjust sound brightness.
When entering this mode by pressing the SETUP button, the display shows “brt”. Use the
▲,▼ button to set desired level of the brightness ranged 1 to 16. Press ▲ and ▼ buttons
simultaneously to recall the default setting 04.
设置
SOFT RESET
The recorded music, layer voice, touch mode, song number are un-volatile. When turn on
the power, the settings above will be recalled automatically. If you want to recover the
default setting, press and hold down both ▲,▼ buttons when turn on the power. Please
note that recorded contents will be erased.
POWER
22
MIDI
MIDI (Musical Instrument Digital Interface) is a world-standard interface that enables
electronic musical instruments and computers to communicate with each other so that
instructions and other data can pass between them. This makes it possible to create a
system of MIDI instruments and devices that offer far greater versatility and control than is
available with isolated instruments.
MIDI In: This terminal receives data from an external MIDI device.
MIDI Out: This terminal transmits data from the instrument to another MIDI device. The
transmitted data include the note and touch velocity produced while playing on the piano as
well as voice changes.
The MIDI system in the unit has 16 channels numbered from 0 to 15. Each of them is
responsible for a instrument voice. When the piano receives control from external device,
the active channel is determined by the MIDI setting of the piano or control message.
Connection Examples
Output to an external sound generator
Connect the MIDI Out terminal of the piano and MIDI In terminal of an external device
(keyboard, synthesizer, or sound module). The external device will response to your
playing. In this way, you can play two instruments at same time or play on your instrument
to sound on another MIDI device.
Output from an external MIDI device
Connect the MIDI In terminal of the piano and MIDI Out terminal of an external device.
Data generated on another device can sound on your piano.
Connect with computer
You can transmit your performance to a computer to utilize advanced recording, composing
and editing available from software on the computer. MIDI music stored on the computer
can be played back through your instrument.
USB - The USB connector allows you to connect the piano directly to your computer’s
USB port. The features of the USB interface are the same as MIDI, but both MIDI In and
MIDI Out data run in the same USB port and cable. The USB interface is compatible with
Windows XP/Vista and MAC.
23
MIDI APPLICATION CHART
Function
Basic Channel
Channel changed
Default mode
Note number
Velocity Note On
Note Off
Pitch Bender
Control Change
Transmitted
1 CH
1 – 16 CH
X
11 – 118
9nV,V=0–127
8nV,V=0–127
X
Recognized
1 – 16 CH
1 – 16 CH
3
0 – 127
9nV,V=0–127
8nV,V=0–127
√
1
X
√
Modulation
5
X
√
Portamento value
7
X
√
Volume
10
X
√
Pan
11
X
√
Expression
64,
66
√
√
Sustain, ,
√
√
Sostenuto
67
√
√
Soft pedal
65
X
√
Portamento yes/no
80
√
√
Reverb program
√
√
chorus program
√
√
Reverb send level
√
√
chorus send level
81
91
92
98
Remark
X
√
NRPNL
99
X
√
NRPNH
100
X
X
RPNL
101
X
X
RPNH
121
X
√
Reset all controllers
123
√
0 – 127 *
X
X
X
X
X
√
0 – 127
X
X
X
X
X
All notes off
Program change
System exclusive
Sys. Common: Song select
Song position
System: Clock
Real time: Commands
Mode 1: OMNI ON, POLY
Mode 2: OMNI ON, MONO
Mode 3: OMNI OFF, POLY
Mode 4: OMNI OFF, MONO
* Depends on the voice can be selected in the piano, refer to the Voice List.
24