1
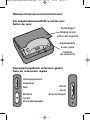
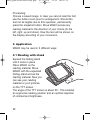
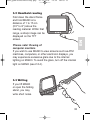
14:25
Kontakt innherhalb Deutschlands:
Reinecker Reha-Technik GmbH
Entwicklung, Produktion, Vertrieb,
Kundenberatung und Kundendienst
Sandwiesenstraße 19
64665 Alsbach-Hähnlein
Seite 1
Bitte wenden Sie
sich bei Fragen oder
einem Servicefall
direkt an unsere
Zentrale oder Ihren
authorisierten
Fachhändler.
User manual
Modo de empleo
EN
Tel. 0 18 05-54 56 65*
Fax 0 62 57-25 61
Gebrauchsanweisung
[email protected]
www.reineckerreha.de
ES
*Nur gültig innerhalb Deutschlands.
Festnetzpreis 14 ct/min, Mobilfunkpreise abweichend.
International contact:
Reinecker Reha-Technik GmbH
Head office and German engineering
Sandwiesenstraße 19
64665 Alsbach-Hähnlein, Germany
Tel. + 49 62 57-93 11 0
Fax + 49 62 57-25 61
[email protected]
www.reineckerreha.com
Version 1.0, Stand 12/08, Art.Nr.: 000 10 236
In case service
is necessary,
please contact your
authorized distributor.
Vor Inbetriebnahme:
Akku in das Akkufach einlegen
• MANO aus Folienbeutel nehmen
• Stativbügel bis zum Anschlag öffnen
• Akku-Abdeckplatte in Pfeilrichtung 1 schieben
• Abdeckplatte herausnehmen
• Akku aus der Verpackung nehmen
• Akku unter Beachtung der Kontaktposition in das Akkufach
legen
• Akku-Abdeckplatte laut Abbildung auf das Akkufach legen
(Dabei beachten Sie, dass die beiden Arretierbügel in die
linke und rechte Öffnung der Abdeckplatte greifen.)
• Akkuplatte gegen den Akku drücken und dabei bis zum
Anschlag in Pfeilrichtung 2 schieben.
Kurzanleitung
• Ein-/Ausschalten von MANO: gelbe Taste drücken
• Zoom drücken: Umschaltung der Farbdarstellung
• Zoom nach oben/unten schieben: Anzeige größer/kleiner
• Schnappschuss im Livebild drücken:
Aufnahme eines Standbildes
• Schnappschuss nach oben schieben:
Umschalten von Standbild auf Livebild
• Schnappschuss nach unten schieben:
Anzeige des nächsten gespeicherten Bildes
• Schnappschuss gedrückt halten: gezoomtes Bild scrollen
(ab Version 2.0)
DE
18.12.2008
DE
mano_gebrauchsanweisung.qxp
14:25
Seite 2
Before initial use
Insert the rechargeable battery into the case
• Take MANO out of the plastic bag
• Open the folding stand until it locks in place
• Slide open the battery cover pushing in the direction
of the arrow 1
• Remove the battery cover
• Take the rechargeable battery out of the packaging
• Insert the rechargeable battery into the case, making sure
the contacts are properly positioned
• According to the illustration, slide the battery cover plate
back into the case (Make sure that the holes on the
battery cover fit squarely over the pins on the case)
• Press the battery cover plate against the battery. Push in
the direction of the arrow 2 until it locks in place
Quick reference guide
• Push the yellow button: switch MANO on/off
• Push the zoom button: change the color modes
• Push the zoom button upwards/downwards: zoom in/out
• Push the snapshot button in live image: save an image
• Press the snapshot button upwards:
switch from freeze frame to live image
• Press the snapshot button downwards:
the next image will be shown
• Keep snapshot pressed: scroll zoomed image
(Version 2.0 or higher)
Antes de usar initialmente:
Coloce la bateria recargable en su enbolsa
• Saca el MANO de su bolsa plastico
• Abre el parador doblable hasta que se quede fijo
• Empuje la tapa de la bateria en la dirreccion de la primera
fletcha.
• Sace la tapa de la bateria
• Sace la bateria recargable de su packete
• Ponga la bateria recargable en el enbolso, asegurandose
que los contactos esten colocados en su aproprado
posicion.
• Segun la illustracion, empuje la tapa de la bateria nuevamente en su embolso. Asegurase que los guecos en la bateria quepa directamente sobre los pinchos de el embolse.
• Apriete la tapa de la bateria sobre la bateria. Empuje en la
direccion de la Segunda fletcha hast que se sierra fijo en
su lugar.
Guía de referencia rápida
• Precione el botón amarillo:
para encender o apagar a MANO
• Presioné el botón zoom: para cambiar el modo del color
• Presione el botón zoom hacia arriba o hacia abajo:
Para enfocar hacia afuera o adentro zoom in/out
• Presione el botón snapshot para obtener la imagen actual:
Salve la imagen
• Presione el botón snapshot hacia arriba:
regrese a la imagen actual
• Presione el botón snapshot hacia abajo:
la próxima imagen será exhibida
• Mantenga el botón snapshot presionado:
mueve la imagen amplificada (Versión 2.0 o más alta)
ES
18.12.2008
EN
mano_gebrauchsanweisung.qxp
mano_gebrauchsanweisung.qxp
18.12.2008
14:04
Seite 5
Skizzen:/Illustrations:/Ilustratciones:/
Vor Inbetriebnahme/Before initial use/
Antes de usar
Stativbügel
folding stand
placa del soporte
Abdeckplatte
1
2
cover plate
cubierta
de la batería
Kurzanleitung/Quick reference guide/
Guía de referencia rápida
Schnappschuss
snapshot
foto
Zoom
zoom
Ein/Aus
on/off
Encender/apagar
Zoom/enfoque
mano_gebrauchsanweisung.qxp
18.12.2008
14:04
Seite 26
Content
Accessories . . . . . . . . . . . . . . . . . . . . . . . . . . . . . . . . . .28
Notes before operating the device . . . . . . . . . . . . . . . .28
1. Start-up . . . . . . . . . . . . . . . . . . . . . . . . . . . . . . . . . . .29
2. Description of the controls . . . . . . . . . . . . . . . . . . . .29
2.1 Yellow “on/off” button . . . . . . . . . . . . . . . . . . . . . . .30
2.2 “Zoom” Button with 4 functions . . . . . . . . . . . . . . . .30
2.2.1 Zoom plus = Increase Magnification . . . . . . . . . .30
2.2.2 Zoom minus = Decrease Magnification . . . . . . . .30
2.2.3 Changing color modes . . . . . . . . . . . . . . . . . . . . .30
2.2.4 Turn on/off the light . . . . . . . . . . . . . . . . . . . . . . .30
2.3. Snapshot/Live image Button . . . . . . . . . . . . . . . . .31
2.3.1 Saving an image . . . . . . . . . . . . . . . . . . . . . . . . .31
2.3.2. Changing to Live picture . . . . . . . . . . . . . . . . . . .31
2.3.3. Retrieving saved pictures . . . . . . . . . . . . . . . . . .31
2.3.4 Widescreen-function . . . . . . . . . . . . . . . . . . . . . .31
3. Application . . . . . . . . . . . . . . . . . . . . . . . . . . . . . . . . .32
3.1 Reading with stand . . . . . . . . . . . . . . . . . . . . . . . . .32
3.2. Handheld reading . . . . . . . . . . . . . . . . . . . . . . . . . .33
3.3 Writing . . . . . . . . . . . . . . . . . . . . . . . . . . . . . . . . . . .33
4. Battery operation . . . . . . . . . . . . . . . . . . . . . . . . . . . .34
4.1 Recharging the battery . . . . . . . . . . . . . . . . . . . . . .34
4.2 Rechargeable battery display . . . . . . . . . . . . . . . . .34
4.3 Display of rechargeable battery flashes . . . . . . . . .34
mano_gebrauchsanweisung.qxp
18.12.2008
14:04
Seite 27
5. Power Supply . . . . . . . . . . . . . . . . . . . . . . . . . . . . . .35
5.1. Included adapters . . . . . . . . . . . . . . . . . . . . . . . . . .35
5.2. Connecting the adapter to the power supply . . . . .35
5.3 Connecting MANO to the power supply . . . . . . . . .36
7. Automatic switch-off . . . . . . . . . . . . . . . . . . . . . . . . .36
8. Saving the settings . . . . . . . . . . . . . . . . . . . . . . . . . .36
9. Notes for changing the rechargeable battery . . . . . .36
9.1. Changing of the rechargeable battery
. . . . . . . . .37
9.2. Non-liability in case of using
wrong rechargeable battery . . . . . . . . . . . . . . . . . .38
9.3 Disposal of the rechargeable battery . . . . . . . . . . .38
9.4 Protective circuit of the rechargeable batteries . . .38
10. Protective bag . . . . . . . . . . . . . . . . . . . . . . . . . . . . .39
11. Hand strap . . . . . . . . . . . . . . . . . . . . . . . . . . . . . . . .39
12. Notes for handling . . . . . . . . . . . . . . . . . . . . . . . . . .40
13. Cleaning of the device . . . . . . . . . . . . . . . . . . . . . .41
14. CE and FCC notes for
electro-magnetic compatibility (EMV) . . . . . . . . . . .41
15. Technical data . . . . . . . . . . . . . . . . . . . . . . . . . . . . .42
16. Warranty Information . . . . . . . . . . . . . . . . . . . . . . .42
EN
6. Standby function . . . . . . . . . . . . . . . . . . . . . . . . . . . .36
mano_gebrauchsanweisung.qxp
18.12.2008
14:04
Seite 28
MANO is an electronic magnifier that magnifies text and
images.
You can use it at home or take it with you when you go
shopping or on a visit.
The following equipment is included in the packaging:
• a power supply with four country-specific adapters
(country-specific top parts guarantee a world-wide
application)
• a hand strap
• a protective bag
• a manual in three languages:
German, English, Spanish
• a microfibre tissue for cleaning the display
Notes before operating the device
!Please note!
Read the manual carefully before switching on the device.
Keep the manual in a safe spot for further reference.
If you need to return your MANO for service, pack it in its
original packaging and return it to your retailer, indicating
the problem you are having.
The manufacturer is not liable for malfunctions or damages caused by inappropriate usage.
28
EN
Accessories
mano_gebrauchsanweisung.qxp
18.12.2008
14:04
Seite 29
1. Start-up
Please insert the pre-charged battery as described in the
quick start guide on the front cover page.
MANO can be switched on by pressing the yellow „on/off“
button.
2. Description of the controls
left side
EN
front
right side
live image
snapshot
zoom plus
image selection
color mode
on/off
zoom minus
Plug
for AC adapter
29
mano_gebrauchsanweisung.qxp
18.12.2008
14:04
Seite 30
2.1 Yellow “on/off” button
The on/off button is unmistakably marked in yellow. When
you briefly push the button, MANO will be switched on.
To turn off MANO, push the yellow button for 2 seconds.
By pushing the button upwards, you will increase the
magnification level
2.2.2 Zoom minus = Decrease Magnification
By pushing the button downwards, you will decrease the
magnification level
2.2.3 Changing color modes
By pushing the zoom button you may change the color
selection options on the TFT screen:
• Full color
• Semi-colors
• Positive mode: black-white
• Negative mode:
white-black, green-black, yellow-black, yellow-blue
2.2.4 Turn on/off the light
If you wish to turn off the light (for use with ATMs and
other machines which may cause glare), push the zoom
button for 2 seconds. To turn on the light, push the button
briefly once more.
30
EN
2.2 “Zoom” Button with 4 functions
2.2.1 Zoom plus = Increase Magnification
mano_gebrauchsanweisung.qxp
18.12.2008
14:04
Seite 31
2.3 Snapshot/Live image Button
You can change from freeze frame image to live image
with the “snapshot” button. Both text and images can be
saved and retrieved.
By pushing the snapshot button, you may save the image
currently on the TFT screen.
!Please note! You may save up to 3 pictures.
If 3 pictures are saved and you take another one, the first
one will be deleted
2.3.2 Changing to Live picture
By pushing the snapshot button upwards, you will switch
back to live viewing.
2.3.3 Retrieving saved pictures
By pushing the snapshot button downwards, you will
retrieve the saved pictures. Pushing the button multiple
times will advance to subsequent images.
2.3.4 Widescreen-function (Version 2.0 or higher)
This function enables you to read savedimages which
cannot be shown completely on the display after having
been enlarged. This may be used for telephone numbers,
email addresses, schedules, package inserts etc.
31
EN
2.3.1 Saving an image
mano_gebrauchsanweisung.qxp
18.12.2008
14:04
Seite 32
3. Application
MANO may be used in 3 different ways:
3.1 Reading with stand
Expand the folding stand
until it locks in place
Place MANO on the
reading material. Move
MANO with the expanded
folding stand across the
reading material. Now you
can see your reading
material or your pictures
on the TFT screen.
The angle of the TFT screen is about 20°. This enables
an ergonomic seating position and an optimal depiction
of contrast and brightness.
32
EN
Proceeding:
Choose a saved image. In case you cannot read the font
use the button zoom plus for enlargement. Should the
text not be legible due to this operation, permanently
press the snapshot button. Move MANO across any
reading material to the direction of your choice (to the
left, right, up and down). Now the text will be shown on
the display according to your movement.
mano_gebrauchsanweisung.qxp
18.12.2008
14:04
Seite 33
Fold down the stand frame
and hold MANO at a
distance of 1 to 15 cm
(0.5" to 6") above the
reading material. Within that
range, a sharp image can be
displayed on the TFT
screen.
!Please note! Viewing of
computer monitors
If you wish to use MANO to view screens such as ATM
machines, computers, or other electronic displays, you
may experience excessive glare due to the internal
lighting on MANO. To avoid the glare, turn off the internal
light on MANO (see 2.2.4).
3.3 Writing
If you lift MANO
or open the folding
stand, you may
write short notes.
33
EN
3.2 Handheld reading
mano_gebrauchsanweisung.qxp
18.12.2008
14:04
Seite 34
Switch off MANO
Put DC plug of power supply in DC nut of MANO
Plug the small end of the power supply into the power
port on the MANO.
Plug the power supply into an electrical outlet.
The rechargeable battery will start charging.
Charging time is approximately 2.5 hours.
4.2 Rechargeable battery display
Upon turning MANO on, you will see the symbol of the
rechargeable battery on the TFT display. The charge
level will be indicated.
Charge level 100% = rechargeable battery is completely
charged
Charge level 50%=rechargeable battery is half charged
If the symbol of the rechargeable battery is flashing, the
rechargeable battery needs to be charged
4.3 Display of rechargeable battery flashes
If the rechargeable battery icon flashes, the rechargeable
battery needs to be charged immediately.
If you do not begin charging promptly, MANO will shut
itself down.
34
EN
4. Battery operation
4.1 Recharging the battery
mano_gebrauchsanweisung.qxp
18.12.2008
14:04
Seite 35
5. Power Supply
Included in the delivery are a 100-240 VAC power supply
and 4 primary adapters. They will enable you to connect
the power supply world-wide.
5.1 Included adapters
adapter
adapter
adapter
adapter
for Europe (EU)
for England (UK)
for USA, South America, Japan etc. (US/J)
for Australia (AUS)
EN
1
1
1
1
5.2 Connecting the adapter to the power supply
When connecting the primary adapter, the power supply
must not be plugged into an electrical outlet. Choose the
primary adapter necessary for your region and connect it
to the power supply. Push both parts together until they
lock in place.
primary adapter
Europe
power supply
35
mano_gebrauchsanweisung.qxp
18.12.2008
14:04
Seite 36
5.3 Connecting MANO to the power supply
6. Standby function
If MANO is left idle for 2 minutes of no use, the device
switches automatically to standby mode.
Simply moving the device turns it on again.
7. Automatic switch-off
If MANO remains in the standby mode for more than 5
minutes, the unit will shut off completely. MANO will then
have to be switched on by means of the main on/off
button.
8. Saving the settings
Upon turning off the device, MANO will save all data and
settings. They will be activated as soon as you switch the
device back on.
9. Notes for changing the rechargeable battery
You may only use the rechargeable battery specified
for MANO. A replacement can only be purchased from
Reinecker Reha-Technik GmbH or from one of its
contractual partners.
36
EN
After connecting the primary adapter, plug the power
supply into an electrical outlet. Switch on MANO. The
operating elements and the use are the same as for
battery operation. If you use MANO with while plugged
into an electrical supply, the power supply to the battery
is disconnected in order to preserve battery capacity.
mano_gebrauchsanweisung.qxp
18.12.2008
14:04
Seite 37
Switch off MANO and pull the DC plug of the power
supply out of the DC nut of MANO. Open the folding
stand. Push the cover plate of the rechargeable battery
softly out of its lock (1), take out the cover plate (2). Take
the rechargeable battery out of the bay (deepening of the
handle at the edge). Put the original rechargeable battery
into the bay (Beware of the positioning due to the contacts). Put the cover plate with the fasteners in front of
the lock holders onto the rechargeable battery. Press on
the plate evenly and into the direction of the LEDs.
Push all the way until stop.
EN
9.1 Changing of the rechargeable battery
folding stand
cover plate
1
2
37
mano_gebrauchsanweisung.qxp
18.12.2008
14:04
Seite 38
!Please note!
You may only use the rechargeable battery specified for
MANO.
The usage of rechargeable batteries other than one
provide by Reinecker Reha-Technik GmbH or one of its
partners is specifically prohibited, as this may cause
severe damage to the device.
The MANO warranty is voided if any other rechargeable
battery is used.
Reinecker Reha-Technik is not liable for damage caused
by wrong or faulty rechargeable batteries as well as
inappropriate operation when using the rechargeable
battery, be it damage to property or persons.
9.3 Disposal of the rechargeable battery
Rechargeable batteries must be disposed of according
to the laws of the specific countries. They must not be
burned. Do not allow animals or children to play with the
battery.
9.4 Protective circuit of the rechargeable
batteries
Despite the protective circuit applied at the rechargeable
battery, it is prohibited to short-circuit the contacts of the
rechargeable battery with a metallic item.
This may cause the rechargeable battery to explode,
creating potential danger for anyone nearby.
38
EN
9.2 Non-liability in case of using wrong rechargeable battery
mano_gebrauchsanweisung.qxp
18.12.2008
14:04
Seite 39
10. Protective bag
EN
Please always use the protective bag for storing MANO.
The display and the case will thus be protected from
damage.
11. Hand strap
In the cardboard box a hand strap is included. It may be
attached to carry MANO on your wrist.
39
mano_gebrauchsanweisung.qxp
18.12.2008
14:04
Seite 40
!Please note!
• The pictures used in this manual only serve illustrative
purposes and may not be in accordance with the actual
positions. Content changes of this manual are subject to
change without advance notice.
• Do not expose MANO to extreme direct sunlight. For
instance, do not store it close to windows or heaters.
• Protect MANO from excessive heat and do not place
other objects on top of it.
• Keep all liquids away from MANO.
• Use MANO only in dry surroundings.
• Never open the case, as this may only be done by an
authorized speciality retailer.
• Operate MANO only with the indicated supply voltage.
• Protect MANO from mechanical damage which may be
caused by stroke, blow or fall.
• Do not expose MANO to magnetic fields.
• Do not alter MANO in any way.
• Send MANO only in its original packaging.
• Never use MANO with wet hands.
• Use the fabric bag for carrying in bags or other
containers.
40
EN
12. Notes for handling
mano_gebrauchsanweisung.qxp
18.12.2008
14:04
Seite 41
13. Cleaning of the device
14. CE and FCC notes for electro-magnetic
compatibility (EMV)
MANO is suited for use in all facilities, including all
homes and offices connected to the public power supply.
MANO is destined for operation in the indicated electromagnetic surrounding. The operator should make sure to
use it in a surrounding as described in this manual.
MANO uses HF energy exclusively for its own function.
Therefore transient emissions of high-frequency transients are limited. It is unlikely to disturb other devices in
operation nearby.
MANO has been verified according to the European regulations of each country as well as to the FCC regulations.
It is guaranteed that the limits determined in the regulations will not be exceeded. However, one should consider
that common operation of MANO and other devices may
lead to interferences between MANO and other devices.
For this reason one should not locate the device within
proximity of another device. Keep a distance of 1 meter
(3 feet.)
41
EN
For cleaning of the display, use the included microfibre
tissue or another dry and soft tissue. Do not use any
liquids for cleaning. Never clean the display or the case
with thinner, gasoline, alcohol, or other chemical means.
The case parts may be damaged.
mano_gebrauchsanweisung.qxp
18.12.2008
14:04
Seite 42
• Magnification: approx. x1 - x20
• Display:
Full color
Semi-color: positive mode: black on white
pegative mode: white on black,
green on black, yellow on black,
yellow on blue
• weight: 139 gr (4.9 oz)
• Measurements of the case: 89 x 74 x 21 mm
(3.5" x 2.9" x 0.8")
• Diameter TFT: 3.5"
Active surface: 74 x 54 mm (2.9" x 2.1")
• Electric power supply:
100-240 VAC 50-60HZ secondary 12 VDC 0,5 A
(in combination with a power supplyf)
• Power consumption: approx. 6 watt
• Rechargeable battery: Li-ions 1500 mAh
16. Warranty Information
The legal requirements apply.
42
EN
15. Technical data
14:25
Kontakt innherhalb Deutschlands:
Reinecker Reha-Technik GmbH
Entwicklung, Produktion, Vertrieb,
Kundenberatung und Kundendienst
Sandwiesenstraße 19
64665 Alsbach-Hähnlein
Seite 1
Bitte wenden Sie
sich bei Fragen oder
einem Servicefall
direkt an unsere
Zentrale oder Ihren
authorisierten
Fachhändler.
User manual
Modo de empleo
EN
Tel. 0 18 05-54 56 65*
Fax 0 62 57-25 61
Gebrauchsanweisung
[email protected]
www.reineckerreha.de
ES
*Nur gültig innerhalb Deutschlands.
Festnetzpreis 14 ct/min, Mobilfunkpreise abweichend.
International contact:
Reinecker Reha-Technik GmbH
Head office and German engineering
Sandwiesenstraße 19
64665 Alsbach-Hähnlein, Germany
Tel. + 49 62 57-93 11 0
Fax + 49 62 57-25 61
[email protected]
www.reineckerreha.com
Version 1.0, Stand 12/08, Art.Nr.: 000 10 236
In case service
is necessary,
please contact your
authorized distributor.
Vor Inbetriebnahme:
Akku in das Akkufach einlegen
• MANO aus Folienbeutel nehmen
• Stativbügel bis zum Anschlag öffnen
• Akku-Abdeckplatte in Pfeilrichtung 1 schieben
• Abdeckplatte herausnehmen
• Akku aus der Verpackung nehmen
• Akku unter Beachtung der Kontaktposition in das Akkufach
legen
• Akku-Abdeckplatte laut Abbildung auf das Akkufach legen
(Dabei beachten Sie, dass die beiden Arretierbügel in die
linke und rechte Öffnung der Abdeckplatte greifen.)
• Akkuplatte gegen den Akku drücken und dabei bis zum
Anschlag in Pfeilrichtung 2 schieben.
Kurzanleitung
• Ein-/Ausschalten von MANO: gelbe Taste drücken
• Zoom drücken: Umschaltung der Farbdarstellung
• Zoom nach oben/unten schieben: Anzeige größer/kleiner
• Schnappschuss im Livebild drücken:
Aufnahme eines Standbildes
• Schnappschuss nach oben schieben:
Umschalten von Standbild auf Livebild
• Schnappschuss nach unten schieben:
Anzeige des nächsten gespeicherten Bildes
• Schnappschuss gedrückt halten: gezoomtes Bild scrollen
(ab Version 2.0)
DE
18.12.2008
DE
mano_gebrauchsanweisung.qxp