1
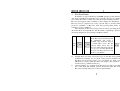
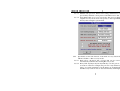
CybeRyder Recovery Card
User’s Manual
Contents
Fast Installation.……………………….……1
Do You Need Recovery Card?..…....…....…2
Features of Recovery Card…….…..….…...2
Preparations before Installation……....3
Installation……….…………………….…5
Operation………………..….…………...…10
Troubleshooting…….…...………….…16
Legal Information……….……………..…19
1. Fast Installation
Normally you only use Windows 95/98/ME operating system, therefore
only insert CybeRyder System Recovery Card into the slot in computer,
press Enter three times continuously after the initial installing interface of
Recovery Card appears when switching on the computer, the installation of
Recovery Card is completed. Of course you had better to modify default
password “12645678” of Recovery Card after pressing Enter firstly, for
example to set it as “7#M4%g”.
After installation, Recovery Card provides two kinds of working modes
(Protected Mode and Open Mode) and three kinds of privilege operations
(System Configuration, Save Changes and Restore Data).
Original
Hard
of File
Disk
X1
To modify file X1 under Protected
Mode, Recovery Card can keep file
X1 unchanged and create a
modified copy of file X1. Later it
Original
is normal when access file X2 Copy of
of File
however when access file X1, File X1
X2
Recovery Card will always transfer
it to its copy. It seems that file X1
has been modified however real
file X1 is only hidden.
Actually, Recovery Card only creates copy of data that were partially
modified. For example, 5% of content of file X1 were modified, and
then Recovery Card only creates copy of modified 5%. Such a way
which has no relation with file that it can support data operation of
non-file form (e.g., Fdisk, Format, etc.).
“Protected Mode” is a working mode that can protect data on specified
area of the hard disk. Student operates whatsoever under this mode,
Recovery Card can always restore data on the hard disk.
“Open Mode” is a working mode that does not protect data and seems
that Recovery Card is not installed.
“System Configuration” is used to set working parameters of Recovery
Card and styles data will be restored and so on.
“Save Changes” means to write the copy of file X1 to the origin of file
X1 then delete the copy of file X1 so as to really modify file X1.
“Restore Data” means to delete the copy of file X1 and the origin of file
X1 will appear again. To operators, it seems that file X1 is recovered.
2. Do You Need Recovery Card?
Should you use computer or manage computer room, you would have
experiences such as mis-operation, abnormal shutdown, illegal operation
mentioned by computer, disgusting virus, as well as losing of files and
destruction of system due to student’s curiosities and mistakes. We believe
that you’ll have a fresh memory over them and we feel that you should have
a professional stuff instead of you yourself to maintain all computers. Here
we recommend you CybeRyder System Recovery Card.
Only insert Recovery Card into your computer and specify the area of
data needed to be protected, can your computer hold good for all time. It will
provide a looser environment of computer practice as larger as possible
whatever students make Delete, Format, Uninstall and etc. because that
everything will be recovered only by restarting your computer. CybeRyder
System Recovery Card would have made formerly troubles become history
forever.
3. Features of Recovery Card
3.1 Plug and play without any change on hard disk, no occupation of hard
disk space; recover data instantaneously, support operating systems
such as Windows 95/98/ME/NT/2000 etc., support file systems such as
FAT12/FAT16/BigDOS/FAT32 /NTFS etc.
3.2 Support CMOS protection and recovery. Even those hard disk
parameters and types are modified can also be recovered.
3.3 Recovery Card has built-in device driver VxD of Windows 95/98/ME,
therefore it does not need floppy disk at all during the process of
installation and usage. Windows always has best performance after it is
installed and no exclamation mark appeared on hard disk controller of
device management.
3.4 Support automatic maintenance of network computer room. To
maintain a computer room it is just like to maintain a computer. It
supports synchronization, remote switch on/off and automatic settings
of IP address computer name and user name.
3.5 Support multi-boots. One hard disk can be installed several
independent operating systems at the same time and the third party
multi-boot software such as System Commander is also supported.
3.6 Support multi-disk protection. For instance in case of Disk C, D and E,
you can set protection over Disk C and E and let Disk D opened.
Arbitrary combination is allowed.
3.7 Support high-speed access mode of hard disk such as Ultra DMA66 or
ATA-100 etc.
3.8 Support large hard disk with capacity over 100 GB.
3.9 Support hard disk with IDE and SCSI interfaces.
3.10 Prevent virus infection and destruction under protection mode, and can
prevent DM tools and low-level formalization.
3.11 Single-key 5-second fast installation is provided.
3.12 At present, CybeRyder System Recovery Card are divided as follows:
3.12.1 ISA edition.
3.12.2 PCI edition (suffixed P to version number).
3.12.3 LAN edition integrated 10/100Mb network card (suffixed N).
3.12.4 Pure software edition based floppy disk or CDROM (suffixed S).
3.13 Each Recovery Card sold in market shall has a global unique encrypted
serial number (i.e. card ID). The card ID shall appear on screen if you
press ESC or F1 hotkey when Recovery Card loading.
4. Preparations before Installation
4.1 Basic requirements of hard disk are compatible PC with CPU 386 and
upward, VGA monitor, hard disk, one empty ISA or PCI slot and
network card if network maintenance function is required.
4.2 Check hardware and software of current computer to see if they are in
best working condition.
4.2.1 Check CMOS to ensure correctness of parameters of hard disk.
Recovery Card only supports the first physical hard disk.
4.2.2 Set the virus-warning item in CMOS to “Disabled”.
4.2.3 It is suggested to check virus in computer in order to ensure that no
virus is existing in the system before Recovery Card is installed.
4.2.4 If the computer is used for a period of time, it is suggested to enter
Windows to make defragment of data in the hard disk.
4.2.5 It is suggested to set Virtual Memory to unprotected area of hard
disk via [Control Panel/System/Virtual Memory/Set Virtual
Memory Specified].
4.2.6 It is suggested to set Internet Temporary Files to unprotected area
of hard disk via [Control Panel/Internet/Normal Option/Internet
Temporary File/Setting/Move folder], and select a folder from
unprotected area of hard disk to save Internet temporary files.
4.3 It is suggested to disable real-time virus monitoring.
4.4 It is suggested to unload system recovery software such as Norton.
4.5 Installation flow chart:
Preset Multi-Boot
Initial installing interface appears
Select [Set Multi-Boot] button
Partition hard disk and save
Select [Install Later] after restart
Select one bootable disk
Install software into current disk
Is there any other bootable disk?
Select [Install Now] button as left
Plug and Play Installation
Initial installing interface appears
Select [Install Now] button
Recommended: modify password
Optional: modify system parameters
Specify protection area of hard disk
Press [Install] button and restart
Installation is completed
5. Installation
5.1 If Windows NT/2000 operating system is installed, you are pleased to
log on as Administrator and run SETUP to install NT driver from the
tool disk.
5.2 Open the cover of the computer to insert Recovery Card into an empty
ISA or PCI slot, and ensure that it is inserted to the bottom without
swaying, close the cover.
5.3 After power-on self-test, the initial installing interface of CybeRyder
System Recovery Card will normally appear, otherwise refer to
question and answer section of this manual. You can directly select
[Install Now] to enter the system menu to execute normal plug and play
installation, or select [Set Multi-Boot] to partition the hard disk to
execute multi-boot.
5.4 Preset Multi-Boot is an independent pretreatment module and can carry
out multi-system booting on single hard disk. If you want to partition
one hard disk into many completely independent bootable disks, you
can select [Set Multi-Boot] on initial installing interface to enter into
preset multi-boot module. Then input names and size of each bootable
disk in turn, and a public data disk D on remaining space of hard disk is
created automatically. After inputs are finished, you can press [OK]
button to save and exit. Thereafter when restart the computer each time,
you should select [Install Later] then select boot disk and install
operating system and application software from floppy disk or
CDROM. Lastly, after all software of echo boot disk is finished
installation, you should select [Install Now] to install Recovery Card
for protection. Attentions for preset multi-boot are as follows:
5.4.1 Only one bootable disk can be selected on startup menu of
Recovery Card, therefore you can only find one C disk and one D
disk for public data anytime;
5.4.2 As versions of DOS 6.X and NT 4.0 downward cannot support
boot on 2GB hard disk upward, it is recommended to set as the
first boot disk which has DOS 6.X and NT 4.0;
5.4.3 Preset multi-boot is only to partition hard disk, therefore it needs
formal installation by select [Install Now] after system and
application software are installed on each bootable disk.
5.5 Whether normal single system or multi-boot is installed, you should
finally select [Install Now] to enter into the system menu. Here you can
adjust system parameters, modify password of Recovery Card and set
protected area of the hard disk to complete installation.
5.6 Recovery Card preset default values for each system parameter. You
can adjust them by selecting “Set Parameters” on system menu if
necessary, in which those displayed in red color are advanced options.
Normally advanced options use default values and need to adjust only
when problem occurs.
5.6.1 Options for mode of data recovery of hard disk are as follows:
5.6.1.1 Automatic: Protected data can be restored periodically or
automatically when each loading;
5.6.1.2 Manual: When each loading, operator can press hotkey to
restore data and needn’t any privilege;
5.6.2
Specifically set the time interval of automatic recovery data mode
which is invalid to other recovery modes:
5.6.2.1 Each reboot: Protected data of hard disk can be restored
automatically each time after loading Recovery Card;
5.6.2.2 Every half day/day/7-days/15-days/30-days: Set the period of
restoration of data. For example, the period is 7-day and the last
time to set system parameters is in the afternoon on Wednesday,
then Recovery Card can restore data automatically with ringing
5.6.1.3 Manual with password: When each loading, administrator can
press hotkey and enter correct password and then restore data;
5.6.1.4 Open Mode: This is not a recovery mode, and does not change
original recovery mode. It can only specify to enter Open Mode
directly after exiting the system menu.
when each afternoon on Wednesday after each 7-day interval.
5.6.3 Specified display during Recovery Card loading after self-test:
5.6.3.1 Hotkey prompt: Display interface of hotkey prompt of
Recovery Card;
5.6.3.2 Self-made picture: Display picture made by dealer or user
himself. Each loading, Recovery Card searches the root
directory of the first logic disk C for file HDMC_PIC.BMP.
Picture that has size less than 640x480 pixels and 4-bit 16-color
BMP format can be displayed on screen. There are picture
samples on the website for your reference;
5.6.3.3 None (hide menu): No any information shall be displayed so
that it seems that no Recovery Card has been installed;
5.6.3.4 Wait a jiffy: No display of any information and shorten the
waiting time from three seconds to one second
5.6.4 Set if recovering CMOS data automatically when CMOS data was
modified and inspected by Recovery Card during power-on
self-test. If enabled it is recommended that to backup CMOS data.
5.6.4.1 Disabled: No restoration of CMOS data;
5.6.4.2 Special: Automatic restore all CMOS data including special
expanded information;
5.6.4.3 Normal: Automatic restore standard CMOS data;
5.6.4.4 Partial: Only automatic restore basic CMOS data. It has the best
compatibility.
5.6.5 Set access mode of data in hard disk of Windows system.
Normally standard 32-bit mode is selected, which is suitable for
normal PIO mode to access IDE hard disk. For those high-speed
accesses that have installed UDMA66 or ATA100 driver, it is
recommended to select 8# enhanced 32-bit mode.
5.6.6 Set if preventing direct access of hard disk via I/O port. It can
prevent destruction over data in hard disk by all tool utilities
currently on sale if select mode “4”. For example when detecting
DM tool and low-level formalization is running, Recovery Card
will halt the system and warn via continuous ringing. It is
suggested to select “Disabled” to ensure compatibility with the
operating system.
5.6.7 Set if connecting to the network before booting the operating
system. After selecting this checkbox by Spacebar, Recovery Card
will run NETCOPY.COM automatically at the time its
initialization is completed (i.e. before booting the operating system)
when switching on or restarting the computer. It will log on
automatically or accept remote control once the sender existing in
the network is checked, otherwise it will boot the operating system
of the computer continuously.
5.6.8 Set if updating boot code in master boot record on hard disk when
firstly installing Recovery Card. It has good compatibility if no
selection, which can support third party multi-boot software. For
those if other Recovery Card was installed before, it is
recommended to select checkbox in order to avoid system
performance to be lowered by remaining information.
5.6.9 Set entry address of interruption INT13H for input-output service
of hard disk, normally it is set in RAM. For that anti-virus software
which can cause error judgment, it can also be set in ROM by
selecting checkbox.
5.7 Privilege password is needed to execute various privilege operations of
Recovery Card. The default password is “12345678” when leaving the
factory. Password can be digits, letters (case sensitive) and symbols.
When modification is needed, select “Modify Password” on the system
menu, enter new password and reenter it again for confirmation.
5.8 Set protected area of hard disk by selecting [Set Protection] on system
menu. After a while inspected current partition status of hard disk will
be displayed and multi-C disks will be displayed in turn if multi-boot is
preset. For those outside file system FAT12/FAT16/FAT32/NTFS shall
be displayed as “???” and no remaining volume of FAT12 and NTFS
shall be displayed. At present Recovery Card is limited to support eight
boot and logic disks. For those disks in which needed restoration of
data, you can select its protection checkbox by Spacebar key.
5.9 After completing setting of protection area, you can press Enter key or
select “Install” button. Recovery Card shall analyze hard disk and save
system parameters, and restart the computer after a while. If automatic
recovery of CMOS data is enabled, Recovery Card will ask to shut off
computer for a moment and restart it automatically three times. Now
the installation of Recovery Card is completely finished.
6. Operation
6.1 Recovery Card has two operating modes: Protected Mode and Open
Mode. In addition, it has three privilege operations: System Config,
Save Changes and Restore Data (it is not privilege operation for
“Automatic” or “Manual” recovery modes). Recovery Card will
confirm privilege identity by password. Only correct password is input,
can privilege operation be executed (e.g., install, uninstall, configure
Recovery Card), or protected data in hard disk be really modified.
6.2 Protected Mode (also named Student Mode). This is a working mode
provided for normal operator such as student. Recovery Card can
protect specified data in hard disk under such a mode, so you can
operate computer without any worry. All operations such as Delete and
Format look that no card is installed but all protected data may be
restored after restarting the computer.
6.3 Open Mode (also named Supervisor Mode or Teacher Mode). Under
such a privilege mode, Recovery Card has no protection for data in
hard disk. When administrator entering, he is able to make real
operation on hard disk. For example, install, uninstall, upgrade and etc.
6.4 “Save Changes” operation. If useful data changes are created under
Protect Mode, and you intend to save them into hard disk, you can
press F3 hotkey within 3 seconds after power-on self-test and loading
Recovery Card, and then enter correct password. After data save is
finished, all these data changes shall be protected formally.
6.5 “Restore Data” operation. If you intend to restore data of hard disk to
previous saved status, you can press F5 hotkey within 3 seconds after
power-on self-test and loading Recovery Card, and enter correct
password if “Manual with Password” recovery mode is selected.
Recovery Card shall restore all data of hard disk within one second. For
shared computer room in school, it is recommended to select
“Automatic” recovery mode, thus Recovery Card shall restore all the
data in hard disk each reboot or periodically, and you are not needed to
deal with each computers by yourself.
6.6 “System Config” operation. When administrator entering into such a
mode, he can reelect working mode and adjust system parameters of
Recovery Card. The menu is same with that in first installation.
6.6.1 Set hard disk protected area to re-specify which disks should need
protection. Please refer to the section 5.8.
6.6.2 Set system parameters. Please refer to the section 5.6.
6.6.3 Modify password. Please refer to the section 5.7.
6.6.4 Re-backup CMOS data. It is needed to re-backup in case that error
judgment occurs in CMOS recovery or after you adjust CMOS.
6.6.5 NetCopy Tool. Execute NetCopy tool for network maintenance.
6.6.6 Uninstall Recovery Card if you decide not to use it any more.
6.6.7 Exit, escape the system menu of Recovery Card and enter into
protected mode directly.
6.7 CMOS protection. When automatic recovery of CMOS data is enabled,
if specified CMOS data have been changed, Recovery Card will inspect
it during power-on self-test, and then give prompt “Restore CMOS?”
and wait for key-pressing. If you do not like to restore CMOS data in a
moment, press Ctrl+Home hotkey and enter first 4 characters of
password after prompt “Password”, thus ignoring changes of CMOS. If
hotkey is not pressed or a wrong password is entered otherwise,
Recovery Card can automatically restore all CMOS data and restart.
6.8 Automatic maintenance of network computer room. Initial installation
and maintenance thereafter can be carried on a computer firstly (called
sender), then use NetCopy utility to synchronically modify data on hard
disks of other computers (called receiver), thus maintenance of dozens
of computers in the room can be simplified to maintenance of one
computer. Brief instruction is as follows:
6.8.1 Preparations of the initial use.
6.8.1.1 After sending via broadcast, all data on hard disk, CMOS data,
settings of Recovery Card and password shall be the same.
Therefore it is suggested to optimize systematic performance at
sender as can as possible.
6.8.1.2 In order to automatically assign and modify identifying
parameters of each receiver, please set the computer name, user
name, IP address (if needed) of sender, and execute SETUP on
the tool disk, select “Auto-assign IP address, computer and user
name” checkbox and install it. After sending via broadcast,
identifying parameter of each receiver will be modified to that
of sender plus network node number of the receiver and again
plus one. For example, network node number of one receiver is
26, computer name of sender is PC5, the computer name of that
receiver then will be modified automatically to PC32; the IP
address of sender is 192.168.10.1, then the IP address of that
receiver shall be 192.168.10.28.
6.8.1.3 If network card and the motherboard all support wake on LAN,
and remote switching all receiver by sender is needed, please
connect wake control wire between network card and the
motherboard, and set Wake from LAN to enabled in CMOS.
6.8.1.4 Packet driver means communication driver provided by each
network card producer. Network maintaining tool NetCopy
does not control various network cards directly but via Packet
driver of network card and has build-in Packet driver of
network card with RTL8139 chip. If network card with other
chip is used, please rename the Packet driver file under
PKTDRV or similar directory in driver disk of network card
into NCPACKET.COM then copy to the directory where
NETCOPY.COM is located.
6.8.1.5 In order for automation of network maintenance, please copy
NETCOPY.COM and NCPACKET.COM to root directory of
Disk C, and enter into the system menu after restarting, select
checkbox [run NetCopy before starting OS] in [Set Parameters].
Thus receiver will always try to log on the sender when
switching on the computer or restarting each time.
6.8.2 Initial Use of NetCopy.
6.8.2.1 If Recovery Card is installed, please enter into Open Mode. If
6.8.2.5
6.8.2.4
6.8.2.3
6.8.2.2
DOS/Win95/98 systems are installed on the hard disk, please
press F8 and select “Safe mode commend prompt only” to enter
into pure DOS environment, otherwise booting from floppy
disk to enter into basic DOS.
Execute NetCopy utility from the sender. If network card has
no RTL8139 chip, you should execute Packet driver
NCPACKET.COM firstly, normally a command line parameter
is needed, for example “NCPACKET 0X60”. After executing,
please press F10 key to switch to sender, and select content
needed to be sent synchronically, options normally are 4 and 6.
After prompting information, number of receiver is displayed,
and waiting for login from receivers.
Execute NetCopy on each receiver in turn. After several
seconds, receivers will be automatically logged on sender, and
obtained network node numbers assigned by the sender
according to login order. If not, check if network is connected
and if Packet driver of network card is correct. If failed login is
displayed, check if installed Recovery Card is genuine version.
You can see numbers and states of logged receiver from the
screen of sender. It is suggested to save current parameters by
pressing F2 key after all logins of receivers are completed.
Usage: one is for remote switch on, and all receivers will be
switched on automatically as per historical records by sender;
the other ensures that network node assigned to each receiver
will be unchanged, so as to ensure computer name, user name,
and IP address unchanged.
Start to send data by pressing F10 key on sender. If
communication succeeds and receivers complete operation then
status “OK” is continuously displayed after corresponding
number, otherwise “fail” i.e. no answer, or “error” i.e. read or
write error of hard disk will be displayed. For unsuccessful
status please adjust parameters such as “delay” and try again.
There will be process percentage displayed during the period of
sending, which can be terminated by pressing ESC key if
needed. After normal sending is completed, you can control all
receiver to restart or switch off by setting parameter
“In-the-end” as “Restart Receivers ” or “Shutdown Receivers”.
6.8.2.6 For receiver who is installed LAN edition of Recovery Card
(namely two-in-one card), you can execute NetCopy without
entering into DOS, select [NetCopy Tool] on the system menu.
If no file NETCOPY.COM under root directory of Disk C, you
can insert tool floppy disk made by NETCOPYX.COM.
6.8.3 Daily Network Maintenance.
6.8.3.1 If you have made corresponding settings as per suggestions in
6.8.1.2, 6.8.1.3, 6.8.1.5 and 6.8.2.4 during the first NetCopy,
then daily network maintenance thereafter will be quite simple.
6.8.3.2 Switch on the sender to enter into Open Mode, upgrade
application software.
6.8.3.3 Select [NetCopy Tool] on the system menu of Recovery Card
after restarting. If your Recovery Card has no such an option,
please enter into pure DOS under Open Mode to execute
NetCopy utility.
6.8.3.4 Select sending mode and content and press F10 key to switch
on the power supply of all receivers remotely, and set
parameter “In-the-end” as “Shutdown All” by pressing F6 key.
6.8.3.5 Each receiver will log on the sender within several seconds
after the completion of initialization of Recovery Card.
6.8.3.6 Send data by pressing F10 key on the sender, and switch off all
computers automatically when it is completed.
6.8.3.7 Receivers who have completed sending can be put into
operation without any additional settings.
6.8.3.8 So far you can make synchronically upgrading of dozens of
computers without leaving the sender even one step.
6.8.4 You are welcome to download and upgrade many other additional
functions free of charge from the website.
7. Troubleshooting
7.1 Recovery Card cannot be inspected in several computers thus it seems
that no card is present.
A: If card cannot be inspected please do as following procedures:
7.1.1 Take out Recovery Card and reinsert or insert in another slot.
7.1.2 The default address of BIOS ROM of ISA edition is D800H. If
other card that has BIOS ROM (e.g., network card, SCSI adapter,
etc.) is installed on the computer, you can adjust address of BIOS
ROM of Recovery Card or other card by jumpers on the card.
7.1.3 For PCI and LAN edition, you can press Del key to enter CMOS
setup and then enable LAN or Network to boot preferentially. For
example, set “Boot from LAN/Network” or “LAN boot first” or
“Boot other device” as Enabled, set “First boot device” as Network
or LAN or ZIP.
7.1.4 For V6.0 upward of PCI edition, you can adjust jumpers on the
card, or run SETPCI.COM from tools disk.
7.2 Prompt shows that boot failure or other error information during
power-on self-test when Recovery Card is inserted in the slot.
A: There will be two reasons: First, Virus item in CMOS is set enabled,
change it to Disabled and save. Second, initialization mode of
Recovery Card is incorrect. Modes 1 to 4 are lined as per functional
intensifying and compatibility lowering in turn. For ISA edition,
switching among these 4 kinds of initialization modes can adjust
address of ROM. Addresses corresponding to initialization mode
1/2/3/4 are D000H/C800H/D400H/D800H. For PCI and LAN edition,
adjust jumpers or execute SETPCI.COM or press Alt+1/2/3/4 key after
the completion of initialization of memory and hard disk. For example,
you can press both Alt and 1 key to set compatibility of Recovery Card
with ASUS motherboard.
7.3 For Windows 95/98, exclamation mark appears on hard disk controller
after installing Recovery Card; system halts or blue screen “can not
load HDMC driver” appears during starting Windows.
A: There will be two reasons: first, the assignment of system resources is
unreasonable. The solve method is to set “Reset” in “PnP/PCI
Configuration” of CMOS to “Enabled” or “Both”, and some computers
have also relations with “PnP OS Installed” option; Second, VxD drive
of Recovery Card does not run normally, or it is enforced to run in
16-bit mode. The solve way is as follows:
7.3.1 There is program in the system, which can only run in 16-bit mode.
For example virus or remaining information from other low-grade
card of its like installed before. The solution is to select the
checkbox of [Update Boot Code in Hard Disk MBR] in system
parameters on the system menu of Recovery Card.
7.3.2 IDE special driver that is not compatible with Recovery Card was
installed in Windows 95/98. The solution is to uninstall it and
restore standard driver, namely, run SETUP on the original IDE
special driver disk and select “uninstall”, restart and install
universal standard driver that Windows provided itself.
7.3.3 High-speed access driver (e.g., Ultra DMA66, ATA-100, SCSI,
etc.) of chipset (e.g., SIS, VIA, Intel, etc.) is installed in Windows
95/98, thus makes the system abnormal. The solution is to adjust
“access mode of hard disk” in system parameters on the system
menu of Recovery Card. Normally 8# enhanced 32-bit mode can
support high-speed access. If problem still exists, please select
other access mode for “access mode of hard disk”.
7.3.4 Virus infected the operating system. It should be ensured that the
system has no virus before installing Recovery Card, and it should
also prevent to be infected with virus each time when entering into
Open Mode and before saving changes of data;
7.3.5 Remained space in hard disk is too little. If more write operation
made, Recovery Card will enforce the system to stop due to no
enough dynamic buffers. Sometimes there will be “overflow”
prompt on blue screen. It is recommended to run Defrag under
Windows to keep data orderly in hard disk;
7.3.6 Real-time virus monitoring or safety monitoring software with bad
compatibility has been installed, causing the system unstable.
7.3.7 The primitive solution is to format disk C then reinstalls Windows.
7.4 Data on hard disk cannot be protected under Windows NT/2000.
A: The reason is that NT driver of Recovery Card does not run normally.
Perhaps NT driver has not been installed or NT driver does not find NT
edition of Recovery Card During starting Windows NT/2000, prompt
“can not load” will appear plus low-high-low-high sound of bell if
Recovery Card is not installed or failed to load driver. If Windows
starting finished, you can run SETUP from tools disk to check version
number of NT driver that is running and you can reinstall NT driver by
running SETUP if necessary.
7.5 Recovery Card shows prompt “Restore CMOS” after power-on self-test,
and will show as well if recovery by pressing any key and restart.
A: When automatic recovery of CMOS data is enabled, Recovery Card will
display above information and recover after pressing key if it found
CMOS data was modified. However it will display as well after
restarting, possible reasons are as follows: one is temporary dynamic
units exist in CMOS; two is CMOS has something special that
Recovery Card cannot identify its effective data area. For the first
reason, it needs backup CMOS data again to make Recovery Card
identify its temporary dynamic units and ignore its changes of data. For
the second reason, it needs to enforcedly specify CMOS effective data
area, namely protected area. First, press Ctrl+Home hotkey after
prompt “Restore CMOS”, enter first 4 characters of privilege password
after prompt “password:” (e.g., entering “1a2b” and Enter if password
is “1a2b3c4”, and entering “1a” and Enter if password is “1a”). If
password is correct, it can temporarily ignore changes of CMOS data,
and continue to start. Then press F10 hotkey and input password to
enter into system menu, select “Backup CMOS” to analyze CMOS data.
If the problem exists yet, it should enforcedly specify protection area of
CMOS data, lower from “Special” to “Normal” and to “Partial”.
7.6 Forget privilege password after installing Recovery Card.
A: Take out the Recovery Card directly from the computer and execute
password reborn utility PASSWORD.EXE on tool disk under pure
DOS environment after switching on the computer. Clear out the
system password to empty by pressing F5 key, which means to set the
system password to be empty, namely, pressing Enter key directly.
8. Legal Information
This product is protected by copyright law and international treaties.
Unauthorized reproduction or distribution of this product, or any portion of it,
may result in severe civil and criminal penalties, and will be prosecuted to
the maximum extent possible under the law.