1
The ResiDOS User’s Manual
Introduction
ResiDOS is an extension to ZX Spectrum BASIC that operates with either the ZXATASP IDE/compactflash
interface or the new ZXCF compactflash interface. Both interfaces were designed by Sami Vehmaa.
ResiDOS installs itself into your interface's onboard RAM together with a modified copy of the Spectrum
ROM, and then provides you with extra BASIC commands for accessing files on the hard disk or
compactflash card, and using the extra RAM on your interface. It also provides a comprehensive task
manager which can be reached using the NMI button and allows you to instantly switch between a number of
programs or games running on your Spectrum.
ResiDOS Installation
Installing for the first time
Installing ResiDOS is simple. First download the appropriate version of the installation software for your
interface from the downloads page and load it into your Spectrum. The software is provided in the form of an
emulator TAP or TZX file, so you will need to transfer it using software such as playtzx or an emulator.
You'll find suitable software on the World Of Spectrum site. Once it's transferred, just LOAD it into your
Spectrum and follow the simple on-screen instructions.
During installation, the program will confirm the size of your interface's RAM (usually 128K, 512K or
1024K) and give you two main options.
The first option is to use the standard ROM or an alternative one. Using the standard one means that your
Spectrum's existing ROM will be copied into the interface RAM and modified. If you select an alternative
ROM, you will be asked for a filename to LOAD in containing the ROM image. This allows your interface to
start up with a different ROM; for example you might choose SE BASIC.
The second option allows you to decide whether the NMI button will have any effect. You should enable this
unless you have a specific reason not to (if, for example, you are using an alternative ROM that has it's own
NMI routine that you would prefer to use). If you enable the NMI, then you will be able to use the powerful
ResiDOS Task Manager.
Once you have made your choices and changed the jumpers on your interface as instructed, the Spectrum
will reset and you should see the ResiDOS boot screen appear!
Upgrading to a new version of ResiDOS
When a new version of ResiDOS becomes available, installation is even easier. Just load the installation
program from tape as normal, and it will automatically detect your existing version. You can then choose to
upgrade, and the system will be automatically updated, leaving all your installed ROMs and tasks still in the
interface's memory.
If you choose to re-install, the normal installation procedure will occur. This will wipe all the ROMs and
tasks from your interface's memory.
Note that the upgrade will only work if you already have ResiDOS version 1.20 or higher already installed,
since earlier versions cannot be detected.
Setting up your hard disk or CompactFlash
Before you can use your hard disk or CompactFlash, it needs to be initialised with the IDEDOS system.
ResiDOS can work with two different physical drives, normally known as the "master" and "slave" unit; in
all the following commands, the first number given identifies the unit number, which is 0 for the master and
1 for the slave.
The first thing to do is make sure that ResiDOS understands the structure of your disk. Normally, it
automatically detects this and displays the details on the boot screen. However, if for some reason this
doesn't work, you can manually specify the parameters (shown on the drive itself, or to be found on the
manufacturer's website) with the following command:
FORMAT %0,977,10,17
(The above command assumes your hard disk is the master drive (unit 0) and has 977 cylinders, 10 heads and
17 sectors). Once you have entered this command, the details are permanently stored in your interface's
RAM.
You can re-enable auto-detection for the master drive (unit 0) with the command:
FORMAT %0
If you want to disable detection of a drive altogether, to save a bit of time on boot, you can do so with the
following example command, which disables detection of the slave drive (unit 1):
FORMAT %1,0,0,0
When you're sure that ResiDOS knows the correct details, you need to initialise the disk. Note that doing
this erases everything currently stored on the disk. The command to use is:
FORMAT % ERASE 0,15
This initialises the master drive (unit 0), allowing up to 15 partitions to be created. You can specify any
number you like for the number of partitions, but note that the more you allow, the slower certain partition
management commands will be. Each partition can be up to 16Mb in size; I'd recommend calculating the
number you would need to completely fill the disk, and adding several more for a bit of elbow-room. So, a
1Gb disk could use about 1000/16=63 partitions, and you might wish to specify around 80.
Once the disk is initialised (you only ever need to do this once) you can use the partition management
commands to add some partitions for storing your files.
Switching disks or CompactFlash cards
To switch to using a different hard disk or CompactFlash card, you can use the following command:
FORMAT %
This will unmap all existing drives and re-detect your disks/cards, automatically mapping any drives back
again as it would do on boot. Your BASIC program and all other data will be unaffected by this process, so
it's a very useful command for transferring files from one CompactFlash card to another.
Note that once your disk is initialised, ResiDOS stores its details (about cylinders, heads, sectors etc) on the
disk itself, so when swapping disks or CompactFlash cards there is no need to set these details again.
Partition Management
The IDEDOS system used by ResiDOS allows you to divide your hard disk up into many separate partitions,
which can each be assigned to a drive letter and used for storing files. You can have as many partitions as
you like on your disk, but currently there are a maximum of 6 that can be assigned to drive letters at any one
time.
Partitions can be one of two types: "data", for holding files; and "swap", for use as temporary workspace by
programs or the operating system. Other types may be added in the future. Note that no programs currently
require swap partitions, but there is no harm in creating one for future use.
Commands exist to allow you to create and delete partitions and assign them to drive letters. Unlike some
inferior operating systems, this can all be done from BASIC, and there is no need to reset your Speccy at any
point!
Creating, deleting and listing partitions
You can create a partition using one of the following commands, which create data and swap partitions
respectively:
•
•
FORMAT % DATA "name",size
FORMAT % EXP "name",size
To identify which unit (master or slave) a partition is to be created on, the number can be included at the start
of the name, followed by the unit number (eg "0>Documents" or "1>Games"). If you don't specify the unit,
then the master drive is assumed. Names can be up to 16 characters long (this doesn't include the unit
identifier) and are not case-sensitive.
The size for a partition can be given in kilobytes (K) or megabytes (MB), with a maximum size of 16
megabytes allowed. A number smaller than 256 is assumed to be a size in megabytes; a number larger or
equal to 256 is assumed to be a size in kilobytes.
You can delete a partition, together with any files that are stored on it, using the command:
•
FORMAT % BIN "name"
A partition can only be deleted if there are currently no drives mapped to it.
You may also rename a partition, using the following command:
•
MOVE % "unit>name" TO "newname"
Note that you must include the unit identifier for this command, otherwise it will assume you want to rename
a file, not a partition.
Finally, you may display a list of partitions, in a normal or expanded form, using the following commands:
•
•
CAT % TAB
CAT % TAB EXP
Mapping drives to partitions
Before you can access files on a data partition, you must map it to a
drive letter. Up to 6 drive letters can be in use at a time, and you can
use any drive from A: to P:. By default, ResiDOS saves and loads
files to drive A:, so you may want to map your most frequently used
drive to this letter (however, it is also possible to change the default
drive to something other than A:).
When mapping a drive to a partition, you can make the assignment
permanent, which means that ResiDOS will automatically make the
same assignment every time the Spectrum starts up. This is done by
adding the ASN keyword to the end of the mapping command.
The commands to map drives to partitions are:
•
•
MOVE % "drive:" IN "name"
MOVE % "drive:" IN "name" ASN
Similar commands are available to remove mappings from drives.
Using the ASN keyword here means that any permanent assignment
associated with the drive will also be removed:
•
•
MOVE % "drive:" OUT
MOVE % "drive:" OUT ASN
Finally, you can obtain a listing of the current drive mappings with
the following command:
•
CAT % ASN
Using files in ResiDOS
The filesystem used by ResiDOS is the same as that used by the ZX Spectrum +3, ZX Spectrum +3e and
various Amstrad computers, and is a version of the popular CP/M filesystem. If you are using a +3e, then you
can use the same disk and files with ResiDOS as with +3e BASIC.
Filenames
Filenames consist of an 8-character name, optionally followed by a full stop ( . ) and an extension of up to 3
characters. The characters allowed are:
•
•
•
letters A to Z (upper- or lower-case; there is no distinction)
numbers 0 to 9
the following characters: " # $ ' @ ^ _ { } ~ `
Although extensions are not needed by BASIC or ResiDOS, you may find it helpful to name files in a
consistent way, so that all BASIC programs have an extension of .BAS, for example.
As well as the filename itself, you can specify a drive letter followed by a colon ( : ) to identify which drive
the file is stored on (A: to P:); if this is not done, then the default drive will be assumed (this is drive A:
unless you change it).
Finally, you can also specify a user area number just before the drive (if you don't, then the default user area
- usually 0 - is assumed). The user area can be between 0 and 15. This facility allows you a sort of primitive
directory system on each drive.
Some example filenames are:
•
•
•
•
•
prog
TEST.BAS
c:puzzle
5e:screen.scr
test21.z__
Wildcards
Some commands can have wildcards provided in their filenames. These are used to match multiple files. The
following wildcard characters are allowed:
•
•
* matches any sequence of characters
? matches any single character
Wildcard characters can be used in either the name or extension part of the filename. Some examples are:
•
•
•
*.*
*.bas
c:test.b??
Setting the default drive and/or user area
You can set the drive which is used by default to any you like; if you don't use this facility, then ResiDOS
will use A: as the default drive, and 0 as the default user area. To set the default drive and/or user area, use
the commands:
•
•
•
LOAD %"c:"
LOAD %"3:"
LOAD %"5d:"
As these commands show, you can alter the default drive without affecting the default user area (and viceversa), or you can set both together. You can use the SAVE keyword instead of LOAD if you like; it doesn't
make any difference.
If you wish, you can make your preference permanent by adding the ASN keyword to the end of the
command. For example, to make E: the default drive, and have ResiDOS remember this preference every
time you switch on, use:
•
LOAD %"E:" ASN
Note that it is not currently possible to change the default user area from 0, although this may be possible in
future.
LOADing and SAVEing files
You can load and save files to and from the hard disk or CompactFlash card using the standard LOAD and
SAVE syntax, but adding a % sign after the command name. For example:
•
•
SAVE %"hello.bas" LINE 10
LOAD %"piccy" SCREEN$
Note that DATA files are not currently supported, although BASIC programs, CODE files and SCREEN$ are.
If you attempt to SAVE a file when one already exists with the same name, the existing file will be renamed
by changing its extension to .BAK, before the new file is saved. If there was an existing .BAK file of the
same name, it will be automatically deleted.
Additionally, snapshot files saved by the Task Manager can be reloaded using the command:
•
LOAD %"snapname" RESTORE
Changing BASIC auto-run status
It is not possible to MERGE files in ResiDOS, but you can change whether or not a BASIC program autoruns, using the LINE command:
•
LINE %"filename",line
If you specify a line number of 0, then the BASIC program will no longer auto-run.
Cataloguing files
To show a list of all files on the current drive in the current user area, use:
•
CAT %
You can also specify a string containing a drive, or a drive and user area, to see files in that particular
location (otherwise the default drive and user area are assumed). The string can also contain a filename or
wildcards, and will display only those files which match the string.
Additionally, you can add the EXP keyword at the end of the command to show all files (including system
files, which are normally hidden) together with the attributes for each file. Some additional information is
also given for BASIC and CODE files saved by ResiDOS.
Finally, you can specify a stream number, so that you can (for example) print the catalog listing. (This also
applies to all other CAT commands in ResiDOS).
Some examples are:
•
•
•
•
•
CAT %"d:"
CAT %"15C:"
CAT %"*.bas"
CAT %"e:test.*" EXP
CAT % #3;"c:"
Note that on some versions of BASIC (notably SE BASIC), the CAT command has been renamed to DIR.
Deleting files
To erase files from the hard disk, use:
•
ERASE %"filename"
You can use wildcards in order to erase many files at the same time, but be careful if using this facility!
Note that in SE BASIC, the ERASE command has been renamed to DEL.
Copying files
You can make a copy of file to a new file with a different name, or copy one or more files (using wildcards)
to a different drive and/or user area. Some examples are:
•
•
•
•
SAVE %"letter.doc" TO "letter2.doc"
SAVE %"*.rom" TO "b:"
SAVE %"0c:*.*" TO "3c:"
SAVE %"manic.sna" TO "e:"
You can use the LOAD keyword instead of SAVE if you prefer; the effect is exactly the same.
Renaming files
To rename a file, use:
•
MOVE %"filename" TO "newname"
This must be a single file (you cannot use wildcards). It is possible to use this command to change the user
area for a file (but not the drive), simply by specifying the same name with a different user area.
Changing file attributes
You can add or remove various file attributes from a file (or group of files, using wildcards). The possible
attributes are:
•
•
•
P (protected, or read-only)
S (system, or hidden)
A (archive - doesn't have any real use)
Protected files cannot be erased or changed, and system files cannot be copied and are not normally listed in
catalogs (only in expanded catalogs). You can add or remove a single attribute at a time, by using a "+" or "-"
character, as in the following examples:
•
•
•
MOVE %"*.*" TO "+p"
MOVE %"*.sys" TO "+s"
MOVE %"letter.doc" TO "-p"
Accessing old ResiDOS filesystems
Before v1.40, ResiDOS used a very simplistic filesystem. If you have a disk containing this old filesystem,
you can still access files on it, by using the LOAD, SAVE, CAT and ERASE commands, but adding an
extra %. For example:
•
•
•
•
LOAD %%"Program"
SAVE %%"screen" SCREEN$
CAT %%
ERASE %%"Jetpac"
Note that this facility exists in v1.43 only, and is not present in current versions, so if you need to transfer
files from an old filesystem please download v1.43 to do this, and then upgrade to the current version when
you have transferred all your files onto the new filesystem.
Customising ResiDOS
As well as being able to configure ResiDOS to automatically set up drive mappings and default drives when
you boot up, you can customise it in other ways.
Custom colours
You can choose custom colours which will be set every time the Spectrum starts up, rather than the usual
boring old black on white. To do this, use the normal colour commands, but followed by "%". By using the
percentage sign you specify that the current colour scheme (including the new colour you are just setting)
will be used whenever you boot. Additionally, you can use the new ATTR command to specify all colours
together (this is calculated as ink+(paper*8)+(bright*64)+(flash*128)). The commands are:
•
•
•
•
•
INK % n
PAPER % n
BRIGHT % n
FLASH % n
ATTR % n
Note that because the % sets all the current scheme as default, the following examples have the same effect,
and set a default colour scheme of yellow ink on blue paper:
•
•
INK % 6:PAPER % 1
INK 6:PAPER % 1
AutoRUN files
You can also set an "auto-run" file. This must be a BASIC program (which can do whatever you like) which
will run automatically on boot, or just whenever you enter the special RUN % command.
To set an auto-run file, use one of the following commands:
•
•
RUN %"filename"
RUN %"filename" ASN
You may specify a drive and/or user area with the filename (otherwise the defaults will be assumed). These
two commands differ, because with the second case, the auto-RUN file will automatically be loaded every
time you reset (or NEW) your Spectrum. The first command stores the filename, but will not load it unless
you enter the following command:
•
RUN %
Note that you can hold the CAPS SHIFT key down when booting to stop drives from being automatically
mapped, so any auto-RUN file will not be able to be loaded.
You can disable the auto-RUN file with the following command: RUN % ""
Using alternative ROMs in ResiDOS
The RAM in your ZXCF or ZXATASP interface can be used to store alternative versions of BASIC, or
Interface II ROM images. Once they have been added, you can start them up at any time using a simple
command.
Adding ROM images to the interface memory
The first stage is to transfer an image of the ROM (BASIC or Interface II) that you wish to use, and save it on
the hard disk or CompactFlash card using the SAVE % command. You can get these ROMs from various
places, but a good starting point is always World Of Spectrum.
Next, you must type the following command, which reserves memory space for the installation process:
CLEAR 29999
Now, install the ROM using the following command:
LOAD %"filename" FORMAT n
In this command, the parameter "n" is a number made by adding the following values together:
•
•
•
•
0: for an Interface II ROM (or any other ROM that does not require ResiDOS support)
1: for a BASIC ROM
16: to install the ROM into the writeable "RAM" part of the interface memory (the non-writeable
"ROM" part is used by default)
32: to disable the NMI button for this ROM (only affects BASIC ROMs)
If you don't specify a value, then the default of 0 will be used. Note that it is generally advisable to only store
BASIC ROMs only into the non-writeable "ROM" part of the memory, since unless they have been
specifically patched they tend to overwrite themselves. However, if you are running short of ROM space on a
ZXATASP interface, you may specify RAM instead. This is not a concern on ZXCF interfaces, since the
memory can be configured automatically by ResiDOS to be ROM or RAM as required.
A couple of examples are:
LOAD %"SEBASIC.FMT" FORMAT 1
LOAD %"c:jetpac.rom" FORMAT 0
Managing alternative ROMs
You can see a list of all the installed formats in your interface by using the following commands (the second
version includes "hidden" formats, used by the system but not selectable by the user):
CAT % FORMAT
CAT % FORMAT EXP
The names of the formats (except built-in system formats) will be the same as the filename used when
loading them, except that any extension is ignored. For example, the formats loaded in the previous section
would be named "SEBASIC" and "jetpac".
You can erase any installed format using the following command (this only erases it from the interface
memory, not from the hard disk):
ERASE %"formatname" FORMAT
Remember that SE BASIC uses DIR instead of CAT, and DEL instead of ERASE.
Using alternative ROMs
Once you have installed some formats as described in the previous section, they are available for instant use
whenever you switch on the Spectrum. To activate a particular format, use the command:
FORMAT %"formatname"
For example, having installed the ROMs in the previous section, we could use either of them like this:
FORMAT %"SEBASIC"
FORMAT %"jetpac"
If the format is an Interface II ROM, it will immediately start. Pressing the reset button will reset the ROM.
To return to ResiDOS you will need to either reset your interface and the Spectrum together, or switch off the
power completely and then switch the system back on.
If you are activating a BASIC format, the Spectrum will restart using that BASIC. You can then use
ResiDOS commands as normal, and the additional features of the particular BASIC you have chosen.
The new BASIC will remain as the default one even if you switch off the Spectrum and turn back on again.
To return to the original BASIC, you can simply select the "Standard" format (which is automatically created
as part of the installation process), for example:
FORMAT %"Standard"
Alternatively, hold down the CAPS SHIFT key while the Speccy is booting up, and the standard format will
be automatically re-selected.
One final feature is the ability to switch off the interface memory altogether and use your Spectrum's built-in
ROM, without having to unplug the interface or set the upload or disable jumper (this is useful for 128K
Spectrums and +3s). To do this, use the command:
FORMAT %""
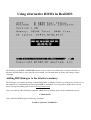
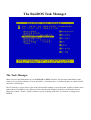
The ResiDOS Task Manager
The Task Manager
When you press the NMI button on your ZXATASP or ZXCF interface, the Spectrum immediately stops
whatever it was doing (whether you were in BASIC, a word processor, a commercial game or whatever) and
enters the Task Manager.
The Task Manager screen shows a list of the current tasks running on your Spectrum, together with the menu
options that are available to you. When you first enter the task manager, the task list will consist of just a
single task, named "Task 0", which is whatever you were doing at the time. To return to it, simply press
ENTER.
Using the RAM in your ZXCF or ZXATASP interface, you can store several tasks at the same time, and
switch between them instantly from the task manager screen. The number of tasks you can have running at
once depends on the amount of RAM in your interface. Since ZXATASP interfaces have their memory
strictly divided between ROM and RAM, they can only run about half the number of tasks as a ZXCF
interface. With 512K memory, depending upon what else is using your RAM, you can have up to 10 tasks
running at once on a ZXCF interface, or 5 on a ZXATASP interface. The maximum number of tasks
allowable is 16 (this is only possible on a 1Mb ZXCF interface).
The menu options described below allow you to manage your tasks quickly and easily.
Managing Tasks
The options available are shown on the task manager screen. Simply press the highlighted letter to select the
option.
Cursor keys (up and down)
Use these to move the highlight up and down the task list.
ENTER
Re-enters the highlighted task.
New
Creates a new task, activates it and resets the Spectrum into BASIC. (Don't worry, all the other tasks
are still there!)
Copy
Makes a copy of the highlighted task.
Delete
Deletes the highlighted task.
Purge
Deletes all tasks except the highlighted task.
Rename
Renames the highlighted task. Task names are up to 16 characters long.
Border
Sets the border colour for the highlighted task. Since it isn't possible for ResiDOS to know the border
colour, it makes a guess which is sometimes wrong. You can change that here before saving a
snapshot.
Snapshot
Saves a snapshot of the highlighted task onto the hard disk. This can be reloaded later using the
LOAD %"filename" RESTORE command.
Other options
Help
Shows a series of pages giving help on extra BASIC commands provided by ResiDOS. (NB: This
feature is temporarily unavailable, due to a lack of space.)
Turn off Spectrum
This takes you to a special "shutdown" screen, from which you can turn off the Spectrum in safety.
When you switch back on, the Task Manager will start up again, and you will be able to continue
exactly where you were, with all your tasks still running.
ResiDOS Command Reference
The following is a complete list of commands currently provided by ResiDOS. "Hard disk" refers to
CompactFlash cards for ZXCF interfaces, or ZXATASP interfaces with a compactflash adapter.
Note that in SE BASIC and some others, CAT is replaced by DIR, and ERASE is replaced by DEL.
All the CATaloguing commands can send their listings to other streams by specifying a stream number. For
example, if stream 3 is attached to your printer, you can use CAT % #3;"e:*.bas" to print a list of all the
.BAS type files on drive E.
Disk management commands
FORMAT %unit, cyl, head, sec
Specifies the parameters (number of cylinders, heads and sectors) of your hard disk. "Unit" is 0 for
the master drive, or 1 for the slave drive. Only needs to be done if the auto-detection fails to work.
FORMAT %unit, 0, 0, 0
Disables any detection of "unit" altogether. This might help improve boot speed slightly if, for
example, you never have a slave drive attached.
FORMAT %unit
Changes "unit" to use auto-detection again, rather than manually set parameters.
FORMAT %
Unmaps all current drives and re-initialises IDEDOS (causing disks to be re-detected, and drives
mapped back again), without losing any of the program or data currently in memory. This is useful to
allow swapping of compactflash cards while the Spectrum is still on.
FORMAT % ERASE unit, maxpartition
Completely erases the hard disk (unit=0 for master, 1 for slave) and initialises it with the IDEDOS
structure. Following this, you will be able to use the partition management commands to add
partitions for storing data on the disk. The maxpartition number is approximately the total number of
partitions you will be able to create; don't make this too large (hundreds of partitions), or other disk
management routines will be too slow. Don't make it too small, or you may not be able to create all
the partitions you want (some partitions are used to keep track of free space, etc). Suggested values
are between 15-63.
Partition management commands
CAT % TAB
Displays a list of all the partitions on your disk, also showing any permanent drive mappings.
CAT % TAB EXP
Displays an expanded listing of all the partitions on your disk, including their physical positions on
the disk.
FORMAT % DATA "name",size
Creates a new data partition on your disk, for storing files. Partition names are not case-sensitive, and
can be up to 16 characters long, and include a unit identifier ("0>" or "1>"). The maximum partition
size is 16Mb. Sizes can be specified in kilobytes (numbers larger or equal to 256), or megabytes
(numbers up to 255).
FORMAT % EXP "name",size
Creates a new swap partition on your disk, for temporary use by the Spectrum. These are not
currently used by ResiDOS itself, but may be used by applications in the future. The maximum
partition size is 16Mb. Sizes can be specified in kilobytes (numbers larger or equal to 256), or
megabytes (numbers up to 255).
FORMAT % BIN "name"
Deletes a partition, together with all the files it contains. This can only be done if no drive is currently
"mapped" to it.
MOVE % "unit>name" TO "newname"
Renames a partition. The unit identifier must be present in the original name in this command.
Drive mapping commands
CAT % ASN
Displays a list of the current drive mappings.
MOVE %"drive:" IN "name"
Maps a drive ("A:" to "P:") to the partition specified. A maximum of 6 drives can be mapped at any
time.
MOVE %"drive:" IN "name" ASN
Maps a drive, and makes the assignment permanent, so it will automatically be restored each time you
switch on.
MOVE %"drive:" OUT
Unmaps the drive ("A:" to "P:") specified.
MOVE %"drive:" OUT ASN
Unmaps a drive. Additionally, removes any permanent assignment for the drive.
LOAD %"location:"
Makes the specified location the default. The location can be a user area (0-15) or a drive (A-P), or
both. If you only specify one of these, the current default for the other will be retained. Any filenames
that don't include a drive letter or user area will now refer to this default. You can also use the SAVE
keyword for this command.
LOAD %"location:" ASN
Makes the specified location the default, and makes this permanent so that it will also be the default
on startup. Otherwise, user area 0 on drive "A:" will be the default drive when you switch on. You
can also use the SAVE keyword for this command.
File management commands
CAT % Shows a list of all files on the default drive in the default user area.
CAT % EXP Shows an expanded listing of all files on the default drive in the default user area.
CAT %"filespec"
Shows a list of files that match the file specification provided. This can include a user area, drive,
filename, extension and wildcard characters (* and ?).
CAT %"filespec" EXP
Shows an expanded listing of files that match the file specification provided.
LOAD %"filename"
Loads a BASIC program from hard disk.
LOAD %"filename" CODE
Loads a CODE file from hard disk.
LOAD %"filename" CODE a
Loads a CODE file from hard disk at a specific address.
LOAD %"filename" CODE a, l
Loads a CODE file from hard disk at a specific address, and with a specific length.
LOAD %"filename" SCREEN$
Loads a screen from hard disk.
LOAD %"filename" RESTORE
Loads a snapshot from hard disk.
SAVE %"filename"
Saves a BASIC program to hard disk.
SAVE %"filename" LINE n
Saves an auto-starting BASIC program to hard disk.
SAVE %"filename" CODE a, l
Saves a CODE file to hard disk.
SAVE %"filename" SCREEN$
Saves a screen to hard disk.
LINE %"filename", line
Changes the auto-run line number for a BASIC program. If the line provided is 0, auto-running is
disabled for the program.
ERASE %"filespec"
Erases a file from the hard disk. The filespec can include wildcards to erase multiple files at once.
MOVE %"filename" TO "newname"
Renames a file (wildcards are not allowed). This command can be used to change the user area a file
is located in (but not the drive).
MOVE %"filespec" TO "+attrib"
Adds the attribute (P=protected, S=system or A=archive) to the file (or group of files) specified.
MOVE %"filespec" TO "-attrib"
Removes the attribute (P=protected, S=system or A=archive) from the file (or group of files)
specified.
SAVE %"filename" TO "filename2"
Copies a single file to a new file, which may be in the same location, or a different one. You can also
use the LOAD keyword for this command.
SAVE %"filespec" TO "location:"
Copies one or more files (if using wildcards) to another location. You can also use the LOAD
keyword for this command.
Customisation commands
INK % n
Sets ink colour to n and saves the current colour scheme as the default.
PAPER % n
Sets paper colour to n and saves the current colour scheme as the default.
BRIGHT % n
Sets bright to n and saves the current colour scheme as the default.
FLASH % n
Sets flash to n and saves the current colour scheme as the default.
ATTR % n
Sets attributes to n and saves them as the default colour scheme.
RUN %"filename"
Sets the auto-RUN file, which will only be executed with RUN %.
RUN %"filename" ASN
Sets the auto-RUN file, which will be executed automatically on boot, or with RUN %.
RUN %""
Removes any auto-RUN file setting.
RUN %
Loads and runs the auto-RUN file.
ROM management commands
LOAD %"filename" FORMAT
Loads a ROM image from the hard disk and installs to the interface as an Interface II-type ROM. NB:
you must first CLEAR 29999 or lower.
LOAD %"filename" FORMAT n
Loads a ROM image from the hard disk and installs to the interface as a type "n" ROM. NB: you
must first CLEAR 29999 or lower. Values for "n" are made as the sum of the following:
•
•
•
•
0: for an Interface II ROM (or any other ROM that does not require ResiDOS support)
1: for a BASIC ROM
16: to install the ROM into the writeable "RAM" part of the interface memory
32: to disable the NMI button for this ROM (only affects BASIC ROMs)
CAT % FORMAT
Shows a list of all installed ROM "formats", the location (ROM/RAM) and the type (Interface 2 /
BASIC / System).
CAT % FORMAT EXP
Shows a list of all installed ROM "formats", the location (ROM/RAM) and the type (Interface 2 /
BASIC / System), including "hidden" formats.
ERASE %"formatname" FORMAT
Erases format from ROM or RAM. You do not need to change write-protection for this command.
FORMAT %"formatname" Restarts computer using selected format.
FORMAT %"" Restarts computer using internal ROM.
ResiDOS Programming
From v1.40, it is possible to access some of the features of the operating system from machine-code
programs, so that utility programs which access files can be written.
Calls are available in ResiDOS using hook codes, which are invoked using the RST 8 instruction followed by
a hook code. There are two main hook codes available to programmers: the version information hook code,
which detects which version of ResiDOS is available (if any), and the package call hook code, which is used
to access all other facilities.
All the following pieces of code are provided in the format used by Interlogic's free z80asm assembler which
is available for many platforms at Z88 Forever!. Binaries are provided for several platforms, and most others
(including MacOS X) can compile the source package. Additionally, instead of using "magic numbers" for
the various call IDs etc, these are defined as meaningful words. You should download the following file,
which contains the necessary include files, together with an example utility program (assembly file and prebuilt TAP/TZX):
•
resitools.zip
Detecting ResiDOS
Any program which is going to use ResiDOS facilities must first check that it is installed, and that a suitable
version number is available. Currently, you should check that at least v1.40 is available, since no packages or
calls were available in previous versions. Some suitable code for testing the version follows. It can be called
from BASIC, and returns the version number in BC (or 0 if not installed).
.residetect
ld
push
ld
push
ld
add
ld
rst
defb
pop
jr
.detect_error
pop
ld
ld
inc
jr
ex
push
ld
and
sbc
pop
ret
.noresidos
ld
ld
ld
ret
hl,(ERR_SP)
hl
hl,detect_error
hl
hl,0
hl,sp
(ERR_SP),hl
RST_HOOK
HOOK_VERSION
hl
noresidos
hl
(ERR_SP),hl
a,(ERR_NR)
a
nz,noresidos
de,hl
hl
de,$0140
a
hl,de
bc
nc
bc,0
a,$ff
(ERR_NR),a
; save the existing ERR_SP
; stack error-handler return address
; set the error-handler SP
; invoke the version info hook code
; ResiDOS doesn't return, so if we get
; here, some other hardware is present
; restore the old ERR_SP
; is the error code now "OK"?
; if not, ResiDOS was not detected
; get HL=ResiDOS version
; save the version
; DE=minimum version to run with
; restore the version to BC
; and return with it if at least v1.40
; no ResiDOS
; clear error
Package calls
The facilities of ResiDOS are divided up into packages, each of which provides its own set of calls. Two
packages are currently provided: the ResiDOS package itself, and the IDEDOS package. The first of these
provides only one call at the moment (to cause a new ResiDOS error code in BASIC); the other provides all
the useful calls for accessing partitions and files.
Making a package call involves the following steps:
•
•
•
•
•
setting up registers required by the call
switching to the alternate set, and loading B with the package ID and HL with the call ID
invoking the package call hook code
checking for errors if the carry flag is reset (Fc=0)
examining the registers returned by the call
Here is some generic code to make a package call. Note that if you are intending to return to BASIC at any
point, you should always preserve the alternate HL register pair (H'L') as this is required by BASIC:
; set up
exx
ld
ld
rst
defb
jr
; handle
any entry parameters here
b,package_id
hl,call_id
RST_HOOK
; invoke the package call hook code
HOOK_PACKAGE
nc,process_error
; handle error if Fc=0
any return values here
The ResiDOS Package
This package currently provides a single call, which takes a ResiDOS error code in A (such as returned by
any call in the IDEDOS package) and generates a report message, returning to BASIC. Here is an example
use of this call:
ld
exx
ld
ld
rst
defb
a,rc_noswap
b,PKG_RESIDOS
hl,RESI_REPORT
RST_HOOK
HOOK_PACKAGE
; "no swap partition"
; switch to alternate set
; ResiDOS package
; ResiDOS call ID
; invoke the package call hook code
The IDEDOS Package
This package provides many of the calls available in +3DOS (used on the +3 and +3e) and IDEDOS (used on
the +3e). The calls all use the same input and output parameters, but there are some "gotchas":
•
•
128K memory configurations are not supported. You should always specify 0 for the page number in
calls which expect it.
Some calls return addresses "in page 7" (such as DOS_REF_HEAD). Data at these addresses cannot
be accessed directly, since it is not in main memory. Instead, you must use the IDE_ACCESS_DATA
call, detailed later.
+3DOS Calls
The following +3DOS calls may be used. Full details are in the +3 manual, which can be obtained from The
World Of Spectrum. Calls marked with an asterisk probably won't work as expected, or be very useful.
•
•
•
•
•
•
•
•
•
•
•
•
•
•
•
•
•
•
•
•
•
•
•
•
•
•
•
•
•
•
•
•
•
•
DOS_INITIALISE
DOS_VERSION
DOS_OPEN
DOS_CLOSE
DOS_ABANDON
DOS_REF_HEAD
DOS_READ
DOS_WRITE
DOS_BYTE_READ
DOS_BYTE_WRITE
DOS_CATALOG
DOS_FREE_SPACE
DOS_DELETE
DOS_RENAME
DOS_BOOT *
DOS_SET_DRIVE
DOS_SET_USER
DOS_GET_POSITION
DOS_SET_POSITION
DOS_GET_EOF
DOS_GET_1346 *
DOS_SET_1346 *
DOS_FLUSH
DOS_SET_ACCESS
DOS_SET_ATTRIBUTES
DOS_OPEN_DRIVE
DOS_SET_MESSAGE
DOS_REF_XDPB
DOS_MAP_B *
DD_SET_RETRY
DD_SEL_FORMAT *
DD_ENCODE
DD_L_XDPB *
DD_L_DPB *
IDEDOS Calls
The following IDEDOS calls are provided. Documentation is provided at the +3e website.
•
•
•
•
•
•
•
•
•
•
•
•
•
•
•
•
•
•
•
•
•
•
•
•
•
•
•
•
•
•
•
IDE_VERSION
IDE_INTERFACE
IDE_INIT
IDE_DRIVE
IDE_SECTOR_READ
IDE_SECTOR_WRITE
IDE_FORMAT
IDE_PARTITION_FIND
IDE_PARTITION_NEW
IDE_PARTITION_INIT
IDE_PARTITION_ERASE
IDE_PARTITION_RENAME
IDE_PARTITION_READ
IDE_PARTITION_WRITE
IDE_PARTITION_WINFO
IDE_PARTITION_OPEN
IDE_PARTITION_CLOSE
IDE_PARTITION_GETINFO
IDE_PARTITION_SETINFO
IDE_SWAP_OPEN
IDE_SWAP_CLOSE
IDE_SWAP_OUT
IDE_SWAP_IN
IDE_SWAP_EX
IDE_SWAP_POS
IDE_SWAP_MOVE
IDE_SWAP_RESIZE
IDE_DOS_MAP
IDE_DOS_UNMAP
IDE_DOS_MAPPING
IDE_DOS_UNPERMANENT
One slight difference is that for the IDE_DOS_MAP and IDE_DOS_UNMAP calls, the FLAGS3 variable is
not used (it doesn't exist on all Spectrums). Instead, you can provide a drive letter as lower-case to make the
mapping permanent.
Additional calls
An extra call, IDE_ACCESS_DATA, is provided so that data which exists in the ResiDOS memory can be
read or written by programs. Such addresses are referred to in the +3DOS documentation as being "in page
7". Instead, use this call, with the provided address as the source or destination, and your own buffer as the
other address:
;
;
;
;
;
;
;
;
;
IDE_ACCESS_DATA
IN:
HL=source
DE=destination
BC=length
OUT(s): Fc=1
Register status on return:
......../IX same
AFBCDEHL/.. different
From IDEDOS v1.02 onwards (available in ResiDOS v1.60+), the following additional calls are available:
IDE_PARTITIONS returns the number of open partitions (excluding the system partition, which is always
open) on the unit specified:
;
;
;
;
;
;
;
;
;
IDE_PARTITIONS
IN:
OUT(s):
A=unit (0 or 1)
A=number of open partitions, excluding system
HL=free partition handle, or 0
Fc=1
Register status on return:
......../.. same
AFBCDEHL/IX different
IDE_IDENTIFY reads the 512-byte drive identity information, which can be examined to determine the
drive type and manufacturer, as well as other information:
;
;
;
;
;
;
;
;
;
;
;
;
;
;
;
IDE_IDENTIFY
Low-level IDE 512-byte "drive identity" read
IN:
B=page for transfer
C=unit (0 or 1)
HL=address
OUT(s):
Fc=1
HL=end address+1 (in segment 3)
OUT(f):
Fc=0
A=RC_READY, drive not ready
A=RC_SEEK, seek fail
A=RC_UNKNOWN, unknown disk error
Register status on return:
..BCDE../IX same
AF....HL/.. different