1
User’s Guide
v2.2
User’s Guide
add4Q
Table of Contents
1
2
3
4
5
6
7
8
Introduction ...................................................................................................................................... 4
add4Q Toolkit environment ............................................................................................................. 5
2.1
Enterprise Architect and add4Q – a very good combination ................................................... 5
Installation........................................................................................................................................ 6
Licensing.......................................................................................................................................... 7
Overview of the features .................................................................................................................. 9
5.1
Document processing .............................................................................................................. 9
5.2
Requirement management ...................................................................................................... 9
5.3
Test planning ......................................................................................................................... 10
5.4
Review management ............................................................................................................. 10
Guideline for the preparation and classification of projects ........................................................... 11
6.1
Preparation of a new project.................................................................................................. 11
6.1.1
Definition of development levels ...................................................................................... 12
6.1.2
Definition of the review protocol directory ........................................................................ 13
6.1.3
Definition of the proposed document structure ................................................................ 14
6.1.4
Review of project structure .............................................................................................. 15
6.2
Alternative procedure for creating a project structure ........................................................... 15
6.3
Other program settings .......................................................................................................... 15
6.4
Using Filters ........................................................................................................................... 19
6.5
Version control usage ............................................................................................................ 19
Working with single plug-ins ........................................................................................................... 20
7.1
Document processing (add4Q||editor) ................................................................................... 20
7.1.1
Representation of documents in the EA repository ......................................................... 20
7.1.2
add4Q||editor window structure ....................................................................................... 20
7.1.3
Creating documents ......................................................................................................... 21
7.1.4
Editing of the document structure .................................................................................... 22
7.1.5
Use of name prefixes ....................................................................................................... 23
7.1.6
Edit text contents ............................................................................................................. 24
7.1.7
Edit requirements ............................................................................................................. 25
7.1.8
Generate documents ....................................................................................................... 25
7.1.9
Create a document overview ........................................................................................... 25
7.2
Requirement management .................................................................................................... 25
7.2.1
Linking rules ..................................................................................................................... 26
7.2.2
Link requirements (add4Q||linker) ................................................................................... 27
7.2.3
Split / merge requirements ............................................................................................... 28
7.2.4
Check requirement links (add4Q||tracer) ......................................................................... 28
7.2.5
Classification of trace problems ....................................................................................... 29
7.2.6
Create trace report ........................................................................................................... 31
7.2.7
Visualization of requirement links (add4Q||viewer) ......................................................... 31
7.3
Test management (add4Q||tester) ........................................................................................ 32
7.3.1
Create test specifications ................................................................................................. 34
7.3.2
Create test plans .............................................................................................................. 34
7.3.2.1
Processing of test plans ............................................................................................ 35
7.3.2.2
Create a test protocol ................................................................................................ 35
7.4
Perform reviews (add4Q||reviewer) ....................................................................................... 36
7.4.1
Phase 0: Pre-reviews (optional)....................................................................................... 36
7.4.1.1
Selection of documents ............................................................................................. 36
7.4.1.2
Entering participant name .......................................................................................... 37
7.4.1.3
add4Q||reviewer window structure ............................................................................ 37
7.4.2
Phase 1: Discussion of review (mandatory) .................................................................... 39
7.4.3
Phase 2: Correction from review results (optional) .......................................................... 41
7.4.4
Phase 3: Release (mandatory) ........................................................................................ 41
Copyright Verweise ........................................................................................................................ 42
8.1
Disclaimer and warranty ........................................................................................................ 42
8.2
Contact .................................................................................................................................. 42
Page 2 of 42
add4Q
User’s GuideUser's Manual
Table of Figures
Component selection in the installation dialog ........................................................................................ 6
Dialog for product activation .................................................................................................................... 7
4plus project templates .......................................................................................................................... 11
Dialog for the creation of development levels (trace levels) .................................................................. 13
Dialog for the selection or creation of the review directory ................................................................... 14
Creation of a document structure .......................................................................................................... 14
Example of a project structure with created levels ................................................................................ 15
Document properties settings dialog ..................................................................................................... 16
Settings dialog for document-specific properties .................................................................................. 17
Properties dialog in the document ......................................................................................................... 17
Requirement with the "Hazard" property ............................................................................................... 17
Settings dialog for trace output .............................................................................................................. 18
Filter configuration ................................................................................................................................. 19
Context menu of version control ............................................................................................................ 19
Icons for refreshing ................................................................................................................................ 19
View of the add4Q||editor user interface ............................................................................................... 21
Dialog for editing document variables ................................................................................................... 22
UML diagram in the add4Q editor ......................................................................................................... 23
Naming scheme configuration dialog for requirements and test cases ................................................ 23
Project example with levels and requirements in the EA project browser ............................................ 26
Filter options in the objects view ........................................................................................................... 27
Example in the add4Q||linker ................................................................................................................ 27
Dialog box for splitting or merging of requirements ............................................................................... 28
Default view of the add4Q||tracer with error output ............................................................................... 29
View of the add4Q||tracer with document filter ...................................................................................... 29
Left: split/merge error; right: correct link ................................................................................................ 30
Example of a linked requirement with associated test cases ................................................................ 31
User interface of the add4Q||tester during editing ................................................................................. 33
View of the tester during execution phase of test plans ........................................................................ 34
Test window during execution phase of test cases ............................................................................... 35
Extract from a test protocol.................................................................................................................... 35
Start dialog of the add4Q||reviewer ....................................................................................................... 37
Reviewer window during a pre-review................................................................................................... 38
Tree view key ........................................................................................................................................ 39
User interface of the add4Q||reviewer in review mode ......................................................................... 40
Page 3 of 42
User’s Guide
add4Q
1 Introduction
Thank you for choosing add4Q! The constant pursuit of improvement is an important part of our
philosophy. Motivated by these considerations we developed add4Q, offering you a quick and efficient way
of completing projects according to a proven process.
add4Q will perfectly support you in requirement engineering, thus helping to accelerate the process from
requirements to final product. One of the strengths of add4Q is its intuitive usability merely requiring that
you accept structured project development such as the classic V model. Therefore, regardless of whether
you already have experience in requirement engineering or not, you will achieve success even on the first
day and realize an increase in productivity.
add4Q helps you create the project structure, requirements and test cases, it checks and visualizes whether
requirements and test cases are linked over the development levels and the add4Q||reviewer ensures a
valid product file with up-to-date documents at the end of the project.
We hope you enjoy working with add4Q and Enterprise Architect and wish you a lot of success!
Page 4 of 42
add4Q
User’s GuideUser's Manual
2 add4Q Toolkit environment
The add4Q Toolkit aims to accompany and support project development goal-oriented with Enterprise
Architect as defined by the V model on all levels of development. The Toolkit consists of a total of six plugins that simplify development processes such as document processing, requirement management, test
management and review management continuously in the UML modeling tool Enterprise Architect.
The add4Q features aim to support a consistent and structured approach of development teams in their
project environment. To store their used information, the plug-ins exclusively revert to the Enterprise
Architect repository.
2.1 Enterprise Architect and add4Q – a very good combination
Due to its various possibilities as UML modeling tool, Enterprise Architect provides an excellent platform for
structured software development as defined by the V model. Wide distribution, a very good priceperformance ratio and the open interface for commercial and user-specific extensions ensure long-term
reliability.
The combination of Enterprise Architect with the basic characteristics
-
use of a single repository
easy use of the UML notation on all levels
scalability for small and large projects
support for version control
in connection with the add4Q Toolkit allows in addition:
-
easy document management
consistent requirement engineering
reliable test planning
and well-structured team reviews
Page 5 of 42
User’s Guide
add4Q
3 Installation
System requirements
add4Q requires no special hardware or software facilities but a PC with installed
-
Microsoft Windows operating system Windows XP/SP3 or higher
Microsoft .NET Framework 4.0
Enterprise Architect 8.0 or later
Microsoft Office 2003 or later (only required for document export)
and the system configuration recommended by Microsoft and Sparx Systems or better.
Installation
Please download the latest version of add4Q from our website before you start installation. add4Q is
offered as an executable file (Setup.exe). After accessing Setup.exe you will be guided through installation
by a graphical installation routine.
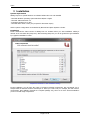
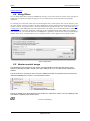
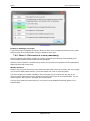
Component selection in the installation dialog
During installation, you will have the option of selecting individual components. We recommend you to
always install all elements because as developer or tester you need to link, for example, also test cases to
requirements. Since add4Q is licensed as a complete package only, there are no more licenses available if
you do not install single components.
Page 6 of 42
add4Q
User’s GuideUser's Manual
4 Licensing
add4Q is licensed for 30 days after installation and can be used without restriction. As a consequence,
when starting Enterprise Architect, a dialog will appear which allows you to carry out licensing or continue
to use the software in demo mode. The alternatives in detail:
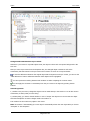
Dialog for product activation
Demo license
The software can be used for 30 days without restriction. All generated requirements, test cases,
properties, notes etc. are stored in the EA repository and can still be used, even without add4Q.
Single-user license
Single-user licenses are tied to the computer from which the activation key is requested. You need your
customer or order number for the request.
Activation is divided in two steps. A click on the "Request key" button opens a dialog box for entering the
customer or order number. After entry, an e-mail will be generated containing the customer information
and a security code.
Do not modify that information. The activation key will be sent to the sender's e-mail address.
For activation, you click on the "Import key" button and copy the license key into the input field. Activation
is now completed.
Note: If you need to install add4Q to another computer, you need a new license key!
Floating license:
With a floating license, you will receive a license file which can be stored on any computer or server that is
accessible on the network. For activation, you just enter the path to the license file. A license is then
checked out on the server, being available as long as the application is running and a network connection
Page 7 of 42
User’s Guide
add4Q
exists.
Floating licenses allow different users to use the same licenses. This saves costs if not all users use the
software at the same time, and facilitates license management.
Page 8 of 42
add4Q
User’s GuideUser's Manual
5 Overview of the features
The following section provides a short description of the main features and functions of the modules.
5.1 Document processing
The add4Q||editor plug-in offers the following options for document processing:
Document storage in the repository
Documents can easily be created or edited; all document artifacts are stored in the EA repository as notes,
linked documents, requirements, test cases etc.
Conversion of packages
Existing packages can be converted by the add4Q||editor into documents for further processing.
Automatic numbering
Hierarchical document and chapter numbering is automatically created.
Formatting
Document contents such as headlines, texts, tables, graphs, references and requirements are easily
editable.
Document attributes
Each document is tagged/provided with attributes like author, version etc.; these attributes are stored as
"tagged values".
Properties
Each element of a document can be tagged with characteristics such as risk level, priorities etc. which are
stored in the EA repository as properties.
Document export
All documents generated with add4Q can be printed in MS Word format as *.doc/*.docx file, as RTF file or
in HTML format. Generation can be done with Word templates (*.dot/*.dotx) so that the documents meet
their corporate standard.
Document overview
An overview (list) of all managed documents with their versions can be generated at the push of a button.
5.2 Requirement management
Requirement management is realized in the add4Q||tracer, add4Q||linker and add4Q||viewer
modules and offers the following options:
Development levels
Mapping and creation of project-specific package structure in the EA repository to development levels such
as requirements (0), functional description (1) and design (2).
Links
Simple linking of requirements, elements of implementation and description chapters on the development
levels.
Graphical view
The add4Q||viewer provides a graphical view of all links of the active element. Thus, one can easily trace
one requirement on the levels and, at the same time, see the associated test cases.
Check for completeness
Check for completeness of links between requirements, test cases and realizing artifacts. Check can be
made on the development levels or in individual documents.
Summary
Generation of a document or trace report, including a summary of all existing and missing links.
Page 9 of 42
User’s Guide
add4Q
5.3 Test planning
The add4Q||tester plug-in offers the following options:
Test specification
Creation of test specifications for the definition of test cases.
Link
Link between test cases, requirements and objects of implementation.
Test plans
Creation of test plans in accordance with the underlying test specification and entry of test results.
Report generation
Output of test specifications and test plans to prove test coverage and execution with results logging.
5.4 Review management
The add4Q||reviewer plug-in provides the possibility to check and release documents of any type in a
specified sequence.
Pre-review phase
Every participant looks through the document to be reviewed and makes notes, if necessary.
Review phase
All review participants view the document and the pre-review notes.
Correction phase
The author updates the document according to the corrections made during the review.
Examination phase
The release manager examines the changes and releases the document. For the release, it is possible to
provide documents with a digital signature.
Page 10 of 42
add4Q
User’s GuideUser's Manual
6 Guideline for the preparation and classification of
projects
When creating a new EA project using the add4Q Toolkit, the following fundamental conditions should be
observed in terms of a V model procedure.
Development levels
The structure of the project should be divided into several levels of development in which both the system
requirements and the implementation are described. The number of development levels is not regulated.
For small projects, for example, there may be one level on the request side, for larger projects there may
be more levels that are broken down from the system level to component levels.
Requirements and tests
The requirements in the different levels of development are to be realized with requirement artifacts that
spread through the levels by links until realization in classes or document sections in descriptions. According
to the V model, all requirements are to be backed "horizontally" by test cases and tested in the relevant
test specifications.
Document orientation
The structure of the project is document-oriented. Each level contains documents whose contents can be
transferred to another document and saved at any time.
6.1 Preparation of a new project
To start a project, the first step should be to create a basic framework in the EA repository. This framework
reflects all the necessary work steps and artifacts of the project, meets project needs in terms of the
development levels planned and contains all necessary management structures.
After creating a new blank EA project, the following options are available:
Manual creation of the basic structure
All steps to create a new project structure are carried out manually using the add4Q plug-ins.
Use of the EA model wizard
By using the model wizard, a pre-assembled structure will be imported on the basis of a project example.
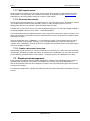
4plus project templates
Under the entry 4plus there are several freely combinable subprojects available to choose from, with
prepared document structures. Documents that are not needed can be removed in the EA project browser.
Page 11 of 42
User’s Guide
add4Q
6.1.1 Definition of development levels
Development levels are important structuring elements during the development process of a project. The
project is described in each of these levels under a certain aspect. Here are a few examples of development
levels:
Request level
On this level, the project is regarded from the perspective of customer requirements or product
management. What do you expect from the system? In this respect, technical implementation is irrelevant
or only of minor relevance.
Functional description level
Description from development point of view of how single requirements are to be technically implemented.
Design level
Description of the architecture, program structure and modules for the realization of functions.
When using the add4Q Toolkit, it is important that on all description levels requirement artifacts are used
for the traceability of individual requirements.
In vertical alignment, requirements are linked to requirements or to implementation elements such as
classes or descriptive document sections.
In horizontal alignment, requirements and implementation artifacts are linked on any level to the
corresponding test cases.
The project can be extended by any number of development levels. For example, by one level in which
system requirements are broken down to component requirements.
Create the structure in the EA project
To create the different levels in the repository, open the configuration dialog via the menu item
[Extensions/add4Q/Einstellungen] by entering "Trace level". The planned development levels can easily be
created in this user interface by creating the required packages or selecting them from existing project
structures.
Page 12 of 42
add4Q
User’s GuideUser's Manual
Dialog for the creation of development levels (trace levels)
Impact on the EA repository:
There are packages created which are assigned to the "Level" category.
Note: Development levels must be created in the appropriate order according to the development process.
add4Q assigns the levels unchangeably in that order. It is not possible to create all the levels in one pass.
Confirm each defined level with OK.
6.1.2 Definition of the review protocol directory
The next step is the definition of a directory in which all review protocols are collected that will be created
later on after the review and release of documents.
To create this directory, open the configuration dialog via the menu item [Extensions/add4Q/Settings] by
entering "reviewer". There, you can accordingly create a directory under the section "review repository
package".
Page 13 of 42
User’s Guide
add4Q
Dialog for the selection or creation of the review directory
Impact on the EA repository:
A package with the stereotype "Reviews" is created.
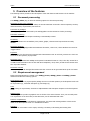
6.1.3 Definition of the proposed document structure
At this point, documents are created that are to be generated during the further course of the project. For
this purpose, the "add4Q||editor" plug-in is started via the menu item [Extensions/add4Q/editor]. Via the
icon "New document" the documents can then be created in order on different development levels.
Creation of a document structure
In addition to the development levels which have already been defined, it is often useful to create other
directories containing documents without traceable information. For instance, a directory of project
agreements containing a project management plan or a technical documentation directory containing a user
manual.
Page 14 of 42
add4Q
User’s GuideUser's Manual
Impact on the EA repository:
A root package is generated for each new document, containing a number of "tagged values" with
document variables such as title, author etc.
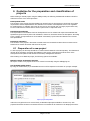
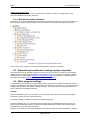
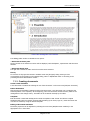
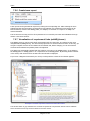
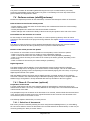
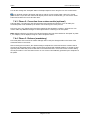
6.1.4 Review of project structure
At this point, it should be checked whether all required documents and directories have been created. The
following figure shows a typical example of the basic structure of a project in the EA project browser.
Example of a project structure with created levels
In the course of the project it is, of course, always possible to add more documents.
6.2 Alternative procedure for creating a project structure
As an alternative to the presented scenario, the project structure can also be created by using supplied
sample structures. Afterwards, this example can be adapted to the current project by deleting or adding
development levels (see chapter Definition of development levels) or by deleting or creating individual
documents (see chapter Definition of the proposed document structure).
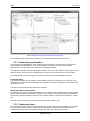
6.3 Other program settings
It is advisable to look directly at the setting dialog and its contents more in detail and make the required
settings. The add4Q program settings are accessed via the Extensions menu item or in the project browser
via [Right mouse button / Extensions / add4Q / Settings]. You can also open the settings dialog via the
plug-in windows using [add4Q / Settings].
General:
[Personal information] Here, you can enter your first and last name, which will be used when creating
documents, creating reviews or performing tests.
[Languages] add4Q is available in German and in English language.
[Document display] Here, you can change how document titles are displayed throughout the plug-ins.
When created, documents are given a unique, three-digit identification number. The document type is
provided by the user's document properties.
Example: If you want your documents displayed in a format like "[201] Functional specification - add4Q",
Page 15 of 42
User’s Guide
add4Q
you can enter a format like "[%id%] %type% - %title%".
[Miscellaneous] Ability to choose a "settings package" where filters, rationals, document settings and more
will be stored.
Also: options to show a splash screen on plug-in startup, project browser selection synchronization and
display of stereotypes.
The type of document results from the document variables that were entered by the user; it can be
indicated in the overview.
Trace level:
see chapter Definition of development levels
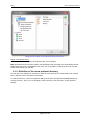
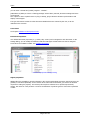
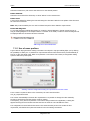
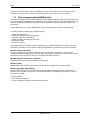
Document Properties:
User defined document properties (e. g. author, title, version) can be assigned to each document. In the
settings dialog, you can modify the attributes and their data types. Global values can also be assigned.
Local values are modified in Editor. See Creating documents.
Document properties settings dialog
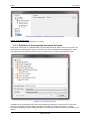
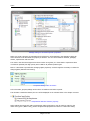
Object properties:
add4Q offers the possibility to provide elements in the project with defined properties, with those being set
globally or document-specifically. In the context menu of the desired document, you choose the function
required for setting the property. For instance, this may be a selection box to provide requirements,
classes, test cases etc. with priorities or a list for the definition of product types for which this requirement
is valid.
Page 16 of 42
add4Q
User’s GuideUser's Manual
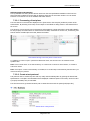
Settings dialog for document-specific properties
When you create a property, by activating the check boxes it will be defined in the description dialog for
which elements of the document the property is effective. You can choose between artifacts, packages,
classes, requirements and test cases.
The result in the document might look as shown below. At a glance, it is clear that the requirement does
not hold risk potential, has high priority and is valid for all planned product types.
Note: if a document is opened while changing object properties, a refresh might be necessary to reflect the
changes ([Edit / Refresh local model]).
Properties dialog in the document
In the document, property dialogs can be shown or hidden as and when required.
If an element is marked as hazard, the icon will be displayed on the relevant folder in the chapter overview.
Requirement with the "Hazard" property
When editing documents with many requirements and/or properties, it may be useful to switch to the
matrix view ([View / Matrix view]), where all objects and properties are shown in a matrix-like dialog.
Page 17 of 42
User’s Guide
add4Q
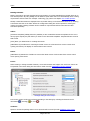
Naming schemes:
Naming conventions are little discussed project agreements, as certain standards have already been set up
from actual practice. By using add4Q one can define a syntax which will be set automatically when creating
requirements and test cases. For example: numbering_type_name. See chapter Use of name prefixes.
Already created documents are displayed here. By double-clicking on the desired document or by selecting
a document and click on the "Edit" button the configuration dialog box will be opened for entering the
naming convention. Naming schemes can be created for requirements and test cases and are valid
document-specifically.
editor:
[Document templates] add4Q offers the possibility to save created documents as templates for the use in
other projects. Specify the path where you want to store document templates. Template files are stored in
XML format.
[Font] Enter your default font for creating documents.
[Miscellaneous] Checkboxes for retrieving the latest version of a document from version control when
opening a document, the display of notes and auto-save interval.
tester:
[Miscellaneous] Activate the checkbox to retrieve the latest version of a document from version control
when opening a document.
tracer:
When creating or linking traceable elements, errors and omissions can happen. For each error class it can
be specified in the tracer dialog how this class is rated. See also Classification of trace problems.
Settings dialog for trace output
In the tracer output results can be filtered according to the settings by selecting the desired icon for
information ( ), warning ( ) or error ( ).
reviewer:
Option to choose the package where review protocols will be stored (see also Definition of the review
Page 18 of 42
add4Q
User’s GuideUser's Manual
protocol directory).
6.4 Using Filters
You can define global filters using the [add4Q/Filter settings...] menu item. Filters are used to restrict the types of
objects that are visible throughout the plug-ins. You can combine filters and create filters using multiple
conditions.
For example, you could create a filter that only shows objects with a version greater than 2.0. For doing so, press
the "plus"-button to create a new filter. The filter configuration dialog is opened automatically. Now you just have
to select "Version" and "greater than" in the drop down boxes on the left and enter "2.0" as the value (See Filter
configuration). If you additionally want only requirements to be shown, you can either add another condition to
the filter or create a new filter altogether. Conditions can be combined with the logical "AND"/"OR" operators.
After confirmation, you can select the filters in [add4Q/Filter...] globally or locally for the currently opened plugin
window. If you do so, any objects which aren't a requirement with a version higher than 2.0 will be invisible.
Filter configuration
6.5 Version control usage
The advantages of VC systems are well known, the implementation of EA-supported version control
systems is described in detail in the EA online help. add4Q is set up for use with the EA-supported VC
systems.
The VC functions for checking in and out and for updating the model are opened from the context menu
"Extensions/add4Q/version control" of the EA project browser.
Context menu of version control
Among the add4Q menu items [Edit] and in the toolbar you will find the entries / icons for updating of the
local model or updating from version control.
Icons for refreshing
Page 19 of 42
User’s Guide
add4Q
7 Working with single plug-ins
In the following chapter, a possible approach to project work with the add4Q Toolkit is described by way of
examples. add4Q does not force you to do things in a certain order or work in rigid sequences. However, it
clearly shows you at any time what remains to be done. You are free to do it according to your "bestpractice" experience, the V model approach or with methods of agile development.
7.1 Document processing (add4Q||editor)
The central application from which everything proceeds and where in the end everything reconvenes, is
the add4Q||editor.
7.1.1 Representation of documents in the EA repository
The add4Q plug-ins manage documents in the repository under a fixed structure and with defined EA
artifacts.
Document root:
A package that can be stored anywhere in the repository. This package contains a number of "tagged
values" with document properties such as author, version etc. of the document.
Document content:
Subchapter:
Packages that are arranged hierarchically under the root package, containing notes as well as linked
documents.
Requirements:
EA requirement objects with notes and linked documents.
Diagrams:
EA diagram objects which are displayed in the add4Q||editor but cannot be edited.
Document artifacts:
EA document artifacts that can be created under packages.
additional Objects:
Change, Class, Feature, Issue, Task, Test case
Note: contrary to normal text, artifacts can be linked, for example, with requirements or realizing classes.
Note: in order to ensure consistent object sorting between the EA project browser and add4Q, "Allow Free
Sort" should be enabled in the EA options dialog ([Tools / Options / General]).
7.1.2 add4Q||editor window structure
To start editing documents, select the EA menu item [Extensions/add4Q/editor].
Page 20 of 42
add4Q
User’s GuideUser's Manual
View of the add4Q||editor user interface
The add4Q||editor window is divided into two panes:
- Document structure pane
On the left side of the window an outline will be displayed, with subchapters, requirements and document
artifacts.
- Document details pane
The right side contains the editor with coherent document contents.
Library
An overview of all project documents is available under the [file/open] dialog. Sorting is done
corresponding to the selection in the settings dialog, either in alphabetical order or according to the
preceding document identification number.
7.1.3 Creating documents
Create a new document
A new document is created via selecting the icon "New document" or the menu item [file/new document].
Define destination
After entering the destination package and the document name, a new document root is created at the
selected position in the repository. At the beginning, each new document contains a history table for the
management of the change history. This table can be continued manually by the editor.
Template
Each document created with add4Q can be saved as template in XML format. This allows to adjust
templates easily with user-specific elements and formatting (cover sheet, logo etc.). New documents can
now also be created by using the desired template.
Editing of document attributes
Document properties can be adjusted by selecting the menu item [Edit/document variables] or the
appropriate icon in the toolbar.
Page 21 of 42
User’s Guide
add4Q
Dialog for editing document variables
Document version:
If a document was released during the review process, a new version of the document will automatically be
created and a corresponding entry will be added. The released document is frozen in the repository and no
longer editable.
7.1.4 Editing of the document structure
The document structure is edited in the document structure pane.
Add chapters on top level
Right mouse click on empty screen area / add chapter.
Insert subchapters
Select chapter icon, right mouse click / insert chapter.
Insert document artifacts
Select chapter icon, right mouse click / insert artifact. Artifacts are preceded by a special symbol in the
structure.
Insert requirements
Select chapter icon, right mouse click / insert requirement. Requirements are preceded by a special symbol
in the structure.
Note: When creating the first requirement for a document, the configuration dialog will be opened for
defining the naming syntax if the checkbox is activated (default) under [add4Q/settings].
Move elements
Page 22 of 42
add4Q
User’s GuideUser's Manual
Select the element icon, left mouse click and move to the desired position.
Delete elements
Select the icon and click the delete key or select "Delete" in the context menu.
Delete notes
A note will be deleted by deleting the text and saving the document. With the next update of the document
the note will be removed.
Note: Only notes created by the user can be deleted except for those related to requirements.
Insert UML diagrams
To use UML diagrams in add4Q documents you create the desired diagram in the EA project browser or
drag an existing diagram to the chapter where it is needed. In the editor, a button to show the diagram will
be displayed after the document has been refreshed.
UML diagram in the add4Q editor
7.1.5 Use of name prefixes
It goes without saying that strict naming conventions are obeyed in a project. add4Q helps you by offering
the possibility to define pre- or postfixes for requirements and test cases which will be put automatically in
front of or after the actual name. When a requirement or test case is first created, a configuration dialog
opens to define the prefix syntax.
Naming scheme configuration dialog for requirements and test cases
If one creates a syntax as above in the screenshot, the result would look like:
001_SA_requirement name
The counter automatically increments the requirements. It is possible to change the value manually.
SA was set as fixed text and the text box used for naming.
Consequently, every time a requirement or test case is being created in the application, a dialog box
appears showing the serial number and the fixed text in which the user still adds the name.
The configuration is saved with the document. This means that the person who creates the first
requirement, also defines the syntax and needs to know the naming conventions.
Page 23 of 42
User’s Guide
add4Q
Subsequent modifications and extensions are possible. For this purpose, you open the settings dialog
[Extensions/add4Q/settings/naming schemes] and select the document in which changes are to be made.
A double-click on the desired document opens the configuration dialog.
Note: Please note that changes do not affect already created requirements.
7.1.6 Edit text contents
After the creation of chapters, document artifacts and requirements, these are shown as headings in the
document detail window. In order to enter text, one puts the cursor under the heading of chapters and
artifacts, with requirements under the applied notes field, and starts typing.
Formatting of text contents in linked documents
In the toolbar, the usual formatting options such as font, size, color, alignment etc. are provided.
Insert images
In the text entry field, image files, graphics, screenshots etc. can be inserted. The size can be adjusted by
moving the handle right at the bottom into the desired direction. Push the shift key to keep the proportions.
add4Q provides no further image editing tools.
Insert tables
Tables can be inserted by clicking the icon "Insert table" and entering the number of columns and lines
needed in the following dialog. Additional lines and columns can be added by marking a line or column and
selecting the desired action in the context menu. The formatting options for tables are limited to column
width, color and text formatting.
The line height is defined by the font size. Formulas and calculations cannot be executed or made.
Insert labels
Labels can be created for tables and graphics by clicking the icon and selecting in the following dialog
whether the caption will be created for a graphic or a table. The text entered will be inserted at the
relevant point of the document.
Insert links or references to tables and graphics
The labels are stored in a table for further use. This allows you to refer to previously inserted tables and
graphics at any point in the document. Select the required label under the menu item [Insert/insert link] to
link it to the element.
Insert references to document chapters
References to document chapters are inserted at the current cursor position in the document details pane
by dragging and dropping the desired chapter into the document navigation window.
Position cursor on object referred to
By pushing the <CTRL key> and clicking on the reference, the cursor will be positioned on the
corresponding chapter / table / image.
Insert notes
Notes are standard elements of EA artifacts with limited formatting option. They appear as a yellow field.
In add4Q, we use notes as standard element for requirements as they allow us to place a short key
information which will be visible at other points (e.g. in the viewer) by mouse-over.
Search
By means of the search function one can search the document starting from the cursor position, optionally
forward or backward, by clicking on the corresponding icon. You can search for whole words or strings.
Search and replace
The dialog for [Search and replace] is reached via the [Edit] menu. The search function can be used casesensitive and for whole words or syllables. Search results are gone through step by step, replacements are
made by the user after confirmation.
Page 24 of 42
add4Q
User’s GuideUser's Manual
7.1.7 Edit requirements
Requirements are presented in the document structure pane with a specific icon and semantically match
the description of a requirement. The contents can be edited, as described in chapter Edit text contents.
Subchapters or document artifacts cannot be created for requirements.
7.1.8 Generate documents
Via the menu item [File/export file] or by selecting the icon, the active document can be issued for external
use. Possible output formats are RTF and HTML, offering no other formatting options. Since the
add4Q||editor does not use hyperlinks, generated HTML pages are static.
Template files (*.dot) can be used for the output as MS Word document. You will find a sample template in
the add4Q installation directory in the folder "..\examples\templates".
The included Microsoft Word template generates a front page, headers and footers, table of contents, list of
tables, list of images, requirements list and the edited document content. All references to chapters, tables
and images are active.
Using the placeholder string "{CONTENT}", you can define the position in the template where the actual
document content will be inserted. This way, you could create indexes at the end of the document for
example. If the "{CONTENT}" string is not found in a template, the document content will be placed at the
end of the template by default.
7.1.9 Create a document overview
After creating several documents, it is useful (sometimes even necessary) to create a list of the documents,
including title, identification number and version. By selecting the corresponding icon a new document will
be automatically generated with the name "[Index] – document directory" and displayed in the library.
7.2 Requirement management
Requirements are managed with the modules add4Q||linker, add4Q||tracer and add4Q||viewer which are
interdependent according to their function. Precondition for the use of requirement management is
that the development levels have been assigned to be able to link requirements throughout the levels and
to make them traceable.
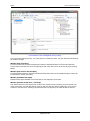
The following example shows a project with different levels, documents and classes, as displayed in the EA
browser.
Page 25 of 42
User’s Guide
add4Q
Project example with levels and requirements in the EA project browser
7.2.1 Linking rules
To create a complete system in terms of requirement engineering, each requirement has to be linked to an
implementation and to at least one test case.
Required links:
Requirement is linked to the previous / next level.
A requirement is linked with at least one test case on the same level.
A test case is linked to a requirement on the same level.
Exceptions:
A requirement is realized with an artifact or text element which is not assigned to a trace level. In this case,
the requirement does not have to be linked to the next level.
A requirement has been split or merged. In these cases, only the resulting products are linked. If, for
example, requirement A has been split into requirement B and C, the products B and C are further linked,
but not the basic requirement A.
A test case can also be realized with elements that are not assigned to a trace level.
Permitted links:
Splitting / merging of requirements on the same level.
Link with requirements and elements that are not assigned to a trace level.
Link direction:
The link direction in add4Q goes from the lowest to the next higher level. An example:
The realization (L2) meets the requirement of the technical specification (L1), the requirement of the
technical specification (L1) meets the requirement of the requirement specification (L0).
Page 26 of 42
add4Q
User’s GuideUser's Manual
See also Classification of trace problems.
7.2.2 Link requirements (add4Q||linker)
To link requirements with artifacts, the add4Q||linker user interface is started via the menu item
[Extensions/add4Q/linker]. The aim is to link all requirements of a higher level with requirements on a
lower level or with realizing document sections or classes.
The add4Q||linker user interface divides the project into three views:
Objects view
Contains all documents with included requirement objects, the marked requirement is loaded into the
"links" window.
Filter options
With the icons in the objects view, the selection can be filtered and one can choose between display in list
or tree form.
Filter options in the objects view
Links
Here, all links of the requirement selected in the requirements window are shown and links with
requirements, test cases and realizing objects are created.
Project view
This window contains the structure of all documents and artifacts of the current model, including
subchapters, requirements, diagrams, classes and test cases. Similar to the objects view, there are also
filter and display options.
Example in the add4Q||linker
Individual artifacts are linked according to the following procedure:
1. Through selection of a requirement in the left pane, the requirement is loaded into the "links" window.
Possibly already existing links are displayed here.
2. In the project view window, an element of another level which is to be linked to this view is selected and
dragged to the element in the links window. It is possible to select requirements, chapters of documents,
artifacts, diagrams or objects of realization. Multiple selection is possible while holding the CTRL key.
Note: It is possible to select, for instance, requirements of level 1 and link them with elements of previous
or following levels in a single operation. If already existing, test cases can of course be linked as well.
Page 27 of 42
User’s Guide
add4Q
7.2.3 Split / merge requirements
It is possible to split or merge requirements by linking them to requirements on the same level. This leads
to a question concerning the link relation.
Dialog box for splitting or merging of requirements
7.2.4 Check requirement links (add4Q||tracer)
To obtain a complete system of linked requirements, the following conditions have to be fulfilled:
All requirements of a level must be linked to at least one requirement of the next level or, in terms of
realization, with a document section or class. All requirements within one level must be linked with at least
one test case (see chapter Test management).
These conditions apply to all defined levels.
To check which elements are not yet linked, the add4Q||tracer is started via the menu item
[Extensions/add4Q/tracer]. The window is structured in a way that unlinked requirements and test cases of
each level can be displayed in an individual list. For each entry, a clear error message is shown.
Page 28 of 42
add4Q
User’s GuideUser's Manual
Default view of the add4Q||tracer with error output
Alternatively, trace errors can also be issued after being filtered by documents which allows employees to
see only those issues relevant to them, or to distinguish hardware and software specific trace output.
View of the add4Q||tracer with document filter
Rationals
If there are trace errors in the model which should be ignored, you can assign them to a so-called rational.
This can be done by using the context menu of the specific trace error. Trace errors which are assigned to
rationals are not shown by default.
7.2.5 Classification of trace problems
Below, you will find some useful information for the tracing and handling of incidents causing an error
message in the tracer.
Multiple requirement/test case descriptions:
Names are checked for consistency, a message is displayed according to your selection.
Multiple links:
In EA requirement diagrams it may happen that two trace links are created accidentally between
requirements. With add4Q, only one link can be created between two requirements.
Linking with wrong direction:
Using add4Q the link direction is: L3 complies with L2, L3 complies with L1 etc. Or in other words: code
complies with technical specification, technical specification complies with requirement specification.
Page 29 of 42
User’s Guide
add4Q
Hazards that are linked to non-hazards:
Normally, a hazard element has to be linked to a hazard, i.e. a requirement having label hazard on level 0
has to be linked to hazard elements until realization.
An element getting the attribute hazard only on level 1 has to be linked to a hazard on level 2 but not on
level 0.
Exceptions are test cases that cannot get a hazard label. The test engineer will recognize that the
requirement to be tested is labelled as a hazard.
Requirements/test cases without trace level:
It is possible to create requirements and test cases in accompanying documents. In this way, a requirement
can, for example, be realized with a text artifact in a user manual.
Links skipping the trace level:
With add4Q, it is impossible to skip levels. However, it is possible in EA to link a requirement of level 3 to a
requirement on level 0.
Requirements that are not linked to the previous level:
Time and again, it will happen in practice that requirements are not created until realization. In terms of a
complete system, these requirements have to be linked and accordingly created in the requirement
specification and technical specification.
Requirements that are not linked to the next level:
Likewise, there could be requirements which do not have an equivalent on the next level or which are not
yet linked.
Requirements with external link, without link to the next level:
External means a link to an element without trace level.
Requirements without test case link on the same level:
As in add4Q terms there may not be a requirement without test case, the selection box should then
indicate an error.
Requirements/test cases that are linked to a wrong level:
See above. These errors are to be corrected in terms of a complete system.
Split/merge errors:
This error message refers to an incorrect link. For instance, if requirement A was split into B and C and A
was linked to the next level. The correct way is to link B and C.
Left: split/merge error; right: correct link
In-level split/merged requirement with test case linking:
Analogously to the above statement, the message refers to test cases related to a requirement. If, as in the
example mentioned above, requirement A is additionally linked to test cases, these have to be linked to B
and C. Accordingly, when being merged from C and B into A, test cases have to be linked on A.
Page 30 of 42
add4Q
User’s GuideUser's Manual
7.2.6 Create trace report
Trace reports can be generated at any time by clicking the corresponding icon. After selecting the store
package and the document name, the document is generated as a so-called trace report which can be
further edited by means of the add4Q||editor, for example, to comment on a report or to adapt it to
external demands.
This list serves as an easy proof for all requirements to be covered by test cases and realizations through
classes or document sections.
7.2.7 Visualization of requirement links (add4Q||viewer)
The add4Q||viewer is used to track single requirements with all of their links. It is started via the menu
item [Extensions/add4Q/viewer]. The viewer always presents one element with all its links. In this way, you
will get a complete overview of the relations of the element and, before changes, you can check which
elements will be affected and possibly have to be adjusted.
The diagram is automatically updated with the selection of an entry in the add4Q||tracer, of an artifact in
the add4Q||linker or add4Q||tester or of a requirement in the add4Q||editor. By selecting another element
in the viewer, that element will be set active and its links will be displayed.
If you hover a diagram element with your mouse, a tooltip with the content of the element appears.
Example of a linked requirement with associated test cases
The element which is grey-shaded in the screenshot represents a requirement with the "future" attribute
which means that it will only become relevant in a future version.
Page 31 of 42
User’s Guide
add4Q
Under the menu item [view] a grid can be displayed to clearly differentiate levels and test cases and to
increase clarity. Likewise, the number of requirements listed next to each other can be limited.
7.3 Test management (add4Q||tester)
The creation and editing of test cases is available in the plugin add4Q||tester which can be selected via the
menu item [Extensions/add4Q/tester]. Analogous to the procedure used so far, test specifications and test
plans are created as documents in which test cases are inserted as traceable elements including their
descriptions.
A precondition for the use of the add4Q||tester is that the development levels have been assigned.
The testing process is divided into the following steps:
-
creating test specifications
creating test cases in the test specifications
linking test cases with requirements
creating test plans and assigning test cases
entering test results
creating test reports.
The add4Q||tester user interface consists essentially of four elements whose functions and names vary,
depending on the action. In the execution stage [test specification] the window is structured as follows:
Window [test specification]
Serves for creating test specifications and test cases. Subsequently, it contains an overview of the
predefined packages including the created test cases. One can switch between tree view and list view and
also filter for one or the other so that only the unlinked test cases are shown.
Window [content of test case / test step]
Serves for creating test steps with detailed test instructions.
Window [links]
Displays always the active test case with its links and allows to link test cases to requirements.
Window [available requirements]
Shows all requirements of the level on which the test specification has been created. One can switch
between tree view and list view and the requirements that are to be displayed can be filtered. There are
the options to display
- all requirements,
- only unlinked requirements
- or only requirements which are not linked with test cases.
Page 32 of 42
add4Q
User’s GuideUser's Manual
User interface of the add4Q||tester during editing
In the execution stage [test plan] , the visual structure remains the same, only the names and functions of
the windows change.
Window [test case filter]
Is used to create test plans and subsequently contains a statistical analysis of all test cases with their
current status. This view also serves for filtering the test cases which are to be shown (all, open, passed,
failed).
Window [test cases in the test plan]
Is used to add test cases to test plans and lists the filtered test cases of the statistical analysis. These can
be activated for further processing.
Window [available test cases]
Displays all test cases available on the level that are not assigned to a test plan.
Window [content of test case / test step]
This window serves for entering the test results on the execution level [Test plan]. For this purpose, the
name of the tester, the test date and the result of each test step are entered. Optionally, a note can be
created for the test result. If testing was performed due to a bug ticket, the ticket ID can be entered.
Page 33 of 42
User’s Guide
add4Q
View of the tester during execution phase of test plans
The following chapters describe the procedure for creating test specifications and test plans.
7.3.1 Create test specifications
The first step in test management is the creation of test specifications. The document is created via the
menu [file/new/test specification]. In the following dialog, one selects the level on which the test
specification is to be generated and creates the corresponding package.
This package is loaded in the [Test specification] window, where now other chapters and test cases can be
added for further structuring. The requested action is chosen from the context menu of each chapter.
The following steps can be performed by selecting a test case in the [Test specification] window:
Create test steps
The required test steps can be created in the [test steps] window by selecting the icon "New step". The
description of the test case, input parameters and acceptance criteria are released for this step and will be
saved when you exit.
Test steps can be copied and their order can be changed.
Assign test cases to requirements
By selecting a test case in the [Test specification] window, this test case is displayed in the [Links] window
and can there be linked to requirements. Therefore, you choose the desired requirement in the [Available
requirements] window and drag it to the test case. Multiple selection is possible while holding the <CTRL>
key.
Incorrect links are removed by marking them and pressing the <Delete> key.
7.3.2 Create test plans
After the definition of the test cases in the specification, the test plans can now be created. The procedure
for creating a test plan is equal to creating the test specification. The test plan generated that way is
loaded into the [Test cases in the test plan] window and can then be filled with test cases.
Page 34 of 42
add4Q
User’s GuideUser's Manual
Add test cases to the test plan
In the [Available test cases] window all test cases from the test specifications available on this level are
shown and can be added to the test plan by dragging them into the test cases window. You can switch
between a tree and list view in the available test cases window.
7.3.2.1 Processing of test plans
The test cases to be executed are displayed in the [Test cases in the test plan] window by means of the
selected filter. By selecting a test case, the test steps to be fulfilled are being shown in the bottom half of
the screen.
The selection of a test step shows the description and acceptance criteria and makes results fields editable.
For this purpose, the tester enters his name and the test date, comments on the test run, if necessary, and
sets the status. Possible options are Edit, Passed and Failed.
Test window during execution phase of test cases
To update the number of open / passed and failed test cases, the window has to be reloaded via the
Update button.
Note: Click on "Edit name" in the field "tested by" to create a list of names of all the testers, or at least to
enter their names.
Note: If the option "continue automatically" is enabled, the next test step is automatically selected when you
mark a test step as "passed".
7.3.2.2 Create a test protocol
Test protocols can be created any time and very easily with the add4Q editor by opening the desired test
specifications or test plans. All information that is displayed in different panes in the tester, can be found in
a properly formatted, easy-to-read table.
The document can be generated as Word, RTF or HTML document with the option [File/export file].
Extract from a test protocol
Page 35 of 42
User’s Guide
add4Q
The protocol contains all information gathered during the test cycle on tested modules, test cases,
personnel responsibilities, timing and results. The green or red marking on the test step shows at first
glance whether the step passed or failed.
7.4 Perform reviews (add4Q||reviewer)
Reviews are important processes for the assessment, correction and subsequent release of documents.
Roles of those involved in the review process
-
Review manager (usually the author of the document) who coordinates and chairs the review meeting.
Author of the document.
Review participants who examine the document and make comments.
Release manager who confirms the validity of the document by his signature at the end of the review.
Precondition for the execution of a review
For the storage of review protocols, it is necessary to create a specific log directory where all review
protocols for the documents of the project are being collected. See chapter Definition of the review protocol
directory.
The dialog to create the directory will be displayed automatically when the storage of review results is
required for the first time and the log directory has not yet been created at that time.
Division of the review process into phases
The execution of a document review is divided into several phases, some of which are optional.
- Phase 0: Pre-review, carried out by a number of review participants (optional)
- Phase 1: Review discussion with review manager, author and review participants (mandatory)
- Phase 2: Correction according to the results of the review by the author (optional, depending on the
review result)
- Phase 3: Release of document by the release manager (mandatory).
Digital signatures
The digital signature will be applied in review management. Review protocols and the underlying
documents usually have to be signed by the author and the release manager. This can be made either
conventionally by printing out the corresponding form and manually signing the cover sheet, or by using a
digital signature stored in the system.
With the add4Q||reviewer documents can be digitally signed if a personal signature of the employee
concerned is stored in the certificate storage of Windows operating system on his/her computer. With the
Windows login, the signature is clearly associated with and only accessible to the user logged in.
7.4.1 Phase 0: Pre-reviews (optional)
Preparation of the review
A review usually begins with the review manager asking the participants to read the document to be
examined and to check it for errors, necessary additions etc. All changes are to be collected and discussed
until the actual review date.
The participants may write comments in the document to be reviewed, edit the linked document and insert
notes. These changes are NOT saved in the original document but are stored as a new document in the
review directory for the next review to come.
The following chapters describe the pre-review process.
7.4.1.1 Selection of documents
Each review process is started by selecting the menu item [extensions/add4Q/reviewer]. In a first dialog,
the user will be asked to choose the document to be reviewed and then the desired action, in case of a prereview by pressing the "Start pre-review" button.
Page 36 of 42
add4Q
User’s GuideUser's Manual
Start dialog of the add4Q||reviewer
7.4.1.2 Entering participant name
The first time the application is started, the tabcard "General" is displayed where the name of the review
participant is entered. This name will later appear when comparing individual pre-review comments in the
actual review meeting.
If a document has already been released in a review, only those elements are being shown which have
been changed since the last release.
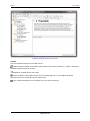
7.4.1.3 add4Q||reviewer window structure
The user interface of add4Q||reviewer is divided into 3 parts. In the left part, you can see all of the objects
from your model in a tree view. This tree view is used for navigating through the document. If the
document contains objects which are already approved, they will not be shown here.
The rich text editor in the upper left portion of the window is used for editing the contents of the selected
object. These changes can then optionally be applied in phase 1 of the review.
In the lower right text box, you can enter a commentary which should describe the changes you made to
the content or the changes that you think will need to be made.
Objects with a commentary will be shown with a "pencil" icon in the tree view. Objects with changed
content will have a green background color.
Page 37 of 42
User’s Guide
add4Q
Reviewer window during a pre-review
Toolbar
The most important buttons in the toolbar include:
"Refresh" detects changes in the model made outside of the reviewer window (e. g. editor or Enterprise
Architect) and shows them in reviewer.
"Expand all" expands all tree view nodes.
"Show all objects" shows objects even if they are already approved. You can add these already
approved items to the review through the context menu.
"Key" contains descriptions on the meaning of the tree view colors/icons.
Page 38 of 42
add4Q
User’s GuideUser's Manual
Tree view key
Pausing or finishing a pre-review
A (pre-)review can be suspended at any time. When you save, the current state will be stored in the model
and the review can be continued later using the [File/Open] menu item.
7.4.2 Phase 1: Discussion of review (mandatory)
After the (optional) performance of single pre-reviews, the actual review meeting will be initiated by the
review manager together with the author and the participants.
When the review is started, a windows pops up where you can enter review properties such as participants,
digital signatures and general notes.
Window structure
Similar to the pre-review, the left tree view contains all objects that need to be reviewed. Also, the top right
view is used to display object contents, such as the chapter text, notes or object properties.
The review window also contains a dropdown box for selecting any pre-reviews that may exist in your
model, as well as radio buttons used to specify the outcome of the review for the selected object. You can
choose between "Not reviewed", "Accepted" and "Not accepted."
The lower part contains text boxes where you can choose to enter additional comments specific to the
selected object.
Page 39 of 42
User’s Guide
add4Q
User interface of the add4Q||reviewer in review mode
Changes and comments from a pre-review
Whenever a pre-review for a specific object exists, the object is shown with a turquoise background in the
tree view.
After you select a pre-review from the dropdown box, the changed object contents as well as the
commentary that was entered in the pre-review will be shown on screen in a turquoise border.
To view the differences between the original object and the object from the pre-review, you can use the
"Mark differences" button. Differences between both objects will be highlighted.
You can synchronize scrolling between both windows to make comparing the contents easier.
You can apply the contents or commentary from the pre-review to the object by pressing the tick
buttons.
General approach
1.) Similar to the pre-review, changed to objects can be made directly in the text box. You can also write a
commentary to clarify what you were doing.
2.) Subsequently, you have to decide whether or not to "Accept" the object in its current state. An object
should be accepted if no further changes need to be made to it.
This needs to be done with every object in the review.
Note: The Feature "Automatically go to next object" automatically selects the next object after you choose
"Accepted" or "Not accepted."
Page 40 of 42
add4Q
User’s GuideUser's Manual
You can also change the "Accepted" status of multiple objects at once using the tree view context menu.
If you finished reviewing all objects and want to end the current review phase, click on the "Finish
phase" button. If you have not reviewed all objects yet but want to continue later, you can use the "Save"
button and continue the review at a later time.
7.4.3 Phase 2: Correction from review results (optional)
If during phase 1 corrections to the document have been noted down which are yet to be made, the
correction phase will be initiated by the author with continuing the review process.
In the tree view, only objects which have been marked as "Not accepted" in phase 1 will be shown. You
need to make any additional changes to these objects before continuing to the next phase.
Note: Objects which are not shown in this phase (because they have been marked as "Accepted" in phase
1, for example) can be displayed using the "show all objects" button.
7.4.4 Phase 3: Release (mandatory)
In the last phase of the review the release manager has to verify the changes made on the basis of the
comments and the current text.
After reviewing the corrections, the release manager completes the review and writes a comment that is
entered in the document history. Finally, the document is signed with a digital signature or printed out and
signed by hand. With that, the document will be archived and frozen in its current version. Further editing
can only be made in a new document version. A new version is automatically generated upon completion of
the phase.
Page 41 of 42
User’s Guide
add4Q
8 Copyright Verweise
Copyright
© Copyright 4plus GmbH
All rights reserved. Any reproduction, adaptation or translation beyond the intended scope without the
express written consent of 4plus GmbH is strictly forbidden.
Trademark
add4Q® is a registered trademark of 4plus GmbH.
Microsoft®, Windows®,Windows XP® and .NET® are registered trademarks of Microsoft Corporation.
Enterprise Architect® and Sparx Systems® are registered trademarks of Sparx Systems Pty. Ltd..
8.1 Disclaimer and warranty
This manual has been validated and reviewed for accuracy and represents the product status of add4Q at
the time of publication. Later versions and user manuals are subject to change without prior notice. 4plus
GmbH explicitly reserves the right to make changes to this document. 4plus GmbH will not assume any
liability for damages caused directly or indirectly by errors, omissions or nonconformance of product and
manual.
8.2 Contact
You will find further information on all topics in the add4Q online help. We will be glad to hear from you if
you have any additional questions or suggestions for improving our product.
4plus GmbH
Team add4Q
Am Weichselgarten 36
D-91058 Erlangen
E-mail: [email protected]
[email protected]
WWW: www.add4Q.de
Page 42 of 42
Telephone:
Fax:
+49-9131-812928-0
+49-9131-812928-24