1
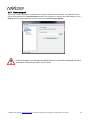
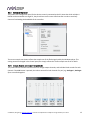
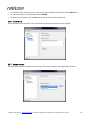
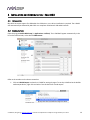
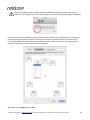
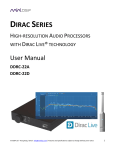
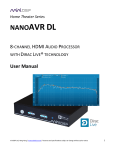
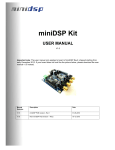
U-DAC8 8-CHANNEL HIGH-RESOLUTION USB DAC User Manual miniDSP Ltd, Hong Kong / www.minidsp.com / Features and specifications subject to change without prior notice 1 Revision history Revision 1.0 Description First public release Date 12 March 2015 miniDSP Ltd, Hong Kong / www.minidsp.com / Features and specifications subject to change without prior notice 2 TABLE OF CONTENTS Important Information......................................................................................................................................... 4 System Requirements – Windows .................................................................................................................... 4 System Requirements – Mac OS X .................................................................................................................... 4 Disclaimer/Warning ......................................................................................................................................... 4 Warranty Terms ............................................................................................................................................... 4 FCC Class B Statement...................................................................................................................................... 4 CE Mark Statement .......................................................................................................................................... 5 Package Contents ............................................................................................................................................ 5 A Note on this Manual ..................................................................................................................................... 5 1 Product Overview .......................................................................................................................................... 6 2 Hardware connectivity .................................................................................................................................. 7 2.1 Analog output ...................................................................................................................................... 7 2.2 DC Power ............................................................................................................................................. 7 2.3 USB ...................................................................................................................................................... 8 3 Installation and Configuration – Windows ..................................................................................................... 9 3.1 Installation ........................................................................................................................................... 9 3.1.1 Download the latest driver ........................................................................................................... 9 3.1.2 Connect your U-DAC8 ................................................................................................................... 9 3.1.3 Setup the driver package .............................................................................................................. 9 3.2 Configuration ..................................................................................................................................... 10 3.2.1 Driver info .................................................................................................................................. 10 3.2.2 Buffer settings ............................................................................................................................ 10 3.2.3 Firmware upgrade ...................................................................................................................... 11 3.2.4 Device configuration ................................................................................................................... 12 3.2.5 Output channel volume control (playback) ................................................................................. 12 3.2.6 Clock source ............................................................................................................................... 13 3.2.7 Stream formats ........................................................................................................................... 13 4 Installation and Configuration – Mac OS X ................................................................................................... 14 4.1 Installation ......................................................................................................................................... 14 4.2 Configuration ..................................................................................................................................... 14 5 Additional Information ................................................................................................................................ 17 5.1 Specifications ..................................................................................................................................... 17 5.2 Firmware Upgrade.............................................................................................................................. 17 5.3 Obtaining support .............................................................................................................................. 17 miniDSP Ltd, Hong Kong / www.minidsp.com / Features and specifications subject to change without prior notice 3 IMPORTANT INFORMATION Please read the following information before use. In case of any questions, please contact miniDSP via the support portal at minidsp.desk.com. SYSTEM REQUIREMENTS – WINDOWS 1GHz or higher processor clock speed recommended / Intel® Pentium®/Celeron® family, or AMD K6®/AMD Athlon®/AMD Duron® family, or compatible processor recommended. 512 megabytes (MB) of RAM or higher recommended One free USB 2.0 port Microsoft• ® Windows® XP SP2/Vista/Win7/Win8 SYSTEM REQUIREMENTS – MAC OS X Intel Core Duo processor or greater 256 megabytes (MB) of RAM or higher recommended One free USB 2.0 port DISCLAIMER/WARNING miniDSP cannot be held responsible for any damage that may result from the improper use or incorrect configuration of this product. Please read this manual carefully to ensure that you fully understand how to operate and use this product, as incorrect use or use beyond the parameters and ways recommended in this manual have the potential to cause damage to your audio system. Please also note that many of the questions we receive at the technical support department are already answered in this User Manual and in the online application notes on the miniDSP.com website. So please take the time to carefully read this user manual and the online technical documentation. Thank you for your understanding! WARRANTY TERMS miniDSP Ltd warrants this product to be free from defects in materials and workmanship for a period of one year from the invoice date. Our warranty does not cover failure of the product due to incorrect connection or installation, improper or undocumented use, unauthorized servicing, modification or alteration of the unit in any way, or any usage outside of that recommended in this manual. If in doubt, contact miniDSP prior to use. FCC CLASS B STATEMENT This device complies with Part 15 of the FCC Rules. Operation is subject to the following two conditions: This device may not cause harmful interference. miniDSP Ltd, Hong Kong / www.minidsp.com / Features and specifications subject to change without prior notice 4 This device must accept any interference received, including interference that may cause undesired operation. Warning: This equipment has been tested and found to comply with the limits for a Class B digital device, pursuant to Part 15 of the FCC Rules. These limits are designed to provide reasonable protection. This equipment generates, uses and can radiate radio frequency energy and, if not installed and used in accordance with the instructions, may cause interference to radio communications. However, there is no guarantee that interference will not occur in a particular installation. If this equipment does cause harmful interference to radio or television reception, which can be determined by turning the equipment off and on, the user is encouraged to try to correct the interference by one or more of the following measures: Reorient or relocate the receiving antenna. Increase the separation between the equipment and receiver. Connect the equipment into an outlet on a circuit different from that to which the receiver is connected. Consult the dealer or an experienced radio/TV technician for help. Notice: Shielded interface cable must be used in order to comply with emission limits. Notice: Changes or modification not expressly approved by the party responsible for compliance could void the user’s authority to operate the equipment. CE MARK STATEMENT The U-DAC8 has passed the test performed according to European Standard EN 55022 Class B. PACKAGE CONTENTS Your U-DAC8 package includes: One U-DAC8 multichannel high-resolution D/A convertor One universal 5 VDC power supply One USB cable for computer connectivity (1.5m) A NOTE ON THIS MANUAL This User Manual is designed for reading in both print and on the computer. If printing the manual, please print double-sided. The embedded page size is 8 ½” x 11”. Printing on A4 paper will result in a slightly reduced size. For reading on the computer, we have included hyperlinked cross-references throughout the manual. In addition, a table of contents is embedded in the PDF file. Displaying this table of contents will make navigation much easier: In Adobe Reader on Windows, click on the “bookmarks” icon at the left. The table of contents will appear on the left and can be unfolded at each level by clicking on the “+” icons. In Preview on the Mac, click on the View menu and select Table of Contents. The table of contents will appear on the left and can be unfolded at each level by clicking on the triangle icons. miniDSP Ltd, Hong Kong / www.minidsp.com / Features and specifications subject to change without prior notice 5 1 PRODUCT OVERVIEW Thank you for purchasing a miniDSP U-DAC8 high-resolution multi-channel D/A convertor. The U-DAC8 supports 8 channels of audio playback at sample rates up to 192 kHz, and is an ideal solution for: High-resolution multi-channel audio Computer-based (HTPC) home theater Surround-sound mixing and mastering Computer-based active loudspeaker systems The U-DAC8 outputs can be connected directly to power amplification (and optionally a subwoofer): The outputs of the U-DAC8 can also be connected to any device with multichannel analog inputs, such as an A/V receiver or processor: miniDSP Ltd, Hong Kong / www.minidsp.com / Features and specifications subject to change without prior notice 6 2 HARDWARE CONNECTIVITY 2.1 ANALOG OUTPUT Connect the analog outputs to your A/V receiver, multichannel preamp, or directly to amplification and subwoofer. Always be sure to turn off all equipment before connecting or disconnecting audio signal cables. 2.2 DC POWER The supplied 5 VDC power supply includes a set of interchangeable power pins. Fit the correct pins for your country. Connect the DC plug to the DC (5V) power socket. miniDSP Ltd, Hong Kong / www.minidsp.com / Features and specifications subject to change without prior notice 7 2.3 USB To play audio through the U-DAC8, connect the USB port of the U-DAC8 to a USB 2.0 port on your computer using the supplied cable. The U-DAC8 should also be connected for initial driver installation under Windows. miniDSP Ltd, Hong Kong / www.minidsp.com / Features and specifications subject to change without prior notice 8 3 INSTALLATION AND CONFIGURATION – WINDOWS Please read and follow all steps in this section carefully. 3.1 INSTALLATION The U-DAC8 is a USB Audio Class 2.0 device. For use with Microsoft Windows, driver installation is required. 3.1.1 Download the latest driver When you receive notification that your order has shipped, your installation software download will be available at the User Downloads section of the miniDSP website: http://www.minidsp.com/userdownloads (If you are unable to access this section of the website, please login first.) Download the installation zip file under the USB Streamer Driver heading and unzip the folder on your PC. 3.1.2 Connect your U-DAC8 In order to automatically detect the U-DAC8 during driver installation, connect the U-DAC8 to your PC and power it on before going to the following step. 3.1.3 Setup the driver package Click on the setup.exe application in the unzipped installation folder to start the installation process. The installer will first check for the presence of the U-DAC8, then continue with installing the driver. Installation will take several minutes. Accept the defaults for screens such as install location. If you receive a warning that Windows cannot verify the publisher, click Install this driver software anyway. miniDSP Ltd, Hong Kong / www.minidsp.com / Features and specifications subject to change without prior notice 9 3.2 CONFIGURATION To configure the U-DAC8, open the USBStreamer Control Panel (from Start Menu -> miniDSP Ltd -> USBStreamer). It has several panes, described below. 3.2.1 Driver info This panel provides general information and the driver version. 3.2.2 Buffer settings The buffer settings are for those looking to optimize the buffering and latency settings of the interface. Note that changing these settings may result in unstable operation since such changes are dependent on the resources of the PC. For example, the lowest latency settings require high amounts of CPU and memory, and may not work on some machines. If you do not require lowest latency, we recommend that you do not depart from the default safe settings. miniDSP Ltd, Hong Kong / www.minidsp.com / Features and specifications subject to change without prior notice 10 3.2.3 Firmware upgrade This screen is used to update the U-DAC8 when a firmware update becomes available. The updated firmware will be made available in the User Downloads section of the miniDSP.com website. After downloading, click on Browse, select the downloaded firmware file, then click on Start Firmware Upgrade. DO NOT DISCONNECT THE USB CABLE OR POWER FROM THE U-DAC8 WHILE FIRMWARE UPDATE IS IN PROGRESS. DOING SO MAY “BRICK” YOUR U-DAC8. miniDSP Ltd, Hong Kong / www.minidsp.com / Features and specifications subject to change without prior notice 11 3.2.4 Device configuration This panel is the configuration panel for the device currently connected to the PC. Note that while multiple UDAC8s can be connected to a single PC, they should not use the same USB Controller in order to avoid any chance of overloading the bandwidth of the controller. The current sample rate shown reflects the sample rate of the file being played by the Windows player. This setting cannot be changed in the Control panel, but simply reflects the current sample rate of the U-DAC8. 3.2.5 Output channel volume control (playback) This panel contains a master volume control for all eight output channels, and individual level controls for each channel. If the Link button is pressed, the volume controls for both channel of a pair (e.g. Analogue 1, Analogue 2) are controlled together. miniDSP Ltd, Hong Kong / www.minidsp.com / Features and specifications subject to change without prior notice 12 o To reset the master volume control or a pair of channels to 0 dB (no attenuation), click the 0dB button. o To mute all channels, click the M button above MASTER. o To mute a pair of channels, click the M button above the names of the channel pair. 3.2.6 Clock source This pane displays the clock source. The U-DAC8 does not allow the clock source to be changed. 3.2.7 Stream formats This pane allows 24-bit or 16-bit data to be selected. The output is always set for eight output channels. miniDSP Ltd, Hong Kong / www.minidsp.com / Features and specifications subject to change without prior notice 13 4 INSTALLATION AND CONFIGURATION – MAC OS X 4.1 INSTALLATION Mac OS X has native support for USB Audio class 2.0 devices, so no driver installation is required. The U-DAC8 will automatically be detected by Mac OS X as a compliant multichannel USB audio interface. 4.2 CONFIGURATION Open the program Audio MIDI Setup (in Applications->Utilities). The U-DAC8 will appear automatically in the list on the left hand side, as the device USBStreamer. Refer to the numbers on the above screenshot: 1. Click on U-DAC8 Output to select the U-DAC8 for settings changes. To set the U-DAC8 to be the default audio output device, right-click and select “Use this device for sound output”. miniDSP Ltd, Hong Kong / www.minidsp.com / Features and specifications subject to change without prior notice 14 2. Select the output sample rate. Note however that many audio players will automatically change this setting according to the media being played. The sample rate can be set to all common rates from 44.1 to 192 kHz. 3. Select 24-bit or 16-bit data. The default 24-bit is usually fine. 4. To set up the U-DAC8 for multichannel audio, click on Configure Speakers… . On the popup pane that appears after clicking on Configure Speakers…, click on Multichannel and then pop down the selector to choose one of the multichannel formats: The display will change to show the selected multichannel speaker layout. miniDSP Ltd, Hong Kong / www.minidsp.com / Features and specifications subject to change without prior notice 15 Before proceeding, set the test signal volume in Audio MIDI Preferences->Audio to be very low. Otherwise, you may generate a very loud test signal in the next step and even damage a loudspeaker. On the multichannel layout diagram, confirm that the speaker channels are as expected. Click on the name of each speaker to generate the test signal. (Increase the volume on the Preferences pane if necessary at this time.) The dropdown channel selectors underneath each speaker can be used to select the output channel number for that speaker if necessary (see screenshot below). When finished, click Apply and then Done. miniDSP Ltd, Hong Kong / www.minidsp.com / Features and specifications subject to change without prior notice 16 5 ADDITIONAL INFORMATION 5.1 SPECIFICATIONS Computer connectivity USB 2.0, USB Audio Class 2 compliant Driver Mac OS X: No driver required Windows: Thesycon driver provided Analog outputs 8 unbalanced (RCA) outputs, 2.0 VRMS Audio sample rate / Resolution Input/output resolution: 24-bit integer Power supply 5 VDC single supply Dimensions (H x W x D) 31 x 161 x 110 mm Sample rate: Up to 192 kHz 5.2 FIRMWARE UPGRADE If a firmware upgrade has been provided to enhance features or functionality, use the USBStreamer Control Panel to update the U-DAC8. Firmware upgrade can currently be performed only on Windows. See Firmware Upgrade on page 11. 5.3 OBTAINING SUPPORT 1. Check the forums on miniDSP.com to see if this issue has already been raised and a solution or solutions provided. 2. Contact miniDSP via the support portal at minidsp.desk.com with: a. The product information including OS version and version of driver installed (for Windows). b. A clear explanation of the symptoms you are seeing. c. A description of the troubleshooting steps you performed and the results obtained. miniDSP Ltd, Hong Kong / www.minidsp.com / Features and specifications subject to change without prior notice 17