1
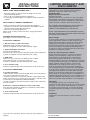
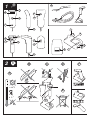
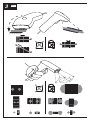
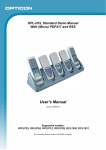
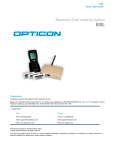
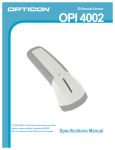
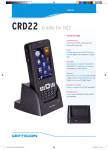
ENGLISH
USER’S
MANUAL
11175-en-GB | 5J0062 | 04 © 2006
compact handheld
1D/2D code scanner
1
2
3
A
B
4 C
INSTALLATION
INSTRUCTIONS
FIRST STEP: TURN POWER OFF !
• Exercise caution at all times when working with AC and
DC-powered equipment.
• Turn off all your equipment before installation.
• It is strongly recommended to use Opticon cables and power
supplies.
NEXT STEPS: CONNECT INTERFACE
• Find your interface type in the corresponding diagram
• Connect the scanner to the computer in accordance with the
diagram and corresponding Instructions.
• Turn your computer equipment on.
When using a battery powered scanner, charge the battery
before use.
DIAGRAM AND INSTRUCTIONS
See diagram on the left side of this page.
Connection CABLED:
1. RS 232 interface cable connection
DB9/DB25: Plug connector into the host.
If power is required: Connect external power supply.
2. Keyboard wedge connection
Disconnect the keyboard.
Plug the male side to the host. Plug the female side to keyboard.
If power is required: Connect external power supply.
3. USB cable
Make sure your computer runs Windows 98 or higher.
Plug USB connector of scanner into the host.
If power is required: Connect external power supply.
4. Test: read bar code
Read the OPTICON bar code and check the result at the host.
Connection WIRELESS:
A. Cradle connection
• USB interface remark: Download USB driver from www.opticon.
com and install the driver on the host.
• Interface connection: Connect the interface cable cradle to the
cradle and to the host. Connect always one type of interface. (Do
not connect for example both USB and RS232).
• Power connection: Connect the power supply to the cradle and
the main socket.
B. Wireless connection between scanner and cradle
Scan the label with device address on the bottom of the cradle,
to connect scanner to cradle.
C. Test: read barcode
Read the OPTICON bar code and check the result at the host.
If you have any questions, please contact your local dealer or
Opticon.
LIMITED WARRANTY AND
DISCLAIMERS
CAUTION: This user’s manual may be revised or
withdrawn at any time without prior notice.
Copyright 2006
Opticon Sensors Europe B.V.
All rights reserved.
This manual may not, in whole or in part, be copied,
photocopied, reproduced, translated or converted to
any electronic or machine readable form without prior
written consent of Opticon Sensors Europe B.V.
BY OPENING THE PACKAGE OF THIS PRODUCT
YOU AGREE TO BECOME BOUND BY THE
LIABILITY AND WARRANTY CONDITIONS.
IN ALL CIRCUMSTANCES THIS MANUAL SHOULD
BE READ ATTENTIVELY, BEFORE INSTALLING AND/
OR USING THE PRODUCT.
Serial number
A serial number appears on all Opticon products. This
official registration number is strictly related to the
device purchased. Make sure that the serial number
appearing on your Opticon device has not been
removed. Removing the serial number might affect the
warranty conditions and liability disadvantageously,
so please be strict at maintaining the label with serial
number on the Opticon product.
Warranty / Warranty period / Liability
Unless otherwise agreed in a contract, all Opticon
products are warranted for a period of two years
after purchase, covering defects in material and
workmanship. Opticon will repair or, at its opinion,
replace products that prove to be defective in material
or workmanship under proper use during the warranty
period. Opticon will not be liable in cases where
modifications are made by the customer. In such
case the standard repair charge will be applicable.
The standard charge for repair will also be applicable
in cases where no defect is found at all. These rules
also apply for products that are still under warranty.
Under no circumstance Opticon Sensors Europe B.V.
will be liable for any direct, indirect, consequential or
incidental damages arising out of use or inability to use
both the hardware and software, even if Opticon has
been informed about the possibility of such damages.
Packaging
The packing materials are not harmful for the
environment. We recommend that you save all packing
materials, as it should be used whenever you need
to transport your scanner (eg. for service). Damage
caused by improper repacking is not covered by the
warranty.
Trademark
Trademarks used are property of their respective
owners.
version 04-2006
1
9
1
6
3
4
2
7
5
7
3
1
6
7
3
2
4
8
6
7
5
2 !
B
C
D
A
o
+ 40 C
E
0 C
o
F
5
1
DETAILED VIEW
Depending on the supplied model and/or the configured options, the following options are applicable:
1. Reading window
to read the codes. Never obstruct this window!
2. Trigger key
to activate the scanner.
3. LED indicator
4. Buzzer/Beeper
Typical LED indication:
red: no code reading / no code acceptation / power is on
green: successful code reading / battery full
flashing LED: data transmission
blue: Bluetooth connection / 802.15.4 communication
5. Cable / Connector
To connect the scanner or cradle to the computer equipment consult installation instructions.
6. Scanner label / Connection label
A label is fixed to scanner and/or cable containing the serial number.
On a Bluetooth product a connection label with device address might be attached.
Do not remove it!
7. Charging contacts
If the scanner is inserted in the cradle the battery will automatically be charged. If no scanner is inserted, keep the charging
compartment empty, do not insert paper clips, coins or other materials to avoid short circuit.
8. Input socket
Input for power supply
9. Handstrap
Fix for convenient use and to avoid drop.
2
HANDLING INSTRUCTIONS
A. Temperature conditions
Use in area’s between 0 and 40°C.
Do not expose the scanner for a long time to direct sunlight, or near direct heat.
For use under extreme conditions, for example freezing area’s or temperatures higher than 40°C, please contact your local
dealer or Opticon.
Avoid contact with water.
B. Shock / ESD
Do not expose the scanner to strong impact, do not throw or drop the scanner.
Do not present mechanical shocks to the product.
Do not leave product in an area where static charge is accumulated, or near devices where electromagnetic emission is
generated.
C. Cleaning
Clean the reading window regularly to maintain optimum reading performance.
Clean the exterior of the scanner by wiping it with a soft, lightly moist cloth.
Do not use a high pressure cleaning method. If a cleaning liquid is needed, only use one drop of a non-abrasive household
liquid.
Clean the electrical contacts of the scanner and the cradle with a soft dry cloth, or cotton bud.
Do not use water or sanding paper. This can cause malfunction.
D. Maintenance
There are no user-serviceable parts inside the scanner. So do not try to take it apart.
In case of malfunction, please consult your local dealer or Opticon.
E. Recycling & Disposal instructions
The icon on the product or package indicates that the product should not be thrown in the home waste bin.
The product must be recycled as an electronic product. For proper treatment of end-of-life products consult the section
for Environmental care on www.opticon.com.
F. Charging instructions
Charge the battery by placing the scanner in the cradle.
Place the scanner in its cradle after scanning to maintain the capacity of the battery.
THE SCANNER IS NOT WARRANTED FOR DAMAGE, DEFECTS, MALFUNCTION OR LOSS OF DATA, RESULTING FROM
INCORRECT USE OF THE BATTERY.
3
X
X
X
X
X
X
3
READING CODES
Check the scanning engine
Is the scanning engine on? Is a red light beam visible?
If not, press the trigger key.
For models without a trigger key check the cable connection.
Approach the code
• Point the reading window of the scanner in the direction of the code.
• The code should fit from margin to margin in the light beam width.
• Move the scanner close to the label.
• Check the data at the connected computer device.
A “Good Read” means that the scanner has effectively recognized and decoded the code. In most cases, the application
program will provide an indicator signal or a buzzer signal to indicate a good read to the user.
When the read is incorrect you can try again, paying attention to the instructions below.
?
TROUBLE SHOOTING
General checks:
• Make sure the scanner is installed properly.
• Check the power supply of all devices.
• Is the reading window of the scanner clean?
• Are the codes on the labels damaged?
Scanner does not operate:
• Check the trigger switch
• Check if you connected the right interface
Code could not be read:
• Check that the width of the code does not exceed the width of the light beam.
• Change the angle between the code and the scanner.
• Change the distance between the code and the scanner.
Communication malfunctioning:
• Check if the interface cable is undamaged, and properly connected to the cradle and the host computer.
• Check the connection of the power supply.
• Check if the main socket has power.
• Check if the connection is configured properly.
If you can not solve the problem:
Contact your local dealer or Opticon.
When the scanner needs to be repaired:
The label with serial number should be present.
If returning the scanner, please use the original packaging to minimize the chance of damage.
More information:
The scanner is configured to default factory settings and is supplied with information that gives you a quick understanding of
the product. More product details, additional support, or configuration options to your own preferences (by Opticonfigure) will
be updated at www.opticon.com
- The Netherlands: Hoofddorp
- France: ISSY Les Moulineaux CEDEX
- Germany: Dietzenbach
- Italy: Castel Maggiore (BO)
- Spain: Valencia
- Sweden: Järfälla
- United Kingdom: Luton, Bedfordshire
- U.S.A.: Orangeburg
- Japan: Warabi City
- Taiwan: Taipei
- P.R.China: Shanghai
- Australia: Kariong
www.opticon.com