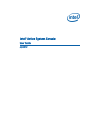
1
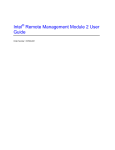
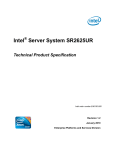
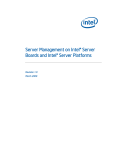
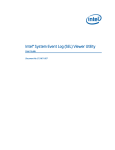
Intel® Active System Console
User Guide
July 2010
Legal Statements
INFORMATION IN THIS DOCUMENT IS PROVIDED IN CONNECTION WITH INTEL® PRODUCTS FOR THE PURPOSE
OF SUPPORTING INTEL DEVELOPED SERVER BOARDS AND SYSTEMS. NO LICENSE, EXPRESS OR IMPLIED, BY
ESTOPPEL OR OTHERWISE, TO ANY INTELLECTUAL PROPERTY RIGHTS IS GRANTED BY THIS DOCUMENT. EXCEPT
AS PROVIDED IN INTEL'S TERMS AND CONDITIONS OF SALE FOR SUCH PRODUCTS, INTEL ASSUMES NO
LIABILITY WHATSOEVER, AND INTEL DISCLAIMS ANY EXPRESS OR IMPLIED WARRANTY, RELATING TO SALE
AND/OR USE OF INTEL PRODUCTS INCLUDING LIABILITY OR WARRANTIES RELATING TO FITNESS FOR A
PARTICULAR PURPOSE, MERCHANTABILITY, OR INFRINGEMENT OF ANY PATENT, COPYRIGHT OR OTHER
INTELLECTUAL PROPERTY RIGHT.
UNLESS OTHERWISE AGREED IN WRITING BY INTEL, THE INTEL PRODUCTS ARE NOT DESIGNED NOR INTENDED
FOR ANY APPLICATION IN WHICH THE FAILURE OF THE INTEL PRODUCT COULD CREATE A SITUATION WHERE
PERSONAL INJURY OR DEATH MAY OCCUR.
Intel may make changes to specifications and product descriptions at any time, without notice. Designers must not
rely on the absence or characteristics of any features or instructions marked "reserved" or "undefined." Intel
reserves these for future definition and shall have no responsibility whatsoever for conflicts or incompatibilities
arising from future changes to them. The information here is subject to change without notice. Do not finalize a
design with this information.
The products described in this document may contain design defects or errors known as errata which may cause
the product to deviate from published specifications. Current characterized errata are available on request.
Contact your local Intel sales office or your distributor to obtain the latest specifications and before placing your
product order.
Intel is a trademark of Intel Corporation in the U.S. and other countries.
Microsoft, Windows, Windows Server, Active Directory, and Vista are trademarks, or registered trademarks of
Microsoft® Corporation in the United States and/or other countries.
* Other names and brands may be claimed as the property of others.
Copyright © 2008 - 2010 Intel Corporation. All rights reserved.
2
Intel® Active System Console - User Guide
Contents
1
Introduction ................................................................................5
1.1
Document Scope...................................................................................... 5
1.2
Overview ................................................................................................ 5
1.3
Features ................................................................................................. 5
1.4
System Requirements............................................................................... 6
3
1.4.2
Browser Requirements ................................................................. 6
1.4.3
Supported Platforms .................................................................... 6
Supported Languages ............................................................................... 8
1.6
Additional Information .............................................................................. 8
1.6.1
Third Party Source Code/Binaries ................................................... 8
1.6.2
Support Information..................................................................... 8
1.6.3
Related documentation ................................................................. 8
Terminology ............................................................................................ 8
Getting Started..........................................................................10
2.1
Installing Intel® Active System Console .....................................................10
2.2
Uninstalling Intel® Active System Console..................................................10
Navigating Intel® Active System Console .................................12
3.1
4
Supported Operating Systems ....................................................... 6
1.5
1.7
2
1.4.1
System Information ................................................................................14
3.1.1
Viewing System Health ................................................................15
3.1.2
Viewing System Summary ...........................................................15
3.1.3
Viewing Processor Summary Readings ...........................................16
3.1.4
Viewing Memory Device Readings .................................................17
3.1.5
Viewing Temperature and Fan Readings (Cooling Sensors) ...............18
3.1.6
Viewing Voltage Sensors Readings ................................................18
3.1.7
Viewing Chassis Information ........................................................19
3.1.8
Viewing Storage Readings............................................................20
3.1.9
Viewing Miscellaneous Readings....................................................20
3.1.10
Viewing System Events................................................................21
Configuring Server Hardware and Reports Generation ..............23
4.1
Configuring BMC .....................................................................................23
4.1.1
Configuring BMC Users ................................................................24
4.1.2
Configuring Network ...................................................................25
4.1.3
Configuring Serial Over Lan (SOL) Settings ....................................26
4.1.4
Configuring SNMP Alerts ..............................................................26
4.1.5
Configuring BIOS ........................................................................27
4.1.6
Configuring Intel® Dynamic Power Node Manager (Node Manager)....28
Intel® Active System Console - User Guide
3
5
Configuring Basic Email: Use Default Email Profile ...........................29
4.1.8
Configuring Advanced Email: Create and Apply Email Profiles............30
4.2
Generating Reports .................................................................................31
4.3
User Settings .........................................................................................31
4.4
Viewing Software Updates ........................................................................32
Security Features ......................................................................34
5.1
4
4.1.7
Security Recommendations ......................................................................35
Intel® Active System Console - User Guide
1
Introduction
The Intel® Active System Console is a walk-up console that provides you a dashboard view
of the system on which it is running. It also provides a BMC configuration. It serves as the
hardware view of the server providing information about the hardware components of the
system. The main components shown include overall health of the server and component
health, sensors, System Event Log (SOL), storage (Logical Drives,), processors, memory,
FRU and BMC configuration.
1.1
Document Scope
The purpose of this document is to help you install and use the Intel® Active System
Console. It provides you detailed information on the features of Intel® Active System
Console and how to use them. It describes the software requirements, supported operating
systems, and the supported platforms. It also explains the installation and un-installation
process.
1.2
Overview
The Intel® Active System Console displays the hardware sensors, Field Replaceable Unit
(FRU) data, and System Event Log (SEL) for any system.
To launch the Intel® Active System Console, go to Start> Programs> Intel® Server
Management Software >Intel® Active System Console.
You can also launch IASC from any client using the URL
https://<ipadddressofserver>:9393/
1.3
Features
The Intel® Active System Console has the following features:
•
Viewing System Health in the Dashboard
•
Viewing Other System Information as follows:
o
Viewing System Summary
o
Viewing Processor Summary Readings
o
Viewing Memory Device Readings
o
Viewing Temperature and Fan Readings (Cooling Sensors)
o
Viewing Voltage Sensors Readings
o
Viewing Chassis Information
o
Viewing Storage Readings
o
Viewing Miscellaneous Readings
o
Viewing System Events
•
Generating Reports
•
Checking for software updates
1.4
System Requirements
This section details the software requirements, supported operating systems and the
supported platforms for the Intel® Active System Console.
1.4.1 Supported Operating Systems
•
Windows* Server 2003 Standard/Enterprise Edition – SP2 - x86 & EM64T
•
Windows* Server 2003 R2 Standard/Enterprise - x86 & EM64T
•
Windows* XP Professional – SP3 - x86 & EM64T
•
Windows* Vista Enterprise/Ultimate - x86 & EM64T
•
Windows* Server 2008 Standard/Enterprise/Datacenter/Storage x86/x64
•
Windows* Server 2003 SBS
•
Windows* 7 Ultimate – x86/x64
•
Red Hat* Linux* Enterprise 5 x86/x64
•
Red Hat* Linux* Enterprise 4 x86/x64
•
SuSE* Linux ES 10 SP2 x86/x64
•
SuSE* Linux ES 11 x86/x64
1.4.2 Browser Requirements
The application can be run on Internet Explorer Version 6.0 or above. This application
supports Mozilla Firefox*. It is best viewed in screen resolution from 1024 X 768 to 1440 X
900.
1.4.3 Supported Platforms
6
•
Intel® Server Board S3420GP (LC, LX, RX)
•
Intel® Server Board S5520UR
Intel® Active System Console - User Guide
•
Intel® Server Board S5520URT
•
Intel® Server Board S5500BC
•
Intel® Server Board S5520HC
•
Intel® Server Board S5520HCT
•
Intel® Server Board S5500HCV
•
Intel® Server Board S5500WB
•
Intel® Workstation Board S5520SC
•
Intel® Server Board S5000PAL
•
Intel® Server Board S5000PSL
•
Intel® Server Board S5000VSA
•
Intel® Server Board S5000XVN
•
Intel® Server Board S5000XSL
•
Intel® Server Board S5000SAL
•
Intel® Server Board S5400RA
•
Intel® Server Board S5400SF
•
Intel® Server System S7000FC4UR
•
Intel® Server Board SE7320SP2
•
Intel® Server Board SE7320VP2
•
Intel® Server Board SE7520AF2
•
Intel® Server Board SE7520BD2
•
Intel® Server Board SE7520JR2
•
Intel® Server Board SE7525GP2
•
Intel® Server Platforms SR6850HW4M and SR4850HW4M
•
Intel® Server Board S3210SH
•
Intel® Server Board X38ML
For the latest and up-to-date list of supported operating systems, system requirements and
platforms supported refer to the release notes available with the product.
Intel® Active System Console - User Guide
7
1.5
Supported Languages
English only.
1.6
Additional Information
This section lists additional IASC related information that will help you use it appropriately.
1.6.1 Third Party Source Code/Binaries
Link to third party source code/binaries:
http://support.intel.com/support/motherboards/server/sysmgmt/sb/CS-031025.htm
1.6.2 Support Information
Support information is available at http://support.intel.com.
1.6.3 Related documentation
The following table lists the related documentation:
Document/ Information
Source
Intel® Active system Console Release Notes
Available at the root of the DVD.
Intel® Intelligent Power Node Manager – White Paper
documents\User Guide\ENU
Intel® System Management Software Installation Guide
documents\Installation\ENU
1.7
Terminology
The following table lists the terminology used in this document and the description:
Term
8
Description
BMC
Base board Management Controller
CIM
DMTFs Common Information Model - CIM provides a common definition of
management information for systems, networks, applications and services,
and allows for vendor extensions
GUI
Graphical User Interface
Intel® SMS
Intel® System Management Software
IPMI
Intelligent Platform Management Interface. Operates independent of the
operating system (OS) and allows you to manage a system remotely even
in the absence of the OS
Intel® Active System Console - User Guide
Term
Description
RMCP
Remote Management Control Protocol – Protocol used by IPMI for
communicating over LAN
SEL
System Event Log
SMBIOS
System Management BIOS (SMBIOS) is specification to lay out data
structures (and access methods) in a BIOS which allows a user or
application to store and retrieve information specifically about the Server
SNMP
Simple Network Management Protocol
SOL
Serial Over LAN
Upgrade
Enhanced versions of Intel® SMS with new platform support or new
features are uploaded to Intel Website. Users installing Intel® SMS from a
CD can upgrade to a new version using multiple ways. Intel recommends
all users to upgrade to a new versions
Intel® Active System Console - User Guide
9
2
Getting Started
This section provides some basic steps on how to install and use the Intel® Active System
Console.
2.1
Installing Intel® Active System
Console
To install the software, run with root privilege
•
•
•
For Red Hat Enterprise Linux* (or RHEL*)
o
cd RHEL/RHEL4 (or) cd RHEL/RHEL5
o
chmod +x ./install;
o
./install
For SUSE*
o
cd SLES/SLES10 (or) cd SLES/SLES11
o
chmod +x ./install;
o
./install
For Windows*
o
cd Windows\<x86/x64>
o
run ASC_x86.exe (or) ASC_x64.exe
o
Follow the instructions
Note: While installing, user will be asked to change the default password of
“admin”•
2.2
Uninstalling Intel® Active System
Console
To uninstall, run the following:
Linux - cd/usr/local/asc/bin.sh.uninstall
Windows* - You can uninstall ASC from Windows either
•
10
from Add/Remove Program options
Intel® Active System Console - User Guide
•
go to Start Menu->All Programs->Intel->Uninstall Intel ® Active System Console
You will be asked to reboot the server to complete installation. You can either reboot
immediately or postpone it. All files and registry entries will be completely removed only on
reboot.
Note: The database will also be removed on uninstallation. If you want the database for
any further storage make sure you copy the database (SMS.db) to appropriate location
before uninstall.
Intel® Active System Console - User Guide
11
3
Navigating Intel® Active
System Console
This section details how you can navigate the Intel® Active System Console to use its
features.
By default, the Intel® Active System Console opens in the System>Dashboard view
displaying overall server health as shown in Figure 1.
Figure 1. Intel ® Active System Console Login page (By default, IASC opens in
Dashboard page)
12
Intel® Active System Console - User Guide
The left side Navigation menu comprises buttons that have submenu. For a quick overview
of the tasks performed by these buttons and their sub menu items see following Table:
Menu Button
Submenu
Task
System
Dashboard
Displays aggregate of the system health in
the Dashboard (chassis, storage, cooling,
processor, memory, and power)
Summary
Displays a table of all hardware sensors
and the threshold settings
Processor
Displays processor details and speed
information
Memory
Displays memory size and type
information
Cooling
Displays all System/Processor fans. It
shows the current health status of the fan
and the current reading of the fan in RPM.
Voltage
Allows you to navigate and clear the SEL
Chassis
Displays the state of the chassis intrusion
sensor and enables identifying the system
by turning on/off the Chassis ID LED
Storage
Displays information about the hard disk
drives, logical disk drives, and media or
DVD drives
Miscellaneous
Lists out all the Sensors which are not
categorized under any of the main
sensors.
These include some BIOS and other
discrete sensors
Events
Lists all the server event logs.
Configuration
BMC
Baseboard Management Controller. Has the following submenu buttons:
Manages the interface between system management software and
platform hardware.
Users
Helps you add/delete/edit a BMC User
Network
Lists all the Network present on the motherboard
Serial Over Lan
SOL. Settings help change the Baud rate of the
system
SNMP Alerts
Help send SNMP based alerts to the target server (
fan failure, memory error, etc.
BIOS
BIOS settings
Node Manager
Intel® Dynamic Power Node Manager. An advanced
feature that helps set power policies resulting in
saving system power
Basic Email
Simple mail configuration that sends all server
alerts to mail server.
Advanced Email
Helps configure user specific Email alerts. Feature-
Intel® Active System Console - User Guide
13
rich customized user settings available.
Reports
Generation
3.1
Helps generate reports on many categories. For
example, Asset Information, All System Events,
Critical Events, Sensor Values ,and BMC Settings.
The file can be exported either in XML or CSV
format
System Information
This section lists the Hardware choices available as listed in the following Figure:
Figure 2 – Intel ® Active System Console Home Page - Hardware Health
The Hardware choices and their functions are listed in the following Table:
Hardware choice
Function
System - Displays system health information.
Dashboard
Default IASC view. Displays chassis, Processor, Storage, Memory, Cooling,
Power, and other Miscellaneous information in a convenient dashboard view.
Summary
Displays a table of all hardware sensors and the threshold settings
Processor
Displays processor details and speed information
Memory
Displays memory size and type information
Cooling
Displays all System/Processor fans. It shows the current health status of the
fan and the current reading of the fan in RPM.
Voltage
Allows you to navigate and clear the SEL
14
Intel® Active System Console - User Guide
Chassis
Displays the state of the chassis intrusion sensor and enables identifying the
system by turning on/off the Chassis ID LED
Storage
Displays information about the hard disk drives, logical disk drives, and
media or DVD drives
Miscellaneous
Lists out all the Sensors which are not categorized under any of the main
sensors.
These include some BIOS and other discrete sensors
Events
Lists all the server event logs.
3.1.1 Viewing System Health
The System page as shown in Figure 3 displays the health of the system and its
components. The UI gets refreshed every 10 minutes.
Figure 3 – Intel ® Active System Console Home Page - Hardware Health
3.1.2 Viewing System Summary
To view information on the board, BIOS, and Firmware, in the System page, click the
Summary button to display System Summary, FRU data, and Power Supply as shown in
Figure 4.
Intel® Active System Console - User Guide
15
Figure 4. System Summary page
•
Asset Tag: Name given to a server for easy server asset tracking such as hardware
and software configuration information during server deployment.
•
BIOS and Firmware version details. Current values obtained from server.
•
System GUID value. Global Unique Identifier for each system on the network.
•
IPMI version. Details of Intelligent Platform Management Interface version.
•
SDR (Sensor Data Recorded) Package version, serial number of the server, and HSC
version.
For systems that do not have compatible power supply, this page will not have instances. If
the platform does not support power gauge sensors or PMBUS power supplies, then the
current reading will be 0s (for example, H800t).
3.1.3 Viewing Processor Summary Readings
To view the processor summary readings, click System -> Processor to display processor
summary, processor configuration, and discrete sensor readings shown as follows:
16
Intel® Active System Console - User Guide
Figure 5 – Processor Summary Readings
As all thresholds are not supported for all sensors, unsupported thresholds are marked with
a hyphen. Health of the sensors is also shown to indicate those that are critical and that are
not.
3.1.4 Viewing Memory Device Readings
To view the processor memory device readings, click System -> Memory to display
memory device details and discrete sensor readings shown as follows:
Figure 6 – Memory Device Readings
Displays the health of each of the populated memory module. It lists the entire memory
bank supported in the Server. If a memory module is populated in the memory slot, it will
list the corresponding size, speed, and type of module. If the slot is not populated, then it
will list as not populated.
Intel® Active System Console - User Guide
17
3.1.5 Viewing Temperature and Fan Readings
(Cooling Sensors)
To view the temperature and fan readings, click System -> Cooling to display the Cooling
Sensors page shown as follows:
Figure 7 - Cooling Sensors
Displays all System/Processor fans. It shows the current health status of the fan and the
current reading of the fan in RPM. Click on any of the System/Processor fan to view the
upper and lower threshold details.
3.1.6 Viewing Voltage Sensors Readings
To view the temperature and fan readings, click System -> Voltage to display the Voltage
Sensors page shown as follows:
18
Intel® Active System Console - User Guide
Figure 8. Voltage Sensors
Lists all the current reading of the voltage sensors present on the base board. The details of
each voltage sensor list the upper/lower critical and warning values.
3.1.7 Viewing Chassis Information
To view the temperature and fan readings, click System -> Chassis to display the Chassis
Sensors page as shown in following figure. The user can also identify the server by turning
the LED on or off. To do this, click the chassis icon in this screen.
Notes:
•
For systems that do not support the chassis sensor, The system LED is currently
Not Supported status displays.
•
For some platforms, the status of LED is not supported, but the user will still be able
to turn the LED on and off as shown in Figure 9. To do this, click the chassis icon in
this screen.
Figure 9 – Chassis Information page/ Identify Chassis On/Off Dialog
Intel® Active System Console - User Guide
19
Displays physical security status of the chassis. Also helps identify chassis (physical Server)
by turning the blue LED in the front pane of the chassis on/off (LED blinks till it is turned
off).
3.1.8 Viewing Storage Readings
To view the temperature and fan readings, click System -> Storage to display the Storage
Sensors page as shown in following figure.
Figure 10 – Storage Device, Logical Drives, Drive Sensor Information page
•
Storage Device. The Storage page lists out all the Storage drives present in the
server. The drive name along with the Model Number, device name serial number
and the total capacity of the Hard disk.
•
Logical Drive. The Logical drive shows all the Logical drives that have been
mounted currently. It shows the total used space and the free space for each of the
logical drive.
•
Drive Sensor. The Drive sensor displays two types of sensors basically the Drive
Status and the Drive Presence sensors. It gives the name of the drive slot, the
corresponding health of the Hard drive presence or absence.
A warning alert gets generated in the Events page if the Hard disk space crosses the
threshold of 75% and a Critical alert is generated if it crosses the 905 margin.
3.1.9 Viewing Miscellaneous Readings
This section lists out all the Sensors which are not categorized under any of the main pages.
These include some BIOS and other discrete sensors. It lists the name of the Bus Sensors
and shows the corresponding health along with the values.
Figure 11. Miscellaneous Information page (Bus Sensors, BIOS and other discrete
20
Intel® Active System Console - User Guide
sensors)
3.1.10 Viewing System Events
Lists all the server event logs as follows:
Figure 12 – System Events Information page
•
The description, severity, status of events (open or closed) and time stamp for each
of the events is listed.
•
Open Status. If in open state, check for event description. If critical event,
take immediate corrective action.
•
events.
Severity filter. Use for viewing only critical/warning/informational
•
Export tab. Use for exporting log files in XML, CSV, or HTML format.
•
Clearing events. For clearing any of the events, select the event in check box and
Intel® Active System Console - User Guide
21
click Delete selected. There are two options
o
To delete the events from BMC SEL memory
o
To delete the events from database as well.
NOTE: If you delete from database, it cannot be recovered. So, backup event logs by
exporting Reports.
22
Intel® Active System Console - User Guide
4
Configuring Server Hardware
and Reports Generation
This section explains configuring the server hardware using IASC. It details the options
available in the Configuration feature of the Intel® Active System Console. Click
Configuration button to configure BMC and Email related options available as follows:
Figure 13 – Configuration Menu
Note: Only users with ADMIN privilege can configure Server using IASC.
4.1
Configuring BMC
This section explains configuring the BMC. It details the options available in the BMC
Configuration feature of the Intel® Active System Console. The BMC Configuration window
has the following choices available:
Intel® Active System Console - User Guide
23
4.1.1 Configuring BMC Users
The BMC User Configuration section helps you add/delete/edit a BMC User. While doing so,
you can set the privilege level as Administrator, Operator, or User.
In the left navigation pane, click the Configuration>BMC>Users button to view the BMC
User window as shown in Figure 14.
Figure 14. Intel ® Active System Console BMC User Configuration window
You can enable or disable the User by clicking Edit Selected to display the following dialog:
24
Intel® Active System Console - User Guide
Figure 15. Configuring BMC User Settings: Edit User dialog
4.1.2 Configuring Network
Click Configuration>BMC>Network.
Figure 16. Configuring BMC Network Window
The Network window lists all the networks present on the motherboard. To enable, check
the enable box.
•
To edit the settings, select the network channel and then choose either static or
DHCP IP address.
•
If you are choosing the option ”IP address from a DHCP server” then you must have
a DHCP Server present in your network environment for the server to obtain an IP
address automatically.
o
User Privilege can be either set to Admin, User, or Operator.
o
Admin user privilege configuration is needed for read, execute, and write
privileges.
Intel® Active System Console - User Guide
25
4.1.3 Configuring Serial Over Lan (SOL) Settings
The Serial Over LAN (SOL) setting helps change the Baud rate of the system. Click
Configuration>BMC>Serial Over Lan to display the Serial Over Lan window as shown
in following figure:
Figure 17. Configuring SOL Settings Window
The setting can be modified such that when using the Console redirection feature, the
server gets accurately redirected from the target server.
To change SOL settings, select LAN channel -> select baud rate -> select privilege level ->
click Update.
4.1.4 Configuring SNMP Alerts
SNMP Alerts help send SNMP -based alerts to the target server. Alerts include fan failure,
memory error, and so on. Click Configuration>BMC>SNMP Alerts to display the SNMP
Alerts settings window as shown in following figure:
26
Intel® Active System Console - User Guide
Figure 18. Configuring SNMP Alerts Settings Window
To set an alert, enter the IP address of target server -> select the alert type from the list of
alerts -> click Apply.
4.1.5 Configuring BIOS
Click Configuration>BMC>BIOS to display the SNMP Alerts settings window as shown in
following figure:
Figure 19. Configuring BIOS Window
Set Boot Order. Helps select system boot order - Hard Disk, DVD, Network, and so on - for
the next reboot cycle. Select desired boot order -> click Update.
Power Action. Helps set power action in case of power breakdown. You have the option to
choose one of the following:
Intel® Active System Console - User Guide
27
•
Stay powered off. Server remains in a powered off state even if the power is restored
back.
•
Restore to Original State. Server will either get powered up or it will remain in an Off
state depending on previous power state during the power breakdown.
•
Power Up. Server powers up when the power is restored back.
4.1.6 Configuring Intel® Dynamic Power Node
Manager (Node Manager)
The Intel® Dynamic Power Node Manager (Node Manager) is an advanced system power
savings feature to help user set power policies. Click Configuration>BMC> Node
Manager to display the Node Manager Settings window as shown in following figure:
Figure 20. Configuring Intel® Dynamic Power Node Manager (Node Manager)
Window
Power policy can be set for a specified power range only. Additionally, it can be applied for
all/selected days. Refer to the Intel® Dynamic Power Node Manager White Paper for more
details.
To create/edit a power policy setting, follow these steps:
1. Find and note current power reading of the server.
2. Find the average power consumed by the server during the day.
3. Select Add to add a new power policy or select one policy and click Edit.
4. In the profile window, enter a power limit value which is 25% higher than the
average power consumption of the server. For example, if power consumption on an
average is 140W and the peak power consumption is 210W then, enter a value for
power limit as 170/180 Watts. NOTE: This is only an example and the power limit
will vary depending on the server configuration. Refer the Intel® Dynamic Power
Node Manager White Paper for limitations.
5. After entering power value, enter start and end time for power policy.
6. Select the recurrence days for the power policy. Either all days (daily) or specific a
day (Monday, Tuesday, Wednesday, Thursday, Friday, Saturday, and Sunday) can be
selected.
7. Check the Alerts box if you also need alerts for the Intel® Dynamic Node Manager
28
Intel® Active System Console - User Guide
power policies.
8. After completing steps 1-7, click Apply to apply the settings.
The Node Manager main page has an option for enabling/disabling the Node Manager
policies. The user can enable all the policies or choose selected policies.
If there are two policies overlapping a specific time, then the policy in which the
power limit is low is the power policy that will be effective for that time period.
9. To delete a Node Manager Policy, select the policy using the check box and click
Delete policy.
4.1.7 Configuring Basic Email: Use Default Email
Profile
Email Alerting helps you receive Server Health Alert messages. For this, you must first
configure your mail settings either through Basic Email settings or through Advanced Email
settings.
Click Configuration>Basic Email to display the Email Alerts Settings window as shown in
following figure:
Figure 21. Basic Email Alerts Settings Window
Email Alerting helps you receive Server Health Alert messages. For this, you must first
configure your mail settings either through Basic Email page or through Advanced Email.
Intel® Active System Console - User Guide
29
For configuring Basic Email settings, you must have a mail server in your network
environment. If not present, you must setup a mail server to use this feature.
•
Select Default -1 profile to receive all Hardware alerts that include critical, warning,
and informational.
OR
•
Select Default-2 profile to get only the critical Hardware events alert.
Enter the mail server IP address, its hostname and then enter the To Email address to
which the alert has to be sent. Click Apply to set the basic Email alert setting.
4.1.8 Configuring Advanced Email: Create and
Apply Email Profiles
Click Configuration>Advanced Email to display the advanced Email Alerts Settings
window as shown in following figure:
Figure 22. Advanced Email Alerts Settings Window
Advanced Email Settings is rich in customized user settings. To create an advanced Email,
do the following:
1. Enter the following:
•
Profile name
•
Mail server IP address. If a mail server is not present, then you need to set
one up to use this feature.
•
From address of the Email
•
One/multiple ”To” address/s
•
Subject line. For example, Chassis Intrusion Detected
•
Specific comments
2. Next, in the Alerts window
•
Click Select all to select all the alerts
OR
30
Intel® Active System Console - User Guide
•
Select only specific alerts based on your need.
3. Next, click Apply to apply the settings.
To create another advanced Email, create a separate profile in step1 and then follow the
same procedure.
4.2
Generating Reports
This option helps you generate reports on categories such as Asset Information, All System
Events, Critical Events, Sensor Values, and BMC Settings. Click Reports>Generation to
display the Report Generation window as shown in following figure:
Figure 23. Generating Reports Window
The file can be exported either in HTML, XML, or CSV format.
4.3
User Settings
A User setting icon is provided on the main IASC page on the top corner right hand side.
Clicking on the setting icon will open the user setting page. Here, new users can be added
or existing user privilege can be edited or users can be deleted.
Figure 24. User Settings Window
Note: It is advised to give minimum number of administrator/root privileged users.
Intel® Active System Console - User Guide
31
4.4
Viewing Software Updates
The Software Updates link on the IASC homepage runs a timer monitoring the time
mentioned in the config file. Once the timer expires, the agent contacts the Intel website at
the path given for the XML file, checks for the versions for version number, platform type,
and OS (type/version) and if different, displays it as follows:
Figure 25. Software Updates (system) window
32
Intel® Active System Console - User Guide
Figure 26. Software Updates (Configuration) window
The user can then decide whether the new software needs to be updated or not. If the user
decides to upgrade, the customer can initiate a download and the new software can be
downloaded to the managed node.
If the agent is not able to contact Intel website, the update process does not show the new
updates to the user. The proxy settings have to be correctly configured by the user and it is
not done as part of IASC.
Intel® Active System Console - User Guide
33
5
Security Features
The Intel® Active System Console offers multiple security features as protection against
unauthorized access to the application.
•
It supports role-based multiple user authentication as follows:
o
ADMIN. Users with administrator privileges.
Default Administrator user is admin. Only admin can create new users and
assign privileges. Any user can, however, change password.
o
USER. Users with read-only privileges. Configuration changes using the
application not permitted.
•
IASC supports SSL based data encryption to securely communicate between client
and application
•
Secure Socket Layer allows two communicating devices to encrypt data using a
public certificate and private key.
•
The certificate used in IASC is a self-signed one to reduce the cost of deployment. All
modern browsers will detect self-signed certificate and give a warning that the
“certificate is invalid” since the authority that signed the certificate is not a publicly
acknowledged authority. However, Users can override the warning and accept the
certificate. You should do this only if you are sure that the certificate is originated
from the application itself (by making sure you first launch the application from a
trusted network and add the certificate to the trusted list).
Once a certificate is accepted, the warning goes away as long as you launch the
application from the same client.
Customers having a valid certificate from a public CA can use that certificate instead
of auto-generated one.
Replacing Certificate in a Windows* Installation
To replace certificate in a Windows* installation, do the following:
1.
34
After installation, shut down the web-server for Certificate replacement.
•
Run services.msc from Run command in Windows. This will launch Services
window.
•
Search for LightTPDService and stop the service.
2.
Go to application installation directory (C:\Program Files\Intel\ASC\ in default case)
and go inside conf folder.
3.
Replace lighttp.crt with your valid certificate. If the name is different rename it to
lighttp.crt.
4.
Replace the private key file, lighttp.pem with your private key file.
5.
Set all the permissions of the key file to only Administrator. No other users should
be able to read or write this file.
6.
Set the permissions of the lighttp.pem to read-write for Administrator and read-only
for other users.
7.
If you do not want to change the file names of your certificate/key file pair, make
appropriate changes in the lighttpd-inc.conf in the same folder.
8.
Restart the web-service LightTPDService from the Service window.
Intel® Active System Console - User Guide
Replacing Certificate in Linux* Installation
To replace certificate in a Linux installation, do the following:
1. After installation, shut down the web-server for Certificate replacement.
/etc/init.d/lighttpd stop.
2. Go to the folder /etc/lighttpd/ and replace lighttp.crt with your valid certificate. If the
name is different rename it to lighttp.crt.
3. Replace the private key file, lighttp.pem with your private key file.
4. Set the permissions of the files as below:
-rw-r--r-- 1 root root 1326 Mar 28 12:11 lighttp.crt
-rw------- 1 root root 3005 Mar 28 12:11 lighttp.pem
Only root is allowed to read the private key file and write the public certificate file
5. If you do not want to change the file names of your certificate/key file pair, make
appropriate changes in the lighttpd.conf in the same folder.
6. Restart the web-server
/etc/init.d/lighttpd start
•
IASC uses a custom https port (9393) so it does not conflict with site’s access control
lists or firewall rules
For proper access to the application, appropriate changes should be done in firewall
rules to exclude this port from blocking.
Customers can modify the port if they want by editing the /etc/lighttpd/lighttpd.conf (in
Windows, %ProgramFiles%\Intel\ASC\conf\lighttpd-inc.conf) and restarting the webservice.
Traceability and Security Audit
•
IASC keeps track of who all logged-in and logged out and from which client. Any
unauthorized attempts to login are also kept track of. This is recorded in the form of
events in the Event Table.
Administrators of the tool should periodically do an audit on the events table to find out if
there is any misuse of the application or any unauthorized attempts to access the tool.
5.1
Security Recommendations
No security feature is fool proof unless you follow certain standard security procedures and
controls.
•
Security controls. Implement, update and monitor industry security products for
servers, such as but not limited to: anti-virus, anti-spyware, host based firewall,
intrusion prevention, and so on.
•
Remote access. The platform should be managed by those familiar with securing
remote access functions as well as managing systems that are exposed to the Internet.
•
When assigning passwords for the ASC and BMC user accounts, make them strong
enough to minimize your risk that someone could guess the passwords and thus use the
ASC to change the server configuration or interrupt its power/temperature controls. ASC
warns the user if the password is weak, so follow the warning and guide-lines.
Intel® Active System Console - User Guide
35
•
Network controls. If the management console is being established to allow internet
based access it is recommended to be placed within a network enclave that is consistent
with many companies’ internal policy of maintaining a “DMZ” or zone of networks that is
more closely monitored than internal networks
•
Firewall. Enable firewall software/services on Server where you install ASC or to the
network, and only enable exceptions to allow access to the web server on each server.
Where possible, limit which remote clients (e.g. using IP address ranges) can connect to
the web server.
•
To prevent successful Cross-Site Scripting and Forgery attack (XSS/CSRF) the users
should follow certain security guidelines:
36
•
Make sure you access the application only from trusted clients.
•
Do not leave the application logged-in for a prolonged time and close the browser
as soon as you finish the usage.
•
Do not visit any suspicious site or click on any public links in any other tabs in the
browser while you are accessing the application.
•
Change the passwords frequently to prevent unauthorized access by any internal
user and to reduce social engineering attacks.
•
Delete and create new application user accounts to reduce the risk of
unauthorized access from internal users or ex-users.
Intel® Active System Console - User Guide