1
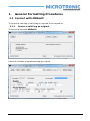
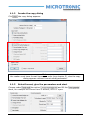
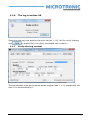
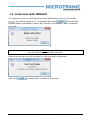
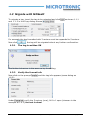
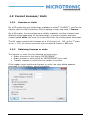
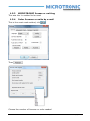
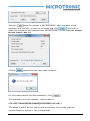
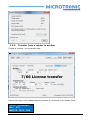
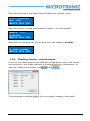
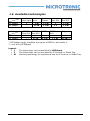
RFID Media Formatting with MDSedit / TML6 User Guide 01.09.2014 TAG Formatting User Manual (e).doc page 1/39 Impressum: Author: Revised: Filename: Copyright: P. Ammann, 23 May 2012 C. Schulz, 1 September 2014 TAG Formatting User Manual (e).doc MICROTRONIC AG Dünnernstrasse 32 CH-4702 Oensingen +41 623884545 +41 623884555 www.microtronic.ch [email protected] 01.09.2014 TAG Formatting User Manual (e).doc page 2/39 Table of contents 1. GENERAL FORMATTING PROCEDURES ........................................................ 5 1.1 Format with MDSedit ....................................................................... 5 1.1.1 1.1.2 1.1.3 1.1.4 1.1.5 1.1.6 1.1.7 1.1.8 1.1.9 Insert a valid tag as original .............................................................. 5 Invoke the copy dialog ...................................................................... 6 Select format, give the parameters and start ....................................... 6 Format next tag ............................................................................... 7 Format failure .................................................................................. 7 The tag is written OK ........................................................................ 8 Verify the tag content ....................................................................... 8 Verify the format info ....................................................................... 9 Customize tag info window .............................................................. 10 1.2 Unformat with MDSedit .................................................................. 12 1.2.1 1.2.2 1.2.3 Verify tag successfully unformatted .................................................. 13 Verify tag successfully restored to virgin ........................................... 13 Tag unformat failed ........................................................................ 14 1.3 Migrate with MDSedit ..................................................................... 15 1.3.1 1.3.2 The tag is written OK ...................................................................... 15 Verify the format info ..................................................................... 15 1.4 Working with models ..................................................................... 16 1.4.1 1.4.2 1.4.3 Creating a model............................................................................ 16 Model considerations ...................................................................... 18 Using a model ................................................................................ 19 1.5 Format Licenses/ Units ................................................................... 22 1.5.1 1.5.2 1.5.3 1.5.4 1.5.5 1.5.6 Licenses or Units ............................................................................ 22 Obtaining licenses or units .............................................................. 22 MICROTRONIC license or unit tag ..................................................... 23 Order licenses or units by e-mail ...................................................... 23 Transfer from a reader to another .................................................... 25 Checking license / units accounts ..................................................... 26 1.6 Available technologies.................................................................... 27 2. MIFARE® CLASSIC™, PLUS™............................................................. 28 1.1 Technology to apply ...................................................................... 28 1.2 Format type ................................................................................. 29 1.2.1 1.2.2 Tags with MAD ............................................................................... 29 Non-MAD tags ............................................................................... 30 1.3 Sectors ........................................................................................ 30 3. MIFARE® DESFIRE™ .......................................................................... 32 1.4 Allocation ..................................................................................... 32 1.1 On-chip encryption ........................................................................ 32 4. CALYPSO® ...................................................................................... 33 1.2 1.3 1.4 1.5 Allocation ..................................................................................... 33 CALYPSO® built-in E-Purse.............................................................. 34 Format vs. Migrate ........................................................................ 34 EP & U-KEY -> E-Purse only ........................................................... 34 01.09.2014 TAG Formatting User Manual (e).doc page 3/39 1.6 E-Purse only -> EP & U-KEY ........................................................... 35 1.6.1 1.6.2 1.6.3 01.09.2014 Interactive migrate ......................................................................... 36 Format per Model ........................................................................... 37 Migrate per Model .......................................................................... 39 TAG Formatting User Manual (e).doc page 4/39 1. General Formatting Procedures 1.1 Format with MDSedit To format a new tag, a valid tag is required to be copied on 1.1.1 Insert a valid tag as original To format a tag with MDSedit: Insert an already programmed tag as original. 01.09.2014 TAG Formatting User Manual (e).doc page 5/39 1.1.2 Click Invoke the copy dialog , the copy dialog appears: Note: the reader must have format licenses or units (see chapter 5), else the copy dialog appears without format mode/parameter. 1.1.3 Select format, give the parameters and start Choose under the option and fill the block, for example we choose here 3 sectors, All-In-1 open: 01.09.2014 TAG Formatting User Manual (e).doc page 6/39 Now click You will be prompted to remove the tag 1.1.4 Format next tag Then to insert a tag to be formatted 1.1.5 Format failure The option Accept virgin badges only was selected at 1.1.3, the tag inserted here was already formatted, 01.09.2014 TAG Formatting User Manual (e).doc page 7/39 1.1.6 The tag is written OK Removing the tag now asks for the next tag (at 1.1.4), but for verify the tag, click 1.1.7 or press [Esc], the newly formatted tag is read in: Verify the tag content The tag content must be the same as the original (see 1.1.1), except that the User # is incremented by 1. 01.09.2014 TAG Formatting User Manual (e).doc page 8/39 1.1.8 Verify the format info Now click on the prompt and the tag info appears: Under verify the 3 sectors, All-In-1 open (choosen in the example at 1.4.3) the test is done! 01.09.2014 TAG Formatting User Manual (e).doc page 9/39 1.1.9 Customize tag info window The size of this window depends on the technology of the tag: Obviously this window is too big for a small screen (like a laptop) , to reduce it, click 01.09.2014 , and choose the tab: TAG Formatting User Manual (e).doc page 10/39 By unchecking, this info window can be selectively reduced to the essential: 01.09.2014 TAG Formatting User Manual (e).doc page 11/39 1.2 Unformat with MDSedit To unformat, insert a valid tag to be unformatted and click on the prompt , the dialog shown at 1.1.8 appears and click the unformat process starts immediately witout any further confirmation; after sucessfull unformat Note: not all technologies provide unformat. Removing the tag now will prompt for the next tag to unformat: Also click 01.09.2014 or press [Esc] to abort the process. TAG Formatting User Manual (e).doc page 12/39 1.2.1 Verify tag successfully unformatted [esc] or The tag is read back and the error code confirms that the UKEY sectors are sucessfully deleted. 1.2.2 Verify tag successfully restored to virgin Check the corresponding box to restore to virgin (fill the whole tag so it was originally delivered), note that not all configurations allow this. Once done, [esc] or The tag is read back and the error code confirms that the U-KEY sectors are sucessfully deleted. The tag is read back and the error code confirms that the tag is succesfully restored to virgin. 01.09.2014 TAG Formatting User Manual (e).doc page 13/39 1.2.3 Tag unformat failed In this case, was checked in the dialog shown at 1.1.8 and the tag rd contains also 3 party partition. 01.09.2014 TAG Formatting User Manual (e).doc page 14/39 1.3 Migrate with MDSedit To migrate a tag, insert the tag to be migrated and click as shown 1.1.1 and 1.1.2 in the Copy dialog choose For example the tag formatted with 3 sectors must be expanded to 5 sectors. Now click 1.3.1 , the tag will be migrated witout any further confirmation. The tag is written OK The further behaviour is the same as by formatting. 1.3.2 Verify the format info Now click on the prompt 1.6.2): and the tag info appears (same dialog as Under verify the 5 sectors (now), All-In-1 open (choosen in the example at 1.4.3) the test is done! 01.09.2014 TAG Formatting User Manual (e).doc page 15/39 1.4 Working with models An alternative way to format/migrate/update badges is using the model, the advantage is that the reader has not to be connected to a PC. 1.4.1 Creating a model To create a model, make first a valid tag: 01.09.2014 TAG Formatting User Manual (e).doc page 16/39 Then in the attributes check immediately: , the model parameter block appear In fact this is no other as the Copy dialog shrunk in 1 block; just the and have another outfit. Once all parameters OK, click 01.09.2014 , and the model is ready to use. TAG Formatting User Manual (e).doc page 17/39 1.4.2 Model considerations On models, some rules have to be observed: There is no unformat per model. The model may be of any technology, format type or size, totally independent of the target formatting. A model must have room for at least 3 log blocks. The model must have at least 1 CC Block (e.g. Vend #1), that have to be in the range of the reader configuration. On migrate models no care is taken of the log blocks of the model, the log blocks of the target badges are left unchanged, the required CC Block is to verify the access rights. On migrate models, the checkbox becomes active, uncheck it means keep the allocation, just change the format type. On models for CALYPSO®, format and migrate have another signification, explained in chapter 4.2. 01.09.2014 TAG Formatting User Manual (e).doc page 18/39 1.4.3 Using a model A reader in the idle state: PRESENT MODEL To start session Insert a model (here a format model): SESSION STARTED To format ... REMOVE MODEL TAG The reader has read in the model parameters and is now ready to accept the 1st tag: PRESENT NEXT TAG Number: 124 Licences: 904 The reader informs you that the next tag will become user # 124 and it remains licences for format 904 badges. Now insert the next non formatted tag: Formatting ... ●●●●●● DON’T REMOVE TAG The formatting process duration may be some seconds, depending the tag size and what is to be done; once formatted OK, the confirmation is shown: User 124 Written - OK REMOVE USER TAG And the reader is ready for the next tag: PRESENT NEXT TAG Number: 125 Licences: 903 01.09.2014 TAG Formatting User Manual (e).doc page 19/39 After the last tag is formatted, insert the model again, so that the user-# can be updated there: Model updated Session closed REMOVE MODEL TAG And the reader returns in the idle state: PRESENT MODEL To start session If any error occurs, the reader shows it like: REJECTED 18.12 Tag is already formatted If the model is for migrate, the next tag is requested so: PRESENT USER TAG To migrate ... And after finishing, it‟s not necessary to reinsert the model (there is no user-# to keep), reinserting the model will just close the session: Session closed By model tag REMOVE MODEL TAG And the reader returns to idle state. It may (often) happen, that the reader in powered off before the model is updated; don‟t worry, the update data is kept in non-volatile RAM, and the next startup of the reader will show like: PRESENT MODEL with SN 637DDAE1 01.09.2014 TAG Formatting User Manual (e).doc page 20/39 Insert this model tag to update it: Model updated Session closed REMOVE MODEL TAG If the model tag has been definitively lost, a special diagnostic tag may be used to unblock the reader. 01.09.2014 TAG Formatting User Manual (e).doc page 21/39 1.5 Format Licenses/ Units 1.5.1 Licenses or Units On a G5 reader the only technology available is mifare® CLASSIC™, and for the right to use the U-KEY structure, the formatting of each tag costs 1 license. On a G6 reader, 4 technologies were initially available, and the licenses have different prices depending on the technology; a format currency has been created called units, the price list is delivered with the configuration document. The G6 reader worked with licenses up to M-Protocol rev. 125, at the 1st start on rev > 125, the license accounts are converted 1 license = 10 units. 1.5.2 Obtaining licenses or units The licenses or units may be obtained on three ways: Order a license or unit tag by MICROTRONIC Order licenses or units online by MICROTRONIC via e-mail Transfer licenses or units from one reader to another If the reader never had format licenses or units, the copy dialog appears truncated no formatting options available: 01.09.2014 TAG Formatting User Manual (e).doc page 22/39 1.5.3 MICROTRONIC license or unit tag This was the 1st method to be used. 1.5.4 Order licenses or units by e-mail This is the most used method, click : Then Choose the number of licenses or units needed 01.09.2014 TAG Formatting User Manual (e).doc page 23/39 And with send the request to MICROTRONIC, after reception of the response (and the bill), go back to the setup and click and enter or paste the realization key obtained from MICROTRONIC (in our case #FJ ZJYWQB M$+DRS 2LE&85 EHR-09) Clicking realizes and the new credit is shown: For information about the last transaction, click The character set in the request / realize codes is 0123456789ABCDEFGHJKLMNPQRSTUVWXYZ%&$+=#!? The letters I and O are not user to avoid confusion if the codes must be communicated by phone or fax (it happened). 01.09.2014 TAG Formatting User Manual (e).doc page 24/39 1.5.5 Transfer from a reader to another Create a license / unit transfer tag: Insert this tag in the reader whose licenses or units are to be taken from: -1000 Licences New: 901 REMOVE THIS TAG 01.09.2014 TAG Formatting User Manual (e).doc page 25/39 Then insert the tag in the reader that will obtain the licenses / units: +1000 Licences New: 1007 REMOVE THIS TAG After the transfer, the tag transformed to license / unit info request. Remain: 1007 licences REMOVE THIS TAG Note that this operation can only be done from one reader to another: Cannot transfer To same reader REMOVE THIS TAG 1.5.6 Checking license / units accounts In its life, the reader may become different configurations, due to the license / unit price policy, the reader maintain a license account per configuration, to view the license account state, click than : The configuration marked 01.09.2014 is the one currently loaded in the reader. TAG Formatting User Manual (e).doc page 26/39 1.6 Available technologies G5 Reader G6 Reader MIFARE ultra light I - MIFARE mini IW IFW MIFARE Classic IFW IFW MIFARE Plus SL0 I IF G5 Reader G6 Reader MIFARE MIFARE DESFire DESFire Plus SL2 Plus SL3 EV1 I I I * IFW IFW IFW MIFARE Plus SL1 IFW IFW Calypso I F W** * G5 Reader simply identifies the tag as a DESFire, and that‟s it. ** only with MICROpay6 Legend: I F W 01.09.2014 The technology can be identified by MIFdump. The technology can be formatted by M-Protocol or Model Tag. Working technology for operational use by M-Protocol or Model Tag. TAG Formatting User Manual (e).doc page 27/39 2. Mifare® CLASSIC™, PLUS™ 1.1 Technology to apply TML6 is able to operate with mifare® CLASSIC™ and PLUS™ SL1 and mifare® PLUS™ SL3 tags. The sector topology is the same for all these types. On the Copy dialog (see 1.1.2), select the technology: Either or Tag types mifare® PLUS™ Security Levels There are 4 Security Levels on mifare® PLUS™: SL0 the Tag is virgin, and can only be written (master keys) but not be read, and there is no access key. SL1 The tag behaves like a mifare® CLASSIC™ (6-Byte access codes, CRYPTO1 encryption) and is 100% compatible. SL2 is something between SL1 and SL3, not supported by MICROTRONIC. SL3 the highest security level (16-Byte access codes, AES encryption). SL0 is only supported by readers of generation 6. So if an SL1 tag must work on readers of generation 6 it needs a by readers of generation 6 to format it. SL2 is not supported 01.09.2014 TAG Formatting User Manual (e).doc page 28/39 1.2 Format type The Mifare® Application directory MAD may be used or not. On the Copy dialog (see ), select the Format Type: The recommended format type is “MIC standard”. The option takes the settings in the reader configuration. 1.2.1 Tags with MAD Tags with MAD may have the following types (differentiated by the B key) MIC standard: same as ALL-IN-1 open, with the control block of sector 0 and 16 frozen. ALL-IN-1 open: B key is B0..B5 (resp. 2 * B0..B7 on SL3). No/Locked MAD: There is a valid MAD on the tag, but the U-KEY partition is not referenced there. Invalid MAD: The content of sector 0 is not readable or cannot be considered as a MAD (NXP AN10787_6). The grayed options are recognized as such, but can‟t be given. Unless „keep virgin‟ is specified, all unused sectors are initialized with the same A and B key as the MAD and their data blocks zeroed. 01.09.2014 TAG Formatting User Manual (e).doc page 29/39 1.2.2 Non-MAD tags The tag comes from a 3rd party furnisher and the B key of MAD and the free sectors are not known by the reader for format (so it can‟t be written), or a MAD exists and is writeable, but we want deliberately work without MAD. Only the used sectors are written. Extended partition or NFC encryption requires a MAD. Giving 1 to 5 sectors requires the start sector number in the reader configuration. If 0, use a sector map. If a MAD already exists (writeable or not), it will be left unchanged. The application reader scans the sectors backward from the last (depending of the tag capacity) to sector 1 for find the 1st U-KEY sector, then forward to find the next. So it‟s an advantage to format the n last sectors (per sector map). 1.3 Sectors The sector size 1 sector: 2 sectors: 3 sectors: 4 sectors: 5 sectors: 1 big sector: determines the max number of 1 logical block 64 7 logical blocks 128 12 logical blocks 192 17 logical blocks 256 23 logical blocks 320 23 logical blocks 256 logical blocks: bytes bytes bytes bytes bytes bytes On the Copy dialog (see 1.1.2), select Sectors: 01.09.2014 TAG Formatting User Manual (e).doc page 30/39 Choosing a “map” or “big sector” enables the Sector map option: Allocation of sectors: 1 to 5 sectors: sectors are allocated straightforward among the free sectors as defined by the MAD from a specific sector on (if no MAD). 1 to 3 sectors + Ext: sectors are allocated straightforward among the free sectors as defined by the MAD (required), and the whole rest of the sectors are allocated for the tag file. Sector map: sectors are allocated according a bitmap in the range 1-15 or 17-31, or 1 (big) sector in the range 32-39. The MAD is optional. + Ext partition: the MAD is required. 01.09.2014 TAG Formatting User Manual (e).doc page 31/39 3. Mifare® DESFire™ On the Copy dialog (see 1.4.2), select the technology: 1.4 Allocation On the Copy dialog (see1.1.2), select the Format Allocation: Log.Blocks File Size Phys Size # of DESF blocks 2 32 64 1 8 96 192 3 14 160 320 5 18 192 384 6 24 256 512 8 1.1 On-chip encryption On the Copy dialog (see 1.4.2), select the Format Type: The App A003 is able to operate with DESFire™ tags, there are 2 format types: Standard (= 3DES) AES 01.09.2014 TAG Formatting User Manual (e).doc page 32/39 4. CALYPSO® On the Copy dialog (see1.1.2), select the technology: 1.2 Allocation On the Copy dialog (see1.1.2), select the Format Type: The App A003 is able to operate with CALYPSO® tags, there are three format types: Virgin: the tag as furnished, this state cannot be restored. E-Purse only: only the built-in electronic purse is used. EP & U-KEY: the electronic purse and room for 9 logical blocks The Reader is not able to unformat CALYPSO®. 01.09.2014 TAG Formatting User Manual (e).doc page 33/39 1.3 CALYPSO® built-in E-Purse The amount of VEND 1 (but not the one of VEND 2) is stored in the built-in EPurse, and not in the tag data. On E-Purse only, the Header 2 and the VEND 1 are faked by the reader. On EP & U-KEY, the Header 2 and the block data are stored on the tag data. The built-in E-Purse has some restrictions: The maximum amount on VEND1 is 0x7EFFFF (8323071) The debit is maximum 32767 per step; an amount 8323071 will need at least 255 steps to be reset to 0. The reader does not perform a loop; an error 12.71 is thrown if a debit is too large. 1.4 Format vs. Migrate On CALYPSO® badges, the notions of format and migrate are overlapped. from to Virgin E-Purse only EP & U-KEY † Only in interactive mode. E-Purse only Format Migrate† EP & U-KEY Format Format or Migrate - 1.5 EP & U-KEY -> E-Purse only This operation has only a meaning if E-Purse only badges are needed for testing format/migrate to EP & U-KEY; the procedure is: Delete all log blocks except Vend #1 Migrate to E-Purse only If other log blocks exist at migration, error 14.09 will be thrown. 01.09.2014 TAG Formatting User Manual (e).doc page 34/39 1.6 E-Purse only -> EP & U-KEY An E-Purse only tag has only the Amount value effectively stored on the tag; the other fields are faked resp. generated by the reader. This tag is EP & UKEY: Now migrate to E-Purse only: The Country and Company code and Departments are taken from the the reader configuration, the User # is computed by the reader and the Category is a fixed value in the reader (therefore read-only on MDSedit). 01.09.2014 TAG Formatting User Manual (e).doc page 35/39 1.6.1 Interactive migrate Interactively migrate to EP & U-KEY will create the U-KEY partition and write these fields onto the tag: Now, they can be modified. 01.09.2014 TAG Formatting User Manual (e).doc page 36/39 1.6.2 Format per Model The furnisher delivered badges may be E-Purse only instead of Virgin 01.09.2014 TAG Formatting User Manual (e).doc page 37/39 To make EP & U-KEY badges with specific Country and Company codes and initialize the Amount #1 to a specific value, make a Format model: Take care on the built-in E-Purse restrictions. 01.09.2014 TAG Formatting User Manual (e).doc page 38/39 1.6.3 Migrate per Model If the badges are E-Purse only and have been used before, the amount field is considered valid and must be preserved while replacing the Country and Company codes, eventually adding log blocks, make a Migrate model: In this case only (Migrate E-Purse only -> EP & U-KEY), the behavior of the reader is the same as with a format model (Increment User-#, consume license, update model at close); the only difference with a format model is that the amount value is preserved on the tag. 01.09.2014 TAG Formatting User Manual (e).doc page 39/39