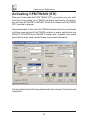
1
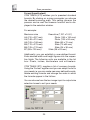
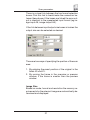
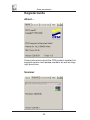
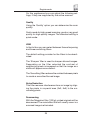
CFM TWAIN (STI)
User Guide
CFM TWAIN
- English -
Revision Rights / Reproduction
The information and data included in this manual may be revised without
prior notice. Unless otherwise indicated, any company names, other names
or data referred to in this manual are entirely imaginary.
No part of this publication may be reproduced or transmitted in any form or
by any means, electronically or mechanically, without the prior permission
in writing from CFM Computer für Menschen GmbH.
Trademarks and Registered Trademarks
Microsoft Windows® 98, Windows® ME, Windows® 2000, Windows® XP
and Windows® VISTA 32-Bit are registered trademarks of Microsoft Corporation in the U.S. and in other countries.
Product names mentioned herein are for idenfication purposes only and
me be trademarks and/or registered trademarks of their respective companies
This document is subject to change without notice, errors and omissions
excepted.
Copyright © 1993-2008
CFM Computer für Menschen GmbH
D-58456 Witten
Made in Germany
7th Edition November 2008
4
Contents
Introduction ......................................
CFM TWAIN (STI) .............................
Scanner Options ..............................
Supported Options, Functions ........
Development .....................................
Support .............................................
System Requirements ......................
Compatibility ......................................
Register cards ...............................
About ... ...........................................
Scanner ...........................................
- Scanner selection .........................
- Search for scanners .....................
Scanner Info ...................................
Filter .................................................
- Quality ...........................................
- USM ..............................................
- Noise reduction ............................
- Descreening .................................
- White Balance ..............................
- Negative .......................................
- Mirror .............................................
Lineart .............................................
Photo/Letter ....................................
Drop Photo ......................................
Halftone ...........................................
Error Diffusion .................................
Grey levels ......................................
Colour ..............................................
Gamma ............................................
Format .............................................
Endorser ..........................................
6
6
6
7
7
7
8
8
Installation of the Scanner ............. 8
Installing the CFM TWAIN (STI) driver .. 8
Installation/Uninstallation ................. 8
Choosing an Application ................ 9
Selecting CFM TWAIN (STI) ............. 9
Activating CFM TWAIN (STI) .......... 10
Scanning in brief ........................... 11
Function and Operation A-Z ........
Overview ..........................................
Prescan ...........................................
Finescan ..........................................
Finescan to clipboard .....................
Help ..................................................
Save ................................................
Cancel .............................................
Finish ...............................................
Status line .......................................
Scan parameters ..........................
Scan Mode ......................................
Original ............................................
Resolution .......................................
Image ...............................................
Format (Input/output) .....................
Image Size ......................................
12
13
14
15
15
15
16
16
16
16
17
17
18
18
19
20
21
22
22
22
23
23
24
24
25
25
25
25
26
26
27
27
31
32
33
34
35
37
38
40
41
Glossary ......................................... 44
Licence Agreement ...................... 46
Index ............................................... 48
5
Introduction
Introduction
CFM TWAIN (STI)
CFM TWAIN (STI) is an independent standard TWAIN module for scanner control and can be run from most applications supporting the
TWAIN standard. It opens up to your scanner all modern desktop
publishing (DTP), optical character recognition (OCR) and document
imaging (DIM) capabilities.
CFM TWAIN (STI) allows you to connect your scanner to your computer via an ASPI compatible SCSI host adapter.
Based on the TWAIN standard features the program options depend
on the capabilities of the respective scanner as well as application
requirements.
With the help of CFM TWAIN (STI) all functions of the scanners are
supported. Because of its variety of functions and options the scan
results can be tailored to your wishes.
Scanner Options
The concept of using a self-reliant and regular TWAIN module consequently tailored to the needs of a particular manufacturer offers many
advantages to the user and his daily scanning work. CFM TWAIN
(STI) not only permits using the basic functions of scanners, but also
enables the other important functions and options inherent in every
scanner model to be fully exploited. This is of special interest to users operating on the PC platform under Windows. Everything that can
be done on the scanner’s “hardware level” saves computing time and
reduces memory requirements.
6
Introduction
Supported Options, Functions etc.
The descriptive information in this manual is based on examples.
CFM TWAIN (STI) as furnished may deviate in a number of aspects.
Please note that the respective scanner or scanner drivers always
affect the available parameters, functions and options. If these are
found to be unsupported by the relevant scanner or currently set mode
they can not be activated. In particular, the window showing scanning
options may considerably vary from what is said in the help and
manual. Current information about operation or settings are included
in the ReadMe files.
Development
CFM TWAIN (STI) is constantly updated to include state-of-the-art
functions and be ready for other operating systems as well. Information about the latest development status can be obtained from CFM
GmbH. Helpful suggestions from your side are always welcome and
will be duly considered. Please do not hesitate to contact us.
Support
Support and update information are available to you under the following address:
Computer für Menschen GmbH
Wittener Str. 142
D - 58456 Witten
Germany
Telephone
Fax
+49 (0) 2302 970 30 - 0
+49 (0) 2302 970 30 - 30
Internet
http://www.cfm.de
[email protected]
7
System Requirements / Installation of the Scanner
System Requirements
The following configuration is required:
•
•
•
•
•
•
•
IBM PC/AT or compatible computer
Minimum 256 MB RAM to suit the individual operating
system, application and scanning job
VGA or higher resolution monitor
CD-ROM or DVD Drive
Supported Scanner
SCSI or USB cable
Supported Operating Systems
Windows 98/98SE/ME
Windows 2000
Windows XP
Windows VISTA 32-Bit
Compatibility
•
TWAIN compliant application programs
Installation of the Scanner
Please refer to the Scanner Operator’s Guide for details of scanner
installation.
Installing the CFM TWAIN (STI) Driver
Before installing CFM TWAIN (STI) you should have completed
connection of the scanner. When the scanner is “READY” to operate
you can turn on your computer.
Detailed information about installation/deinstallation of the CFM TWAIN
(STI) are given in the installation guide that corresponds to the version of Windows that you are using.
8
Installing the CFM TWAIN (STI) Driver
Choosing an Application
Select an application to suit your scanning job and make the required
basic settings (as given in the application manual).
Recommended: To save system resources and attain a satisfactory
working speed close all other running applications and open windows
before starting the scanning operation. When working under DOS
clear as much free conventional memory (below 640 K) as possible.
If tolerated by a given application do not reserve all the memory for
this application (as a rule do not exceed 75%).
Selecting CFM TWAIN (STI)
Before you can start up your CFM TWAIN (STI) module and begin
with the scanning job you must select the TWAIN module once as
source in your application.
1. In your application choose under FILE the SELECT
SOURCE option.
2. Now select CFM TWAIN (STI).
In Picture Publisher for example you choose the source with:
FILE, SETTINGS, SCANNER, TWAIN
In OmniPage you shall choose 'TWAIN scanner'.
9
Choosing an Application
Activating CFM TWAIN (STI)
After you have selected CFM TWAIN (STI) as source you can start
scanning from inside your TWAIN compliant application. For example, choose ACQUIRE or IMPORT which will cause the CFM TWAIN
(STI) module to appear.
Recommended: In line with the TWAIN standard the two commands
initiating scanning with the TWAIN module in every application are
SELECT SOURCE and AQUIRE. Please note, however, that some
applications may have named these commands differently.
Further details about this are described in the chapter Functions and
Operation.
10
Activating CFM TWAIN
Scanning in Brief
If several scanners are connected you can select the desired scanner on the register card scanner with the help of the displayed list
box. The chosen scanner appears in CFM TWAIN (STI) as active
scanner in the scanner box in the top right corner.
1. Insert Document
Place the document to be scanned on the scanning surface
(observe guide mark).
2. Settings
From the displayed scan parameters choose the desired features. The image size based on mode, format and resolution
(memory requirements for the image) is automatically determined and displayed on the far left end of the user interface.
3. Start the desired scan option, ie
Overview
(Ctrl + W)
Prescan
(Crtl + R)
Finescan
(Ctrl + A)
Finescan to clipboard
(Ctrl + C)
Detailed information about these buttons is given under the corresponding headword.
11
Scanning in Brief
Functions and Operation
CFM TWAIN (STI) offers a multitude of adjustment capabilities to
obtain scan results meeting the user’s needs.
The descriptive information in this manual is based on examples.
CFM TWAIN (STI) as furnished may deviate in a number of aspects.
Please note that the respective scanner or scanner drivers always
affect the available parameters, functions and options. If these are
found to be unsupported by the relevant scanner or currently set mode
they can not be activated.
You can select adjustments in different ways:
Direct selection in pulldown menus and check boxes or input in dialog
boxes of the user interface. Functions and options are available via
register cards.
If you need further information about icons, dialog boxes or a pulldown
menu, move the mouse cursor to the relevant position. The designation will be displayed on the monitor, and in the status line on the far
left hand side on the user interface, additional information about the
function can be read, or the status of a started scan is displayed.
Some applications start a TWAIN module in hidden mode (without
User Interface Interaction) or can be set to this mode, particularly
DIM or OCR programs. In this case the CFM TWAIN (STI) driver is
controlled from the respective application. Note that not all applications are capable of doing this correctly. If necessary, you have to
change settings for the TWAIN module in another application or scan
in ”open” mode again. How you can make these settings and other
tips and tricks are explained in the relating chapter of this manual and
in the ReadMe files.
Adjustment capabilities of CFM TWAIN (STI) are described on the
following pages.
12
Functions and Operation
Overview
With a click on the button you can start the scanning
operation at low resolution in the best possible mode
covering the whole scanning area. This causes the whole
scan area to be displayed on the monitor. Using the
frame you can define a scan area for the preview or the
finescan.
For a new overview, for example after changing the scan
original, please open the overview once more and start
a new preview of the whole scan area by clicking the
‘overview’ button.
If desired, you can copy the content of the overview window to the clipboard by clicking the right mouse button
within the displayed overview and then import it into
various other applications by using ‘paste’.
13
Functions and Operation
Prescan
Clicking this button starts the scanning operation based
on all preset parameters and low resolution.
If you have chosen the feeder in the list box ‘original’ the
number of pages to scan will be automatically set to
one page and the first page in the document feeder will
be scanned for the prescan.
The selected scanning area is displayed in the external
preview window to enable selection, assessment and, if
necessary, correction of parameters.
The size of the preview selection frame can be varied
by dragging the handles as desired. If the frame is
smaller than the preview window the frame as a whole
can be moved.
You have the possibility to copy the content of the overview window to the clipboard by clicking the right mouse
button within the displayed overview and then import it
into various other applications by using ‘paste’.
14
Functions and Operation
Recommended: If you want to establish the scanning
area quickly without considering other parameters select the option overview for previewing and afterwards
switch to the desired final scanning mode.
Finescan
Starts the main scanning operation based on all preset
parameters. After the original has been scanned the image is transmitted to the application.
Finescan to Clipboard
Clicking on this button will start the main scanning operation based on all preset parameters. After the original has been scanned the image is copied to the clipboard and can then be imported into various other applications by using ‘paste’.
Help
The integrated HELP function explains the most important program characteristics.
Click on the question mark in the top right corner and
then click on the element you need information about,
click on the help button or press F1.
If you need further information about icons, dialog boxes
or a pulldown menu move the mouse cursor to the relevant location. The name will be displayed as a tool tip.
In the status line of CFM TWAIN (STI) additional information about the function is provided.
15
Functions and Operation
Save
The currently selected settings will be stored when clicking on the ‘Save’ button.
Cancel
A click on the ‘Cancel’ button terminates the current scanning process or closes CFM TWAIN (STI) if no scan
process is active. The currently selected settings will
not be saved.
Finish
Click on the button’Finish’ to terminate CFM TWAIN (STI),
save all current settings and transfer the scan to the
application unless this is automatically controlled by the
relevant application.
Status Line
The status line provides useful information about the
current scanning operation and image transfer to the
application.
16
Functions and Operation
Scan parameters
Scan mode
By clicking on one of the options shown in the MODE
box you can determine the information scope for a given
scanning task. The parameters available with the selected scanner are displayed, for example:
• Lineart
(OCR, drawings)
• Photo/Letter
• Drop Photo
• Halftone
(Screening=Output for printers) (*)
• 16 grey levels
• 256 grey levels
(IES, 3D-OCR)
• False colours
(with grey level scanners)
• 8 colours
• 8 colours halftone
• 256 colours
• 256 colours (diffusion)
• True colours (RGB)
• True colours (CMYK)
(only available with certain
applications)
(*) depends on scanner type
Corresponding to the selected scan mode a register card
with additional settings is displayed.
Further information about the register cards are given in
the relating chapter of this manual.
17
Scan parameters
Original
In the list box the following options are available to suit
the type of original you want to scan and depending on
the installed hardware options of the scanner:
- Flat-bed
(Reflective)
- Transparency
(Transparency option)
- Frontpage
(ADF)
- Backpage
(ADF)
- Duplex
(ADF)
- Duplex (front page first) (ADF)
- Duplex (back page first) (ADF)
If you choose an ADF option in the field ‘count’ you can
select the desired number of pages to be scanned or
use the ‘all pages’ option. If paper is to be fed between
pauses, the ‘media wait’ option must be selected.
If the selected application is only capable of importing
one page at a time, only a single page can be preselected
when the application informs CFM TWAIN (STI) of this
limitation.
Resolution
Adjust the output resolution for the scan by setting the
desired value with the slider or type it into the text box.
Resolution can be set with single dpi increments from
30 dpi to five times the scanner’s optical resolution capability.
18
Scan parameters
Problems may arise because a scanner ‘sees’ by far
better than can be displayed by most of the output devices, i.e. more tonal values such as grey and colour
levels. What is more, it detects these characteristics other
than the human eye does.
More often than not the resolution selected is too high
for the intended purpose. Please note that using high
resolutions of grey levels and colours requires much time
and excessive memory space. The memory requirements are proportional to the square of the resolution.
We thus recommend that you try the lowest possible
resolution for a given purpose and deepen your knowledge by reading literature on the subject.
For Optical Character Recognition (OCR) and Document
Imaging (DIM) you should use the scanning resolution
your application provides for this purpose, e.g. 300 or
400 dpi in the lineart mode. Background colours and
individual incoherent dots (pixels) can be faded out if
they differ from the tonal value (greyscale or colour) of
the text. In this case you can suppress these imperfections by carefully adjusting the threshold value - depending on the scanner - manually or automatically. If your
optical character recognition software package supports
3D-OCR scanning is carried out in 256-greyscale mode.
Please follow the recommendations given in the user’s
guide of your application.
Image
The image dimensions for the selected format are displayed in the IMAGE field which is divided into two sections: Image input and output size.
Moreover, the respective unit is shown.
19
Scan parameters
Format (Input/output)
CFM TWAIN (STI) enables you to preselect standard
formats. By clicking on a given parameter you choose
the desired scanning area. This setting governs the
prescan and as well the finescan function and is displayed in the selection window.
For example:
Maximum size
A4 (210 x 297 mm)
A5 (148 x 210 mm)
A6 (105 x 148 mm)
B5 (176 x 275 mm)
B6 (125 x 176 mm)
B7 (88 x 125 mm)
Executive (7,25" x 10,5")
Photo (150 x 100 mm)
Photo (130 x 90 mm)
Slide (60 x 70 mm)
Slide (70 x60 mm)
Slide (24 x 36 mm)
Slide (36 x 24 mm)
Additionally, you can establish a user-defined format.
Enter desired width and height figures into the respective fields. The following units are available in the list
box: Pixels, inches, centimeters and millimeters.
CFM TWAIN (STI) supplies a list of common formats.
Using the ‘Format’ register card you can adapt the list to
your needs, ie you can create new user-defined formats,
delete existing formats and change the order in which
the formats appear in the list box.
You can choose from the two image-input-to-output-size
selection boxes to suit your needs.
20
Scan parameters
There is a visual link between the two format selection
boxes. Click this link to break/make the connection between these boxes. If the boxes are linked the scan output is identical to the preselected input format (eg image input A6, image output A6).
If the link between input/output size boxes is broken the
output size can be selected as desired.
There are two ways of specifying the position of the scan
area:
1. By entering the exact position of the original in the
fields X0 und Y0.
2. By moving the frame in the overview or prescan
window, if the frame is smaller than the preview
window.
Image Size
Based on mode, format and resolution the memory requirements for the relevant image are automatically determined and displayed.
21
Scan parameters
Registercards
About…
Shows information about the CFM product installed, for
example version and release numbers, as well as copyright provisions.
Scanner
22
Registercards
Scanner Selection
On the ‘Scanner’ register card you will find a list box
which shows the connected scanners ready for use.
Clicking on a scanner selects the desired device and
makes it the current scanner.
The SCSI adapter and ID numbers of adapter and scanner, the scanner’s technical identification name and the
ROM and firmware versions are displayed.
In addition to this, further information about the selected
scanner is shown, for example the optical resolution,
installed hardware options and available CFM TWAIN
(STI) driver version.
Clicking the ‘Rescan’ button starts a new search for scanners which currently have the ready status. All devices
found are displayed in the dialog box for scanner selection.
Search for Scanners
A click on the ‘SCSI’ button starts a search for operational scanners and the devices found will be displayed
and updated in the ‘scanner selection’ list box.
23
Registercards
Scanner Info
Shows information about the connected scanner, for
example, number of scanned pages in ADF, scanned
pages in flatbed, period of lamp turned on. This register
card is only visible if the scanner provides the information.
Filter
24
Registercards
On this registercard you can adjust the following settings, if they are supported by the active scanner:
Quality
Using the ‘Quality’ option you can determine the scan
quality:
Quick-mode for high-speed scanning, good or very good
quality for high-quality images. The standard setting is
quick-mode.
USM
In the list box you can select between three sharpening
and three smoothing filters.
The default setting provides for the filters to be deactivated.
The ‘Sharpen’ filter is used to sharpen blurred images.
Depending on the filter selected the contrast of
neighboring pixels is increased so that the image as a
whole will appear more distinct.
The ‘Smoothing’ filter reduces the contrast between pixels
to create a smoother/blurred image.
Noise Reduction
This filter removes interference from an image by aligning the pixels in a special area (3x3, 5x5) to the surrounding pixels.
Descreening
With the ‘Magazine’ filter (133 lpi) printed originals will be
descreened. The moiré effect that will usually occur in a
scanned image is eliminated.
25
Registercards
White Balance
Using the WHITE BALANCE function enables you to
blank out an undesired background in DIM and OCR
jobs.
The WHITE BALANCE ‘scanner option’ lets you declare
the brightest value of the original as the brightest value
the scanner is able to detect.
In this manner, the gray background of a document, for
example, is defined to be white which will greatly improve the contrast when handling OCR, DIM and drawings scanning jobs.
Depending on the scanner type the White Balance function has various names (eg automatic exposure, dynamic
threshold, line drawing, text mode etc.). However, this
function is not supported by all scanners.
As a rule but varying with scanner type white balancing
is effected at the scanning area starting point. Therefore, the document should be precisely positioned (see
scanner manual).
For example: The tone value is measured within the first
3 mm of the selected scan area. Therefore the background color should be dominant in this zone. If this is
not possible deactivate the option White Balance.
Some scanners with automatic threshold control employ a line by line balancing function. In this case, the
dark background is eliminated only behind a text while
it is retained in the area between the lines.
Negative
This scanner option enables all scanned image pixels
to be inverted during the scanning process. In this way,
a quasi-negative effect is created. This function is very
suitable for colour negative slides.
26
Registercards
Mirroring
This scanner option lets you flip an image to create a
mirrored effect. The output will be a mirror reflection of
the original.
Lineart
On this registercard you can adjust the following settings, if they are supported by the active scanner:
Brightness
The brightness can be controlled via slider. The number
of brightness stages varies with the scanner model with
the default setting being 0.
The image is made uniformly lighter by setting positive
values while negative values will darken it uniformly.
A selected gamma curve is modified accordingly.
Contrast
The contrast can be adjusted by means of the scroll
handle. The number of contrast stages depends on the
scanner type with the default setting being 0.
27
Registercards
Using positive values will brighten the light areas in an
image and darken the dark ones while negative values
result in darkening the lighter areas and lightening the
dark image sections.
Threshold
Internally, the scanning operation performed by the scanner is based on the processing of tonal value scales.
In the ”Lineart” mode (for archiving, fax documents etc.)
the threshold function is used to determine the tone value
at which a pixel is displayed and can be selected via
slider. Pixels brighter than the set threshold are shown
white while pixels darker than the set threshold are shown
in black.
The setting thus governs the tone value at which the
scanned pixels are displayed, eg using a medium threshold and internally scanned 256 grey scales will result in
tone values 0-127 to be deleted while tone values 128255 are displayed.
A fixed threshold leads to rather coarse results. Therefore, scanners for archiving purposes are capable of
varying their threshold during scanning within predetermined limits; originals containing many tone value scales
are shown in higher detail.
Also refer to: Dynamic Threshold
Dynamic Threshold
Using the Dynamic Threshold (DTC) scanner option in
lineart mode you can select a number of options that
will improe the recognition of handwriting, broken lines
or pale originals.
This DTC option adapts the threshold automatically to
the contrast level of the original. Special DTC options
my be used to limit or increase this automatic contrast
adjustement to suit the requirements of the original.
28
Registercards
For example:
Normal
Default setting, the scanner sets the threshold automatically to improve the scanned image.
Character enhancement
Light or pale scripts/characters are darkened to improve
the quality of the scanned image.
Background removal
The scanner discriminates the background colour of an
original and sets the threshold automatically. In this manner, a grey background of a document is shown white
which will greatly improve the contrast in case of OCR.
Speckle Removal
Using the speckle removal option allows you to eliminate individual incoherent dots in an image in lineart mode
to obtain a cleaned-up scan. The size of the search matrix can be adjusted. A larger matrix improves the effect
but can also decompose signs.
Binary filter
Bold Lining
Using the Scanner Option ”Bold Lining” thin lines or letters can be intensified in lineart mode to attain better
results for OCR or DIM jobs.
Edge Extraction
Use this filter if you need the outlines of an image, for
design purposes etc.
29
Registercards
Filter
Average
By selecting the Average filter the average value of adjacent pixels, for example 2 x 2 = 4 pixels or 2 x 1 = 2
pixels, is taken as a basis. This filter can be employed
in lineart, halftone and greyscale mode for soft focusing effects. 2 x 2 yields softer images than 2 x 1.
MTF
The MTF (modulation transfer) function is used with gray
scales and colors to enhance and sharpen pale images
so that they appear to be more lively.
In the lineart mode the thickness of thin lines is increased
and image noise eliminated (automatic threshold).
Colour filter
Via the scanner-inherent colour filter you can mask an
unwanted colour and exclude it from the scan. In case
of OCR and DIM operations the background of the original is erased which will enhance character scanning. You
can easily choose the drop-out colour (for example red,
green or blue) from the listbox.
Smoothing
With the SMOOTHING function irregularities encountered
in the original can be eliminated in the LINEART mode,
for example, to enable a more precise scanning for OCR
and DIM operations.
30
Registercards
Photo/Letter
This mode detects photo (halftone) areas and letter (binary) areas of the original so that the binaryareas are
scanned in lineart mode, and the halftone areas are
scanned in halftone mode.
Additional settings you can adjust on this registercard
are contrast, brightness, threshold, halftone pattern and
the Average and MTF filters. Detailed information about
this options is given under the chapter Registercards/
Lineart and Halftone.
31
Registercards
Drop Photo
This mode detects photo areasin originals and excludes
them while scanning the remaining letter (binary) areas
of the original in lineart.
To improve your scan results you may additionally adjust the contrast, brightness and threshold settings as
well as Average and MTF filters. More information about
this functions is given under the respective headword.
32
Registercards
Halftone
On this registercard you can adjust the following settings, if they are supported by the active scanner:
Brightness
The brightness can be controlled via slider. The number
of brightness stages varies with the scanner model with
the default setting being 0.
The image is made uniformly lighter by setting positive
values while negative values will darken it uniformly.
A selected gamma curve is modified accordingly.
Contrast
The contrast can be adjusted by means of the scroll
handle. The number of contrast stages depends on the
scanner type with the default setting being 0.
Using positive values will brighten the light areas in an
image and darken the dark ones while negative values
result in darkening the lighter areas and lightening the
dark image sections.
33
Registercards
Halftone
Via the HALFTONE list box (only activated when the
Halftone MODE has been preset) you define the halftone pattern to be applied to the scan.
For example:
Error diffusion
• Pattern 1 (screening)
• Pattern 2 (screening)
• Pattern 3 (screening)
• Pattern 4 (screening)
In the ‘error diffusion’ halftone mode a diffuse randomlike pattern is produced.
The error diffusion feature is used with a lower resolution and when a desktop printer is used as output device. By using this setting a moiré pattern (undesired
superimposed interference pattern) can be avoided.
More background information is given under the RESOLUTION chapter in the Manual.
Error Diffusion
In the ‘error diffusion’ mode a diffuse random-like pat34
Registercards
tern is produced.
The error diffusion feature is used with a lower resolution and when a desktop printer is used as output device. By using this setting a moiré pattern (undesired
superimposed interference pattern) can be avoided.
More background information is given under the RESOLUTION chapter in the Manual.
Additional settings you can adjust on this registercard
are contrast, brightness and Dynamic Threshold, Detailed information about this options is given under the
chapter Registercards/Lineart.
Grey
On this registercard you can adjust the following settings, if they are supported by the active scanner:
Brightness
The brightness can be controlled via slider. The number
of brightness stages varies with the scanner model with
the default setting being 0.
The image is made uniformly lighter by setting positive
35
Registercards
values while negative values will darken it uniformly.
A selected gamma curve is modified accordingly.
Contrast
The contrast can be adjusted by means of the scroll
handle. The number of contrast stages depends on the
scanner type with the default setting being 0.
Using positive values will brighten the light areas in an
image and darken the dark ones while negative values
result in darkening the lighter areas and lightening the
dark image sections.
Filter
Average
By selecting the Average filter the average value of adjacent pixels, for example 2 x 2 = 4 pixels or 2 x 1 = 2
pixels, is taken as a basis. This filter can be employed
in lineart, halftone and greyscale mode for soft focusing effects. 2 x 2 yields softer images than 2 x 1.
MTF
The MTF (modulation transfer) function is used with gray
scales and colors to enhance and sharpen pale images
so that they appear to be more lively.
In the lineart mode the thickness of thin lines is increased
and image noise eliminated (automatic threshold).
Colour filter
Via the scanner-inherent colour filter you can mask an
unwanted colour and exclude it from the scan. In case
of OCR and DIM operations the background of the original is erased which will enhance character scanning. You
can easily choose the drop-out colour (for example red,
green or blue) from the listbox.
36
Registercards
Colour
On this registercard you can adjust the following settings, if they are supported by the active scanner:
Brightness
The brightness can be controlled via slider. The number
of brightness stages varies with the scanner model with
the default setting being 0.
The image is made uniformly lighter by setting positive
values while negative values will darken it uniformly.
A selected gamma curve is modified accordingly.
Contrast
The contrast can be adjusted by means of the scroll
handle. The number of contrast stages depends on the
scanner type with the default setting being 0.
Using positive values will brighten the light areas in an
image and darken the dark ones while negative values
result in darkening the lighter areas and lightening the
dark image sections.
37
Registercards
Gamma
The gamma correction affects the contrast and brightness of your image.
With the brightness function all the tone value levels of
an image can be uniformly changed to lighter or darker
as desired. Using the contrast function permits the dark
brightness levels to be uniformly varied between darker
and brighter.
The gamma correction (gradation) function on the other
hand enables an individual adjustment of the various
individual tone value levels (gray and color scale levels). The gamma correction is based on gamma curves.
Applying a gamma curve improves image quality without discarding information inadvertently.
There are two possible ways of carrying out the gamma
correction:
1. Preselectable gamma curves by the CFM TWAIN
(STI) module. In colour mode all colour channels are
determined by one gamma curve.
38
Registercards
The following types of gamma curves can be selected
from the ‘Gamma’ register card :
Name
Normal
Soft
Hard
Linear
Name
Normal
Soft
Hard
Linear
Increasing the brightness of
Shadows Midtones
Highlights
slight
medium
slight
medium
strong
medium
hardly
slight
medium
Default setting, outputs an image as
scanned
Effect of the gamma curves
Emphasizes contrast slightly to improve a
scanned image
Weakens contrast to soften an image
Emphasizes contrast to sharpen an image
Outputs an image as scanned
2. With the help of a gamma value
Please activate the function ‘Use Gamma value’.
Adjust the Gamma value for the scan by setting the
desired value with the slider or type it into the text
box. The Gamma value can be set with single increments from 0,1 to 10.
Entering a value of 1 gives you a neutral curve (linear
gamma curve); a smaller gamma value than 1 darkens
the image, a gamma value higher than 1 will lighten
the image.
39
Registercards
Format
CFM TWAIN (STI) supplies a list of common formats.
Using the ‘Format’ register card you can adapt the list to
your requirements, ie you can create new user-defined
formats, delete existing formats and change the order
in which the formats appear in the list box.
Additionally, you can establish a user-defined format.
Enter desired width and height figures into the respective fields. The following units are available in the list
box: Pixels, inches, centimeters and millimeters.
By clicking on the ‘save’ button you can save the defined format as default setting.
Format: Apply
Format: New
40
Registercards
Format: Delete
Format: Move up
Format: Move down
Endorser
The Endorser (SCANNER OPTION) is used to print alphanumeric characters on a document to facilitate filing
of the scanned pages.
In the dialog box in the ENDORSER field you can enter
the text you want to print. Clicking the Endorser field
will activate the Endorser.
Depending on the respective Endorser the following is
to be noted:
41
Registercards
Maximum number of characters:
The endorsed message must, for example, not include
more than 19 characters.
Type of character:
Capital letters (A-Z)
Numbers(0-9)
Characters (, - . / ‘:.)
The following is created automatically:
Date, time and a consecutive number by including the
following placeholders which have to be entered in lowercase letters:
%date
%time
%count
%user
date
time
serial number
name of the user logged on to the PC
The print layout of date and time refers to the date and
time settings of the operating system.
The serial number can have 5 places as a maximum, its
„starting“ value is entered in the field ‘Start volume’ while
the „increment“ size is entered below.
42
Registercards
Support & Information
CFM Computer für Menschen GmbH
Wittener Str. 142
D - 58456 Witten
Germany
Telephone
Fax
+49 (0) 2302 970 30 - 0
+49 (0) 2302 970 30 - 30
Internet
http://www.cfm.de
[email protected]
43
Glossary
Glossary
ASPI
Adaptec has made ASPI (Advanced SCSI Programming Interface) a
quasi-standard for communication between manufacturer-independent SCSI host adapters and SCSI devices.
CMS
Colour Management System software used for the generation of
device-specific calibration curves, particularly, for the correct colour
value reproduction in different colour systems (eg C.I.E., L.ab)
DPI
Dots per inch. Pixels, Printer resolution in the Line Art mode.
DIM
Document Imaging = archiving.
DTP
Desktop publishing describes the electronic preparation of all types
of publications comprising photos, graphical elements as well as text.
Host Adapter
The interface between mainboard and SCSI bus is termed host adapter.
It includes an integrated SCSI bus controller. Normally, up to 7 additional devices can be connected.
IES
Image Editing Software = electronic image processing.
LPI
Lines per inch. Screening lines. Compromise based on resolution and
tone value scope.
OCR
Optical character recognition.
PPI
Pixels per inch. Designation used to define the scanner resolution.
44
Glossary
TWAIN
TWAIN = two; linking two separated worlds: scanners & applications.
TWAIN is a standard for the communication between image input
media, eg scanners, and their application programs. TWAIN is intended to enable scanners of various manufacturers to be controlled
from within a given application program, and software of various manufacturers to be easily used with a scanner. The application does not
need drivers for a given scanner, and, vice versa, the scanner hardware is no longer dependent on a certain application. Prerequisite for
this is, however, that both hardware and software products are based
on the TWAIN specification. A TWAIN module thus enables communication between TWAIN compliant application programs and TWAIN
compliant scanners.
45
Licence Agreement
CFM Licence Agreement
ATTENTION: Please read this document carefully before installing the software.
This is a legal agreement between you, the end user, and Computer für Menschen GmbH, DWitten, Germany corporation (“CFM”). By installing the software, you are agreeing to be bound
by the terms of this agreement. If you do not agree to the terms of this agreement, promptly return the
disk package and the acconpanying items (including written materials and binders or other containers)
to the place you obtainded them for a full refund. The enclosed CFM Product is a single user
version unless your Product’s packaging indicates otherwise or unless you have a written
agreement with CFM Corporation.
CFM SOFTWARE LICENSE
1. GRANT OF LICENSE
(a) CFM grants the end-user a license to use one copy of the enclosed software program (“the Software”) on a single terminal connected to a single computer. The end-user may copy the Software from
one single terminal to another such single terminal or portable or home computer or terminal belonging
to or used by the enduser provided that the Software is in use on only one computer at a time and is
never installed on more than two computers at any one time and is used only by the end-user. If the
Software package contains both 3-1/2" and 5-1/4" disks, then the end-user may install from only
one set (either the 3-1/2" or 5 1/4") of the disks provided.
(b) If the end-user has multiple licenses for the Software, then at any time the enduser may use
as many copies of the Software as the end-user has licenses. If the number of persons who can
access and use the Software exceeds the number of licenses that the end-user has, then the
end-user must have a reasonable mechanism or process in place to assure that the number of
persons using the Software at the same time does not exceed the number of licenses.
(c) This license is not a sale of any of the rights of ownership of the original Software or any copy. In
particular CFM retains title and full rights of ownership in the original or any copy of the Software
installed or copied or in use on all such physical media or on any other media such as but not
restricted to floppy or hard disks, CD-ROM or similar storage devices or operating memory.
(d) As the end-user is simply acquiring a licence to use this product, it may therefore not be sold,
leased or transferred to anyone without the prior consent of CFM. After written notification to CFM, the
end-us may transfer all copies of the Software (including the original) and the documentation on a
permanent basis to another person or entity, provided that the end-user retain no copies of the Software or documentation and that any authorised transferee of the Software shall be bound by the terms
and conditions of this Agreement. If the Software is an update, any transfer must include the update
and all prior versions.
2. COPYRIGHT
The Software is owned by CFM and is protected by German copyright laws, international treaty provisions, and all other applicable national legislation. Therefore, you must treat the Software like any other
copyrighted material (e.g., a book or musical recording) except that if the software is not copy protected
you may either (a) make one copy of the Software solely for backup or archival purposes, or (b) transfer
the Software to a single hard disk provided you keep the original solely for backup or archival
purposes. You may not copy the Product manual(s) or written materials accompanying the
Software.
46
Licence Agreement
3. OTHER RESTRICTIONS
The Software and the enclosed written materials are copyrighted and for the avoidance of doubt the
following are absolutely prohibited without the express prior written consent of CFM:
1) Unauthorised copying of the Software (or of the written materials), including Software that has
been modified, merged, or included with other software;
2) Translating any of the Software;
3) Reverse-engineering, disassembling, decompiling, or making any attempt to discover the
source code of any of the Software;
4) Sub-licensing, renting, or leasing any portion of the Software, or operating any of the Software on or
from a network or mainframe system;
5) Use a previous version of the Software for which you have acquired an upgrade or update, except
that for a period of ninety (90) days after you receive the upgrade or update you may use the previous
version solely to convert existing documents to the upgraded or updated version. At the end of the
ninety (90) days, the previous version must be deleted from the computer and the original disks must
be physically destroyed.
4. LIMITED WARRANTY
CFM or the resellers warrant that (a) the software will perform substantially in accordance with
the accompanying product manual(s) for a period of ninety (90) days from the date of receipt;
and (b) software will be free from defects in materials and workmanship under normal use and
service for a period of one year from the date of receipt. Any implied warranties on the software are
limited to ninety (90) days.
5. CUSTOMER REMEDIES.
CFM´s and reseller’s entire liability and your exclusive remedy shall be, at CFM´s and reseller’s
option, either (a) return of the price paid or (b) repair or replacement of the software that does
not meet CFM´s and reseller’s Limited Warranty and which is returned to CFM or reseller with a
copy of your receipt. This Limited Warranty is void if failure of the software has resulted from
accident, abuse, or misapplication. Any replacement software will be warranted for the remainder of the original warranty period or thirty (30) days, whichever is longer.
No other warranties. CFM or resellers disclaims all other warranties, either express or implied,
including but not limited to implied warranties of merchantability and fitness for a particular
purpose, with respect to the software, the accompanying product manual(s) and written materials. This limited warranty gives you specific legal rights.
Limitations on liability. In no event shall CFM or resellers be liable for any damages whatsoever
(including, without limitation, damages for loss of business profits, business interruption, loss
of business information, or other pecuniary loss) arising out of the use of or inability to use this
CFM product, even if CFM has been advised of the possibility of such damages. in any case,
CFM’s or resellers entire liability under any provision of this agreement shall be limited to the
amount actually paid by you for the software.
This Agreement is governed by the laws of Germany. Jurisdiction is the place of business and legal
seat of CFM or the reseller.
47
Index
Index
Symbole
16 grey levels
See Grey
256 colours
See Colour
256 colours (diffusion)
17
See Colour
See Grey
256 grey levels
17
8 colours halftone
See Colour
A
About…
22
Activating CFM TWAIN (STI)
Aquire
10
ADF
See Original
Apply
40
Aquire
10
ASPI
44
Average
30, 36
10
B
Background removal
29
Backpage
See Original
Binary filter
29
Bold lining
29
Edge extraction
29
Bold lining
29
Brightness
27, 33, 35, 37
C
Cancel
16
CFM Licence Agreement
46
CFM TWAIN (STI)
6
Character enhancement
29
Choosing an Application
9
Select source
9
Selecting CFM TWAIN (STI)
CMS
44
Colour
37
Brightness
37
Contrast
37
Colourfilter
30, 36
Compatibility
8
Contents
5
Contrast
27, 33, 36, 37
Copy
13, 14
9
48
Index
D
Delete
41
Descreening
25
Development
7
DIM
44
DPI
44
Drop Photo
17, 32
DTP
44
Duplex
See Original
Dynamic Threshold
28
Background removal
29
Character enhancement
29
Normal
29
E
Edge extraction
Endorser
41
Error Diffusion
29
34
F
Filter
24, 30, 34, 35, 36
Average
30, 36
Colour filter
30
Descreening
25
Mirroring
27
MTF
30, 36
Negative
26
Noise Reduction
25
Quality
25
USM
25
White Balance
26
Finescan
11, 15
Finescan to the clipboard
11, 15
Finish
16
Flat-bed
See Original
Format
40
Apply
40
Delete
41
Move down
41
Move up
41
New
40
Format (Input/output)
20
Frontpage
See Original
Functions and Operation
12
Cancel
16
Finescan
15
Finescan to the Clipboard
15
Finish
16
49
Index
Help
15
Overview
13
Copy
13
Paste
13
Prescan
14
Copy
14
Paste
14
Save
16
Status Line
16
G
Gamma
38
Hard
39
Linear
39
Normal
39
Soft
39
Glossary
44
ASPI
44
CMS
44
DIM
44
DPI
44
DTP
44
Host Adapter
44
IES
44
LPI
44
OCR
44
PPI
44
TWAIN
45
Gradation
38
See Gamma
Grey
35
Brightness
35
Colourfilter
30, 36
Contrast
36
Filter
30, 36
Average
30, 36
MTF
30, 36
H
Halftone
34
Brightness
33
Contrast
33
Filter
34, 35
Halftone
34
Help
15
Host Adapter
44
I
IES
44
Image
19
50
Index
Image Size
21
Installation of the Scanner
8
Installing the CFM TWAIN (STI) Driver
Introduction
6
CFM TWAIN (STI)
6
Development
7
Scanner Options
6
Support
7
Supported Options, Functions etc.
8
7
L
Licence Agreement
46
Lineart
27
Average
30
Binary filter
Bold lining
29
Edge extraction
29
Brightness
27
Contrast
27
Filter
30
Average
30
Colour filter
30
MTF
30
Smoothing
30
Speckle Removal
29
Threshold
28
LPI
44
M
Mirroring
27
Moiré
25, 34, 35
Move down
41
Move up
41
MTF
30, 36
N
Negative
26
New
40
Normal
29
O
OCR
44
Original
18
Duplex
18
Flat-bed
18
Transparency
18
Overview
11, 13
Copy
13
Paste
13
51
Index
P
Paste
13, 14
Photo/Letter
17, 31
PPI
44
Prescan
11, 14
Copy
14
Paste
14
Q
Quality
25
R
Registercards
About…
22
Colour
37
Brightness
37
Contrast
37
Drop Photo
32
Endorser
41
Error Diffusion
34
Filter
24
Descreening
25
Mirroring
27
Negative
26
Noise Reduction
25
Quality
25
USM
25
White Balance
26
Format
Apply
40
Delete
41
Move down
41
Move up
41
New
40
Gamma
38
Hard
39
Linear
39
Normal
39
Soft
39
Grey
Brightness
35
Colourfilter
30, 36
Contrast
36
Filter
30, 36
Halftone
33
Brightness
33
Contrast
33
Halftone
34
52
Index
Lineart
27
Binary filter
29
Brightness
27
Contrast
27
Dynamic Threshold
Smoothing
30
Threshold
28
Photo/Letter
31
Scanner
22
Scanner Selection
Search for Scanners
Scanner Info
24
Reproduction
4
Resolution
18
Revision Rights
4
28
23
23
S
Save
16
Scan mode
17
16 grey levels
See Grey levels
256 grey levels
See Grey levels
Lineart
17
Scan parameters
17
Format (Input/output)
20
Image
19
Image Size
21
Original
Duplex
18
Flat-bed
18
Transparency
18
Scan mode
17
Scanner
22
Scanner Selection
23
Search for Scanners
23
Scanner Info
24
Scanner Options
6
Scanner Selection
23
Scanning in Brief
11
Finescan
11
Finescan to clipboard
11
Overview
11
Prescan
11
Search for Scanners
23
Select source
9
Selecting CFM TWAIN (STI)
9
Smoothing
30
Speckle Removal
29
Status Line
16
Support
7
53
Index
Supported Options, Functions etc.
System Requirements
8
Compatibility
8
7
T
Threshold
28
Tradenames
4
Transparency
See Original
True colours (RGB)
17
See Colour
TWAIN
45
TWAIN module
6
U
USM
25
W
White Balance
26
54