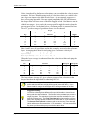
1
VmDas
User's Guide
P/N 95A-6015-00 (September 2003)
RD Instruments
Acoustic Doppler Solutions
Table of Contents
1
Introduction....................................................................................................................................... 1
1.1
1.2
1.2.1
1.2.2
1.3
2
Conventions Used in this Guide..........................................................................................................1
System Requirements.........................................................................................................................2
Using Windows 95 ..............................................................................................................................2
Using Windows NT .............................................................................................................................3
Software Installation............................................................................................................................3
Quick Start Guide ............................................................................................................................. 4
2.1
2.2
2.3
2.4
2.5
2.6
2.7
2.8
2.9
3
ADCP Setup........................................................................................................................................4
Test the ADCP ....................................................................................................................................5
Start VmDas........................................................................................................................................6
Setup Communications .......................................................................................................................7
Load a Command File.........................................................................................................................9
Set Recording Options ......................................................................................................................11
Setup the Transform Screen .............................................................................................................12
Save the User Option File .................................................................................................................14
Collect Data ......................................................................................................................................15
VmDas Tutorial ............................................................................................................................... 16
3-1
3.1.1
3.1.2
3.2
3.2.1
3-2.2
3.2.3
3.2.4
3.2.5
3.2.6
3.2.7
3.2.8
3.2.9
4
Creating a Data Option File...............................................................................................................16
Setting up Data Options ....................................................................................................................17
Saving Data Options .........................................................................................................................17
Error Messages.................................................................................................................................18
Loading Data Options .......................................................................................................................18
View the Current Data Options .........................................................................................................18
Setting up Display Options................................................................................................................18
Edit Display Options..........................................................................................................................19
Reference Tab ..................................................................................................................................19
Ship Track Tab..................................................................................................................................21
Change Chart Properties ..................................................................................................................23
Data Options Screens .......................................................................................................................25
Editing the Data Options ...................................................................................................................25
Communication Tab..........................................................................................................................26
ADCP Setup Tab ..............................................................................................................................30
Recording Tab ..................................................................................................................................32
Transform Tab ..................................................................................................................................34
Note About Conventions ...................................................................................................................37
Averaging Tab...................................................................................................................................39
Data Screening Tab ..........................................................................................................................41
Users Exits Tab.................................................................................................................................43
Simulated Inputs Tab ........................................................................................................................45
Command Files and ADCP Configuration.................................................................................... 46
4.1
4.2
4.2.1
4.2.2
4.3
4.4
4.4.1
4.4.2
4.4.3
Example Command Files ..................................................................................................................46
Creating Command Files ..................................................................................................................46
Command File Basics .......................................................................................................................47
Commands that Should be in a Command File.................................................................................49
How VmDas uses Command Files ...................................................................................................52
Detailed ADCP Initialization ..............................................................................................................52
Abbreviations ....................................................................................................................................52
Choosing Setup Parameters .............................................................................................................52
Detailed ADCP Initialization Procedure.............................................................................................54
5
Reprocessing Data with VmDas.................................................................................................... 57
6
Playback a Data File ....................................................................................................................... 59
7
Turnkey Mode ................................................................................................................................. 60
8
VmDas and NMEA Data.................................................................................................................. 62
8.1
8.2
8.2.1
8.2.2
8.2.3
8.2.4
8.2.5
8.2.6
8.2.7
8.2.8
8.2.9
8.3
8.3.1
8.3.2
8.3.3
8.3.4
8.3.5
8.4
8.4.1
8.5
9
VmDas Outputs............................................................................................................................... 72
9.1
9.2
9.3
9.3.1
9.3.2
9.3.3
10
12
Tips and Tricks to Creating User Exit Programs ...............................................................................81
Example 1 - Modifying Raw ADCP Data ...........................................................................................82
Example 2 - Modifying Raw NMEA Data ..........................................................................................82
Example 3 - Transformation..............................................................................................................83
User Displays....................................................................................................................................84
File Naming Conventions............................................................................................................... 86
ADCP Output Data Format and VMDAS ....................................................................................... 87
12.1
12.2
13
Ensemble Output Data......................................................................................................................72
Speed Log Output Data ....................................................................................................................72
Ensemble Output (ASCII) Data .........................................................................................................74
ASCII Ensemble Output Format........................................................................................................75
Sample Ensemble-Out Data Transmission .......................................................................................75
Ensemble-Out Data Format Description ...........................................................................................76
VmDas User Exits ........................................................................................................................... 80
10.1
10.2
10.3
10.4
10.5
11
General NMEA Data Format .............................................................................................................62
NMEA Input.......................................................................................................................................64
GGA – Global Positioning System Fix Data ......................................................................................64
HDG – Heading, Deviation, and Variation.........................................................................................65
HDT – Heading – True......................................................................................................................65
VTG – Track Made Good and Ground Speed...................................................................................66
$PASHR - Heading, Pitch, and Roll ..................................................................................................66
$PASHR,ATT - Global Positioning System Attitude Data .................................................................67
$PASHR,AT2 - Global Positioning System Attitude Data .................................................................67
$PRDID.............................................................................................................................................68
Reading NMEA Data.........................................................................................................................68
NMEA Output....................................................................................................................................69
$VDDBT – Depth Below Transducer ................................................................................................69
$VDHDT – Heading – True ...............................................................................................................69
$VDVBW – Dual Ground/Water Speed.............................................................................................69
$VDZDA – Time and Date ................................................................................................................70
Writing NMEA Data...........................................................................................................................70
Internal NMEA Messages .................................................................................................................71
$PADCP............................................................................................................................................71
Further Information About NMEA Strings..........................................................................................71
Binary Navigation Data Format .........................................................................................................88
Navigation Data Format – Detailed Explanation ...............................................................................91
Software History ............................................................................................................................. 94
List of Figures
Figure 1.
Figure 2.
Figure 3.
Figure 4.
Figure 5.
Figure 6.
Figure 7.
Figure 8.
Figure 9.
Figure 10.
Figure 11.
Figure 12.
Figure 13.
Figure 14.
Figure 15.
Figure 16.
Figure 17.
Figure 18.
Figure 19.
Figure 20.
Figure 21.
Figure 22.
Figure 23.
Figure 24.
Figure 25.
Figure 26.
Reference Tab............................................................................................................... 19
Ship Track Tab .............................................................................................................. 21
Chart Control Properties ............................................................................................... 23
Ship Track Properties Dialog......................................................................................... 24
Communications Tab..................................................................................................... 26
Communications Tab - Ensemble Output (ASCII) Selected........................................... 28
Communications Tab - Speed Log Output Selected ...................................................... 29
ADCP Setup Tab ........................................................................................................... 30
Recording Tab ............................................................................................................... 32
Choosing the Path......................................................................................................... 33
Transform Tab ............................................................................................................... 34
Y-Axis Alignment ........................................................................................................... 36
Averaging Tab ............................................................................................................... 39
Data Screening Tab....................................................................................................... 41
Users Exits Tab ............................................................................................................. 43
Simulated Inputs Tab..................................................................................................... 45
Select VMO File ............................................................................................................ 57
Reprocessing Data – Recorder Tab............................................................................... 57
Reprocessing Done Message ....................................................................................... 58
Playing Back a Data File ............................................................................................... 59
VmDas Shortcut in the Startup Folder ........................................................................... 60
Shortcut Properties ....................................................................................................... 60
Autostart Dialog............................................................................................................. 61
User Exits...................................................................................................................... 85
ENS, ENX, STA and LTA Binary Output Data Format .................................................... 87
Binary Navigation Data Format ..................................................................................... 88
List of Tables
Table
Table
Table
Table
Table
Table
Table
Table
Table
Table
Table
Table
Table
Table
Table
Table
Table
Table
Table
1:
2:
3:
4:
5:
6:
7:
8:
9:
10:
11:
12:
13:
14:
15:
16:
17:
18:
19:
Ensemble Time ............................................................................................................... 9
Example User Option Files............................................................................................ 10
NMEA Data Format ....................................................................................................... 62
Data Fields .................................................................................................................... 63
GGA NMEA Format ....................................................................................................... 64
HDG NMEA Format....................................................................................................... 65
HDT NMEA Format ....................................................................................................... 65
VTG NMEA Format ....................................................................................................... 66
PASHR NMEA Format................................................................................................... 66
PASHR,ATT NMEA Format ........................................................................................... 67
PASHR,AT2 NMEA Format ........................................................................................... 67
PRDID NMEA Format.................................................................................................... 68
VDDBT NMEA Format................................................................................................... 69
VDHDT NMEA Format .................................................................................................. 69
VDVBW NMEA Format.................................................................................................. 69
VDZDA NMEA Format................................................................................................... 70
PADCP NMEA Format................................................................................................... 71
Ensemble-Out Data Format........................................................................................... 76
Binary Navigation Data Format ..................................................................................... 91
NOTES
VmDas User's Guide
Acoustic Doppler Solutions
VmDas User's Guide
1
Introduction
VmDas is a software package for use with RDI Vessel Mount Acoustic Doppler
Current Profilers. This software package supports the Broadband, Workhorse,
and Ocean Surveyor PD0 Binary Output Data Formats for data collection, replay, and reprocessing.
NOTE. This guide covers version 1.40 or higher.
1.1
Conventions Used in this Guide
Conventions used in the VmDas User’s Guide have been established to help
you learn how to use VmDas quickly and easily.
Windows menu items are printed in bold: File menu, Open. Items that need to
be typed by the user or keys to press will be shown as <F1>. If a key combination were joined with a plus sign (<ALT+F>), you would press and hold the first
key while you press the second key. Words printed in italics include program
names (VmDas, BBTalk) and file names (Test001r.000).
Code or sample files are printed using a fixed font. Here is an example:
WorkHorse Broadband ADCP Version X.XX
RD INSTRUMENTS (c) 1996-2002
ALL RIGHTS RESERVED
>
P/N 95A-6015-00 (September 2003)
page 1
VmDas User's Guide
You will find two other visual aids that help you: Notes and Cautions.
NOTE. This paragraph format indicates additional information that may help
you avoid problems or that should be considered in using the described
features.
CAUTION. This paragraph format warns the reader of hazardous procedures
(for example, activities that may cause loss of data or damage to the ADCP).
1.2
System Requirements
VmDas requires the following:
• Windows 95® (see “Using Windows 95,” page 2), Windows 98®,
Windows NT 4.0® with Service Pack 4 installed (see “Using Windows NT,” page 3), Windows 2000®, or Windows XP®.
• Pentium class PC 233 MHz (350 MHz or higher recommended)
• 32 megabytes of RAM (64 MB RAM recommended)
• 6 MB Free Disk Space plus space for data files (A large, fast hard
disk is recommended)
• One Serial Port (two or more High Speed UART Serial Port recommended)
• Minimum display resolution of 800 x 600, 256 color (1024 x 768
recommended)
• CD-ROM Drive
• Mouse or other pointing device
• An Ethernet card if network I/O is desired
NOTE. VmDas can use up to six serial ports in some configurations.
1.2.1
Using Windows 95
To use VmDas with Windows 95 you must have the ws2_32.dll file installed on
your computer. To determine if you have this file, click Start, Find, Files or
Folders. In the Named box, type ws2_32.dll and click Find Now. If the file
is included on your system, then proceed with the VmDas software installation.
NOTE. Installing Microsoft’s Internet Explorer version 5.xx will
automatically install the ws2_32.dll file.
If the file is not on your computer, do the following.
page 2
RD Instruments
VmDas User's Guide
a. Go to http://www.Microsoft.com/windows95/downloads/
b. It is highly recommended that you download and install all of the critical
and recommended updates, and the service releases for Windows 95.
c. Scroll down the list of files on the Windows95 download page and select
the Windows Socket 2 Update link. Click the Download Now button.
This will download the w95ws2setup.exe file. Double-click the file to install it.
d. You will also need to download and install the Microsoft DUN 1.3 and
Winsock2 Year 2000 Update. Use the link on the Windows Socket 2 Update page to get the y2kvdhcp.exe file. Double-click the file to install it
(install the w95ws2setup.exe file first if you have not already done so).
1.2.2
Using Windows NT
To use VmDas with Windows NT you must have Windows NT 4.0® Service
Release 4 or higher installed before attempting to install VmDas. You must
also have the ws2_32.dll file installed on your computer (see “Using Windows
95,” page 2). VmDas cannot install on computers running Windows NT 3.0 or
earlier versions.
1.3
Software Installation
To install VmDas, do the following.
a. Insert the compact disc into your CD-ROM drive and then follow the
browser instructions on your screen. If the browser does not appear, complete Steps “b” through “d.”
b. Click the Start button, and then click Run.
c. Type <drive>:launch. For example, if your CD-ROM drive is drive D,
type d:launch.
d. Follow the browser instructions on your screen.
P/N 95A-6015-00 (September 2003)
page 3
VmDas User's Guide
2
Quick Start Guide
The Quick Start Guide contains simple instructions to help you begin collecting
data. Making accurate profile measurements is less difficult than you probably
believe now. You will soon see that you need to use only a few keystrokes on
the computer to collect data in the field.
Please take the time to read this entire manual. It will be useful to have the
ADCP and a computer available to follow along. You may also want to keep
the ADCP Technical manuals handy for reference when you want more detail.
2.1
ADCP Setup
Step 1. Connect the ADCP and computer as shown in your ADCP Technical
Manual. If you have not already installed VmDas and the RDI Tools CD, do so
as outlined in “Software Installation,” page 3.
Use this area for notes.
page 4
RD Instruments
VmDas User's Guide
2.2
Test the ADCP
Step 2. Run BBTalk to verify the ADCP is functioning properly. Select a script
file from the table below. The results of the tests will be saved to an ASCII text
log file in the same directory as the BBTalk is running from.
Script File Name
ADCP Type
Results Saved to
testBB.rds
Broadband
BB_RSLTS.txt
testOS.rds
Ocean Surveyor
OS_RSLTS.txt
testWH.rds
Workhorse
WH_RSLTS.txt
These text files (*.rds) were copied into the same directory as BBTalk when
you installed the RDI Tools software CD sent with your system.
Use this area for notes.
NOTE. Exit BBTalk when you are done testing the ADCP so that VmDas
can use the COM port.
P/N 95A-6015-00 (September 2003)
page 5
VmDas User's Guide
2.3
Start VmDas
Step 3. Start VmDas. On the File menu, click Collect Data.
On the Options menu, click Load. Select the Default.ini file and click Open.
This will set VmDas to the factory default options.
Use this area for notes.
page 6
RD Instruments
VmDas User's Guide
2.4
Setup Communications
Step 4. On the Options menu, click Edit Data Options. Click the Communi-
cations tab and set the communications settings for the ADCP and NMEA
ports. Up to three serial ports may be enabled and configured for input, and
three more for output.
Click the ADCP Input radio button in the Select Item to Set box. When this is
done, the controls in the Set Communication Parameters Here box apply to
the ADCP Input port.
In the Set Communication Parameters Here box, click the Enable Serial
check box to enable the controls for configuring the serial port.
Set the serial port to match the ADCP serial port wakeup settings. RDI
strongly recommends 9600, No Parity, 8, 1 for the ADCP Input port.
When the settings are correct, click the Set button and verify that the settings
are reflected in the top row of the Current Settings section.
P/N 95A-6015-00 (September 2003)
page 7
VmDas User's Guide
VmDas can accept optional NMEA data on up to two serial ports. Navigation
input is GPS data. RPH is roll, pitch, and heading data. If both types of data
arrive on a single serial port, use the Navigation Input (NMEA) port, and leave
the RPH Input (NMEA) port disabled.
If GPS data appears on one port and RPH data on another port, then use the
Navigation input (NMEA) port for GPS data and the RPH input (NMEA) port
for your RPH data. They will not work properly if reversed.
Configuring the NMEA ports is much the same as configuring as for the ADCP
Input port. The NMEA standard requires the settings to be 4800, No Parity, 8,
1, however, some equipment can transmit faster.
NOTE. For more information, see the “Communication Tab,” page 26.
Use this area for notes.
page 8
RD Instruments
VmDas User's Guide
2.5
Load a Command File
Step 5. Click the ADCP Setup tab. Select Use File in the ADCP Setup from
File area. Set the Ensemble Time to the value shown in Table 1.
Table 1:
Ensemble Time
Frequency (kHz)
With Bottom Track (sec)
Without Bottom Track (sec)
38
4
2
75
2
1
150
1
1
300
600
Select Ping as Fast as possible
1200
Click the Browse button and use Table 2, page 10 to choose a command file for
your ADCP and load it into VmDas. These text files (*.txt) were copied into
the same directory as VmDas when you installed it from the CD sent with your
system.
P/N 95A-6015-00 (September 2003)
page 9
VmDas User's Guide
Table 2:
Example User Option Files
File Name
Description
OS38BBDEF
Default setup for an Ocean Surveyor (OS) 38kHz ADCP in the highest precision (broad bandwidth) but
reduced range profiling mode.
OS38NBDEF
Default setup for an Ocean Surveyor (OS) 38kHz ADCP in the longest range (narrow bandwidth) but
reduced precision.
OS38BB&NBDEF
Default setup for an Ocean Surveyor (OS) 38kHz ADCP in the highest precision (broad bandwidth) and
the longest range (narrow bandwidth) but reduced precision.
OS75BBDEF
Default setup for an Ocean Surveyor (OS) 75kHz ADCP in the highest precision (broad bandwidth) but
reduced range profiling mode.
OS75NBDEF
Default setup for an Ocean Surveyor (OS) 75kHz ADCP in the longest range (narrow bandwidth) but
reduced precision.
OS75BB&NBDEF
Default setup for an Ocean Surveyor (OS) 75kHz ADCP in the highest precision (broad bandwidth) and
the longest range (narrow bandwidth) but reduced precision.
OS150BBDEF
Default setup for an Ocean Surveyor (OS) 150kHz ADCP in the highest precision (broad bandwidth)
but reduced range profiling mode.
OS150NBDEF
Default setup for an Ocean Surveyor (OS) 150kHz ADCP in the longest range (narrow bandwidth) but
reduced precision.
OS150BB&NBDEF
Default setup for an Ocean Surveyor (OS) 150kHz ADCP in the highest precision (broad bandwidth)
and the longest range (narrow bandwidth) but reduced precision.
BB75DEF
Default setup for a BroadBand (BB) 75kHz ADCP to provide the most range with the optimal precision.
BB150DEF
Default setup for a BroadBand (BB) 150kHz ADCP to provide the most range with the optimal
precision.
BB300DEF
Default setup for a BroadBand (BB) 300kHz ADCP to provide the most range with the optimal
precision.
WH300DEF
Default setup for a WorkHorse (WH) 300kHz ADCP to provide the most range with the optimal
precision.
WH600DEF
Default setup for a WorkHorse (WH) 600kHz ADCP to provide the most range with the optimal
precision.
WH1200DEF
Default setup for a WorkHorse (WH) 1200kHz ADCP to provide the most range with the optimal
precision.
OO38BBDEF
Default setup for an Ocean Observer (OO) 38kHz ADCP in the highest precision (broad bandwidth) but
reduced range profiling mode.
OO38NBDEF
Default setup for an Ocean Observer (OO) 38kHz ADCP in the longest range (narrow bandwidth) but
reduced precision.
OO38BB&NBDEF
Default setup for an Ocean Observer (OO) 38kHz ADCP in the highest precision (broad bandwidth)
and the longest range (narrow bandwidth) but reduced precision.
NOTE. These text files (*.txt) were copied into the same directory as
VmDas when you installed it from the software CD sent with your system.
Use this area for notes.
page 10
RD Instruments
VmDas User's Guide
2.6
Set Recording Options
Step 6. Click the Recording tab. The Recording property page allows you to
set the deployment name and path to where the data files are recorded.
Enter a name in the Name box that identifies your deployment. This name will
be used as part of the filename for each file that is part of this deployment (see
“File Naming Conventions,” page 86). For testing, “Test” or “Practice” are
good choices.
In the Primary Path box, enter the drive and directory where you would like
to store the files of collected data. Use the Browse button or enter the path
manually. Note that this folder must already exist.
NOTE. It is recommended to not set the Maximum File Size greater than
10MB as larger files will slow data processing considerably.
Use this area for notes.
P/N 95A-6015-00 (September 2003)
page 11
VmDas User's Guide
2.7
Setup the Transform Screen
Step 7. Click the Transforms tab. VmDas requires heading data and option-
ally, pitch and roll data. The data can come from the ADCP’s internal compass
and tilt sensors, gyros connected to the ADCP’s electronics chassis, NMEA
data from a serial port, or fixed values entered by the user. It is possible to use
one source for heading and a second source for pitch and roll.
To use either the ADCP internal compass/tilt sensors or gyro data, check the
ADCP compass/gyro radio button.
To use NMEA data, check the radio button for the NMEA sentence that contains the data.
To use fixed values, check the Fixed Heading or Fixed Tilts button and enter
the values.
VmDas needs true heading, and pitch and roll of the ADCP. Sometimes the
heading source reports magnetic data, and some sensors are not aligned to the
ADCP. Sometimes the tilt sensors are not aligned to the ADCP’s axes. For
these situations, check the Enable check box in the Heading Correction or
Tilt Corrections sections and enter corrections.
page 12
RD Instruments
VmDas User's Guide
Click OK to save the changes made to the Program Options tabs. Changes
are not saved until the OK or Apply buttons are clicked.
Use this area for notes.
P/N 95A-6015-00 (September 2003)
page 13
VmDas User's Guide
2.8
Save the User Option File
Step 8. On the Options menu, click Save As. The options may be saved to a
file for later retrieval. You may wish to save several sets of options, to be used
as starting points for different deployments. Option files that are created this
way may have any name you choose.
NOTE. The *.ini file includes the path to the command (*.txt) file you
choose. This allows you to create a *.ini file for each command file or have
different *.ini files with different processing parameters (averaging screens,
etc.) pointing to the same command file.
Use this area for notes.
page 14
RD Instruments
VmDas User's Guide
2.9
Collect Data
Step 9. On the Control menu, click Go to begin collecting data. The ADCP
Communication window will open and show the commands from the command
file you selected (see “Load a Command File,” page 9) being sent to the ADCP
and the ADCP’s response. Once all of the commands have been captured to the
*.LOG file, the window will close automatically. The *.LOG file is saved to
the same path as set in the Recording tab. See “Detailed ADCP Initialization,”
page 52 for details on how the ADCP commands are generated and sent to the
ADCP.
NOTE. You can review the ADCP Communication window by selecting
View, ADCP Communication.
Use this area for notes.
P/N 95A-6015-00 (September 2003)
page 15
VmDas User's Guide
3
VmDas Tutorial
The first section of this User’s Guide presented a Quick Start to collecting data.
The default Command files presented in that section will work for most conditions. There may be specific sites where you will need to create your own User
Option files and Command files (see “Command Files and ADCP Configuration,” page 46) if you want to change some of the sampling parameters. The
tutorial will go through a step-by-step procedure for creating a site-specific
User Option file for collecting data. The tutorial will also go through the reprocessing data (see “Reprocessing Data with VmDas,” page 57) and data
playback (see “Playback a Data File,” page 59).
CAUTION. If you edit the default command files with a text editor, be sure to
back them up first, and save the file in plain text format when you have finished
editing. Extra formatting characters inserted for other document file formats will
make the file unreadable by VmDas.
3-1
Creating a Data Option File
In the following, you will be creating a Data Option file that will be used to
program both the ADCP and VmDas software processing.
The VmDas, WinADCP, and RDI Tools software should be installed on your
computer as outlined in “Software Installation,” page 3. Connect the ADCP to
a computer as shown in the ADCP Technical Manual, and apply power to the
ADCP.
a. Start VmDas. Click File, Collect Data.
b. Click Options, Load. Select the Default.ini file. Select Open.
c. Click Options, Edit Data Options. See “Data Options Screens,” page 25)
for details on each tab. Once you have set all the parameters, click OK to
exit the Edit User Options screens. When OK is clicked, VmDas checks
the new options for consistency. For example, it is not allowed to use the
same serial port twice on the Communications tab. If VmDas finds an error, it will display an error message box and refuse to close the Edit Data
Options dialog box. You may either correct the error(s), or use Cancel to
abandon all changes to the options.
d. Save the Data Option file by clicking Options, Save As. Enter a file name
for the *.ini file that you have just created. This *.ini file will save the
setup in all of the tabs including the path to the command text file. You can
use this same method in case you wish to create several different setup files
for the same machine. As an example, you could create a command text
file that has a 6-meter bin size. You might save this to a text file with the
name BB150BIN6M.TXT and call the *.ini file 6METER.INI. You could
then create another command file and *.ini file with a 16-meter bin size
page 16
RD Instruments
VmDas User's Guide
with the same concept. Then when you want to actually use the proper
command file you just have to select the *.ini file you intend to use.
3.1.1
Setting up Data Options
When data collection or data reprocessing is started, the current data options
tell VmDas how to collect and process data.
• Data options are not used for playing back data. Editing them is not
allowed in playback mode.
• VmDas stores current data options. They persist until changed, even
if VmDas is closed and restarted.
• If the current set of data options is not satisfactory, they must be
changed before starting data collection or data reprocessing. Once
collection or reprocessing has started, it must be stopped before
changes can be made.
• Current settings can be viewed at any time when a mode is selected.
• The current data options can be replaced with a set of data options
stored in an *.INI, *.VMO, or *.VMP file. The current options can
be edited.
Saving Data Options
When the current data options are changed, the old version is overwritten. To
keep from losing a set of options, they should be stored in a file by clicking
Options, Save As.
• The Save As option is available only when options have been edited
but not saved in a file.
• Choose a file name that suggests the purpose of this set of data options. VmDas will add the INI extension to the name. No extension
should be supplied by the user.
• Whenever data collection starts, the current data options are automatically saved in a VMO file.
• Whenever reprocessing starts, the current data options are automatically saved in a VMP file.
• All of these files are stored as standard Windows INI files. They are
easy to read with a text editor. Editing them directly is not recommended.
P/N 95A-6015-00 (September 2003)
page 17
VmDas User's Guide
Error Messages
Some options or combinations of options are illegal. VmDas detects some of
these bad settings and refuses to allow them to be saved or used.
• Clicking OK or Apply on the Edit Data Options dialog box causes
VmDas to do a consistency check and save the new settings as the
current data options if no errors are found.
• The check is also done when starting data collection.
• If an error is found, a message describing the error will pop up and
no changes will be saved. The user can either correct the problem,
or cancel editing and lose all changes made.
Loading Data Options
On the Options menu, click Load. By default, only INI files are displayed.
VMO files can be displayed by choosing them in the Files of type box. To
display VMP files, choose all files in the Files of type box.
NOTE. To return to the factory default setting, select the Default.ini file.
View the Current Data Options
On the Options menu, click View Data Options. The same dialog opens as
when editing, but no changes can be made. You can view the data options in
the Playback mode.
3.1.2
Setting up Display Options
The Display Options determine how data is displayed.
• They can be set for modes that display data (playback and collect).
• They can be changed at any time when one of those two modes is
active, whether or not data is being played or collected.
• Graphs or charts may be erased and re-plotted because of changes to
these options, but it makes no change to the data itself.
• In reprocess mode, data is not displayed, so there are no settings to
determine how it is displayed.
page 18
RD Instruments
VmDas User's Guide
Edit Display Options
Click Options, Edit Display Options to display a tabbed dialog box from
which you can change the display options. Click the Reference tab to select
the display units, or the velocity reference to use for profiles. Click the Ship
Track tab to select the ship position source and the profile bins to use for the
current stick plots.
Reference Tab
When you click the Reference tab (Figure 1) in the Display Options dialog
box, the following display units and velocity reference settings are displayed
and may be changed.
Figure 1.
Reference Tab
P/N 95A-6015-00 (September 2003)
page 19
VmDas User's Guide
Velocity Reference - Choose between None, Bottom Track, Bottom Track
Water Mass Reference Layer, Water Current Profile Layer, Delta Position,
Speed, and Speed/Dir Made Good.
• Bottom Track Water Mass Reference Layer refers to the water
reference layer output that some ADCP instruments output along
with the bottom track data. This layer is only available from the
BroadBand and WorkHorse ADCPs. This data is collected and recorded by these ADCPs only when the BK command is set to collect
Water Mass Layer and the BL command has been set to select the
section of water that will be measured to record a speed through the
water. This speed through the water is stored in a separate location
in the bottom track data. Enabling this feature will reference all of
the profile velocities to this recorded speed through the water. This
feature is typically enabled only when the bottom track is not possible and navigation data will not be collected.
• The Water Current Profile Layer is setup as a totally independent
water layer to reference the averaged data in either the STA or LTA
files. The user should set this to a number of consecutive bins that
will represent only the vessel motion (i.e. that has as little real water
motion as possible). The Start and Stop bins selected will all be
averaged together to produce a single speed through the water. This
speed through the water is stored in a separate location in computer
RAM. If not used it is discarded and not recorded. Enabling this
feature will reference all of the profile velocities to this recorded
speed through the water. This feature is intended to be used when
there is no bottom track or navigation data available.
• Delta Position calculates a reference velocity as delta position divided by delta time, where the position data is obtained from the
NMEA GGA message. The position used in the calculation is the
first and last GGA position received in each ADCP data interval.
• Speed calculates a reference velocity from speed and direction, obtained from the NMEA VTG message, by resolving them into East
and North components.
• Speed/Dir Made Good calculates a reference velocity from speedmade-good and direction-made-good, which is in turn calculated
from the averages of position and time, as received in the NMEA
GGA messages, for each ADCP data interval.
Velocity Units - Choose between millimeters per second, meters per second,
knots, or feet per second for all displayed velocity data.
Depth Units - Choose between meters, centimeters, or feet for all displayed
depth data.
page 20
RD Instruments
VmDas User's Guide
Ship Track Tab
When you click the Ship Track tab (Figure 2) in the Display Options dialog
box, the following settings are displayed and may be changed.
Figure 2.
Ship Track Tab
Ship Position Source - For each ship track plot, choose between NAV, Bottom
Track, Water Mass Reference Layer, and Current Profile Layer.
• If NAV is selected, the last NMEA GGA position received in each
ADCP data interval is used to calculate the ship track, and can be
displayed as a Lat/Lon position, or as a distance from the initial position received within an ADCP data interval.
• If Bottom Track (BT) is selected, the ADCP bottom track velocity
data are integrated to calculate a ship track.
P/N 95A-6015-00 (September 2003)
page 21
VmDas User's Guide
• If Bottom Track Water Mass Reference Layer is selected, the
ADCP water reference layer data are integrated to calculate a ship
track. This layer is only available from the BroadBand and WorkHorse ADCPs. This data is collected and recorded by these ADCPs
only when the BK command is set to collect Water Mass Layer and
the BL command has been set to select the water depths to collect a
speed through the water. The delta speed and delta time between
consecutive averaging intervals is then used to calculate a distance
traveled and direction and plotted on the Ship Track graph. This
feature is typically enabled only when the bottom track is not possible and navigation data will not be collected.
• If Water Current Profile Layer is selected, the layer velocity is defined to be the average of the range of profile bins selected as the
velocity reference, and that velocity is integrated to calculate a ship
track. This layer is setup as a totally independent water layer to reference the averaged data in either the STA or LTA files. The user
should set this to a number of consecutive bins that will represent
only the vessel motion (i.e. that has as little real water motion as
possible). The Start and Stop bins selected will all be averaged together to produce a single speed through the water.
The delta speed and delta time between consecutive averaging intervals is then used to calculate a distance traveled and direction and
plotted on the Ship Track graph. This feature is typically enabled
only when there is no bottom track or navigation data available.
NOTE. If Bottom Track (BT), Bottom Track Water Mass Reference
Layer, or Water Current Profile Layer is selected, the ship track is shown
as a distance from the initial position, where the initial position is 0,0.
Chart units for distances - Choose between Kilometers, Meters, Miles (statute),
or Feet.
Current Sticks - Choose to display up to three current sticks at each ship posi-
tion, and select which profile bin each stick represents.
NOTE. Changes made to the Ship Track tab may require that the ship
track be re-plotted. VmDas will issue a warning before accepting these
changes. If the ship track must be re-plotted, the ship track is erased.
Plotting continues from the current position.
When collecting data, this means it is a good idea to settle on desired
configurations early. Once erased from the display, the Ship Track cannot
be redisplayed until the deployment files are played back.
page 22
RD Instruments
VmDas User's Guide
Change Chart Properties
Whenever you right-click on any profile plot, a pop-up property menu
(Figure 3) is displayed from which you can change many attributes for the profile graphs.
Profile Plots
• How do I manually set the ranges for the plot axes? Select the Axes
tab. On the right, click the tab that contains the attribute that you
want to change for the axis, in this case Scale. On the left, click on
the label of the axis you want to change. On the right, enter new
numbers for Max and Min and click OK or Apply.
• How do I put symbol markers on my data points? Select the Chart
Styles tab. On the right, click the Symbol Style tab. On the left,
click on the label for the series you want to mark (i.e. Style1,
Style2, etc.). Click the box labeled Shape and select a shape for the
symbol. Click the box labeled Size to set the size of the symbol.
Click the Name box to set the desired color for the symbol. Click
OK or Apply. Note that from the Chart Styles tab you can also set
the line width, pattern, and color of each line in the graph.
Figure 3.
Chart Control Properties
P/N 95A-6015-00 (September 2003)
page 23
VmDas User's Guide
Ship Track Plots
• How do I manually set the ranges for the plot axes? Right-click the
ship track plot and click on Properties (Figure 4). Click the Plot
Area tab. Manually enter values for Left, Right, Top, and Bottom.
On this property page, you may also change the font, turn on or off
the grid lines and set their style, and change the aspect ratio method.
Click OK.
Figure 4.
page 24
Ship Track Properties Dialog
RD Instruments
VmDas User's Guide
3.2
Data Options Screens
Click Options, Edit Data Options to display a tabbed dialog box from which
you can change the program options.
• Communications (see “Communication Tab,” page 26)
• ADCP Setup (see “ADCP Setup Tab,” page 30)
• Recording (see “Recording Tab,” page 32)
• Transforms (see “Transform Tab,” page 34)
• Averaging (see “Averaging Tab,” page 39)
• Data Screening (see “Data Screening Tab,” page 41)
• Users Exits (see “Users Exits Tab,” page 43)
• Simulated Inputs (see “Simulated Inputs Tab,” page 45)
3.2.1
Editing the Data Options
On the Options menu, click Edit Data Options to display a tabbed dialog box.
Data Options can be edited only when collect or reprocess mode is selected,
and collection or reprocessing is not in progress.
• Clicking OK or Apply causes VmDas to do a consistency check and
save the new settings as the current data options.
• If an error is found, a message describing the error will pop up and
no changes will be saved. The user can either correct the problem,
or cancel editing and lose all changes made.
• Editing data options saves them as the current options, not in a file
(see “Saving Data Options,” page 17).
NOTE. If the save to a file step is skipped, the current options still persist
until changed, even if VmDas is closed.
P/N 95A-6015-00 (September 2003)
page 25
VmDas User's Guide
3-2.2
Communication Tab
When you click the Communications tab in the Program Options dialog box,
the following communications settings are displayed and may be changed to
match the communication parameters to those of the device you have connected to the computer.
Figure 5.
Communications Tab
VmDas can collect data from one to three input serial ports. When collecting
data, ensembles must be read from the ADCP input port. The Navigation and
RPH input ports can collect NMEA data if desired. If both NMEA ports are
used see “Reading NMEA Data,” page 68 for details on which sentences are
accepted at which port.
Enabling an input port instructs VmDas to listen for data at that port, to log all
data received to a file, and to generate error messages if data is not received.
VmDas enforces some rules for input port options.
• Duplicate or invalid COM ports cannot be specified for active ports.
• If options on the Transform page use NMEA data, at least one input
port must be configured to accept it.
• If only one NMEA port is enabled, it must be the Navigation port.
VmDas can write data to up to three output serial ports and up to three TCP/IP
ports.
page 26
RD Instruments
VmDas User's Guide
VmDas can provide up to three optional real time outputs through serial ports,
Ethernet ports, or both.
Enabling an output port instructs VmDas to write data to that port whether or
not anyone is listening.
Ensemble Output (Binary LTA) provides long term averaged ensembles. This
output is a copy of the LTA output file.
Ensemble output (ASCII) converts binary ensembles to an ASCII format. If
this port is enabled, the data to be written must be selected in the Set Ensemble
Output Configuration Here box.
Speed Log Output produces NMEA messages containing ship speed information from short-term averaged data. Data is output at the same rate as the
short-term average.
Set Ensemble Output Configuration Here
The settings in the Set Ensemble Output Configuration Here box are needed
only if Ensemble Output (ASCII) is selected and either Enable Serial or Enable Network is checked (see Figure 6, page 28).
• Data Select - VmDas produces several output files with binary ensembles. Data Select chooses one of these files as the source of ensemble data for ASCII output. Some of the data in the binary source
will be extracted, converted to an ASCII format (See “Ensemble
Output (ASCII) Data,” page 74), and written out the output port.
• Data Type Switches - Select the type of data to send to the ensemble-out device during data collection. Check the appropriate checkbox for each type of data you want sent to the ASCII ensemble-out
port. The Navigation box will have no effect if the Data Select box
contains ENR. Navigation data is not present in the raw ENR files.
Navigation data comes from NMEA inputs. The navigation and ensemble data are merged to produce ENX, STA, and LTA files.
• Velocity Switch - If the Velocity box is checked, the Start Bin and
End Bin boxes in the Output column set the bins that will be added
to the ASCII ensemble velocity data.
• Velocity Ref - If the Velocity box is checked, the Velocity Ref box
can be used to remove ship velocity from the velocity profile. Other
velocities, such as bottom track, are not changed.
If Velocity Ref is set to None, velocities are unchanged.
If Velocity Ref is set to Bottom, the velocity from the bottom track
field, if present, is subtracted from the velocity of each bin.
If Velocity Ref is set to Water Current Profile Layer, the average
velocity of a water layer is subtracted from the velocity of each bin.
P/N 95A-6015-00 (September 2003)
page 27
VmDas User's Guide
The Start Bin and End Bin boxes in the Profile Layer column select the bins that makes up the water layer.
• Output Start/End Bin - Lets you select the portion of the ADCP
profile (depth cell range) to send to the ASCII ensemble-out port.
• Profile Layer Start/End Bin - Lets you select the bin (depth cell)
range for the Water Current Profile Layer velocity reference.
Figure 6.
Communications Tab - Ensemble Output (ASCII) Selected
Set Speed Log Output Configuration Here
If the Speed Log Output box is selected and either Enable Serial or Enable
Network is checked, the Set Speed Log Output Configuration Here section
lets you select the following parameters for the speed log output only (see
Figure 7, page 29).
• Data Select - Lets you select between STA Short-term avg Earth or
LTA Long-term avg Earth as the output source.
• Water Reference Layer Source - Lets you select the reference
velocity to subtract from the profile output. Water Current Profile
Layer sets the reference velocity to the average of the user-defined
bin range in the "Profile Layer" column, and causes the reference
velocity to be subtracted from the profile before data output. Bottom Track Water Mass Reference Layer sets bottom track as the
reference velocity, and causes the reference velocity to be subtracted
from the profile before output.
page 28
RD Instruments
VmDas User's Guide
• Start/End Bin - Lets you select the bin (depth cell) range for the
Water Current Profile Layer velocity reference.
Figure 7.
Communications Tab - Speed Log Output Selected
NOTE. If the start and end bins are out of range (e.g., the ADCP
ensemble contains 40 bins, and you set the Output Start Bin = 1 and the
Output End Bin = 50), VmDas automatically adjusts the output bin range to
the ADCP ensemble (i.e., Output End Bin = 40).
Suggested Setting.
The parameters set in the ADCP input port should match the ADCP
wakeup serial port settings. RDI recommends that the ADCP wakeup
serial port settings be set at 9600 BAUD, no parity, 8 data bits, and 1 stop
bit.
The Navigation Input and RPH input ports read NMEA data. The NMEA
0183 standard specifies 4800 BAUD, no parity, 8 data bits, and 1 stop bit.
Never the less, many ships use 9600 BAUD, and some may use faster
rates.
NOTE. Advanced users can change the ADCP serial port parameters with
a command file. Those parameters are used only while collecting data.
When data collection stops, the serial port settings the ADCP uses will
return to their wakeup values.
VmDas automatically changes the PC serial port when the ADCP serial
port changes.
P/N 95A-6015-00 (September 2003)
page 29
VmDas User's Guide
3.2.3
ADCP Setup Tab
Use this dialog box to setup the ADCP. Select either Use Options to set the
ADCP commands on this tab or select Use File to use a command file.
Figure 8.
ADCP Setup Tab
Ensemble Time is set on this tab for both Use Options and Use File. Select
the Set time between ensembles button to specify a ping interval (see Table 1,
page 9). Select the Ping as fast as possible button to let the processing and
I/O time dictate the ping rate.
NOTE. See “Detailed ADCP Initialization,” page 52 for details on how the
ADCP commands are generated and sent to the ADCP.
page 30
RD Instruments
VmDas User's Guide
To set the ADCP commands using this dialog box, select the Use Options
button.
• Select the Set Profile Parameters box in the Water Current Profile section to set the following parameters; Number of Bins (WN),
Bin Size (WS), Blank Distance (WF), and Transducer Depth
(ED).
• Select the Set Processing Mode box to switch between high and low
resolution modes.
• Select the Set BT on/off box to enable or disable bottom track pings
(BP1) and set the maximum search range (BX command).
• Select the Heading Sensor Set Sensor Type box in this section to
switch between using the ADCP's internal sensor or an external analog gyro (synchro/stepper) (EZ command).
• Select the Tilt Sensor Set Sensor Type box in this section to switch
between using the ADCP's internal sensor or an external analog gyro
(synchro) (EZ command). When this box is not checked, the default
ADCP setup will be used.
To set the ADCP commands using a command file, select the Use File button.
Enter the name of an ADCP command file in the Command File box, or click
the Browse button to navigate to a file using a File Open dialog box. This
should be a text file with one ADCP command per line, and can have any valid
ADCP commands. The contents of this file will be sent to the ADCP during
initialization.
Suggested Setting for First Time Users.
Select the Use File button in the ADCP Setup file area and click the
Browse button under the Command File window. Select one of the
default command files (see “Load a Command File,” page 9 and
“Command Files and ADCP Configuration,” page 46) and click Open.
Set the Ensemble Time as shown in Table 1, page 9.
NOTE. The ADCP automatically increases the Time per Ensemble if
((WP + NP + BP) x TP > the setting in Set time between ensembles box).
P/N 95A-6015-00 (September 2003)
page 31
VmDas User's Guide
3.2.4
Recording Tab
The Recording property page allows you to set the deployment name and path
to where the data files are recorded.
Figure 9.
Recording Tab
Enter a name that identifies your deployment. This name will be used as part
of the filename for each file that is part of this deployment (see “File Naming
Conventions,” page 86).
Normally, you do not need to enter a starting Number as the software handles
it automatically. This deployment number is used to identify the specific data
collection run, and becomes part of the filename of each data file recorded for
the deployment. If you do not enter a deployment number, the software will
automatically assign one for each deployment.
Enter the desired Maximum File Size. Each file type in your deployment will
be limited to the specified size. Each file has a sequence number as part of the
file name, and as each recorded file reaches the specified size limit, the sequence number will be incremented and a new file started. It is recommended
to not set the Maximum File Size greater than 10MB as larger files will slow
data processing considerably.
page 32
RD Instruments
VmDas User's Guide
For example, a data files produced by VmDas during data collect mode has the
following file name: RDI000_000001.enr, where:
RDI
is the user-entered name for the deployment,
000
is the deployment number (changes with each stop/restart),
000001
is the file sequence number, which is incremented when the specified
maximum file size is reached, and
enr
is the file extension, and reflects the type of data in the file is raw data
Enter the Primary Path where the raw, intermediate, and processed data files
are to be stored. Clicking the Browse button to the right of the Primary Path
edit box will allow you to browse your computer to select a folder to record to.
You will be presented with a Choose Directory dialog box (see Figure 10),
which will have the default path of C:\Program Files\RD Instruments\VmDas
selected. Select the primary path (note the directory must already exist) and
click OK.
Figure 10.
Choosing the Path
Check the Dual Output Directories box to create two copies of the raw data
files and to allow a backup path to be entered. If this box is not checked, only
the Primary Path is enabled.
Enter the Backup Path where optional backup copies of raw data and option
files are stored. These files are not used for data processing. They are made
available in case the primary files are lost. If the backup copies are needed,
copy them to the primary directory and reprocess them to create intermediate
and processed data files.
Suggested Setting.
Enter a file name that identifies your deployment.
Select the primary path (note the directory must exist already; VMDAS
does not create it, except for the default path already entered).
P/N 95A-6015-00 (September 2003)
page 33
VmDas User's Guide
3.2.5
Transform Tab
VmDas reads single ping beam coordinate data from the ADCP. VmDas transforms the data to earth coordinates and averages it. How the transformation is
done depends on details of the geometry of the ADCP, sensors, and the platform they are mounted on (see “Note About Conventions,” page 37 for more
insight). Use this screen to select the Heading Source, Tilt Source, Heading
Correction, and Tilt Correction.
Figure 11.
Transform Tab
VmDas stored the heading, pitch, and roll information from the ADCP in the
ADCP leader data ID. Additionally it will store heading, pitch, and roll sensor
data from a NMEA device in the NMEA data ID. This means that your data
can contain information from both a direct connection to the ADCP and from
an external input (NMEA). The Transform tab allows you to select which of
these are actually used in the transformation.
page 34
RD Instruments
VmDas User's Guide
Heading and Tilt Sources
VmDas can accept heading and tilt data from five sources.
• ADCP internal sensors
• External sensors (gyro) connected directly to the ADCP
• Fixed heading and tilts entered in the ADCP with a command file
• External NMEA sensors connected to the PC
• Fixed heading and tilts entered as options in VmDas
For the first two data sources, heading, pitch, and roll data are obtained from
the variable leader of the ADCP ensembles. Select the ADCP compass/gyro
heading option and the ADCP tilt/gyro tilt option to use them in your transformation.
To use a VmDas generated fixed input for Heading Pitch, and Roll, select
Fixed Heading and/or Fixed Tilts. Once selected, enter in the fixed heading
or tilts you require. This information will be stored in the VmDas configuration file.
To use an external sensor input that produces data in NMEA format, select the
heading or tilt option that contains the NMEA sentence you wish to read. External sensor NMEA data is stored in the NMEA data ID.
NOTE. NMEA data is read through one or two serial ports. These serial
ports must be configured on the Communications tab (see “Communication
Tab,” page 26). Selecting NMEA data without configuring the Navigation
and/or RPH serial ports results in an error. VmDas will not allow the
options to be saved until the error is corrected.
NOTE. The NMEA HDG sentence contains magnetic heading, together
with variation and deviation corrections. VmDas calculates true heading of
the ship from this. When this sentence is the heading source, the only
heading correction needed is a heading alignment error if the ADCP is not
aligned with the ship.
Heading Correction
EV – magnetic offset. This is variation, the angle between magnetic north and
true north. It is used to correct the heading from magnetic heading sensors.
EV is negative for a west variation, where magnetic north is west of true north.
For example, a magnetic variation chart for the deployment area shows a variation of W3.5 (-3.5). To counteract the effects of this magnetic field, you must
enter a heading bias value of -3.5 in the magnetic offset box.
EA – hdng align error. The Heading Alignment Error is the angle between the
forward axis of the ADCP and the forward axis of the ship or other platform it
is mounted on. The EA command is used to correct the heading when the
heading describes the attitude of the ship. EA is the heading of the ADCP’s
P/N 95A-6015-00 (September 2003)
page 35
VmDas User's Guide
beam 3 when the ship is level and headed north. EA is positive if beam 3 is to
the starboard. For Example, the ADCP is mounted in place on a moving ship.
The Y-axis has been rotated 45 clockwise (+45) from the ship’s centerline. Enter 45 in the EA:– hdng align error box.
HSHIP, TRUE
HSHIP, MAG.
ag
RTH
m
NO
NORTHTRUE
EV
RD
A
RW
O
F
P
I
SH
EA
Y-AXIS
Projected onto ship forward-starboard plane
Figure 12.
Y-Axis Alignment
Tilt corrections
EA – heading alignment error. As before, this is the angle between the forward axis of the ADCP and the forward axis of the ship or other platform it is
mounted on. This time EA is used to correct pitch and roll when the heading
describes the attitude of the ship. EA is the heading of the ADCP’s beam 3
when the ship is level and headed north. The heading correction is positive if
the Y-axis is to the starboard.
EJ – roll alignment error. EJ is the roll of the ship when the ADCP is level.
For example, the amount of rotation that the ADCP’s y-axis is physically offset
from the ship’s starboard axis is 2 degrees. Enter 2 in the EJ roll alignment
error box. The tilt correction is positive if the y-axis is to the starboard.
page 36
RD Instruments
VmDas User's Guide
EI – pitch alignment error. EI is the pitch of the ship when the ADCP is
level. For example, the amount of rotation that the ADCP’s x-axis is physically
offset from the ship’s starboard axis is –1.2 degrees. Enter –1.2 in the EI pitch
alignment error box. The tilt correction is positive if the x-axis is to the starboard.
NOTE. To verify the EV, EA, EJ, and EI corrections, do the Water Profile
Reasonableness Test as shown in the ADCP Technical Manual Test
Guide.
NOTE. If reprocessing data and heading corrections are enabled, EA, EB,
and EV commands in a command file will have no effect. If tilt corrections
are enabled, EA, EI, and EJ commands will have no effect. VmDas will
issue its own EA0, EB0/EV0, EI0, and EJ0 commands after the command
file has been sent to the ADCP.
NOTE. If an ensemble contains EA and EV information in its fixed leader,
VmDas will apply the corrections in addition to other corrections entered in
the Transform page.
Note About Conventions
VmDas needs the attitude (Heading, Pitch, and Roll) of the ADCP to obtain
true water and bottom east and north components. However, heading, pitch,
and roll devices sometimes describes the attitude of the ADCP an other times
they describe the attitude of the ship or other platform that the ADCP is
mounted on. Sometimes heading is magnetic, sometimes true. VmDas can accept any of these.
When describing the attitude of a ship, heading is the angle between the forward axis and true or magnetic north. Actually, the projection of the forward
axis on the horizontal plane is used. This usually makes very little difference
in practice. Pitch and roll describe the tilt of the mast.
Pitch is positive if the bow is higher than the stern. Roll is positive if the port
side is higher than the starboard side. As seen from above, a clockwise rotation
of the ship makes the heading increase.
When describing the attitude of an ADCP, the ADCP takes the place of the
mast. Beam 3 marks the forward axis. If beam 3 points north (slanted up or
down), then the heading is zero. It does not matter whether the system is concave or convex, or whether transducer 3 is on the north or south side of the instrument. Therefore, your attitude input must reflect the attitude of the ADCP,
which may or may not be the same as the ship.
An ADCP uses the same sign conventions as a ship. The “bow” is always the
beam 3 side. The “stern” is the beam 4 side. Port and starboard are marked by
beams 1 and 2, but which is which changes when the ADCP is rotated from up
facing to down facing.
P/N 95A-6015-00 (September 2003)
page 37
VmDas User's Guide
Facing up or down, an ADCP has a positive pitch if the “bow” (the beam 3
side) is higher than the “stern” (beam 4). Roll is positive if the port side is
higher than the starboard side. Heading increases as the forward (beam 3) axis
rotates in a clockwise direction.
Pitch and roll should always be near zero in relation to the ship. An ADCP has
an internal sensor to tell whether it is facing up or down. It sets an upfacing/down-facing flag in the system configuration field of the fixed leader in
each ensemble. VmDas reads this flag and corrects internally before doing the
transformation to earth coordinates.
The unit for all angles is degrees.
page 38
RD Instruments
VmDas User's Guide
3.2.6
Averaging Tab
The Averaging property page allows you to set the Ensemble Averaging interval and Reference Layer Averaging properties.
Figure 13.
Averaging Tab
Enter the Temporal Averaging short-term averaging in the First Time Interval (STA) box. Use the short-term average to get more frequent updates for a
data quality check. The First Time Interval (STA) is what we refer to as the
Short Term Average (which will become file name with a *.STA extension).
Enter the long-term averaging period in the Second Time Interval (LTA) box.
Use the long-term average to get your intended results. The Second Time Interval (LTA) is what we refer to as the Long Term Average (which will become file name with a *.LTA extension).
Enable the Profile Ping Normalization Reference Layer checkbox to turn on
or off the reference layer averaging feature. Using a Reference Layer helps
removes biases caused from accelerations on platforms or ships. To set up a
Reference Layer, you must set the Start Bin and the End Bin to be used as the
“meaning” reference layer.
P/N 95A-6015-00 (September 2003)
page 39
VmDas User's Guide
Noise, introduced by platform accelerations, can overwhelm the velocity measurements. We have found keeping track of velocities relative to a stable reference layer can improve the data in such Cases. As an example, suppose we
have a four-ping ensemble. Because signal amplitude falls off with distance,
the deeper bins will have more of the data flagged as bad. Bad data are not included in averages. As a result, the average profile might be erratic when the
percent good is low. In the data below, a constant profile is assumed for bins
20 to 22, yet the average of good data shows it to be sheared.
Ping #
1
Bin
1
2
↓
20
21
22
2
3
4
18
16
↓
bad
bad
15
19
17
↓
16
bad
bad
Velocities
5
3
↓
bad
2
bad
6
4
↓
bad
bad
bad
AVG #1
12
10
↓
16
2
15
Bins 1 and 2 have all good data; and in this example, are used as the reference
layer. Averaging these bins for each ping gives a reference velocity of:
Ping #:
1
2
3
4
Layer Average:
4
5
17
18
Mean Layer Average = 11 : (4 + 5 + 17 + 18) / 4
When the layer average is subtracted from the velocities within each ping the
data become:
Bin
1
2
↓
20
21
22
Velocities
1
-1
↓
bad
-2
bad
1
-1
↓
bad
bad
bad
1
-1
↓
bad
bad
-2
1
-1
↓
-2
bad
bad
Average #1
1
-1
↓
-2
-2
-2
Average #2
12
10
↓
9
9
9
The last column, Average #2, gives a better picture of the velocities at the
deeper bins than the algorithm for obtaining AVG #1.
NOTE. When using a reference layer, use bins in the upper part of the
profile and bins that have a high percent good (more than 85%). If you
select a bad bin range, the averages will be wrong and data will be bad.
Suggested Setting.
You will be collecting three different files and will be able to view all three
during real time data collection. The first file is the raw data input, which is
single ping data. The selections for the other two files are based on your
time input values here. The First Time Interval is what we refer to as the
Short Term Average (which will become file name with a *.STA extension).
The Second Time Interval is what we refer to as the Long Term Average
(which will become file name with a *.LTA extension). You can set these to
any times you like and they may even be the same value.
page 40
RD Instruments
VmDas User's Guide
3.2.7
Data Screening Tab
Click the checkboxes for the data screening options you wish to enable. When
a box is checked, its associated edit box becomes enabled, and you may enter a
threshold value for screening the data.
Figure 14.
Data Screening Tab
For RSSI (amplitude), Correlation, and Percent Good screening, the threshold value represents a minimum allowed value. For example, if you set the
RSSI threshold to 35 counts, then any beam with an RSSI value below 35
counts will be discarded and not used in the processed data. RSSI and correlation screening for each beam are performed on the raw data. Percent good
screening is performed on the averaged data.
For Error Velocity and Vertical Velocity screening, the threshold value represents a maximum allowed value. For example, if you set the Error Velocity
threshold to 1500 mm/s, then any transformed ensemble that has an error velocity greater than 1500 mm/s will be discarded and not used in the processed
data. Error Velocity and Vertical Velocity screening are performed on the
transformed data, before averaging.
P/N 95A-6015-00 (September 2003)
page 41
VmDas User's Guide
For Fish screening (also known as false-target detection), the threshold used
for bottom track is based on percentage, and the water track ping and profile
ping is based on counts.
Check the box labeled Mark Data Bad Below Bottom to have the software
mark bad all profile bins that fall below the sea bottom. The formula is LastGoodBin = (ShallowestBeam) * (COS (BeamAngle)) + (BinLength).
NOTE. The ADCP has its own internal thresholds. Setting thresholds on
this page that is lower than those used by the ADCP will have no effect.
While it is possible for advanced users to modify the ADCP command file
to disable some of the internal thresholds, this practice is not
recommended. VmDas is designed to do those checks. It allows you to
change them when you reprocess the data. This gives you the maximum
flexibility.
Suggested Setting.
You are able to screen data based on the items in this menu and the
thresholds you decide during real-time or when reprocessing. This
screening will affect what is displayed on the screen and what data is
recorded to the *.STA and *.LTA files. The original raw data will be
unaffected by what is setup here. For real-time data collection, we
recommend you only enable Mark Bad Below Bottom. You can
reprocess data later and change the settings in this screen to see what the
effect is.
page 42
RD Instruments
VmDas User's Guide
3.2.8
Users Exits Tab
User exits are hooks at various points in the processing where the user can
modify the data with an external program. The external user application needs
to be written so that it will keep trying to look for the appropriate file names,
which will not exist until VmDas creates them some time after starting the program. It then needs to monitor the file size to determine when new data is
available, and it has to observe the same file size limits specified for VmDas
and automatically advance to the next file in the sequence when the size limit is
reached.
Figure 15.
Users Exits Tab
Click the Launch WinADCP checkbox to have VmDas automatically start the
WinADCP application in monitor mode when data collection is started. When
in monitor mode, WinADCP will periodically refresh its displays from the data
recorded by VmDas, and will allow you to view time series and contour graphs
of the data. From the WinADCP application menu, you can exit the monitor
mode to change the WinADCP setup, and then reenter the monitor mode to continue the data updates. The WinADCP application must be installed on the
computer for this option to work.
Enter the WinADCP program file name in the WinADCP Path box, including
the entire path for the directory in which it resides. VmDas uses this information to find the WinADCP application. Alternatively, you may click the
Browse button to navigate using the File Open dialog.
P/N 95A-6015-00 (September 2003)
page 43
VmDas User's Guide
Select which type of data to view with WinADCP using the Data File to Open
box. Choose from single-ping beam data (ENR), single-ping screened beam
data, single-ping Earth data (ENX), short-term averaged data (STA), or longterm averaged data (LTA). Once data collection has started, you can use the
WinADCP application menu to open a different file type if desired. Just remember to exit the monitor mode in order to make the change, then reenter
monitor mode to continue the automatic data refreshing.
Enter the number of seconds that WinADCP should wait between screen refreshes in the Refresh Interval (sec) box.
NOTE. When you press Stop, VmDas leaves WinADCP open so that your
data screen does not disappear. A consequence of that is if you have
WinADCP enabled as a User Exit, and click Go, Stop, Go in VmDas, it will
cause a second instance of WinADCP to run.
Click the External Raw ADCP Data Screening checkbox (see “VmDas User
Exits,” page 80 and Figure 24, page 85) to give an external user-supplied program access to the raw ADCP data before the initial screening. The usersupplied program is expected to read raw ADCP ensemble data from the .ENR
file and write the modified ensembles to an .ENJ file. This occurs before
VmDas performs its data screening (does not bypass it), and if additional
screening by VmDas is desired, it may be enabled.
Click the External Raw Nav Data Screening checkbox (see “VmDas User
Exits,” page 80 and Figure 24, page 85) to give an external user-supplied program access to the raw NMEA data. Normally the VmDas NMEA data screening logic reads data from the .N1R/N2R raw NMEA data file, screens the data
and averages the data between ADCP time stamps, then writes the averaged
data out in binary format to a .NMS file. When this user exit option is enabled,
the user-supplied program is expected to read data from the .N1R/N2R files,
and write the modified data to a .N1J or N2J text file with the same NMEA
format. The VmDas NMEA data screening and averaging functions will then
read the NMEA data from the .N1J (or N2J) file instead of the .N1R (or N2R)
file.
NOTE. The last two user exits are enabled by clicking on their associated
checkboxes in the User Exits tab. However, VmDas does not currently
support automatic launching of these user exits. They must be launched
independently before selecting Go on the Control menu in VmDas.
Suggested Setting.
If you want to view the data using WinADCP, select the Launch WinADCP
box. Enter the path to the WinADCP program using the Browse button.
VmDas will automatically enter the default path. Select what file you want
to view in the Data File to Open drop-down list. Select a Refresh Rate
equal to your STA or LTA file average. The WinADCP program will check
VmDas for new data based on the Refresh Rate.
page 44
RD Instruments
VmDas User's Guide
3.2.9
Simulated Inputs Tab
Use the simulated data files to help learn how to use VmDas or to test the User
Exits.
NOTE. Enabling the simulated data will automatically disable the serial
port communications setting for the corresponding items on the
communication setup tab.
Figure 16.
Simulated Inputs Tab
P/N 95A-6015-00 (September 2003)
page 45
VmDas User's Guide
4
Command Files and ADCP Configuration
Command files provide a way to configure the ADCP with user-selected commands as data collection begins. This provides the advanced user with more
control than is possible by having VmDas configure the ADCP from user selected options.
This section describes how to create a command file. To use an existing command file, see “ADCP Setup Tab,” page 30.
4.1
Example Command Files
VmDas ships with several example command files, listed in Table 2, page 10.
These command files are usable as they are. They will configure an ADCP
with reasonable general-purpose settings.
Each command file is intended for a specific ADCP. There are example files
for Broadband, Workhorse, and Ocean Surveyors. Navigators should start with
a Broadband file and edit it as described in the next section.
For VmDas purposes, an Ocean Observer is the same as an Ocean Surveyor.
4.2
Creating Command Files
To create a new command file, do the following.
a. Make a copy of one of the default command files (see Table 2, page 10)
and give it a new name. VmDas expects command files to have a txt extension, but other extensions can be used.
b. Open the copy in NotePad or a similar type of text editor. Editors such as
WordPad or word processors such as Word or WordPerfect should be used
carefully because they add hidden characters to the file for formatting.
c. Edit the commands as needed. Refer to the ADCP Technical Manual for
detailed information on each command.
d. You may want to add or edit commands, but most commands should not be
deleted. Deleting a command leaves the configuration dependent on the
ADCP’s command default setting. This can cause the configuration to
change unexpectedly if the command file is used with a different ADCP or
the same ADCP with a new firmware version.
e. Save the file.
f. Test the new command file with the ADCP that the file is intended to configure. The ADCP must be in water.
CAUTION. NEVER ping an Ocean Surveyor/Observer while the
transducer is in air. This will damage the electronic chassis.
page 46
RD Instruments
VmDas User's Guide
Open VmDas in data collection mode. Edit the options and set the command file as described in the ADCP Setup Tab, page 30. Begin collecting
data. If data collection starts normally and VmDas begins displaying data
(even bad data), the test is passed.
g. If any command causes an error, VmDas will stop the initialization process
and start over. This cycle will repeat indefinitely. If this happens, stop data
collection and use Notepad to look in the log file. An error message will
pinpoint the offending command.
4.2.1
Command File Basics
A command file provides instructions to the ADCP for profiling setup, bottom
track, and ADCP sensor source (internal such as the flux-gate compass or external such as the synchro or stepper gyro input). The following describes how
to create or modify a command file.
• A command file should contain only ASCII characters. Each line
should end with a Carriage Return.
• Command files should be created with an editor that does not insert
hidden characters. Notepad is a good choice; WordPad, Word, or
Word Perfect are not.
• Every line in a command file should be a command, a comment, or
blank.
• Lines with a ‘;’ (semicolon) in the first column are comments. They
are often used to explain the commands to a person reading the file.
VmDas ignores comments.
NOTE. The default command files have comments that explain the
function of each command. It is a good idea to keep the comments and
edit them when you make command changes.
• ADCPs mostly use the same set of commands, but there are minor
differences. Consult the ADCP technical manual for a particular
ADCP for details of its commands.
• Commands are not case sensitive.
P/N 95A-6015-00 (September 2003)
page 47
VmDas User's Guide
The following shows the printout of the default command file OS38BBDEF.txt.
;-----------------------------------------------------------------------------\
; ADCP Command File for use with VmDas software.
;
; ADCP type:
38 Khz Ocean Surveyor
; Setup name:
default
; Setup type:
High resolution, short range profile(broadband)
;
; NOTE: Any line beginning with a semicolon in the first
;
column is treated as a comment and is ignored by
;
the VmDas software.
;
; NOTE: This file is best viewed with a fixed-point font (eg. courier).
; Modified Last: 12August2003
;----------------------------------------------------------------------------/
; Restore factory default settings in the ADCP
cr1
; set the data collection baud rate to 38400 bps,
; no parity, one stop bit, 8 data bits
; NOTE: VmDas sends baud rate change command after all other commands in
; this file, so that it is not made permanent by a CK command.
cb611
; Set for broadband single-ping profile mode (WP), forty (WN) 24 meter bins (WS),
; 16 meter blanking distance (WF), 390 cm/s ambiguity vel (WV)
NP0
WP00001
WN040
WS2400
WF1600
WV390
; Enable single-ping bottom track (BP),
; Set maximum bottom search depth to 2000 meters (BX)
BP001
BX20000
; output velocity, correlation, echo intensity, percent good
WD111100000
; Three seconds between bottom and water pings
TP000300
; Six seconds between ensembles
; Since VmDas uses manual pinging, TE is ignored by the ADCP.
; You must set the time between ensemble in the VmDas Communication options
TE00000600
; Set to calculate speed-of-sound, no depth sensor, external synchro heading
; sensor, no pitch or roll being used, no salinity sensor, use internal transducer
; temperature sensor
EZ1020001
; Output beam data (rotations are done in software)
EX00000
; Set transducer misalignment (hundredths of degrees)
EA00000
; Set transducer depth to (decimeters)
ED00000
; Set Salinity (ppt)
ES35
; save this setup to non-volatile memory in the ADCP
CK
page 48
RD Instruments
VmDas User's Guide
4.2.2
Commands that Should be in a Command File
ADCPs mostly use the same set of commands, but there are minor differences.
Consult the technical manual for a particular ADCP for details of its commands. In addition, some commands are not appropriate for all ADCPs. For
example, only the Ocean Surveyor understands commands such as NP, EI, and
EJ. They will cause errors if sent to other kinds of ADCP.
For RDI recommendations on which commands should be used with which
ADCP, check the example command file for the ADCP.
Restore Factory Defaults
CR1
It is a good idea to restore the ADCP to the known factory default configuration
before starting. CR1 should be the first command in the file.
Data fields
WD
Edit this to turn on or off each kind of data to record in the output file.
Profile
WP
For VmDas to perform correctly, command files must set the ADCP for single
ping data. This means either a WP1 command must be present if velocity profile data is desired, or WP0 if not.
Most Navigators do not recognize the WP command unless they have the Water
Profiling upgrade installed. It should not be in command files intended for
Navigators without this upgrade.
NP
Command files for Ocean Surveyor should include NP1 or NP0. Other ADCPs
do not recognize this command, and should not have it.
WS, WF, WN, WV (or NS, NF, NN for Ocean Surveyor’s using the NP1
command)
These commands configure the velocity profile. Edit these to fit the ADCP and
deployment. Omit them for ADCPs that do not have water pings.
Bottom Track
BP
For VmDas to perform correctly, command files must set the ADCP for single
ping data. This means a BP1 command must be present if bottom track data is
desired, or BP0 if not.
P/N 95A-6015-00 (September 2003)
page 49
VmDas User's Guide
Some Workhorses do not recognize the BP command unless they have the Bottom Track upgrade installed. It should not be in command files intended for
Workhorses without this upgrade.
BX
This sets the maximum bottom tracking depth the ADCP will use. Edit it to fit
the ADCP and deployment.
Some Workhorses do not recognize the BX command unless they have the Bottom Track feature upgrade installed. It should not be in command files intended for Workhorses without this upgrade.
Timing
TP
This sets the time between bottom track and water pings. It is the only timing
command that normally needs to be in the command file.
TE
This is not needed since VmDas does single pinging; it and other timing commands have no effect. It is present so that a user reading the file will see it,
read the accompanying comment, and understand that timing is controlled by
the ADCP Setup tab in the options.
Coordinate Transformation
EX00000
VmDas requires data to be in beam coordinates. The transformation to earth
coordinates is done by VmDas. EX00000 is in the command file to make it
clear to the user that no transformation is done in the ADCP.
VmDas would work the same if the EX00000 command was modified or left
out of the command file. VmDas sends an EX00000 command after all the
commands in the command file. If the EX command is omitted or an EX
command with different parameters is present, the automatically generated
command overrides the command file.
NOTE. The automatically generated EX00000 command is not stored by
the CK command. If the ADCP were to be used with another program
without setting the command in the command file, it would not have the
same configuration.
External Sensors
EZ
The EZ-command tells the ADCP to use data from a manual setting or from an
associated sensor. When a switch value is nonzero, the ADCP overrides the
manual E-command setting and uses data from the appropriate sensor. If no
sensor is available, the ADCP defaults to the manual E-command setting in in-
page 50
RD Instruments
VmDas User's Guide
strument coordinates regardless of the coordinate frame parameter of the Ecommand setting. The example command files contain either EZ1020001 for
shipboard use or EZ1111111 for a stationary deployment (such as Oil Rig platforms). Edit this command as needed.
ED
The ED command sets the transducer depth. Edit this to fit the ADCP and deployment.
Store to Nonvolatile Memory
CK
This command stores the ADCP’s current configuration in the ADCP’s nonvolatile memory, so that the ADCP wakes up in the same state after being shut
down. All commands above CK in the command file (except CB, see below)
will be permanently stored. Commands sent after the CK command will not be
saved. Make sure CK is the last command in the command file.
VmDas sends commands after the command file is done. These commands are
not stored in non-volatile memory.
Serial Port Configuration
CB
This command configures the ADCP’s serial port. VmDas watches for the CB
command and provides the special handling that it needs.
First, VmDas reads the CB command before sending it to the ADCP. After the
command is sent, VmDas configures the PC serial port to match the ADCP.
Communication is not lost.
Second, it is very important that the ADCP wake up with its serial port in a
known state. This state need not be the same as a high-speed configuration desired for transmitting lots of data. RD Instruments strongly recommends that
all ADCPs be set to wake up at 9600 BAUD, 8 data bits, no parity, and 1 stop
bit.
VmDas provides for keeping the wakeup and data collection serial port configurations separate. VmDas does not send the CB command immediately
upon reading it in the command file. The CB command is sent after all other
commands in the command file are sent. This means that the CB command
will never be saved because it is sent after the CK command. VmDas will not
change the wakeup serial port configuration.
P/N 95A-6015-00 (September 2003)
page 51
VmDas User's Guide
4.3
How VmDas uses Command Files
One command file can be used for many deployments. Whenever data collection starts, VmDas copies the current options into a VMO file. This includes
the path and filename of the command file, if any. The command file itself is
not copied into the VMO file.
When data collection starts, VmDas sends commands to the ADCP to configure
it. VmDas creates some of the commands. Others are taken from the command file, if the options are set to do so. VmDas may edit the commands in the
command file before sending them to the ADCP, as described in “Detailed
ADCP Initialization,” page 52.
VmDas creates a log file (extension LOG) whenever data collection is started.
This file contains the commands sent to the ADCP, the replies returned by the
ADCP, and some auxiliary information such as time stamps.
When configuring an ADCP, VmDas sends commands one at a time, and waits
for a response after each line. If VmDas does not receive a response or the response is an error message, initialization fails. VmDas will start initialization
over again. VmDas will keep trying until it succeeds or the program is
stopped.
4.4
Detailed ADCP Initialization
4.4.1
Abbreviations
The following abbreviations for ADCP types are used in the following sections.
OS – Ocean Surveyor or Ocean Observer
BB – Broadband
WH – Workhorse
NV – Navigator
If VmDas does not recognize the ADCP type, but the data format is correct, it
will use this type
UN – Unknown
4.4.2
Choosing Setup Parameters
As VmDas begins collecting data, it configures the ADCP by sending it commands. Which commands are sent depends partly on options the user selects
and partly on the type of ADCP.
The major choices the user makes are in the ADCP Setup tab of the options
dialog. The primary choice is Use Options or Use File.
page 52
RD Instruments
VmDas User's Guide
Selecting Use Options activates more user options. VmDas creates commands
from the options.
Selecting Use File causes VmDas to configure the ADCP by reading commands from a command file, as described earlier in this section.
Either way, VmDas adds commands of its own. Some commands depend on
options the user has selected or the type of ADCP connected. It should be
noted that VmDas will override a command in a command file if it will setup
the ADCP in such a way that it would conflict with VmDas ability to process
the data. The following sections explain the specific commands that are over
written.
Manual pinging
VmDas always generates a CF 0111x command, where x indicates that the last
bit is unchanged from its current setting. This bit controls the recorder.
This setup places the ADCP in a Manual Ensemble mode. A Manual Ensemble
mode means that VmDas will control the timing of ADCP ensembles and therefore the ADCP TE command is ignored. VmDas sets up the ADCP for single
ping Water Profile and single ping Bottom Track (if Bottom Track is required).
Because of this setting, the ADCP ensemble can be thought of as a ping and
thus manual pinging.
Beam Coordinates
VmDas always generates an EX00000 command. This places the ADCP in
Beam Coordinates. With the ADCP in Beam Coordinates, VmDas is able to
perform the transformations to Earth Coordinates. The advantage of this is
VmDas can interface with external Heading, Pitch, and Roll sensors and therefore it can be setup to use either the internal or external input for this information.
Heading and Tilt Corrections
Depending on options the user has selected and the type of ADCP, VmDas may
generate EA0, EB0, EV0, EI0, or EJ0 commands (EV0, EI0, and EJ0 are generated for Ocean Surveyor with recent firmware only).
These commands are generated if Use Options is selected on the ADCP setup
tab. If the Heading Correction Enable box in the Transform tab is checked,
then EA0 and EB0 or EV0 commands are generated. If the Tilt Correction
Enable box is checked, then an EA0 command will be generated. For Ocean
Surveyor, EI0 and EJ0 are generated as well.
P/N 95A-6015-00 (September 2003)
page 53
VmDas User's Guide
4.4.3
Detailed ADCP Initialization Procedure
a. Open the serial port using the settings from the Communications tab.
b. Send a break.
c. Interpret the ADCP’s response to the break to determine what kind of
ADCP is present.
d. For OS, Initialize the ADCP time to the PC time with a TS command.
e. If a command file is selected, copy it to the ADCP one line at a time with
the following caveats.
• Letters are converted to upper case.
• Comments (lines starting with ;) are ignored.
• CS (Start Pinging) and CZ (Power Down) commands are not sent.
• Baud rate commands (CB) are held until all other commands in the
file have been sent
• After each line, a check is done for an error message from the
ADCP. If one is found, no further commands from the file are sent.
Initialization will start over.
• Immediately after sending a CB command, change the PC serial port
parameters to match the CB command.
f. For BB, WH, and NV, read the beam-to-instrument transformation matrix.
Write it to a log on the hard disk.
g. If Use Options was selected on the ADCP Setup tab VmDas will generate
commands based on user selections and send them to the ADCP. User options are enabled and disabled by check boxes on the ADCP Setup tab. If
the check box is unchecked, the ADCP Setup tab will not generate the
commands, and the current ADCP settings will be used.
Bottom track
• If the Set BT On/Off check box is unchecked, nothing is sent.
• If Off is selected, BP0 is sent.
• If On is selected, BP1 and a BX command created from the ADCP
Setup tab maximum range is sent.
page 54
RD Instruments
VmDas User's Guide
Processing Mode
• If the Set Processing Mode check box is unchecked, nothing is sent.
• Different commands are sent to different types of ADCP, as shown in
the tables below.
• If Hi-resolution (short range) option is selected, the following commands are sent.
Command
Command Description
ADCP Type
NP0
NB mode Pings per Ensemble
OS
WP1
Pings per Ensemble
OS,BB,WH, NV
WM1
WT Profiling Mode
BB,WH, NV
WB0
Mode 1 WT Bandwidth
BB,WH, NV
WV650
WT Mode 1 Ambiguity Velocity
BB
WV480
WT Mode 1 Ambiguity Velocity
WH, NV
<none>
All others
• If Low-resolution (long range) option is selected, the following
commands are sent.
Command
Command Description
ADCP type
WP0
Pings per Ensemble
OS
NP1
NB mode Pings per Ensemble
OS
WP1
Pings per Ensemble
BB,WH, NV
WM1
WT Profiling Mode
BB,WH, NV
WB1
Mode 1 WT Bandwidth
BB,WH, NV
WV330
WT Mode 1 Ambiguity Velocity
BB, WH, NV
<none>
All others
Profile Parameters
• If the Set Profile Parameters check box is unchecked, nothing is
sent.
• For BB, WH, NV type of ADCPs or OS in high-resolution mode, the
following commands are constructed and sent.
Command
ADCP setup tab data source
WN
Number of Bins
WS
Bin Size
WF
Blank Distance
ED
Transducer Depth
P/N 95A-6015-00 (September 2003)
page 55
VmDas User's Guide
• For OS in low-resolution mode, the following commands are constructed and sent.
Command
ADCP setup tab data source
NN
Number of Bins
NS
Bin Size
NF
Blank Distance
ED
Transducer Depth
h. Send commands for flow control, heading and tilt corrections, and coordinate transformations.
Flow Control
• This command is always sent.
• The current CF setting is read from the ADCP. A new command is
generated using the last bit (the recorder bit) of the current setting.
• CF 0111x is sent.
Heading and Tilt Corrections
• If the user has selected Use Options on the ADCP Setup tab of the
options, he does not intend to send his own commands. VmDas will
send all of the commands that are appropriate for the ADCP, as
shown below.
• If the user has selected Use File, but has enabled Heading Corrections on the Transform tab, the user does not intend to send EA, EB,
or EV commands. VmDas will send the appropriate ones.
• If the user has selected Use File and has enabled Tilt Corrections,
the user does not intend to send EA, EI, or EJ. VmDas will send
them, as appropriate.
Command
Command Description
ADCP Type
EA0
Heading alignment correction
All
EB0
Magnetic variation
All except OS with recent firmware
EV0
Magnetic variation
OS with recent firmware
EI0
Roll alignment
OS with recent firmware
EJ0
Pitch alignment
OS with recent firmware
Coordinate Transformation
• Beam coordinates. EX00000 is always sent.
page 56
RD Instruments
VmDas User's Guide
5
Reprocessing Data with VmDas
a. Start VmDas. Click File, Reprocess Data.
b. Browse and locate the *.vmo file for the data you wish to reprocess. For
this example, select the SAMPLE002_000000.VMO file. Click Open (see
“File Naming Conventions,” page 86).
Figure 17.
Select VMO File
c. Click Options, Edit Data Options.
d. Click the Recording tab (see “Recording Tab,” page 32).
• Verify the Name of the data set is the one you wish to reprocess.
• Verify the Number of the data set is the one you wish to reprocess.
Figure 18.
Reprocessing Data – Recorder Tab
P/N 95A-6015-00 (September 2003)
page 57
VmDas User's Guide
e. Click the Transforms tab (see “Transform Tab,” page 34).
• The Heading Source needs to be selected for the input you intend to
use. If you will use the gyro heading being fed into the ADCP real
time then leave it selected to ADCP.
• The Tilt Source needs to be selected for the input you intend to use.
f. Click the Averaging tab (see “Averaging Tab,” page 39).
• Enter a time value for the First Time Interval. This is the Short
Term Average (which will become file name with a *.sta extension).
Enter a time value for the Second Time Interval. This is the Long
Term Average (which will become file name with a *.lta extension).
You can set these to any times you like and they may even be the
same.
g. Click the Data Screening tab.
• You are able to screen data based on the items in this menu and the
thresholds you decide. This screening will affect what is displayed
on the screen and what data is recorded to the *.sta and *.lta files.
The original raw data will be unaffected by what is setup here.
h. Click OK to exit the Edit Data Options screen.
i. Save the User Option file by clicking Options, Save As.
• Enter a file name for the *.ini file that you have just created.
j. To start data reprocessing, on the Control menu, click Go. You should see
the Ensemble number increase on the Processing Bar during reprocessing.
If the Processing Bar is not visible, Click View, Processing Bar. When reprocessing is done, you will see the message “Done!” next to the toolbar.
Figure 19.
page 58
Reprocessing Done Message
RD Instruments
VmDas User's Guide
6
Playback a Data File
a. Start VmDas. Click File, Playback Data.
b. Browse and locate the data file for the data you wish to view. Click Open.
NOTE. VmDas will automatically search for *.enr, *.enx, *.sta, and *.lta
files.
In order to view files that use other naming conventions, the user can
either type the file name directly into the File name field of the Open File
dialog box, or click in the Files of type box to select the All files (*.*) filter
from the drop-down list.
c. On the Playback Tool Bar, click Play.
Figure 20.
Playing Back a Data File
P/N 95A-6015-00 (September 2003)
page 59
VmDas User's Guide
7
Turnkey Mode
When VmDas is started in the turnkey mode, a message box appears to prompt
the user to start collecting data. After 30 seconds, or on confirmation, VmDas
begins collecting data automatically.
Syntax – “C:\program files\RD Instruments\VmDas.exe” /autostart
For example, if a computer operating system has VmDas with the /autostart
switch in the startup folder, VmDas will open with a message box asking if it is
OK to start collecting data when the computer is started. The user clicks OK
or waits 30 seconds for the message box to time out. VmDas will close the
message box, open a document in data collect mode, and begin collecting data.
If the user clicks Cancel, VmDas exits.
page 60
Figure 21.
VmDas Shortcut in the Startup Folder
Figure 22.
Shortcut Properties
RD Instruments
VmDas User's Guide
Figure 23.
Autostart Dialog
NOTE. Turnkey mode only works on startup. Once data collection has
started, VmDas reverts to normal operation. It will not enter turnkey mode
again until closed and restarted with the /autostart switch. If a second
document is opened with the File, Collect Data menu, the user must use
the Control, Go menu item to start data collection. It will not happen
automatically.
P/N 95A-6015-00 (September 2003)
page 61
VmDas User's Guide
8
VmDas and NMEA Data
VmDas can read in, decode, and record ensembles from an ADCP and NMEA
data from some specific (i.e. GPS and attitude sensors) external devices.
VmDas stores this data in both raw NMEA data files (N1R and N2R) (leaving
all original data input in its original format) and in a combined, averaged data
file. VmDas uses all of this data to create different displays for the user.
As well as being able to input NMEA strings to VmDas, it can produce NMEA
output strings of speed log information. The speed log contains VDVBW
(ground/water speed), VDDBT (depth), VDHDT (Heading True), and VDZDA
(UTC Time and Date).
8.1
General NMEA Data Format
Much of the following information was abstracted from the NMEA 0183 standard. Discussion is limited to NMEA strings that VmDas understands. All
NMEA messages are ASCII strings with the general format as shown in
Table 3.
Table 3:
NMEA Data Format
String
Description
$
HEX 24 – start of sentence
<Address field>
Approved address fields consist of five characters defined by the NMEA 0183
standard. The first two characters are the TALKER identifier. The next three
characters identify the message.
The proprietary address field consists of the proprietary character “P” followed
by a three-character Manufacturer’s Mnemonic Code, used to identify the
TALKER issuing a proprietary sentence, and any additional characters as
required.
(VmDas accepts any two valid characters as the TALKER identifier in approved
address fields.)
(RD Instruments uses the RDI Mnemonic Code for proprietary address fields,
even though it is assigned to Radar Devices. VmDas also uses the unassigned
ADC Mnemonic Code for its own data files).
[“,”<data field>]
.
.
.
Zero or more data fields, each preceded by a “,” (comma, HEX 2C) delimiter.
The number of data fields and their content are determined by the address field.
[“,”<data field>]
Data fields may be null (contain no characters). The comma delimiter is
required even when a data field is null.
[“*”checksum field ]
Checksum
The checksum is the 8-bit exclusive OR of all characters in the sentence,
including “,” delimiters, between but not including the “$” and the “*” delimiters.
The hexadecimal value of the most significant and least significant 4 its of the
result are converted to two ASCII characters (0-9, A-F) for transmission, The
most significant character is transmitted first.
<CR><LF>
page 62
HEX 0D 0A – End of sentence
RD Instruments
VmDas User's Guide
Data Fields
Detailed descriptions of each message VmDas uses are provided below. These
descriptions use format specifiers for data fields. The meanings of some of the
format specifiers are listed in Table 4.
Table 4:
Data Fields
Field
Description
hhmmss.ss
A mixed fixed/variable length time field. 2 fixed digits of hours, 2 fixed digits of
minutes, 2 fixed digits of seconds, and a variable number of digits for decimal-fraction
of seconds.
Leading zeros are always included for hours, minutes, and seconds to maintain fixed
length. The decimal point and associated decimal-fraction are optional if full
resolution is not required.
x.x
A variable length integer or floating numeric field with optional leading and trailing
zeros. The decimal point and associated decimal-fraction are optional if full resolution
is not required. (example: 73.10 = 73.1 = 073.1 = 73).
A negative sign “-“ (HEX 2D) is the first character if the value is negative. The sign is
omitted if value is positive.
hh
A fixed length HEX number. The most significant digit is on the left.
a
aa
aaa
etc.
A fixed length alpha field. This type of field contains a fixed number of upper-case or
lower-case alpha characters.
x
xx
xxx
etc.
A fixed length numeric field. This type of field contains a fixed number of numeric
characters (0 - 9).
A
A single character status field.
In all strings recognized by VmDas, all these fields have a length of one character.
Some fields allow negative values. If needed, a negative sign “-“ (HEX 2D) is the first
character, increasing the length of the field by one. The sign is omitted if value is
positive.
A = Yes, Data Valid, or Warning Flag Clear.
V = No, Data Invalid, or Warning Flag Set.
Other single
letter
A single character field with fixed content. The letter is the content of the data field.
When used below, the HEX value of the letter is also given.
NOTES. Spaces should not be used anywhere in these NMEA strings.
Spaces may only be used in variable text fields. No NMEA string
recognized by VmDas uses a variable text field.
If data is not available or unreliable, a null field is used. A null field is a
field with no characters in it. When a null field is present, two delimiters
(comma, *, or <CR>) are found side by side. A null field does NOT contain
the zero character (HEX 30), the ASCII NUL character (HEX 00), a space
(HEX 20), or other character.
VmDas ignores some fields when it decodes messages. The fields it reads
are explained in “NMEA Input,” page 64.
P/N 95A-6015-00 (September 2003)
page 63
VmDas User's Guide
8.2
NMEA Input
The messages VmDas reads are standard GGA, HDG, HDT, VTG messages,
and the RDI proprietary PRDID, PASHR, PASHR,ATT, and PASHR,AT2 messages.
VmDas NMEA data files will contain the RDI proprietary PADCP message.
VmDas generates this message and uses it internally. It is expected to be of no
use externally, and is not transmitted to other devices. It is stored in the *.N1R
and *.N2R data files.
8.2.1
GGA – Global Positioning System Fix Data
Time, position, and fix related data for a GPS receiver.
$__GGA,hhmmss.ss,llll.ll,a,yyyy.yy,a,x,xx,x.x,x.x,M,x.x,M,x.x,xxxx*hh<CR><LF>
Table 5:
Field
GGA NMEA Format
Description
1*
hhmmss.ss
UTC of position - 2 fixed digits of hours, 2 fixed digits of minutes, 2 fixed digits of
seconds, and a variable number of digits for decimal-fraction of seconds. Leading
zeros are always included for hours, minutes, and seconds to maintain fixed length.
The decimal point and associated decimal-fraction are optional if full resolution is not
required.
2*
llll.ll
Latitude - Two fixed digits of degrees, 2 fixed digits of minutes, and a variable number
of digits for decimal-fraction of minutes. Leading zeros are always included for
degrees and minutes to maintain fixed length of the first 4 chars. The decimal point
and associated decimal-fraction are optional if full resolution is not required.
3*
a
Latitude hemisphere. N or S.
4*
yyyy.yy
Longitude - 3 fixed digits of degrees, 2 fixed digits of minutes, and a variable number
of digits for decimal-fraction of minutes. Leading zeros are always included for
degrees and minutes to maintain fixed length of the first 5 chars. The decimal point
and associated decimal-fraction are optional if full resolution is not required.
5*
a
Longitude hemisphere. E or W.
6*
x
GPS Quality indicator:
0 = fix not available or invalid
1 = GPS fix
2 = Differential GPS fix
3 = GPS PPS Mode, fix valid
4 = Real Time Kinematic. System used in RTK mode with fixed integers
5 = Float RTK. Satellite system used in RTK mode, floating integers
6 = Estimated (dead reckoning) mode
7 = Manual Input Mode
8 = Simulator mode
This shall not be a null field.
7
xx
Number of satellites in use, 00 – 12, may be different from the number in view
8
x.x
Horizontal dilution of precision
9
x.x
Antenna altitude above/below mean-sea-level (geoid)
10
M
HEX 4D. Units of antenna altitude, meters
11
x.x
Geoidal separation. The difference between the WGS-84 earth ellipsoid and meansea-level (geoid), “-“ = mean-sea-level below ellipsoid.
12
M
HEX 4D. Units of geoidal separation, meters
13
x.x
Age of Differential GPS data. Time in seconds since last SC104 Type 1 or 9 update,
null field when DGPS is not used.
14
xxxx
Differential reference station ID, 0000-1023
* This field is used by VmDas.
page 64
RD Instruments
VmDas User's Guide
8.2.2
HDG – Heading, Deviation, and Variation
Heading (magnetic sensor reading), which if corrected for deviation, will produce Magnetic heading, which if offset by variation will provide True heading.
$__HDG,x.x,x.x,a,x.x,a*hh<CR><LF>
Table 6:
Field
HDG NMEA Format
Description
1*
x.x
Magnetic sensor heading, degrees
2*
x.x
Magnetic deviation, degrees
This field and the following direction field are null if deviation is unknown.
3*
a
Direction of magnetic deviation. E or W.
4*
x.x
Magnetic variation, degrees
5*
a
This field and the following direction field are null if variation is unknown.
Direction of magnetic variation. E or W.
* This field is used by VmDas.
To obtain Magnetic Heading:
a. Add Easterly deviation (E) to Magnetic Sensor Reading.
b. Subtract Westerly deviation (W) from Magnetic Sensor Reading.
To obtain True Heading:
a. Add Easterly variation (E) to Magnetic Heading.
b. Subtract Westerly variation (W) from Magnetic Heading.
8.2.3
HDT – Heading – True
Actual vessel heading in degrees True produced by any device or system producing true heading.
$__HDT,x.x,T *hh<CR><LF>
Table 7:
Field
HDT NMEA Format
Description
1*
x.x
Heading, degrees True
2
T
HEX 54
* This field is used by VmDas.
P/N 95A-6015-00 (September 2003)
page 65
VmDas User's Guide
8.2.4
VTG – Track Made Good and Ground Speed
The actual track made good and speed relative to the ground.
$__VTG,x.x,T,x.x,M,x.x,N,x.x,K,a*hh<CR><LF>
Table 8:
Field
VTG NMEA Format
Description
1*
x.x
Track, degrees true
2
T
HEX 54
3*
x.x
Track, degrees magnetic
4
M
HEX 4D
5
x.x
Speed, knots
6
N
HEX 4E
7*
x.x
Speed, km/hr
8
K
HEX 4B
9
a
Mode indicator
A=Autonomous mode
D=Differential mode
E=Estimated (dead reckoning) mode
M=Manual input mode
S=Simulator mode
N=Data not valid
This shall not be a null field.
* This field is used by VmDas.
8.2.5
$PASHR - Heading, Pitch, and Roll
Heading, pitch, and roll from multiple GPS receivers
$PASHR,hhmmss.ssss,xxx.xx,T,RRR.RR,PPP.PP,HHH.HH,a.aaa,b.bbb,c.ccc,d,e,*hh<CR><LF>
Table 9:
PASHR NMEA Format
Field
Description
1
hhmmss.ssss
UTC time of data
2*
xxx.xx
True vessel heading 0 – 359.99 degrees
3
T
True T
4*
RRR.RR
Roll -90.00 to +90.00 degrees, +for starboard down
5*
PPP.PP
Pitch -90.00 to +90.00 degrees, + for bow up
6
HHH.HH
Heave -99.00 to +99.00 meters
7
a.aaa
Accurracy roll, 0 to 9.999 degrees
8
b.bbb
Accurracy pitch, 0 to 9.999 degrees
9
c.ccc
Accurracy heading, 0 to 9.999 degrees
10
d
Flag Accur hdg, 0=No aiding, 1=GPS aiding, 2=GPS and GAMS aiding
11*
e
Flag: IMU, 0=Satisfactory, 1=IMU out
* This field is used by VmDas
page 66
RD Instruments
VmDas User's Guide
8.2.6
$PASHR,ATT - Global Positioning System Attitude Data
Heading, pitch, and roll from multiple GPS receivers
$PASHR,ATT, ,ssssss.s,hhh.hh,ppp.pp,rrr.rr,mmm.mm,bbb.bb,r<CR><LF>
Table 10:
Field
PASHR,ATT NMEA Format
Description
1
ATT
Identifies this as a PASHR,ATT string
2
ssssss.s
GPS receive time, seconds of week
3*
hhh.hh
Heading, degrees
4*
ppp.pp
Pitch, degrees, + for starboard down
5*
rrr.rr
Roll, degrees, + for bow up.
6
mmm.mm
Baseline rms error (BRMS), meters
7
bbb.bb
Measurement rem error (MRMS), meters
8*
r
Altitude reset flag, 0=good attitude, 1=bad attitude or rough estimate
* This field is used by VmDas
8.2.7
$PASHR,AT2 - Global Positioning System Attitude Data
Heading, pitch, and roll from multiple GPS receivers
$PASHR,AT2,ssssss.s,hhh.hh,ppp.pp,rrr.rr,mmm.mm,bbb.bb,r,l,ddd,P<CR><LF>
Table 11:
Field
PASHR,AT2 NMEA Format
Description
1
AT2
Identifies this as a PASHR,AT2 string
2
ssssss.s
GPS receive time, seconds of week
3*
hhh.hh
Heading, degrees
4*
ppp.pp
Pitch, degrees, + for starboard down
5*
rrr.rr
Roll, degrees, + for bow up.
6
mmm.mm
Baseline rms error (BRMS), meters
7
bbb.bb
Measurement rem error (MRMS), meters
8*
r
Altitude reset flag, 0=good attitude, 1=bad attitude or rough estimate
9
l
Last state, 0=No search in progress, >0=Start from last completed state
10
ddd
Each digit is number of double differences for V12, V13, V14
11
P
PDOP
* This field is used by VmDas
P/N 95A-6015-00 (September 2003)
page 67
VmDas User's Guide
8.2.8
$PRDID
RDI defines a proprietary NMEA message that contains ship heading, pitch,
and roll data.
$PRDID,x.x,x.x,x.x,*hh<CR><LF>
Table 12:
Field
PRDID NMEA Format
Description
1*
x.x
Vessel Pitch, degrees. + = bow up.
2*
x.x
Vessel Roll, degrees. + = port up.
3*
x.x
Vessel Heading, degrees True
* This field is used by VmDas.
NOTE. $PRDID pitch and roll are not the standard gimbaled pitch and roll.
They are simple tilts of the mast. In most cases, the difference is small.
VmDas ignores the difference.
8.2.9
Reading NMEA Data
NMEA input is required in all moving vessel open ocean data collections.
However, VmDas can just collect ensembles from an ADCP. If NMEA data is
to be used, options must be set in the communications tab to configure the serial ports to read the data (up to two serial ports are available).
Each enabled port logs all data that arrives. The Navigation port logs to a file
with an N1R extension. The RPH port uses an N2R extension. The ports are
not interchangeable. VmDas expects certain data at each one. Any unexpected
NMEA messages will be logged, but not processed further.
If only one port is enabled, it must be the Navigation port. When used alone,
this port will process any GGA, HDG, HDT, VTG, PRDID, PASHR,
PASHR,ATT, and PASHR,AT2 messages it receives.
If two ports are enabled, VmDas expects GPS data (GGA, VTG) at the Navigation port, and attitude data (HDG, HDT, PRDID) at the RPH port.
VmDas internally generates PADCP messages and adds them to both log files.
These messages are expected to have meaning only to VmDas.
page 68
RD Instruments
VmDas User's Guide
8.3
NMEA Output
8.3.1
$VDDBT – Depth Below Transducer
Water depth referenced to the transducer
$VDDBT,x.x,f,x.x,M,x.x,F*hh<CR><LF>
Table 13:
Field
8.3.2
VDDBT NMEA Format
Description
1
x.x
Water depth, feet
2
f
HEX 66
3
x.x
Water depth, Meters
4
M
HEX 4D
5
x.x
Water depth, Fathoms
6
F
HEX 46
$VDHDT – Heading – True
Actual vessel heading in degrees True.
$VDHDT,x.x,T*hh<CR><LF>
Table 14:
Field
8.3.3
VDHDT NMEA Format
Description
1
x.x
Heading, degrees True.
2
T
HEX 54
$VDVBW – Dual Ground/Water Speed
Water referenced and ground referenced speed data.
$VDVBW,x.x,x.x,A,x.x,x.x,A*hh<CR><LF>
Table 15:
Field
VDVBW NMEA Format
Description
1
x.x
Longitudinal water speed, knots. “-“ = astern.
2
x.x
Transverse water speed, knots. “-“ = port.
3
A
Status: water speed, A = Data valid, V = Data invalid.
4
x.x
Longitudinal ground speed, knots. “-“ = astern.
5
x.x
Transverse ground speed, knots. “-“ = port.
6
A
Status: ground speed, A = Data valid, V = Data invalid.
P/N 95A-6015-00 (September 2003)
page 69
VmDas User's Guide
8.3.4
$VDZDA – Time and Date
UTC, day, month, year, and local time zone.
$VDZDA,hhmmss.ss,xx,xx,xxxx,xx,xx*hh<CR><LF>
Table 16:
Field
VDZDA NMEA Format
Description
1
hhmmss.ss
UTC
2
xx
Day, 01 – 31.
3
xx
Month, 01 – 12.
4
xxxx
Year
5
xx
Local time zone description. –13 to 13 hours.
The number of whole hours added to local time to obtain GMT. Zone
description is negative for East longitudes.
6
xx
Local time zone minutes description. –59 to 59 minutes.
The number of whole minutes added to local time to obtain GMT. This permits
a finer resolution time zone description than is possible using hours alone. The
sign is the same as the hour time zone description.
VmDas produces a null field here.
8.3.5
Writing NMEA Data
VmDas writes strings formatted as described in the NMEA 0183 standard to a
serial port, a TCP/IP port, or both.
NOTE. This is not in keeping with NMEA standards. The NMEA 0183
standard specifies that strings are to be transmitted through a serial port.
The NMEA 2000 standard is being developed for transmitting similar data
over a network. VmDas does not support the NMEA 2000 standard.
page 70
RD Instruments
VmDas User's Guide
8.4
Internal NMEA Messages
RDI defines a proprietary NMEA message for VmDas internal use only that
contains VmDas internal timing information.
8.4.1
$PADCP
This message is stored in VmDas N1R and N2R extension data files as a time
stamp. It is not transmitted over any I/O port.
$PADCP, ens,yyyy,xx,xx,xx,xx,ss.ss,x.x*hh<CR><LF>
Table 17:
Field
PADCP NMEA Format
Description
1
ens
Ensemble number. A variable length integer numeric field without leading zeros.
2
yyyy
Year, 4 digits, PC local time.
3
xx
Month, 01 – 12, PC local time.
4
xx
Day, 01 – 31, PC local time.
5
xx
Hours, 00 – 23, PC local time.
6
xx
Minutes, 00 – 59, PC local time.
7
ss.ss
Seconds and hundredths, 00.00 – 59.99, PC local time.
8
x.x
PC clock offset from UTC in seconds. –86399.99 to 86399.99.
VmDas keeps track of the date/time of GGA messages by recording the date/time
according to the PC clock when the message is read, and calculating the offset
between the times in the PC clock and the GGA message. If the clock offset is
added to a GGA message time, the result is a local PC time, The offset corrects for
the difference in time zone between local PC time and GGA time (UTC) and any
errors because the two clocks are not perfectly synchronized.
If no GGA messages have been read, this field is null.
NOTES. This message is used to synchronize ensemble data and NMEA
data.
The year, month, day, hour, minute, and second fields describe the time
that a ping command was sent to the ADCP.
The ens field contains the number of the ensemble generated by the ping
command.
8.5
Further Information About NMEA Strings
Users who need full details about NMEA data strings can find more information in the NMEA 0183 standard, available from the National Marine Electronics Association at.
P O Box 3435
252-638-2626 (voice)
[email protected] (e-mail)
New Bern, NC
252-638-4885 (fax)
http://www.nmea.org/ (web site)
28564-3435
P/N 95A-6015-00 (September 2003)
page 71
VmDas User's Guide
9
VmDas Outputs
VmDas can output Ensemble, Speed Log, and ASCII data out the serial port or
through an Ethernet port.
9.1
Ensemble Output Data
Long term averaged ensemble data is output in the RDI standard binary
ensemble (PD0) output format.
a. On the File menu, click Collect Data.
b. On the Options menu, click Edit Data Options. If you have created a
User Option File, click Load.
c. On the Communications tab, select the Ensemble Output (Binary LTA)
button.
d. To output the data to a serial port, click the Enable Serial box, and configure the serial port parameters, then click the Set button to apply the new
configuration. Verify that the new settings appear in the Current Settings
section.
e. To output the data to a network port, click the Enable Network box, and
set the Local IP Port number. VmDas will be the server, and the local machine's IP address will be used automatically. After data collection has
started, a remote client can request a TCP/IP connection using the specified
port number and the IP address of the computer running VmDas to receive
the data.
9.2
Speed Log Output Data
Speed log data output consists of the NMEA VBW and DBT messages, and is
calculated from the short-term averaged data. Use the following procedure to
enable speed log data output.
NOTE. Speed log data is not stored to a disk file. It is only sent to a serial
port and/or an Ethernet port.
a. On the File menu, click Collect Data.
b. If you have created a User Option File, on the Options menu, click Load.
Choose your file and click OK.
c. On the Options menu, click Edit Data Options.
d. On the Communications tab, select the Speed Log Output button.
e. To output the data to a serial port, click the Enable Serial box, and configure the serial port parameters, then click the Set button to apply the new
page 72
RD Instruments
VmDas User's Guide
configuration. Verify that the new settings appear in the Current Settings
section.
f. To output the data to a network port, first choose an IP port number.
VmDas uses 5434 by default, which should be fine for most users. Remote
clients will need to know the IP port number and the IP address of the computer running VmDas to receive data.
Click the Enable Network box, and set the Local IP Port number. VmDas
will use the local machine's IP address automatically. Click the Set button
to apply the new configuration. Verify that the new settings appear in the
Current Settings section.
After data collection has started, a remote client can request a TCP/IP connection using the specified port number and the IP address of the computer
running VmDas to receive the data.
Tips for Advanced Users
Advanced users can get more control over the Speed Log data by using the following tips.
Speed Log data will only be output if the serial and/or Ethernet port(s) are configured for that purpose.
• If a port is configured for speed log output, speed log output will be
produced. If there is no data or the data is invalid, the NMEA messages will indicate that they contain invalid data.
The data will only be received if something is listening to the port(s). This requires a cable and usually a second computer.
• One device may listen to a serial port. When sending speed log data
out an Ethernet port, VmDas is a TCP/IP server and supports up to
100 clients.
Speed log data is calculated from ensembles in the short-term averaged data.
There will be one VBW and one DBT message for each short-term average ensemble.
• To control the time between messages, on the Options menu, click
Edit Data Options, choose the Averaging tab, and change the First
Time Interval.
The speed log will contain valid data only if the ADCP is configured to produce the data. The data comes from the bottom track field in the short-term
average data.
• The VBW message will contain water speed data only if the ADCP
has been configured to produce water reference layer data. The BK
and BL commands are useful here.
P/N 95A-6015-00 (September 2003)
page 73
VmDas User's Guide
• The VBW message will contain bottom speed data only if the ADCP
has been configured to produce bottom velocity data. The BP command is useful here.
• The DBT message will contain depth data only if the ADCP has
been configured to produce bottom track range data. This data is
present whenever bottom track data is being produced, and the bottom is in range. The BP and BX commands are useful here.
• The Options on the ADCP Setup tab can override the BP and BX
commands in a command file. To use the ADCP defaults for these
commands or to set them from a command file, the Set BT On/Off
box must be unchecked.
9.3
Ensemble Output (ASCII) Data
ASCII-out files contain a fixed format of text. You can then use these files in
other programs (spreadsheets, databases, and word processors).
a. On the File menu, click Collect Data.
b. On the Options menu, click Edit Data Options. If you have created a
User Option File, click Load.
c. On the Communications tab, select the Ensemble Output (ASCII) button.
d. To output the data to a serial port, click the Enable Serial box, and configure the serial port parameters, then click the Set button to apply the new
configuration. Verify that the new settings appear in the Current Settings
section.
e. To output the data to a network port, click the Enable Network box, and
set the Local IP Port number. VmDas will be the server, and the local machine's IP address will be used automatically. After data collection has
started, a remote client can request a TCP/IP connection using the specified
port number and the IP address of the computer running VmDas to receive
the data.
f. In the Set Ensemble Output Configuration Here section, check the box
for each type of data within the ensemble that you want output. In the Data
Select box, select the desired data source. In the Velocity Ref box, select
the desired reference velocity to be applied to the profile data. In the Output column, select the desired depth cell range to output by setting the
Start Bin and End Bin. If Water Current Profile Layer is selected as the
velocity reference, then in the Profile Layer column, select the desired
depth cell range to use as the reference velocity by setting the Start Bin and
End Bin.
page 74
RD Instruments
VmDas User's Guide
9.3.1
ASCII Ensemble Output Format
This section explains the format of the data sent from the ADCP to the ensemble-out serial device after each ADCP ensemble. Sending ensemble-out data is
an option in the Options, Program Options, Communications Setup menu.
You set the communications protocol and select the data to send to the ensemble-out device through the Communication options. Ensemble-out data are in
ASCII with fixed field lengths.
The transmission of ensemble-out data occurs after VmDas finishes recording
ADCP data after each ADCP ensemble. The next section shows a sample
ensemble-out data transmission. The first byte in the ensemble-out data stream
is a START OF TEXT (^B) byte. This byte is also known as STX, ASCII
character 2, or Control-B (^B). VmDas always sends the STX byte when data
transmission begins. After the STX byte, VmDas sends a 2-byte flag that
represents the data type that will be sent next. See “Ensemble-Out Data
Format Description,” page 76 for an explanation of all the flags and associated
fields used in the ensemble-out data stream.
9.3.2
Sample Ensemble-Out Data Transmission
^B 0
1
4
2
3
4
6
-23
85
49
4 4
128
129
117
96 91 10 2 9 54 30<CR/LF>
4
1
4
0
0
0
-1375
-38
33<CR/LF>
-1453
-2
-3<CR/LF>
-1465
-44
-52<CR/LF>
-1464
-76
30<CR/LF>
1
4<CR/LF>
119
133
142<CR/LF>
103
120
110<CR/LF>
133
141
142<CR/LF>
134
4 4
167
162
154
146
4 4
100
100
100
100
141
134
4<CR/LF>
155
159
151
149
145
137
138
130
1
4<CR/LF>
100
100
100
100
100
100
100
100
1
0<CR/LF>
127<CR/LF>
168<CR/LF>
161<CR/LF>
154<CR/LF>
152<CR/LF>
100<CR/LF>
100<CR/LF>
100<CR/LF>
100<CR/LF>
5
4 4
1
4<CR/LF>
-32678 -32678 -32678 -32678<CR/LF>
-32678 -32678 -32678 -32678<CR/LF>
-32678 -32678 -32678 -32678<CR/LF>
-32678 -32678 -32678 -32678<CR/LF>
6 0 0 0 10 100 25 25 2 0 0 0 0 5000 25 0 0
7 2 4<CR/LF>
-33
-1414
-62 -32768<CR/LF>
833
878
0
783<CR/LF>
8 13856000 -324937000
634
4786
425
470<CR/LF>
^C^B 0
1
4
2
3
7
-19
89
48
4 4
121
127
130
130
4 4
167
163
156
147
4
97 91 10 2 9 55 00<CR/LF>
1
4
0
0
0
-1373
-40
29<CR/LF>
-1456
-1
-4<CR/LF>
-1462
-46
-51<CR/LF>
-1466
-73
34<CR/LF>
1
4<CR/LF>
123
130
139<CR/LF>
100
122
114<CR/LF>
135
140
141<CR/LF>
1
140
138
4<CR/LF>
156
153
155
147
143
138
140
132
P/N 95A-6015-00 (September 2003)
0
2500
0
0
0
35
1480<CR/LF>
0<CR/LF>
129<CR/LF>
166<CR/LF>
162<CR/LF>
153<CR/LF>
151<CR/LF>
page 75
VmDas User's Guide
4
4 4
100
100
100
100
1
4<CR/LF>
100
100
100
100
100
100
100
100
100<CR/LF>
100<CR/LF>
100<CR/LF>
100<CR/LF>
5
4 4
1
4<CR/LF>
-32678 -32678 -32678 -32678<CR/LF>
-32678 -32678 -32678 -32678<CR/LF>
-32678 -32678 -32678 -32678<CR/LF>
-32678 -32678 -32678 -32678<CR/LF>
6 0 0 0 10 100 25 25 2 0 0 0 0 5000 25 0 0
7 2 4<CR/LF>
-31
-1420
-58
-768<CR/LF>
840
862
845
850<CR/LF>
8 13857000 -324938000
634
4787
426
471<CR/LF>
0
2500
0
0
0
35
1480<CR/LF>
^C
9.3.3
Ensemble-Out Data Format Description
Each ASCII ensemble-out data stream begins with a Start Of Text code <^B>
and ends with an End Of Text code <^C>. VmDas identifies each data type
with an integer flag. At least one space separates the fields within each data
type. Each line of data ends with a carriage return <CR> and line feed <LF>
sequence.
Table 18:
Ensemble-Out Data Format
Flag
Field
Description
0
1
Flag 0 identifies the ensemble number just processed by the ADCP and the
date/time that data collection for the ensemble began. The fields identified by this
flag contain:
2
The ensemble number just processed by the ADCP.
3
The year data collection began for this ensemble.
4
The month data collection began for this ensemble.
1
5
The day data collection began for this ensemble.
6
The hour data collection began for this ensemble.
7
The minute data collection began for this ensemble.
8
The second data collection began for this ensemble.
1
Flag 1 marks the start of velocity data. VmDas scales the water current velocity
data in millimeters per second (mm/s). A value of -32768 indicates bad or
missing data. VmDas lists water profile velocity data in columns beginning with
the next output line. The fields identified by this flag contain:
2
The number of bins selected for transmission.
3
The number of beams used by the ADCP to collect the data. This value
corresponds to the number of COLUMNS of data beginning with the next output
line.
4
The first bin selected for transmission in the Communication options.
5
The last bin selected for transmission in the Communication options.
6
The east(+)/west(-) water-current velocity of the reference layer if VELOCITY REF
is set to BOTTOM or MEAN (Communication options).
7
The north(+)/south(-) water-current velocity of the reference layer if VELOCITY
REF is set to BOTTOM or MEAN (Communication options).
Continued Next Page
page 76
RD Instruments
VmDas User's Guide
Table 18:
Flag
2
3
Ensemble-Out Data Format (continued)
Field
Description
8
The up(+)/down(-) water-current velocity of the reference layer if VELOCITY REF
is set to BOTTOM or MEAN (Communication options).
9
The error velocity of the reference layer if VELOCITY REF is set to BOTTOM or
MEAN (Communication options).
10
Column data for the east(+)/west(-) water-current velocities for the bin range
selected in the Communication options.
11
Column data for the north(+)/south(-) water-current velocities for the bin range
selected in the Communication options.
12
Column data for the up(+)/down(-) water-current velocities for the bin range
selected in the Communication options.
13
Column data for the error velocities for the bin range selected in the
Communication options.
1
Flag 2 marks the start of correlation magnitude data. A value of -32768 indicates
missing data. VmDas lists correlation data in columns beginning with the next
output line. The fields identified by this flag contain:
2
The number of bins selected for transmission.
3
The number of beams used by the ADCP to collect the data. This value
corresponds to the number of COLUMNS of data beginning with the next output
line.
4
The first bin selected for transmission in the Communication options.
5
The last bin selected for transmission in the Communication options.
6
Column data for the Beam #1 correlation data for the bin range selected in the
Communication options.
7
Column data for the Beam #2 correlation data for the bin range selected in the
Communication options.
8
Column data for the Beam #3 correlation data for the bin range selected in the
Communication options.
9
Column data for the Beam #4 correlation data for the bin range selected in the
Communication options.
1
Flag 3 marks the start of echo intensity data. VmDas scales echo intensity data
in ADCP counts. A value of -32768 indicates missing data. VmDas lists echo
intensity data in columns beginning with the next output line. The fields identified
by this flag contain:
2
The number of bins selected for transmission.
3
The number of beams used by the ADCP to collect the data. This value
corresponds to the number of COLUMNS of data beginning with the next output
line.
4
The first bin selected for transmission in the Communication options.
5
The last bin selected for transmission in the Communication options.
6
Column data for the Beam #1 echo intensity data for the bin range selected in the
Communication options.
7
Column data for the Beam #2 echo intensity data for the bin range selected in the
Communication options.
8
Column data for the Beam #3 echo intensity data for the bin range selected in the
Communication options.
9
Column data for the Beam #4 echo intensity data for the bin range selected in the
Communication options.
P/N 95A-6015-00 (September 2003)
page 77
VmDas User's Guide
Table 18:
Field
Description
4
1
Flag 4 marks the start of percent-good data. VmDas scales percent-good data in
percentage points (0-99). A value of -32768 indicates bad or missing data.
VmDas lists percent-good data in columns beginning with the next output line.
The fields identified by this flag contain:
2
The number of bins selected for transmission.
3
The number of beams used by the ADCP to collect the data. This value
corresponds to the number of COLUMNS of data beginning with the next output
line.
4
The first bin selected for transmission in the Communication options.
5
The last bin selected for transmission in the Communication options.
6
Column data for the Beam #1 percent-good data for the bin range selected in the
Communication options.
7
Column data for the Beam #2 percent-good data for the bin range selected in the
Communication options.
8
Column data for the Beam #3 percent-good data for the bin range selected in the
Communication options.
9
Column data for the Beam #4 percent-good data for the bin range selected in the
Communication options.
1
Flag 5 marks the start of status data. See VmDas STA and LTA Output Data
Format for information on how status data are scaled. A value of -32768
indicates bad or missing data. VmDas lists status data in columns beginning with
the next output line. The fields identified by this flag contain:
2
The number of bins selected for transmission.
3
The number of beams used by the ADCP to collect the data. This value
corresponds to the number of COLUMNS of data beginning with the next output
line.
4
The first bin selected for transmission in the Communication options.
5
The last bin selected for transmission in the Communication options.
6
Column data for the Beam #1 status data for the bin range selected in the
Communication options.
7
Column data for the Beam #2 status data for the bin range selected in the
Communication options.
8
Column data for the Beam #3 status data for the bin range selected in the
Communication options.
9
Column data for the Beam #4 status data for the bin range selected in the
Communication options.
1
Flag 6 marks the start of leader data. The fields identified by this flag contain:
2
The minutes portion of the time between pings as set by the TP-command.
3
The seconds portion of the time between pings as set by the TP-command.
4
The hundredths of seconds portion of the time between pings as set by the TPcommand.
5
The number of pings per ensemble as set by the WP-command.
6
The number of depth cells (bins) as set by the WN-command.
5
6
page 78
Ensemble-Out Data Format (continued)
Flag
7
The depth cell (bin) length in centimeters as set by the WS-command.
8
The blank after transmit in centimeters as set by the WF-command.
RD Instruments
VmDas User's Guide
Table 18:
Flag
7
Ensemble-Out Data Format (continued)
Field
Description
9
The ADCP profiling mode as set by the WM-command.
10
The Built-In Test result code from the last ADCP ensemble.
11
The sensor source as set by the EZ-command.
12
The available sensors as read by the PS1-command.
13
The low correlation threshold as set by the WC-command.
14
The error velocity threshold in mm/s as set by the WE-command.
15
The percent-good minimum as set by the WG-command.
16
The average ADCP pitch (tilt 1, x-axis) angle in hundredths of degrees (e.g., -70 =
-0.7°) during the ADCP data ensemble. This value comes from the internal
pendulums or external gyrocompass.
17
The average ADCP roll (tilt 2, y-axis) angle in hundredths of degrees (e.g., 430 =
4.3°) during the ADCP data ensemble. This value comes from the internal
pendulums or external gyrocompass.
18
The average ADCP heading angle in hundredths of degrees (e.g., 7707 = 77.07°)
during the ADCP data ensemble. This value comes from the internal flux-gate
compass or external gyrocompass.
19
The average water temperature in hundredths of degrees C (e.g., 1711 =
17.11°C) at the transducer head during the ADCP data ensemble.
20
The standard deviation (accuracy) of heading data in degrees during the ADCP
data ensemble from the compass.
21
The standard deviation (accuracy) of pitch (tilt 1, x-axis) data in tenths of degrees
(e.g., 15 = 1.5°) during the ADCP data ensemble from the
pendulum/gyrocompass.
22
The standard deviation (accuracy) of roll (tilt 2, y-axis) data in tenths of degrees
(e.g., 5 = 0.5°) during the ADCP data ensemble from the pendulum/gyrocompass.
23
The salinity value in parts per thousand from the ADCP (ES or EZ-command).
24
The speed of sound value in m/s from the ADCP (EC or EZ-command).
1
Flag 7 marks the start of bottom-track data. A value of -32768 indicates bad or
missing velocity data. A zero indicates bad or missing beam range data. The
fields identified by this flag contain:
2
The number of lines of bottom-track data sent. This value corresponds to the
number of ROWS of data beginning with the next output line.
3
The number of beams used by the ADCP to collect the bottom-track data. This
value corresponds to the number of COLUMNS of data beginning with the next
output line.
4
The east(+)/west(-) bottom-track velocity in mm/s.
5
The north(+)/south(-) bottom-track velocity in mm/s.
6
The up(+)/down(-) bottom-track velocity in mm/s.
7
The bottom-track error velocity in mm/s.
8
The Beam #1 range in meters to the bottom/surface, excluding ADCP depth.
9
The Beam #2 range in meters to the bottom/surface, excluding ADCP depth.
10
The Beam #3 range in meters to the bottom/surface, excluding ADCP depth.
11
The Beam #4 range in meters to the bottom/surface, excluding ADCP depth.
P/N 95A-6015-00 (September 2003)
page 79
VmDas User's Guide
Table 18:
10
Ensemble-Out Data Format (continued)
Flag
Field
Description
8
1
Flag 8 marks the start of external navigation data collected by VmDas. A value of
2147483647 indicates bad or missing latitude/longitude data. A value of -32768
indicates bad or missing data for all other fields. The fields identified by this flag
contain:
2
Navigation device latitude in thousandths of seconds.
3
Navigation device longitude in thousandths of seconds (-324937000 =
W90°15'37").
4
Navigation device speed in mm/s.
5
Navigation device course in hundredths of degrees (4786 = 47.86°).
6
The east(+)/west(-) navigation device velocity in mm/s.
7
The north(+)/south(-) navigation device velocity in mm/s.
VmDas User Exits
The User Exit options in VmDas are hooks at various points in the processing
where the user can modify the data with an external program.
• The first User Exit option selects a VmDas data file to be displayed
using WinADCP.
• The second User Exit option allows a program to adjust RAW
ADCP data that VmDas put in the *.ENR file.
• The third User Exit option allows a program to adjust RAW NMEA
data that VmDas put in the *.N1R and *.N2R file.
• The fourth User Exit option allows a program to perform coordinate
transformations.
For example, a User Exit could be used to translate all or part of a nonsupported NMEA string (e.g. Ashtech’s $GPPAT position and attitude NMEA
string) into a supported string (e.g. RD Instruments $PRDID NMEA string).
NOTE. The last three user exits are enabled by clicking on their associated
checkboxes in the User Exits tab. However, VmDas does not currently
support automatic launching of these user exits. They must be launched
independently before selecting Go on the Control menu in VmDas.
page 80
RD Instruments
VmDas User's Guide
10.1
Tips and Tricks to Creating User Exit Programs
There are many non-supported NMEA string formats for position, heading, and
pitch/roll devices. In order to use a non-supported NMEA string with VmDas,
the user needs to create a User Exit program. The User Exit program needs to
do the following:
• Opens the .N1R (or .N2R) file for input (the file may not exist right
away, so it must clear the error condition and keep trying).
• Creates the .N1J (or .N2J) file for output.
• Read characters from the file until an end of line is found. It has to
handle the fact that it will often see an End-Of-File condition, because the data may not be there yet, but it must clear the error condition and keep trying. The best way to do this might be to check the
file status in a loop to get the current file size and detect when it
changes.
• Each time it has read a complete line, decode and convert the nonsupported NMEA string into a $xxHDT string (the first two letters
could be anything, as VmDas doesn't care about the device ID).
• Write the new $xxHDT string out to the .N1J (or .N2J) file
• Repeat
This program can be written in any of several ways:
• DOS-type program written using Borland C, or Turbo Pascal, or
other programs.
• Windows console program
• Visual Basic program
• Visual C++ program
In other words, you can use any development tool that can create a program
that will read and write disk files on a PC running the Microsoft Windows®
operating system.
P/N 95A-6015-00 (September 2003)
page 81
VmDas User's Guide
10.2
Example 1 - Modifying Raw ADCP Data
VmDas writes the ADCP raw data into a file with the naming convention
*.ENR. The format of this data is the ADCP raw binary data. The data file
*.ENR is normally read in by the VmDas screening and filtering stage of the
software. The output of this screening and filtering is then written into a file
with the naming convention of *.ENS. A user can set an option (via the User
Exit tab) that will instruct the VmDas program to read in a file with the naming
convention of *.ENJ instead of the *.ENR file.
This allows the user to write their own program which can modify the data inside the *.ENR file in anyway as long as they write the data back out into a file
with the same original data format as the *.ENR file except they rename the
file *.ENJ. The VmDas program will read in the *.ENJ file and screen and
process it as it would have the *.ENR file.
An example of why a user may want to do this is that the user wishes to screen
the heading data that is read directly by the ADCP gyro interface board and
output to the *.ENR data file. The user could write a program that would read
the heading data from the *.ENR file and compare that heading data to the
heading in the NMEA data file *.N1R (or *.N2R). The user can then decide
based on an algorithm they write which heading is more accurate to use. The
user would then take the heading they chose to use and write this new heading
value into the raw ADCP ensemble file *.ENJ, being sure to modify the ADCP
checksum for that ensemble as required. The VmDas would read in the *.ENJ
file because the user had selected the User Exit Option for RAW ADCP Data
Screening.
10.3
Example 2 - Modifying Raw NMEA Data
VmDas writes the NMEA raw data into a file with the naming convention
*.N1R or *.N2R (depending on which NMEA device we are working with).
The format of this data is ASCII and is in the same format as what is transmitted by the users NMEA device (with one exception). That exception being we
add an ADCP mark (or time tag) string $PADCP. The *.N1R (or *.N2R) data
file is normally then just converted to binary and stored in a file with the naming convention *.NMS. A user can set an option (via the User Exit menu) that
will instruct the VmDas program to read in a file with the naming convention
of *.N1J (or *.N2J) instead of the *.N1R (or *.N2R) naming convention.
This allows the user to write their own program which can modify the data inside the *.N1R (or *.N2R) in anyway as long as they write the data back out
into a file with the same original data format as the *.N1R (and if collected
*.N2R) file except they rename the file *.N1J (and if N2R is collected the file
*.N2J). When the user turns on the User Exit option External Raw Nav Data
Screening/Pre-Averaging the VmDas program will read in the *.N1J (or
page 82
RD Instruments
VmDas User's Guide
*.N2J) file convert it into the binary file with the naming convention of
*.NMS.
An example of why a user may want to do this is that the user wishes to decode
pitch and roll data from a NMEA string that the VmDas does not currently decode. The user can write a program that would read in the data from the *.N1R
file (or *.N2R) and create a string that is read by the VmDas program from the
data available in the NMEA strings.
An example of this is seen when using an Ashtech device that outputs pitch and
roll data in the string $GPPAT (not supported) and $GPASHR (supported).
VmDas does not currently decode the $GPPAT proprietary NMEA string. The
user could write a program that would take the data from the Ashtech NMEA
strings and write them into the RDI propriety NMEA string $PRDID. The RDI
NMEA string contains heading, pitch, and roll data and is decoded by the
VmDas program. The format for this string is as follows:
$PRDID,ppp.pp,rrr.rr,hhh.hh@
or
$PRDID,-ppp.pp,-rrr.rr,hhh.hh@
Where:
@ = carriage return, line feed
h = heading
p = pitch
r = roll
10.4
Example 3 - Transformation
The VmDas program normally reads in the contents of the binary file *.ENS
and performs a beam to earth coordinate transformation. This beam to earth
coordinate transformation is performed using the users selections for where to
obtain attitude information such as heading, pitch, and roll (the choices being
either the raw ADCP leader data or the raw NMEA data). Using this attitude
information VmDas will transform the data from beam to earth using RDI's
standard matrix table conversion and then writes this data to the file *.ENX.
The VmDas program does allow the user to perform their own coordinate transformation routine. The user would select the User Exit option of External
Transformation. This choice would disable the VmDas coordinate transformation routine and the user would have to create their own being sure to write
the data out in correct format to a data file with the *.ENX naming convention.
This is important as the next routines of the VmDas program will be reading in
the *.ENX data for averaging, displaying, and recording in the *.STA and
*.LTA files.
An example of why a user may want to do this is that the user may have purchased a special RDI ADCP that does not have the standard 4-beam Janus con-
P/N 95A-6015-00 (September 2003)
page 83
VmDas User's Guide
figuration. Many times these systems do not come with a coordinate transformation algorithm built into them. The user is responsible for this conversion.
Special Notes. Included in the Transformation routine are the following func-
tions. If the user chooses to perform their own Transformation, they must ensure that these functions are also covered. A description of how RDI performs
this transformation is included in the Coordinate Transformation Booklet
(available on RDI’s web site).
• Selection of the attitude sensor (based on the user input during Edit
Data Options)
• Apply Heading Corrections
• Apply Beam Angle Corrected Matrix table (read from the ADCP)
• Bin Mapping
• Three Beam Solutions
• Mark Data Bad Below Bottom
• Error Velocity Screening
• Vertical Velocity Screening
• Percent Good Calculations and Screening
10.5
User Displays
The VmDas program has its own display modules built in. The VmDas program reads in the raw ADCP files (*.ENR), short-term average files (*.STA),
and long term average files (*.LTA) and displays this data in either a Tabular,
Profile, or Ship Track plot.
The files *.ENR, *.STA, and *.LTA are available to be read by other programs
such as WinADCP during real time data collection. This allows a user to create
their own software package to display, or output the data in any way they
would like. The only restriction is that when reading in the data file they must
leave the data file open (or in a shared condition) so that VmDas may continue
to access the file and update it with the new ensembles.
page 84
RD Instruments
Figure 24.
P/N 95A-6015-00 (September 2003)
NMEA2
*.N1R
NMEA1
ASCII NMEA
*.N2R
ASCII NMEA
Reprocess *.vmo
ASCII NMEA
*.N2J
User Created
ASCII NMEA
*.N1J
NMEA
user exit
Binary RDI
Proprietary
*.NMS
Binary PD0 + NMEA
Binary PD0
Coordinate Transformation
user exit
*.ENS
User Created
Binary PD0
*.ENJ
User Created
*.ENR
Realtime *.ini
ADCP
External raw ADCP
data screening
user exit
VmDas
XFORM
USER
XFORM
User Created
Realtime *.vmo
Reprocess *.vmp
Binary PD0 + NMEA
*.LTA
Binary PD0 + NMEA
*.STA
Binary PD0 + NMEA
*.ENX
VmDas User's Guide
User Exits
page 85
VmDas User's Guide
11
File Naming Conventions
Data files produced by VmDas during data collect mode have the following
filename format: DeployName000_000000.Ext,
Where:
DeployName
is a user-entered name for the deployment (up to 128 characters),
000
is the deployment number (changes with each stop/restart),
000000
is the file sequence number, which is incremented when the specified maximum file
size is reached, and
Ext
is the file extension, and reflects the type of data in the file
Reprocessed files have a similar format: DeployName000_000_000000.Ext,
Where:
000
Represents the reprocessing number, and gets incremented each time the same raw
data is reprocessed. The other fields are the same as for the data collect mode format, and identify the raw data source that was reprocessed.
The file extensions have the following meaning:
.ENR
Raw ADCP data file (see your ADCP Technical Manual Commands and Output Data Format guide for the output data format).
.LTA
ADCP (plus Navigation Data (see “Binary Navigation Data Format,” page 88)) data that has
been averaged using the long time period specified in the Options, Edit Data Options,
Averaging tab.
.STA
ADCP (plus Navigation Data (see “Binary Navigation Data Format,” page 88)) data that has
been averaged using the short time period specified in the Options, Edit Data Options,
Averaging tab.
.ENS
ADCP data after having been screened for RSSI and correlation by VmDas, or adjusted by
the user via a User Exit. Also has Navigation Data (see “Binary Navigation Data Format,”
page 88) records merged into the ensembles from the .NMS file.
.ENX
ADCP single-ping data (plus Navigation Data (see “Binary Navigation Data Format,” page
88) after having been bin-mapped, transformed to Earth coordinates, and screened for
error velocity, vertical velocity, and false targets. This data is ready for averaging.
.N1R,
.N2R
Raw NMEA data files - text files; includes ADCP time stamps with the following format:
$PADCP,eeeee,yyyymmdd,hhmmss,-nnnnn.nn<CR><LF>
Where:
eeeee = ADCP ensemble number
yyyymmdd = Year, Month, Day (date of ADCP ping)
hhmmss.ss = Hour, minute, seconds.hundredths (Time of ADCP ping)
-nnnnn.nn = (signed) PC clock offset from UTC in seconds; includes time zone difference).
The .N1R extension is used for single-port NMEA data collection, or for GPS position data
(Nav) in dual-port collection mode. The .N2R extension is used for Roll/Pitch/Heading
(RPH) data collection when using two serial ports for NMEA data collection.
.NMS
page 86
Binary format NAV data file after having been screened and pre-averaged.
.VMO
The option settings used for collecting the data (text file).
.VMP
The option settings used for reprocessing the data (text file).
.ENJ
ADCP raw data after adjustment by a user-exit application.
.N1J,
.N2J
Raw NMEA data after being adjusted by a user-exit application.
.LOG
ASCII file containing any errors found in NEA, ASCII Ensemble Output, or ADCP communications.
RD Instruments
VmDas User's Guide
12
ADCP Output Data Format and VMDAS
This section shows the format of the VmDas Navigation data when using an
ADCP. This output can only be binary.
The ADCP binary output data buffer contains header data, leader data, velocity,
correlation magnitude, echo intensity, percent good, and a checksum. The
ADCP collects all data in the output buffer during an ensemble. The VmDas
program writes this ADCP output into the *.ENR files (see “File Naming Conventions,” page 86). The *.ENR file format is described in the ADCP Technical Manual, Commands and Output Data Format guide.
The Navigation data is inserted before the checksum (and reserved bytes) when
VmDas saves the ENS, ENX, STA and LTA files. Figure 25 show the sequence
in which the VmDas program creates the ENS, ENX, STA and LTA files that
make up the binary output buffer. Figure 26, page 88 shows the format of the
binary Navigation Data. Table 19, page 91 lists the format, bytes, fields, scaling factors, and a detailed description of every item in the binary navigation
output buffer.
HEADER
FIXED LEADER DATA
VARIABLE LEADER DATA
VELOCITY
CORRELATION MAGNITUDE
ECHO INTENSITY
PERCENT GOOD
Always Output
WD-command
WP-command
BP-command
BOTTOM TRACK DATA
See “Binary Navigation Data Format,” page 88
RESERVED
CHECKSUM
Always Output
Figure 25.
NAVIGATION DATA (78 BYTES)
ENS, ENX, STA and LTA Binary Output Data Format
NOTE. For a full description of the Binary Output Data Format (i.e.
Header, Fixed Leader Data, etc.), see the ADCP Technical Manual
Commands and Output Data Format guide. This guide is also available in
Adobe Acrobat Reader pdf format on RDI’s website and on the
documentation CD sent with your system.
P/N 95A-6015-00 (September 2003)
page 87
VmDas User's Guide
12.1
Binary Navigation Data Format
Figure 26.
Binary Navigation Data Format
BIT POSITIONS
BYTE
1
7
6
5
4
3
2
NAVIGATION ID
2
UTC DAY
4
UTC MONTH
6
UTC YEAR
7
8
9
0
LSB 00h
MSB 20h
3
5
1
LSB
MSB
LSB
UTC TIME OF FIRST FIX
10
MSB
11
LSB
12
13
PC CLOCK OFFSET FROM UTC
14
MSB
15
LSB
16
17
FIRST LATITUDE
18
MSB
19
LSB
20
21
FIRST LONGITUDE
22
MSB
23
LSB
24
25
UTC TIME OF LAST FIX
26
MSB
27
LSB
28
29
30
LAST LATITUDE
MSB
LSB
MSB
Continued Next Page
page 88
RD Instruments
VmDas User's Guide
Continued from Previous Page
31
32
33
LSB
LAST LONGITUDE
34
35
36
37
38
39
40
41
42
43
44
45
46
47
48
49
50
MSB
LSB
MSB
AVG SPEED
AVG TRACK TRUE
AVG TRACK MAGNETIC
SPEED MADE GOOD
DIRECTION MADE GOOD
LSB
MSB
LSB
MSB
LSB
MSB
LSB
MSB
LSB
MSB
RESERVED
FLAGS
RESERVED
51
LSB
52
53
ADCP ENSEMBLE NUMBER
54
MSB
55
56
LSB
ADCP ENSEMBLE YEAR
57
ADCP ENSEMBLE DAY
58
ADCP ENSEMBLE MONTH
MSB
59
60
61
ADCP ENSEMBLE TIME
62
63
64
LSB
PITCH
MSB
Continued Next Page
P/N 95A-6015-00 (September 2003)
page 89
VmDas User's Guide
Continued from Previous Page
65
LSB
ROLL
66
67
LSB
HEADING
68
69
70
MSB
LSB
NUMBER OF HEADING AVG
77
78
MSB
LSB
NUMBER OF MAG TRACK AVG
75
76
MSB
LSB
NUMBER OF TRUE TRACK AVG
73
74
MSB
LSB
NUMBER OF SPEED AVG
71
72
MSB
MSB
LSB
NUMBER OF PITCH/ROLL AVG
MSB
See Table 11 for description of fields
NOTE. This data is output in this format only by the VmDas program in the
STA and LTA data files.
page 90
RD Instruments
VmDas User's Guide
12.2
Navigation Data Format – Detailed Explanation
These fields contain the Navigation Data. This data is only recorded in the
STA and LTA files created by the RDI Windows software program VmDas.
The LSB is always sent first. The ADCP Technical Manual has descriptions of
commands used to set these values.
Table 19:
Binary Navigation Data Format
Hex Digit
Binary
Byte
Field
Description
1-4
1,2
ID Code
Stores the sum of velocities identification word (2000h).
5-6
3
UTC Day
This field contains the UTC Day.
7-8
4
UTC Month
This field contains the UTC Month.
9-12
5,6
UTC Year
This field contains the UTC Year, i.e. i.e. 07CF = 1999
13-20
7-10
UTC Time of
first fix
UTC time since midnight; LSB = 0.01 seconds
21-28
11-14
PC Clock
offset from
UTC
PC Time – UTC (signed); LSB = milliseconds
29-36
15-18
First Latitude
This is the first latitude position received after the previous
ADCP ping.
LSB = approx. 8E-8 deg (32-bit BAM)
In the BAM (Binary Angular Measure) format, the most significant bit of the word has a weight of 180 degrees, and you keep
dividing by 2 as you proceed to the right. The lease significant
31
bit for a 32-bit BAM is about 8E-8 arc degrees (180/2 ), or just
under 1 cm of longitudinal distance at the equator, where 1 arc
minute = 1 Nautical mile. If you interpret the BAM word as an
unsigned number, the range is 0 to (360-LSB) degrees, and if
you interpret the BAM as a signed number, the range is –180 to
180-LSB) degrees. The least significant bit for a 16-bit BAM is
15
about 0.0055 degrees (180/2 ). Some 32-bit BAM examples
are:
UNSIGNED
0x40000000
0x80000000
0xC0000000
0xFFFFFFFF
90
180
270
360
SIGNED
0x40000000
0x80000000
0xC0000000
0xFFFFFFFF
90 degrees
minus 180 degrees
minus 90 degrees
minus one LSB degrees
degrees
degrees
degrees
degrees minus one LSB degrees
37-44
19-22
First Longitude
This is the first longitude position received after the previous
ADCP ping.
45-52
23-26
UTC Time of
last fix
Time since midnight UTC; LSB = 1E-4 seconds
53-60
27-30
Last Latitude
This is the last latitude position received prior to the current
ADCP ping.
LSB = approx. 8E-8 deg (32-bit BAM)
LSB = approx. 8E-8 deg (32-bit BAM)
Continued Next Page
P/N 95A-6015-00 (September 2003)
page 91
VmDas User's Guide
Table 19:
Binary Navigation Data Format (continued)
Hex Digit
Binary
Byte
61-68
31-34
Field
Last Longitude
Description
This is the last longitude position received prior to the current
ADCP ping.
LSB = approx. 8E-8 deg (32-bit BAM)
69-72
35,36
Avg Speed
Average Navigational Speed mm/sec (signed)
73-76
37,38
Avg Track
True
Average True Navigational Ship Track Direction
Avg Track
Magnetic
Average Magnetic Navigational Ship Track Direction
77-80
81-84
39,40
41,42
Speed Made
Good (SMG)
LSB = approx. 0.0055 deg (16-bit BAM)
LSB = approx. 0.0055 deg (16-bit BAM)
Speed calculated between navigation positions. LSB = one
mm/sec (signed)
The Speed Made Good (SMG) and Direction Made Good (DMG)
quantities are calculated from the navigation fixes that enter the
system between ADCP outputs, and are calculated as follows:
IF:
aLat(i) = the average of the latitudes of the nav fixes in interval I
aLon(i) = the average of the longitudes of the nav fixes in
interval I
Ta(i) = the average of the time of validity of the nav fixes
in interval I
dLat = the difference in average latitude between averaging intervals
dLon = the difference in average longitude between averaging intervals
VelMGn (i) = the velocity made good in the East direction
for interval I
VelMGn (i) = the velocity made good in the East direction
for interval I
LatToDist (dLat) is a function that converts delta Latitude
to a distance
LonToDist (dLon) is a function that converts delta Longitude to a distance
Smg (i) = speed made good in interval i
Dmg (i) = direction made good in interval i
THEN:
dLat = (aLat (I-1) – aLat (i))
dLon = (aLon (i-1) – aLon (i))
VelMgn (i) = LatToDist (dLat) / (Ta(i-1) – Ta(i))
VelMge (i) = LonToDist (dLon) / (Ta(i-1) – Ta(i))
2
2
Smg(i) = sqrt(VelMgn(i) + VelMGe(i) )
Dmg(i) = atan(VelMge(i) / VelMGn(i))
page 92
85-88
43,44
89-92
45,46
Direction
Made Good
(DMG)
Reserved
Direction calculated between navigation positions. LSB-= approx. 0.0055 deg (16-bit BAM)
Reserved for RDI use.
RD Instruments
VmDas User's Guide
Table 19:
Binary Navigation Data Format (continued)
Hex Digit
Binary
Byte
93-96
47,48
Field
Flags
Description
Describes the validity of the data. Each bit has represents a
separate flag and has its own meaning 1=true, 0=false. The flag
bits are defined as follows:
bit 0 = Data updated
bit 1 = PSN Valid
bit 2 = Speed Valid
bit 3 = Mag Track Valid
bit 4 = True Track Valid
bit 5 = Date/Time Valid
bit 6 = SMG/DMG Valid
bit 7 = Pitch/Roll Valid
bit 8 = Heading Valid
bit 9 = ADCP Time Valid
bit 10 = Clock Offset Valid
bit 11 = Reserved
bit 12 = Reserved
bit 13 = Reserved
bit 14 = Reserved
bit 15 = Reserved
97-100
49,50
Reserved
Reserved for RDI use.
101-108
51-54
ADCP Ensemble Number
This field contains the sequential number of the ensemble to
which the data in the output buffer apply.
Scaling: LSD = 1 ensemble; Range = 1 to 4,294,967,296 ensembles
109-112
55,56
ADCP Ensemble Year
This field contains the ADCP year, i.e. 07CFH = 1999
113-114
57
ADCP Ensemble Day
This field contains the ADCP day.
115-116
58
ADCP Ensemble Day
This field contains the ADCP month.
117-124
59-62
ADCP Ensemble Time
Number of seconds since midnight; LSB=1E-4 seconds
125-128
63,64
Pitch
Pitch angle. LSB- = approx. 0.0055 deg (16-bit BAM)
Pitch is positive when bow is higher than stern.
129-132
65,66
Roll
Roll angle. LSB- = approx. 0.0055 deg (16-bit BAM)
Roll is positive when the port side is higher than the starboard
side.
133-136
67,68
Heading
Heading input. LSB- = approx. 0.0055 deg (16-bit BAM)
137-140
69,70
Number of
Speed Samples Averaged
The number of speed samples averaged since the previous
ADCP ping.
141-144
71,72
Number of
True Track
Samples Avg
The number of True Track samples averaged since the previous
ADCP ping.
145-148
73,74
Number of
Magnetic
Track Samples Avg
The number of Magnetic Track samples averaged since the
previous ADCP ping.
P/N 95A-6015-00 (September 2003)
page 93
VmDas User's Guide
Table 19:
13
Binary Navigation Data Format (continued)
Hex Digit
Binary
Byte
Field
Description
140-152
75,76
Number of
Heading
Samples Averaged
The number of Heading samples averaged since the previous
ADCP ping.
153-156
77,78
Number of
Pitch/Roll
Samples Averaged
The number of Pitch/Roll samples averaged since the previous
ADCP ping.
Software History
Version 1.40.
• Fixed the problem with the year being set to number bigger than
100.
• Changed format of displaying a date.
• Changed Copyright dates in About box.
• Fixed problem with names with too many underscores.
• Tied up Speed Log output rate to LTA.
• Fixed the problem with reprocessing that would stop at end of first
N2R file.
• Fixed problem with OS when Use Options for low-resolution mode
would send W commands instead of N commands.
• Changed the time out message for ADCP and NMEA devices.
• Changed equatorial radius and flattening to match WGS-84 standard.
• Improved speed of reprocessing the data.
• Added ability to select an ENS file to the drop down list for the
WINADCP read file selection.
• Fixed typo in WH600def.txt file.
• Added Reference Layer source selection in Speed Log output.
• Changed the names of the averaging intervals on the Averaging Tab.
• Removed the grayed out spatial averaging interval selections from
the Averaging tab.
• Removed the grayed out Application Selection items in the User Exit
tab.
page 94
RD Instruments
VmDas User's Guide
• Changed version number string to match new standard.
• Fixed the problem with program crashing when Bottom Track was
selected as reference in ASCII out and Bottom Track was not available.
• Added ability to use COM port above 9.
• Added ability to pass a file name for playback on the command line.
• Fixed problem with internal heading to be more than 360 degrees.
• Activated “Preview” button under "ADCP Setup from File" and renamed it to “View/Edit”.
• Made Reference Layer labels consistent.
• Disabled display of serial product number if not necessary.
• Added sending of “CR1” command before any other commands.
P/N 95A-6015-00 (September 2003)
page 95
VmDas User's Guide
NOTES
page 96
RD Instruments