1
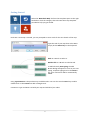
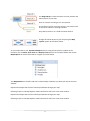
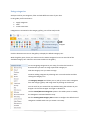
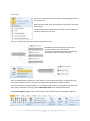
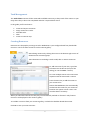
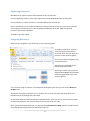
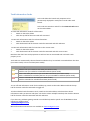
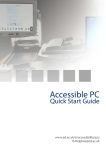
User Guide Getting Started.................................................................................................................................... 2 Using categories .................................................................................................................................. 4 Filtering ............................................................................................................................................... 5 Creating New Category Sets ............................................................................................................... 6 Task Management............................................................................................................................... 7 Creating Resources ............................................................................................................................. 7 Importing Resources ........................................................................................................................... 8 Assigning Resources ............................................................................................................................ 8 Scheduling Tasks ................................................................................................................................. 9 Task Management Filters .................................................................................................................. 10 Task Information Cards ..................................................................................................................... 11 T: +44 (0) 1355 247766 | F: +44 (0) 1355 200140 | E: [email protected] | W: www.mindgenius.com 1 Getting Started Select the ‘New Blank Map’ tile from the Templates pane on the right hand side or click the category tiles to browse the many templates provided to help you get started. Each time a new map is created, you are prompted to enter a title for the core branch of the map. Type the title of your map then select OK or simply hit the Return key on the keyboard. Click on a Branch to select it. Double click on a Branch to edit the title. To Add a branch, Start typing, the Add Branch dialog will appear as soon as you start typing, complete typing then hit the Return key. Your new branch will be automatically added. Using Type & Return is the quickest way to add branches. You can also use the Insert key to add a child branch or select Return to add a sibling branch. Continue to Type and Return to build your map and add all of your ideas. 2 Use Drag & Drop to move branches to a new position and add structure to your map. Click on a branch and drag it to a new position. As you drag a branch across the map its’ new position will be shown in relation to existing branches. Drop above, below or as a child of another branch Change the overall layout of your map using the Map Layouts option on the Home ribbon. As your map builds in size, Expand & Collapse sections using the plus/minus symbols on the branches, use the Zoom, Auto-Zoom and Display Levels options on the Home ribbon and use the Map Explorer on the left hand side to navigate your information. The Map Explorer on the left hand side is automatically created as you build you map in the main window. Expand and collapse the sections to drill up and down through your map. Selecting a topic in the Map Explorer makes that branch the focus in the main window. Expand and collapse the sections to drill up and down through your map. Selecting a topic in the Map Explorer makes that branch the focus in the main window. 3 Using categories Analysis tools let you categorize, filter and take different views of your data. In this guide you’ll learn how to: Apply categories Filter Create new views Categories are contained in the category gallery; part of the Analyze tab. Dropper Click the bottom arrow next to the gallery to display the default category sets. With the gallery open, hover your mouse over the ‘More Categories’ menu to reveal all of the available category sets. Select the set name to add it to the gallery. To start assigning categories to your map, first select the branch or branches that you want to assign a particular category to. Click the category icon you want to assign. Continue adding categories by selecting one or more branches and then clicking the category icon. The Category Dropper tool allows you to ‘pick up’ one or more categories from the category gallery and assign them by clicking on the branch. You can scroll or pan around the map without losing the selection in your dropper. Click on the Dropper Tool again to deselect it. Use the Create/Rename categories option in the Gallery menu to modify the Categories associated with this map. See the Creating New Category Sets section to configure the default set of categories available each time you create a new map. 4 Filtering Filter your map using the Analysis Filter command group found on the Analyze tab. Open the Quick Filter menu by clicking the lower half of the Quick Filter button. The Quick Filter menu automatically updates to show categories currently assigned in your map. Filter on a category by selecting it from the Quick Filter menu. MindGenius will normally apply a grey tint to branches that fail your filter criteria. You can also choose to hide them altogether by clicking the ‘Hide non-matches’ button. Clear an applied filter by clicking the ‘Clear’ button. If non-matching branches are greyed the grey tint will be removed and if non-matches are hidden they will become visible once more. Filters that combine multiple properties, e.g. categories and resources are possible using the Quick Filter Panel, accessed by selecting Launch Quick Filter Panel from the Quick Filter menu. Click Create Category map to create a new map structured and based on the applied categories. 5 Creating New Category Sets Use this section to create new category sets that will be applied to all new maps. Start creating custom categories by switching to the Tools tab and clicking the Options button. When the Options dialog is displayed, click the Categories tab. Categories are organized in to groups. Add a new group to house your custom categories by clicking the ‘Create a new category group’ link. Type a name for your custom category group and press Enter to add it to your category list. To start adding categories to your new group, select the group name from the list and then click the ‘Create a new category’ link. Add icons to your categories by selecting a category and clicking the Add Icon button. (Icons should be in Portable Network Graphics (.png) format and 16x16 pixels in size. Even the most basic graphics packages, e.g. Microsoft Paint, can create this format.) Click OK to save your custom categories. To add your custom categories to your category gallery, open the gallery, click More Categories… and select your custom group name. Applications Categories can be applied for many purposes; helping get clarity on ideas captured during a brainstorming session, reviewing documentation, identifying priorities/severities/risks, to indicate project status, etc. 6 Task Management The Tasks ribbon contains all the commands and fields necessary to keep track of the actions in your map, when they’re due to be completed and who’s responsible for them. In this guide you’ll learn how to: Create and import resources Assign resources to tasks Schedule tasks Filter Create a resource map Creating Resources Resources are the people you assign to tasks. MindGenius is pre-configured with four placeholder resources. You’ll see these resources in the resource gallery. Start editing resources by clicking the arrow in the bottom-right corner of the Resources command group. The Edit Resource List dialog is used to add, edit or remove resources. To add resources of your own, type their full name into the box at the top of the dialog. (or use the ‘New…’ button) To enter multiple names at the same time separate each full name with a comma. Press the Enter key to add the names to your resource list. Notice that MindGenius has automatically worked out the initials for your resources based on the spaces in their names. You can edit these if necessary. When you add new resources this way they’re automatically marked as ‘favorites’. Only favorite resources are displayed in the resource gallery. To exclude a resource from your resource gallery, uncheck the checkbox beside their name. Click OK to save your new resources. 7 Importing Resources MindGenius can import contacts from Outlook for use as resources. To start importing contacts, select File/ Import then select MS Outlook from the sub panel. Choose whether to import contacts or a specific address list and click OK. Place a checkmark in the checkbox beside each contact you want to import. If you want to add all your imported contacts to your resource gallery immediately, check the ‘Mark all imported resources as favorites’ checkbox. Click OK to start the import. Assigning Resources Resources are assigned to your branches via the resources gallery. To assign a resource to a branch, select one or more branches in your map, then click the name of a resource in the resource gallery. The resource will be assigned to all selected branches. Resources are displayed on the branch using their initials. Selecting a branch with a resource assigned will highlight the full name of the assigned resource(s) in the resource gallery. If you need to assign a resource in several places throughout your map you can use the Resource Dropper tool. The Resource Dropper tool allows you to ‘pick up’ one or more resources and ‘drop’ them onto branches simply by clicking over the branch. To use the dropper tool click the Resource Dropper button, then click one or more resources names in the resource gallery. You can then drop the resource(s) onto your map. Once you have assigned Resources, try selecting the Create Resource Map option to produce a new map with all tasks organized by the individual resources. 8 Scheduling Tasks Tasks can use all or a combination of the following information, set via the Task Schedule group of the Tasks tab: Property Meaning Start date The date on which your task is scheduled to start Due date The date on which your task is scheduled to end End date The date on which your task did end Percent complete The current completion state of the task in percent Priority The current priority of the task, e.g. High Status The current status of the task, e.g. In Progress Duration The length of time the task is scheduled to take To set task information for a branch you should first select the branch within the map. When one or more branches are selected the task property fields will change from being disabled (you can’t select or add information) to being enabled. To create a task in its most basic form, first set a Due date. When you add a due date a calendar icon appears on the branch. This signifies that a date has been set. You can see the date by moving your mouse over the calendar icon. Next assign a Priority value for the task. When you assign a priority value a task bar icon appears on the branch. This signifies that a priority has been set and the task has not been started. You can see the priority by moving your mouse over the task bar icon. Lastly, estimate the Duration of your task. Task durations can be specified in hours or days and can be decimal values, e.g. 1.5 days. 9 Task Management Filters Use the Task Filter section on the Tasks Ribbon to filter your map based on the task properties. Select one of the pre-defined filters from the list or select the Launch Quick Filter Panel to filter on multiple branch properties. The Launch Filter Builder allows you to build complex queries. Note: To use the ‘Tasks assigned to me’ option, you must tell MindGenius who ‘you’ are. To do that, switch to the Tools tab and click the Options button and type your full name (as it appears in the Resource list) into the Default Map Author field. MindGenius will normally apply a grey tint to branches that fail your filter criteria. You can also choose to hide them altogether by clicking the ‘Hide nonmatches’ button. Clear an applied filter by clicking the ‘Clear’ button. If non-matching branches are greyed the grey tint will be removed and if non-matches are hidden they will become visible once more. 10 Task Information Cards Task cards allow the branch task properties to be permanently displayed in small post-it cards under each branch. Task cards are turned on and off via the View Task Info menu on the Tasks ribbon: To view task information cards for all branches: • Switch to the Tasks ribbon • Click the top half of the View Task Info command To view task information cards for selected branches: • Switch to the Tasks ribbon • Click the bottom half of the View Task Info command and click Selection To view task information cards for branches in the current view: • Switch to the Tasks ribbon • Click the bottom half of the View Task Info command and click Current view Branches that don't have task properties set will not have an associated task card until a task property is set. Task cards are automatically coloured based on whether they've reached or exceeded their due date (non-Gantt mode) or their end date (Gantt mode). Colour Meaning Task has not yet reached its due date (non-Gantt mode) Task has not yet reached its scheduled end date (Gantt mode) Task is due today but has not yet exceeded its due date (non-Gantt mode). Task is scheduled to end today but has not yet exceeded its end date (Gantt mode). Task has exceeded its due date (non-Gantt mode). Task has exceeded its scheduled end date (Gantt mode) To turn off task information cards for the whole map, switch to the Tasks ribbon and click the top half of the View Task Info command to toggle off. To hide individual task information cards, switch to the Tasks ribbon, select branches whose information cards you want to hide (Use Ctrl+click to select multiple branches) then click the bottom half of the View Task Info command and click Selection. If you have any problems getting started or would like help with a specific use of MindGenius then contact our support desk. [email protected] More information and resources are available at www.mindgenius.com. 11