1
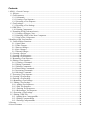
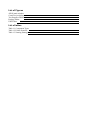
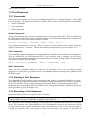
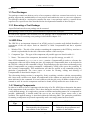
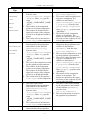
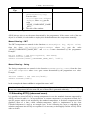
ATOSj v0.9 en
User Guide
Author: Nicos Tegos
Translated by Juliane Hüttl
Contents
1 ATOSj – General Concept ................................................................................................................. 4
1.1 Projects ....................................................................................................................................... 5
1.2 Test Sequences ........................................................................................................................... 6
1.2.1 Commands .......................................................................................................................... 6
1.2.2 Creating a Test Sequence .................................................................................................... 6
1.2.3 Executing a Test Sequence .................................................................................................. 6
1.3 Test Packages ............................................................................................................................. 7
1.3.1 Executing a Test Package .................................................................................................... 7
1.4 URF-Files ................................................................................................................................... 7
1.4.1 Naming Components .......................................................................................................... 7
1.5 Extending ATOSj (advanced users) ........................................................................................... 9
1.5.1 Creating a Wrapper Class .................................................................................................. 10
1.5.2 Notifying ATOSj of the New Component ......................................................................... 11
1.5.3 Using a New Component .................................................................................................. 11
2 Handling of the User Interface ........................................................................................................ 13
2.1 General Editor Functions ......................................................................................................... 13
2.1.1 Open Editor ....................................................................................................................... 13
2.1.2 Undo Changes ................................................................................................................... 13
2.1.3 Restore Changes ................................................................................................................ 13
2.1.4 Save Changes .................................................................................................................... 14
2.1.5 Discard Changes ............................................................................................................... 14
2.2 Creating a Project ..................................................................................................................... 14
2.3 Creating a Test Sequence ......................................................................................................... 16
2.4 Deleting a Test Sequence ......................................................................................................... 16
2.5 Renaming a Test Sequence....................................................................................................... 16
2.6 Editing a Test Sequence ........................................................................................................... 16
2.6.1 Creating a Command ........................................................................................................ 17
2.6.2 Editing Commands ............................................................................................................ 18
2.6.3 Deleting Commands .......................................................................................................... 19
2.6.4 Deactivating Commands ................................................................................................... 19
2.6.5 Activating Commands ....................................................................................................... 19
2.6.6 Moving a Command.......................................................................................................... 20
2.7 Executing a Test Sequence ....................................................................................................... 20
2.8 Creating a Test Package ........................................................................................................... 20
2.9 Deleting a Test Package ........................................................................................................... 21
2.10 Renaming a Test Package....................................................................................................... 21
2.11 Editing a Test Package ........................................................................................................... 21
2.11.1 Adding Test Sequences .................................................................................................... 22
2.11.2 Edit Test Sequence .......................................................................................................... 22
2.11.3 Deleting Test Sequences .................................................................................................. 22
2.11.4 Relocating a Test Sequence ............................................................................................. 23
2.12 Executing a Test Package ....................................................................................................... 23
2.13 Editing a URF-File ................................................................................................................. 24
2.13.1 Adding New ComponentIDs ........................................................................................... 24
2.13.2 Editing ComponentIDs ................................................................................................... 24
2.13.3 Deleting ComponentIDs ................................................................................................. 25
3 Glossary .......................................................................................................................................... 26
4 List of Literature ............................................................................................................................. 26
List of Figures
ATOSj main window
Create Project dialog
Test Sequence Editor
Package Editor
URF-Editor
List of tables
Table 1.1 Component Types
Table 1.2 Folder Structure
Table 1.3 Naming Strategy
1 ATOSj – General Concept
Repeated Testing of GUI-based systems is a complex and time-consuming process. An automated
procedure for this problem saves time and costs. ATOSj provides automation of GUI tests for Java
programs. It supports programs whose GUIs were built using the library Swing or SWT. ATOSj is
able to navigate GUI-based systems, imitating a user operating the program. Additionally, it is able
to check conditions relevant for the test and to log the entire testing procedure.
ATOSj also supports users in creating test sequences which consists of a series of commands for
controlling actions relevant for the test. Progressing test sequences can be combined in test
packages.
In order to control the test object, it is necessary to assign well-defined identifiers to each graphical
element. These identifiers are administered in a specific file, the co-called URF-file (Uniform
Resource Locator).
The following table shows all kinds of components which can be controlled by ATOSj.
Key word
Description
Graph. representation (Swing)
COMPONENT
All components not explicitly mentioned
in this list
BUTTON
Push button
COMBOBOX
Text input field combined with a select list
CHECKBOX
Selecting/ Deselecting an option
EDITBOX
Text input field
LABEL
Non-editable field for text presentation
LIST
Select list
MENU
Hierarchically ordered push buttons
RADIOBUTTON
Selecting an option, only one button per
group may be selected
TABFOLDER
Tab
TABLE
Table with possibility of selection and
editing of entries
4
1 ATOSj – General Concept
Key word
Description
Graph. representation (Swing)
TREE
Hierarchically ordered entries with
possibility of selection
WINDOW
All windows and dialogs
Table 1.1 component types
1.1 Projects
The first step to testing a program always is creating a project as described in chapter 2.2. In an
ATOSj project all data relevant for the test are administered. Technically a project is a directory
structured as follows:
Directory
Files
Description
Project directory
Project file
backup
(.apf)
(.bak)
The project directory is named after the
project name and consists of the project file
(<project name>.apf), the security backup
(<project name>.bak) and any other
directories.
SEQ
Test sequences
Test packages
(.seq)
(.pak)
This directory holds all files for test
sequences and test packages.
URF
URF file
(.urf)
This directory contains the URF file
(<project name>.urf) of the project. All
well-defined identifiers of the components
of the test object are enclosed in this file.
LOG
Report files
(.pdf)
This directory consists of all reports
generated during the execution of test
sequences or test packages. These can be
read e.g. with AcrobatReader.
BIN
Test-accompanying
programs
External programs needed during the test
can be stored here. Starting the program
works with the command LAUNCH.
ENV
Environmental files
This directory holds all files necessary to
initialize the test object in a defined original
state before starting a test run. The files
may then be copied into the desired
directory via the command COPY.
REF
Reference files
Here are all files for potential file
comparisons stored. A file comparison is
not implemented in ATOSj and must be
executed by an external program.
EXT
Configuration
library
Custom.lst All files for extending the support of
ext.jar
components can be stored here. The
detailed description of this procedure
follows in chapter 1.5.
5
1 ATOSj – General Concept
Table 1.2 directory structure
1.2 Test Sequences
1.2.1 Commands
A test sequences consists of a series of commands composed in a scripting language – HTS (High
Level Testscript) – developed specifically for ATOSj. There are three main categories of commands:
1. Action Commands
2. Test Commands
3. Other Commands
Action Commands
Action commands provide a means of simulating user interaction on the GUI. They are defined by
the HTS-command ACTION. Several semantic actions are possible depending on the component to
be manipulated. A text field could be edited as follows:
ACTION, “Customer”, EDITBOX, “name”, EDIT, “Nicos”
The example command writes the text “Nicos” into the text field with the name “name” inside the
window with the title “Customer”. Details about naming components are given in chapter 1.4.1.
Test Commands
Test commands support matching the nominal conditions with the actual conditions of components.
They are defined by the HTS-command TEST. An accordant error is signaled on test failure.
Several tests are possible depending on the components to be tested. Testing whether a radio button
was selected could be done as follows:
TEST, “Customer”, CHECKBOX, “male”, CHECKSTATE, TRUE.
Other Commands
There are more commands which are useful for the execution of test, e.g. for starting external
programs or copying files. A complete list of all commands and their meaning can be gathered from
the HTS-syntax.
1.2.2 Creating a Test Sequence
The commands of a test sequence can be entered by hand. However, since this method is very timeconsuming ATOSj offers the capturing of commands. Capturing means that the test object is started
by the user and then ATOSj records all actions executed by the user, transforming them to HTScommands. The commands ACTION and TEST can be created automatically. A detailed description
of the procedure is given in chapter 2.6.1.
1.2.3 Executing a Test Sequence
A specified and error-free test sequence can be executed.
A test sequence will be error-free, if all included commands comply with the HTS-syntax and all
ComponentIDs used in the commands are defined in the URF-file.
The interpreter of the scripting language HTS executes all commands and informs the user about
errors. The execution can be documented in a file. Evaluating the results of the execution is left to
the user. The user has to check whether the reason for signaled errors are errors in the test object or
a faulty test sequence. The exact course of action for executing a test sequence is described in
6
1 ATOSj – General Concept
chapter 2.7.
1.3 Test Packages
Test packages contain an arbitrary series of test sequences which are executed successively. A test
package supports the modularization of test projects and enables the user to reuse test sequences.
Test packages should be employed to structure the tests. A test package could e.g. contain all test
sequences for a specific use case described in the development documents of the test object.
1.3.1 Executing a Test Package
A specified and error-free test package can be executed.
A test package will be error-free, if all included test sequences are error-free.
As with a test sequence, the execution of a test package can be documented in a file. The exact
course of action for executing a test package is described in chapter 2.12
1.4 URF-Files
The URF-file is an important element of an ATOSj project. It contains well-defined identifiers of
components of the test object. Such an identifier is called ComponentID and has a tripartite
structure:
1. Window Title – The title of the window containing the component or the HTS-key word MAIN
which is a placeholder for the title of the main window of the test object.
2. Component Type – The type of the component, all possible types are listed in table 1.1.
3. Name – The name of the component, determined via a specific strategy, see table 1.3.
Some HTS-commands, e.g. ACTION or TEST, contain a ComponentID in order to reference the
components of the test object during run time. All employed ComponentIDs have to be included in
the URF-file, otherwise the command is illegal. This method prevents users from accidentally using
faulty ComponentIDs on creating commands. Additionally, ATOSj offers users the possibility to
edit existent ComponentIDs. This modification will then be applied to all commands using the
particular ComponentID. The exact course of action for creating, editing and deleting of
ComponentIDs is described in chapter 2.13.
The referencing during run time is arranged by, firstly, searching a window with the corresponding
title. Once such a window was found, all components of the window are analyzed for the type and
name indicated in the command. If several windows with the title exist, all further windows will be
scanned as well. In case the component could not be found, ATOSj notifies the user of this error.
1.4.1 Naming Components
In order to be able to find a Component with the help of its ID, ATOSj has to determine the names
of the components of the test object. This is done during the run time of the test object according to
a well-defined strategy. It is supposed to generate as distinct and striking names for a component as
possible. Additionally, it should enable the user to use test objects whose source code is not
available. The applied strategy is described within the following table. The particular possibilities
for naming a component are perused sequentially until a non-empty name has been found.
Component
Type
COMPONENT
SWT
SWING
1. The name of the component.
Determined by the programmer
and callable via the function
7
1. The name of the component.
Defined by the programmer and
callable via the function
1 ATOSj – General Concept
Component
Type
EDITBOX
SWT
COMBOBOX
LIST
TABLE
TREE
2.
TABFOLDER
3.
LABEL
1.
RADIOBUTTON
CHECKBOX
BUTTON
2.
3.
4.
MENU
WINDOW
SWING
getData(String key)
from the class
org.eclipse.swt.widgets
.Widget, where key gets the
value
“ATOSJ_COMPONENT_NAME
_KEY”.
The borders of the component
relative to its parent component.
The borders are defined by the
upper left corner of the compent
as well as its height and width in
pixels.
The return value of the function
toString() of the component
The name of the component.
Determined by the programmer
and callable via the function
getData(String key)
from the class
org.eclipse.swt.widgets
.Widget, where key gets the
value
“ATOSJ_COMPONENT_NAME
_KEY”.
The text of the component as used
for the graphical representation.
The borders of the component
relative to its parent component.
The borders are defined by the
upper left corner of the compent
as well as its height and width.
The return value of the function
toString() of the component
2.
3.
1.
2.
3.
4.
getName() from the class
java.awt.Component.
The text of a label assigned to the
respective component. It is
callable via the function
getClientProperty(Objec
t property) from the class
javax.swing.JComponent,
where property gets the value
“labeledBy”.
The borders of the component
relative to its window. The
borders are defined by the upper
left corner of the compent as well
as its height and width.
The name of the component.
Defined by the programmer and
callable via the function
getName() from the class
java.awt.Component.
The text of the component as used
for the graphical representation.
The text of a label assigned to the
respective component. It is
callable via the function
getClientProperty(Objec
t property) from the class
javax.swing.JComponent,
where property gets the value
“labeledBy”.
The borders of the component
relative to its window. The
borders are defined by the upper
left corner of the compent as well
as its height and width.
The name of the menu. Defined
by the programmer and callable
via the function getName()
from the class
java.awt.Component.
The text of the menu as used for
the graphical representation.
1. The name of the menu.
1.
Determined by the programmer
and callable via the function
getData(String key)
from the class
org.eclipse.swt.widgets 2.
.Widget, where key gets the
value
“ATOSJ_COMPONENT_NAME
_KEY”.
2. The return value of the function
toString() of the component
1. The name of the window.
1. The title of the window.
Determined by the programmer
8
1 ATOSj – General Concept
Component
Type
SWT
SWING
and callable via the function
getData(String key)
from the class
org.eclipse.swt.widgets
.Widget, where key gets the
value
“ATOSJ_COMPONENT_NAME
_KEY”.
2. The title of the window.
Table 1.3 Naming Strategy
ATOSj always tries to use the name determined by the programmer. If the source code of the test
objects is available, it is advisable to employ this method and name the components manually.
Manual Naming - SWT
The SWT components are named via the function setData(Object key, Object value)
from the class org.eclipse.widgets.Widget where key gets the value
“ATOSJ_COMPONENT_NAME_KEY” and value a name determined by the programmer.
Example:
…
Button addBtn = new Button(parent, SWT.PUSH);
addBtn.setText(“Add”);
addBtn.setDATA(“ATOSJ_COMPONENT_NAME_KEY”, “add”);
…
Manual Naming – Swing
The Swing components are named via the function setName(String name) from the class
java.awt.Component where name gets a name determined by the programmer as a value.
Example:
…
JButton addBtn = new JButton(“Add”);
addBtn.setName(“add”);
…
In the examples the button addBtn is assigned the name “add”.
Mind that distinct IDs are generated in combination with the window title and the component types.
In case two components have the same ID, one of those IDs is generated arbitrarily.
1.5 Extending ATOSj (advanced users)
It is possible to extend ATOSj by custom components in case the standard elements supported by
ATOSj, as listed in table 1.1, are not sufficient. A custom component is a component created for a
specific purpose which is not satisfied by the standard components. A fictitious component for the
graphical input of a date, called calendar-component, which is implemented in the class
CalenderComponent is used as an example here. In the following the steps to embedding the
calendar-component into ATOSj are explained. It is necessary to thoroughly read the ATOSj API in
order to do this.
9
1 ATOSj – General Concept
1. Creating a wrapper class for the actual GUI class
2. Notifying ATOSj of the new component
3. Usage in commands
1.5.1 Creating a Wrapper Class
At first, it is necessary to create a wrapper class for your custom component. For this, you need to
create a new Java project using the library of the test object and the library atosj.jar. Set the class
path accordingly.
•
Create a new class, in our example it is called CalendarWrapper
Please note that the custom component needs to directly descend from the respective GUI
library, e.g. javax.swing.JComponent.
•
•
•
•
Swing: Derivate the class directly from atosj.component.swing.
SwingComponent or any subclass of atosj.swt.SWTComponent.
•
SWT:
Derivate
the
class
directly
from
atosj.component.swt.
SWTComponent or any subclass of atosj.swt.SWTComponent
Re-implement the function setProperty(String property, String value)
from the base class of CalendarWrapper. This function is intended specific values by
simulating user inputs.
•
Define legal properties, in our example this is the property “date”. For any illegal
property an atosj.exception.ComponentException has to be thrown.
•
Define legal values for each property, in our example legal values for the property “date”
are strings of the format DD.MM.YYYY. For all illegal values an
atosj.exception.ComponentException has to be thrown.
•
Implement the setting of a value. Setting a value should only be achieved by simulating
user inputs, meaning by key-press or mouse-click. For this the functions pressKey and
click exist in the base class of CalendarWrapper. These should be used, if possible.
You are free to use the pre-defined wrapper classes for using standard components in the
custom component. For example, the class atosj.component.swing.
SwingTestComponent could be used to set the text for an instance of the class
javax.swing.JTextField.
Re-implement the function getProperty(String property) from the base class of
CalendarWrapper. This function’s purpose is identifying current values/states of the
calendar-component.
•
Define legal properties, in our example this is the property “date”. For all illegal
properties an atosj.exception.ComponentException has to be thrown.
•
Implement the reading-out of a value. In our case, the currently set date “date” is
supposed to be read. Return the read value as java.lang.String, e.g. “24.16.2006”.
Create another class CalendarWrapperCommandCreator. This could be a private inner
class of the class CalendarWrapper. It is supposed to enable recording user actions on the
calendar-component.
•
Derivate
the
class
CalendarWrapperCommandCreator
CommandCreator class, the base class of CalendarWrapper.
10
from
the
1 ATOSj – General Concept
•
•
Re-implement the function getTestCommands(). This function returns a vector
containing all test commands for the calendar-component. The calendar-component
could, e.g., be tested on visibility or a comparison of the nominal value of the current
date could be executed. Use the function createTestCommand(String state,
Vector stateParameters, Vector subitemPath) for generating test
commands.
•
Supervise all changes of the calendar-component done by the user and generate an
ACTION command for these. For example, ATOSj could be notifies of changes of the
date
in
the
calendar-component.
Use
the
function
publishActionCommand(String
actionType,
Vector
actionParameters, Vector subitemPath) for creating and notifying ATOSj
of ACTION commands.
Re-implement
the
function
initCommandCreator(IHTSCommandReceiver
receiver).
This
function’s
purpose
is
to
initialize
the
CalendarWrapperCommandCreator you created. This means you need to return a new
instance of CalendarWrapperCommandCreator.
After doing all this, you have finished implementing the wrapper class. A complete
implementation of an example for a wrapper class can be found in the sources of ATOSj inside
the package atosj.sampleapp.custom where you should look at the class
DateWidgetWrapper.
1.5.2 Notifying ATOSj of the New Component
After creating the wrapper class for the custom component, you have to notify ATOSj of this class
in order to be able to use it in commands. For this you create the file custom.lst in the directory
EXT of your ATOSj project.
Include a line of the following format into the file for each wrapper class you created:
COMPONENT, <TYPE NAME>, <WRAPPER CLASS>, <CUSTOM CLASS>
<TYPENAME>
determines the type name for the custom component which will then
be used in the HTS commands. The type name is an abstraction which
needs to be well-defined inside the used GUI library.
<WRAPPER CLASS>
is the complete qualified name of the wrapper class for the class of the
custom component.
<CUSTOM CLASS>
is the complete qualified name of the clas of the custom component
which has to be a derivate of the base class of the GUI library.
So, for our calendar-component, the line has to look like this:
COMPONENT, CALENDAR, CalendarComponentWrapper, CalendarComponent
After creating the file custom.lst, include all wrapper classes into a jar-file with the name ext.jar and
put it into the directory EXT of your ATOSj project.
1.5.3 Using a New Component
The custom component can now, after finishing steps one and two, be used with the commands of
ATOSj. Following are two examples for setting and testing of properties of the calendar-component:
ACTION, “customer”, CALENDAR, “birth.dat.”, PROPERTY, “date”,
“24.07.1981”
11
1 ATOSj – General Concept
TEST, “customer”, CALENDAR, “birth.dat.”, PROPERTY, “date”,
“24.07.1981”
12
2 Handling of the User Interface
This chapter presents all important functions of the user interface of ATOSj. The following picture
shows the main window of ATOSj in the project view.
Figure 2.1 ATOSj main window
2.1 General Editor Functions
This section describes the functions which can be executed for all editors similarly.
2.1.1 Open Editor
Opening an editor works the same way for all resources, i.e. for test sequences, test packages and
the URF-file. In order to open the editor, double-click on the resource in the navigator.
2.1.2 Undo Changes
You can make changes on all resources (test sequences, test packages, URF-file). Should you
realize that you made a mistake, you have the possibility to undo the last five changes.
•
The precondition is that all changes have been carried out inside the current editor.
•
Three options:
1. Click the button Undo (3) on the button panel of the main window.
2. Choose the option Undo of the menu Edit of the main window.
3. Push the keys “Ctrl” and “Z” at the same time.
•
Your last change inside the current editor will be undone and the preceding state reinstated.
2.1.3 Restore Changes
You can make changes on all resources (test sequences, test packages, URF-file). It is possible to
undo these changes as described in chapter 2.1.2. Analogically, you can restore undone changes.
•
Precondition is that all changes have been carried out inside the current editor.
•
Three options:
1. Click the button Restore (4) on the button panel of the main window.
2. Choose the option Restore of the menu Edit of the main window.
3. Push the keys “Ctrl” and “Y” at the same time.
•
Your last change will be reversed and the preceding state reinstated.
13
2 Handling of the User Interface
2.1.4 Save Changes
You can make changes on all resources (test sequences, test packages, URF-file). In order to
explicitly set these changes, you need to choose one of the following options.
•
Precondition is that all changes have been carried out inside the current editor.
•
Three options:
1. Click the button Save Changes (1) on the button panel of the main window.
2. Choose the option Save of the menu Edit of the main window.
3. Push the keys “Ctrl” and “S” at the same time.
•
Your last changes inside the current editor will be saved.
2.1.5 Discard Changes
You can make changes on all resources (test sequences, test packages, URF-file). Should you
realize that you made a mistake, you have the possibility to discard these changes, i.e. reinstate the
last saved state.
•
Precondition is that all changes have been carried out inside the current editor.
•
Three options:
1. Click the button Discard on the button panel of the main window.
2. Choose the option Discard of the menu Edit of the main window.
3. Push the key “Ctrl” and “W” at the same time.
•
Your last change will be undone and the preceding state reinstated.
2.2 Creating a Project
This section indicates how you can create a new test project.
•
Two options:
1. Choose the option New… of the menu File.
2. Choose the button Create Project on the start screen.
•
The dialog Create Project appears.
14
2 Handling of the User Interface
Figure 2.2 Create Project Dialog
•
Choose the project type (1), two options:
1. Swing for test objects whose GUI has been created using the library Swing.
2. SWT for test objects whose GUI has been created using the library SWT.
•
Indicate the name (2) of the new project. This will also be the name of the project directory and
the project file created inside the project directory.
•
Choose the location (directory) (3) for the project. The project directory will then be created
inside the directory indicated.
•
You have to indicate the main class (4) of the test object. This must be the fully qualified name
of the class containing the main function for starting the test object.
•
The directory (5) where the test object should be executed has to be specified. The test object
will be executed here during all tests. You should see that all native libraries which might be
used by your test object during run time, e.g. files ending on “dll” in windows systems, are
either located in the execution directory or the operating system’s search path for run time
libraries.
•
Specify the title of the main window (6) of the test object. ATOSj requires the title of the main
window in order to verify the start of the test object. If the main window does not appear within
20 seconds after starting the test object, an error will be reported.
•
Determine the class path (7) for the test object. All directories and libraries (jar-files) necessary
for starting the test object have to be indicated here. Missing entries will likely lead to the
exception java.lang.ClassNotFoundException during the test object’s run time.
•
Clicking the button Start (8) will start the test object on a trial basis. In case the start fails, you
should check the specifications regarding the test object (main class, main window, execution
directory, class path).
•
Click the button Create (9).
15
2 Handling of the User Interface
•
The project will be created and the project view opened.
2.3 Creating a Test Sequence
This section describes how you can add a test sequence to the project.
•
Right-click the directory Test Sequences in the navigator. A context menu will appear. Here you
have to choose the option New Test Sequence.
•
The dialog Create Test Sequence will appear.
o Enter the name of the test sequence and click OK.
The name of test sequence has to be a valid file name and must not be used by another
test sequence. When working with different operating systems you should see that the
names of the test sequences is portable between them.
•
The test sequences will be created. It will appear as an entry inside the Navigator and the editor
of the test sequences will be opened. The test sequence will still be empty.
2.4 Deleting a Test Sequence
This section describes deleting a test sequence from a project.
•
Right-click the test sequence you would like to delete in the Navigator. A context menu will
apear. Here you should choose the option delete.
•
The dialog Delete Test Sequence will appear.
o Click Yes.
•
The test sequence will be deleted. The test sequence will also be deleted from all packages using
this test sequence.
Mind that the test sequence will be deleted from all packages using it. You will have to check
whether the test packages would still fulfill the intended purpose after that.
Also note that deleting a test sequence cannot be undone.
2.5 Renaming a Test Sequence
This section shows you how to change the name of a test sequence.
•
Right-click the particular test sequence in the Navigator. A context menu will appear. Choose
the option Rename here.
•
The dialog Rename Test Sequence will appear.
o Enter the new name of the test sequence and click OK. The name may not be used by
another test sequence.
•
The test sequence will be renamed.
2.6 Editing a Test Sequence
This section describes how to edit a test sequence with the help of the Test Sequence Editor.
•
Double-click the respective test sequence in the navigator.
•
The Test Seqeuence Editor will open.
16
2 Handling of the User Interface
Figure 2.3 Test Sequence Editor
2.6.1 Creating a Command
This section explains how to add a new command to a test sequence.
Manually for Beginners
A command can be entered via a graphical dialog which can be operated in a very intuitive manner
and requires very little proficiency in the employed scripting language [HTS06].
•
There are three options available:
1. Click the button Add Command (1).
2. Right-click the command table (12) and choose the option Add Command from the context
menu.
3. Click on the command table (12) and push the keys “Ctrl” and “N” at the same time.
•
The dialog Add Command will appear.
o Enter the parameters for the command.
o Choose the location where the command is supposed to be inserted.
o Click the button Add.
•
The new command will appear at the chosen position (11) in the command table.
Manually for Advanced Users
In contrast to creating a command the beginner’s way, a command is not specified using graphical
elements but in a strictly textual notation. Therefore you should be familiar with the syntax of the
scripting language HTS [HTS06], in case you choose this way of creating a command.
•
There are two options available:
1. Right-click the command table and choose the option Add Command (adv.) from the context
menu.
2. Click on the command table and push the keys “Alt” and “N” at the same time.
•
The dialog Add Command will appear.
o Enter the command in its full textual notation.
o Choose the position where the command should be inserted.
17
2 Handling of the User Interface
o Click the button Add.
•
The new command appears at the indicated position.
Automatically via Capture
You can not only add commands manually but also directly transform your actions on the test object
into HTS commands in order to speed up the creating of test sequences.
•
Click the button Start Recording (8).
•
The test object will be started.
•
For all actions you carry out on the interface of the test object an analogous ACTION command
will be added into the test sequence, if one exists.
•
If you want to avoid recording certain actions, you will have to click the button Pause (9). Click
the button again in order to resume recording.
•
It is also possible to generate TEST commands automatically.
o Push the key “Ctrl” and right-click a component at the same time.
o The dialog Create Test Command will appear.
o From the list you can choose all conditions of the component for which you want to
execute a comparison with the nominal value.
o Click OK.
•
The TEST commands will be added to the test sequence.
•
Exit the test object or click the button Start Recording (8) again.
2.6.2 Editing Commands
This section describes how to edit existing commands.
For Beginners
The command can be edited via the same graphical dialog that is also used for creating a command.
This dialog can be operated in an intuitive manner and requires only little proficiency of the used
scripting language [HTS06].
•
Choose exactly one command from the table. The command has to be legal!
•
Three possibilities:
1. Click the button Edit Command (2).
2. Right-click the command table (12) and choose the option Edit Command from the context
menu.
3. Push the keys “Ctrl” and “E” at the same time.
•
The dialog Edit Command will appear.
o Enter the changes for the command.
o Click the button Add.
•
The command will be changed as indicated.
For Advanced Users
In contrast to editing a command the beginner’s way, a command is not specified using graphical
18
2 Handling of the User Interface
elements but in a strictly textual notation. Therefore you should be familiar with the syntax of the
scripting language HTS [HTS06], in case you choose this way of editing a command.
•
Choose the entry from the command table.
•
Two option:
1. Right-click the command table (12) and choose the option Edit Command (adv.) from the
context menu of the command table.
2. Push the keys “Alt” and “E” at the same time.
•
The dialog Edit Command will appear.
o Enter your changes for the command in textual notation.
o Click the button Add.
•
The command will be changed accordingly.
2.6.3 Deleting Commands
This section describes how to delete existing commands from a test sequence.
•
Select one or more entries from the command table.
•
Three options:
1. Click the button Delete Commands (3).
2. Right-click the command table (12) and choose the option Delete Command from the
context menu of the command table.
3. Push the key “Entf”.
•
The selected commands will be deleted.
2.6.4 Deactivating Commands
This section shows how to deactivate commands. Deactivated commands will not be executed
during the test. If you want to temporarily prevent a command from being executed, you have the
possibility to deactivate instead of deleting the command.
•
Select one or more entries from the command table.
•
Two options:
1. Right-click the command table (12) and choose the option Deactivate Command from
the context menu of the command table
2. Push the keys “Ctrl” and “D” at the same time.
•
The selected commands will be deactivated.
2.6.5 Activating Commands
This section explains how to activate commands that have been deactivated.
•
Choose one or more entries from the command table.
•
Two options:
1. Right-click the command table (12) and choose the option Activate Command from the
context menu of the command table.
2. Push the keys “Ctrl” and “A” at the same time.
19
2 Handling of the User Interface
•
The selected commands will be activated.
2.6.6 Moving a Command
This section describes how to change the position of a command within a test sequence.
•
Select an entry from the command table (12).
•
You have the possibility to move a command
o one position up (5)
o one position down (6)
o to the beginning of the test sequence (4)
o to the end of the test sequence (7)
•
Two possibilities:
1. Right-click the command table (12) and choose the respective option from the menu.
2. Click the button on the button panel to the right side of the command table.
•
The selected command will be moved.
2.7 Executing a Test Sequence
This section explains how to execute a test sequence. The test sequence must be error-free.
•
Right-click the desired test sequence in the navigator. Choose the option Start from the
appearing context menu.
•
The dialog Execute Test Sequence will appear.
o If you put a tick on the option Stop on Error, the test sequence will be terminated on the first
emerging error. This option is especially sensible in case the failing of a command could
lead to subsequent errors.
o If you put a tick on the option Create Log File, a log file will be created inside the directory
LOG after the test sequence has been terminated. The log file is of the format <test sequence
name> DD.MM.YYYY HH.MM.SS.pdf
o Enter a time duration into the field Delay in ms. After each execution of a command there
will be a delay of this duration. This option is especially sensible for being able to closely
follow the test run.
o Click the button Start in order to start the test run.
o After the test sequence has been terminated you can click the button Return in order to view
the test log. This button will only be activated if you have selected the option Create Log
File beforehand.
o Close the dialog Start Test Sequence by clicking the button Abort.
•
The project view of ATOSj appears again.
2.8 Creating a Test Package
This section describes how to add a Test Package to a project. A Test Package can contain several
Test Sequences.
•
Right-click the folder Test Packages in the navigator. A context menu appears. Choose the point
New Test Package.
20
2 Handling of the User Interface
•
The dialog Create Test Package appears.
o Enter the name of the Test Package and push OK.
The name of the Test Package has to be a legal file name and may not already be used by
a different Test Package. When working on different operating systems it is essential to
choose a portable name for the Test Package.
•
In the Navigator the name of the Test Package appears and the respective Editor is opened. The
Test Package is still empty.
2.9 Deleting a Test Package
In the following section the process of deleting a Test Package from the project is described.
•
Right-click the Test Package to be deleted in the navigator. A context menu appears. Here you
have to choose the option Delete.
•
The dialog Delete Test Package appears.
o Choose Yes.
•
The test package will be deleted.
Mind that deleting a Test Package is irreversible.
2.10 Renaming a Test Package
In this section it is demonstrated how to change the name of a Test Package.
•
Right-click the respective Test Package in the navigator. A context menu appears. Choose the
point Rename.
•
The dialog Rename Test Package appears.
o Enter the new name of the Test Package and push OK. No other Test Package may
already use this name.
•
The Test Package will be renamed.
2.11 Editing a Test Package
This section describes how to edit an existing Test Package with the help of the Package Editor.
•
Double-click the respective Test Package in the navigator.
•
The Package Editor appears.
21
2 Handling of the User Interface
Figure 2.4 Package Editor
2.11.1 Adding Test Sequences
This subsection describes how to add a Test Sequence to a Test Package.
•
There are three possibilities:
1. Click the button Add Test Sequence (1).
2. Right-click the table (10) and choose the option Add Test Sequence from the context
menu.
3. Click the table while pushing the keys “Ctrl” and “N” at the same time.
•
The dialog Add Test Sequence appears.
o Put a tick on all Test Sequences you would like to add to the Test Package. It is possible
to include a Test Sequence in several Test Packages.
o Choose the position where you would like to add the Test Sequence in the Test Package.
o Push the button Add.
•
The new Test Sequences appear at the indicated position (9) in the table.
2.11.2 Edit Test Sequence
It is possible to open the Test Sequence Editor directly from the Package Editor. In order to do this
you have to double-click the column Test Sequence (10) of the respective Test Sequence or select a
Test Sequence and click the button Edit Test Sequence (2)
2.11.3 Deleting Test Sequences
This section describes how to delete one or several Test Sequences from a Package.
•
Select one or several entries from the table with the Test Sequences.
•
There are three possibilities:
1. Click the button Delete Test Sequences (3).
2. Right-click the table (10) and select the option Delete Test Sequences from the context menu.
22
2 Handling of the User Interface
3. Push the key “Del”
•
The selected Test Sequences will be deleted.
2.11.4 Relocating a Test Sequence
Changing the position of a Test Sequence in a Test Package is demonstrated in this section.
Choose an entry from the table with the Test Sequences.
You may move a Test Sequence:
one position up (5)
one position down (6)
to the start of the Test Package (4)
to the end of the Test Package (7)
There are two possibilities:
Right-click the table (10) and choose the corresponding option from the context menu.
Push the according button on the button panel at the right side of the command table.
The selected Test Sequence will be relocated.
2.12 Executing a Test Package
In this section it is shown how to execute a Test Package. The Test Package must be error-free.
•
Right-click the Test Package to be executed in the navigator. A context menu appears. Choose
the option Start.
•
The dialog Start Test Package appears.
o Put a tick on the option Halt Test Sequence on error in order to abort the current Test
Sequence on the first error to occur. This option especially makes sense, if a failing
command produces consecutive faults.
o If you put a tick on the option Create Log File, a log file will be created in the folder
LOG after terminating the Test Package. The log file has the format <Test Package
Name> DD.MM.YYYY HH.MM.SS.pdf
o Enter a time in milliseconds in the field delay in ms. After each command has been
executed, there will be a delay of the indicated duration. This option is helpful in order
to be able to closely observe the test run.
o If you put a tick on the option Abort Test Package on fault in Test Sequence, the
execution of the whole Test Package will be aborted after a fault occurred in a Test
Sequence.
o Push the button Start in order to start the test run.
o After the Test Package has been terminated, you can have the log file displayed by
clicking the button Report. This button will only be activated, if the option Create Log
File has been selected.
o Close the dialog Start Test Package by clicking Abort.
•
The project view of ATOSj appears again.
23
2 Handling of the User Interface
2.13 Editing a URF-File
This section describes how to edit a URF-file with the help of the URF-Editor.
•
Double-click the URF-File in the Navigator.
•
The URF-Editor appears.
Fig. 2.5 URF-Editor
2.13.1 Adding New ComponentIDs
This section demonstrates how to add ComponentIDs to a URF-file.
Manually
•
There are three possibilities:
1. Click the button Add ID (1).
2. Right-click the ID-table (7) and choose the option Add from the context menu.
3. Click on the ID-table (7) and push the keys Strg and ‘N’ at the same time.
•
The dialog Create ID appears.
o Enter the title of the window.
o Enter the name of the element.
o Choose a type of element from the list.
o Push the button OK.
Mind that the window and element titles of WINDOW-type components have to be
identical.
•
The new ID will be added to the URF-file unless it already exists.
Automatically via Recording
It is also possible to add URF-files automatically. In order to do this, the test object needs to be
started. On opening a window, an ID for each component inside the window is generated.
•
There are two possibilities:
1. Push the button Start Recording (5).
2. Right-click the ID-table (7) and choose the option Start Recording from the context menu.
•
The test object will be started.
•
Open all windows for whose components you would like to have new IDs generated.
•
The new IDs will be added to the URF-file. Preexisting IDs will be preserved.
Mind that IDs are only generated for components that have actually been created on opening a
window. Components which are created dynamically at a later point will not be considered.
•
Close the test object or push the button Stop Recording (5) or choose the respective option from
the context menu of the ID-table.
2.13.2 Editing ComponentIDs
This section describes how to edit existing ComponentIDs. The modification will be adopted by all
commands using the respective ID.
24
2 Handling of the User Interface
•
Choose exactly one ID from the table (7).
•
There are three possibilities:
1. Push the button Edit ID (2).
2. Right-click on the ID-table (7) and choose the option Edit ID from the context menu.
3. Push the keys Strg and ‘E’ at the same time.
•
The dialog Edit ID appears.
o Enter your modifications for the ID.
o Push the button OK.
•
The ID will be changed accordingly. Then the URF-file will be saved and all modifications will
be adopted by the commands using the ID.
2.13.3 Deleting ComponentIDs
This section shows how to delete one or several IDs from the URF-file.
•
Choose one or several entries from the table (7).
•
There are three possibilities:
1. Push the button Delete IDs (3).
2. Right-click the table (7) and choose the option Delete IDs from the context menu.
3. Push the key Del.
•
The marked IDs will be deleted.
Mind that deleting IDs which are still being used in commands will render these commands
illegal.
25
3 Glossary
Component
General expression for an element of the graphical user interface, e.g. a push
button. The term derives from the base class of all graphical elements in
AWT/Swing java.awt.Component.
GUI
Abbr. Graphical User Interface.
Test Object
The program to be tested with ATOSj.
Wrapper Class
A Java class containing an object of anther class. The wrapper class provides a
modified interface for partial or full functionality of the contained object.
4 List of Literature
HTS06: Nicos Tegos, HTS2.0 Syntax, 2006.
26