1
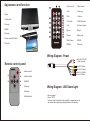
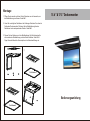
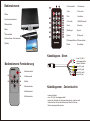
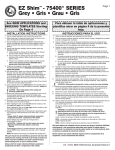
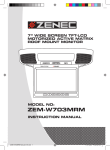
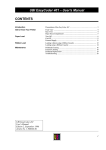
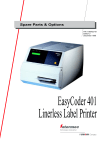
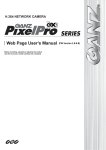
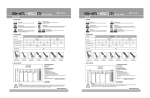
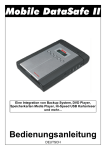
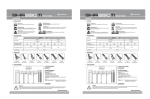
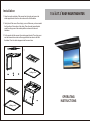
Installation
1. Open the monitor and take off the screws from the inside and remove the
metal support bracket from the unit as shown in the first illustration.
〃
〃
15.6&17.3ROOFMOUNTMONITOR
2. Carely take off the cover of the ceiling in your car. Make sure you have marked
the fix position of the monitor at the ceiling. Place the metal support bracket
under the ceiling cover at the marked position as shown in the second
illustration.
3. Fix the monitor with the screws to the metal support bracket. The ceiling cover
must be between the monitor and the support bracket as shown in the third
illustration. Place the rubber stoppers inside the screw holes.
①
③
ceiling cover
②
OPERATING
INSTRUCTIONS
ceiling cover
Appearanceandfunction
①.Open
②.Light switch
③.Analog+
④.MENU
①
②③④ ⑤⑥
⑤.Analog⑥.Power switch/AV Switch
⑦.Standby
①Power on/off
②Back rewind
③Left
④Last song
⑤Exit
⑥Volume-
⑦AV switch
⑧USB/SD switch
⑨Up
⑩Forward rewind
⑪Enter
⑫Right
⑬Down
⑭Next song
⑮Play/Pause
⑯MUTE
⑰MENU
⑱Volume+
⑦
Wiring Diagram - Power
Fuse
Remote control panel
❶
❶Power on/off
❸
❷
❷Video Switch
❹
❺
❸MENU
❻
❹Analog-
Red to 12V (24V) DC
Black to ground
Video IN 1 (Yellow)
Video IN 2 (Yellow)
Audio IN L (White)
Audio IN R (Red)
Wiring Diagram - LED Dome Light
❺Analog+
❻Mode Switch
- Black to ground
- Red to 12V DC
- Yellow to Power On switch for Interior light (if no connection you can
also activate dome lights by pressing the button on the monitor)
Montage
1. Öffnen Sie den monitor und lösen Sie die Schrauben von der Innenseite, um
die Metallhalterung zu entfernen. Siehe Bild 1.
15.6 " & 17.3 " Deckenmonitor
2. Lösen Sie vorsichtig den Dachhimmel des Fahrzeugs. Markeiren Sie vorher die
Positiondes Deckenmonitors. Platzieren Sie die Metallhalterung über den
Dachhimmel an der entsprechenden Position. Siehe Bild 2
3. Fixieren Sie den Monitor nun mit der Metallhalterung. Der Dachhimmel sollte
sich zwischen der Metallhalterung und dem Monitor befinden. Siehe Bild 3.
Fügen Sie anschließend die Gummistopfen in die Schraubenöffnungn ein.
①
③
Dachhimmel
②
Bedienungsanleitung
Dachhimmel
Bedienelemente
①Öffnen
②Leuchte ein/ausschalten
③Weiterschalten
④Menü
①
②③④ ⑤⑥
⑤Zurückschalten
⑥An/Ausschalten - Modi wechseln
①An/Ausschalten
②Zurückspulen
③links
④Titel zurück
⑤Exit
⑥Lautstärke -
⑦AV switch
⑧USB/SD Auswahl
⑨hoch
⑩Vorpulen
⑪Bestätigen
⑫rechts
⑬runter
⑭Titel weiter
⑮Wiedergabe/Pause ⑯Stummschalten
⑦Standby
⑱Lautstärke +
⑰Menü
⑦
Kabeldiagram - Strom
Bedienelemente Fernbedienung
❶
❶An/Ausschalten
❸
❷
❷Videoauswahl
❹
❺
❸Menü
❻
❹Zurückschalten
Fuse
- rot an 12V (24V)
zündungsgeschaltet
- schwarz an Masse
Video IN 1 (gelb)
Vdeio IN 2 (gelb)
Audio IN L (weiß)
Audio IN R (rot)
Kabeldiagramm - Deckenleuchte
❺Weiterschalten
❻Modi wechseln
- schwarz an Masse
- rot an 12V (24V) zündungsgeschaltet
- gelb an den Anschalter der Innenraumbeleuchtung - (wird dies nicht
verbunden kann die Deckenleuchte manuell über die Taste am
Monitor an/ausgeschaltet werden.