1
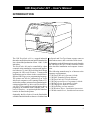
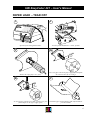
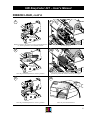
UBI EasyCoder 401 – User's Manual
CONTENTS
Introduction
Get to Know Your Printer
Paper Load
Ribbon Load
Maintenance
Presentation of the EasyCoder 401 ............................................................. 3
Front View ................................................................................................. 4
Rear View .................................................................................................. 4
Paper Stock Compartment .......................................................................... 5
Tear-Off ..................................................................................................... 6
Cut-Off ....................................................................................................... 8
External Supply ........................................................................................ 11
Loading without using a Ribbon Cassette ................................................. 12
Loading using a Ribbon Cassette .............................................................. 14
Printhead Cleaning ................................................................................... 16
External Cleaning ..................................................................................... 18
Printhead Replacement ............................................................................. 19
Troubleshooting ....................................................................................... 20
UBI EasyCoder 401
User's Manual
Edition 2, September 1996
Article No. 1-960368-01
1
UBI EasyCoder 401 – User's Manual
Information in this manual is subject to change without prior notice and does not represent a
commitment on the part of UBI Printer AB.
© Copyright UBI Printer AB, 1996. All rights reserved. Published in Sweden.
EasyCoder and LabelShop are trademarks of United Barcode Industries (UBI).
Apple and Macintosh are registered trademarks of Apple Computer Inc.
Microsoft is a registered trademark of Microsoft Corporation.
Speedo is a trademark of Bitstream, Inc.
TrueType is a trademark of Apple Computer Inc.
Windows is a trademark of Microsoft Corporation.
FCC Notice
United States of America
WARNING:
This equipment generates, uses, and can radiate radio frequency energy and if not installed and used in accordance
with the instructions manual, may cause interference to radio communications. It has been tested and found to
comply with the limits for a Class A computing device pursuant to Subpart J of Part 15 of FCC Rules, which are
designed to provide reasonable protection against such interference when operated in a commercial environment.
Operation of this equipment in a residential area is likely to cause interference in which case the user at his own
expense will be required to take whatever measures may be required to correct the interference.
DOC Notice
Canada
Canadian Dept. of Communication
REGULATIONS COMPLIANCE
(DOC-A)
This digital apparatus does not exceed the class A limits for radio noise emissions from a digital apparatus as set out
in the radio interference regulations of the Canadian Department of Communication.
✳✳✳
Ministère des Communications du Canada
CONFORMITE DE REGLEMENTS
(DOC-A)
Le présent appareil numérique n´émet pas de bruits radio-électriques dépassant les limites applicables aux appareils
numériques de classe A prescrites dans le règlement sur brouillage radioélectrique édicté par le Ministère des
Communications du Canada.
VDE Notice
Germany
ALLGEMEINE VORSCHRIFT:
Reparaturen oder sonstige Eingriffe, die sich nicht auf normale Bedienung der Maschine beziehen, dürfen
ausschließlich nur von einem ausgebildeten, zuständigen Fachmann vorgenommen werden.
2
UBI EasyCoder 401 – User's Manual
INTRODUCTION
Power
EasyCoder
Ready
Error
401
Print
The UBI EasyCoder 401 is a rugged industrial
thermal transfer/direct thermal printer intended for
low volume label production of max. 1,000 – 2,000
labels/day.
The EasyCoder 401 can be controlled by a host
computer using standard or custom-made application software, e.g. the UBI LabelShop label-design
program for Microsoft Windows. Custom-made
applications can be written in the versatile Basicinspired UBI Fingerprint programming language.
The printer can also be connected to an Apple
Macintosh computer or a PC running Windows 3.1
and used to produce printouts from standard application programs like e.g. Microsoft Word or Microsoft Excel. This requires an optional printer driver
program to be installed in the computer, and – in
case of Windows – an optional parallel interface
board to be fitted in the printer.
Optionally, the EasyCoder 401 can be fitted with a
scalable fonts kit that allows the use of outline fonts
in Speedo and TrueType format, a paper cutter or
label-taken sensor, and a real-time clock circuit.
Information on the different options can be found in
the UBI EasyCoder 401 Technical Manual, which
also describes installation and computer connection.
The following manuals may be of interest to the
operator or programmer:
• UBI EasyCoder 401, Operator's Guide
• UBI Shell Standard, Startup Manual
• UBI EasyCoder 401 Technical Manual
• UBI Fingerprint Direct, Programmer's Guide
• UBI Fingerprint, Programmer's Guide
• UBI Fingerprint, Reference Manual
• UBI LabelShop, various manuals
• UBI Windows Driver, Installation Instructions
• UBI Macintosh Driver, Installation Instructions
3
UBI EasyCoder 401 – User's Manual
GET TO KNOW YOUR PRINTER
LED Indicator Lamps
Display Window
Pow
er
Ea
sy
Rea
Co
dy
de
Print Key
r
40
1
Erro
r
Cutter Interface Connector
Label Taken Sensor
(option)
Pr
int
Front Door
The front door can be swung open and removed
from the hinges. It can also be replaced by an
optional paper cutter unit.
Main Switch
Voltage Switch
Provision for Parallel Interface Board
Display Contrast Adjustment
Serial Interface Connector "uart1:"
e
Hz
Typ .
60
o
50– N
.N
3 A DE
Art .
o 2.6/1. SWE
•
r. N
Se V R AB
0 TE
23
IN
115/ PR
I
UB
Mains Receptacle
Machine Sign
Upper External Paper Intake
Lower External Paper Intake
Continued!
4
UBI EasyCoder 401 – User's Manual
GET TO KNOW YOUR PRINTER, cont'd.
Power
Ready
EasyCoder
The paper stock compartment becomes accessible when the
right-hand and front doors are swung open. Although the printer
is operable when the doors are left opened or completely
removed, you are strongly recommended to keep them closed
during normal operation, so as to prevent the printer mechanism
from being exposed to dust.
Error
401
Print
Transfer Ribbon Supply
Paper Supply Spool
Transfer Ribbon Take-Up
External Guides
(option)
3" Adapter
Thermal
Printhead
FF
R-O
TEA
Dispenser Edge
Printhead Lift Knob
ION
AT
d.
RM te printhea ce
FOvalida
is
rtan e
in for th
ill
impoed thg
N IN
I, w cally
eat atch usin
BO
ifi
UB
m
of gr
IBed
by spec
lly se of
R
so
fu
vi
al
ND supplineered ter is s carely ad
ng
e engi
prin BI ha
D Athos
stro
e
this d. U oreting.
EA thanon
s ar
ef
ea
s in
THother ri
inth ther prin
bb
pplie
e pr We ality
RINontrs,an
sfer
ia su
qu
of th ter.
T Per ribb
med life prin high
mal
sfer long this re a
AN
ansf
ther
an
T
a
of
su
I
tr
tr
s
d
R al UB
en
al
PO
ed to
an
s
erm nty.
erm des e ne
y th arra
d th r co to th pplie
of and w
al ang ba ide ed su
erm intin prov ovid
use thea
d/
pr
Thee prin
of th pr
ity ity ofmmen ded/
th
qualqual co mmen
Ther the we re
co
fo per BI re
U
pa ly
on
IM
Guide Ring
The adapter for 76 mm (3") paper roll cores is included in the
delivery and can be fitted on the paper supply spool.
Lock the adapter by means of the screw, making sure that the
screw hits the evenly rounded plastic surface, rather than the leaf
spring or the cam.
5
UBI EasyCoder 401 – User's Manual
PAPER LOAD – TEAR OFF
1
2
Power
Ready
EasyCoder
Print
Error
401
Load
Print
Open the front and right-hand doors.
3
Turn the printhead lift knob to “Load” position.
4a
mm
38-40 )
(1.5"
Remove the empty paper core, if any.
4b
Fit a new paper roll on the paper supply spool and push
the roll inwards as far as it will go.
5
m
76 m
(3")
In case of paper roll with a 76.2 mm (3 inches) core, first
fit the adapter on the paper supply spool.
Thread the paper underneath the guide shaft behind the
print mechanism.
6
UBI EasyCoder 401 – User's Manual
PAPER LOAD – TEAR OFF, cont'd.
7
6
This diagram shows the path of the paper web.
8
Push the paper inwards as far as it will go.
9
Print
Load
Turn the printhead lift knob to “Print” position.
10
Adjust the green guide ring so the paper is guided with a
minimum of play.
11
Power
EasyCoder
Power
Ready
EasyCoder
Ready
Error
401
Error
401
2x
Print
Print
#2
#1
Close the front and side doors.
Feed out two blank copies by pressing the <Print> key
twice. Tear off the paper by pulling it downwards.
7
UBI EasyCoder 401 – User's Manual
PAPER LOAD – CUT OFF
1
2
Power
EasyCoder
Ready
Error
401
Print
Turn off the power using the switch on the rear plate.
Open the optional cutter unit and the right-hand door.
3
4
Print
Load
Turn the printhead lift knob to “Load” position.
5a
Remove the empty paper core, if any.
5b
mm
38-40 )
(1.5"
Fit a new paper roll on the paper supply spool and push
the roll inwards as far as it will go.
m
76 m
(3")
In case of paper roll with a 76.2 mm (3 inches) core, first
fit the adapter on the paper supply spool.
8
UBI EasyCoder 401 – User's Manual
PAPER LOAD – CUT OFF, cont'd.
7
6
Thread the paper underneath the guide shaft behind the
print mechanism.
This diagram shows the path of the paper web.
9
8
Print
Load
Push the paper inwards as far as it will go.
10
Turn the printhead lift knob to “Print” position.
11
Pr
int
Print
Load
TEA
Th
th
Adjust the green guide ring so the paper is guided with a
minimum of play.
Thread the paper through the cutter between the two
guide plates.
9
UBI EasyCoder 401 – User's Manual
PAPER LOAD – CUT OFF, cont'd.
12
Power
EasyCoder
13
Ready
Error
401
Print
Close the cutter unit while pulling at the end of the paper.
Close the right-hand door.
Turn on the power using the switch on the rear plate.
14
Power
EasyCoder
Ready
Error
401
2x
Print
#2
#1
Feed out and cut two blank copies by pressing the
<Print> key twice.
10
UBI EasyCoder 401 – User's Manual
PAPER LOAD – EXTERNAL PAPER SUPPLY
1
The printer can be supplied with paper from e.g. an
external label roll or a box of fan-fold tickets via the
upper or lower slot in the rear plate.
2
As an option, the printer can be fitted with a set of
fan-fold guides in the upper intake slot only.
3
When an external paper supply is used, take precautions
to protect the paper stock from sand, grit and other hard
particles, that may damage the printhead!
The outer guide is adjustable for different paper widths.
11
UBI EasyCoder 401 – User's Manual
RIBBON LOAD
1
2
Power
Ready
EasyCoder
Error
401
Print
R-O
TEA
Open the front and right-hand doors.
3
Turn the printhead lift knob to “Load” position.
4
Pow
er
Eas
yC
od
er
Rea
dy
401
Erro
r
Print
Load
Unpack a roll of original UBI transfer ribbon.
The use of any thermal transfer ribbon, other than those
supplied by UBI, will invalidate the printhead warranty.
Pull out the used-up ribbon and the empty ribbon core.
5
6
Powe
r
Eas
yC
od
er
Read
y
401
Erro
r
1.
Print
Load
2.
Print
Load
!
-OFF
TEAR
A
RT
PO
rm
y the rra
wa
of an
ad
use he
the
The print
ty ofty of
the
quali
quali co
The the we re
co
I re
for per
pa ly UB
on
IM
Press the ribbon roll onto the ribbon supply spool (1)
and thread the ribbon under the upper part of the print
unit. Pull out approx. 20 cm (8") of ribbon (2).
Be careful to thread the ribbon above the handle of the
label stop sensor! The ribbon must be fitted so the spools
rotate counter-clockwise, as illustrated above.
12
UBI EasyCoder 401 – User's Manual
RIBBON LOAD, cont'd.
7
Pow
er
Eas
yC
8
Rea
od
dy
er
401
Erro
r
Print
Load
Print
Load
FF
Without releasing the ribbon, turn the printhead lift knob
to “Print” position so as to lock the ribbon.
R-O
TEA
Press the paper core at the front end of the ribbon onto
the take-up spool.
yC
od
9
er
10
ead
y
401
Erro
r
Print
Load
Print
Load
FF
R-O
TEA
Turn the printhead lift knob to “Load” position.
11
Wind up the ribbon until all of the transparent part has
passed the printhead and the ribbon becomes tight.
12
Print
Power
Ready
EasyCoder
Error
401
Load
Print
Turn the printhead lift knob to “Print” position.
Close the front and side doors.
13
UBI EasyCoder 401 – User's Manual
RIBBON LOAD USING A RIBBON CASSETTE
1
2
Power
Ready
EasyCoder
Error
401
Print
R-O
TEA
Open the front and right-hand doors.
3
4
Pow
er
Eas
yC
od
er
Turn the printhead lift knob to “Load” position.
Rea
dy
401
Erro
r
Print
Load
Pull out the used-up ribbon and the empty ribbon core.
5
The ribbon cassette is an optional device, that speeds up
and facilitates ribbon reloads. Prepare by keeping a
loaded cassette ready.
Unpack a roll of original UBI transfer ribbon.
The use of any thermal transfer ribbon, other than those
supplied by UBI, will invalidate the printhead warranty.
6
Press the spools of the ribbon onto the sockets of the
cassette, as indicated by the stamped-out arrows, with the
transparent part hanging in a loop.
14
UBI EasyCoder 401 – User's Manual
RIBBON LOAD USING A RIBBON CASSETTE, cont'd.
7
8
Pow
er
Eas
yC
Rea
od
er
dy
401
Error
Pri
nt
Print
Load
FF
R-O
TEA
AD
Wind up excessive ribbon on one of the spools so as to
remove any slack.
yC
od
9
er
yC
Rea
od
er
dy
401
er
10
Pow
Eas
D
AN
hose
Align the spools on the ribbon cassette with the ribbon
unwind and rewind spools on the printer and press the
cassette inwards as far as it will go.
ead
y
401
Erro
r
Erro
r
Print
Print
Load
Load
-OFF
TEAR
INF
ON
I, w
if
UB
IBB
d by spec
D Rpplie
ered
ri
ANose su
gine
inte I h
th are en
is pr UB
AD
in th ead.
efor
than
HEher rib
bons
T
liesprinth
ther pri
e
ot
pp
ity
r
IN ,
R bons nsfe edia suof thineter. Wqual
TP
lifeis pr a high
al tra
r rib
rm
erm
re
AN
nsfe
nsfe long th
I th
tra
tra d a s of ensu
RT al y.
UB
mal s an needs to
PO erm
lie
thercode the
rant
IMf any th
and bar e to supp
war
FF
R-O
TEA
Press the ribbon spools inwards as far as they will go
and pull out the ribbon cassette.
Wind up the ribbon until all of the transparent part has
passed the printhead and the ribbon becomes tight.
11
12
Print
Power
Ready
EasyCoder
Error
401
Load
Print
Turn the printhead lift knob to “Print” position.
Close the front and side doors.
15
UBI EasyCoder 401 – User's Manual
PRINTHEAD CLEANING
Cleaning of the printhead on a regular basis, preferably in
connection with each ribbon or paper reload, is important for the
life of the printhead and for the printout quality. Below is a
description on how to clean the printhead by means of Cleaning
Cards. If additional cleaning is required, e.g. for removing
adhesive residue from the print roller or dispenser edge, use a
cotton swab moistened with isopropyl alcohol.
Caution:
Isopropyl alcohol [(CH3)2CHOH; CAS 67-63-0] is a highly
flammable, moderately toxic and mildly irritating substance.
1
2
Power
Ready
EasyCoder
Print
Error
401
Load
Print
Open the front and right-hand doors.
3
Turn the printhead lift knob to “Load” position.
4
Pow
er
Eas
yC
Rea
od
er
dy
401
Erro
r
le
C
g
in
an
.
is
ds
d
ea
Car , H e
nt
g
in tape ri th
an k, al P of
Cle , in rm life
er rt he e
nt l di T d th
Pri al om an
–
al ove fr y
rs
rm m ants alit
re
nte
.
The y in t qu
d.
Pri
le el am in
on
er
ab iv nt pr
bb d.
Car s
os ct co e
g turn
od
e ri ar
sp fe r ov
C s
t
ov g C anin r re
di d efothe pr
ar
sy on
m
d
re anin Cle inte D l st
te an d ill im
Ea cti
E
il
ra ly
s,
tu fe an w
er Cle oder If pr FE r w
all ire
ng
sa sa ve rd
y,
D
rint er yC T. ess inte
on
e- to hesi ca ead.
dr aini
g
s
r P od as IN pr
to
m
pr
R
s pr ed ad in nt H
t
fe yC E
d
re
ork
ns Eas sert or P e bu The
Thi signdue, lean Pri
W
Car ove
de si s C al
Tra e d in ED
ur d.
g
l
–
in rem
re
ov
ed ea
al
be
E
la
an
Thi herm
rm rem d an s F proc inth
to
T
of
.
Cle ed
ea es e
The d
ll
ly
e pr .
ro
er
or h an inth d pr at th th ered oder e, fe
y
g
op
pr
: F uc
an
m
w
er
pe
in
pr
E:
ev
TE n po mal ead , re er is lo asyC ti
G
O
g
nd
e of SA
rE
N pe ther inth ge low d
rtin
os
sa re
ea s fo seco
U
pr es
•O t
se
sp
th
if
a
fo
in
di
E T
ED
• L er r m be prin cond for
d
re
D
an
fo
se rd
TIV EN
Low erro INT ter
d
EN
be
ca
w
af
R
EC IPM
an
M
y
P
g
ds
Car
M
a fe dr
FF U
or edin
O
rt
n. ing
Car
• E EQ
g
fe llow inse atio an
EC
in
R
SY UR
in Cle
• A en
an
am ove
EA YO
th
Cle
nt
k. E • S
er
co em
od oc F CT
•R
yC et st SA TE
O
Eas ck
PR
se or ti
•U k
stoc
ar
C
d
Print
Load
ION .
AT
RMate printhead e
nc
FOvalidth
is
INill
in for
portathe
y
t im hed ing
ON
I, w all
greamatc us
UBecific
IBB
o offullyvise of
sp
d by
re ad
D Rpplieee
red
is als
s ca
ANose su
gin
interI ha ongly
pr
en
D
str
th are
.
. UB
A
this
ore
-OFF
TEAR
ad ef
ing
in
than
HEher rib
bons
liesprinthe
ther print
ot
INT
We ality
supphe
fer
ns,
PR
Remove the transfer ribbon and paper supplies.
Open the Cleaning Card pouch. The cleaning card
contains isopropyl alcohol, see “Caution” above.
16
UBI EasyCoder 401 – User's Manual
PRINTHEAD CLEANING, cont'd.
5
6
Pr
int
Pr
int
2.
Print
Print
Load
2.
Load
2.5 cm")
(1
1.
1.
Insert most of the cleaning card under the printhead (1).
Turn the printhead lift knob to “Print” position (2).
7
Pull out the cleaning card (1) and turn the printhead
lift knob to “Load” position (2).
8
11
12
1
10
Pr
int
2
30 s.
9
8
3
Print
Load
4
7
2.
2.5 cm")
(1
5
6
1.
Wait for approx. 30 seconds.
9
Insert the cleaning card under the printhead again (1).
Turn the printhead lift knob to “Print” position (2).
10
➨
Pr
int
Print
Load
➨
Pull out the cleaning card. Repeat if necessary.
Allow the cleaned part to dry before loading the printer
with paper and thermal transfer ribbon.
17
UBI EasyCoder 401 – User's Manual
EXTERNAL CLEANING
1
2
Power
Ready
EasyCoder
Error
401
Print
e
Hz
Typ .
60
o
50– N
.N
3 A DE
Art .
o 2.6/1. SWE
•
r. N
Se V R AB
230 INTE
115/ I PR
B
U
Always remove the power cord before cleaning!
3
Wipe external surface with a soft cloth moistened with
water and, if necessary, a mild detergent.
4
Pow
er
Eas
yC
Rea
od
er
dy
401
Erro
r
Pri
nt
Print
Load
FF
R-O
TEA
Never spray the printer. Protect the printer from water
when cleaning the premises.
Never use any sharp tools for removing stuck labels.
The printhead and the print roller are easily damaged.
18
UBI EasyCoder 401 – User's Manual
PRINTHEAD REPLACEMENT
The quick-mount thermal printhead is easy to replace:
• Turn off the printer.
• Open the front and right-hand doors.
• Lift the printhead and remove the paper and ribbon stocks.
• Turn the printhead lock handle counter-clockwise to open position, see illustration.
• Remove the printhead assy carefully as far as the cables allow.
• Remove the two printhead cables by pulling at the connectors.
• If you want to change the lateral position of the printhead, move
the #T20 Torx screw to its alternative position.
• Connect the two cables to the printhead.
• Fit the replacement printhead assy back into the bracket so the
guide screw fits into its slot and the rear end of the assy is held by
the two lugs.
• Turn the locking handle clockwise to locked position.
• Load paper and transfer ribbon. Then lower the printhead.
• Turn on the power. At power-up, the printer will automatically
reset itself to the characteristics of the printhead in regard of head
resistance.
• Close the front and right-hand door and the printer is ready for
operation.
Lug
Slot (for alternative position
of guide screw)
Slot
Lug
Locked Position
Lock Handle
Open Position
Alternative position
for guide screw
Guide Screw
Printhead assy
19
UBI EasyCoder 401 – User's Manual
TROUBLE SHOOTING
The list below is intended to help the operator to correct possible
printout troubles or flaws in printout quality, and to decide when
assistance from the Service dept. of the nearest UBI distributor
is required. Note that most problems are due to operating errors
or normal wear of the printhead.
Symptom
Overall weak printout
Possible Cause
Wrong Paper type setup
Low Contrast setup
Printhead pressure too low
Worn printhead
Wrong printhead voltage
Printout weaker on one side
Uneven printhead pressure
Weak spots
Foreign particles on paper/ribbon
Paper/ribbon don't match
Poor paper or ribbon quality
Worn printhead
Worn pressing roller
Overall dark printout
Wrong Paper Type setup
Too high Contrast setup value
Printhead pressure too high
Wrong printhead voltage
Excessive bleeding
Wrong Paper Type setup
Contrast setup value too high
Printhead pressure too high
Faulty energy control
Transfer ribbon breaks
Ribbon fitted around label stop sensor
Wrong Paper Type setup
Ribbon unwind unit stuck
Bad energy control
White parts at transfer printing
Transfer ribbon wrinkled
Transfer ribbon wrinkles
Incorrect paper guide ring adjustment
Ribbon obstructed by printhead cable
Too strong printhead pressure
Bad ribbon guide plate adjustment
Dark lines along paper web
Foreign objects on printhead
or ribbon guide plate
White lines along paper web
Printhead dirty
Missing dots on printhead
Large part of dot line missing
Wrong X-start or Width setup
Failing printhead
Failing strobe signal
Last part of label missing
Too small image buffer
Printout missing along inner edge Bad paper alignment
X-start setup value too low
Remedy
Change setup
Change setup
Adjust both knobs
Replace printhead
Replace CPU board
Adjust outer knob
Clean
Use other media
Use other media
Replace printhead
Check/replace
Change setup
Change setup
Adjust both knobs
Replace CPU board
Change setup
Change setup
Adjust both knobs
Replace CPU board
Reload ribbon
Change setup
Adjust
Check CPU board
Adjust
Adjust
Clear
Adjust both knobs
Adjust
Refer to
Technical Manual
Technical Manual
Technical Manual
User's Manual
☎ Call Service
Technical Manual
n.a.
Technical Manual
Technical Manual
User's Manual
☎ Call Service
Technical Manual
Technical Manual
Technical Manual
☎ Call Service
Technical Manual
Technical Manual
Technical Manual
☎ Call Service
User's Manual
Technical Manual
☎ Call Service
☎ Call Service
See next paragraph
User's Manual
n.a.
Technical Manual
Technical Manual
Clean printhead
Clean printhead
Replace printhead
Change setup
Replace printhead
Check CPU-board
Increase buffer
Adjust
Increase
User's Manual
User's Manual
User's Manual
Technical Manual
User's Manual
☎ Call Service
Technical Manual
User's Manual
Technical Manual
20


![j:j_"Xt$l"j:]:":,lg]:"r/Human Resources have been duty - e](http://vs1.manualzilla.com/store/data/005657435_1-26d97049bf04f0fd92265d73e45a9ab3-150x150.png)