1
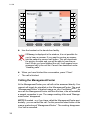
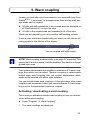
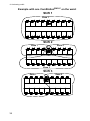
ComStationBUS-C
Order no. 77 0605 50
User Guide
00 8811 17
All rights to this documentation are reserved, in particular copyright and distri‐
bution rights. No part of this documentation may be reproduced in any form
or processed, copied or distributed using electronic systems without the prior
written consent by Tunstall GmbH.
We reserve the right for implementing technical changes.
E Tunstall GmbH
ComStationBUS-C - User Guide, 00 8811 17, 10/2014 (Rev. 2.0)
1. Table of Contents
2.
For safety . . . . . . . . . . . . . . . . . . . . . . . . . . . . . . . . .
3
2.1
2.2
2.3
General safety instructions . . . . . . . . . . . . . . . . . . . . . . . . .
If a fault is displayed... . . . . . . . . . . . . . . . . . . . . . . . . . . . . .
If “no connection“ is displayed... . . . . . . . . . . . . . . . . . . . .
3
4
6
3.
Necessary basic knowledge . . . . . . . . . . . . . . . .
7
3.1
3.2
Flamenco nurse call system . . . . . . . . . . . . . . . . . . . . . . . .
ComStationBUS-C . . . . . . . . . . . . . . . . . . . . . . . . . . . . . . . . .
7
11
4.
Log on / Log off . . . . . . . . . . . . . . . . . . . . . . . . . . . .
15
4.1
4.2
Log on . . . . . . . . . . . . . . . . . . . . . . . . . . . . . . . . . . . . . . . . . .
Log off . . . . . . . . . . . . . . . . . . . . . . . . . . . . . . . . . . . . . . . . . .
16
17
5.
Speech connections . . . . . . . . . . . . . . . . . . . . . . .
19
5.1
Status of the speech connection . . . . . . . . . . . . . . . . . . . .
20
6.
Handling calls . . . . . . . . . . . . . . . . . . . . . . . . . . . . .
21
6.1
6.2
6.3
Call display . . . . . . . . . . . . . . . . . . . . . . . . . . . . . . . . . . . . . .
Basic procedure for call handling . . . . . . . . . . . . . . . . . . .
This is how you handle a call . . . . . . . . . . . . . . . . . . . . . . .
22
26
27
7.
Announcements . . . . . . . . . . . . . . . . . . . . . . . . . . .
31
8.
Call . . . . . . . . . . . . . . . . . . . . . . . . . . . . . . . . . . . . . . .
33
9.
Ward coupling . . . . . . . . . . . . . . . . . . . . . . . . . . . . .
35
10.
Activating a shift . . . . . . . . . . . . . . . . . . . . . . . . . .
37
11.
Adjusting the volume . . . . . . . . . . . . . . . . . . . . . .
41
12.
Put the ComStationBUS-C into operation . . . . . .
43
12.1
Menu structure . . . . . . . . . . . . . . . . . . . . . . . . . . . . . . . . . . .
45
13.
Cleaning and disinfection . . . . . . . . . . . . . . . . . .
47
1
1. Table of Contents
2
2. For safety
2.1
General safety instructions
WARNING! Please follow the safety instructions below for the safety
of staff and patients:
n
Before the ComStationBUS-C can be used, it has to be put into op‐
eration by a technician. Please refer to page 43.
n
This user guide assumes that you are familiar with the nursing pro‐
cedures in hospitals.
n
You must acquire sufficient knowledge about operating and
using the nurse call system via suitable measures such as train‐
ing sessions. The measures must be repeated if necessary. This
user guide assumes that the reader possesses sufficient know‐
ledge.
n
Ensure that the ComStationBUS-C is always plugged in.
n
Never place the ComStationBUS-C in a humid environment. Take
care that is does not become wet. The ComStationBUS-C is
powered by electricity and thus should not be exposed to moisture.
n
Bright sunlight can impair the readability of the display. Place the
ComStationBUS-C in a non-reflective location.
n
The ComStationBUS-C is under the prescribed limits regarding
electromagnetic compatibility. Nevertheless, faults can occur in
individual cases and under certain conditions. In this case, you
must increase the distance between the affected devices or take
appropriate measures to repair the faults.
n
Never open the casing of the ComStationBUS-C. In case of a fault,
return the device to the supplier.
3
2. For safety
2.2
If a fault is displayed...
Fault!
2.2.1
If the symbol for faults appears in the title bar, you must
deal with it immediately.
There is a fault in the nurse call system. This means that perhaps you
can no longer be called from every room.
Additionally your are informed acoustically about the fault by the re‐
peated tone sequence “1 second tone - 20 seconds pause“.
2.2.1.1 You must immediately do the following:
l
Press “System“ à “Info“ à “Fault“.
ü All rooms with faults are shown.
The tone for the fault display is turned off.
Location name
Participant number
4
2. For safety
NOTE! For the meaning of location name and participant number
please the technician should refer to the online help for the “System‐
Organizer“ configuration software.
l
Inform a responsible technician about the fault. S/he will then deal
with correcting the fault.
l
To return the to the main window, press
.
ü The main window appears again. You can resume work.
2.2.1.2 Acoustic fault display
The acoustic fault display sounds, when there is a new fault.
The acoustic fault display is turned off, when the fault is cleared or when
you have displayed the fault in the described manner. In the second
case the acoustic fault display is turned off, although the fault has not
yet been cleared.
5
2. For safety
2.3
If “no connection“ is displayed...
No connection!
2.3.1
If the symbol for “no connection“ appears in the title
bar, you must deal with it immediately.
Die ComStationBUS-C is not ready to use as there is no connection to
the nurse call system.
2.3.1.1 You must immediately do the following:
6
l
Inform a responsible technician.
l
Ensure that the patients are still given the best possible care. Look
out for the display of the room lamps.
3. Necessary basic knowledge
3.1
Flamenco nurse call system
Flamenco systems are nurse call systems for hospitals and similar es‐
tablishments.
If a patient needs help, he/she presses the call button on his/her call
device (patient handset). This call will be displayed on the ComStation‐
BUS-C in the ward nurse station and answered. The staff at the Com‐
StationBUS-C shall ask the patient about the nature of the call and de‐
cide on appropriate action. Maybe medical attention or assistance is
required. The ComStationBUS-C will show where staff is present in the
rooms, as they press a presence button when entering a room. The
staff at the ComStationBUS-C informs the staff in a room, where help is
required. of the call. An illuminated room lamp above the door outside
the room also identifies the call location. After dealing with the problem
or query, the call is cancelled when presence switch is switched off
upon leaving the room. All signals displaying the call will now be reset.
Calls to which a speech connection has not yet been established, i.e.
those which have not yet been answered are referred to as fresh calls.
Calls which have been answered, but have not yet been cancelled, are
are referred to as answered calls.
7
3. Necessary basic knowledge
3.1.1
Sample ward
ComStationBUS-C
8
3. Necessary basic knowledge
3.1.1.1 Icons used for the sample ward drawing
Room lamp
Corridor display
Patient handset
ComTerminal
Cancel switch/WC
3.1.2
Various call switches
What else you should know
3.1.2.1 Announcements
Aside from call handling, announcements can be made from the Com‐
StationBUS-C; these can be made either exclusively to staff or to all
rooms in the ward.
3.1.2.2 Staff groups
The medical staff can be divided into two groups (e.g. nurses and doc‐
tors). In order that the staff at the ComStationBUS-C address the appro‐
priate medical staff, a distinction is made between both types. We have
staff 1and staff 2. Each staff group has its own presence button in the
room (Staff 1 = green, Staff 2 = yellow). You have to ask your system
administrator which type of staff is allocated to the respective group.
3.1.2.3 Privacy
Although it is possible to converse with rooms from the ComStation‐
BUS-C, it is not possible to listen in on the rooms without this being no‐
ticed. The reason is, every room has a privacy function, a technical fa‐
cility which makes listening in impossible. This will be cancelled if a call
is triggered from the room or if staff are logged as present in the room.
9
3. Necessary basic knowledge
It is also possible to manually activate the privacy function, although
staff are logged as present in the room.
Exception for children's rooms: In the Flamenco nurse call system it is
possible that rooms are set as children's rooms. In these rooms, the pri‐
vacy function is always OFF. For optimum care of the patients in these
rooms, you can listen in to these rooms if needed, even if there is no
call and no staff is present in the room. Your system administrator will
tell you which rooms are set up as children's rooms.
3.1.2.4 Call forwarding
As a rule, calls are displayed and answered by the ComStationBUS-C
at the nurse station. If the ComStationBUS-C is unoccupied, the calls are
automatically forwarded to the rooms where medical staff are logged
as present. The calls can then be answered by the medical staff in the
room via the communication terminal (ComTerminal).
3.1.2.5 Ward coupling
During periods of low activity, two or more wards can be organisatio‐
nally coupled. This means that in the coupled wards, all calls from the
coupled wards will be displayed and answered.
3.1.2.6 Zones and shifts (zone nursing)
Wards can be organisationally divided into smaller entities (zones).
Then the calls within one zone are only forwarded within that zone. The
division into zones can be changed during the course of the day (shift
operation).
10
3. Necessary basic knowledge
3.2
ComStationBUS-C
The ComStationBUS-C is a console for the ward nurse station.
One ward is managed by the ComStationBUS-C.
In the following cases, the managed area is not the same as the ward:
n
Ward coupling (refer to page 35 onwards)
n
Shift operation (refer to page 37 onwards)
Handset
Display
Loudspeaker
Buttons
Connection cable
Microphone
11
3. Necessary basic knowledge
3.2.1
The buttons
Select buttons for selection of the associated list field.
Menu buttons for selection of the relevant menu option.
Automatic button for automatic selection of the most urgent
call. Thereby the current window is closed.
Navigation buttons to scroll through lists, if a scroll bar is
displayed.
12
3. Necessary basic knowledge
3.2.2
The main window
Call list:
Calls from connected rooms are shown. Fresh calls are flashing. Calls
can be selected with the select button next to the item on the list.
Staff list:
The staff presence messages for the connected rooms are listed in time
order, oldest message from the top. You can speak to the staff in the
rooms via the select buttons next to the item on the list.
Green: Staff 1
Yellow: Staff 2
Green/yellow: Staff 1 and
staff 2 in the same room
Title bar:
On the left in the main window: The date, otherwise the menu level.
On the right: The time.
Fault in the nurse call system! See page 4 onwards.
No connection! ComStationBUS-C is not ready to use! See
page 6 onwards.
Ward coupling: This ward is coupled with other wards, refer to
35 onwards.
Shift operation: A shift is active, refer to 37 onwards.
13
3. Necessary basic knowledge
Menu:
You can select menu options with the menu buttons.
Scroll bar:
A scroll bar is displayed, iIf the list is too long to be viewed completely.
To scroll through the list use the navigation buttons.
14
4. Log on / Log off
Before you start working on the ComStationBUS-C, you must log on.
When you leave the ComStationBUS-C, you must log off.
15
4. Log on / Log off
4.1
Log on
The ComStationBUS-C is always turned on. Before you log on, you will
see the following window in the display:
l
Press “Log On“.
ü You are logged on. The main window of the ComStationBUS-C ap‐
pears. The green section of the room lamp illuminates to indicate
that the ComStationBUS-C is in use.
16
4. Log on / Log off
4.2
Log off
Each time you leave the ComStationBUS-C, you should log off. Calls for
your ComStationBUS-C will then be transferred to another console or
will be forwarded to the ward.
If you have not logged off when you have left the ComStationBUS-C, the
calls will still be forwarded but only after a pre-set period of time has
elapsed.
This is how you log off:
l
Press “Log Off“ in the main window.
17
4. Log on / Log off
ü The following window appears:
l
Press the button on the left or on the right of „Off“.
ü You are logged out. The window to log-on appears again (see
page 16). The green section of the room lamp goes out to show that
the ComStationBUS-C is not in use.
18
5. Speech connections
You can establish speech connections to rooms on your ward from your
ComStationBUS-C. For example, you speak to patients who have
called, or with medical staff, to organize help.
You will learn how to establish speech connections in various situations
in the following sections. In all cases, a window will appear when a
speech connection has been established.
Example:
Window during
speech connection
19
5. Speech connections
5.1
Status of the speech connection
The status of the speech connection is shown in the window using the
following symbols:
Status of the privacy in the room:
Privacy: In the room, the privacy function is switched on.
You can speak to the room but not listen to what is said in
the room (see page 9).
No privacy: You can speak to the room and listen to what
is said in the room.
Receiving volume:
Receiving volume is displayed.
To increase the volume press “Volume +“.
To decrease the volume press “Volume -“.
This is a temporary setting. For how to set the volume
permanently, refer to page 11 onwards.
NOTE! If a speech connection is not closed within one minute, it will be
closed automatically.
20
6. Handling calls
The following will explain how calls are shown on the ComStationBUSC. You will learn the sequence of call handling. Finally, it will be ex‐
plained how you handle calls at your work place.
21
6. Handling calls
6.1
Call display
6.1.1
Call types and categories
We differentiate various call types. It is important that you know these
types of calls as they will give you a hint towards the kind of assistance
the patient requires. The call types are divided into three categories:
Calls, emergency calls and alarms. The call categories are distin‐
guished by their level of urgency.
Call category Call type
Call
Call
A patient has raised a call or the plug of
the patient unit has been disconnected
from the connection socket.
WC Call
A call was raised in a WC room.
Door Call
Somebody raised a call at the entrance
door.
(low
priority)
Emergency
Call
Emergency Call 1 A call was raised whith presence of
staff 1 logged.
(medium
Emergency Call 2 A call was raised whith presence of
staff 2 logged.
priority)
WC Emergency
A WC call was raised whith presence of
staff logged.
Telephone Call
The telephone in the duty room is
ringing.
Diagnostic Call
A medical monitoring device has raised
a call. That can be, for example, a mon‐
itor that has automatically raised a call
when values have exceeded specified
parameters.
Cardiac Alarm
Staff has pressed a special cardiac
alarm button to call for assisstance, e.g.
a re-animation team.
Alarm
(high
priority)
NOTE! Your system administrator can amend the terms for the call ty‐
pes (SystemOrganizer) to customize them. For this reason the terms
on your ComStationBUS-C may differ from the terms above.
22
6. Handling calls
6.1.2
How calls are displayed
Calls from connected rooms are shown on the left side of the main win‐
dow in the call list - with the room number.
Call list
The flash sequence of the fresh call indicates the call category:
Call category
Flash sequence
Call
Red is flashing slowly.
Emergency Call
Red is flashing quickly.
Alarm
Blue is flashing very quickly.
Calls are categorised according to the call category - i.e. level of their
urgency. The most urgent call appears at the top.
This means that alarms appear at the top, with emergency calls below
and calls at the bottom. The oldest call appears at the top within the call
categories.
Fresh call are flashing. Answered call do not flash.
23
6. Handling calls
You can also determine the category of a call by listening:
6.1.2.1 Calls
1 second sound - 10 seconds pause...
6.1.2.2 Emergeny calls
1 second sound - 1 second pause...
6.1.2.3 Alarms
0.3 seconds - 0.3 seconds pause...
The more urgent the call, the faster the sequence of the sounds.
If there are several calls, you will only hear the most urgent call.
NOTE! The audible call indication is particularly important, if you do not
have the main window on your display. Calls can only be heard. They
are not displayed.
NOTE! While there is a speech connection only emergency calls and
alarms are signalled acoustically.
24
6. Handling calls
You will learn the type of call when you establish a speech connection
to the room and the speech connection window appears:
Call location
Green: Staff 1 in the room
Yellow: Staff 2 in the room
Green/yellow: Staff 1 and
Staff 2 in the room
Light red background:
No staff in the room
Symbol for the call type
Call type
Bed no.
Status of the privacy in the room, refer to page 20.
Receiving volume, refer to page 20.
After you have established a speech connection to a call location, the
call is named an answered call. Previously, it was a fresh call.
Answered calls appear below fresh calls in the call list. Answered calls
are not indicated audibly and do not flash.
25
6. Handling calls
6.2
Basic procedure for call handling
Call handling always follows the same pattern. You will see this pattern
here. Then, we will explain how you carry this out in practice.
On your ComStationBUS-C, one or several calls are shown in the call
list. You will handle these calls one after the other.
Calls which you have not yet dealt with are named fresh calls. They
are flashing in the display.
You establish a speech connection to a caller. On the display, the
speech connection window appears. You obtain details about the call
from this display.
You speak to the caller. In the conversation, you find out which type of
assistance is required. Perhaps, a small piece of advice from you will
suffice in dealing with the matter. If this is not sufficient, or you cannot
speak to the caller at all, for example, if s/he is not responding, you must
send staff to assist him/her. You must decide whether this involves staff
from group 1 or group 2 and this depends on the situation.
You establish a speech connection with a room where staff is present,
and you speak to the staff.
It could be the case that several speech connections are required for
the handling of one call. That depends on the individual situation. As
long as the call has not been entirely dealt with it is called an answered
call.
Only when no more action is required the call is cancelled. As a rule,
the staff cancel the call in the room (by pressing the presence button).
The call type “Call“ can also be cancelled at the ComStationBUS-C. All
other types of calls must be cancelled at their location. After cancelling
the call, the call handling procedure is finished.
26
6. Handling calls
6.3
This is how you handle a call
Calls are displayed in the call list. Fresh calls are flashing. The most
urgent call is at the top of the call list. You hear the calling tone for the
most urgent call.
e.g.
Select button
l
or
Automatic button
Answer a call, i.e. establish a speech connection with the call loca‐
tion. There are two possibilities here:
Press the select button next to the desired call,
or
press the Automatic button. (By pressing the Automatic button you
will establish a speech connection with the call at the top of the call
list.)
27
6. Handling calls
ü The speech connection window for the call appears. The speech
connection is established:
6.3.1
Speak to the caller
l
To speak to the caller, use the handset or the hands-free facility.
l
If you want to increase the volume when listening, press “Vo‐
lume +“. If you want to decrease the volume when listening, press
“Volume -“.
6.3.1.1 Closing the speech connection
l
For closing the speech connection without cancelling the
call press “Close“.
ü The speech connection window disappears. The call appears as
an answered call in the call list.
l
You can re-establish a speech connection at any time by
pressing the select button of the call.
6.3.1.2 Speaking to staff
l
28
Close the speech connection at the call location by pressing
“Close“.
6. Handling calls
l
From the staff list, select the appropriate staff of which you press
the relevant select button.
e.g.
ü The speech connection window with staff appears. The speech
connection is established:
l
To speak to the staff, use the handset or the hands-free facility.
29
6. Handling calls
l
If you want to increase the volume when listening, press “Volume
+“. If you want to decrease the volume when listening, press “Vo‐
lume -“.
l
When you have finished the conversation, press “Close“.
l
If you want to speak to the caller again, re-establish the speech
connection with the call location of which you press the select but‐
ton of the call.
6.3.1.3 Door call: Opening the door
If a call is raised at a door entry speaker, you can activate the door
opening mechanism from the ComStationBUS-C. For this there is an ad‐
ditional menu button “Opener“.
l
While you press the “Opener“ button, the door opening mechanism
is active.
6.3.1.4 Cancelling a call
NOTE! You can only carry out remote call cancelling with call type
“Call“. All other call types can only be cancelled by pressing the pres‐
ence button in the room or by pressing the cancel button in the WC.
l
Press “Cancel“.
ü The call display disappears. The call is cancelled.
30
7. Announcements
You can make the following announcements
Staff
To all rooms of your ward in which staff are present.
Staff 1 To all rooms of your ward in which staff from group 1 are
present.
Staff 2 To all rooms of your ward in which staff from group 2 are
present.
Ward
To all rooms in your ward.
This is how you make an announcement:
l
Press “Announcement“ in the menu of the main window.
ü The list of possible announcements appears:
e.g.
l
e.g.
Select the desired announcement by pressing the appropiate
select button on the left or on the right side.
ü The announcement window appears. The speech connection is
established.
31
7. Announcements
l
Make your announcement into the microphone or the handset.
l
When you have finished your announcement, press “Back“.
ü The announcement is finished.
32
8. Call
You can call the rooms in your ward and other ComStationBUS-C units
on your ward as well as the ManagementCenter (if installed).
This is how you call:
l
Press “Call“ in the menu of the main window.
ü All possible call desinations are listed.
e.g.
l
Press the select button of the desired call destination.
ü The speech connection window appears. The speech connection
is established.
33
8. Call
l
Use the handset or the hands-free facility.
If Privacy is displayed in the window, it is not possible for
you to hear an answer. If you want to receive an answer,
ask the patient to press a call button. This will deactivate
the privacy function and you will be able to hear the pa‐
tient. When you have finished the call, it will appear as an
answered call in the call list. Cancel it as described under
“Handling calls“.
l
When you have finished the conversation, press “Close“.
ü The call is finished.
8.1
Calling the ManagementCenter
At the ManagementCenter your call will not be answered directly. Your
request will simply be signalled on the ManagementCenter. The word
“ManagementCenter“ is marked orange on your ComStationBUS-C. As
soon as the ManagementCenter staff has the time, s/he will establish
a speech connection to you. The orange marking of the word “Manage‐
mentCenter“ disappears.
NOTE! If needed - e.g. if you have called the ManagementCenter acci‐
dentally - you can cancel the call. For this press the select button of the
orange marked word “ManagementCenter“. The marking disappears.
Your call is cancelled.
34
9. Ward coupling
Usually, you look after only those rooms in your ward with your Com‐
StationBUS-C. If necessary, for example when there are few staff, sev‐
eral wards can be coupled.
n
All calls and staff registrations in the coupled area are displayed on
all ComStationBUS-C units in the area.
n
All calls in the coupled area are forwarded to all of the area.
Wards can be coupled by you or by another call handling console.
If one or more wards are coupled with your ward, you will see the fol‐
lowing symbol in the title bar of the display:
You are coupled with other wards
NOTE! Ward coupling disables shifts (see page 37 onwards). This
means that if a shift is active, it will be disabled. The ward is no longer
divided into zones.
Your system administrator has installed a maximum of 8 ward coup‐
lings, from which you can select. There is a coupling of certain wards
behind every ward coupling. Ask you system administrator which
wards will be coupled with which ward coupling.
You can activate these ward couplings. At the same time, other ward
couplings can be activated, which you cannot influence. If a ward coup‐
ling is active, the appropriate wards are coupled.
9.1
Activating / deactivating a ward coupling
This is how you activate an inactive ward coupling or how you de-activ‐
ate an active ward coupling.
l
Press “Program“ à “Ward Coupling“.
ü The ward couplings are displayed.
35
9. Ward coupling
e.g.
Active ward couplings are marked in orange; they are activated by you
or by another call handling console. Inactive ward couplings are not
marked in orange. You can activate or deactivate ward couplings:
l
If you would like to activate an inactive ward coupling, press the
corresponding select button, so that it will be marked in orange. It
will be activated directly.
l
If you would like to de-activate an active ward coupling, press the
corresponding select button, so that the orange marking disap‐
pears. It will be de-activated directly.
l
To return to the main window press the button
.
(If you want to return to the previous menu level, press the button
.)
ü If still a ward coupling is active for your ward, in the title bar the sym‐
bol for ward coupling is displayed. The operation is completed.
36
10. Activating a shift
You only need to read this section, if shifts are assigned to your ward.
Ask your system administrator.
To support zone nursing Tunstall has developed the concept of zones
and shifts:
10.1
Zone
A zone is a part of a ward within which calls are forwarded. Calls which
are triggered within the zone are not forwarded to rooms in the ward
which lie outside the zone. Usually, certain nursing staff are respons‐
ible for one zone.
10.1.1
Shift
The zones of a ward are not set for the long-term. The zone organisa‐
tion can change. Each division of the ward into zones is classed as a
“shift“.
A shift refers to the division of a ward into a maximum of 8 zones. Thus,
the zones may overlap each other, i.e. certain rooms can belong to sev‐
eral zones.
A maximum of 8 different shifts can be defined for each ward. You activ‐
ate shifts using the ComStationBUS-C.
10.1.1.1 ComStationBUS-C
One or more ComStationBUS-C units are installed in each ward. Ac‐
cording to the shift, the ComStationBUS-C units can belong to different
zones. If a ward is divided into zones, but only has one ComStationBUSCunit, the system is usually programed that the ComStationBUS-C
belongs to all zones.
10.1.1.2 Examples
On the following pages you will find two examples of shift division.
37
10. Activating a shift
10.1.2 Example with one ComStationBUS-C on the ward:
Shift 1
Zone 1
Shift 2
Zone 1
Zone 2
Zone 3
Shift 3
Zone 1
38
Zone 2
10. Activating a shift
10.1.3 Example with several ComStationBUS-C units on the
ward:
Shift 1
Shift 2
Zone 1
Zone 2
Ask your system administrator how the shifts are assigned on your
ward.
10.1.4 Activating a shift
This is how you activate a shift:
l
Pressr „Program“ à „Shift“.
ü The shifts which can be activated for your ward are displayed.
39
10. Activating a shift
z.B.
If a shift is active, it is marked in orange.
l If a shift is marked in orange, press its select button.
ü The shift is no longer marked in orange, thus inactive.
l
Press the select button of the shift that you wish to activate.
l
The shift is marked in orange, thus active.
l
To return to the main window press the button
.
(If you want to return to the previous menu level, press the button
.)
ü The symbol for shift operation is displayed in the title bar. The ope‐
ration is completed.
NOTE! Ward coupling (see page 35 onwards) disables shifts. That
means, an active shift will be deactivated, if ward coupling is activated.
The ward will no longer be divided into zones. In the title bar the symbol
for ward coupling is displayed.
10.1.5 Deactivating the shift
You wish to deactivate the active shift, the ward should not be divided
into zones.
l Proceed as in the previous section. Only do not activate a new shift
after you have deactivated the active one.
40
11. Adjusting the volume
You can set the following values of the ComStationBUS-C:
n
Volume of the loudspeaker
n
Volume of the handset
n
Volume of the system sounds (e.g. call tone volume)
This is how you proceed:
l
Press “System“ à “Adjust“ à “Volume“.
ü The following window appears:
Decrease
Increase
l
To decrease the volume of loudspeaker, handset or system so‐
unds, press the left buttons. To increase the volume of loudspea‐
ker, handset or system sounds, press the right buttons.
l
Press “Confirm“.
ü The volume is adjusted.
l
To return to the main window press the button
.
(If you want to return to the previous menu level, press the button
.)
ü The operation is completed.
41
11. Adjusting the volume
42
12. Put the ComStationBUS-C into operation
It's only permitted to system administrators to install and setup a new
ComStationBUS-C. For this s/he needs the so-called configuration
password which can be obtained from Tunstall GmbH.
For setting up a new ComStationBUS-C the physical address has to be
adjusted. This address must match to the address set up in the “Sys‐
temOrganizer“ configuration software.
This is how you proceed:
l
Plug the ComStationBUS-C plug into the connection socket.
ü In the display appears: “Initialization“.
l
Please wait until initialization procedure is completed.
ü The log-on window appears, see page 16.
l
Press “Log On“.
ü You are logged on.The main window appears, see page 13.
l
Press “System“ à „Config“ à “Adjust Address“.
ü You are prompted to enter the configuration password.
l
Enter the configuraton password, which you obtained from Tunstall
GmbH, by pressing the select buttons corresponding to the figures.
43
12. Put the ComStationBUS-C into operation
ü The window for adjusting the address appears:
l
To decrease the value press the left button. To increase the value
use the right button.
l
If the correct address is displayed, press “Adjust Address“ by pres‐
sing the select button on the left or on the right of the phrase “Adjust
Address“.
ü The ComStation address is adjusted.
l
To return to the main window press the button
.
(If you want to return to the previous menu level, press the button
.)
ü The ComStationBUS-C is put into operation.
44
12. Put the ComStationBUS-C into operation
12.1
Menu structure
Log Off
Off
System
Adjust
Volume
Loudspeaker
Handset
System Sounds
Config
Adjust Address
Reinitialize
Configuration Password
Service
Service Password
For Tunstall only
Info
ComStation Info
Fault
Program
Shift
Ward Coupling
Announcement
Staff
Staff 1
Staff 2
Ward
Call
Room ...
ComStation
ManagementCenter
45
12. Put the ComStationBUS-C into operation
46
13. Cleaning and disinfection
13.1
Important notices
Do not use harsh or abrasive cleaning material or scouring cream.
Non residue-free cleaning fluids collect in the spaces of the housing.
When cleaning or disinfecting, do not touch any electrical contacts.
The ComStationBUS-C is not water-proof. Therefore, do not immerse it
into water or cleaning solutions.
Comply with the applicable directives for hygiene at your hospital.
13.1.1 How to proceed
Basically, the ComStationBUS-C can be cleaned with a moist tissue us‐
ing diluted and residue-free household cleaners or detergents.
The ComStationBUS-C is suitable for moist wipe disinfection. Recom‐
mended medium for disinfecting, e.g. Dismozon pur (0.5%) from Bode
Chemie, Hamburg, Germany. This oxygen-active surface cleaner and
disinfectant features the comprehensive ingredient Magnesium mon‐
operoxyphthalate hexahydrate (MMPP). Before using the disinfectant,
read the manufacturer's instructions.
When selecting a cleaning medium or a disinfectant, the following
notes to the product materials should be considered.
13.1.2 Product materials
The housing is made from the user-friendly plastic ABS. ABS features
a good resistance against dilute organic and inorganic acids, lyes, sa‐
line solutions as well as against most animal and vegetable fats and
oils. However, concentrated mineral acids, aromatic hydrocarbons, hy‐
drogen chlorides, esters, ether and ketones are aggressive for ABS.
Therefore, do not use any cleaning or disinfecting media which contain
the before-mentioned ingredients.
The display is made from transparent polycarbonate. This polycarbo‐
nate is resistant against dilute acids, oils and ethanol. However,
polycarbonate is not resistant against lye solutions, concentrated
47
13. Cleaning and disinfection
acids, chlorinated hydrocarbons, aromatic hydrocarbons and metha‐
nol.
The buttons are designed as robust membrane keys. The front is a
polyester film with polyurethane. Cleaning can be effected with any
cleaning medium which is also suitable for ABS material. Do not use
any cleaning agent which contains isopropanol. This ingredient may
damage the membrane.
48
QUALITY
MANAGEMENT
SYSTEM
DQS certified to
DIN EN ISO 9001
Reg. no. 56386
Reg. no. 56386
Tunstall GmbH
Orkotten 66, 48291 Telgte, Germany
Telephone +49 25 04 7 01-0
Fax +49 25 04 7 01-4 99
Email: [email protected]
Web: www.tunstall.de