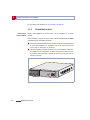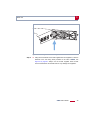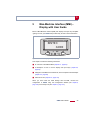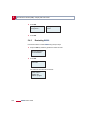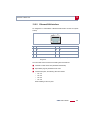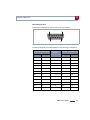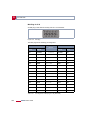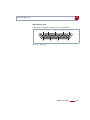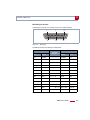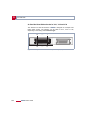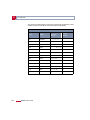
1
X4000 User’s Guide Installation and Configuration Copyright © 2000 BinTec Communications AG, all rights reserved. Version 1.3 Document #71000L August 2000 X4000 User’s Guide 1 Purpose This manual explains the installation and initial configuration of X4000 with software release 5.1.6. For up-to-the-minute information and instructions concerning the latest software release, you should always read our release notes, especially when carrying out a software update to a later release level. The latest release notes can always be found at www.bintec.de. Liability While every effort has been made to ensure the accuracy of all information in this manual, BinTec Communications AG cannot assume liability to any party for any loss or damage caused by errors or omissions or by statements of any kind in this document and is only liable within the scope of its terms of sale and delivery. The information in this manual is subject to change without notice. Additional information, including changes and release notes for X4000, can be found at www.bintec.de. As a multiprotocol router, X4000 sets up WAN connections in accordance with the system configuration. To prevent unintentional charges accumulating, the operation of the product should be carefully monitored. BinTec Communications AG accepts no liability for loss of data, unintentional connection costs and damages resulting from unsupervised operation of the product. Trademarks BinTec and the BinTec logo are registered trademarks of BinTec Communications AG. All other product names and trademarks mentioned are the property of the respective companies and manufacturers. Copyright Guidelines and standards All rights are reserved. No part of this publication may be reproduced or transmitted in any form or by any means – graphic, electronic, or mechanical – including photocopying, recording in any medium, taping, or storage in information retrieval systems, without the prior written permission of BinTec Communications AG. Adaptation and especially translation of the document is inadmissible without the prior consent of BinTec Communications AG. X4000 complies with the following guidelines and standards: ■ Low voltage directive 73/23/EEC according to EN60950, complies with German equipment safety regulations 2 X4000 User’s Guide ■ Interference immunity according to EN50082 1/8.97 ■ Class B interference emissions according to EN55022/8.94 +A1/1995 +A2/ 1997, electromagnetic compatibility according to EU directive 89/336/EEC. ■ CE marking for all EU countries Registration: ■ CE registration ■ German TÜV inspection/GS safety regulations ■ BAKOM (Switzerland) registration had not been completed at the time this manual went to print. For further information on this, see the latest release notes at www.bintec.de. In addition to the CE directives, X4000 also meets the ISDN requirements in France and can be connected to Euro-Numeris. How to reach BinTec By … At the telephone number or address Telephone +49 911 96 73 0 Fax +49 911 688 07 25 Mail BinTec Communications AG Südwestpark 94 D-90449 Nürnberg Internet www.bintec.de X4000 User’s Guide 3 4 X4000 User’s Guide Table of Contents Table of Contents Welcome! 15 General Safety Precautions 31 Hardware Description and Installation 35 Configuration Requirements 69 Man-Machine Interface (MMI) – Display with User Guide 93 Fast Configuration with the Configuration Wizard (Basic Unit) 109 Basic Configuration of Basic Unit with Setup Tool 119 Advanced Configuration of the Basic Unit with the Setup Tool 187 Configuration of Expansion and Resource Cards with the Setup Tool 277 Configuration of Security Functions and Firewall 307 Configuration Management 363 Troubleshooting 375 Technical Data 387 Important Commands 411 General Safety Precautions in 15 Different Languages 421 Glossary 469 Index 487 X4000 User’s Guide 5 Table of Contents 6 X4000 User’s Guide Table of Contents Table of Contents Table of Contents 5 Table of Contents 7 1 Welcome! 1.1 15 X4000 – The Workgroup Access Router for Present and Future Applications 16 1.2 Scope of Supply 18 1.2.1 Basic Unit 18 1.2.2 Expansion Cards 18 1.3 BinTec Companion CD 20 1.4 Documentation from BinTec 22 1.5 System Requirements 23 1.6 Guarantee Terms 24 1.7 About this Manual 25 1.7.1 Contents 25 1.7.2 Meaning 27 1.8 Feedback 29 2 General Safety Precautions 31 3 Hardware Description and Installation 35 3.1 Basic Unit 36 3.1.1 Desktop Unit 37 3.1.2 19-Inch Built-In Unit 40 3.2 Expansion and Resource Cards 53 3.2.1 Design of Expansion Cards 53 3.2.2 Installation and Replacement of Expansion Card 55 X4000 User’s Guide 7 Table of Contents 4 5 8 3.3 Setting Up and Connecting 59 3.4 Status Messages via LEDs 63 3.4.1 Basic Unit 63 3.4.2 Expansion Cards 64 3.5 Boot Sequence 66 Configuration Requirements 69 4.1 Connection Methods 70 4.1.1 Man-Machine Interface (MMI) 71 4.1.2 Connecting Over the Serial Interface 71 4.1.3 Connecting Over a LAN 73 4.1.4 Connection Over ISDN 74 4.2 Logging In 76 4.3 Configuration Options 78 4.3.1 Methods of Configuration 78 4.3.2 Using the Setup Tool 79 4.4 Procedure for Initial Configuration 91 Man-Machine Interface (MMI) – Display with User Guide 93 5.1 Overview 94 5.2 Display and Input Keys 96 5.2.1 Using the Input Keys 96 5.2.2 Meaning of LEDs 97 5.2.3 Navigation Bars 98 5.3 Menu Architecture 5.3.1 Display Settings 100 5.3.2 IP Address and Netmask 102 5.3.3 Date and System Time 103 5.3.4 Information about X4000 Basic Unit 104 5.3.5 Information about X4000 Expansion Card 105 X4000 User’s Guide 99 Table of Contents 5.3.6 6 7 Monitoring 106 5.4 Useful Short-Cuts 107 5.4.1 Defining Default Screen 107 5.4.2 Saving the Configuration 107 5.4.3 Restarting X4000 108 Fast Configuration with the Configuration Wizard (Basic Unit) 109 6.1 In Advance of Configuration 110 6.2 Installing BRICKware 112 6.3 Basic X4000 Configuration with the Configuration Wizard 113 6.4 Configuring a PC 115 6.5 Testing your Configuration 117 Basic Configuration of Basic Unit with Setup Tool 119 7.1 Basic Router Settings 120 7.1.1 Entering License(s) 121 7.1.2 Entering System Data 123 7.1.3 Configuring the LAN Interface 126 7.1.4 Configuring X4000 as DHCP Server 129 7.1.5 Setting Filters 132 7.1.6 Where do we go from here? 136 7.2 Configuring WAN Interfaces 137 7.2.1 Configuring the ISDN BRI Interface 137 7.2.2 Configuring Serial Interfaces 148 7.2.3 Configuring the LAN Interface for Using ADSL (PPP-over-Ethernet) 155 7.3 Configuring WAN Partners 159 7.3.1 Basic Procedure 159 7.3.2 Examples 182 7.4 Saving the Configuration File 186 X4000 User’s Guide 9 Table of Contents 8 10 Advanced Configuration of the Basic Unit with the Setup Tool 187 8.1 General WAN Settings 188 8.1.1 Dynamic IP Address Server 188 8.1.2 CAPI User Concept 190 8.1.3 General PPP Settings 194 8.1.4 X.31 TEI 197 8.2 Settings Specific to WAN Partners 198 8.2.1 Delay after Connection Failure 198 8.2.2 Channel Bundling 199 8.2.3 Bandwidth on Demand (BoD) 201 8.2.4 Always On/Dynamic ISDN (AO/DI) 206 8.2.5 Layer 1 Protocol (ISDN B-Channel) 219 8.2.6 IP Transit Network 222 8.2.7 Transfer of DNS and WINS IP Addresses to WAN Partner 225 8.2.8 Routing Information Protocol (RIP) 229 8.2.9 Compression 232 8.2.10 Proxy ARP (Address Resolution Protocol) 234 8.2.11 Keepalive Monitoring 236 8.3 Basic IP Settings 242 8.3.1 System Time 242 8.3.2 Name Resolution in X4000 with DNS Proxy 246 8.3.3 Port Numbers 265 8.3.4 BOOTP Relay Agent 266 8.4 IPX Settings 268 8.4.1 General Settings 268 8.4.2 Configuring the LAN Interface 270 8.4.3 Configuring WAN Partners 271 8.5 Bridging 275 8.6 Extra License Features 276 X4000 User’s Guide Table of Contents 9 10 Configuration of Expansion and Resource Cards with the Setup Tool 277 9.1 WAN Interface Card for ISDN BRI 278 9.1.1 Configuration with the Setup Tool 278 9.2 WAN Interface Card for ISDN PRI and/or G.703 281 9.2.1 Configuration with the Setup Tool 282 9.3 LAN Interface Card for 10/100 Mbps 287 9.3.1 Configuration with the Setup Tool 287 9.3.2 Broadband Internet Access (ADSL) with X4000 and LAN Expansion Card 288 9.4 Resource Card with Digital Modems 295 9.4.1 X4000 with Digital Modems as Remote Access Server 295 9.5 Resource Card for Encryption and Compression 306 9.5.1 Configuration with the Setup Tool 306 Configuration of Security Functions and Firewall 307 10.1 Activity Monitoring 308 10.1.1 Syslog Messages 308 10.1.2 Monitoring Functions in the Setup Tool 313 10.1.3 Credits Based Accounting System 316 10.1.4 HTTP Status Page 320 10.1.5 Java Status Monitor 321 10.1.6 Activity Monitor 322 10.2 Access Security 325 10.2.1 Logging In 325 10.2.2 Checking the Calling Party Number 326 10.2.3 Authentication of PPP Connections with PAP, CHAP or MS-CHAP 327 10.2.4 Callback 327 10.2.5 Closed User Group 330 10.2.6 Access to Remote CAPI 330 10.2.7 NAT (Network Address Translation) 331 X4000 User’s Guide 11 Table of Contents 10.2.8 11 12 12 Filters (Access Lists) 335 10.2.9 Local Filters 348 10.2.10 Back Route Verification 352 10.2.11 TAF Client 353 10.2.12 Extended IP Routing (XIPR) 353 10.3 Line Tapping Security 354 10.3.1 Encryption 354 10.3.2 VPN (with extra license) 357 10.4 Special Features 358 10.4.1 Startup Procedure 358 10.4.2 Auto Logout 358 10.4.3 Prevention of Denial-of-Service Attacks 358 10.5 Checklist 360 Configuration Management 363 11.1 Administration of Configuration Files 364 11.2 Updating Software 371 Troubleshooting 375 12.1 Aids to Troubleshooting 376 12.1.1 Man-Machine Interface (MMI) 376 12.1.2 Local SNMP Shell Commands 376 12.1.3 External Aids 377 12.2 Typical Errors and Procedure 379 12.2.1 System Errors 379 12.2.2 ISDN Connections 380 12.2.3 IPX Routing 383 X4000 User’s Guide Table of Contents 13 14 15 Technical Data 387 13.1 Mains Unit 388 13.2 Features of Basic Unit 389 13.2.1 Serial Console Interface 390 13.2.2 Ethernet/LAN Interface 391 13.2.3 ISDN BRI Interface 392 13.2.4 Serial WAN Interfaces: 393 13.2.5 Display Interface 405 13.3 Features of Expansion and Resource Cards 406 13.3.1 X4E-2/3BRI – WAN Interface Card for ISDN BRI (Basic Rate Interface) 406 13.3.2 X4E-1/2PRI – WAN Interface Card for ISDN PRI (Primary Rate Interface) and/or G.703 407 13.3.3 X4E-2FE – LAN Interface Card for 10/100 Mbps 408 13.3.4 XTR-S/M/L – Resource Cards with Digital Modems 408 13.3.5 XTR-ENC – Resource Card for Encryption and Compression 409 Important Commands 411 14.1 SNMP Shell Commands 412 14.2 BRICKtools for Unix Commands 419 General Safety Precautions in 15 Different Languages 421 Glossary 469 Index 487 Document #71000L, Version1.3 497 X4000 User’s Guide 13 Table of Contents 14 X4000 User’s Guide 1 1 Welcome! Congratulations on deciding to buy the X4000 extendible multiprotocol router from the workgroup access series of BinTec Communications AG – an efficient and future-oriented router solution for use in small and medium-sized firms. Figure 1-1: X4000 - the workgroup access router for present and future applications X4000 can provide various applications with only a basic unit: ■ Router for leased lines with ISDN backup ■ Central fax gateway for up to 30 connections ■ Router for analog and digital connections ■ VPN solution with data encryption and ISDN backup ■ Remote access server for up to 62 connections X4000 User’s Guide 15 1 Welcome! 1.1 X4000 – The Workgroup Access Router for Present and Future Applications The extension capability of X4000 makes the multiprotocol router a futureoriented and flexible investment. X4000 with its RISC CPU is extremely powerful and capable of meeting future requirements. 16 Basic unit The basic unit is obtainable as a desktop unit or as a 19-inch built-in unit. Both variants of the basic unit are already equipped with integrated 10/100 BT Ethernet interface, ISDN BRI interface, serial X.21/V.35/V.36 interface for leased lines, serial X.21bis interface and serial console interface. Expansion cards A slot for externally inserting an expansion card enables X4000 to grow in line with your requirements, so that you can use the same basic unit for various applications. A high degree of flexibility is assured by our motto: “Change the card, not the equipment!” Resource cards Expansion cards with ISDN BRI or ISDN PRI interfaces can also be equipped with powerful resource cards with digital modems. This makes extremely high efficiency and high port or modem density possible. Ergonomic design The well-proven BinTec "Setup Tool" for the router configuration interface and the "Configuration Wizard" for fast basic configuration ensure ergonomic and user-friendly design. The newly developed Man-Machine Interface (MMI) from BinTec Communications AG with its LC display, input keys and intuitive user guide – in several languages – also simplifies "getting to know" your router and provides fast access and display of the main settings. A wide-range mains unit without fans ensures quiet operation of X4000 in office environments. Multiprotocol router The flexible multiprotocol router can be used for WAN access, as well as for remote access server, fax gateway, remote CAPI server or LAN router. X4000 supports the TCP/IP, IPX and X.25 (optional) protocols and is also suitable for bridging other protocols based on the spanning tree method. Remote CAPI Using BinTec’s remote CAPI interface, applications based on the widely used CAPI interface can be used network-wide. This means the available ISDN connections can be used more effectively. X4000 User’s Guide X4000 – The Workgroup Access Router for Present and Future Applications 1 Security The features supplied include BinTec’s well-tried security package SAFERNETTM. This package contains security technologies such as filters, Network Address Translation (NAT) and access passwords. The security functions protect X4000 and the network connected to it against unauthorized access. The future New technologies and developments are vital for BinTec Communications AG. X4000’s flexible platform with an expansion slot and a powerful processor enable the rapid use of new WAN/LAN technologies and features. This makes X4000 a future-oriented and migration-capable device. We’ll keep working on it! You can download BinTec’s current software from the World Wide Web. You can find detailed information about the individual subjects in the relevant parts of this manual and in the more detailed documentation (on the BinTec Companion CD). X4000 User’s Guide 17 1 Welcome! 1.2 Scope of Supply 1.2.1 Basic Unit The X4000 basic unit is obtainable as a desktop unit or as a 19-inch built-in unit. The X4000 basic unit is supplied with the following parts: ■ Cable sets – Serial cable for the console port – IEC AC power cord – ISDN cable ■ BinTec Companion CD ■ Documentation – User’s Guide – Release notes, if required ■ Additional material – 19-inch mounting kit (only with 19-inch built-in unit) – License card with license information – Single user license for RVS-COM Lite – Leaflet with X4000 guarantee information 1.2.2 Expansion Cards The following expansion cards can be purchased for X4000: ■ X4E-1/2PRI: WAN interface card for ISDN PRI and/or G.703 18 – equipped as standard with hardware support for encryption and compression – to be optionally equipped with up to two resource cards with digital modems (XTR-S, XTR-M) or a resource card (XTR-L) X4000 User’s Guide 1 Scope of Supply ■ X4E-2/3BRI: WAN interface card for ISDN BRI, to be optionally equipped with – a resource card with digital modems (XTR-S, XTR-M) and/or – a resource card for encryption and compression (XTR-ENC) ■ X4E-2FE: LAN interface card for 10/100 Mbps, to be optionally equipped with – a resource card for encryption and compression (XTR-ENC) X4000 User’s Guide 19 1 Welcome! 1.3 BinTec Companion CD You will find all the programs you need for the installation, configuration and administration of X4000 on your BinTec Companion CD. BRICKware BRICKware for Windows contains the Windows utility programs: ■ DIME Tools are for monitoring and administration of your X4000. ■ The Configuration Wizard leads you step by step through the basic configuration of X4000. ■ You gain access to X4000 via the serial interface using the terminal program BRICK at COM1 or BRICK at COM2. ■ The Configuration Manager allows you to configure and administrate all BinTec routers in the network via a graphic interface. Here you can view and edit all SNMP tables and variables. ■ The Java Status Monitor allows you to request system information over an Internet browser. ■ Remote CAPI Client: The Remote CAPI Client allows you to use communications applications based on the standard CAPI interface (e.g. RVS-COM Lite). ■ Token Authentication Firewall (TAF) program (optional): This software package is required if you are using the Security Dynamics security system. ■ The Activity Monitor enables you to monitor the utilization of X4000 at a glance. More detailed descriptions of all software programs can be found in our online manual BRICKware for Windows. RVS-COM Lite 20 In addition to BRICKware, your BinTec Companion CD contains the RVS-COM Lite communications program that allows you to use all the usual communications applications on your PC, such as an answering machine, fax or file transfer. X4000 User’s Guide 1 BinTec Companion CD Please note: The license for RVS-COM Lite is a single user license. You can purchase additional licenses from your dealer. What else? The Companion CD also contains a range of other useful directories in which you can find the following, for example: ■ The documentation in electronic form (see chapter 1.4, page 22) ■ A copy of the router software ■ UNIX Tools (administration) ■ Adobe’s Acrobat Reader ■ Configuration examples X4000 User’s Guide 21 1 Welcome! 1.4 Documentation from BinTec Together with X4000, you will have received part of the documentation in printed form and all of it in electronic form (PDF, HTML). The electronic versions of the different documents are included on the BinTec Companion CD. In addition to your Companion CD documentation, you can download all the very latest BinTec documentation from our WWW server at www.bintec.de. The following documentation is currently available: ■ User’s Guide (English) This manual. ■ Benutzerhandbuch (German) This manual in German. ■ Reference manuals (English, PDF/HTML). – Software Reference (PDF) Online reference with detailed information on functions described here, a reference for the internal SNMP table structures and the operation of the SNMP shell. – Extended Features Reference (PDF) Online reference for extra functions, some of which are only available with a separate license (e.g. VPN). – MIB Reference HTML document with short descriptions about all SNMP tables and variables for X4000. ■ BRICKware for Windows (English, PDF) User’s guide for Windows utility programs (BRICKware) ■ Release notes (English, PDF and/or printed) Up-to-the-minute information and instructions concerning the latest software release, description of all changes undertaken since the previous release. In the Logic release notes, you will find instructions to help you upgrade BOOTmonitor and/or firmware logic. ■ Release notes for router operation in UK (English, PDF) Instructions for the operation of BinTec routers in Great Britain. 22 X4000 User’s Guide 1 System Requirements 1.5 System Requirements X4000 can be configured from all conventional platforms. X4000 is a standalone device that is independent of the PC or operating system to which it is connected. The router communicates with the PC over a LAN interface (10/ 100 Mbps) or a serial connection. Your router can therefore be used in many different operating system environments, such as DOS, Windows, UNIX, AS/ 400, Macintosh or Novell. If you want to use the Configuration Wizard, however, you will require the following: ■ PC with serial interface (V.24) ■ Windows 95 or 98 or Windows NT 4.0 ■ Installed network card (10 Mbps Ethernet or 10/100 Mbps Fast Ethernet) ■ Installed Microsoft TCP/IP protocol ■ High-color monitor (more than 256 colors) for correct display of graphics. X4000 User’s Guide 23 1 Welcome! 1.6 Guarantee Terms 2 years X4000 is guaranteed for 2 years from the date of purchase. Please contact your dealer for handling claims under the guarantee. 6 years You can extend the guarantee for X4000 to 6 years by registering with BinTec Communications AG. To register, fill out the online form provided at www.bintec.de. You will then receive written confirmation by return. As a registered user, you not only have the advantage of an extended guarantee, but also receive regular information about new products, if you wish. Please read the enclosed leaflet with detailed guarantee information for X4000. Danger! Live components are exposed when the equipment is open. There is a risk of electric shock! It is not necessary to open the housing for connecting or operating, or for installing or removing the expansion card. If the housing is opened, this tears the guarantee label on X4000, which invalidates the guarantee. ➤ Never open the housing! 24 X4000 User’s Guide 1 About this Manual 1.7 About this Manual 1.7.1 Contents This manual is structured as follows: Chapter Contents 1: "Welcome!" General introduction, scope of supply, guarantee terms, information about this manual. 2: "General Safety Precautions" General safety precautions. 3: "Hardware Description and Installation" Description of the hardware (basic unit, expansion cards, MMI, LEDs, connections). Instructions on how to install the 19-inch built-in unit in the rack, how to change over the display, how to install and remove an expansion card, and how to connect the equipment. Description of boot sequence. 4: "Configuration Requirements" Description of access and configuration options. A basis for working with the Setup Tool. Procedure for initial configuration. 5: "Man-Machine Interface (MMI) – Display with User Guide" How to use the MMI with display and input keys. 6: "Fast Configuration with the Configuration Wizard (Basic Unit)" How to take X4000 into operation in a few minutes using the Windows tool Configuration Wizard and how to install and set up other useful software. 7: "Basic Configuration of Basic Unit with Setup Tool" How to take X4000 into operation with the Setup Tool and set up a basic configuration (including configuration of the WAN interfaces). X4000 User’s Guide 25 1 Welcome! Chapter Contents 8: "Advanced Configuration of the Basic Unit with the Setup Tool" How to carry out more advanced settings with the Setup Tool. 9: "Configuration of Expansion and Resource Cards with the Setup Tool" How to configure an expansion card and any resource card(s) equipped 10: "Configuration of Security Functions and Firewall" How to configure security mechanisms using SAFERNET, e.g. NAT (Network Address Translation) or filters. 11: "Configuration Management" How to administrate configuration files and how to perform software updates. 12: "Troubleshooting" Important tips on fault clearance. 13: "Technical Data" X4000 technical data. 14: "Important Commands" A brief overview of the most important commands of the SNMP shell and BRICKtools for Unix. 15: "General Safety Precautions in 15 Different Languages" General safety precautions in 15 different languages. Table 1-1: List of chapters 26 X4000 User’s Guide 1 About this Manual 1.7.2 Meaning To help you locate and interpret information easily, this manual uses the following visual aids: Symbol Meaning Points out useful and relevant tips and tricks. Predicts potential pitfalls and explains how to avoid them. Brings to your attention general and important points. Explains required fundamental information. Brings your attention to important safety precautions. Levels of danger are in accordance with ANSI: ■ Caution (indicates possible danger that, if unheeded, could cause material damage) ■ Warning (indicates possible danger that, if unheeded, could cause bodily harm) ■ Danger (indicates danger that, if unheeded, could lead to serious bodily harm or death) Table 1-2: List of visual aids X4000 User’s Guide 27 1 Welcome! To help you find and interpret the information in this manual, the following typographical elements are used: Typographical element Meaning ➤ Here you are requested to do something. ■ Lists including two levels. – – MENU ➧ SUBMENU Indicates menus and submenus in the Setup Tool. Non-proportional (Courier), e.g. ping 192.168.1.254 ■ Indicates commands (e.g. in the SNMP shell) that you must enter as shown. ■ Used to display the Setup Tool. <IP address> Indicates inputs in which you enter a value for the term shown in the brackets. Do not enter the pointed brackets. bold, italics, e.g. Indicates example terms. BigBoss bold, e.g. ➤➤ MIB Indicates terms that you can find in the glossary (for online texts, click the double arrow). bold, e.g. ■ Indicates fields in the Setup Tool and MIB tables and variables. biboAdmLoginTable, Windows Start menu ■ Indicates italics, e.g. Indicates values that can be entered or set in the Setup Tool or MIB variables. none keys/key Windows terms. Table 1-3: Typographical elements 28 X4000 User’s Guide combinations and 1 Feedback 1.8 Feedback As the BinTec Communications AG documentation team, we write manuals and other documentation for your use. We aim to supply documentation that is up to the high quality of X4000 and meets your requirements. You as the user of BinTec products are the best person to judge whether we have succeeded with this manual. So please let us know what is missing in this manual, what you don’t like, what we should do better, what you like, what you think is especially successful, etc. Your constructive criticism is always welcome and will help us design the documentation for BinTec products to suit your wishes and needs. Questionnaire The last page of this manual contains a questionnaire we have prepared for your suggestions. Please fill out the questionnaire and return ■ by fax to: +49 911 - 9673 1498 ■ by post to: BinTec Communications AG Keyword: Docu Feedback Südwestpark 94 90449 Nürnberg ■ or just send us an e-mail to: [email protected] We look forward to receiving your feedback. Thanks for your support. X4000 User’s Guide 29 1 30 Welcome! X4000 User’s Guide 2 2 General Safety Precautions The following sections contain safety precautions you are strongly advised to heed when working with your equipment. Transport and storage ■ Only transport and store X4000 in its original packaging or use other Installation and operation ■ Read the information on the ambient conditions (see Technical Data) appropriate packaging to protect against knocking and shaking. before installing and operating X4000. Place the equipment on a firm flat base. ■ Electrostatic charges may cause damage to the equipment. You should therefore wear a grounded wrist strap or touch a grounded surface before you touch sockets or extension cards of X4000. Only grip extension cards at the edges and do not touch components or conductor tracks. ■ Keep the unused extension slot covered with the dummy cover to prevent objects getting inside the equipment. Foreign bodies located in the equipment during operation create a danger of electric shock and shortcircuits. ■ Ensure that no sharp objects can damage the window of the display module. Protect the display module against knocks and dropping and only connect it to the RJ11 socket provided for this purpose on X4000 to prevent damage to X4000 and the display module. ■ Make sure the cables do not cover the ventilation slots of the equipment or interfere with ventilation. Obstructing the ventilation of X4000 may cause damage to the equipment. Damage caused by lack of ventilation invalidates the guarantee. ■ Never open the basic unit or tamper with the mains unit in any way, as this can create a lethal danger through electric shock. Don’t remove any fixing screws on the basic unit. ■ Condensation may occur externally or internally if the equipment is moved from a colder room to a warmer room. When moving the equipment under such conditions, allow ample time for the equipment to reach room X4000 User’s Guide 31 2 General Safety Precautions temperature and to dry out completely before operating. Observe the ambient conditions under Technical Data. ■ Make sure the local mains voltage is the same as the nominal voltages of the mains unit. The equipment may only be operated under the following conditions. – 100 - 240 V AC – 50 - 60 Hz ■ Make sure the safety mains socket in the building is freely accessible. You must remove the mains plug to disconnect the equipment completely from the mains. ■ Make sure you follow the correct cabling sequence, as described in the manual. Use only the cables supplied with the equipment or cables that meet the specifications in this manual. If you use other cables, BinTec Communications AG cannot accept liability for any damage occurring or for any adverse effects on operation. The equipment guarantee is invalidated in such cases. ■ Connect the equipment as described in the manual. ■ Arrange the cables so that they are not in the way and cannot be tripped over or damaged. ■ Do not connect, disconnect or touch the data lines during lightning storms. Operation according to the regulations ■ X4000 is intended for use in offices. As an ISDN multiprotocol router, X4000 establishes WAN connections depending on the system configuration. To avoid extra charges, you should carefully monitor the product. ■ X4000 meets the relevant safety standards for information technology equipment for use in offices. ■ Operation of the system according to IEC 950/EN 60950 is only guaranteed when the top of the housing is fitted (cooling, fire protection, RFI suppression). ■ Ambient temperature should not exceed 50 °C. Avoid exposure to direct sunlight. 32 X4000 User’s Guide 2 ■ Make sure no foreign objects (e.g. paper clips) or liquids get into the equipment (risk of electric shock, short-circuit). Make sure the equipment is sufficiently cooled. ■ X4000 contains no components for the user to replace or any switches or jumpers that need to be set by the user. ■ In an emergency (e.g. damaged housing or operating element, entry of liquid or foreign bodies), immediately disconnect the power supply and notify customer service. Cleaning and repair ■ The equipment should only be opened by service centers authorized by BinTec. Always disconnect the power cord before opening the equipment. Unauthorized opening and improper repairs can result in serious danger for the user (e.g. electric shock). Ensure that repairs are only carried out by service centers authorized by BinTec. Your dealer will tell you where the service centers are situated. Failure to observe the above instructions invalidates the guarantee and no claims can be accepted. ■ Never use water to clean this equipment. Water spillage can result in serious danger for the user (e.g. electric shock) and cause considerable damage to the equipment. ■ Never use scouring or abrasive alkaline cleaning agents on this equipment. X4000 User’s Guide 33 2 34 General Safety Precautions X4000 User’s Guide 3 3 Hardware Description and Installation This chapter contains the following information, which you will need for the installation of X4000: ■ Basic unit, chapter 3.1, page 36 – X4000 as desktop unit, chapter 3.1.1, page 37 or 19-inch built-in unit, chapter 3.1.2, page 40 – "Display and Input Keys", page 37 – "Installing in a 19-inch cabinet", page 40 – "Removal from 19-inch cabinet", page 44 ■ Expansion and resource cards, chapter 3.2, page 53 – Design of expansion cards, chapter 3.2.1, page 53 – Installation and replacement of expansion card, chapter 3.2.2, page 55 ■ Setting up and connecting X4000, chapter 3.3, page 59 – "Connecting X4000 to PC or terminal", page 60 – "Connecting X4000 to LAN", page 60 – "Connecting X4000 to WAN", page 60 – "Connecting X4000 to power supply", page 61 – Connecting the "Expansion card", page 61 – Activating the "Real-time clock", page 61 ■ Status messages by LEDs, chapter 3.4, page 63 – Basic unit, chapter 3.4.1, page 63 – Expansion cards, chapter 3.4.2, page 64 ■ Boot sequence, chapter 3.5, page 66 X4000 User’s Guide 35 3 Hardware Description and Installation 3.1 Basic Unit BinTec Communications AG offers you X4000 in two variants: ■ Desktop unit for setting up in the office ■ Built-in unit for 19-inch cabinet The X4000 basic unit is not fitted with an expansion card in the ex works state. The expansion slot provided for the expansion card at the rear of the equipment is closed by a dummy cover. This dummy cover is unscrewed when the expansion card is fitted. The slot is automatically covered by the backplane of the expansion card when the card is fitted. 36 X4000 User’s Guide 3 Basic Unit 3.1.1 Desktop Unit 4000 1 C OK 2 1 Display with input keys Figure 3-1: 2 Power LED (blue) Front view of desktop unit Display and Input Keys BinTec’s Man-Machine Interface (MMI), a convenient user guide with display and input keys, guides the user through a number of basic functions of X4000. You will find a detailed description of the MMI in chapter 5, page 93. X4000 User’s Guide 37 3 Hardware Description and Installation Display unit on 19-inch built-in unit 38 The display unit on the 19-inch built-in unit can be mounted on the front or back of X4000. The instructions for changing the position are contained in "Step 2 Changing over the display", page 46. X4000 User’s Guide 3 Basic Unit Rear view of desktop unit: 10 11 1 10 2 3 9 4 8 5 6 7 1 Expansion card slot (with dummy cover) 7 IEC AC socket of mains unit 2 Status LEDs (red and green) 8 X.21/V.35/V.36 interface 3 RJ11 socket for display 9 X.21bis interface 4 Mini DIN socket (console) 10 Fixing screws for expansion card and dummy cover 5 Ethernet/LAN 10/100 Base-T Fast Ethernet interface 11 Plastic strip for activating the buffer battery for the real-time clock (RTC) 6 ISDN BRI interface Figure 3-2: Rear view of desktop unit X4000 User’s Guide 39 3 Hardware Description and Installation For connecting your desktop unit, go to chapter 3.3, page 59. 3.1.2 Installing in a 19-inch cabinet 19-Inch Built-In Unit BinTec offers X4000 as a 19-inch built-in unit for installation in a 19-inch cabinet. How to install your 19-inch unit in the 19-inch cabinet is described below. X4000 is flexible and can be installed as follows: ■ with its front panel towards the front and the connections towards the back in your 19-inch cabinet (cf. "Installation with Front Panel Towards the Front", page 41 and Figure 3-6, page 44). ■ with the connections towards the front in your 19-inch cabinet. In this case, the display can be changed over so that it can be seen from the front (cf. "Installation with Connections Towards the Front and Changing Over the Display", page 45). C Figure 3-3: 40 X4000 User’s Guide OK 4000 19-inch built-in unit 3 Basic Unit Installation with Front Panel Towards the Front Caution! It is not necessary to open the housing for connecting or operating, or for installing or removing the expansion card. If the housing is opened, this tears the guarantee label on X4000, which invalidates the guarantee. ➤ Never open the housing! Danger! Live components are exposed when the equipment is open. There is a risk of electric shock! ➤ Never open the housing! X4000 User’s Guide 41 3 Hardware Description and Installation The following components and fixing parts are required for installation in a 19inch cabinet: 1 3 1 2 2 5 4 1 Mounting bracket 4 Cover 2 Fixing holes 5 Power LED housing 3 Display unit Figure 3-4: 42 X4000 User’s Guide Exploded drawing showing the main components and mounting parts for the installation of X4000 in a 19-inch cabinet 3 Basic Unit Proceed as follows: Figure 3-5: Step 1 Screwing the bracket to the fixing holes ➤ Using the two brackets and screws supplied with X4000, screw the brackets to the front fixing holes provided on the side of X4000, see Figure 3-5, page 43. Always use the screws supplied. Other screws may not withstand the mechanical loads or may damage the equipment. Step 2 ➤ Connect the necessary interface cables to the sockets provided (cables must already be installed if your cabinet is not accessible from the rear!). Step 3 ➤ Slide this preassembled unit with the two brackets screwed to it into the cabinet and screw the preassembled unit to the longitudinal sections of the cabinet (these screws are not supplied with X4000, but are included with the cabinet.) X4000 User’s Guide 43 3 Hardware Description and Installation This is what X4000 should look like on completion of installation. Figure 3-6: X4000 installed in a 19-inch cabinet For connecting your 19-inch built-in unit, go to chapter 3.3, page 59. Removal from 19-inch cabinet 44 To remove X4000 from the 19-inch cabinet (e.g. for replacing or installing an expansion card, installing a fan unit, etc.), carry out the steps described above in the reverse order. X4000 User’s Guide 3 Basic Unit Installation with Connections Towards the Front and Changing Over the Display Caution! It is not necessary to open the housing for connecting or operating, or for installing or removing the expansion card. If the housing is opened, this tears the guarantee label on X4000, which invalidates the guarantee. ➤ Never open the housing! Danger! Live components are exposed when the equipment is open. There is a risk of electric shock! ➤ Never open the housing! Caution! X4000 must be switched off before changing over the display unit. Changing over the display unit with the equipment switched on may damage both the display and the basic unit. ➤ Switch off X4000 before changing over the display unit! X4000 User’s Guide 45 3 Hardware Description and Installation Proceed as follows: Figure 3-7: Step 1 Removing the plastic cover ➤ Remove the plastic cover of X4000 from the metal housing. This is done by pressing the edge of the housing on the narrow side of the front panel (marked with a grip) slightly towards the display, see Figure 37, page 46. This releases the plastic cover, which can be removed from the front. The blue Power LED with the BinTec logo is still visible after removing the front panel. Step 2 Changing over the display 46 ➤ Disconnect the display cable from the RJ11 socket on the metal housing (Caution: The plug is locked to the socket; make sure you free the plug). X4000 User’s Guide 3 Basic Unit Figure 3-8: Step 3 Removing the display ➤ Turn the display unit by approx. 40 ° to the left and remove the display unit to the front away from the metal housing (bayonet connection), see Figure 3-8, page 47. X4000 User’s Guide 47 3 Hardware Description and Installation The following components and fixing parts are required for installation in a 19inch cabinet with the X4000 connections to the front: 3 6 1 4 1 2 5 2 1 Mounting bracket 4 Bayonet connection for fixing the display unit 2 Fixing holes 5 Display cable 3 Display unit 6 Power supply for external fan unit (for 19-inch built-in unit only). Figure 3-9: 48 4 X4000 User’s Guide Exploded drawing showing the main components and mounting parts for the installation of X4000 in a 19-inch cabinet 3 Basic Unit Figure 3-10: Screwing the bracket to the fixing holes Step 4 ➤ Using the two brackets and screws supplied with the equipment, screw the brackets to the rear fixing holes provided on the side of X4000, see Figure 3-10, page 49. Always use the screws supplied. Other screws cannot withstand the mechanical loads or may damage the equipment. X4000 User’s Guide 49 3 Hardware Description and Installation Figure 3-11: Mounting the display on a fixing bracket Step 5 ➤ Mount the display unit on one of the two fixing brackets. Make sure that the display unit engages properly, see Figure 3-12, page 51. 50 X4000 User’s Guide 3 Basic Unit Figure 3-12: Mounting the display on one of the side brackets Step 6 ➤ Slide this preassembled unit with the two brackets screwed to it into the cabinet and screw the preassembled unit to the longitudinal sections of the cabinet (these screws are not supplied with X4000, but are included with the cabinet), see Figure 3-13, page 52. Step 7 ➤ Connect the plug of the display cable to the RJ11 socket provided. X4000 User’s Guide 51 3 Hardware Description and Installation This is what X4000 should look like on completion of installation. Figure 3-13: X4000 installed with connections at the front For connecting your 19-inch built-in unit, go to chapter 3.3, page 59. Removal from 19-inch cabinet 52 To remove X4000 from the 19-inch cabinet (e.g. for installing a fan unit, etc.), carry out the steps described above in the reverse order. X4000 User’s Guide 3 Expansion and Resource Cards 3.2 Expansion and Resource Cards You can extend your basic unit by adding an X4000 expansion card. The following expansion cards are offered by BinTec for integration in X4000: ■ X4E-1/2PRI: WAN interface card for ISDN PRI and/or G.703 – equipped as standard with hardware support for encryption and compression – can be optionally equipped with up to two resource cards with digital modems (XTR-S, XTR-M) or a resource card (XTR-L) ■ X4E-2/3BRI: WAN interface card for ISDN BRI, can be optionally equipped with – a resource card with digital modems (XTR-S, XTR-M) and/or – a resource card for encryption and compression (XTR-ENC) ■ X4E-2FE: LAN interface card for 10/100 Mbps, can be optionally equipped with – a resource card for encryption and compression (XTR-ENC) For configuration of expansion and resource cards, please refer to chapter 9, page 277. The technical data (including pin assignment of interfaces) can be found in chapter 13.3, page 406. 3.2.1 Design of Expansion Cards Rear views of the expansion cards with their respective interfaces and LEDs are shown below. The meaning of the LEDs is given in chapter 3.4.2, page 64. If you are using an expansion card with resource card(s) in the X4000 built-in unit, BinTec Communications AG recommends that you use the fan unit obtainable as optional equipment. X4000 User’s Guide 53 3 Hardware Description and Installation BRI Expansion Card X4E-2/3BRI 2 3 1 ISDN BRI port 3 Screws 2 1 1 3 1 2 LEDs Figure 3-14: Rear view of a BRI expansion card PRI/G.703 Expansion Card X4E-1/2PRI 3 1 1 ISDN PRI/G.703 port with IN and OUT socket 3 Screws 2 1 2 LEDs Figure 3-15: Rear view of a PRI/G.703 expansion card 54 X4000 User’s Guide 3 3 Expansion and Resource Cards Two RJ45 sockets – IN and OUT – are available per interface on the PRI/G.703 expansion card. Connect the expansion card by connecting the cable to the IN socket. You can connect a backup router via the OUT socket as an option, which can then take over the function of the first router if this is switched off or fails. By connecting a loopback plug to the OUT socket, it is also possible to prevent the provider’s exchange disconnecting the line if the expansion card fails. LAN Expansion Card X4E-2FE 3 1 Fast Ethernet port 3 Screws 2 1 1 2 2 3 LEDs Figure 3-16: Rear view of a LAN expansion card 3.2.2 Installation and Replacement of Expansion Card Now you can find out how to equip the X4000 basic unit with an expansion card or replace this with one of the other X4000 expansion cards. Make sure you also follow the installation guide supplied with the expansion and resource cards. X4000 User’s Guide 55 3 Hardware Description and Installation Caution! An expansion card must not be installed or replaced during operation. X4000 must always be disconnected from the power supply first, otherwise there is a risk of damaging both X4000 and the expansion card. ➤ Always disconnect the power cord of X4000 and all connecting cables on the expansion card before you insert or replace the expansion card. ➤ Do not connect X4000 to the power supply until the equipment is completely closed and you have rechecked the installation. Danger! Do not touch any parts inside the expansion slot when installing or replacing the expansion card. There is a risk of electric shock! ➤ Do not touch any parts inside the expansion slot of X4000! Caution! Electrostatic charges can damage electronic components. Please observe the following precautions to avoid damaging components: ➤ Ground yourself before unpacking components and before carrying out installation work on the equipment. ➤ Only grip boards at the edges and do not touch cables or components. 56 X4000 User’s Guide 3 Expansion and Resource Cards 1 2 1 2 1, 2 Hole and screw for fixing the expansion card Figure 3-17: Installing an expansion card Installation / replacement Proceed as follows to install or replace an expansion card. ➤ Undo the screws of the dummy cover or the expansion card installed in the slot. Remove the dummy cover or withdraw the existing expansion card from the slot. Keep the two screws of the dummy cover, as these are used for fixing the expansion card. ➤ Mount the resource card(s) on the expansion card, if applicable. Follow the installation guide supplied with the resource card. ➤ Push the expansion card into the slot provided in the housing until it engages in the slot connector. Card guides ensure that the expansion card X4000 User’s Guide 57 3 Hardware Description and Installation is reliably plugged in. Once the expansion card engages in the connector, fix it to the housing with the two screws you previously unscrewed from the dummy cover or the expansion card to be replaced (see Figure 3-17, page 57). If you are using an expansion card with resource card(s) in the X4000 built-in unit, BinTec Communications AG recommends that you use the fan unit obtainable as optional equipment. Removal 58 To remove an expansion card, carry out the installation steps described above in the reverse order. X4000 User’s Guide 3 Setting Up and Connecting 3.3 Setting Up and Connecting 7 6 5 4 3 10 10 9 8 2 1 11 1 Expansion card slot (with dummy cover) 7 IEC AC socket of mains unit 2 Status LEDs (red and green) 8 X.21/V.35/V.36 interface 3 RJ11 socket for display 9 X.21bis interface 4 Mini DIN socket (console) 10 Fixing screws for expansion card and dummy cover 5 Ethernet/LAN 10/100 Base-T Fast Ethernet interface 11 Plastic strip for activating the buffer battery for the real-time clock (RTC) 6 ISDN BRI interface Figure 3-18: X4000 rear view X4000 User’s Guide 59 3 Hardware Description and Installation Caution! Incorrect cabling of ISDN or LAN interfaces can cause your router to malfunction! ➤ Only connect the LAN interface of X4000 to the LAN interface of the hub and the ISDN interface of X4000 to the ISDN connection. Make the connections in the following order: ➤ Place X4000 on a firm level surface. Connecting X4000 to PC or terminal ➤ Connect the serial port of your PC (COM1 or COM2) to the console interface of your X4000. Use only the serial cable supplied with the equipment. You only need to connect X4000 to the console interface (no. 4, see Figure 3-18, page 59) if you want to carry out your initial configuration serially via the console port, e.g. with the Configuration Wizard (cf. chapter 6, page 109). No serial connection is necessary if you only want to quickly assign X4000 the IP address and netmask. You can assign the IP address quickly and easily using the input keys and the display (cf. chapter 5, page 93). Connecting X4000 to LAN ➤ Connect the LAN interface (no. 5, see Figure 3-18, page 59) of X4000 to Connecting X4000 to WAN If you want to use the ISDN BRI interface in your applications scenario: your hub. Use only LAN cables suitable for CAT5. A poorer quality cable can cause malfunctions of X4000. ➤ Connect the ISDN BRI interface (no. 6, see Figure 3-18, page 59) of X4000 to your ISDN connection using the cable (RJ-45) supplied with the equipment. If you want to use the X.21/V.35/V.36 or X.21bis interface(s) in your application scenario: ➤ Connect the X.21/V.35/V.36 or X.21bis (no. 8 or no. 9, Figure 3-18, page 59) of X4000 to your connection via a cable (not supplied with the equipment). 60 X4000 User’s Guide 3 Setting Up and Connecting We recommend you use original BinTec cables, which you can buy from your dealer. The use of other cables may cause damage to your equipment and invalidates the guarantee! Real-time clock Finally, you must activate the buffer battery of the real-time clock: Figure 3-19: Removing the plastic strip for activating the buffer battery ➤ Remove the plastic strip (see Figure 3-19, page 61) from the dummy cover. Expansion card To connect your expansion card: ➤ Plug the necessary interface cables of your expansion card into the sockets provided. Two RJ45 sockets – IN and OUT – are available per interface on the PRI/ G.703 expansion card. Connect the expansion card by connecting the cable to the IN socket. You can connect a backup router via the OUT socket as an option, which can then take over the function of the first router if this is switched off or fails. Connecting X4000 to power supply ➤ If you want to use the display, make sure that the display cable is connected to the appropriate socket on the 19-inch built-in unit. ➤ Connect X4000 to a mains socket or to the power supply of the 19-inch cabinet using the IEC AC power cord supplied with the equipment. X4000 selftest X4000 carries out a selftest; see chapter 3.5, page 66. If you have connected all the cables correctly, the red LED of the C key on the display X4000 User’s Guide 61 3 Hardware Description and Installation and the red LED on the back of X4000 go out at the end of the selftest. The blue Power LED lights as long as X4000 is supplied with power. The status messages displayed by (LEDs) are described in chapter 3.4, page 63. Hardware basic settings ➤ Make the necessary hardware basic settings via the keyboard and display (a detailed description is contained in chapter 5, page 93): – Select interactive language in the MMI. – 62 Enter any IP address and netmask so that further configuration can be carried out via the LAN and not via the console port. X4000 User’s Guide 3 Status Messages via LEDs 3.4 Status Messages via LEDs The three different types of LED used by the X4000 basic unit for indicating status messages and the meaning of the LEDs on the expansion cards are given below. 3.4.1 Basic Unit Power LED The blue Power LED inside the BinTec logo on the front of X4000 (see Figure 31, page 37) lights as soon as X4000 is supplied with power. Illuminated input keys The display input keys illuminated during operation guide you through the MMI. Key On Flashes Off C Press this key to leave the menu level – No meaningful entry possible Press this key to move backwards in the menu level – No meaningful entry possible Press this key to move forwards in the menu level – No meaningful entry possible Confirmation of entry or selection is possible – No meaningful entry possible OK Table 3-1: Status message via input keys LEDs on the back of X4000 One red and one green LED on the back of the X4000 basic unit (see Figure 32, page 39) indicate the general status of each of the individual interfaces. If the green LED flashes or lights, this always means fault-free operation. If the red LED flashes or lights, this indicates a fault. You can obtain more detailed status information via the display, the Setup Tool or an SNMP Management Tool. X4000 User’s Guide 63 3 Hardware Description and Installation 3.4.2 Expansion Cards The expansion cards are equipped with LEDs, which respond as described below if the cables are connected. BRI Expansion Card X4E-2/3BRI The BRI expansion card has six LEDs, which are assigned in pairs (red and green) to each port. The LEDs indicate the following status messages: green LED red LED LED lights LED flashes Meaning X – 1 B-channel is used – X 2 B-channels are used – – None of the B-channels used X – D-channel missing or autoconfiguration failed – X Layer 1 not stable Table 3-2: LED status messages of a BRI expansion card PRI/G.703 Expansion Card X4E-1/2PRI The PRI/G.703 expansion card has two LEDs. The top LED is assigned to the first port (Unit 0) and the bottom LED to the second port (Unit 1). 64 X4000 User’s Guide 3 Status Messages via LEDs The LEDs indicate the following status messages: LED lights LED flashes Meaning – – Port is not activated by license X – Port is in G.703 Mode (license for G.703 or PRI is activated and G.703 is selected under ISDN Line Framing) – X Port is in PRI Mode (license for PRI is activated and G.703 is not selected under ISDN Line Framing) Table 3-3: LED status messages of a PRI/G.703 expansion card LAN Expansion Card X4E-2FE The LAN expansion card has four LEDs. The two LEDs on the left side (red and green) are assigned to the first port (Unit 0) and the two LEDs on the right side (red and green) to the second port (Unit 1). The red LEDs light up if Ethernet collisions occur and the green LEDs indicate activity on the Ethernet: green LED red LED LED flashes LED lights Meaning – X 100 Mbps Mode (Fast Ethernet) X – 10 Mbps Mode (Ethernet) – – Port is not available – X Ethernet collision – – No Ethernet collision Table 3-4: Status messages of LEDs on a LAN expansion card X4000 User’s Guide 65 3 Hardware Description and Installation 3.5 Boot Sequence X4000 passes through various functional states on booting: ■ Start Mode ■ BOOTmonitor Mode ■ Normal Operation Mode After several selftests have been performed successfully in Start Mode, X4000 changes to the BOOTmonitor Mode. The BOOTmonitor prompt is displayed if you are connected to X4000 via a terminal program. BOOTmonitor Press Space within four seconds of the display of the BOOTmonitor prompt if you want to use the BOOTmonitor functions. If you do not make an entry within four seconds, X4000 changes back to normal operation mode. Functions The BOOTmonitor makes the following functions available, which you select by entering the relevant digit (for more detailed information, refer to Software Reference): ■ (1) Boot system: X4000 loads the compressed boot file from the flash memory to the RAM memory. This happens automatically when started. ■ (2) Software update via TFTP: X4000 performs a software update via a TFTP server. ■ (3) Software update via XMODEM: X4000 performs a software update over a serial interface with XMODEM. ■ (4) Delete configuration: X4000 is reset to the unconfigured ex works state. All configuration files are deleted and the BOOTmonitor settings are set to the default values. ■ (5) Default BOOTmonitor parameters: You can change the default settings of X4000’s BOOTmonitor, e.g. the baud rate for serial connections. 66 X4000 User’s Guide 3 Boot Sequence If you change the baud rate (the preset value is 9600 baud), make sure the terminal program used also uses this baud rate. If this is not the case, you will not be able to establish a serial connection to X4000! X4000 User’s Guide 67 3 68 Hardware Description and Installation X4000 User’s Guide 4 4 Configuration Requirements This chapter tells you how to carry out the following tasks: ■ How to access X4000 (chapter 4.1, page 70) ■ How to log in to X4000 (chapter 4.2, page 76) ■ Which methods of configuration are available to you (chapter 4.3, page 78) ■ How the ➤➤ Setup Tool is constructed (chapter 4.3.2, page 79) ■ How to carry out an initial configuration of X4000 (chapter 4.4, page 91) X4000 User’s Guide 69 4 Configuration Requirements 4.1 Connection Methods Before you can configure your X4000, you must connect X4000. There are various ways of doing this: ■ Over the Man-Machine Interface (MMI) ■ Over the serial interface ■ Over your ➤➤ LAN ■ Over an ➤➤ ISDN connection MMI Serial Connection 4000 BinTec isdnlogin X4000 ISDN Figure 4-1: LAN 4000 BinTec Possible connections to X4000 The various connection methods are presented below, so that you can choose the best method for your needs. 70 X4000 User’s Guide 4 Connection Methods 4.1.1 Initial steps Man-Machine Interface (MMI) The MMI with its display and input keys is a good method for establishing “initial contact” with X4000. You should carry out the following initial steps with the MMI: ➤ set the desired display language ➤ enter the IP address and netmask You can then carry out further configuration steps using the Configuration Wizard or Setup Tool. 4.1.2 Connecting Over the Serial Interface Initial configuration Connecting over the serial interface is very suitable if you carry out an initial configuration on X4000 before you have entered an IP address and netmask. To connect X4000 to your computer over the serial interface, connect the serial interface on the basic unit of X4000 to the serial interface of your computer. Windows If you are using a Windows PC, you will need a terminal program, e.g. HyperTerminal, for the serial connection. How to install this assistant and BRICKware for Windows is described in chapter 6.2, page 112). To do ➤ Click the Windows Start button and then Programs ➧ BRICKware ➧ BRICK at COM1 (or BRICK at COM2 if you use the COM2 port of your PC) to start HyperTerminal. ➤ Press Return (at least once) after the HyperTerminal window opens. A window with the login prompt appears. You are now in the SNMP shell of X4000. ➤ Continue with chapter 4.2, page 76. X4000 User’s Guide 71 4 Configuration Requirements If the login prompt does not appear after pressing Return several times, the connection to X4000 has not been set up successfully. Check the COM1 or COM2 settings on your PC. ➤ Click File ➧ Properties. ➤ Click Configure.... in the Connect to tab. The following settings are necessary: – Bits per second: 9600 – Data bits: 8 – Parity: none – Stop bits: 1 – Flow control: none ➤ Enter the values and click OK. ➤ Set in the Settings tab: – Emulation: VT100 ➤ Click OK. The changes to the terminal program settings do not take effect until you disconnect the connection to X4000 and set up the connection again. You can also use any other terminal program that can be set to 9600 bps, 8N1 (8 data bits, no parity, 1 stop bit), software handshake (none) and VT100 emulation. If you use the Configuration Wizard for configuration, you also connect to X4000 over the serial interface, but you do not access the SNMP shell. The start window of the Configuration Wizard appears in this case (see Figure 6-1, page 113). Unix If you are using a Unix PC, you cannot use HyperTerminal. You will require a terminal program such as cu (under System V), tip (under BSD) or minicom (under Linux). The settings for these programs are the same as listed above. Example of a command line for using cu: cu -s 9600 -c/dev/ttyb Example of a command line for using tip: tip -9600 /dev/ttyb 72 X4000 User’s Guide 4 Connection Methods 4.1.3 Connecting Over a LAN You can reach X4000 from the LAN over the ➤➤ telnet service. Telnet is normally available on every PC. To be able to reach your X4000 over the LAN, it should already have an ➤➤ IP address and ➤➤ netmask. If this is not the case and X4000 has therefore not yet been configured, you have two options: ■ Enter the IP address and netmask via the input keys of the MMI (see chapter 5, page 93). ■ If you are using Windows, you can assign X4000 an IP address by using the ➤➤ DIME Tools assistant. If you have not yet installed DIME Tools together with BRICKware for Windows, proceed as explained in chapter 6.2, page 112. To do Assigning IP addresses ➤ Connect X4000 to the LAN. To assign your X4000 an IP address (if necessary) with the DIME Tools program, proceed as follows: ➤ Click the Windows Start button and then PROGRAMS ➧ BRICKWARE ➧ DIME Tools. ➤ If the ➤➤ BootP server is not started as standard, you must start it. The BootP server window will appear after a short time if X4000 is still unconfigured. ➤ Enter the name and IP address of your X4000 in the window under BRICK Parameter. ➤ Click OK. ➤ Close DIME Tools. Running telnet Windows Now establish a connection to X4000 with telnet: ➤ Click the Windows Start button and then Run.... ➤ Type telnet <IP address of X4000>. X4000 User’s Guide 73 4 Configuration Requirements ➤ Click OK. A window with the login prompt appears. You are now in the SNMP shell of X4000. Continue with chapter 4.2, page 76. Unix ➤ Type telnet <IP address of X4000> into a terminal. A window with the login prompt appears. You are now in the SNMP shell of X4000. Continue with chapter 4.2, page 76. 4.1.4 Remote configuration Connection Over ISDN Connection over ➤➤ ISDN with ➤➤ ISDN login is especially recommended if X4000 is to be configured or administrated remotely (remote LAN in Figure 42, page 74). This is also possible even if X4000 has not been initially configured, i.e. is still in the ex works state. Connection is then obtained by means of a BinTec router that is already configured or an ISDN card in the remote LAN, using a number of X4000’s ISDN connection in your own LAN (e.g. 1234). It is thus possible for the administrator at a remote LAN to configure X4000 in a home office which is hundreds of kilometers away. The X4000 in the home office (e.g. your LAN) merely has to be connected to an ISDN line and turned on. isdnlogin 1234 4000 BinTec X4000 unconfigured ( 1234 ISDN BI AN CA /B RI CK -X M Router in the Remote-LAN Your LAN Figure 4-2: 74 X4000 User’s Guide Connection over ISDN login for remote maintenance Remote-LAN 4 Connection Methods Access over ISDN costs money. If X4000 and the PC are in the same LAN, it is cheaper to access X4000 over the LAN or the serial interface. To do ➤ Connect X4000 to the ISDN. To reach X4000 over ISDN login, proceed as follows: ➤ Log in on your BinTec router in the remote LAN in the usual way. ➤ In the SNMP shell, type in isdnlogin <number of the ISDN connection of X4000>, e.g. isdnlogin 1234. The login prompt will appear in the window. You are now in the SNMP shell of X4000. Continue with chapter 4.2, page 76. X4000 User’s Guide 75 4 Configuration Requirements 4.2 Logging In Regardless of how you access X4000, the ➤➤ SNMP shell of X4000 with the login prompt always appears first. Exceptions to this rule are the Configuration Wizard and Configuration Manager under Windows and the MMI. In order to log in, you need to know the user name and password. In its ex works state, X4000 is provided with the following user names and passwords: User name Password Permission admin bintec Read and change system variables, save configurations, use the Setup Tool. write public Read system variables (changes are lost when X4000 is turned off). read public Read system variables. http bintec Call up HTTP status page and Java status monitor from X4000, read system variables, no login. Table 4-1: User names and passwords in ex works state As you can see, it is only possible to change and save configurations when you log in with the user name admin. Access information (user names and passwords) can also only be changed if you log in with the user name admin. For security reasons, passwords are not normally shown on the Setup Tool screen in plain language, but only as asterisks. The user names appear in plain language. The security concept of X4000 enables you to read all the other configuration settings with the user name read, but not the access information. It is therefore impossible to log in with read, read the password of the admin user and subsequently log in with admin and make changes to the configuration. To do This is how you log in: ➤ Type in your user name (e.g. admin) and press Return. 76 X4000 User’s Guide 4 Logging In ➤ Type in your password (e.g. bintec) and press Return. Your router then issues an input prompt, e.g. X4000:>. The login was successful. Caution! To prevent unauthorized access to X4000, you should change the passwords right away. How to change the passwords is described in "Changing the password", page 85. ➤ Change the passwords as described in chapter 7.1.2, page 123. Closing the SNMP shell To leave the SNMP shell after completing the configuration, enter exit and press Return. X4000 User’s Guide 77 4 Configuration Requirements 4.3 Configuration Options Before you set to work with the configuration, you must select a method. For this reason, we would first like to give you an overview of the different configuration methods and an introduction to using the Setup Tool. This manual explains how to configure X4000 by means of the Setup Tool. 4.3.1 Methods of Configuration Methods of configuring X4000: ■ Man-Machine Interface (MMI) ■ Configuration Wizard ■ Setup Tool ■ ➤➤ SNMP shell commands ■ Configuration Manager and other SNMP managers MMI The easy-to-use and intuitive Man-Machine Interface (MMI) gives you the possibility of displaying information about X4000 on the display and entering a number of basic settings (e.g. IP address and netmask) with the input keys. You can do this quickly and easily without having to log in. The MMI cannot be used to set up a comprehensive configuration. You should use the Setup Tool or Configuration Wizard for this purpose. You can find detailed information about the MMI and the complete menu architecture in chapter 5, page 93. Configuration Wizard You will learn about configuration using the Configuration Wizard in chapter 6, page 109. It is useful for quick, basic configuration of X4000 and can be used if you have a Windows PC. This usually covers most standard configurations. However, if you need additional settings or wish to use other WAN interfaces of X4000 than the ISDN BRI interface of the basic unit, you can use one of the other configuration options stated above. You could first configure X4000 with the Configuration Wizard and subsequently extend or change this initial configuration with one of the other tools. In many cases, the Configuration Wizard alone will be sufficient! 78 X4000 User’s Guide 4 Configuration Options Setup Tool The Setup Tool is a menu-driven tool for the configuration and administration of X4000. Configuration with the Setup Tool is much easier and clearer than configuration with SNMP commands, although not all settings can be made with the Setup Tool. Besides the Configuration Wizard, this manual mainly explains how to configure with the Setup Tool. The Setup Tool is independent of the operating system of your PC. If a configuration step is only possible in isolated cases with the help of an SNMP command, the procedure for this is also explained. SNMP ➤➤ SNMP (Simple Network Management Protocol) is a ➤➤ protocol that defines how you can access the configuration settings. All configuration settings are stored in the ➤➤ MIB (Management Information Base) in the form of MIB tables and MIB variables. You can access these directly via the SNMP shell. Configuration Manager and other SNMP managers The Configuration Manager is a Windows-based SNMP manager provided by BinTec Communications AG. You can use its interface based on Windows Explorer to access all MIB tables and variables of X4000. You can also use other SNMP managers, such as SNM, HP Open View or Transview, to access and modify the MIB tables and variables. However, more detailed knowledge of the structure and interrelations of the tables and subsystems of X4000 would be a prerequisite for handling SNMP shell commands and SNMP managers; this method is therefore suitable for experienced users. Handling MIB tables and MIB variables is not described in this manual. You can find this information in the Software Reference and MIB Reference. 4.3.2 Using the Setup Tool You can call up the Setup Tool once you have logged in to X4000: ➤ Type setup after the input prompt and press Return. The main menu of the Setup Tool appears. X4000 User’s Guide 79 4 Configuration Requirements Menu Line X4000 Setup Tool BinTec Communications AG X4000 Licenses LAN: WAN: System CM-100BT, Fast Ethernet CM-1BRI, ISDN S0 Module: Serial-WAN: CM-SERIAL, Serial Configuration Window WAN PArtner IP IPX PPP ISDN CAPI Configuration Management Monitoring and Debugging Exit Help Line Press <Crtl-n>,<Ctrl-p> to scroll through menu items,<Return> to enter Figure 4-3: Setup Tool menu layout To use the Setup Tool, you must log in with the user name admin! If you don’t know the corresponding password, you cannot open the Setup Tool (see chapter 4.2, page 76). The Setup Tool is easy to use. After a few minutes, you will have no problem finding your way around. Nevertheless, you should first familiarize yourself with the facilities offered by the Setup Tool. By way of introduction, we would first like to point out a few things you should be aware of when using the X4000 Setup Tool. Menu layout Every Setup Tool menu consists of three parts (see Figure 4-3, page 80): The menu line contains a navigation aid to show you where you currently are in the Setup Tool menu system. The system name of X4000 is also displayed. This is especially helpful if you are using several BinTec routers with different system names. The configuration window is where the actual entries are made and the respective settings displayed. The field in which the cursor is currently located is also marked. 80 X4000 User’s Guide 4 Configuration Options The help line tells you how to move around in the menu currently displayed or which entries you can change. X4000 User’s Guide 81 4 Configuration Requirements Menu navigation You can use the following keys or key combinations to navigate the various menus in the Setup Tool: Key combination Meaning Tabulator To move to the next item in a menu. Return To open a submenu or activate a menu command (e.g. SAVE). up or down To move forwards or backwards between menu fields (functions with VT 100 emulation when using a terminal program). left or right To scroll backwards or forwards in the same field to reveal a list of possible entries (functions with VT 100 emulation when using a terminal program). Esc Esc Esc twice in succession: To return to the previous menu. Cancels any changes made. Space To toggle the delete flag for list entries that are to be deleted. The tagged entries are marked with D. Pressing Space again removes the tag marking. Ctrl - l To redraw the screen. Ctrl - n To move to the next item in a menu. Ctrl - p To move to the previous item in a menu. Ctrl - f To scroll forward a page in a long list. An "=" sign at the bottom right indicates the end of the list or a "∨" indicates more to come. Ctrl - b To scroll back a page in a long list. An "=" sign at the top right indicates the start of the list or a "∧" indicates more to come. Ctrl - c Leave the Setup Tool. Table 4-2: 82 X4000 User’s Guide Navigation in the Setup Tool 4 Configuration Options Menu commands When you start moving around in the Setup Tool, you will notice that some menus have special command options, such as DELETE, SAVE and CANCEL. There are a few slight differences between these commands that you should be aware of. Schaltfläche Meaning ADD To create or add an item to a list. A submenu appears for entering the desired settings. CANCEL To discard all changes made in the current menu. DELETE To delete all entries tagged with the Space bar for deletion from a list. These changes become effective immediately. OK To confirm the changes in the current menu. These changes do not become effective until SAVE is pressed in the next menu. SAVE All variables set in the current menu and all its submenus are saved to memory. These changes become effective immediately. EXIT To leave the current menu and return to the previous menu. Any entries made are lost. Table 4-3: Searching lists Buttons in the Setup Tool Some Setup Tool menus contain lists of items, e.g. the WAN PARTNER menu, which lists all ➤➤ WAN partners currently configured. X4000 User’s Guide 83 4 Configuration Requirements X4000 Setup Tool [WAN]: WAN Partners BinTec Communications AG MyRouter Current WAN Partner Configuration Partnername Protocol State BigBoss T_ONLINE Partner1 Partner2 PROVIDER ppp ppp ppp ppp ppp dormant dormant dormant dormant dormant ADD DELETE ∧ | | | = EXIT Press<Ctrl-n>,<Ctrl-p>toscroll,<Space>tag/untag DELETE,<Return>to edit Search: p These lists are in alphabetical order according to the contents of the first field. An incremental search function is provided, which is very useful for searching for an item in long lists. Proceed as follows: ➤ Enter the first letter of the item you are looking for, with the cursor located on an item in the list. Entries can be made in upper or lower case. ➤ As long as the search is active, you can enter more characters to refine the search. ➤ The Backspace or Delete key can be used to edit the search string. The cursor automatically jumps to the first match it finds in the list. The characters entered for the search are displayed in the help line at the bottom of the menu. Do not enter invisible characters, such as Tabulator or Space, as they stop the search and could lead to a function being executed. If the search does not work, make sure that the cursor is located in a list field. The search cannot run if the cursor is located in a command field, e.g. ADD or DELETE. 84 X4000 User’s Guide 4 Configuration Options Example: In the WAN PARTNER menu shown above, the entries provide the following search results: Entry Cursor moves to entry p or P Partner1 pr, Pr, pR, PR PROVIDER p a r t n e r 2 Partner1, on entering 2 to Partner2 Table 4-4: Changing the password Search results The procedure described below for changing the password applies to all X4000 passwords: the access passwords for the user names admin, read and write, the HTTP password, the RADIUS password, the PPP password, the provider password and the CAPI user passwords. Any character may be used for entering a password. Passwords are only displayed as asterisks, even during password changes. The number of asterisks is the same as the number of characters in the password. To start the X4000 Setup Tool in a mode in which the passwords are displayed in plain language and can be changed once by editing, you must enter the command setup -p. This option only exists if you have logged in on X4000 under the user name admin. To change a password, proceed as follows: In the password field, the Backspace key always deletes the complete entry and not just one character. ➤ Select the password field and enter the new password. The field changes to the change mode and the message Change Password appears in the help line. ➤ Now press Return, Tabulator or a Cursor key to confirm. The field changes to the confirm mode and Confirm displayed in the help line. Password is X4000 User’s Guide 85 4 Configuration Requirements ➤ Now enter the new password again and confirm by pressing Return, Tabulator or a Cursor key. If you have entered the repeat password correctly, the password is changed. The new password is saved on leaving the menu with the SAVE button. If you leave the menu by pressing CANCEL or Esc Esc, the password change is not saved. If the two passwords you entered were not the same, the field is reset to the old password and Password doesn’t match Try again. is displayed in the help line. Menu structure The main menu of the Setup Tool looks like this: X4000 Setup Tool BinTec Communications AG MyRouter Licenses System LAN: CM-100BT, Fast Ethernet WAN: CM-1BRI, ISDN S0 Serial WAN: CM-SERIAL, Serial WAN Partner IP IPX PPP Configuration Management Monitoring and Debugging Exit 86 X4000 User’s Guide ISDN CAPI Module: 4 Configuration Options The menu structure of the Setup Tool looks like this: Licences IP Routing System Static Settings External Activity Monitor Network Adr. Translation External Sytem Logging Access Lists Keepalive Monitoring BOD Password settings IP adr. pool WAN (PPP) Time and Date LAN: IP adr. pool LAN (DHCP) Fast Ethernet SNMP Advanced Settings WAN: Serial-WAN: Radius Server ISDN S0 OSPF Advanced Settings Token Auth. Firewall Incoming Call Answering Loc. Serv. Acc. Control Serial IPX Unit 0 PPP Unit 1 ISDN WAN Partner Credits PPP CAPI Advanced Settings User Compuserve Login WAN Numbers Advanced Settings Config. Management Monitoring a. Debugging IP ISDN Monitor Advanced Settings ISDN Credits IPX Interfaces Bridge Messages TCP/IP Figure 4-4: Setup Tool menu structure (basic unit) X4000 User’s Guide 87 4 Configuration Requirements Figure 4-4, page 87 shows the Setup Tool menus available on X4000. When you activate the necessary license, X4000 detects this and displays the corresponding menus (for entering license, see chapter 7.1.1, page 121). Summary To help you find your bearings during configuration, the menus are briefly explained below. Menu Function LICENSES This menu is for entering the license information printed on the license card supplied with the equipment. This menu is also used for activating extra licenses. SYSTEM In this menu, you enter the basic system settings of X4000, e.g. system name and passwords. FAST ETHERNET This menu is for configuring the ➤➤ LAN interface of X4000. Here you enter data such as the IP address and netmask of X4000. ISDN S0 This menu is for configuring the ISDN interface of X4000. Here you enter data such as the type of ISDN connection to which X4000 is connected. The submenu ISDN S0 ➧ INCOMING CALL ANSWERING is for assigning the available ISDN numbers to the desired services (e.g. PPP routing, ➤➤ CAPI, ➤➤ ISDN Login). SERIAL This menu is for configuring the serial WAN interfaces of X4000. WAN PARTNER Here you define all your WAN partners, e.g. your ➤➤ Internet Service Provider (➤➤ ISP). All the WAN partners entered are displayed in a list that includes the name of partner, protocol used and current status of each. 88 X4000 User’s Guide 4 Configuration Options Menu Function IP Here you enter the settings for the ➤➤ IP protocol. This menu consists of several submenus: IP ➧ ROUTING includes X4000’s IP routing table. Here you enter routes to your partners (e.g. default routes, network routes), which ensure that your X4000 sends all the ➤➤ data packets to the correct addresses. IP ➧ STATIC SETTINGS is for entering important settings, e.g. the domain name of X4000, the IP addresses of additional ➤➤ servers (e.g. Domain Name Server) and system time specifications. IP ➧ NETWORK ADDRESS TRANSLATION is for configuring the interfaces to the partners for which you want to use the Network Address Translation function (➤➤ NAT). IP ➧ ACCESS LISTS is for defining ➤➤ filters to allow or deny access from or to the different hosts in the connected networks. You can thus prevent your X4000 from establishing unintended connections to the ISDN. IP ➧ BANDWIDTH ON DEMAND (BOD) is for defining filters for the Bandwidth on Demand and AO/DI (Always On/Dynamic ISDN) functions. IP ➧ IP ADDRESS POOL WAN (PPP) is for setting up a pool of IP addresses that your X4000 as a dynamic IP address server can assign to WAN partners, who can then dial in. IP ➧ IP ADDRESS POOL LAN (DHCP) is for configuring X4000 as a ➤➤ DHCP server. As a DHCP server, X4000 assigns the IP addresses to the hosts in the LAN dynamically. IP ➧SNMP is for changing the basic ➤➤ SNMP settings. IP ➧ RADIUS S ERVER is for configuring RADIUS servers. IP ➧ DNS is for defining the procedure for name resolution in X4000. IP ➧ LOCAL SERVICES ACCESS CONTROL is for controlling access to the local UDP and TCP services in X4000. IPX Here you make the entries for the IPX protocol. ➤➤ IPX is used especially in Novell networks. X4000 User’s Guide 89 4 Configuration Requirements Menu Function PPP Includes generally valid ➤➤ PPP settings, e.g. authentication protocol, that do not just refer to particular WAN partners. With these settings, the router can perform an authentication procedure for incoming calls, even if the calling line number cannot be identified (e.g. because the call is made from an analog line that does not transfer the calling line number). ISDN Here you administrate X4000’s Credits Based Accounting System. CAPI Includes the settings for BinTec's ➤➤ CAPI user concept. You can use this to assign user names and passwords to users of the X4000's CAPI applications. This makes sure that only authorized users can receive incoming calls and make outgoing calls via CAPI. CONFIGURATION MANAGEMENT Here you can administrate X4000’s configuration files. You can save them either locally on X4000 or on your PC, for example. MONITORING AND DEBUGGING Includes submenus that enable you to locate problems in your network and monitor activities, e.g. at X4000’s WAN interface. EXIT Quit the Setup Tool with Exit. You can save the configuration file to the flash memory with Exit ➧ Save as boot configuration and exit; this file is loaded after X4000 is restarted. If you select Exit ➧ Exit without saving, all the settings made since X4000 was last started are lost. Table 4-5: 90 X4000 User’s Guide Setup Tool menus 4 Procedure for Initial Configuration 4.4 Procedure for Initial Configuration We recommend the following procedure for initial configuration of X4000: ➤ Carry out the first configuration steps using the MMI (see chapter 5, page 93). X4000 should not yet be connected to the LAN for this work, only the power cord must be connected: – set the desired display language – enter the IP address and netmask ➤ Connect X4000 as explained in chapter 3.3, page 59. ➤ Create a basic configuration, using either the – Configuration Wizard (see chapter 6, page 109) or – Setup Tool (see chapter 7, page 119). ➤ You can then carry out the following: – Configure further functions with the Setup Tool (see chapter 8, page 187. – Configure security functions with the Setup Tool (see chapter 10, page 307). – Configure your expansion card with the Setup Tool (see chapter 9, page 277). X4000 User’s Guide 91 4 92 Configuration Requirements X4000 User’s Guide 5 5 Man-Machine Interface (MMI) – Display with User Guide BinTec’s Man-Machine Interface (MMI) with display and input keys simplifies "getting to know" your X4000 and provides easy access to status information. BINTEC X4000 C Figure 5-1: OK MMI with display and input keys (logo) This chapter contains the following information: ■ An overview of the MMI facilities (chapter 5.1, page 94) ■ A description of how to use the display and input keys (chapter 5.2, page 96) ■ A diagram of the MMI menu architecture, which is helpful for the initial steps (chapter 5.3, page 99) ■ Useful short-cuts (chapter 5.4, page 107) When you have made the initial settings with the MMI, continue the configuration of X4000 using the Configuration Wizard (see chapter 6, page 109) or the Setup Tool (see chapter 7, page 119). X4000 User’s Guide 93 5 Man-Machine Interface (MMI) – Display with User Guide 5.1 Overview Getting started You can use the MMI to enter X4000’s IP address and netmask without first having to set up a serial connection to X4000. This simplifies the initial configuration, as you can first assign an IP address to X4000 and then set up the equipment and connect it in the planned location. The configuration is then carried out from your PC via your network (e.g. using the Setup Tool). Status information The display of status information in the MMI enables you to monitor X4000 activities without having to log in. This provides an additional diagnostic tool, which can display information such as the current version of the system software or the activities of the X4000 interfaces. User guide Illuminated input keys and navigation bars simplify operation of the MMI and guide you through the menu architecture so that you can make settings in each menu without having to search for each menu individually. You can still open a certain menu if you wish. Logo After switching on, X4000 first performs a few selftests and then shows the X4000 logo on the display (see Figure 5-1, page 93). Press any input key to use the MMI. If no more inputs are made for a long period of time, the MMI returns to the logo. You can set this period of time in the "Display Idle Timer" menu. X4000’s logo is normally shown on switching on X4000 or on expiry of the display idle timer. To use another MMI menu instead of this, show the desired menu on the display and then press C and OK simultaneously. The corresponding menu then appears instead of the logo when the idle timer expires. This enables you, for example, to display a certain default interface of X4000 for monitoring purposes. Access protection 94 The MMI is operated in Configuration Mode as the default mode and all MMI functions can be used. In Monitoring Mode, each menu can be displayed, but entries are only possible to a limited extent. For example, the IP address entered can be displayed in Monitoring Mode, but not changed. X4000 User’s Guide 5 Overview You can change from Monitoring Mode to Configuration Mode and vice versa in the main menu "Display Settings", see chapter 5.3.1, page 100. X4000 User’s Guide 95 5 Man-Machine Interface (MMI) – Display with User Guide 5.2 Display and Input Keys How to use the display and input keys of the MMI is described below. 5.2.1 Using the Input Keys To explain the use of the input keys, Figure 5-2, page 96 shows an extract of the menu system: l..... Display Settings OK C Language l..... OK Deutsch English C OK Display Idletimer OK .l.... The language has been changed to ENGLISH Brightness ..l... Figure 5-2: Using the input keys (extract from menu system) Navigating with and The arrow keys enable you to move up and down in the menu system. You always move on one level only, e.g. changing from one main menu to another. Selecting a menu with OK To select a menu item, press OK. You then change to the next lower level, in which you can also navigate by means of and . In the menu You can execute the following actions in a menu: ■ Select a value (e.g. display brightness) with with OK. 96 X4000 User’s Guide and and then confirm 5 Display and Input Keys ■ Enter numbers (e.g. IP address or PIN) with and and then confirm with OK. ■ Display a value (e.g. serial number of X4000) and then leave the menu with OK. Leaving the menu with C To leave a menu and change to the next higher menu level without changing a setting, just press C. 5.2.2 User guide Meaning of LEDs The four input keys of the MMI are equipped with LEDs (see Table 5-1, page 97) to provide simple, convenient operation. Keys are only illuminated if they can be used. Pressing keys that are not illuminated has no effect. Key On Flashes Off C Press this key to leave the menu level – No meaningful entry possible Press this key to move backwards in the menu level – No meaningful entry possible Press this key to move forwards in the menu level – No meaningful entry possible Confirmation of entry or selection is possible – No meaningful entry possible OK Table 5-1: Illumination of input keys X4000 User’s Guide 97 5 Man-Machine Interface (MMI) – Display with User Guide 5.2.3 Navigation bars for guidance Navigation Bars The display shows two navigation bars, which indicate your present level in the menu system. l...... 1st main menu Display settings Set the brightness of the display ..l... C OK 3rd submenu Brightness Figure 5-3: Navigation bars (example) The vertical navigation bar at the left edge of the display is for the main menus. The horizontal navigation bar at the bottom edge indicates in which menu of the second level of the corresponding main menu you are located. The following figures of the menu architecture also show the associated navigation bars. 98 X4000 User’s Guide 5 Menu Architecture 5.3 Menu Architecture The MMI offers the following menus at the top level (main menus): l..... .l.... IP Address and Netmask ..l... Date and Systemtime ...l.. Information about X4000 Basic Unit ....l. Information about X4000 Expansion Card .....l Figure 5-4: Display Settings Monitoring Main menus (with navigation bars) ■ Display Settings (see chapter 5.3.1, page 100) ■ IP Address and Netmask (see chapter 5.3.2, page 102) ■ Date and System Time (see chapter 5.3.3, page 103) ■ Information about X4000 Basic Unit (see chapter 5.3.4, page 104) ■ Information about X4000 Expansion Card (see chapter 5.3.5, page 105) ■ Monitoring (see chapter 5.3.6, page 106) The following figures show the architecture of the individual menus. Running through these is a good opportunity to carry out your first steps with the MMI. X4000 User’s Guide 99 5 Man-Machine Interface (MMI) – Display with User Guide 5.3.1 l..... Display Settings OK Display Settings Language l..... OK OK Display Idletimer Deutsch English OK The language has been changed to ENGLISH OK .l.... OK Min aus 1 2 3 4 5 Brightness OK ..l... OK Contrast 0 1 2 3 OK ...l.. OK 0 2 4 6 8 10 OK Run MMI in ... mode MMI Mode ....l. (Config. Mode only) OK Change PIN for Configuration Mode OK .....l OK MMI mode has changed to ... mode Enter current PIN: 0000 OK Enter new PIN: 1234 OK Retype new PIN: 1234 .l.... OK IP Address and Netmask Figure 5-5: 100 X4000 User’s Guide OK PIN has been changed Menus for selecting the display settings (with navigation bars) 5 Menu Architecture The main menu "Display Settings" offers the following options for modifying the display characteristics: ■ Language For setting the display language. English is initially preset as default. ■ Display Idle Timer For enabling and disabling the display idle timer (1 ... 5 minutes). On expiry of this time, the logo appears in the display if no input key has been used for the set period of time. ■ Brightness For setting the display brightness. ■ Contrast For setting the display contrast. ■ MMI Mode For changing from Configuration Mode to Monitoring Mode and vice versa. To change to Configuration Mode, you need the set PIN. ■ Changing the PIN for Configuration Mode Here you can change the PIN (Personal Identification Number) for Configuration Mode. Configuration Mode is protected by a four-digit PIN. The default setting of the PIN is 0000 in the ex works state. When you use the MMI for the first time, you should change the PIN to prevent entries by unauthorized users. For technical reasons, the PIN is shown on the display in plain language. Make sure the display is not visible to other persons when you enter the PIN. Users who do not know the set PIN cannot change from Monitoring Mode to Configuration Mode. X4000 User’s Guide 101 5 Man-Machine Interface (MMI) – Display with User Guide 5.3.2 IP Address and Netmask The main menu "IP Address and Netmask" offers the following options: .l.... IP Address and Netmask OK l. IP Address OK OK Enter IP address: 192.168.1.254 OK IP address has been set to: 192.168.1.254 Netmask OK .l Set netmask: 255.255.255.0 OK ..l... Date and Systemtime OK Figure 5-6: Netmask has been set to: 255.255.255.0 Menus for entering the IP address and netmask (with navigation bars) ■ IP Address Enter the IP address of X4000. This is done by selecting each digit with and and confirming each by pressing OK. The IP address is saved after confirming the last digit. ■ Netmask Enter the netmask of the network in which X4000 is located. This is done by pressing and as often as necessary until the correct netmask appears. Save the netmask by confirming with OK. 102 X4000 User’s Guide 5 Menu Architecture 5.3.3 Date and System Time The main menu "Date and System Time" offers the following options: .. .. ll .. .. .. Date and System time OK l. System Date OK OK System date: current: 2000-03-17 set: 2000-04-17 System Time OK .l .. .. .. ll .. .. Information about X4000 Basic Unit OK Figure 5-7: System time: current: 07:56 pm set: 08:56 pm Menus for entering date and system time (with navigation bars) ■ System Date For setting the current date in X4000. This is done by selecting the day, month and year in succession with and and confirming each by pressing OK. ■ System Time For setting the current time in X4000. This is done by selecting the hours and minutes in succession with and and confirming each by pressing OK. X4000 User’s Guide 103 5 Man-Machine Interface (MMI) – Display with User Guide 5.3.4 Information about X4000 Basic Unit The main menu "Information about X4000 Basic Unit" offers the following options for displaying system information: ...l.. Information about X4000 Basic Unit OK C OK C OK C OK C OK C OK C OK C OK C Figure 5-8: 104 X4000 User’s Guide Credits Based Accounting System l.. Available licenses l.. Serial number l.. System Name .l. Logic version .l. Hardware revision .l. Software release ..l Interfaces onboard ..l OK OK OK OK OK OK OK OK OK OK OK OK OK OK OK OK Limit: ... Last: ... Total: ... Serial Number: ... Mask: ... Key: ... Serial number of X4000: ... System name of X4000: ... Logic version of X4000: ... Hardware revision of X4000: ... Software release of X4000: ... Interfaces onboard: ... Menus for monitoring the basic unit (with navigation bars) 5 Menu Architecture ■ Credits Based Accounting System Displays the settings for the Credits Based Accounting System (see chapter 10.1.3, page 316). Limit: selected limit for charges. Last: cost of last connection. Total: total costs charged to date. ■ Available Licenses Displays the licenses entered in X4000 (see chapter 7.1.1, page 121). ■ Serial Number Displays the serial number of X4000. ■ System Name Displays the system name of X4000 (see chapter 7.1.2, page 123). ■ Logic Version Displays the version of X4000’s firmware logic. ■ Hardware Revision Displays the hardware version of X4000. ■ Software Release Displays the system software version used by X4000. ■ Onboard Interfaces Displays the status of the X4000 hardware interfaces available with the basic unit. 5.3.5 Information about X4000 Expansion Card Data for the interfaces on the optional expansion card can only be displayed if the relevant card is installed. Please observe subsequent software releases and the corresponding release notes. X4000 User’s Guide 105 5 Man-Machine Interface (MMI) – Display with User Guide 5.3.6 Monitoring The main menu "Monitoring" offers a facility for monitoring the operating temperature of X4000: . . l. . . . . l Monitoring OK C Figure 5-9: Current temperature l. OK OK Temp Temp1 Temp2 °C 40 50 60 Menus for monitoring X4000 ■ Current Temperature Displays the current operating temperature of X4000 in °C. The current operating temperature is always indicated by a black bar. Temp shows the temperature measured by a sensor in the basic unit, Temp1 and Temp2 show the temperature measured on the expansion card. A PRI expansion card is equipped with two temperature sensors and a BRI or LAN expansion card with one sensor (Temp1). The current maximum permissible temperature is 60 °C and is indicated by a continuous line on the display. The maximum permissible temperature can be changed by editing the MIB variable sysX4ConfigTempAlarmTrap for the basic unit (Temp) and the MIB variables sysX4ConfigTempAlarmTrapMod1 / sysX4ConfigTempAlarmTrapMod2 for the expansion cards (Temp1 and Temp2). If this temperature is exceeded, X4000 generates traps, which can be evaluated over the network. 106 X4000 User’s Guide 5 Useful Short-Cuts 5.4 Useful Short-Cuts You can carry out a number of actions using the input keys: 5.4.1 Defining Default Screen The logo is displayed as standard on the screen when the idle timer expires. If you want to use another screen as default screen for the MMI, proceed as follows: ➤ Use the input keys to indicate the desired screen. ➤ Keep the C key pressed for three seconds. New default screen has been selected ➤ Confirm with OK. The selected screen is shown and used as default screen. 5.4.2 Saving the Configuration Proceed as follows to save the current configuration of X4000 using the input keys. ➤ Keep the OK key pressed for three seconds. Do you want to save the current configuration? X4000 User’s Guide 107 5 Man-Machine Interface (MMI) – Display with User Guide ➤ Press OK. Saving configuration ... Configuration saved ➤ Press OK. 5.4.3 Restarting X4000 Proceed as follows to restart X4000 using the input keys: ➤ Keep the OK key and C key pressed for three seconds. ATTENTION! Do you really want to reboot X4000? ➤ Press OK. System reboot in 5 seconds! The restart is executed after 5 seconds. System reboot ... Standby until X4000 is up again! 108 X4000 User’s Guide 6 6 Fast Configuration with the Configuration Wizard (Basic Unit) With the Configuration Wizard on your BinTec Companion CD, BinTec Communications AG offers you a quick and convenient way to start running your X4000. You can perform basic configuration via the serial connection of your Windows PC. This basic configuration includes all the important settings of the router, access to the Internet via an Internet Service Provider (ISP), as well as connection to a WAN partner (e.g. to a corporate headquarters). As the Configuration Wizard guides you step by step through the configuration, detailed knowledge of networking technologies is not necessary. Graphic illustrations and a detailed online help system you can access at any time during the configuration give you additional support. The Configuration Wizard is one of several possible ways of configuring your X4000. Access to your X4000 in this case is via the serial interface. Please note that you can only use the Configuration Wizard to configure your ISDN BRI interface on the basic unit. For configuration of WAN connections over the X.21/ V.35/V.36 or X.21bis interface, you must use the Setup Tool. Advanced configuration (chapter 8, page 187) and setting up the security functions (chapter 10, page 307) are done after this using the Setup Tool. This chapter tells you how to carry out the following tasks: ■ In advance of configuration (chapter 6.1, page 110) ■ Install Windows software: – Install BRICKware for Windows (chapter 6.2, page 112) – Configure X4000 with the Configuration Wizard (chapter 6.3, page 113) ■ Make possible additional settings on your PC (chapter 6.4, page 115) – Configure the Remote CAPI interface ("Remote CAPI configuration", page 115) – Install RVS-COM Lite ("RVS-COM Lite installation", page 115) – Set up PC for WAN access ("Internet access with X4000", page 115) You can test your configuration at the end of the chapter. X4000 User’s Guide 109 6 Fast Configuration with the Configuration Wizard (Basic Unit) 6.1 Router settings In Advance of Configuration Before you start to configure your X4000, make sure you know the following information about your ISDN connection and your network environment. Write down your values in the table below so that you can quickly find the necessary information while you are performing the configuration. Examples are shown. ■ ISDN extensions: The extension numbers of your ISDN connection. ■ IP address and netmask of X4000: If you are installing a new network, simply use the example values given. Internet access Corporate network connection (LAN-LAN) 110 Access data Example ISDN extensions 10, 11, 12 IP address of X4000 192.168.1.254 Netmask of X4000 255.255.255.0 Your value For access to the Internet via your Internet Service Provider (ISP), you will need access information that should be provided by your ISP. Access data Example Provider name GoInternet Dial-in number 1234567 User account MyName Password TopSecret Your value For connection to a corporate network or another WAN partner, you must know the following information about the opposite terminal. Access data Example Partner’s name BigBoss Dial-in number 0911987654321 Local name LittleIndian X4000 User’s Guide Your value 6 In Advance of Configuration Access data Example Your value Password Secret Partner’s network address(es) 10.1.1.0 Partner’s netmask(s) 255.255.255.0 Agree on the data with your WAN partner: You must both use the same password; your entry for "local name" and your partner’s entry for "partner’s name" must be identical; your entry for "partner’s name" and your partner’s entry for "local name" must also be identical. TCP/IP protocol testing and installation ➤ Make sure the TCP/IP protocol is installed on the PC before you start the configuration. X4000 User’s Guide 111 6 Fast Configuration with the Configuration Wizard (Basic Unit) 6.2 Installing BRICKware BRICKware for Windows contains the Configuration Wizard and other Windows utility programs. ➤ Place your BinTec Companion CD in the CD-ROM drive of your PC. The Start window appears automatically after a short time. If the Start window does not open automatically, click your CD-ROM drive in Windows Explorer and double-click setup.exe. ➤ Click BRICKware. The setup program starts. ➤ Specify the directory in which BRICKware should be installed. The DIME Tools, which are part of BRICKware for Windows, contain mainly assistants for configuration, administration and diagnosis of your X4000. For the basic operation of X4000, it is not necessary to have DIME Tools started automatically by Windows. ➤ Start the Configuration Wizard at the end of the installation. You will find a detailed description of the BRICKware installation and a description of the individual components in BRICKware for Windows on BinTec’s WWW server under "Solutions & Products" and then "Download". 112 X4000 User’s Guide 6 Basic X4000 Configuration with the Configuration Wizard 6.3 Basic X4000 Configuration with the Configuration Wizard Configuration of the basic settings of X4000 is quick and easy with the Configuration Wizard. Please note: If you have already created a configuration with the Configuration Wizard, the Wizard may assume the preset values. At the end, the configuration is transferred to the router and saved on the PC. You can carry out the configuration in either Quick Mode or Expert Mode. If you are unfamiliar with networking technologies, choose Quick Mode. If you have installed BRICKware and activate the Configuration Wizard, the following start window appears (if not, see chapter 6.2, page 112): Figure 6-1: Configuration Wizard start window You can select from the following configuration items: ■ Basic router configuration ■ Internet access ■ Corporate network connection (LAN-LAN connection). X4000 User’s Guide 113 6 Fast Configuration with the Configuration Wizard (Basic Unit) The basic router settings are essential. They integrate X4000 in your local network and enable the use of communications applications (CAPI). ➤ Select the desired items and follow the instructions on the screen. Caution! All BinTec routers are shipped with the same user names and passwords. As long as the password remains unchanged, they are not protected against unauthorized use. ➤ You must therefore change your system password when requested to do so. ➤ Click Finish. You have now completed the basic configuration with the Configuration Wizard. If you have configured X4000 as a DHCP server with the Configuration Wizard, the PCs must be assigned an IP address at the end of the configuration. This happens automatically under Windows NT. Under Windows 95 or 98, the Configuration Wizard starts the program WINIPCFG: ➤ Click Yes to start WINIPCFG. Click Renew and then OK. 114 X4000 User’s Guide 6 Configuring a PC 6.4 Configuring a PC If you have selected communications applications (CAPI) during the configuration, you will be asked to carry out CAPI configuration now. Among other things, CAPI allows you to send and receive fax messages and to use an answering machine. Remote CAPI configuration ➤ Click Yes to start configuration. In the Remote CAPI tab, enter the IP RVS-COM Lite To be able to use fax services on your PC, you must install a CAPI application such as RVS-Com Lite. RVS-Com Lite is included on your BinTec Companion CD. address of your X4000 and the user name and password of users of communications applications set up previously with the Configuration Wizard, if these have not already been entered. Click Use these values. Click OK. Please note: The license for RVS-COM Lite is a single user license. You can purchase additional licenses from your dealer. COM port driver If you want to use your data communications network with BinTec’s Remote CAPI, RVS-Com Lite will provide you with the necessary COM port driver. RVS-COM Lite installation ➤ To install RVS-COM Lite, click RVS-Com Lite in the setup program and Internet access with X4000 You can set up WAN access over X4000, e.g. to the Internet, for all PCs located in a network with X4000. In order to do this, you must enter X4000 as gateway and as DNS for all those PCs that were not configured as DHCP clients. Proceed as follows: follow the instructions. An online help system is also available. ➤ In the start menu click Settings ➧ Control Panel. Double click Network. ➤ Select TCP/IP in the network components list (for Windows NT it is in the Protocol tab) and click Properties. ➤ Enter the IP address of X4000 in the Gateway tab under New Gateway. Click Add. (Windows NT: Click the IP Address tab and enter the IP address of X4000 under Standard Gateway). X4000 User’s Guide 115 6 Fast Configuration with the Configuration Wizard (Basic Unit) ➤ Click the DNS Configuration tab and enter the IP address of X4000 under DNS Server Search Order. Click Add and then OK. Follow the instructions on the screen. 116 X4000 User’s Guide 6 Testing your Configuration 6.5 Testing your Configuration Once you have removed the serial cable of X4000, your configuration is complete. Now let’s make sure everything works. Caution! Incorrect configuration of the devices in your LAN may result in unintended connections and increased charges! Monitor your X4000 and make sure that the system does not establish unwanted ISDN connections (and charges). ➤ To avoid unnecessary charges, check whether the filters set in the Configuration Wizard are sufficient for your needs. If not, you can configure filters with the Setup Tool (chapter 10.2.8, page 335). ➤ Watch the LEDs on your X4000 (cf. chapter 3.4, page 63), use the monitor function of the Setup Tool (cf. chapter 10.1, page 308), call up your settings in the display (cf. chapter 5, page 93) or check your settings with an SNMP Management Tool. LAN connection testing ➤ Test the connection to your X4000. In the start menu of your PC, click Run Testing Internet access ➤ Now test your Internet access by entering www.bintec.de in the browser. and enter ping, followed by a space and the IP address of X4000, e.g. ping 192.168.1.254. A window appears with the response "Reply from...". BinTec’s WWW site offers you the latest news, updates, and documentation. X4000 User’s Guide 117 6 118 Fast Configuration with the Configuration Wizard (Basic Unit) X4000 User’s Guide 7 7 Basic Configuration of Basic Unit with Setup Tool This chapter tells you how to carry out the basic configuration steps for taking your X4000 basic unit into operation using the Setup Tool. This chapter is broken down as follows: ■ Basic router settings (chapter 7.1, page 120) This chapter describes the steps you must always carry out for taking X4000 into operation, irrespective of the environment or applications for which you use X4000. You can also carry out the steps described here using the Configuration Wizard (see chapter 6, page 109). ■ Where do we go from here? (chapter 7.1.6, page 136) This chapter tells you what to do next after you have completed the basic router settings. ■ Configuring the WAN interfaces (chapter 7.2, page 137) Description of how to configure the WAN interfaces integrated in the X4000 basic unit. – ISDN-BRI Interface (chapter 7.2.1, page 137), including the distribution of incoming calls to subsystems and users ("Incoming call answering", page 141) – Serial interfaces (X.21, V.35, V.36, X.21bis) (chapter 7.2.2, page 148) – LAN interface for using ADSL (chapter 7.2.3, page 155) ■ Configuring WAN Partners – Basic procedure (chapter 7.3, page 159) – Example configurations (chapter 7.3.2, page 182) ■ Saving the configuration (chapter 7.4, page 186) X4000 User’s Guide 119 7 Basic Configuration of Basic Unit with Setup Tool 7.1 Basic Router Settings The configuration of the basic router settings concerns only your X4000 and your local network. 192.168.1.1 4000 (10, 11, 12 BinTec 192.168.1.2 WAN Your X4000 192.168.1.254 192.168.1.3 Your Local Area Network Figure 7-1: Basic router settings – X4000 in the LAN The following steps are necessary: ■ Entering a license (chapter 7.1.1, page 121) ■ Entering system data (e.g. passwords) (chapter 7.1.2, page 123) ■ Configuring the LAN interface (chapter 7.1.3, page 126) ■ Configuring X4000 as a DHCP server (optional) (chapter 7.1.4, page 129) ■ Setting NetBIOS filters (optional) (chapter 7.1.5, page 132) The necessary preparatory measures can be found in chapter 6.1, page 110. The work to be done on your network and PCs can be found in chapter 6.4, page 115. Off we go: 120 X4000 User’s Guide 7 Basic Router Settings 7.1.1 License card Entering License(s) After you have logged in to your X4000 with the user name admin and called up the Setup Tool with setup, as described in chapter 4.2, page 76, enter the license information. This information is printed on the license card supplied. Entering this information activates the functions of X4000. ➤ Go to LICENSES: X4000 Setup Tool [LICENSE]: Licenses BinTec Communications AG MyRouter Available Licenses: IP (builtin), STAC (valid), CAPI (valid), BRIDGE (valid) IPX (valid) Serialnumber 101546 ADD Mask 55 Key 88PNUPZ DELETE State ok EXIT Press<Ctrl-n>,<Ctrl-p>to scroll,<Space>tag/untagDELETE,<Return>to edit Listed under Available Licenses are all subsystems available to X4000, as well as their current state (builtin - always available, valid - activated, not_valid - not activated). The license entries are shown under (Serialnumber, Mask, Key). If you have not yet entered your license data, the subsystem list will be almost empty. Only IP, i.e. ➤➤ IP routing, is available (builtin). X4000 User’s Guide 121 7 Basic Configuration of Basic Unit with Setup Tool Subsystems The following subsystems can be activated on your X4000: Subsystems Meaning IP IP routing OSPF Open Shortest Path First (only with extra license) TAF Token Authentication Firewall (only with extra license) TUNNEL Virtual Private Networking VPN (only with extra license) STAC ➤➤ STAC ➤➤ data compression CAPI ➤➤ Remote CAPI interface makes communications applications possible on your PC, e.g. sending and receiving faxes. BRIDGE Bridging X25 X.25 (only with extra license) FRAME RELAY Frame Relay (only with extra license) IPX ➤➤ IPX routing Table 7-1: To do Subsystems To enter your license, proceed as follows: ➤ Add a new entry with ADD. Another menu window opens. ➤ Enter Serial Number, Mask and Key as shown on your license card. ➤ Press SAVE. You have returned to the LICENSES menu. The subsystems activated by your license data are now listed. The license entered is displayed with the state ok. 122 X4000 User’s Guide 7 Basic Router Settings If not ok is shown as the state, you have probably made a typing error. ➤ Try again. 7.1.2 System name, ... Entering System Data Now you should enter the basic system data for your X4000. ➤ Go to SYSTEM: X4000 Setup Tool [SYSTEM]: Change System Parameters BinTec Communications AG MyRouter System Name Local PPP ID (default) Location Contact MyRouter BigBoss 3rd floor [email protected] Syslog Output on Serial Console Message Level for the Syslog Table Maximum Number of Syslog Entries no info 20 External Activity Monitor> External System Logging> Keepalive Monitoring> Password Settings> Time and Date> SAVE CANCEL Enter string, max. length = 34 chars X4000 User’s Guide 123 7 Basic Configuration of Basic Unit with Setup Tool The following parts of the menu are relevant for this configuration step: Field Meaning System Name Defines the system name of X4000, is also used as PPP host name. Appears as input prompt when logging in to X4000. If no system name is set, a warning appears on logging in with the user name admin. Local PPP ID This entry is necessary for identification of X4000, if ➤➤ PPP authentication (e.g. ➤➤ PAP or ➤➤ CHAP) is carried out that is not specific to a partner (see chapter 8.1.3, page 194). Location Indicates where X4000 is located (optional). Contact States the contact person responsible (optional). If the person is to be reached from X4000’s HTTP status page (see chapter 10.1.4, page 320), a valid e-mail address must be entered here. Table 7-2: Passwords Enter the passwords for X4000 in the submenu SYSTEM ➧ PASSWORD SETTINGS: Field Meaning admin Login Password Password for user name admin. read Login Password Password for user name read. write Login Password Password for user name write. HTTP Server Password Password for the HTTP status page of X4000. Table 7-3: 124 SYSTEM X4000 User’s Guide SYSTEM ➧ PASSWORD SETTINGS 7 Basic Router Settings Caution! All BinTec routers are shipped with the same user names and passwords. As long as the password remains unchanged, they are not protected against unauthorized use. How to change the passwords is described in "Changing the password", page 85. ➤ Change the passwords to prevent unauthorized access to X4000. The permission rights of the possible user names and passwords can be found in chapter 4.2, page 76. To do Proceed as follows to enter the relevant system data and passwords: ➤ Enter System Name of X4000, e.g. MyRouter. ➤ Enter the Local PPP ID. The entry can be the same as the System Name. ➤ Enter your Location, e.g. Europe. ➤ Enter Contact, e.g. SysAdmin. ➤ Go to SYSTEM ➧ PASSWORD SETTINGS. ➤ Enter admin Login Password. ➤ Enter read Login Password. ➤ Enter write Login Password. ➤ Enter HTTP Server Password. ➤ Press SAVE. ➤ Press SAVE. You have returned to the main menu and the entries have been saved. Advanced configuration The menu SYSTEM ➧ EXTERNAL ACTIVITY M ONITOR contains the settings necessary for monitoring X4000 with the Windows Activity Monitor Tool (see chapter 10.1.6, page 322 and BRICKware for Windows). The menu SYSTEM ➧ EXTERNAL SYSTEM LOGGING contains the settings for syslog messages (see chapter 10.1.1, page 308). The menu SYSTEM ➧ KEEPALIVE MONITORING contains the settings for the keepalive monitoring function (see chapter 8.2.11, page 236). X4000 User’s Guide 125 7 Basic Configuration of Basic Unit with Setup Tool The menu SYSTEM ➧ TIME AND DATE contains the settings for manually entering the time and date in X4000 (see chapter 8.3.1, page 242). 7.1.3 ➤➤ IP address, ➤➤ netmask, ➤➤ Encapsulation Configuring the LAN Interface Now configure the LAN interface (10/100 Base-T Ethernet) of X4000. The LAN interface is the physical interface to the local network. In the following menu, enter the address where your router can be reached in the LAN. As long as your router does not have this entry, it cannot be recognized by other hosts in the network. If your X4000 is connected to a LAN that consists of two subnets, you should enter a Second Local IP Number and a Second Local Netmask for it for the second subnet. This is explained in the following example: X4000 4000 BinTec Local IP-Number 192.168.42.3 192.168.42.1 Figure 7-2: 192.168.42.2 Second Local IP-Number 192.168.46.3 192.168.46.1 192.168.46.2 X4000 with two different local IP addresses The first subnet has two hosts with the IP addresses 192.168.42.1 and 192.168.42.2 and the second subnet has two hosts with the IP addresses 192.168.46.1 and 192.168.46.2. To be able to exchange data packets with the first subnet, X4000 uses the IP address 192.168.42.3, for example, and 192.168.46.3 for the second subnet. The netmasks for both subnets must also be indicated. 126 X4000 User’s Guide 7 Basic Router Settings You have probably entered the IP address and netmask in X4000 with the MMI before the basic configuration. Even if you have, you should still check the entries in the following menu. ➤ Go to CM-100BT, FAST ETHERNET. X4000 Setup Tool [LAN]: Configure LAN Interface IP Configuration Local IP Number Local Netmask Second Local IP Number Second Local Netmask Encapsulation Mode BinTec Communications AG MyRouter 192.168.1.254 255.255.255.0 Ethernet II Auto IPX Configuration Local IPX Netnumber 0 Encapsulation none Bridging disabled Advanced Settings> SAVE CANCEL Enter IP address (a.b.c.d or resolvable host name) Entries are possible in this menu for IP configuration, ➤➤ IPX configuration and ➤➤ bridging. This chapter explains only the configuration of the ➤➤ IP. Retain the preset values under IPX Configuration and Bridging. X4000 User’s Guide 127 7 Basic Configuration of Basic Unit with Setup Tool The following parts of the menu are relevant for this configuration step: Field Meaning Local IP Number IP address of X4000 in the LAN. Local Netmask Netmask of the network in which X4000 with Local IP Number is located. Second Local IP Number Second IP address of X4000 in the LAN. Second Local Netmask Netmask of the network in which X4000 with Second Local IP Number is located. Encapsulation Defines the kind of header added to the IP packets that run over this LAN interface. Possible values: ■ Ethernet II (conforms to IEEE 802.3) ■ Ethernet SNAP You can generally retain the default value Ethernet II. The LAN interface is called en1 for Ethernet II and en1-snap for Ethernet SNAP. Mode Defines the mode in which the LAN interface is operated. Possible values: ■ Auto (default value) Automatic detection of the LAN parameters is activated and the LAN interface is operated in the appropriate mode. ■ 10 Mbps Half Duplex ■ 10 Mbps Full Duplex ■ 100 Mbps Half Duplex ■ 100 Mbps Full Duplex You should normally leave the default value at Auto. Table 7-4: 128 X4000 User’s Guide CM-100BT, FAST ETHERNET 7 Basic Router Settings To do Proceed as follows to configure X4000’s LAN interface: ➤ Enter Local IP Number of X4000, e.g. 192.168.1.254. ➤ Enter Local Netmask, e.g. 255.255.255.0. ➤ If applicable, enter Second Local IP Number and Second Local Netmask. ➤ Select Encapsulation, e.g. Ethernet II. ➤ Select Mode, e.g. Auto. ➤ Press SAVE. You have returned to the main menu and the entries have been saved. Advanced configuration If you wish to use the IPX ➤➤ protocol, you will find an explanation of how to configure the LAN interface for IPX in chapter 8.4, page 268. Information about bridging can be found in the Software Reference. The menu CM-100BT, FAST ETHERNET ➧ ADVANCED SETTINGS contains settings for the Routing Information Protocol RIP (see chapter 8.2.8, page 229), IP Accounting, Proxy ARP (see chapter 8.2.10, page 234) and Back Route Verification (see chapter 10.2.10, page 352). How to use the LAN interface for ADSL connections over the T-DSL connection of Deutsche Telekom is described in chapter 7.2.3, page 155. 7.1.4 IP addresses in the LAN Configuring X4000 as DHCP Server Each PC in your ➤➤ LAN and X4000 requires its own IP address. If you configure X4000 as a ➤➤ DHCP (Dynamic Host Configuration Protocol) server, X4000 automatically assigns ➤➤ IP addresses from a defined IP address pool to requesting PCs in the LAN. A PC sends out an ARP request and in turn receives its IP address assigned by X4000. You do not need to assign fixed IP addresses to PCs, which reduces the amount of configuration work in your network. To do this, you set up a pool of IP addresses, from which X4000 assigns IP addresses to hosts in the LAN for a defined period of time. A DHCP server also transfers the addresses of the Domain Name Server entered X4000 User’s Guide 129 7 Basic Configuration of Basic Unit with Setup Tool statically or by PPP negotiation (➤➤ DNS), (WINS) and standard ➤➤ gateway. ➤➤ NetBIOS name server ➤ Go to IP ➧ IP ADDRESS POOL LAN (DHCP) ➧ ADD: X4000 Setup Tool [IP][DHCP][ADD]: Add Range of IP Addresses Interface IP Address Number of Consecutive Addresses Lease Time (Minutes) MAC Address Gateway NetBT Node Type SAVE Use <Space> to select 130 X4000 User’s Guide BinTec Communications AG MyRouter en1 192.168.1.1 8 120 not specified CANCEL 7 Basic Router Settings The menu contains the following fields: Field Meaning Interface An interface to which the next address pool is assigned. When an address request is received over Interface, one of the addresses in the address pool is assigned. IP Address First IP address in the address pool. Number of Consecutive Addresses Total number of IP addresses in the address pool, including the first IP address (IP Address). Lease Time (Minutes) Specifies the length of time an address from the pool can be assigned to a host. After the Lease Time (Minutes) expires, the address can be assigned elsewhere. MAC Address (optional) Only for Number of Consecutive Addresses = 1: IP Address is only assigned to the device with MAC Address. Gateway Defines which IP address is assigned to the DHCP client as gateway. If no IP address is entered here, the IP address of X4000 is also given. NetBT Node Type Defines how and in what order the assignment of NetBIOS names to IP addresses is attempted for the hosts of an address pool. You can accept the default value not specified. A detailed description of this function is given in the Software Reference. Table 7-5: To do IP ➧ IP ADDRESS POOL LAN (DHCP) ➧ ADD Make the following entries to configure X4000 as a DHCP server: ➤ Select Interface, e.g. en1. ➤ Enter IP Address, e.g. 192.168.1.1. X4000 User’s Guide 131 7 Basic Configuration of Basic Unit with Setup Tool ➤ Enter Number of Consecutive Addresses, e.g. 8. ➤ Enter Lease Time (Minutes), e.g. 120. ➤ Enter MAC Address, if applicable. ➤ Enter Gateway, if applicable. ➤ Select NetBT Node Type, e.g. not specified. ➤ Press SAVE. You have returned to IP ➧ IP ADDRESS POOL LAN (DHCP), where the IP address pools are listed. The entries are saved and you have defined an address pool with 8 IP addresses: 192.168.1.1 to 192.168.1.8. You can also create several entries to define an IP address pool of unconnected address ranges, e.g. 192.168.1.20 - 192.168.1.29 and 192.168.1.35 - 192.168.1.40, and so on. 7.1.5 NetBIOS filters Setting Filters If you are working with Windows in your local network, you should set ➤➤ NetBIOS filters to save costs. This prevents establishing connections from the network to your Internet Service Provider (➤➤ ISP), e.g. in order to forward WINS requests from PCs in your network. This means that X4000 asks your ISP which ➤➤ host name can be assigned an IP address. These connections are unnecessary because the ISP cannot resolve WINS names, but still cost money. A more detailed explanation of chapter 10.2.8, page 335. To do ➤➤ filters and security can be found in To prevent these unnecessary connections, proceed as follows: When configuring filters, make sure not to lock yourself out. ➤ Use the serial interface or ISDN login on X4000 for filter configuration. ➤ If you still access X4000 over your LAN (e.g. telnet), before starting filter configuration select in the menu IP ➧ ACCESS LISTS ➧ INTERFACES ➧ EDIT : First rule = none. 132 X4000 User’s Guide 7 Basic Router Settings ➤ Go to IP ➧ ACCESS LISTS ➧ FILTER ➧ ADD: X4000 Setup Tool BinTec Communications AG [IP][ACCESS][FILTER][ADD]: Configure IP Access Filter MyRouter Description Index wrong_dns 1 Protocol udp Source Address Source Mask Source Port Specify Port specify 137 Destination Address Destination Mask Destination Port Specify Port specify 53 Type of Service (TOS) 00000000 SAVE TOS Mask 00000000 CANCEL Enter string, max. length = 48 chars To do Make the following entries to define a filter for WINS requests: ➤ Enter Description: wrong_dns. ➤ Select Protocol: udp. ➤ Select Source Port: specify. ➤ Enter Specify Port: 137. ➤ Select Destination Port: specify. ➤ Enter Specify Port: 53. ➤ Press SAVE. You have returned to IP ➧ ACCESS LISTS ➧ FILTER, and the entries have been saved. Now define a second filter as follows: ➤ Go to IP ➧ ACCESS LISTS ➧ FILTER ➧ ADD. ➤ Enter Description: all. ➤ Select Protocol: any. ➤ Select Source Port: any. X4000 User’s Guide 133 7 Basic Configuration of Basic Unit with Setup Tool ➤ Select Destination Port: any. ➤ Press SAVE. You have returned to menu IP ➧ ACCESS LISTS ➧ FILTER. The entries have been saved and both filters are now listed. To define rules for these filters, proceed as follows: ➤ Go to IP ➧ ACCESS LISTS ➧ RULES ➧ ADD: X4000 Setup Tool BinTec Communications AG [IP][ACCESS][RULE][ADD]: Configure IP Access Rules MyRouter Action deny M Filter wrong_dns (1) SAVE CANCEL Use <Space> to select To do Make the following entries to define a rule: ➤ Select Action: deny M. ➤ Select Filter: wrong_dns (1). ➤ Press SAVE. You have returned to IP ➧ ACCESS LISTS ➧ RULES, and the entries have been saved. Now define a second rule as follows: ➤ Go to IP ➧ ACCESS LISTS ➧ RULES ➧ ADD. ➤ Select Insert Behind Rule: RI 1 FI 1 (wrong_dns). ➤ Select Action: allow M. ➤ Select Filter: all (2). ➤ Press SAVE. You have returned to IP ➧ ACCESS LISTS ➧ RULES, and the entries have been saved and listed. 134 X4000 User’s Guide 7 Basic Router Settings X4000 Setup Tool BinTec Communications AG [IP][ACCESS][RULE]: Configure IP Access Rules MyRouter Abbreviations: RI (Rule Index) M (Action if filter matches) FI (Filter Index)!M (Action if filter does not match) NRI (Next Rule Index) RI 1 2 Action Filter deny M wrong_dns allow M all FI 1 2 NRI 2 0 ADD Conditions udp, sp 137, dp 53 DELETE REORG EXIT Press<Ctrl-n>,<Ctrl-p>to scroll,<Space>tag/untag DELETE,<Return>to edit ➤ Go to IP ➧ ACCESS LISTS ➧ INTERFACES: X4000 Setup Tool BinTec Communications AG [IP][ACCESS][INTERFACES]: Configure First Rule MyRouter Configure first rules for interfaces Interface en1 en1-snap First Rule 1 1 First Filter 1 (wrong_dns) 1 (wrong_dns) EXIT Press <Ctrl-n>, <Ctrl-p> to scroll, <Return> to edit/select To do Make the following entries: ➤ Select the LAN interface of X4000 (en1 or en1-snap) and confirm with Return. ➤ Select First Rule: RI 1 FI 1 (wrong_dns). ➤ Press SAVE. These entries ensure that all data traffic that passes from source ➤➤ port 137 to destination port 53 will be discarded. This means that no unnecessary connections will be established to resolve WINS names. ➤ Leave IP ➧ ACCESS LISTS ➧ INTERFACES with EXIT. ➤ Leave IP ➧ ACCESS LISTS with EXIT. X4000 User’s Guide 135 7 Basic Configuration of Basic Unit with Setup Tool ➤ Leave IP with EXIT. You have returned to the main menu. The configuration of the basic router settings is complete. 7.1.6 Where do we go from here? After you have configured X4000 for your LAN, you can carry out the following steps to permit WAN connections. ➤ Configure the WAN interface(s) of X4000 that you wish to use: – ISDN BRI interface (chapter 7.2.1, page 137) – X.21/V.35/V.36 interface or X.21bis interface (serial) (chapter 7.2.2, page 148) – LAN interface for ADSL connections (chapter 7.2.3, page 155 and chapter 9.3.2, page 288) ➤ Configure the WAN partners (chapter 7.3, page 159). Configuration examples: – ISP T-Online ("Internet Access over T-Online", page 183) – ISP Compuserve ("Internet Access over Compuserve", page 184) ➤ Configure the interfaces of your expansion card, if applicable (chapter 9, page 277) ➤ The facilities for more advanced configuration can be found in chapter 8, page 187. ➤ The configuration of security functions and Firewall can be found in chapter 10, page 307. ➤ If you wish to run communication applications on the hosts in the LAN with your X4000 basic unit (e.g. RVS COM Lite), you must configure the remote CAPI on the hosts (see chapter 6.4, page 115) and assign the extension numbers accordingly ("Incoming call answering", page 141). ➤ When you have completed the configuration, you should save your configuration file (chapter 7.4, page 186). 136 X4000 User’s Guide 7 Configuring WAN Interfaces 7.2 Configuring WAN Interfaces The necessary steps for configuring the WAN interfaces of X4000 are described below step by step. The basic unit is equipped with the following WAN interfaces: ■ ISDN BRI interface (see chapter 7.2.1, page 137) ■ Two serial interfaces: X.21/V.35/V.36 interface and X.21bis interface (see chapter 7.2.2, page 148) ADSL ■ You can also configure the LAN interface as an interface to the WAN by providing a connection to T-DSL, the ADSL connection of Deutsche Telekom, using PPP-over-Ethernet (see chapter 7.2.3, page 155). If you use a LAN expansion card, see chapter 9.3.2, page 288. Installing an expansion card enables other WAN interfaces to be used on X4000, if applicable (see chapter 9, page 277). 7.2.1 Configuring the ISDN BRI Interface You can use the ISDN BRI interface of X4000 for both dialup and leased lines over ISDN. Proceed as follows to configure the ISDN BRI interface: ■ Entering the settings of your ISDN connection: Here you set the most important parameters of your ISDN connection. ■ Configuring Incoming Call Answering: Here you tell X4000 how to react to incoming calls from the WAN. Autoconfiguration, ISDN Switch Type, … Firstly, enter the settings for your ISDN connection. ➤ Go to CM-1BRI, ISDN S0: X4000 User’s Guide 137 7 Basic Configuration of Basic Unit with Setup Tool X4000 Setup Tool [WAN]: WAN Interface BinTec Communications AG MyRouter Result of Autoconfiguration: Euro ISDN, point-to-multipoint ISDN Switch Type autodetect on bootup D-Channel B-Channel 1 B-Channel 2 dialup dialup dialup Incoming Call Answering> Advanced Settings> SAVE Use <Space> to select 138 X4000 User’s Guide CANCEL 7 Configuring WAN Interfaces The menu contains the following fields: Field Meaning Result of Autoconfiguration Status of ISDN autoconfiguration. Automatic ➤➤ D-channel detection runs until a setting is found or until the ISDN protocol is entered manually under ISDN switch type. ISDN Switch Type Defines the ISDN ➤➤ protocol supplied by your ISDN provider. The following parameters are possible: ■ autodetect on bootup: automatic D-channel detection (default setting) ■ Euro ISDN point-to-multipoint: Euro ISDN for point-to-multipoint ■ Euro ISDN point-to-point: Euro ISDN for point-to-point ■ none ■ leased line B1 channel (64S): leased line over B-channel 1 ■ leased line B1+B2 channel (64S2): leased line over both B-channels ■ leased line D+B1+B2 channel (TS02): leased line over D-channel and both Bchannels ■ leased line B1+B2 different endpoints (digital 64S with dual connection): leased line to two different endpoints X4000 User’s Guide 139 7 Basic Configuration of Basic Unit with Setup Tool Field Meaning D-Channel D-channel configuration. The selection can only be changed if ISDN Switch Type = leased line D+B1+B2 (TS02). Possible values: ■ leased dte (default value) ■ leased dce B-Channel 1 Configuration of first ➤➤ B-channel. Possible values: ■ dialup (default setting) ■ not used ■ leased dte ■ leased dce B-Channel 2 Configuration of second B-channel. Possible values: ■ dialup (default setting) ■ not used ■ leased dte ■ leased dce Table 7-6: To do CM-1BRI, ISDN S0 Make the following entries: ➤ Select ISDN Switch Type: autodetect on bootup. This setting enables X4000 to use its automatic D-channel detection. As long as the D-channel detection is running, running appears next to Result of Autoconfiguration. Once the setting has been found, it is displayed, e.g. Euro ISDN, point-to-multipoint. 140 X4000 User’s Guide 7 Configuring WAN Interfaces If the ISDN protocol is not detected, it can be entered manually under ISDN Switch Type. The automatic D-channel detection is then switched off. An incorrectly set ISDN protocol prevents ISDN connections being set up! ➤ Select D-Channel, if applicable. ➤ Select B-Channel 1: e. g. dialup. ➤ Select B-Channel 2: e. g. dialup. In most cases, you can accept the preset values for D-Channel, B-Channel 1 and B-Channel 2. If you use an ISDN leased line and have requested a special service from your service provider, it may be necessary to set the local side of the leased line at this point (DTE or DCE). You must then ensure that the far end has set the opposite value. You must also set D-channel, B-channel 1 and B-channel 2 to the same values, if you have selected several D-/B-channels under ISDN Switch Type and the values can be changed. ➤ Press SAVE. You have returned to the main menu. and the entries have been saved. Incoming call answering If you use the ISDN BRI interface for dialup connections, you must now tell X4000 how it should respond to incoming calls from the ISDN. X4000 distributes the incoming calls to the appropriate internal services according to the settings in the following menus. X4000 supports the following services: ■ PPP (Routing): The ➤➤ PPP service is X4000’s general routing service. This connects incoming data calls from WAN partners’ dialup connections to your ➤➤ LAN. This enables partners outside your own local network to access hosts within your LAN. This subsystem also enables outgoing data calls to be set up to WAN partners outside your local network. This PPP routing is also used for X.25 connections. X4000 User’s Guide 141 7 Basic Configuration of Basic Unit with Setup Tool ■ ISDN Login: The ➤➤ ISDN Login service allows incoming data calls access to the ➤➤ SNMP shell of your X4000. This is how X4000 is remotely configured and administrated. ■ CAPI: The ➤➤ CAPI service allows connection of incoming and outgoing data and voice calls to communications applications on hosts in the LAN that access the ➤➤ Remote-CAPI interface of X4000. This enables, for example, hosts connected to X4000 to receive and send faxes. To be able to use CAPI applications (e.g. RVS COM Lite) from the hosts in the LAN with the X4000 basic unit, you must also carry out the Remote CAPI configuration on the individual hosts (see chapter 6.4, page 115) in addition to distributing the extension numbers as described in this chapter. When a call is received, X4000 first checks the Called Party Number (CPN) and the type of call (data or voice call). The CPN is the extension the partner has dialed to reach X4000. Then the call is forwarded to the corresponding service (see Figure 7-3, page 142). WAN 4000 BinTec X4000 PPP CAPI Login: ISDN Login Figure 7-3: 142 X4000 User’s Guide Distribution of incoming calls 7 Configuring WAN Interfaces If your ISDN connection has more than three extensions, a practical allocation could look as follows: Called party number Data services 10 PPP (routing) 11 CAPI 12 ISDN Login Table 7-7: Voice services CAPI Distribution of extensions to services If no entry is specified in the following menu, every incoming ISDN call is accepted by the ISDN Login service. To avoid this, be sure to make the necessary entries here. As soon as you have made one or more entries in this menu, the matching incoming calls are distributed to the corresponding services. In the unconfigured ex works state, a user with the user name “default” and no password is always entered for the CAPI subsystem. All calls to the CAPI are offered to all CAPI applications in the LAN. To distribute incoming calls for the CAPI subsystem to defined users with password, you should use BinTec’s User Concept (see chapter 8.1.2, page 190). You should then delete the user "default" without password. All incoming calls that do not match an entry are passed on to the CAPI service. Now set the entries for Incoming Call Answering: ➤ Go to CM-1BRI, ISDN S0 ➧ INCOMING CALL ANSWERING: X4000 User’s Guide 143 7 Basic Configuration of Basic Unit with Setup Tool X4000 Setup Tool [WAN][INCOMING]: Incoming Call Answering Item CAPI 1.1 EAZ 1 Mapping CAPI 1.1 EAZ 1 Mapping ISDN Login PPP (routing) ADD Number 11 11 12 10 BinTec Communications AG MyRouter Mode right right right right DELETE Username to to to to left left left left EXIT Press<Ctrl-n>,<Ctrl-p>to scroll,<Space>tag/untagDELETE,<Return>to edit This menu lists the previously completed assignment of systems to extension numbers. To make entries in the list, proceed as follows: ➤ Use ADD to add a new entry or select an existing entry. Confirm with Return to change the entry. Another menu window opens: X4000 Setup Tool [WAN][INCOMING][ADD]: Incoming Calls Item Number Mode PPP (routing) 10 right to left Bearer data SAVE Use <Space> to select 144 BinTec Communications AG MyRouter X4000 User’s Guide CANCEL 7 Configuring WAN Interfaces The menu contains the following fields: Field Meaning Item Service which shall accept a call to the Number below. Possible values: see Table 7-9, page 147. Number Phone number under which the service (Item) entered above can be reached. Mode Mode in which X4000 compares the digits of Number with the called party number of the incoming call: ■ right to left (default value) ■ left to right (DDI): Always select if X4000 is connected to a point-to-point connection. User name (only for Item = CAPI 1.1 EAZ 0...9 Mapping) CAPI user name. Only necessary if you want to use the CAPI user concept (see chapter 7.1.2, page 192). Bearer Type of incoming call. Possible values: ■ data: data call ■ voice: voice call ■ any: both data and voice calls Table 7-8: CM-1BRI, ISDN S0 ➧ INCOMING CALL ANSWERING ➧ ADD X4000 User’s Guide 145 7 Basic Configuration of Basic Unit with Setup Tool The Item field includes the following selection: Possible values Meaning PPP (routing) Default setting for ➤➤ PPP routing. Also applicable for the PPP connections below. ISDN Login Enables logging in with ➤➤ isdnlogin. PPP 64k Enables 64 kbps PPP data connections. PPP 56k Enables 56 kbps PPP data connections. PPP Modem (Only available if expansion card and resource card with digital modems are installed) Assigns incoming analog calls to the PPP routing service. The digital modem on the resource card that accepts this call uses the settings for Modem Profile 1, which were selected in the menu MODEM ➧ PROFILE CONFIGURATION ➧ PROFILE 1. PPP DOVB Data transmission Over Voice Bearer - useful in the USA, for example, where voice connections are sometimes cheaper than data connections. PPP V.110 (1200...38400) Enables PPP connections with V.110 at bit rates of 1200 bps, 2400 bps,..., 38400 bps. Pots Not available in X4000. PPP Modem Profile 1...8 (Only available if expansion card and resource card with digital modems are installed) Assigns incoming analog calls to the PPP routing service. The digital modem on the resource card that accepts this call uses the settings for Modem Profile 1... 8, which were selected in the menu MODEM ➧ PROFILE CONFIGURATION ➧ PROFILE 1...8. CAPI 1.1 EAZ 0...9 Mapping 146 X4000 User’s Guide Enables connections with Remote CAPI applications. Required for CAPI 1.1 applications only. 7 Configuring WAN Interfaces Possible values Meaning X.25 PAD Enables data connections with X.25 PAD. Table 7-9: Item Make sure you enter the right number under Number, i.e. the number that actually arrives at X4000! For example, if X4000 is connected to a ➤➤ PABX, only the PABX extension number arrives at X4000. If you are not sure which number arrives at X4000, proceed as follows: ➤ Call X4000 with a conventional telephone using one of its extension numbers. ➤ Go to MONITORING AND DEBUGGING ➧ ISDN MONITOR. You can now see the incoming call in the menu. ➤ Place the cursor on the call and enter d (for details). Under Local Number, you can see the part of the number that arrives at X4000. ➤ Type in this part of the number in CM-1BRI, ISDN S0 ➧ INCOMING CALL ANSWERING ➧ ADD under Number. If you use a communication application on your PC that is based on Remote CAPI 1.1 (current version: Remote CAPI 2.0), X4000 must translate the ➤➤ MSNs (= Number, multidigit) of the incoming call to ➤➤ EAZs (single digit) (CAPI 1.1 can only detect single-digit numbers). This is why the CAPI entry under Item is not simply called "CAPI" but "CAPI 1.1 EAZ x Mapping". When using CAPI 1.1, you must therefore make sure you assign each CAPI application the corresponding EAZ(s) by "mapping". For example select for Number = 1234 the entry Item = CAPI 1.1 EAZ 0 Mapping and for Number = 5678 the entry Item = CAPI 1.1 EAZ 1 Mapping. CAPI 2.0 evaluates the MSN directly and "translation" to EAZ is not necessary. You can use the same CAPI 1.1 EAZ x Mapping entry for each Number i.e. a single entry is sufficient. You should certainly try to change your PC system to CAPI 2.0 so that you can also use new features. X4000 User’s Guide 147 7 Basic Configuration of Basic Unit with Setup Tool To do Make the following entries: ➤ Select the Item, e.g. PPP (routing). ➤ Enter the Number, e.g. 10. ➤ Select the Mode, e.g. right to left. ➤ Select the Bearer, e.g. data. ➤ Press SAVE. You have returned to the menu CM-1BRI, ISDN S0 ➧ INCOMING CALL ANSWERING. The entries are saved and displayed in the list. You have thus assigned a service (PPP (routing)) to one of your phone numbers (10). This means that when a data call is received by Called Party Number 10, it is put through to the service PPP (routing). ➤ Repeat these steps until you have assigned to all phone numbers the services to be reached under these numbers. This concludes the configuration of Incoming Call Answering. X4000 now distributes the incoming calls to the internal services. Advanced configuration CM-1BRI, ISDN S0 ➧ ADVANCED SETTINGS contains settings for X.31 TEI (see chapter 8.1.4, page 197). If you use a leased line, you can implement a backup solution using the Bandwidth on Demand feature (see chapter 8.2.3, page 201). If you use this facility, a dialup connection is set up to the connection partner if the leased line fails. 7.2.2 Configuring Serial Interfaces The X4000 basic unit is equipped with two serial WAN interfaces: ■ The first serial port (Setup Tool menu CM-SERIAL, SERIAL ➧ UNIT 0) can be used as interface type 148 – X.21/V.11 – V.35/V.11 – V.36/V.11 X4000 User’s Guide 7 Configuring WAN Interfaces The setting in the Setup Tool Connector field (see Table 7-11, page 153) enables the port to be changed so that X4000 can be operated in both DCE and DTE Mode. Making the relevant settings in the Setup Tool Connector field physically reverses the signal direction and the pin functions. ■ The second serial port (Setup Tool menu CM-SERIAL, SERIAL ➧ UNIT 1) can be used as interface type – X.21bis/V.28 The change from DCE to DTE Mode and vice versa for this port can only be made by using a DCE or DTE cable. Port 1 Interface Type DTE Mode DCE Mode X.21 Standard cable Standard cable V.35 Connector = dte Connector = dce DTE cable DCE cable V.36 Port 2 X.21bis Table 7-10: Functionality of serial ports X4000 User’s Guide 149 7 Basic Configuration of Basic Unit with Setup Tool Configuration with the Setup Tool The following menu is available for configuring the X.21/V.35/V.36 and X.21bis interface of X4000: X4000 Setup Tool BinTec Communications AG [SLOT 3 UNIT 0 SERIAL]:Configure Serial Interface MyRouter Interface Type Connector Clock mode Speed Layer 2 Mode X.21 dte auto 64000 bps auto Interface Leads disabled SAVE Use <Space> to select 150 X4000 User’s Guide CANCEL 7 Configuring WAN Interfaces The menu contains the following fields: Field Meaning Interface Type Defines the interface type of the port used. Possible values: ■ none (default value): Interface is not used. ■ X.21: Use as X.21/V.11 interface ■ V.35: Use as V.35/V.11 interface ■ V.36: Use as V.36/V.11 interface ■ X.21bis: Use as X.21bis/V.28 interface Connector Defines the pin assignment of the port (see chapter 13.2.4, page 393). This setting only affects the pin assignment for the first serial port CM-SERIAL, SERIAL ➧ U NIT 0; a suitable DCE or DTE cable must be used for the second serial port CM-SERIAL, SERIAL ➧ UNIT 1! Possible values: ■ dte (default value): The pins are assigned as DTE interface. This setting is necessary, for example, if X4000 is connected to a public data network (e.g. Datex-P in Germany). ■ dce: The pins are assigned as DCE interface. This is necessary for using a unit configured as DTE. X4000 User’s Guide 151 7 Basic Configuration of Basic Unit with Setup Tool Field Meaning Clock Mode Defines which connection partner sends the clock signal for synchronization between transmitter and receiver. Possible values: ■ auto (default value): The setting is based on the Connector selected: – X4000 sends the clock signal if Connector = dce. – X4000 receives the clock signal if Connector = dte. You can usually accept this setting. ■ external: X4000 receives the clock signal, irrespective of the setting selected under Connector. ■ internal: X4000 sends the clock signal, irrespective of the setting selected under Connector. Speed Transmission rate of connection, scalable from 2400 bps to 8 Mbps. The value to be set depends on the quality and length of the cable and on the connection type (balanced/unbalanced). Up to 8 Mbps are possible over a short distance of up to 5 m if shielded cables are used. Default value: 64000 bps 152 X4000 User’s Guide 7 Configuring WAN Interfaces Field Meaning Layer 2 Mode Defines the value of the HDLC address field in the transmitted command frames (Layer 2). Possible values: ■ auto (default value): The selection made for Connector is accepted. You can usually accept this setting, e.g. for access to a public data network such as Datex-P. ■ dte: The address field has the value for DTE. ■ dce: The address field has the value for DCE. Interface Leads Defines whether X4000 checks the status of the interface lines. The same value should be set for both connection partners. Possible values: ■ enabled: The status of the signal line (I for X.21, CTS for V.35, V.36 and X.21bis) is checked and transferred as L1State. ■ disabled (default value): The status is not checked; the physical line is always up. In this setting, you should monitor the interface line in some other way, e.g. with PPP Keepalive. Table 7-11: CM-SERIAL, SERIAL ➧ UNIT 0 or CM-SERIAL, SERIAL ➧ UNIT 1 X4000 User’s Guide 153 7 Basic Configuration of Basic Unit with Setup Tool Connector = DTE (default value) Connector = DCE Function DTE DCE Cables Standard cable Pin assignment X.21: see "DB-15 Plug for X.21", page 395 Port 1 V.35: see "M34 Plug for V.35", page 396 V.36: see "DB-37 Plug for V.36", page 397 Function DTE DCE Cables DTE cable DCE cable Pin assignment X.21bis: see "DB-25 Plug for X.21bis", page 399 Table 7-12: To do 2 Use of Connector in the Setup Tool Proceed as follows to configure the serial interfaces (the example values given are necessary if you connect X4000 to Datex-P): ➤ Go to CM-SERIAL, SERIAL ➧ UNIT 0 or CM-SERIAL, SERIAL ➧ UNIT 1 ➤ Select Interface Type: e.g. X.21. ➤ Select Connector: e.g. dte. ➤ Select Clock Mode: e.g. auto. ➤ Select Speed: e.g. 64000 bps. ➤ Select Layer 2 Mode: e.g. auto. ➤ Select Interface Leads: e.g. disabled. ➤ Press SAVE. You have returned to the main menu. and the entries have been saved. Advanced configuration 154 If you use a leased line, you can implement a backup solution using the Bandwidth on Demand feature (see chapter 8.2.3, page 201). If you use this facility, a dialup connection is set up to the connection partner if the leased line fails. X4000 User’s Guide 7 Configuring WAN Interfaces 7.2.3 ADSL Configuring the LAN Interface for Using ADSL (PPP-over-Ethernet) To be able to use ADSL (Asymmetric Digital Subscriber Line) with X4000, you must configure a PPP-over-Ethernet interface over the LAN interface. This is done by connecting X4000 to T-DSL, which is the ADSL connection of Deutsche Telekom AG. If you use the ADSL connection of another provider, ask the provider about any special features of your ADSL connection that need to be observed. T-DSL The T-DSL package is currently offered by Deutsche Telekom AG as highspeed access to the Internet. It consists of an ISDN connection and a data line with a bandwidth of up to 768 kbps from the Internet Service Provider to the customer (downstream) and 128 kbps in the upstream direction. Security risks and restrictions The following restrictions and security risks exist as the X4000 connection to TDSL is established only over one Ethernet interface: ■ If PPP-over-Ethernet is operated with only one Ethernet interface, there is a risk of unauthorized accesses from the Internet to the local X4000 LAN. Such unauthorized accesses can originate from the first node of the Internet. ■ Users of the local network can configure a PPP-over-Ethernet client on their PC and use the Internet unnoticed by X4000. ■ Broadcasts in the local LAN are always forwarded by the ADSL modem (NTBBA) to the PTT exchange and are not rejected until the exchange. This means that the maximum bandwidth of 128 kbps upstream to the PTT may not be fully available. The limitations and security risks described here do not apply if X4000 is equipped with a LAN expansion card and several LAN interfaces are therefore available (see chapter 9.3.2, page 288). X4000 User’s Guide 155 7 Basic Configuration of Basic Unit with Setup Tool The T-DSL connection (without X4000) looks like this: T-ISDN ADSL T-ISDN dsl 768 kbit/s Customer TAE 128 kbit/s ISDN telephone NTBA ADSL Splitter (BBAE) ISDN-NTBA PC with network card ADSL modem (NTBBA) Figure 7-4: T-DSL connection (without X4000) The following scenario (see Figure 7-5, page 157) is used to describe the necessary configuration steps: The LAN interface of X4000 and the ADSL modem (NTBBA) of Deutsche Telekom AG are connected to your hub as described in chapter 3.3, page 59 . If you receive a special cable from Deutsche Telekom AG or another provider for connecting the ADSL modem, use only this cable. 156 X4000 User’s Guide 7 Configuring WAN Interfaces 192.168.1.1 ADSL 192.168.1.2 4000 ADSL-Modem (NTBBA) BinTec Your X4000 192.168.1.254 192.168.1.3 Your Local Area Network Figure 7-5: Example scenario (with X4000) The following settings are necessary (the Setup Tool menus concerned are described elsewhere): ➤ Go to PPP (see chapter 8.1.3, page 194). ➤ Select PPPoE Ethernet Interface: en1. ➤ Press SAVE. ➤ Go to WAN PARTNER ➧ ADD (see Table 7-13, page 163). ➤ Enter your Partner Name: e.g. t-online. ➤ Select Encapsulation: PPP ➤ Go to WAN PARTNER ➧ ADD ➧ PPP (see Table 7-18, page 168). ➤ Enter Local PPP ID (= your user name): e.g. 000460004256091169386#[email protected]. X4000 User’s Guide 157 7 Basic Configuration of Basic Unit with Setup Tool The T-Online user name comprises the following elements: <Anschlußkennung><T-Online-Nummer>#<Mitbenutzernummer>@t-online.de Anschlußkennung is a 12-digit number, in this case: 000460004256. T-Online-Nummer is the extension number, in this case: 091169386. Mitbenutzernummer is a 4-digit number, in this case: 0001. The T-Online-Nummer and the Mitbenutzernummer must be separated by # if the T-Online-Nummer has less than 12 digits. ➤ Enter PPP Password (= your T-Online password). ➤ Select Keepalives: on. ➤ Confirm with OK. ➤ Go to WAN PARTNER ➧ ADD ➧ ADVANCED SETTINGS (see chapter 8.2.5, page 219). ➤ Select Layer 1 Protocol : PPP over Ethernet (PPPoE). ➤ Confirm with OK. ➤ Go to WAN PARTNER ➧ ADD ➧ IP (see Table 7-21, page 174). ➤ Select IP Transit Network: dynamic client. ➤ Press SAVE. ➤ Go to IP ➧ ROUTING ➧ ADD (see "Creating a Routing Entry", page 175). ➤ Select Route Type: Default route. ➤ Select Network: WAN without transit network. ➤ Select Partner / Interface: e.g. t-online. ➤ Enter Metric: e.g. 1. ➤ Press SAVE. ➤ Go to IP ➧ NETWORK ADDRESS TRANSLATION (see "Activating Network Address Translation (NAT)", page 181). ➤ Select the PPPoE interface, e.g. t-online, and confirm with Return. ➤ Select Network Address Translation: on. ➤ Press SAVE. 158 X4000 User’s Guide 7 Configuring WAN Partners 7.3 Configuring WAN Partners To enable X4000 to make connections to networks or hosts outside your LAN, you must configure the partners you want to connect to as WAN partners on your X4000. This applies to outgoing connections (X4000 dials its WAN partner), as well as for incoming connections (a WAN partner dials the number of your X4000) and leased lines. Consequently, if you want to access the Internet, you must set up your Internet Service Provider (➤➤ ISP) as a WAN partner. If you wish to establish a LANLAN connection, e.g. between your LAN (head office) and the LAN of a branch office (corporate network connection), you have to configure the LAN of your branch office as a WAN partner. If you have set up one or more leased lines on configuring the WAN interface(s) of X4000, a WAN partner for each leased line is already created automatically in the WAN Partner menu. Edit this entry to suit your requirements. General The procedure for configuring or editing a WAN partner in X4000 is explained in general form in chapter 7.3.1, page 159 below. Examples A number of frequently required configuration examples are shown in chapter 7.3.2, page 182. If you would like to configure Internet access over Compuserve, please see "Internet Access over Compuserve", page 184. 7.3.1 Basic Procedure Configuring a WAN partner generally involves the following steps: ■ Entering a WAN partner: – Defining a ➤➤ protocol (encapsulation). – Entering extension(s). – Defining ➤➤ PPP settings for authentication. – Defining ➤➤ short hold. X4000 User’s Guide 159 7 Basic Configuration of Basic Unit with Setup Tool – Carrying out IP configuration. ■ Creating routing entry. ■ Activating Network Address Translation (➤➤ NAT) (optional). Off we go: Entering a WAN Partner WAN partner configuration Before you get down to it, you should collect the necessary access information that you received from your ISP or system administrator (see chapter 6.1, page 110). The terms used may vary slightly from provider to provider. To enter a WAN partner, proceed as follows: ➤ Go to WAN PARTNER: X4000 Setup Tool [WAN]: WAN Partners BinTec Communications AG MyRouter Current WAN Partner Configuration Partnername LittleIndian ADD Protocol ppp DELETE State dormant EXIT Press<Ctrl-n>,<Ctrl-p>to scroll,<Space>tag/untag DELETE,<Return>to edit This is where all WAN partners currently configured are listed with the corresponding Partner name, Protocol and State. A WAN partner interface is created automatically for leased lines. Edit the previously created entry for a leased line in the WAN P ARTNER menu and enter the necessary parameters. State can have the following values: ■ up: connected 160 X4000 User’s Guide 7 Configuring WAN Partners ■ dormant: not connected ■ blocked: not connected (an error occurred on establishing a connection, a renewed attempt is only possible after a specified number of seconds) ■ down: set to down by administration To make an entry in the list, proceed as follows: ➤ Use ADD to add a new entry or select an existing entry. Confirm with Return to change the entry. Another menu window opens: X4000 Setup Tool [WAN][ADD]: Configure WAN Partner BinTec Communications AG MyRouter Partner Name LittleIndian Encapsulation Compression Encryption Calling Line Identification PPP none none no WAN Numbers > PPP > Advanced Settings > IP > IPX > Bridge > SAVE CANCEL Enter string, max. length = 25 chars X4000 User’s Guide 161 7 Basic Configuration of Basic Unit with Setup Tool The menu contains the following fields: Field Meaning Partner Name Enter a name for uniquely identifying the WAN partner. Encapsulation ➤➤ Encapsulation. Defines how the ➤➤ data packets are packed for transfer to the WAN partner. Possible values: ■ PPP ■ Multi-Protocol LAPB Framing ■ Multi-Protocol HDLC Framing ■ Async PPP over X.75 ■ Async PPP over X.75/T.70/BTX ■ X.25_PPP ■ X.25 ■ HDLC Framing (IP only) ■ LAPB Framing (IP only) ■ X31 B-Channel ■ X.25 No Signaling ■ X.25 PAD ■ X.25 No Configuration ■ Frame Relay ■ X.25 No Configuration, No Signaling 162 X4000 User’s Guide 7 Configuring WAN Partners Field Meaning Compression Defines the type of compression that should be used for data traffic to the WAN partner. Possible values: ■ STAC: only if Encapsulation = PPP ■ MS-STAC: only if Encapsulation = PPP ■ none Encryption Defines the type of encryption that should be used for data traffic to the WAN partner. Only possible if STAC compression is not activated for the connection. Possible values: ■ MPPE 40: MPPE version 1 with 40-bit key ■ MPPE 56: MPPE version 1 with 56-bit key ■ MPPE V2 40: MPPE version 2 with 40-bit key ■ MPPE V2 56: MPPE version 2 with 56-bit key ■ DES 56: DES with 56-bit key ■ Blowfish 56: Blowfish with 56-bit key ■ none: No encryption These values are only available if PPP, Async PPP over X.75, Async PPP over X.75/T.70/ BTX or X.25_PPP has been selected under Encapsulation. Calling Line Identification Indicates whether calls from this WAN partner should be identified by means of the calling party number (➤➤ CLID). The value of this field is dependent on Direction in the submenu WAN NUMBERS and cannot be set here. Table 7-13: WAN PARTNER ➧ ADD X4000 User’s Guide 163 7 Basic Configuration of Basic Unit with Setup Tool The following table illustrates which encapsulations support procedures for ➤➤ data compression: Protocols Encapsulation Compression: STAC, MS-STAC X PPP X X X Async PPP over X.75 X X X Async PPP over X.75/T.70/BTX X X X Multi-Protocol LAPB Framing X X Multi-Protocol HDLC Framing IP IPX X X HDLC Framing (IP only) X LAPB Framing (IP only) Table 7-14: To do Encapsulation and compression Make the following entries: ➤ Enter Partner Name, e.g. LittleIndian. ➤ Select Encapsulation, e.g. PPP. ➤ Select Compression, e.g. none, if applicable. ➤ Select Encryption, e.g. none, if applicable. ➤ Go to WAN PARTNER ➧ ADD ➧ WAN NUMBERS: Entering extension numbers X4000 Setup Tool BinTec Communications AG [WAN][ADD][WAN Numbers]: WAN Numbers (BigBoss) MyRouter WAN Numbers for this partner: WAN Number 0911987654321 ADD Direction outgoing DELETE EXIT Press<Ctrl-n>,<Ctrl-p>toscroll,<Space>tag/untag DELETE,<Return>to edit 164 X4000 User’s Guide 7 Configuring WAN Partners This is where the currently entered extensions of the WAN partners are listed. To make an entry in the list, proceed as follows: ➤ Use ADD to add a new entry or select an existing entry. Confirm with Return to change the entry. Another menu window opens: X4000 Setup Tool BinTec Communications AG [WAN][ADD][WANNUMBERS][ADD]:Add or Change WANNumbers(BigBoss) MyRouter Number Direction 0911987654321 outgoing Advanced Settings > SAVE Cancel Enter string, max. length = 40 chars The menu contains the following fields: Field Meaning Number Extension of WAN partner. Direction Defines whether Number should be used for incoming or outgoing calls or for both. Table 7-15: WAN PARTNER ➧ ADD ➧ WAN NUMBERS ➧ ADD The Direction field contains the following selection options: Possible values Meaning outgoing For outgoing calls, where you dial your WAN partner. both (CLID) For incoming and outgoing calls. incoming (CLID) For incoming calls, where your WAN partner dials in to your X4000. Table 7-16: Direction X4000 User’s Guide 165 7 Basic Configuration of Basic Unit with Setup Tool When X4000 is connected to a PABX system for which a "0" prefix is necessary for external line access, this "0" must be considered when entering the access number. Wildcards When entering the Number, you can either enter the extension digit for digit or you can replace single numbers or groups of numbers with wildcards. Number can therefore be the same as various extensions. You can use the following wildcards, which have different effects for incoming and outgoing calls: Meaning Example Wildcard X4000 accepts incoming calls, e.g. with: Outgoing calls, i.e. X4000 sets up a connection to the WAN partner with: Incoming calls Outgoing calls Number * Matches a group of none or more digits. Is ignored. 123* 123, 1234, 123789 123 ? Matches exactly one digit. Is replaced by 0. 123? 1234, 1238, 1231 1230 [a-b] Defines a range of matching digits. The first digit of the specified range is used. 123[5-9] 1235, 1237, 1239 1235 [^a-b] Defines a range of excluded digits. The first digit after the specified range is used. 123[^0-5] 1236, 1238, 1239 1236 {ab} Optional sequence to match. Sequence is used. {00}1234 00123 and 123 00123 Table 7-17: 166 X4000 User’s Guide Wildcards for incoming and outgoing calls 7 Configuring WAN Partners If the calling party number of an incoming call matches both a WAN partner’s Number with wildcards and a WAN partner’s Number without wildcards, the entry without wildcards is always used. To do Make the following entries: ➤ Enter the Number, e.g. 0911987654321. ➤ Select the Direction, e.g. outgoing. ➤ Press SAVE. The entries are saved and listed. ➤ Leave WAN PARTNER ➧ ADD ➧ WAN NUMBERS with EXIT. ➤➤ PPP authentication Now enter the ➤➤ PPP settings of your WAN partner. These are used to authenticate your connection partner. When a call is received, the Calling Party Number is always sent over the ISDN ➤➤ D-channel. This number enables X4000 to identify the caller (➤➤ CLID), provided the caller is entered as a WAN partner. After identification with CLID, the router can additionally carry out PPP authentication with the WAN partner before it accepts the call. The router needs the necessary data for this, which you should enter here. First establish the type of authentication process that should be performed, then enter a common password and two user names. You get this information, for example, from your Internet Service Provider (ISP) or the system administrator at your head office. The call is only accepted if the data entered in X4000 matches the caller’s data. If you authenticate WAN partners over a RADISU server, please see the relevant instructions in the Extended Features Reference. To set the PPP authentication for the WAN partner, proceed as follows: ➤ Go to WAN PARTNER ➧ ADD ➧ PPP: X4000 User’s Guide 167 7 Basic Configuration of Basic Unit with Setup Tool X4000 Setup Tool [WAN][ADD][PPP]: PPP Settings (BigBoss) Authentication Partner PPP ID Local PPP ID PPP Password CHAP + PAP LittleIndian BigBoss Secret Keepalives Link Quality Monitoring off off OK BinTec Communications AG MyRouter CANCEL Use <Space> to select The menu contains the following fields: Field Meaning Authentication Authentication protocol Partner PPP ID ID of WAN partner Local PPP ID X4000’s ID PPP Password Password Keepalives Activates keepalive packets for checking the interface status. Possible values: ■ off ■ on Link Quality Monitoring Activates PPP Link Quality Monitoring as per RFC 1989. Possible values: ■ off ■ on Table 7-18: 168 X4000 User’s Guide WAN PARTNER ➧ ADD ➧ PPP 7 Configuring WAN Partners The Authentication field contains the following selection options: Possible values Meaning PAP Only run ➤➤ PAP (PPP Password Authentication Protocol); the password is transferred uncoded. CHAP Only run ➤➤ CHAP (PPP Challenge Handshake Authentication Protocol as per RFC 1994); the password is transferred coded. CHAP + PAP Run primarily CHAP, otherwise PAP. MS-CHAP Only run MS-CHAP (MS Challenge Handshake Authentication Protocol). CHAP + PAP + MSCHAP Primarily run CHAP, on denial, the authentication protocol required by the WAN partner. MS-CHAP V2 Run MS-CHAP version 2 only. none Run no PPP authentication protocol. Table 7-19: To do Authentication Make the following entries: ➤ Select Authentication, e.g. CHAP. ➤ Enter Partner PPP ID, e.g. LittleIndian. ➤ Enter Local PPP ID, e.g. BigBoss. How to enter the passwords is described in "Changing the password", page 85. ➤ Enter PPP Password, e.g. Secret. ➤ Select Keepalives, e.g. off. ➤ Select Link Quality Monitoring, e.g. off. X4000 User’s Guide 169 7 Basic Configuration of Basic Unit with Setup Tool ➤ Confirm with OK. You have returned to WAN P ARTNER ➧ ADD. In some cases, the caller cannot be identified with ➤➤ CLID, although entered as a WAN partner. In this case, your X4000 does not know which authentication protocol was set for this WAN partner. To enable the call to still be accepted, X4000 falls back on general settings in the PPP, which you can change as necessary (chapter 8.1.3, page 194). Setting short hold Now set short hold so that X4000 clears down the ISDN connection when there is no further data exchange to save money. The short hold setting can be either static or dynamic and tells X4000 the duration of the idle time, after which it is to clear down the ISDN connection. Static The static ➤➤ short hold setting determines how much time should pass between sending the last ➤➤ data packet and clearing the ISDN connection. Enter a fixed period of time in seconds. Dynamic With the dynamic short hold setting, no fixed period of time is specified and the length of an ISDN charging unit is considered instead. Dynamic short hold is based on AOCD (advice of charge during the call). When setting dynamic short hold, you specify how much time should pass after the last exchange of data before the connection is cleared. You enter a percentage based on the last charging unit. The value of the idle timer can therefore change, just as the length of the charging unit changes (according to the time of day, weekend, weekday, etc.). If you enter 50 %, for example, the idle timer is 60 seconds if the preceding charging unit was 120 seconds, and 300 seconds if the preceding charging unit was 600 seconds. The connection is cleared on expiry of the idle timer and shortly before the next charging unit starts. Please note: You can only use dynamic short hold if you receive charging information during the connection. Ask your telephone company. 170 X4000 User’s Guide 7 Configuring WAN Partners When using dynamic Short Hold, you must also set static Short Hold so that you do not get a permanent ➤➤ switched connection if AOCD fails. You should make sure static Short Hold comes into operation later than dynamic Short Hold. If not, X4000 always clears the connection based on static short hold and never gives dynamic short hold a chance to disconnect. In this case, enter a value for Static Short Hold (sec) that is a little more than the expected maximum dynamic idle time. In Germany, only Deutsche Telekom currently supports call charging information. Static Short Hold Dynamic Short Hold Static Short Hold Dynamic Short Hold Connected Short Hold = 60 s Data Disconnected Connected Disconnected Idle Timer = 50% Data Connected Short Hold = 60 s Data Disconnected Connected Idle Timer = 50% Data $ 120 s $ 0s Figure 7-6: Disconnected $ 240 s $ 360 s Dynamic and static short hold Proceed as follows: ➤ Go to WAN PARTNER ➧ ADD ➧ ADVANCED SETTINGS: X4000 User’s Guide 171 7 Basic Configuration of Basic Unit with Setup Tool X4000 Setup Tool BinTec Communications AG [WAN][ADD][ADVANCED]: Advanced Settings (BigBoss) MyRouter Callback Static Short Hold (sec) Idle for Dynamic Short Hold (%) Delay after Connection Failure (sec) Layer 1 Protocol no 20 0 300 ISDN 64 kbps Channel Bundling no Extended Interface Settings (optional) > OK CANCEL Use <Space> to select The following parts of the menu are relevant for this configuration step: Field Meaning Static Short Hold (sec) Idle time in seconds for static short hold. Example values for trunk connections: 60, only effective if charging pulses are transmitted during the connection (AOCD), 20 otherwise. Idle for Dynamic Short Hold (%) Idle time in % for dynamic Short Hold. Only effective if charging pulses are transmitted during the connection (AOCD). Table 7-20: To do WAN PARTNER ➧ ADD ➧ ADVANCED SETTINGS Make the following entries: ➤ Enter Static Short Hold (sec), e.g. 20. ➤ Enter Idle for Dynamic Short Hold (%), e.g. 0. ➤ Confirm with OK. You have returned to WAN P ARTNER ➧ ADD. 172 X4000 User’s Guide 7 Configuring WAN Partners Tips on entering Idle for Dynamic Short Hold %: ■ For interactive connections (e.g. ➤➤ telnet), specify a high value (e.g. 80...90) to avoid clearing connections during short phases without data exchange. ■ For Internet connections (e.g. WWW, http, etc.), specify a medium to high value (e.g. 50...80) to avoid clearing connections while waiting. ■ For data connections (e.g. ➤➤ ftp), specify a low value (e.g. 10...40) to avoid the unnecessary continuation of a connection after data has been transferred. You will find a more detailed explanation about static and dynamic short hold in the Software Reference. Carrying out IP configuration Now let’s move on to the IP configuration of your WAN partner. Here you enter the ➤➤ IP address and ➤➤ netmask of your partner. Proceed as follows: ➤ Go to WAN PARTNER ➧ ADD ➧ IP: X4000 Setup Tool [WAN][ADD][IP]: IP Configuration (BigBoss) BinTec Communications AG MyRouter IP Transit Network no Partner’s LAN IP Address Partner’s LAN Netmask 10.1.1.0 255.255.255.0 Advanced Settings > SAVE CANCEL Use <Space> to select X4000 User’s Guide 173 7 Basic Configuration of Basic Unit with Setup Tool The menu contains the following fields: Field Meaning IP Transit Network Defines whether X4000 sets up a transit network to the WAN partner. Local IP Address IP address of X4000. You do not normally need to make an entry here, unless you wish to configure a transit network for one of your WAN partners (see chapter 8.2.6, page 222). Local ISDN IP Address ISDN IP address of X4000 in the transit network. Partner’s ISDN IP Address ISDN IP address of WAN partner in the transit network. Partner’s LAN IP Address WAN partner’s LAN IP address. Partner’s LAN Netmask WAN partner’s LAN netmask. If you make no entry, X4000 enters a default netmask for the net class used under Partner’s LAN IP Address. Table 7-21: To do WAN PARTNER ➧ ADD ➧ IP Make the following entries (normally sufficient for a corporate network connection): ➤ Select IP Transit Network: e.g. no. ➤ Enter Partner’s LAN IP Address, e.g. 10.1.1.0. ➤ Enter Partner’s LAN Netmask, e.g. 255.255.255.0. ➤ Press SAVE. ➤ Press SAVE again. You have returned to WAN P ARTNER and your entries have been saved. 174 X4000 User’s Guide 7 Configuring WAN Partners If you are setting up access to the Internet, you do not normally know the IP address of your Internet Service Provider (ISP). Either your X4000 is assigned its Local ISDN IP Address dynamically (for the duration of the connection) or statically by the ISP. In such a case, make the following settings in WAN PARTNER ➧ ADD ➧ IP: ➤ IP address is assigned dynamically: – Select IP Transit Network: dynamic client. ➤ IP address is assigned statically: – Select IP Transit Network: yes. – Local ISDN IP Address: X4000’s static IP address you get from your ISP (often termed your gateway or router address). – Partner’s ISDN IP Address: Partner’s IP address (if known) or else X4000’s static IP address you get from your ISP. – No entries for Partner’s LAN IP Address and Partner’s LAN Netmask. If you want to know more about what a transit network actually is, for example, and what you need it for, see chapter 8.2.6, page 222. To be able to use the Domain Name Server of the ISP while connected, make A DVANCED the following settings in WAN PARTNER ➧ ADD ➧ IP ➧ SETTINGS: ➤ Select Dynamic Name Server Negotiation: client (receive). This setting is only necessary if you have not entered fixed IP addresses for DNS on the PCs of your network. Creating a Routing Entry Routing entry creation You have just entered a WAN partner in your X4000. A routing entry is created automatically in the routing table of your X4000 for every WAN partner. You can edit existing routing entries and add new ones. For the connection to your Internet Service Provider, you should always configure a default route. Proceed as follows: ➤ Go to IP ➧ ROUTING: X4000 User’s Guide 175 7 Basic Configuration of Basic Unit with Setup Tool X4000 Setup Tool [IP][ROUTING]: IP Routing The flags are: U (Up), D (Dormant), B (Blocked), G (Gateway Route), I (Interface Route), S (Subnet Route), H (Host Route), E (Extended Route) Destination Gateway 192.168.1.1 192.168.1.254 10.1.1.0 default ADD BinTec Communications AG MyRouter Mask Flags 255.255.255.0US 255.255.255.0DI 0.0.0.0 DI ADDEXT DELETE Met 0 0 0 Interface en1 BigBoss GoInternet Pro loc mgmt mgmt EXIT Press<Ctrl-n>,<Ctrl-p>to scroll,<Space>tag/untag DELETE,<Return>to edit All IP routes entered are listed here. Flags shows the current status (Up, Dormant, Blocked) and the type of route (Gateway Route, Interface Route, Subnet Route, Host Route, Extended Route). The protocol with which X4000 has "learned" the routing entry is displayed under Pro. To define a route, proceed as follows: ➤ Use ADD to add a new entry or select an existing entry. Confirm with Return to change the entry. Another menu window opens: To create extended IP routing entries, press the ADDEXT button to open the relevant menu. In this case, see chapter 10.2.12, page 353. 176 X4000 User’s Guide 7 Configuring WAN Partners X4000 Setup Tool [IP][ROUTING][ADD]: IP Routing BinTec Communications AG MyRouter Route Type Network Network route WAN without transit network Destination IP Address Netmask Partner / Interface 10.1.1.0 255.255.255.0 BigBoss Metric 1 SAVE CANCEL Use <Space> to select X4000 User’s Guide 177 7 Basic Configuration of Basic Unit with Setup Tool The menu contains the following fields: Field Meaning Route Type Type of route. Possible values: ■ Host route: Route to a single host ■ Network route: Route to a network ■ Default route: Is only used if no other suitable route is available. Network Defines the type of connection (LAN, WAN), see Table 7-23, page 179. Destination IP Address IP address of the destination host or LAN. Netmask Netmask of the partner LAN (only possible for Route Type = Network route. If no entry is made, the router uses a default netmask). Partner / Interface WAN partner (only possible for Network = WAN without transit network). Gateway IP Address IP address of the host to which X4000 should forward the IP packets. Metric The lower the value, the higher the priority of the route (range of values 1...14). Table 7-22: 178 X4000 User’s Guide IP ➧ ROUTING ➧ ADD 7 Configuring WAN Partners The Network field contains the following selection options: Possible values Meaning LAN Route to a destination host or LAN that can be reached via X4000’s LAN interface. WAN without transit network Route to a destination host or LAN that can be reached via a WAN partner without transit network. WAN with transit network Route to a destination host or LAN that can be reached via a WAN partner with transit network. Refuse X4000 discards data packets using this route and sends the sender a message saying the destination of the packet is unreachable. Ignore X4000 discards data packets using this route without sending a status message. Table 7-23: Network You can only configure one default route on your X4000. If you set up access to the Internet, you must therefore configure the route to your Internet Service Provider (ISP) as a default route. If, for example, you configure a corporate network connection, only enter the route to the head office or branch office as a default route if you do not configure Internet access over X4000. If, for example, you configure both Internet access and a corporate network connection, enter a default route to the ISP and a network route to the head office. Default route To define a default route, proceed as follows: ➤ Select Route Type: Default route. ➤ Select Network: WAN without transit network. ➤ Select Partner / Interface: e.g. GoInternet. ➤ Enter Metric, e.g. 1. X4000 User’s Guide 179 7 Basic Configuration of Basic Unit with Setup Tool ➤ Press SAVE. You have returned to IP ➧ ROUTING. The entries have been saved and the newly entered or modified route is listed. The corporate network can consist of several LANs with different network IP addresses and netmasks (➤➤ subnets). If you do not enter the access to such a network as a default route (e.g. because you have already set up your Internet access as a default route), then you must make a separate routing entry for each subnet you want to reach in this network. ( 1234567 10.1.2.0 255.255.255.0 BigBoss LittleIndian Secret Subnet 2 of your Companys Head Office 4000 BinTec ISDN BI AN CA /B RI CK -X M Router of your Companys Head Office Your X4000 ( 1234567 10.1.1.0 255.255.255.0 BigBoss LittleIndian Secret Your Local Area Network Figure 7-7: Network route Subnet 1 of your Companys Head Office Network with subnets To establish a network route, e.g. for a corporate network connection (without a default route), proceed as follows: ➤ Select Route Type: Network route. 180 X4000 User’s Guide 7 Configuring WAN Partners ➤ Select Network: WAN without transit network. ➤ Enter Destination IP Address, e.g. 10.1.2.0. ➤ Enter Netmask, e.g. 255.255.255.0. ➤ Enter Partner / Interface, e.g. LittleIndian. ➤ Enter Metric, e.g. 1. ➤ Press SAVE. You have returned to IP ➧ ROUTING. The entries have been saved and the newly entered or modified route is listed. ➤ Repeat these steps if you have to enter several routes. Activating Network Address Translation (NAT) Activating NAT Here you can activate Network Address Translation (➤➤ NAT) for your WAN partner. This conceals your whole network to the outside world with just one IP address. You should certainly do this for your connection to the Internet Service Provider (ISP). More information about Network Address Translation (NAT) can be found in chapter 10.2.7, page 331. Proceed as follows to activate NAT: ➤ Go to IP ➧ NETWORK ADDRESS TRANSLATION: X4000 Setup Tool [IP][NAT]: NAT Configuration BinTec Communications AG MyRouter Select IP Interface to be configured for NAT GoInternet LittleIndian en1 en1-snap Nat static mappings on off off off 2 EXIT Press <Ctrl-n>, <Ctrl-p> to scroll, <Return> to edit/select X4000 User’s Guide 181 7 Basic Configuration of Basic Unit with Setup Tool ➤ Mark the WAN partner for which you want to activate NAT (e.g. GoInternet) and press Return. Another menu window opens: X4000 Setup Tool BinTec Communications AG [IP][NAT][CONFIG]: NAT Configuration (GoInternet) MyRouter Network Address Translation on Configuration for sessions requested from outside Service Destination ADD DELETE Source Dep. Dest. Dep. SAVE Port Remap CANCEL Use <Space> to select To do Make the following entries: ➤ Select Network Address Translation: on. ➤ Press SAVE. Network Address Translation is activated for the selected interface or WAN partner. ➤ Leave IP ➧ NETWORK ADDRESS TRANSLATION with EXIT. ➤ Leave IP with EXIT. You have returned to the main menu and have configured a WAN partner. In order to permit certain external connections to hosts in the LAN in spite of activated NAT, you must define the sessions allowed exactly. How to do this is described in chapter 10.2.7, page 331. 7.3.2 Examples The WAN partner settings for some example configurations are shown below: ■ "Internet Access over T-Online", page 183 ■ "Internet Access over Compuserve", page 184 182 X4000 User’s Guide 7 Configuring WAN Partners How to enter the passwords is described in "Changing the password", page 85. Internet Access over T-Online T-Online The following settings are necessary: ■ In WAN PARTNER ➧ ADD: Partner Name: e.g. T_ONLINE. Encapsulation: PPP Compression: none Encryption: none ■ In WAN PARTNER ➧ ADD ➧ WAN NUMBERS ➧ ADD: Number (= dial-in number): z. B. 0191011 Direction: outgoing ■ In WAN PARTNER ➧ ADD ➧ PPP: Authentication: CHAP + PAP Local PPP ID (= user account + T-Online number + joint user account): e.g. 123456789012081512345678#0001. PPP Password: e.g. mycat. Keepalives: off Link Quality Monitoring: off ■ In WAN PARTNER ➧ ADD ➧ ADVANCED SETTINGS: Callback: no Static Short Hold (sec): z. B. 60 Idle for Dynamic Short Hold (%): z. B. 0 Delay after Connection Failure (sec): z. B. 300 Channel Bundling: no Layer 1 Protocol: ISDN 64 kbps ■ In WAN PARTNER ➧ ADD ➧ IP: IP Transit Network: dynamic client X4000 User’s Guide 183 7 Basic Configuration of Basic Unit with Setup Tool ■ In WAN PARTNER ➧ ADD ➧ IP ➧ ADVANCED SETTINGS: RIP Send: none RIP Receive: none Van Jacobson Header Compression: off Dynamic Name Server Negotiation: client (receive) IP Accounting: off Back Route Verify: off Route Announce: up or dormant Proxy Arp: off ■ In IP ➧ ROUTING ➧ ADD: Route Type: Default route Network: WAN without transit network Partner / Interface: T-Online Metric: e.g. 1. ■ In IP ➧ NETWORK ADDRESS TRANSLATION ➧ T_Online ➧ Return: Network Address Translation: on Internet Access over Compuserve Compuserve The following settings are necessary: ■ In WAN PARTNER ➧ ADD: Partner Name: e.g. COMPUSERVE. Encapsulation: Async PPP over X.75 Compression: none Encryption: none ■ In WAN PARTNER ➧ ADD ➧ WAN NUMBERS ➧ ADD: Number (= dial-in number): z. B. 010880191919 Direction: outgoing ■ In WAN PARTNER ➧ ADD ➧ PPP: Authentication: none Keepalives: off Link Quality Monitoring: off 184 X4000 User’s Guide 7 Configuring WAN Partners ■ In WAN PARTNER ➧ ADD ➧ ADVANCED SETTINGS: Callback: no Static Short Hold (sec): e.g. 120 Idle for Dynamic Short Hold (%): e.g. 0 Delay after Connection Failure (sec): e.g. 300 Channel Bundling: no Layer 1 Protocol: ISDN 64 kbps ■ In WAN PARTNER ➧ ADD ➧ ADVANCED SETTINGS ➧ COMPUSERVE LOGIN: Provider: Compuserve Network. Host: CIS. User ID (= your user name). Password. ■ In WAN PARTNER ➧ ADD ➧ IP: IP Transit Network: dynamic client ■ In WAN PARTNER ➧ ADD ➧ IP ➧ ADVANCED SETTINGS: RIP Send: none RIP Receive: none Van Jacobson Header Compression: off Dynamic Name Server Negotiation: client (receive) IP Accounting: off Back Route Verify: off Route Announce: up or dormant Proxy Arp: off ■ In IP ➧ ROUTING ➧ ADD: Route Type: Default route Network: WAN without transit network Partner / Interface: COMPUSERVE Metric: e.g. 1. ■ In IP ➧ NETWORK ADDRESS TRANSLATION ➧ COMPUSERVE ➧ Return: Network Address Translation: on X4000 User’s Guide 185 7 Basic Configuration of Basic Unit with Setup Tool 7.4 Saving the Configuration File After creating a working configuration on your X4000, make sure you save it: ➤ From the Setup Tool main menu, select Exit and press Return. Another menu window opens: X4000 Setup Tool [EXIT]: Exit Setup BinTec Communications AG MyRouter Back to Main Menu Save as boot configuration and exit Exit without saving You have three alternatives: ➤ Select Back to Main Menu to return to the Setup Tool main menu. ➤ Select Save as boot configuration and exit to save the configuration data as a file in the flash memory. The SNMP shell of X4000 appears with the login prompt. All the changes you have made with the Setup Tool are saved. The next time you start your X4000, the configuration file you have just saved will be loaded. ➤ Select Exit without saving to quit the Setup Tool without saving the changes made. The SNMP shell of X4000 appears with the login prompt. All settings or changes you have made with the Setup Tool will be lost when you turn off your X4000. 186 X4000 User’s Guide 8 8 Advanced Configuration of the Basic Unit with the Setup Tool This chapter contains more X4000 configuration options for the advanced user. This is the right chapter if you would like to make additional settings that are not covered by the Configuration Wizard or in chapter 6, page 123. The following configuration steps are described: ■ General ➤➤ WAN Settings (chapter 8.1, page 188) ■ Settings Specific to WAN Partners (chapter 8.2, page 198) ■ Basic ➤➤ IP Settings (chapter 8.3, page 242) ■ ➤➤ IPX Settings (chapter 8.4, page 268) ■ Bridging (chapter 8.5, page 275) ■ Extra License Functions (chapter 8.6, page 276) Use the Credits Based Accounting System (see chapter 10.1.3, page 316). This enables you to set a limit for connections to X4000 to prevent unnecessary charges accumulating as a result of mistakes made during configuration. X4000 User’s Guide 187 8 Advanced Configuration of the Basic Unit with the Setup Tool 8.1 General WAN Settings General WAN functions: ■ X4000 as Dynamic IP Address ➤➤ Server (chapter 8.1.1, page 188) ■ CAPI User Concept (chapter 8.1.2, page 190) ■ General ➤➤ PPP Settings (chapter 8.1.3, page 194) ■ Setting of X.31 TEI value (chapter 8.1.4, page 197) These settings are not linked to certain WAN partners, but concern all WAN connections. 8.1.1 IP address pools Dynamic IP Address Server X4000 can operate as a dynamic IP address server for PPP connections. You can use this function by providing one or more pools of ➤➤ IP addresses. These IP addresses can be assigned to dial-in WAN partners for the duration of the connection. Any host routes entered always have priority over IP addresses from the address pools. That is, when an incoming call has been authenticated, X4000 first checks whether a host route is entered in the routing table for this caller. If not, X4000 can assign an IP address from an address pool (if available). If address pools have more than one IP address, you cannot specify which WAN partner receives which address. The addresses are initially assigned in order. If a new dial-in takes place within an interval of one hour, an attempt is made to assign the same IP address assigned to this partner the last time. Configuration is made in: ■ IP ➧ IP ADDRESS POOL WAN (PPP) ■ WAN PARTNER ➧ EDIT ➧ IP ■ WAN PARTNER ➧ EDIT ➧ IP ➧ ADVANCED SETTINGS 188 X4000 User’s Guide 8 General WAN Settings Field Meaning Pool ID Unique number for identifying the address pool. A pool may comprise a number of address ranges. IP Address First IP address in the address pool. Number of Consecutive Addresses Total number of IP addresses in the address pool, including the first IP address (IP Address). Table 8-1: Field Meaning IP Transit Network Defines whether a transit network is to be used between X4000 and the WAN partner. You must select dynamic server here if you assign an address pool. Table 8-2: WAN PARTNER ➧ EDIT ➧ IP Field Meaning IP Address Pool Pool ID of the address pool assigned to the WAN partner. Table 8-3: To do IP ➧ IP ADDRESS POOL WAN (PPP) WAN PARTNER ➧ EDIT ➧ IP ➧ ADVANCED SETTINGS Proceed as follows: ➤ Go to IP ➧ IP ADDRESS POOL WAN (PPP) ➧ ADD. ➤ Enter Pool ID. ➤ Enter IP Address. ➤ Enter Number of Consecutive Addresses. ➤ Press SAVE. X4000 User’s Guide 189 8 Advanced Configuration of the Basic Unit with the Setup Tool ➤ Go to WAN PARTNER ➧ EDIT ➧ IP to assign an address pool to a WAN partner. ➤ Select IP Transit Network: dynamic server. ➤ Go to WAN PARTNER ➧ EDIT ➧ IP ➧ ADVANCED SETTINGS. ➤ Enter IP Address Pool: Pool ID. ➤ Confirm with OK. ➤ Press SAVE. 8.1.2 CAPI User Concept User name and password The CAPI user concept is used to check access to the ➤➤ CAPI service. This ensures that only users entered with a user name and password can use X4000‘CAPI services. Example This means, for example, that an incoming fax for the user Winnetou is only passed to Winnetou and not to a user such as Old Shatterhand, who is located in the same LAN. If the CAPI user concept is not used (see "Incoming call answering", page 141), all incoming calls passed to the CAPI service are offered to all CAPI applications in the LAN. The first user to respond receives the call. So if Old Shatterhand is quicker off the mark ... Configuration is made in: ■ CAPI ➧ USER ■ CM-1BRI, ISDN S0 ➧ INCOMING CALL ANSWERING 190 X4000 User’s Guide 8 General WAN Settings Field Meaning Name User name for which access to the CAPI service is to be allowed or denied (maximum 16 characters). Password Password with which the user Name has to identify to gain access to the CAPI service. CAPI Determines whether access to the CAPI service is allowed or denied for the user Name. Possible values: ■ enabled: access to CAPI allowed ■ disabled: access to CAPI denied Table 8-4: CAPI ➧ USER X4000 User’s Guide 191 8 Advanced Configuration of the Basic Unit with the Setup Tool Field Meaning Item Service which is to accept a call to the Number below. Number Phone number under which the service (Item) entered above can be reached. Mode Mode in which X4000 compares the digits of Number with the called party number of the incoming call: right to left: default mode. left to right (DDI): always select this mode if X4000 is connected to a point-to-point ISDN access (system access). User name Corresponds to Name in CAPI ➧ USER. User to whom an incoming call to the CAPI service under Number is to be passed. Bearer Type of incoming call. Possible values: ■ data: data call ■ voice: voice call ■ any: random call Table 8-5: CM-1BRI, ISDN S0 ➧ INCOMING CALL A NSWERING When on starting X4000 in CAPI ➧ USER there is no entry, automatically a standard entry is created without password (with Name = default and CAPI = enabled). To do Proceed as follows: ➤ Go to CAPI ➧ USER. ➤ Select an existing entry and confirm it with Return or add a new entry with ADD. ➤ Enter Name. 192 X4000 User’s Guide 8 General WAN Settings ➤ Enter your Password. How to enter the passwords in the Setup Tool is described in "Changing the password", page 85. ➤ Select CAPI. ➤ Press SAVE. ➤ Repeat these steps for every user in the LAN. ➤ Go to CM-1BRI, ISDN S0 ➧ INCOMING CALL ANSWERING. Make an entry here for every user in the LAN who has access to the CAPI service. ➤ Select an existing entry and confirm it with Return or add a new entry with ADD. ➤ Select Item: CAPI. If you use a communication application on your PC that is based on Remote CAPI 1.1 (current version: Remote CAPI 2.0), X4000 must translate the ➤➤ MSNs (= Number, multidigit) of the incoming call to ➤➤ EAZs (single digit) (CAPI 1.1 can only detect single-digit numbers). This is why the CAPI entry under Item is not simply called "CAPI" but "CAPI 1.1 EAZ x Mapping". When using CAPI 1.1, you must therefore make sure you assign each CAPI application the corresponding EAZ(s) by "mapping". For example select for Number = 1234 the entry Item = CAPI 1.1 EAZ 0 Mapping and for Number = 5678 the entry Item = CAPI 1.1 EAZ 1 Mapping. CAPI 2.0 evaluates the MSN directly and "translation" to EAZ is not necessary. You can use the same CAPI 1.1 EAZ x Mapping entry for each Number i.e. a single entry is sufficient. You should certainly try to change your PC system to CAPI 2.0 so that you can also use new features. ➤ Enter Number. ➤ Select Mode. ➤ Enter User Name. ➤ Select Bearer. X4000 User’s Guide 193 8 Advanced Configuration of the Basic Unit with the Setup Tool ➤ Press SAVE. ➤ Repeat these steps as often as necessary until you have created an entry for every user. When you carry out remote CAPI configuration on the hosts, you must enter the user name and password for each user corresponding to the entries in X4000. 8.1.3 General PPP Settings Authentication You must enter the ➤➤ PPP settings for each WAN partner, e.g. the settings needed for authentication of connection partners with ➤➤ CHAP or ➤➤ PAP (see chapter 7.3, page 159). If a call is received, X4000 then recognizes the calling WAN partner from the calling party number with the aid of ➤➤ CLID (Calling Line Identification) and therefore knows what authentication negotiations it has agreed with this partner. The call is accepted if the authentication is correct. CLID In some cases, it is not possible to identify an incoming call via CLID. This is the case, for example, ■ if the call is made over an analog line (the caller dials into your router via a ➤➤ modem), ■ if the caller suppresses the CLID facility. In both cases, X4000 receives no calling line number. The caller therefore cannot be identified by CLID, even if the caller is entered as a WAN partner. X4000 does not know which ➤➤ PPP authentication protocol to use to identify the incoming call. General PPP settings 194 In order to answer the call in spite of the identification problem, X4000 executes the defined general PPP authentication protocol with the caller. This protocol does not refer to a certain WAN partner. If the data (password, partner PPP ID) obtained by executing the authentication protocol are the same as the data of an entered WAN partner, X4000 accepts the incoming call. X4000 User’s Guide 8 General WAN Settings The general PPP settings are configured in PPP: Field Meaning Authentication Protocol Defines the PPP authentication protocol offered to the caller first. Possible values: ■ PAP: PAP only ■ CHAP: CHAP only ■ CHAP + PAP: first CHAP, then PAP ■ MS-CHAP: MS-CHAP only ■ CHAP + PAP + MS-CHAP: first CHAP, if denied then the protocol required by the caller ■ MS-CHAP V2: MS-CHAP version 2 only ■ none: no PPP authentication Radius Server Authentication Settings for RADIUS server authentication. For RADIUS, see Extended Features Reference. PPP Link Quality Monitoring Defines whether Link Quality Monitoring is executed for PPP connections. Possible values: ■ no, is not executed. ■ yes, the connection statistics are stored in the ➤➤ MIB table biboPPPLQMTable. PPPoE Ethernet Interface Table 8-6: To do Defines the interface used by PPP-overEthernet for using an ADSL connection (see chapter 7.2.3, page 155). PPP Proceed as follows to define the general PPP settings: ➤ Go to PPP. ➤ Select Authentication Protocol, e.g. CHAP + PAP + MS-CHAP. X4000 User’s Guide 195 8 Advanced Configuration of the Basic Unit with the Setup Tool ➤ Select Link Quality Monitoring, e.g. no. ➤ Press SAVE. 196 X4000 User’s Guide 8 General WAN Settings 8.1.4 X.31 TEI The menu CM-1BRI, ISDN S0 ➧ ADVANCED SETTINGS contains settings for X.31 TEI (X.25 in the D-channel). You only need to make changes here if you want to use the X.31 TEI value for CAPI applications. The menu contains the following fields: Field Meaning X.31 TEI Value X.31 TEI is detected automatically in ISDN autoconfiguration and this value set to specify. If autoconfiguration has not detected TEI, you can set specify manually. Specify TEI Value The value for X.31 TEI assigned by the exchange. This value is detected automatically by ISDN autoconfiguration, but can also be entered manually. X.31 TEI Service Here you select the service for which you want to use X.31 TEI. Possible values: ■ Capi ■ Capi Default ■ Packet Switch Capi and Capi Default are for using X.31 TEI for CAPI applications. For CAPI, the TEI value set in the CAPI application is used. For CAPI Default, the value of the CAPI application is ignored and the default value set here is always used. Set to Packet Switch if you want to use X.31 TEI for the X.25 router. Table 8-7: CM-1BRI, ISDN S0 ➧ ADVANCED SETTINGS X4000 User’s Guide 197 8 Advanced Configuration of the Basic Unit with the Setup Tool 8.2 Settings Specific to WAN Partners Specific functions for ➤➤ WAN partners make it possible to define the characteristics for connections to WAN partners individually. Carry out the configuration steps described separately for each WAN partner. ■ Delay after Connection Failure (chapter 8.2.1, page 198) ■ Channel Bundling (chapter 8.2.2, page 199) ■ Bandwidth on Demand (BoD) (chapter 8.2.3, page 201) ■ Always On/Dynamic ISDN (AO/DI) (chapter 8.2.4, page 206) ■ Layer 1 Protocol (ISDN B-Channel) (chapter 8.2.5, page 219) ■ IP Transit Network (chapter 8.2.6, page 222) ■ Transfer of DNS and WINS Server IP Addresses to WAN Partners (chapter 8.2.7, page 225) ■ ➤➤ RIP (Routing Information Protocol) (chapter 8.2.8, page 229) ■ Compression: ➤➤ VJHC, ➤➤ STAC, MS-STAC (chapter 8.2.9, page 232) ■ ➤➤ Proxy ARP (Address Resolution Protocol) (chapter 8.2.10, page 234) ■ Keepalive Monitoring (chapter 8.2.11, page 236) The configuration steps necessary in each case are explained in detail below. 8.2.1 Delay after Connection Failure This function enables you to set the period of time X4000 is to wait after an unsuccessful attempt to set up a call. 198 X4000 User’s Guide 8 Settings Specific to WAN Partners This is configured in WAN PARTNER ➧ EDIT ➧ ADVANCED SETTINGS: Field Meaning Delay after Connection Failure (sec) Block timer. Indicates the wait time in seconds before X4000 tries again after an attempt to establish a connection has failed. Table 8-8: To do WAN PARTNER ➧ EDIT ➧ ADVANCED SETTINGS Proceed as follows: ➤ Go to WAN PARTNER ➧ EDIT ➧ ADVANCED SETTINGS. ➤ Enter Delay after Connection Failure (sec). ➤ Confirm with OK. ➤ Press SAVE. 8.2.2 Channel Bundling X4000 supports dynamic and static ➤➤ channel bundling for dialup connections. Only one B-channel is initially opened when a connection is established. Dynamic Dynamic channel bundling means that X4000 connects other ➤➤ ISDN Bchannels to increase the throughput for connections to the WAN partner, if this is required, e.g. for large amounts of data. If the amount of data traffic drops, the additional ➤➤ B-channels are closed again. Static In static channel bundling, you specify right from the start how many B-channels X4000 uses for connections to the WAN partner, regardless of the amount of data transferred. X4000 User’s Guide 199 8 Advanced Configuration of the Basic Unit with the Setup Tool The configuration is made in WAN PARTNER ➧ EDIT ➧ ADVANCED SETTINGS: Field Meaning Channel Bundling Defines whether and which type of channel bundling is to be used for connections to the WAN partner. Total Number of Channels For dynamic channel bundling: Defines the maximum number of B-channels that may be opened. For static channel bundling: Defines the number of B channels that are open during the complete connection. Table 8-9: WAN PARTNER ➧ EDIT ➧ ADVANCED SETTINGS The Channel Bundling field contains the following selection options: Possible values Meaning no No channel bundling, only one B-channel is ever available for connections. dynamic Dynamic channel bundling. static Static channel bundling. Table 8-10: To do Channel bundling Proceed as follows: ➤ Go to WAN PARTNER ➧ EDIT ➧ ADVANCED SETTINGS. ➤ Select Channel Bundling. ➤ Enter Total Number of Channels. ➤ Confirm with OK. ➤ Press SAVE. Refer to Bandwidth on Demand (BOD) function, see chapter 8.2.3, page 201. 200 X4000 User’s Guide 8 Settings Specific to WAN Partners 8.2.3 Bandwidth on Demand (BoD) This function permits dynamic bundling of leased lines with dialup lines to cope with large amounts of data. You have the following options: ■ BOD for leased lines, i.e. dynamic connection of one or more dialup connection(s) to the existing leased line, if required. ■ BOD for dialup connections, i.e. dynamic connection of one or more dialup connection(s) to the existing dialup connection, if required. ■ Backup for leased lines, i.e. establishing a dialup connection when the leased line to the partner fails. BOD also acts if the leased line fails (i.e. other dialup connections can be switched in); if more than 1 additional channel was allowed in the configuration (Maximum Number of Dialup Channels > 1). Switching B-channels in and out A B-channel is switched in if the current data throughput of the relevant interface to the connection partner is 90 % or more of the maximum permissible throughput for at least 5 seconds. The current throughput is not used as a basis for switching out a B-channel already connected. This is based on the calculated (i.e. fictitious) throughput of the channel group after switching out one B-channel. A B-channel is switched out if the calculated value stays below 80 % of the maximum permissible throughput of the remaining channels for 10 seconds. Static or dynamic short hold may also cause an additional B-channel to be switched out. If static short hold has been configured, this always has the highest priority. If dynamic short hold has been configured, the calculated value mentioned above must also apply. X4000 also supports the AO/DI (Always On/Dynamic ISDN) function for using the ISDN D-channel for data transmission (see chapter 8.2.4, page 206). Authentication PPP authentication is not required from the connection partner for establishing a leased line. Authentication is, however, necessary for any dialup connections switched in. X4000 User’s Guide 201 8 Advanced Configuration of the Basic Unit with the Setup Tool Configuration is made in: ■ WAN PARTNER ➧ EDIT ➧ ADVANCED SETTINGS ➧ EXTENDED INTERFACE SETTINGS (OPTIONAL) ■ WAN PARTNER ➧ EDIT ➧ WAN NUMBERS ➧ ADD (menu description in chapter 7.3, page 159) ■ WAN PARTNER ➧ EDIT ➧ PPP (menu description in chapter 7.3, page 159) The menu WAN PARTNER ➧ EDIT ➧ ADVANCED SETTINGS ➧ EXTENDED INTERFACE S ETTINGS (OPTIONAL) contains the following fields: The fields described below appear only if Channel Bundling = dynamic has previously been selected in the menu WAN PARTNER ➧ EDIT ➧ ADVANCED SETTINGS. 202 X4000 User’s Guide 8 Settings Specific to WAN Partners Field Meaning Mode Defines which mode is used for BOD. Possible values: see Table 8-12, page 205. Line Utilization Weighting Defines how the line utilization is calculated. Possible values: ■ equal: All the measured values of throughput in Line Utilization Sample (sec) are weighted equally for the calculation (default value). ■ proportional: The last measured values of throughput are weighted more heavily for the calculation, i.e. the calculation is most heavily influenced by the last measured values in Line Utilization Sample (sec). Line Utilization Sample (sec) Time interval in seconds. Throughput measurements in Line Utilization Sample (sec) are included in the calculation of the line utilization. Possible values: 5 to 300 (default value: 5). Gear Up Threshold Utilization threshold at which another Bchannel is added for a connection. Gear Down Threshold B-channels are dropped until the remaining channels have at least the percentage utilization degree remaining here. D-Channel Queue Length (only if Layer 1 Protocol = AO/DI in the menu WAN PARTNER ➧ EDIT ➧ ADVANCED SETTINGS) Threshold value for the number of bytes accumulated in the D-channel at which the system is to change to the B-Channel Mode (see chapter 8.2.4, page 206). X4000 User’s Guide 203 8 Advanced Configuration of the Basic Unit with the Setup Tool Field Meaning Maximum Number of Dialup Channels Maximum permitted number of channels that are opened for dialup connections. The value is only displayed here; it is set under Total Number of Channels in the menu WAN PARTNER ➧ EDIT ➧ ADVANCED S ETTINGS. Table 8-11: 204 X4000 User’s Guide WAN PARTNER ➧ EDIT ➧ ADVANCED SETTINGS ➧ EXTENDED INTERFACE SETTINGS (OPTIONAL) 8 Settings Specific to WAN Partners The Mode field includes the following selection options: Possible values Meaning Bandwidth On Demand Disabled Deactivates BOD, no additional channels are opened (default value). Bandwidth On Demand Enabled (For dialup connections only) BAP, Active Mode (Necessary for the AO/DI (Always On/Dynamic ISDN) function, see Table 8-17, page 214) BAP, Passive Mode Is currently not supported by X4000. BAP, Active and Passive Mode Is currently not supported by X4000. BAP, Client Active Mode Is currently not supported by X4000. Backup (For leased lines only) Activates BOD, additional channels can be opened. The connection partner who initiated the connection opens the additional channels. Backup connection is activated if the leased line fails. The backup connection is cleared when the leased line is available again. BOD is also available for this mode, if a value > 1 is used for Maximum Number of Dialup Channels. Bandwidth On Demand Active (For leased lines only) Bandwidth On Demand Passive (For leased lines only) Table 8-12: Enables BOD and defines the active partner. Only one of the connection partners should be configured as active partner. This page activates switching in and out additional Bchannels on demand. Enables BOD and defines the passive partner. This page does not activate switching in and out additional channels. Mode X4000 User’s Guide 205 8 Advanced Configuration of the Basic Unit with the Setup Tool To do Proceed as follows: ➤ Go to WAN PARTNER ➧ EDIT ➧ ADVANCED SETTINGS ➧ EXTENDED INTERFACE SETTINGS (OPTIONAL). ➤ Select Mode and Line Utilization Weighting. ➤ Enter Line Utilization Sample (sec) and Maximum Number of Dialup Channels. ➤ Press SAVE. ➤ Confirm with OK. ➤ Go to WAN PARTNER ➧ EDIT ➧ WAN NUMBERS ➧ ADD. ➤ Enter Number. ➤ Select Direction. Select Direction = outgoing if you have set Mode = Bandwidth On Demand Active. Select Direction = incoming (CLID), if you have set Mode = Bandwidth On Demand Passive. ➤ Press SAVE. ➤ Go to WAN PARTNER ➧ EDIT ➧ PPP. ➤ Select Authentication. ➤ Enter Partner PPP ID, Local PPP ID and PPP Password, if applicable. ➤ Confirm with OK. ➤ Press SAVE. 8.2.4 Always On/Dynamic ISDN (AO/DI) Always On/Dynamic ISDN (AO/DI) uses the existing ISDN infrastructure to configure a new service for the user without hardware changes: AO/DI is a permanently available (always on) but nevertheless low-cost connection from the end customer to the Internet Service Provider. 206 X4000 User’s Guide 8 Settings Specific to WAN Partners Short Description AO/DI uses X.25 data packet transmission in the D-channel (X.31) to set up a PPP connection (PPP over X.25). 9600 bps are available for data transmission in the D-channel (D-channel Mode). If more bandwidth is needed, one or two Bchannels are dynamically added (Dynamic ISDN). Data transmission in this case is only in the B-channel or B-channels, i.e. the B-channels remain reserved for bandwidth-intensive applications (B-channel Mode). AO/DI offers the following advantages: ■ three full communication channels, which can be independent if required ■ permanent connection to the Internet at low-cost ■ transparent bandwidth control ■ in D-Channel Mode – high reliability and guaranteed throughput times – volume-oriented charges independent of distance ■ in B-Channel Mode: – time-dependent connection charges only for bandwidth-intensive applications How Does AO/DI Work? AO/DI is implemented in X4000 via a special PPP interface. As soon as the interface is configured and ready for operation, the initial PPP connection is set up via X.31 (X.25 in the D-channel). This involves carrying out authentication of the PPP connection partner and assigning a dynamic IP address and DNS addresses, if applicable (AO/DI Client Mode). The use of the B-channels is controlled by the data throughput or by applicationdependent bandwidth management (Bandwidth on Demand, BOD for IP-based applications). Both Bandwidth on Demand and BOD for IP-based applications uses the Bandwidth Allocation Control Protocol (BACP/BAP to RFC 2125) in order to agree with the remote terminal on the circumstances under which Bchannels are to be added or dropped. The use of BACP/BAP is agreed during the initial connection setup. As the D-channel connection is normally no longer X4000 User’s Guide 207 8 Advanced Configuration of the Basic Unit with the Setup Tool ended after connection setup, it represents a permanently available (always on) connection to the provider. As soon as the bandwidth of the D-channel is no longer adequate for data transmission, B-channels are added and data transmission takes place exclusively in the B-channels (Dynamic ISDN). This is implemented in X4000 by an advanced configuration option in the IP subsystem. An interface is assigned filters, rules and rule chains similar to the concept for IP Access Lists (see User’s Guide, chapter 9.2.8 "Filters (Access Lists)". These rules can be used to determine whether additional B-channels are to be set up for certain protocols, ports or IP addresses, or whether data transfer is to take place exclusively in the D-channel. How is AO/DI Configured? The following steps are necessary for configuring X4000 for AO/DI: ■ Carry out X.31 configuration, i.e. reserve the TEI (Terminal Endpoint Identifier) value for X.25 (Packet Switch) (see "X.31 configuration", page 209) ■ Carry out X.25 configuration (see "X.25 configuration", page 209): – Link configuration for Datex-P – Call routing ■ Configure AO/DI partner as WAN partner (see "Configuring AO/DI partner as WAN partner", page 211) – Select PPP parameters – Define the PPP interface as AO/DI interface – Enter X.25 destination address for initial connection setup – Control Bandwidth on Demand (dynamic B-channel bundling) – Control BOD for IP-based applications Please note the following when carrying out X.25 configuration: Some of the X.25 parameters must be adapted to the X.25 network connected. For Datex-P, the Windowsize/Packetsize Neg. field must be deactivated using the Setup Tool. 208 X4000 User’s Guide 8 Settings Specific to WAN Partners For X4000, the X.25 software is designed as an X.25 switch. This switch must be appropriately configured for AO/DI (see "X.25 configuration", page 209). You will find all the necessary steps below for configuring X4000 for AO/DI with the Setup Tool. X.31 configuration Proceed as follows to assign X.31/X.25: ➤ Go to CM-1BRI, ISDN S0 ➧ ADVANCED SETTINGS (the menu is described in chapter 8.1.4, page 197). ➤ Select X.31 TEI Value: specify. The default setting for X.31 TEI Value should bespecify. If this is not the case, the X.31 service has not been detected by autoconfiguration and this service is probably not supported (contact your telephone provider). ➤ Enter Specify TEI Value: 1. ➤ Select X.31 TEI Service: Packet Switch. ➤ Press SAVE. You have returned to the CM-1BRI, ISDN S0 menu. ➤ Press SAVE. You have returned to the main menu. The main menu now contains the X.25 menu, which you need for the following configuration steps. Information about the X.25 parameters can be found in the Extended Features Reference at www.bintec.de. X.25 configuration Proceed as follows to make the preset link settings for X.25 configuration for Datex-P: ➤ Go to X.25 ➧ LINK CONFIGURATION. ➤ Select the interface for which you want to configure X.25, e.g. x31d2-0-1. X4000 User’s Guide 209 8 Advanced Configuration of the Basic Unit with the Setup Tool The following parts of the menu are relevant for this configuration step: Field Meaning L3 Packet Size Permissible size of data packets for this connection on the third layer of the OSI model. Windowsize/Packetsize Neg. Negotiation of the size of Windowsize and Packetsize with the remote terminal. There is only one meaningful setting for Datex-P: never, i.e. negotiation is deactivated. Highest Two-WayChannel (HTC) Defines the highest number of virtual channels. Table 8-13: X.25 ➧ LINK CONFIGURATION ➧ EDIT ➤ Select L3 Packet Size max: 256. ➤ Select Windowsize/Packetsize Neg. : never. ➤ Enter Highest Two-Way-Channel (HTC): 1. ➤ Press SAVE. ➤ Leave X.25 ➧ LINK CONFIGURATION with Exit. Proceed as follows to make the preset routing settings for X.25 configuration: ➤ Go to X.25 ➧ ROUTING ➧ ADD. The following parts of the menu are relevant for this configuration step: Field Meaning Source Link Source interface of data packets. Destination Link Destination interface of data packets. Destination X.25 Address X.25 destination address Table 8-14: X.25 ➧ ROUTING ➧ ADD ➤ Select Source Link: local. ➤ Select Destination Link, e.g. x31d2-0-1. 210 X4000 User’s Guide 8 Settings Specific to WAN Partners ➤ Enter Destination X.25 Address, e.g. 019011. ➤ Press SAVE. ➤ Leave X.25 ➧ ROUTING ➧ ADD with Exit. ➤ Leave X.25 ➧ ROUTING with Exit. You have returned to the main menu. Configuring AO/DI partner as WAN partner To define an AO/DI-capable PPP interface, proceed as follows: ➤ Go to WAN PARTNER ➧ ADD. ➤ Enter Partner Name, e.g. AODI partner. ➤ Select Encapsulation: PPP. Proceed as follows to make the PPP settings: ➤ Go to WAN PARTNER ➧ ADD ➧ PPP. ➤ Select Authentication, e.g. CHAP. ➤ Leave out Partner PPP ID. ➤ Enter Local PPP ID, e.g. bintec_router. ➤ Enter PPP Password twice, e.g. secret. An asterisk appears on the screen as a place marker for each letter you enter for the password. ➤ Confirm with OK. To activate AO/DI on the PPP interface and enter the X.25 address, proceed as follows: ➤ Go to WAN PARTNER ➧ ADD ➧ ADVANCED SETTINGS. X4000 User’s Guide 211 8 Advanced Configuration of the Basic Unit with the Setup Tool The following part of the menu is relevant for this configuration step: Field Meaning Layer 1 Protocol Defines which Layer 1 Protocol X4000 is to use. There is only one meaningful setting for AO/DI: AO/DI. Channel Bundling Defines whether or which type of channel bundling is to be used for connections to the WAN partner (see manual, chapter 7.2.2). If AO/DI is selected under Layer 1 Protocol, dynamic is set automatically for Channel Bundling. Total Number of Channels Defines the maximum number of channels that may be opened for dynamic channel bundling. Remote X.25 Address X.25 destination address. Appears only if AO/ DI is selected under Layer 1 Protocol. Table 8-15: WAN P ARTNER ➧ ADD ➧ ADVANCED SETTINGS ➤ Select Layer 1 Protocol: AO/DI. ➤ Enter Total Number of Channels, e.g. 1. ➤ Enter Remote X.25 Address, e.g. 019011. Proceed as follows to configure BACP/BAP for the "AO/DI client" access (control of Bandwidth On Demand): ➤ Go to WAN PARTNER ➧ ADD INTERFACE SETTINGS (OPTIONAL). 212 X4000 User’s Guide ➧ ADVANCED SETTINGS ➧ EXTENDED 8 Settings Specific to WAN Partners The following part of the menu is relevant for this configuration step: Field Meaning Mode Defines which mode is used for BOD. Only the BAP, Active Mode setting is used for an AO/DI client. Line Utilization Weighting Weighting within the interval considered for adding and dropping B-channels. Line Utilization Sample (sec) Length of the interval over which the mean of the measured throughput data is taken and weighted with Line Utilization Weighting. Gear Up Threshold Utilization threshold at which another Bchannel is added for a connection. Gear Down Threshold B-channels are dropped until the remaining channels have at least the percentage utilization degree remaining here. D-Channel Queue Length Threshold value for the number of bytes accumulated in the D-channel at which the system is to change to the B-Channel Mode. Maximum Number of Dialup Channels Maximum number of channels that may be opened. The value is defined in the Total Number of Channels field under WAN PARTNER ➧ ADD ➧ ADVANCED SETTINGS. Table 8-16: WAN PARTNER ➧ ADD ➧ INTERFACE SETTINGS (OPTIONAL ) ADVANCED SETTINGS ➧ X4000 User’s Guide EXTENDED 213 8 Advanced Configuration of the Basic Unit with the Setup Tool The following selection option in the Mode field is relevant for AO/DI: Possible values Meaning BAP, Active Mode The Bandwidth Allocation Protocol (BAP) knows three different options for negotiating a bandwidth change. It behaves as follows in Active Mode: ■ Call Request: one of the two communication partners wants to add a Bchannel; adding the channel is initiated if applicable. ■ Callback Request: the remote terminal is requested to add a B-channel; adding the channel is not initiated but accepted if applicable. ■ Link Drop Request: one communication partner wants to drop a B-channel; dropping is initiated or accepted if applicable. Table 8-17: Mode = BAP, Active Mode ➤ Select Mode: BAP, Active Mode. ➤ Use the preset values for the other fields of this menu. ➤ Press SAVE. ➤ Confirm with OK. To enter the necessary ISDN extensions for adding the B-channel, proceed as follows: ➤ Go to WAN PARTNER ➧ ADD ➧ WAN N UMBERS ➧ ADD. ➤ Enter the Number, e.g. 0911123456. ➤ Select Direction: outgoing. ➤ Press SAVE. 214 X4000 User’s Guide 8 Settings Specific to WAN Partners ➤ Leave WAN PARTNER ➧ ADD ➧ WAN NUMBERS ➧ ADD with Exit. For dynamic assignment of the IP address by the Internet Service Provider, proceed as follows: ➤ Go to WAN PARTNER ➧ ADD ➧ IP . ➤ Select IP Transit Network: dynamic client. ➤ Press SAVE. ➤ Press SAVE. ➤ Leave WAN PARTNER with Exit. You have returned to the main menu. BOD for IP-Based Applications (Optional) Filters and rules BOD for IP-based applications is configured by filters and rules in a similar way to Access Lists for IP packets (see chapter 10.2.8, page 335). First filters are defined that determine which IP packets (and thus applications) are to influence the available bandwidth. If several filters are defined, they can be interlinked using a rule chain. Proceed as follows to define suitable filters: ➤ Go to IP ➧ BANDWIDTH ON DEMAND (BOD) ➧ FILTER ➧ ADD. ➤ Enter Description, e.g. mail_smtp_out. ➤ Select Protocol, e.g. tcp. ➤ Enter Destination Address, e.g. 172.16.08.15. ➤ Enter Destination Mask, e.g. 255.255.255.255. ➤ Select Destination Port: e.g. specify. ➤ Enter Specify Port, e.g. 25 (port for SMTP). ➤ Press SAVE. A list of all the previously defined filters appears. ➤ Leave IP ➧ BANDWIDTH ON DEMAND (BOD) ➧ FILTER with Exit. A rule for BOD is defined in a similar way to a rule for IP packets (see chapter 10.2.8, page 335). Different rules normally consist of different filters X4000 User’s Guide 215 8 Advanced Configuration of the Basic Unit with the Setup Tool and can be interlinked to form a rule chain. Each rule results in an action, but the direction of the data packets for which it is to apply can also be stated for each rule, i.e. for sent or received data packets. Proceed as follows to define a rule for BOD: ➤ Go to IP ➧ BANDWIDTH ON DEMAND (BOD) ➧ RULES FOR BOD ➧ ADD. In addition to the already familiar fields for definition of conventional rules (see chapter 10.2.8, page 335), the menu contains the following fields: Field Meaning Direction Direction of data packets to which the rule is to be applied. Possible values: ■ incoming: incoming data packets ■ outgoing: outgoing data packets ■ both: incoming and outgoing data packets Number of Channels Number of B-channels that are to be added. Table 8-18: IP ➧ BANDWIDTH ON DEMAND (BOD) ➧ R ULES FOR BOD ➧ ADD The Action field, which indicates how a filtered out data packet is to be handled, contains the following selection options: Possible values Meaning invoke M B-channels are added if the rule matches. invoke !M B-channels are added if the rule does not match. deny M B-channels are not added if the rule matches. deny !M B-channels are not added if the rule does not match. ignore The rule is ignored or it is omitted if part of a rule chain. Table 8-19: Action 216 X4000 User’s Guide 8 Settings Specific to WAN Partners ➤ Select Action, e.g. invoke M. ➤ Select Direction, e.g. outgoing. ➤ Select Number of Channels, e.g. 1. ➤ Select Filter, e.g. mail_smtp_out. ➤ Press SAVE. ➤ Leave IP ➧ BANDWIDTH ON DEMAND (BOD) ➧ RULES FOR BOD with Exit. ➤ Leave IP ➧ BANDWIDTH ON DEMAND (BOD) with Exit. You have returned to the main menu. To apply a rule to an interface, proceed as follows: ➤ Go to IP ➧ BANDWIDTH FOR ON DEMAND (BOD) ➧ CONFIGURE INTERFACES BOD. ➤ Select the interface to which you wish to apply a rule, e.g. aodiclient, and press Return. ➤ Select the rule you wish to apply to this interface, e.g. mail_smtp_out. ➤ Press SAVE. ➤ Leave IP ➧ BANDWIDTH ON DEMAND (BOD) ➧ CONFIGURE INTERFACES FOR BOD ➧ EDIT with Exit. ➤ Leave IP ➧ BANDWIDTH ON DEMAND (BOD) ➧ CONFIGURE INTERFACES FOR BOD with Exit. ➤ Leave IP ➧ BANDWIDTH ON DEMAND (BOD) with Exit. You have returned to the main menu. Configuration Examples for BOD (Bandwidth on Demand) Two configuration examples are described below: ■ Additional Bandwidth for HTTP Connections ■ Restricting Mail Reception to D-Channel Additional bandwidth for HTTP connections The following example shows a special configuration of X4000 for connection setup of the PC with the IP address 172.16.77.11 (TCP Port 80) to the Internet. The system should always change to B-Channel Mode with one B-channel when an HTTP connection is set up to the Internet. X4000 User’s Guide 217 8 Advanced Configuration of the Basic Unit with the Setup Tool Proceed as follows to define the relevant filter for BOD: ➤ Go to IP ➧ BANDWIDTH ON DEMAND (BOD) ➧ FILTER ➧ ADD. ➤ Enter Description: hostxy_http_out. ➤ Select Protocol: tcp. ➤ Enter Source Address: 172.16.77.11. ➤ Enter Source Mask: 255.255.255.255. ➤ Select Destination Port: specify. ➤ Enter Specify Port: 80. ➤ Press SAVE. A list of all the previously defined filters appears. ➤ Leave IP ➧ BANDWIDTH ON DEMAND (BOD) ➧ FILTER with Exit. Proceed as follows to define a rule for BOD: ➤ Go to IP ➧ BANDWIDTH ON DEMAND (BOD) ➧ RULES FOR BOD ➧ ADD. ➤ Select Action: invoke M. ➤ Select Direction: outgoing. ➤ Select Number of Channels: 1. ➤ Select Filter: hostxy_http_out (1). ➤ Press SAVE. ➤ Leave IP ➧ BANDWIDTH ON DEMAND (BOD) ➧ RULES FOR BOD with Exit. Restricting mail reception to D-channel In the following configuration example, mail reception is restricted to the Dchannel and there is no change to B-Channel Mode. The inquiry about whether new mails have been received does not cause a change to B-Channel Mode either. Proceed as follows to define the relevant filter for BOD: ➤ Go to IP ➧ BANDWIDTH ON DEMAND (BOD) ➧ FILTER ➧ ADD. ➤ Enter Description: mail_pop3_in. ➤ Select Protocol: tcp. 218 X4000 User’s Guide 8 Settings Specific to WAN Partners ➤ Enter Destination Address: 172.16.08.15. ➤ Enter Destination Mask: 255.255.255.255. ➤ Select Destination Port: specify. ➤ Enter Specify Port: 110. ➤ Press SAVE. A list of all the previously defined filters appears. ➤ Leave IP ➧ BANDWIDTH ON DEMAND (BOD) ➧ FILTER with Exit. Proceed as follows to define a rule for BOD: ➤ Go to IP ➧ BANDWIDTH ON DEMAND (BOD) ➧ RULES FOR BOD ➧ ADD. ➤ Select Action: deny. ➤ Select Direction: incoming. ➤ Select Number of Channels: 1. ➤ Select Filter: mail_pop3_in (2). ➤ Press SAVE. ➤ Leave IP ➧ BANDWIDTH ON DEMAND (BOD) ➧ RULES FOR BOD with Exit. 8.2.5 ISDN B-channel Layer 1 Protocol (ISDN B-Channel) You can define the Layer 1 Protocol of the ISDN ➤➤ B-channel that X4000 is to use for connections to the WAN partner. The default setting is the protocol for 64-kbps ISDN data connections, which is the default value of the B-channel. Only change the setting if expressly required. X4000 User’s Guide 219 8 Advanced Configuration of the Basic Unit with the Setup Tool This is configured in WAN PARTNER ➧ EDIT ➧ ADVANCED SETTINGS: Field Meaning Layer 1 Protocol Defines which Layer 1 Protocol X4000 is to use. This setting applies only to outgoing calls to the WAN partner and to incoming calls from the WAN partner, if they have been identified from the calling party number. Table 8-20: WAN PARTNER ➧ EDIT ➧ ADVANCED SETTINGS For incoming calls that cannot be identified from the calling party number, X4000 uses the settings under Item in menu CM-1BRI, ISDN S0 ➧ INCOMING CALL ANSWERING as the Layer 1 Protocol (see "Incoming call answering", page 141). 220 X4000 User’s Guide 8 Settings Specific to WAN Partners Layer 1 Protocol contains the following selection options: Possible values Meaning ISDN 64 kbps For 64-kbps ISDN data connections. This is the default value. ISDN 56 kbps For 56-kbps ISDN data connections. Modem (Only available if expansion card and resource card with digital modems are installed) Assigns incoming analog calls to the PPP routing service. The digital modem on the resource card that accepts this call uses the settings for Modem Profile 1, which were selected in the menu MODEM ➧ PROFILE CONFIGURATION ➧ PROFILE 1. DOVB Data transmission Over Voice Bearer - useful in the USA, for example, where voice connections are sometimes cheaper than data connections. V.110 (1200 ... 38400) For GSM connections with V.110 at bit rates of 1200 bps, 2400 bps,..., 38400 bps. Modem Profile 1 ... 8 (Only available if expansion card and resource card with digital modems are installed) Assigns incoming analog calls to the PPP routing service. The digital modem on the resource card that accepts this call uses the settings for Modem Profile1... 8, which were selected in the menu MODEM ➧ PROFILE CONFIGURATION ➧ PROFILE 1...8. PPTP PNS For VPN interface. PPP over Ethernet (PPPoE) For connections to ADSL (see chapter 7.2.3, page 155 and chapter 9.3.2, page 288). AO/DI For using Always On/Dynamic ISDN (AO/DI, see chapter 8.2.4, page 206). Table 8-21: Layer 1 Protocol X4000 User’s Guide 221 8 Advanced Configuration of the Basic Unit with the Setup Tool Most of the entries for Layer 1 Protocol correspond to the entries for Item in CM-1BRI, ISDN S0 ➧ INCOMING CALL ANSWERING (see "Incoming call answering", page 141). To do Proceed as follows: ➤ Go to WAN PARTNER ➧ EDIT ➧ ADVANCED SETTINGS. ➤ Select Layer 1 Protocol. ➤ Confirm with OK. ➤ Press SAVE. 8.2.6 IP Transit Network When you enter a WAN partner in X4000, there are various options for indicating the IP address of the partner network: ■ You enter the ➤➤ IP address and ➤➤ netmask of the partner or partner network. You must obviously have this information available. ■ You use an additional ISDN IP address each for X4000 and the WAN partner. You thus set up a virtual IP network during the connection, a socalled transit network. You do not need this setting normally, only for some special configurations. ■ You assign the WAN partner a dynamic IP address from a specified IP address pool for the duration of the connection. ■ Get the WAN partner to assign you a dynamic IP address for the duration of the connection. 222 X4000 User’s Guide 8 Settings Specific to WAN Partners Partner IP 200.200.200.2 ISDN IP 200.200.200.2 ISDN IP 200.200.200.1 4000 ISDN BinTec BI AN CA /B RI CK -X M LAN IP 10.1.1.1 X4000D LAN IP 192.168.1.254 Partner IP 200.200.200.1 Network of your WAN Partner Your Local Area Network Figure 8-1: LAN-LAN link with transit network X4000 User’s Guide 223 8 Advanced Configuration of the Basic Unit with the Setup Tool The configuration is made in WAN PARTNER ➧ EDIT ➧ IP : Field Meaning IP Transit Network Defines whether X4000 sets up a transit network to the WAN partner. Possible values: see Table 8-23, page 225. Local IP Address LAN IP address of X4000. Appears only for the following value of IP Transit Network: no. You normally do not need to make any entry here. Exception: You set up several WAN partners, use a transit network for one or more WAN partners and no transit network for the other WAN partners. Then enter the Local IP Address (LAN IP address) for all WAN partners without a transit network. Local ISDN IP Address ISDN IP address of X4000 in the transit network. Partner’s ISDN IP Address WAN partner’s ISDN IP address in the transit network. Partner’s LAN IP Address IP address of LAN of WAN partner or LAN IP address (host). Partner’s LAN Netmask WAN partner’s LAN netmask. If you make no entry, X4000 enters a default netmask for the net class used under Partner’s LAN IP Address. Table 8-22: 224 X4000 User’s Guide WAN PARTNER ➧ EDIT ➧ IP 8 Settings Specific to WAN Partners IP Transit Network contains the following selection options: Possible values Meaning yes A transit network is used. dynamic client X4000 receives its IP address from the WAN partner for the duration of the connection. dynamic server X4000 assigns the ➤➤ Remote WAN partner an IP address for the duration of the connection. In this case, X4000 must be configured as a dynamic IP address server, i.e. it has an IP address pool available (see chapter 8.1.1, page 188). no No transit network. This setting is adequate for most WAN partners. Table 8-23: To do IP Transit Network Proceed as follows: ➤ Go to WAN PARTNER ➧ EDIT ➧ IP. ➤ Select IP Transit Network. ➤ Enter Local IP Address, if applicable. ➤ Enter Local ISDN IP Address. ➤ Enter Partner’s ISDN IP Address, if applicable. ➤ Enter Partner’s LAN IP Address, if applicable. ➤ Enter Partner’s LAN Netmask, if applicable. ➤ Press SAVE. 8.2.7 IP address = ? Transfer of DNS and WINS IP Addresses to WAN Partner A Domain Name Server (➤➤ DNS) or Windows Internet Name Server (WINS) is used for converting host names and ➤➤ NetBIOS names into IP addresses X4000 User’s Guide 225 8 Advanced Configuration of the Basic Unit with the Setup Tool (name resolution). Domain Name Servers form a hierarchical tree structure. As soon as a request is sent to a Domain Name Server, it tries to execute name resolution using its internal tables. If it cannot find the name, it asks a higherlevel DNS that it knows. If you use the DNS Proxy function, X4000 can save previously resolved names and IP addresses in the cache and on receipt of a request first checks if the desired address can be answered from the cache. This keeps the costs of setting up WAN connections to name servers outside the LAN at a low level and optimizes performance in the LAN, as requests to frequently used addresses or addresses already resolved are answered by X4000 itself. How to configure the DNS Proxy function is described in chapter 8.3.2, page 246. When you enter a WAN partner in X4000, you can define whether X4000 sends or answers requests for WINS or DNS IP addresses. Configuration is made in: ■ IP ➧ STATIC SETTINGS ■ WAN PARTNER ➧ EDIT ➧ IP ➧ ADVANCED SETTINGS Field Meaning Primary Domain Name Server IP address of X4000’s first global Domain Name Server (DNS). Secondary Domain Name Server IP address of another global Domain Name Server. Primary WINS IP address of X4000’s first global WINS (Windows Internet Name Server) or NBNS (NetBIOS Name Server). Secondary WINS IP address of another global WINS or NBNS. Table 8-24: 226 X4000 User’s Guide IP ➧STATIC SETTINGS 8 Settings Specific to WAN Partners Field Meaning Dynamic Name Server Negotiation In the event of dynamic name server negotiation, defines whether X4000 receives IP addresses for Primary Domain Name Server, Secondary Domain Name Server, Primary WINS and Secondary WINS from the WAN partner or sends them to the WAN partner. Table 8-25: WAN PARTNER ➧ EDIT ➧ IP ➧ ADVANCED SETTINGS X4000 User’s Guide 227 8 Advanced Configuration of the Basic Unit with the Setup Tool The Dynamic Name Server Negotiation field contains the following selection options: Possible values Meaning off X4000 does not send or answer requests for WINS or DNS IP addresses. yes The response is linked to the mode for issuing/ receiving an IP address (setting in WAN PARTNER ➧ EDIT ➧ IP under IP Transit Network): ■ X4000 sends requests for name server addresses to the WAN partner if dynamic client is selected. ■ X4000 answers requests for name server addresses from the WAN partner if dynamic server is selected. ■ X4000 answers but does not send requests for name server addresses if yes or no is selected. client (receive) X4000 sends requests for name server addresses to the WAN partner. server (send) X4000 answers requests from the WAN partner for name server addresses. Table 8-26: WINS, DNS in the LAN To do Dynamic Name Server Negotiation If you have set up a DNS or WINS in your LAN, enter its IP address. Proceed as follows if you have not made this entry already (see chapter 8.3.2, page 246): ➤ Go to IP ➧ STATIC SETTINGS. ➤ Enter Primary or Secondary Domain Name Server. ➤ Enter Primary or Secondary WINS. ➤ Press SAVE. 228 X4000 User’s Guide 8 Settings Specific to WAN Partners Proceed as follows if you want X4000 to report the name server addresses entered to the WAN partner (Server Mode) or if other name server addresses other than those in the LAN are to be used for connections to the WAN partner (Client Mode, e.g. for dialing in to an Internet Service Provider): ➤ Go to WAN PARTNER ➧ EDIT ➧ IP ➧ ADVANCED SETTINGS. ➤ Select Dynamic Name Server Negotiation. ➤ Confirm with OK. ➤ Press SAVE. If you do not have a Secondary DNS or WINS server, you can enter the IP address of the Primary DNS or WINS server in the Secondary Domain Name Server or Secondary WINS field again. This may be necessary for connection to some data communications clients. If you do not have a Domain Name Server in your LAN (smaller networks often have no DNS of their own), the name resolution can be carried out, for example, via your Internet Service Provider (Client Mode). However, this requires ISDN connections, which involve charges. If you work with Windows, you can also obtain name resolution without asking for a DNS. To do this, you must adapt the LMHOSTS file on all PCs in the LAN. 8.2.8 Routing Routing Information Protocol (RIP) Routing can be described as follows: The➤➤ router receives ➤➤ data packets, each of which contains data about the destination host. On the basis of the entries in the so-called Routing Table (see "Creating a Routing Entry", page 175), the router decides which route to use to forward the data packet to ensure that it arrives at its destination as quickly and cheaply as possible (with the fewest possible intermediate stations). The entries in the routing table can be defined statically or the routing table can be updated constantly by a dynamic exchange of routing information between several routers. This exchange is X4000 User’s Guide 229 8 Advanced Configuration of the Basic Unit with the Setup Tool controlled by a so-called Routing Protocol, e.g. RIP (Routing Information Protocol). RIP Routers use the ➤➤ RIP to exchange the information stored in their routing tables by communicating with each other at regular intervals to mutually supplement and renew their routing entries. X4000 supports both version 1 and version 2 of RIP, either exclusively or parallel. RIP is configured separately for LAN and WAN. Active and passive Routers can be defined as active or passive routers: Active routers offer their routing entries to other routers via ➤➤ broadcasts. Passive routers accept the information from the active routers and store it, but do not pass on their own routing entries. X4000 can do both. WAN partner If you negotiate to receive and/or send RIP packets from/to your WAN partner, X4000 can exchange routing information dynamically with the routers in the LAN of the WAN partner. Receiving routing tables via the RIP is a possible security loophole, as external computers or routers can change X4000’s routing functionality. RIP packets do not set up or hold ISDN connections. Configuration is made in: ■ WAN PARTNER ➧ EDIT ➧ IP ➧ ADVANCED SETTINGS ■ CM-100BT, FAST ETHERNET ➧ ADVANCED SETTINGS Field Meaning RIP Send Enables RIP packets to be sent via the interface to the WAN partner and LAN interface. RIP Receive Enables RIP packets to be received via the interface to the WAN partner and LAN interface. Table 8-27: 230 X4000 User’s Guide WAN PARTNER ➧ EDIT ➧ IP ➧ ADVANCED SETTINGS or CM-100BT, FAST ETHERNET ➧ A DVANCED SETTINGS 8 Settings Specific to WAN Partners RIP Send and RIP Receive contain the following selection options: Possible values Meaning none Not activated. RIP V1 Enables sending and receiving of RIP packets in version 1. RIP V2 Enables sending and receiving of RIP packets in version 2. RIP V1 + V2 Enables sending and receiving of RIP packets in both version 1 and version 2. Table 8-28: To do RIP Send and RIP Receive Proceed as follows: ➤ Go to WAN PARTNER ➧ EDIT ➧ IP ➧ ADVANCED SETTINGS. ➤ Select RIP Send. ➤ Select RIP Receive. ➤ Confirm with OK. ➤ Press SAVE. ➤ Press SAVE. ➤ Go to CM-100BT, FAST ETHERNET ➧ ADVANCED SETTINGS. ➤ Select RIP Send. ➤ Select RIP Receive. ➤ Press SAVE. X4000 User’s Guide 231 8 Advanced Configuration of the Basic Unit with the Setup Tool 8.2.9 Data compression Compression You can increase the data throughput and so reduce the connection costs by using ➤➤ data compression. X4000 supports several options, depending on the ➤➤ encapsulation selected, e.g. PPP (see chapter 7.3, page 159): ■ ➤➤ STAC: The industry standard STAC data compression (Check Mode 3 in RFC 1974) implemented in X4000 can increase the data throughput on the PPP ISDN connections. ■ MS-STAC: STAC data compression for Windows ➤➤ clients (Check Mode 4 in RFC 1974). Select this if you dial into a Windows Remote Access Server. ■ Van Jacobson Header Compression (➤➤ VJHC): Reduces the size of ➤➤ TCP/IP packets. Van Jacobson Header Compression can be used in addition to the above-mentioned compression algorithms. If the far station does not support data compression or its data compression is not activated, X4000 detects this during the ➤➤ PPP negotiation phase and deactivates data compression for this connection. Configuration is made in: ■ WAN PARTNER ➧ EDIT ■ WAN PARTNER ➧ EDIT ➧ IP ➧ ADVANCED SETTINGS Field Meaning Compression Defines the type of compression for connections to the WAN partner. Table 8-29: 232 X4000 User’s Guide WAN PARTNER ➧ EDIT 8 Settings Specific to WAN Partners The Compression field contains the following selection options: Possible values Meaning none No compression. STAC Enables STAC data compression (if Encapsulation = PPP). MS-STAC Enables STAC data compression for dialing into a Windows Remote Access Server (if Encapsulation = PPP). Table 8-30: Field Meaning Van Jacobson Header Compression Enables VJHC. Table 8-31: STAC, MS-STAC Compression WAN PARTNER ➧ EDIT ➧ IP ➧ ADVANCED SETTINGS Proceed as follows to set STAC or MS-STAC: ➤ Go to WAN PARTNER ➧ EDIT. ➤ Select Compression. ➤ Press SAVE. VJHC Proceed as follows to set VJHC: ➤ Go to WAN PARTNER ➧ EDIT ➧ IP ➧ ADVANCED SETTINGS. ➤ Activate Van Jacobson Header Compression: on. ➤ Confirm with OK. ➤ Press SAVE. ➤ Press SAVE. X4000 User’s Guide 233 8 Advanced Configuration of the Basic Unit with the Setup Tool 8.2.10 ARP requests Proxy ARP (Address Resolution Protocol) The ➤➤ Proxy ARP function enables X4000 to answer ➤➤ ARP requests from the LAN. That is, if a host in the LAN wants to set up a connection to another host in the LAN or to a WAN partner but doesn’t know its hardware address, it sends a so-called ARP request into the network as a ➤➤ broadcast. This is actually a question to all those in the network: "What is the hardware address of host x?" If Proxy ARP is activated in X4000 and the desired host can be reached over a defined WAN connection, X4000 answers the ARP request with its own hardware address. This is sufficient for establishing the connection: The ➤➤ data packets are sent to X4000, which then forwards them to the desired host. 1 192.168.1.4 MAC = ? 4000 BinTec ISDN X4000D 192.168.1.254 MAC = 0:0:0:1:2:3 2 192.168.1.4 MAC=0:0:0:1:2:3 Your Local Area Network Figure 8-2: 192.168.1.4 MAC = 0:0:0:4:5:6 Single workstation with ISDN card Proxy ARP Configuration is made in: ■ WAN PARTNER ➧ EDIT ➧ IP ➧ ADVANCED SETTINGS ■ CM-100BT, FAST ETHERNET ➧ ADVANCED SETTINGS 234 X4000 User’s Guide 8 Settings Specific to WAN Partners Field Meaning Proxy Arp Enables X4000 to answer ARP requests. Table 8-32: WAN PARTNER ➧ EDIT ➧ IP ➧ ADVANCED SETTINGS or CM-100BT, FAST ETHERNET ➧ ADVANCED SETTINGS Proxy Arp in WAN PARTNER ➧ EDIT ➧ IP ➧ ADVANCED SETTINGS contains the following selection options: Possible values Meaning off Disables Proxy ARP via the interface to the WAN partner. on (up or dormant) X4000 answers an ARP request only if the status of the connection to the WAN partner is up (active) or dormant (idle). In the case of dormant, X4000 only answers the ARP request; the connection is not set up until someone actually wants to use the route. on (up only) X4000 answers an ARP request only if the status of the connection to the WAN partner is up (active), i.e. a connection already exists to the WAN partner. Table 8-33: Proxy Arp Proxy Arp in CM-100BT, FAST ETHERNET ➧ ADVANCED S ETTINGS contains the following selection options: Possible values Meaning off Disables Proxy ARP via the LAN interface. on Enables Proxy ARP via the LAN interface. Table 8-34: Proxy Arp X4000 User’s Guide 235 8 Advanced Configuration of the Basic Unit with the Setup Tool To do Proceed as follows: ➤ Go to WAN PARTNER ➧ EDIT ➧ IP ➧ ADVANCED SETTINGS. ➤ Select Proxy Arp. ➤ Press SAVE. ➤ Press SAVE. ➤ Go to CM-100BT, FAST ETHERNET ➧ ADVANCED SETTINGS. ➤ Select Proxy Arp. ➤ Press SAVE. ➤ Press SAVE. 8.2.11 LAN-LAN connection 236 Keepalive Monitoring If you have connected two (or more) LANs over a dialup connection, e.g. between the LAN of the head office and the LAN of a branch office as in Figure 8-3, page 237, a central server is frequently located in the LAN at the head office. If this central server is configured such that it regularly sets up WAN connections to X4000 in the LAN of the branch office, e.g. for updating data, these connections are superfluous (but unfortunately not free) if none of the hosts in the branch office can be reached, e.g. because all PCs are switched X4000 User’s Guide 8 Settings Specific to WAN Partners off. As it is not possible to determine whether the hosts can be reached until the connection is set up, costs are incurred by the calling party, i.e. the head office. 1 Central Server 4000 WAN BI AN CA /B RI CK -X M Headquarters Router No Host reachable! BinTec Reachable? X4000 192.168.1.10 Group 0 2 Reachable? LAN IP 10.1.1.1 LAN IP 192.168.1.254 Headquarters Branch Office 1 Connection setup attempt Figure 8-3: Cutting costs 192.168.1.20 Group 0 2 X4000 is "busy", no connection is possible Keepalive Monitoring The Keepalive Monitoring function enables you to configure X4000 in the branch office so that unnecessary WAN connections from the head office to the branch office are avoided. X4000 checks at regular, adjustable intervals to see whether the hosts to be monitored in the LAN at the branch office can be reached. If none of the hosts to be checked answers a corresponding request after three consecutive attempts, connection setup by the central server is prevented by X4000 deactivating the interface to the "head office" WAN partner. The result is that the line to the branch office appears to be busy if the central server at head office attempts to set up a connection. This means that no costs are incurred for a connection, which would have been useless anyway. X4000 User’s Guide 237 8 Advanced Configuration of the Basic Unit with the Setup Tool In some countries (e.g. Switzerland), costs may still occur for these useless dial-in attempts in spite of using Keepalive Monitoring. If all PCs in the LAN at the branch office were inactive, a connection to the head office is not set up automatically as soon as one of the PCs to be monitored is switched on. The interface to the "head office" WAN partner is not activated, i.e. a connection cannot be set up to the head office, until X4000 has registered that a PC can be reached. The amount of time that expires before X4000 indicates that a PC can be reached again depends on the monitoring interval set (Interval). The corresponding WAN partner, i.e. the head office, should be identifiable in X4000 via CLID (Calling Line Identification). If this is not the case, Keepalive Monitoring may not function. If Keepalive Monitoring is configured in X4000 for WAN partners that are authenticated over a RADIUS server, Keepalive Monitoring does not function. This means the relevant unnecessary connections cannot be prevented in this way. 238 X4000 User’s Guide 8 Settings Specific to WAN Partners Configuration is made in SYSTEM ➧ KEEPALIVE M ONITORING ➧ ADD: Field Meaning Group Defines a group of hosts, whose reachability is to be monitored by X4000. Each host to be monitored is assigned to a group. A total of ten groups can be configured with up to ten hosts each. Possible values: 0 ... 9 IPAddress Defines a host that is to be monitored by X4000. Interval Defines the time interval in s to be used for reachability of hosts (default value: 300). The smallest time interval is used within a group. That is, all the hosts in a group are checked by X4000 at the smallest time interval of the group. DownAction Defines how the status of the X4000 interfaces selected in FirstIfIndex and Range is set if ALL hosts in a group are not reachable. Possible values: ■ down (default value): Interfaces are deactivated. ■ up: Interfaces are activated. The status of the interfaces is set to the original value again when at least one host in a group can be reached again. X4000 User’s Guide 239 8 Advanced Configuration of the Basic Unit with the Setup Tool Field Meaning FirstIfIndex Defines the first interface of an interface range in X4000, for which the action defined under DownAction is to be executed. Possible values: 10001 ... 15000 (default value: 10001). Interfaces with indices from 10001 to 15000 are provided for dialup connections to WAN partners. The default value 10001 designates the interface to the first WAN partner configured in X4000 (dialup connection). The indices of other interfaces are given in the Software Reference. Range Defines the range of interfaces in X4000, for which the action defined under DownAction is to be executed. If you set FirstIfIndex = 10001 and Range = 0, only the interface with the index 10001 is affected. If you set FirstIfIndex = 10001 and Range = 4999 (default value), the interfaces with indices 10001 to 15000 are affected. Table 8-35: SYSTEM ➧ KEEPALIVE MONITORING ➧ ADD SYSTEM ➧ KEEPALIVE MONITORING lists all the hosts that are monitored by Keepalive Monitoring. The reachability of the hosts is listed under State: alive, if the host was reachable on the last check, down, if the host was not reachable. To do Proceed as follows to configure the example shown in Figure 8-3, page 237: ➤ Go to SYSTEM ➧ KEEPALIVE MONITORING. ➤ Press ADD to add the first host that is to be monitored by X4000 with Keepalive Monitoring. ➤ Enter Group: 0. ➤ Enter IPAddress: 192.168.1.10. 240 X4000 User’s Guide 8 Settings Specific to WAN Partners ➤ Enter Interval, e.g. 300. ➤ Select DownAction: down. ➤ Enter FirstIfIndex: 10001. ➤ Type in Range: 4999. ➤ Press SAVE. ➤ Press ADD to add the second host. ➤ Enter Group: 0. ➤ Enter IP Address: 192.168.1.20. ➤ Enter Interval, e.g. 300. ➤ Select DownAction: down. ➤ Enter FirstIfIndex: 10001. ➤ Type in Range: 4999. ➤ Press SAVE. These settings ensure that X4000 checks the reachability of hosts 192.168.1.10 and 192.168.1.20 at intervals of 300 s. If neither of the two hosts is reachable after three consecutive attempts, all X4000 interfaces for dialup connections to WAN partners are deactivated. X4000 continues to check the hosts at the time interval of 300 s and X4000 activates the interfaces again as soon as at least one host is reachable again. X4000 User’s Guide 241 8 Advanced Configuration of the Basic Unit with the Setup Tool 8.3 Basic IP Settings Here you will find a number of basic settings you can define in X4000: ■ Deriving System Time (chapter 8.3.1, page 242) ■ Name Resolution (➤➤ DNS) in X4000 (chapter 8.3.2, page 246) ■ ➤➤ Port Numbers (chapter 8.3.3, page 265) ■ ➤➤ BOOTP Relay Agent (chapter 8.3.4, page 266) The necessary configuration steps are explained below. 8.3.1 System time System Time You need the system time to obtain correct timestamps for recording connection data (for accounting). You can derive the system time ■ automatically, e.g. via ISDN or a time server (see "Deriving the System Time Automatically", page 243). ■ by setting it manually in X4000 (see "Setting the System Time Manually", page 245). 242 X4000 User’s Guide 8 Basic IP Settings Deriving the System Time Automatically Configuration is made in IP ➧ STATIC S ETTINGS. Field Meaning Time Protocol Protocol used to derive the current time. Possible values: ■ TIME/UDP ■ TIME/TCP ■ SNTP ■ ISDN ■ none Time Offset (sec) Number of seconds added to or subtracted from the derived time. If you enter values between -24 and +24, X4000 interprets the input as the number of hours and converts it to the corresponding number of seconds automatically after you press SAVE. Note: If you select ISDN as Time Protocol, you must set the Time Offset to 0. If you change Time Offset (sec) (turn back the time), there should be no data flow. Time Update Interval (sec) Time interval in seconds, after which the system time is checked and updated if necessary. If you enter values between 1 and 24, X4000 interprets the input as the number of hours and converts it to the corresponding number of seconds automatically after you press SAVE. For Time Protocol = TIME/UDP, TIME/TCP or SNTP: Current time is checked after every Time Update Interval in seconds. For Time Protocol = ISDN: Current time is checked for each first ISDN connection after expiry of the Time Update Interval. X4000 User’s Guide 243 8 Advanced Configuration of the Basic Unit with the Setup Tool Field Meaning Time server IP address of the time ➤➤ server used by X4000. Time Server is not needed if you set ISDN as Time Protocol. Table 8-36: IP ➧ STATIC SETTINGS The Time Protocol field contains the following selection options: Possible values Meaning TIME/UDP System time (RFC 868) via ➤➤ UDP. TIME/TCP System time (RFC 868) via ➤➤ TCP. TIME/SNTP System time as per SNTP (Simple Network Time Protocol, RFC 1769) via UDP. ISDN System time from ISDN ➤➤ D-channel (free). none System time not derived. Table 8-37: ISDN Time Protocol Proceed as follows to derive the system time via ISDN: ➤ Go to IP ➧ STATIC SETTINGS. ➤ Select Time Protocol: ISDN. ➤ Enter Time Offset (sec): 0. ➤ Enter Time Update Interval (sec), e.g. 86400 (corresponds to 24 hours). ➤ Press SAVE. After the first ISDN connection has been ended, X4000 derives the system time from the ISDN. Time server Proceed as follows to derive the system time from a time server: ➤ Go to IP ➧ STATIC SETTINGS. ➤ Select Time Protocol, e.g. TIME/UDP. ➤ Enter Time Offset (sec), e.g. 0. 244 X4000 User’s Guide 8 Basic IP Settings ➤ Enter Time Update Interval (sec), e.g. 86400 (corresponds to 24 hours). ➤ Enter IP address or host name for Time Server. ➤ Press SAVE. X4000 now derives the system time via a time server. X4000 adjusts its system time to the time set on the time server every 24 hours. The ➤➤ DIME Tools contain a time server. If you enter the IP address of your PC for Time Server, make sure the time server of DIME Tools is active on your PC every time you start X4000. If your computer has no fixed IP address but is assigned its IP address dynamically via ➤➤ DHCP, you cannot use your computer as a time server. Setting the System Time Manually Configuration is made in SYSTEM ➧ TIME AND DATE. Field Meaning Time is currently controlled by: Shows the settings defined under IP ➧ STATIC SETTINGS for deriving the time automatically. Current Time: Shows the system time currently set in X4000 (date and time). New Time: For entering the new time to be used by X4000 (hours:minutes). New Date: For entering the new date to be used by X4000 (month/day/year). Table 8-38: SYSTEM ➧ TIME AND DATE X4000 User’s Guide 245 8 Advanced Configuration of the Basic Unit with the Setup Tool Proceed as follows to enter the system time in X4000 manually: If a method for deriving the time automatically is also defined in X4000, the values obtained automatically have higher priority. That is, if X4000 receives a relevant time signal (e.g. from a time server), any system time entered manually is overwritten. ➤ Go to SYSTEM ➧ TIME AND DATE. ➤ Enter New Time. ➤ Enter New Date. ➤ Confirm the new system time with SET. Current Time: shows the new system time set in X4000. 8.3.2 Name Resolution in X4000 with DNS Proxy Why Name Resolution? IP address = ? Name resolution is necessary for converting host names in a LAN or on the Internet into IP addresses. For example, if you would like to reach the host "Goofy" in your LAN or enter the URL "http://www.bintec.de" in your Internet browser, you need the associated IP address before you can set up the required connection. The following options are available: ■ DNS (Domain Name Server): A DNS stores the relevant IP addresses for host names in the form of DNS records and resolves the names if a relevant request is received, i.e. the name server sends a DNS record with the IP address associated with the name to the source of the request. Name servers form a hierarchical tree structure. If a name server cannot resolve a name, it therefore asks a higher-order name server, etc. ■ HOSTS files: HOSTS files are located on the PCs in the LAN. You can use these files to create a table of host names with associated addresses. This means connections to DNS are no longer needed to resolve these names. As the HOSTS files must be updated on each PC, this method of name resolution is not very practicable. 246 X4000 User’s Guide 8 Basic IP Settings In practice, the DNS of the Internet Service Provider is often used for name resolution. Advantages of Name Resolution with X4000 X4000 has the following functions and facilities for name resolution (port 53): ■ DNS Proxy, for passing DNS requests to the right DNS. ■ DNS cache, for saving the results of DNS requests. ■ Static name entries, for defining assignments of names to IP addresses. ■ Filter function, to prevent the resolution of certain names. ■ Monitoring via Setup Tool, to provide an overview of DNS requests in X4000. This is how it works: DNS Proxy DNS Proxy makes the tedious updating of HOSTS files on PCs in the LAN unnecessary, as you can enter X4000 as DNS on the relevant PCs. DNS requests are passed by the PC to X4000 for processing. The configuration of the PCs in the LAN is then easy and can also be left at provider changes. This also works if the PCs in the LAN do not have any static DNS entries, but are assigned these dynamically by X4000 as DHCP server. Forwarding entries enable X4000 to decide which DNS is to be used for the resolution of certain names. If you have configured two WAN partners in X4000, your head office and your Internet Service Provider, it is advisable to have Internet names resolved by the DNS of your ISP, but names from within the corporate network by the DNS of the head office. A DNS request for resolution of an internal company address usually cannot be answered by the DNS of the ISP and is thus superfluous, causes unnecessary costs and resolution takes longer than necessary. A forwarding entry, which passes DNS requests for names such as "*.intranet.de" to the WAN partner "head office", is therefore advisable. DNS cache If a DNS request is passed by X4000 to a DNS and this DNS answers with a DNS record, the resolved name is saved with the associated IP address as a positive dynamic entry in the DNS cache of X4000. This means that once a name has been resolved and is required again, X4000 can answer the request X4000 User’s Guide 247 8 Advanced Configuration of the Basic Unit with the Setup Tool from the cache and a new request to an external name server is not necessary. These requests can therefore be answered more quickly, bandwidth is reduced on the WAN connections and the costs of unnecessary connections are saved. If a DNS request cannot be answered by any of the DNS asked, this is saved in the cache as a negative dynamic entry. As failed DNS requests (requests that cannot be answered) are not usually saved by applications or IP stacks, these negative dynamic entries in the cache prevent frequent unsuccessful connection setups to external DNS. The validity of the positive dynamic entries in the cache is given by the TTL (Time To Live), which is contained in the DNS record. Negative entries are assigned the value Maximum TTL for Neg Cache Entries. A dynamic entry is deleted from the cache when the TTL expires. Static name entries You use positive static entries to enter names with the associated IP addresses in X4000. If you save frequently needed IP addresses in this way, X4000 can answer relevant DNS requests itself and the connection to an external name server is not necessary. This speeds up access to these addresses. For a small network, such a name server can be configured in X4000. The installation of a separate DNS and the tedious updating of HOSTS files on the PCs in the LAN is not necessary. With negative static entries, a name is not assigned an IP address, a corresponding DNS request is answered negatively and not passed to any other name server either. You can easily change a dynamic entry to a static entry "at the press of a button" in IP ➧ DNS ➧ DYNAMIC CACHE (see Table 8-43, page 258). Filter function By using negative static entries, you can limit name resolution in X4000 using a filter function. This makes access to certain domains much more difficult for users in the LAN, as it prevents the corresponding names being resolved. You can use wildcards (*) when entering the name. When you enter a static entry, you define how long this assignment of name and IP address is valid by setting the TTL. This TTL is entered in each DNS record with which X4000 answers a relevant DNS request. 248 X4000 User’s Guide 8 Basic IP Settings Make sure your static entries are always up to date. Names or IP addresses can change at any time! Monitor function Which IP addresses are requested by hosts in the LAN and how often? The Setup Tool permits rapid access to this and other statistical information. You can also use the nslookup command in the command line (SNMP shell) to check how a name or an IP address is resolved by X4000 or another name server (see chapter 14.1, page 412). To obtain help information for the command, enter nslookup -?. Other Options Global name server In IP ➧ STATIC SETTINGS, you can also enter the IP address of preferred global name servers that are to be asked if X4000 cannot answer requests itself or with forwarding entries. For local applications, the IP address of X4000 or the loopback address (127.0.0.1) can be entered as global name server. If necessary, X4000 can send or receive the addresses of name servers to and from WAN partners: Default interface In Default Interface, you can also select a WAN partner to whom a connection is set up as standard for name server negotiation if name resolution was not successful using the methods already stated. Exchanging DNS Addresses with LAN Partners DHCP If X4000 is configured as DHCP server, DHCP clients in the LAN can be sent IP addresses from name servers. In this case, the addresses of the global name servers entered in X4000 can be sent or the address of X4000 itself. In the latter case, DNS requests from the DHCP clients are sent to X4000, which either answers these itself or passes them on if necessary (proxy function). Exchanging DNS Addresses with WAN Partners X4000 User’s Guide 249 8 Advanced Configuration of the Basic Unit with the Setup Tool IPCP The same applies if the dynamic negotiation of name servers is activated for the IP configuration of a WAN partner and X4000 is operating in Server Mode (Dynamic Name Server Negotiation = server (send)). In this case, the addresses of the global name servers or the address of X4000 itself can also be sent for name server negotiations via IPCP to the WAN partner, who is the IP address client. If X4000 is operating in Client Mode (Dynamic Name Server Negotiation = client (receive)), name server addresses can if necessary be negotiated with the WAN partner, who is the IP address server, and sent to X4000. These can be entered as global name servers in X4000 and are thus available for future name resolutions. Strategy for Name Resolution in X4000 A DNS request is handled by X4000 as follows: 1. 2. 3. 250 Can the request be answered directly from the static or dynamic cache (IP address or negative answer)? – If yes, the information is forwarded. – If no, see 2. Is a matching forwarding entry available? In this case, the relevant DNS are asked. If the connection to the WAN partner is not active, an attempt is made to set it up. – If a DNS can resolve the name, the information is forwarded and a dynamic entry created in the cache. – If none of the DNS asked can resolve the name or no matching forwarding entry is available, see 3. Are global name servers entered? In this case, the relevant DNS are asked. If the IP address of X4000 or the loopback address is entered for local applications, these are ignored here. – If a DNS can resolve the name, the information is forwarded and a dynamic entry created in the cache. – If none of the DNS asked can resolve the name or no static name servers are entered, see 4. X4000 User’s Guide 8 Basic IP Settings 4. Is a WAN partner selected as default interface? In this case, the associated DNS are asked. If the connection to the WAN partner is not active, an attempt is made to set it up. – If a DNS can resolve the name, the information is forwarded and a dynamic entry created in the cache. – If none of the DNS asked can resolve the name or no default interface has been selected, see 5. 5. Is overwriting the global name server addresses admissible (Overwrite Global Nameserver = yes)? In this case, a connection is set up to the first WAN partner, which is configured so that addresses of DNS can be sent – provided this has not previously been attempted. If name server negotiation is successful, these are entered as global name servers and are therefore available for further requests. 6. Request is answered with server error. If one of the DNS answers with "non-existent domain", this answer is forwarded to the source of the request immediately and included in the cache as negative entry. Overview of Configuration with the Setup Tool The configuration and monitoring of name resolution in X4000 is set in: ■ IP ➧ STATIC SETTINGS: ■ IP ➧ DNS ■ IP ➧ DNS ➧ STATIC HOSTS ■ IP ➧ DNS ➧ FORWARDED DOMAINS ■ IP ➧ DNS ➧ DYNAMIC CACHE ■ IP ➧ DNS ➧ ADVANCED SETTINGS... ■ IP ➧ DNS ➧ GLOBAL STATISTICS... ■ WAN PARTNER ➧ EDIT ➧ IP ➧ ADVANCED SETTINGS X4000 User’s Guide 251 8 Advanced Configuration of the Basic Unit with the Setup Tool IP ➧ STATIC S ETTINGS contains the following fields: Field Meaning Domain Name Defines X4000’s Domain Name. Primary Domain Name Server IP address of X4000’s first global Domain Name Server (DNS). Secondary Domain Name Server IP address of another global Domain Name Server. Primary WINS IP address of X4000’s first global WINS (Windows Internet Name Server) or NBNS (NetBIOS Name Server). Secondary WINS IP address of another global WINS or NBNS. Table 8-39: 252 X4000 User’s Guide IP ➧ STATIC SETTINGS 8 Basic IP Settings IP ➧ DNS contains the following fields: Field Meaning Positive Cache Enables positive dynamic entries in the cache. Possible values: ■ enabled (default value): Successfully resolved names and IP addresses are saved in the cache. ■ flush: All positive dynamic entries in the cache are deleted. ■ disabled: Successfully resolved names and IP addresses are not saved in the cache and existing dynamic positive entries are deleted (static entries are not deleted). Negative Cache Enables negative dynamic entries in the cache. Possible values: ■ enabled (default value): Names that could not be resolved are saved in the cache as negative entries. ■ flush: All negative dynamic entries in the cache are deleted. ■ disabled: Names that could not be resolved are not saved in the cache and existing dynamic negative entries are deleted (static entries are not deleted). Overwrite Global Nameservers Defines whether the addresses of global name servers in X4000 (in IP ➧ STATIC SETTINGS) may be overwritten with name server addresses sent by WAN partners. Possible values: ■ yes (default value) ■ no X4000 User’s Guide 253 8 Advanced Configuration of the Basic Unit with the Setup Tool Field Meaning Default Interface Defines the WAN partner to which a connection is normally set up for name server negotiation if other name resolution attempts were not successful. DHCP Assignment Defines which name server addresses are sent to the DHCP client if X4000 is configured as DHCP server. Possible values: ■ none: No name server address is sent. ■ self (default value): The address of X4000 is sent as name server address. ■ global: The addresses of the global name servers entered in X4000 are sent. IPCP Assignment Defines which name server addresses are sent by X4000 to a WAN partner for dynamic name server negotiation. Possible values: ■ none: No name server address is sent. ■ self: The address of X4000 is sent as name server address. ■ global (default value): The addresses of the global name servers entered in X4000 are sent. Static Hosts The number of static entries is displayed in brackets. Forwarded Domains The number of forwarding entries is displayed in brackets. Dynamic Cache The number of positive and negative dynamic entries in the DNS cache is displayed in brackets. Table 8-40: 254 X4000 User’s Guide IP ➧ DNS 8 Basic IP Settings IP ➧ DNS ➧ STATIC HOSTS ➧ ADD contains the following fields: Field Meaning Default Domain: The Domain Name of X4000 entered in IP ➧ STATIC SETTINGS is displayed. Name Host name, which is assigned the Address with this static entry. May also contain wildcards (*) (only at the start of Name, e.g. *.bintec.de). If an incomplete name is entered without a dot, this is completed with ".Default Domain" after confirming with SAVE. Response Defines the type of static entry. Possible values: ■ positive (default value): A DNS request for Name is answered with a DNS record, which contains the associated Address. ■ ignore: A DNS request is ignored; no answer is given (not even a negative answer). ■ negative: A DNS request for Name is answered with a negative answer. Address (Only for Response = positive) IP address, which is assigned to Name. TTL Period of validity in s for the assignment of Name to Address (only relevant for Response = positive). This value is displayed in the TTL field (Time To Live) if X4000 sends a corresponding DNS record. Default value: 86400 (= 24 h) Table 8-41: IP ➧ DNS ➧ STATIC HOSTS ➧ ADD X4000 User’s Guide 255 8 Advanced Configuration of the Basic Unit with the Setup Tool IP ➧ DNS ➧ FORWARDED DOMAINS ➧ ADD contains the following fields: Field Meaning Global Nameservers: The global name servers entered in IP ➧ STATIC S ETTINGS are displayed. Default Domain: The Domain Name of X4000 entered in IP ➧ STATIC S ETTINGS is displayed. Name Host name that is to be resolved with this forwarding entry. May also contain wildcards (only at the start of Name, e.g. *.bintec.de). If an incomplete name is entered without a dot, this is completed with ".Default Domain" after confirming with SAVE. Interface Defines the WAN partner to which a connection is set up for the resolution of Name. TTL Period of validity in s for the assignment of Name to Address. Default value: 86400 (= 24 h) If the request of X4000 for Name is answered with a DNS record, this contains a TTL field (= Time To Live in s), whose value is not normally changed by X4000 on forwarding the DNS record. If the TTL field received has the value 0 or exceeds Maximum TTL for Pos Cache Entries, then TTL is also sent with the DNS record forwarded. Table 8-42: 256 X4000 User’s Guide IP ➧ DNS ➧ FORWARDED DOMAINS ➧ ADD 8 Basic IP Settings IP ➧ DNS ➧ DYNAMIC CACHE contains the following fields: Field Meaning Name Host name, which is assigned the Address with this dynamic entry in the cache. Address IP address, which is assigned to Name. Resp Defines the type of dynamic entry. Possible values: ■ positive: A DNS request for Name is answered with the associated IP address from the cache. ■ negative: A DNS request for Name is answered with a negative answer from the cache. TTL Indicates how many seconds the dynamic entry remains in the cache. The entry is deleted on expiry of TTL. When a positive dynamic entry is saved in the cache, the value of the TTL field (= Time To Live in s) contained in the DNS record is used. If the TTL field in the DNS record is set to 0 or exceeds Maximum TTL for Pos Cache Entries, the value Maximum TTL for Pos Cache Entries is used when saving the entry. When a negative dynamic entry is saved in the cache, Maximum TTL for Neg Cache Entries is always assigned as this value. Ref Indicates how often the entry has been referenced, i.e. how often a DNS request has been answered with the entry from the cache. X4000 User’s Guide 257 8 Advanced Configuration of the Basic Unit with the Setup Tool Field Meaning STATIC A dynamic entry can be converted to a static entry by tagging the entry with the Space bar and confirming with STATIC. The relevant entry then disappears from IP ➧ DNS ➧ DYNAMIC CACHE and is listed in IP ➧ DNS ➧ STATIC HOSTS. TTL is transferred in this operation. Table 8-43: 258 X4000 User’s Guide IP ➧ DNS ➧ DYNAMIC CACHE 8 Basic IP Settings IP ➧ DNS ➧ ADVANCED SETTINGS... contains the following fields: Field Meaning Maximum Number of DNS Records Defines the maximum number of static and dynamic entries. Once this value is reached, an older dynamic entry is deleted from the cache when a new entry is added. The entry deleted is always the dynamic entry that has not been requested for the longest period of time. If Maximum Number of DNS Records is reduced by the user, dynamic entries are also deleted, if necessary. Static entries are not deleted; Maximum Number of DNS Records cannot be set lower than the current number of existing static entries. If Maximum Number of DNS Records corresponds to the number of static entries, no further dynamic entries are possible! Maximum TTL for Pos Cache Entries Is assigned to a positive dynamic entry in the cache as TTL if the field of the DNS record has the value 0 or exceeds Maximum TTL for Pos Cache Entries. Maximum TTL for Neg Cache Entries Is assigned as TTL to a negative dynamic entry in the cache. Table 8-44: IP ➧ DNS ➧ A DVANCED SETTINGS... X4000 User’s Guide 259 8 Advanced Configuration of the Basic Unit with the Setup Tool IP ➧ DNS ➧ GLOBAL STATISTICS... contains the following fields (the menu is updated every second): Field Meaning Received DNS Packets Displays the number of received DNS packets, including the answer packets for forwarded requests. Invalid DNS Packets Displays the number of invalid DNS packets received. DNS Requests Displays the number of correct DNS requests received. Cache Hits Displays the number of requests that could be answered with static or dynamic entries from the cache. Forwarded Requests Displays the number of requests forwarded to other name servers. Cache Hitrate (%) Displays the number of Cache Hits per DNS Request in %. Successfully Answered Queries Displays the number of successful requests (positive and negative) answered. Server Failures Displays the number of requests that could not be answered by any name server (either positively or negatively). Table 8-45: 260 X4000 User’s Guide IP ➧ DNS ➧ GLOBAL STATISTICS... 8 Basic IP Settings The following part of WAN PARTNER ➧ EDIT ➧ IP ➧ ADVANCED SETTINGS is of interest for this configuration step: Field Meaning Dynamic Name Server Negotiation In the event of dynamic name server negotiation, defines whether X4000 receives IP addresses for Primary Domain Name Server, Secondary Domain Name Server, Primary WINS and Secondary WINS from the WAN partner or sends them to the WAN partner. Table 8-46: WAN PARTNER ➧ EDIT ➧ IP ➧ ADVANCED SETTINGS X4000 User’s Guide 261 8 Advanced Configuration of the Basic Unit with the Setup Tool The Dynamic Name Server Negotiation field contains the following selection options: Possible values Meaning off X4000 does not send or answer requests for name server addresses. yes The response is linked to the mode for issuing/ receiving an IP address (setting in WAN PARTNER ➧ EDIT ➧ IP under IP Transit Network): ■ X4000 sends requests for name server addresses to the WAN partner if dynamic client is selected. ■ X4000 answers requests for name server addresses from the WAN partner if dynamic server is selected. ■ X4000 answers but does not send requests for name server addresses if yes or no is selected. client (receive) X4000 sends requests for name server addresses to the WAN partner. server (send) X4000 answers requests from the WAN partner for name server addresses. Table 8-47: Dynamic Name Server Negotiation Procedure for Configuration with the Setup Tool To do Name resolution in X4000 Proceed as follows to configure name resolution with DNS Proxy in X4000: If applicable, first enter the global name servers in X4000: ➤ Go to IP ➧ STATIC SETTINGS. ➤ Enter Domain Name, e.g. mycompany.com. ➤ Enter Primary or Secondary Domain Name Server, if applicable. 262 X4000 User’s Guide 8 Basic IP Settings ➤ Enter Primary or Secondary WINS, if applicable. If you do not have a Secondary DNS or Secondary WINS server, you can enter the IP address of the Primary DNS or WINS server in the Secondary Domain Name Server or Secondary WINS field again. This may be necessary for connection to some data communications clients. ➤ Press SAVE. Activate or deactivate the cache function and define general settings for DNS Proxy: ➤ Go to IP ➧ DNS. ➤ Select Positive Cache and Negative Cache, e.g. enabled. ➤ Select Overwrite Global Nameservers, e.g. yes, if you do not wish to enter any static global name servers under IP ➧ STATIC SETTINGS. ➤ Select DHCP Assignment, e.g. self. ➤ Select IPCP Assignment, e.g. global. Define the values for the static and dynamic entries: ➤ Go to IP ➧ DNS ➧ ADVANCED SETTINGS.... ➤ Enter Maximum Number of DNS Records. ➤ Enter Maximum TTL for Pos Cache Entries. ➤ Enter Maximum TTL for Neg Cache Entries. ➤ Press SAVE. How to create static entries: ➤ Go to IP ➧ DNS ➧ STATIC HOSTS. All the existing static entries are listed here. ➤ You can create a new entry with ADD. ➤ Enter Name. ➤ Select Response. ➤ Enter Address, if applicable. ➤ Enter TTL. X4000 User’s Guide 263 8 Advanced Configuration of the Basic Unit with the Setup Tool ➤ Press SAVE. How to create forwarding entries: ➤ Go to IP ➧ DNS ➧ FORWARDED DOMAINS. All the existing forwarding entries are listed here. ➤ You can create a new entry with ADD. ➤ Enter Name. ➤ Select Interface. ➤ Enter TTL. ➤ Press SAVE. ➤ Select EXIT. ➤ Press SAVE. X4000 <–––> WAN partner Proceed as follows if you would like to configure a WAN partner so that the address of a name server is sent from X4000 to the WAN partner or from the WAN partner to X4000, as applicable: ➤ Go to WAN PARTNER ➧ EDIT ➧ IP ➧ ADVANCED SETTINGS. ➤ Select Dynamic Name Server Negotiation. ➤ Confirm with OK. ➤ Press SAVE. Monitoring and statistics How to obtain a list of dynamic entries in the cache: ➤ Go to IP ➧ DNS ➧ DYNAMIC CACHE. This menu contains a list of all the dynamic entries in the cache. ➤ To convert a dynamic entry into a static entry, tag the entry with the Space bar and confirm with STATIC. The entry disappears from the list of dynamic entries and is listed as a static entry under IP ➧ DNS ➧ STATIC HOSTS. How to obtain a list of static parameters: ➤ Go to IP ➧ DNS ➧ GLOBAL STATISTICS.... Here you will find some statistics for DNS Proxy. 264 X4000 User’s Guide 8 Basic IP Settings 8.3.3 What is a ➤➤ port? Port Numbers X4000 has a number of services or applications, e.g. HTTP, ➤➤ telnet. To be able to reach several services on the same host and as it were to enter an exact destination for the IP packet within the host, a port is also entered in addition to the IP address for a connection to X4000. This addresses the relevant application. Ports are only used in the TCP and UDP protocols. X4000 forwards incoming ➤➤ data packets to the port with the number associated with the desired application. This addresses the relevant X4000 application and the incoming data can be processed. You can define important port numbers in IP ➧ STATIC SETTINGS: As the settings are normally correct, you should only make changes here if necessary. Field Meaning Remote CAPI Server TCP Port Port number for ➤➤ Remote CAPI connections: 2662 (defined by IANA, www.iana.com). Remote TRACE Server TCP Port Port number for TRACE Requests. Default value: 7000. RIP UDP Port Port number for ➤➤ RIP (Routing Information Protocol). Default value: 520. The RIP can be disabled with RIP UDP Port = 0. HTTP TCP Port Port number for HTTP Requests. Default value: 80. HTTP TCP Port = 0 disables access to X4000’s HTTP status page (see chapter 10.1.4, page 320). Table 8-48: IP ➧ STATIC SETTINGS X4000 User’s Guide 265 8 Advanced Configuration of the Basic Unit with the Setup Tool To do Proceed as follows to change one of the port numbers: ➤ Go to IP ➧ STATIC SETTINGS. ➤ Enter Remote CAPI Server TCP Port, Remote TRACE Server TCP Port, RIP UDP Port and/or HTTP TCP Port. ➤ Press SAVE. 8.3.4 Bootstrap protocol BOOTP Relay Agent The Bootstrap Protocol (➤➤ BOOTP) defines how a host (BOOTP ➤➤ client) in a TCP/IP network receives his IP address and other configuration information on booting. The BOOTP client sends a BOOTP Request, a BOOTP server answers the request with a BOOTP Response and supplies the client with the necessary information. As the server only hears requests from the LAN in which it is located, it is sometimes advisable to set up a BOOTP Relay Agent. The agent forwards all requests and responses between the client and server via a WAN connection to this server. 1 IP = ? 4000 ISDN BinTec IP = ? BI AN CA /B RI CK -X M X4000D BootP Relay Agent 2 IP = 192.168.1.1 WAN Partners Network Your Local Area Network Figure 8-4: 266 X4000 User’s Guide BootP-Server X4000 as BOOTP Relay Agent 8 Basic IP Settings Configuration is made in IP ➧ STATIC S ETTINGS: Field Meaning BOOTP Relay Server IP address of the BOOTP server. Table 8-49: To do IP ➧ STATIC SETTINGS Proceed as follows: ➤ Go to IP ➧ STATIC SETTINGS. ➤ Enter BOOTP Relay Server. ➤ Press SAVE. If a WAN connection is needed for the connection between the BOOTP server and BOOTP client, you must configure an appropriate WAN partner (chapter 7.3, page 159). X4000 User’s Guide 267 8 Advanced Configuration of the Basic Unit with the Setup Tool 8.4 IPX Settings The ➤➤ IPX Protocol (Internet Packet Exchange Protocol) is a network protocol that is used mainly in Novell networks. Novell ➤➤ clients and Novell ➤➤ servers can use IPX to communicate via LAN/WAN connections. The configuration steps necessary for IPX connections are explained below: ■ General Settings ■ Configuring the LAN Interface ■ Configuring WAN Partners 8.4.1 General Settings Here you will find the global parameters for IPX. These settings apply to all IPX connections of X4000. 268 X4000 User’s Guide 8 IPX Settings The configuration is made in IPX: Field Meaning Local System Name IPX system name of X4000 using upper case letters, numbers and -: /. Internal Network Number X4000’s internal network number. This value must be unique among all the network numbers and normally comprises the last four bytes of X4000’s ➤➤ MAC address. Change this value only if it is already used somewhere else in the network. Internal Network Number of a ➤➤ Remote IPX router has the same value. Enable IPX Spoofing Enables and disables NCP session watchdog spoofing and handling of "broadcast message waiting" packets. Possible values: ■ yes: convenient for IPX-WAN connections ■ no Enable SPX Spoofing Enables and disables spoofing of SPX session watchdog packets. Possible values: ■ yes: convenient for SPX sessions over WAN connections ■ no NetBIOS Broadcast Replication Table 8-50: Defines how X4000 handles ➤➤ NetBIOS packets. IPX X4000 User’s Guide 269 8 Advanced Configuration of the Basic Unit with the Setup Tool NetBIOS Broadcast Replication contains the following selection options: Possible values Meaning yes All NetBIOS hosts in the network can access each other, even if WAN connections must be set up frequently. Cost-intensive! no (default value) on LAN only NetBIOS hosts in the LAN can only access each other if they do not need WAN connections to be set up. Low cost. Table 8-51: To do NetBIOS Broadcast Replication Proceed as follows: ➤ Go to IPX. ➤ Enter Local System Name. ➤ Enter Internal Network Number (only if necessary!). ➤ Activate Enable IPX Spoofing, if applicable. ➤ Activate Enable SPX Spoofing, if applicable. ➤ Select NetBIOS Broadcast Replication, e.g. on LAN only. ➤ Press SAVE. 8.4.2 Configuring the LAN Interface The next step is to configure X4000’s LAN interface to the IPX network. The LAN interface is the physical interface to the local network. In the next menu, you tell the router the network number of the IPX LAN to which it is connected. As long as X4000 does not have this information, it cannot actively participate in its own IPX LAN. 270 X4000 User’s Guide 8 IPX Settings The configuration is made in CM-100BT, FAST ETHERNET: Field Meaning Local IPX NetNumber The IPX network number of the LAN to which X4000 is connected. Encapsulation Defines the type of header to be used for IPX packets in the LAN connected. Possible values: ■ none ■ Ethernet II ■ Ethernet 802.2 LLC ■ Ethernet SNAP ■ Ethernet NOVELL 802.3 Table 8-52: To do CM-100BT, FAST ETHERNET Proceed as follows: ➤ Go to CM-100BT, FAST ETHERNET. ➤ Enter Local IPX NetNumber. ➤ Select Encapsulation. ➤ Press SAVE. 8.4.3 Configuring WAN Partners If the connection to one or more WAN partners is implemented with the IPX protocol, you must define a number of IPX-specific settings for the WAN partner. X4000 User’s Guide 271 8 Advanced Configuration of the Basic Unit with the Setup Tool The configuration is made in WAN PARTNER ➧ EDIT ➧ IPX : Field Meaning Enable IPX Enables IPX for the WAN partner. Possible values: ■ yes ■ no IPX NetNumber IPX network number of the WAN connection. This is required by some IPX routers. Send RIP/SAP Updates Defines how often ➤➤ RIP (Routing Information Protocol) and SAP (Service Advertising Protocol) packets are sent by X4000 to the WAN partner. In IPX networks, RIP and SAP packets are sent as ➤➤ broadcasts to connected networks to provide information about current routes and services. The data flow caused by this is acceptable in the LAN, but you must make a setting here to control the data flow for networks connected via WAN connections. Update Time Defines the time intervals at which periodic updates are sent. Age Multiplier If routes and services entered are not renewed during Update Time x Age Multiplier, they are deleted. This prevents accumulation of unnecessarily large numbers of routes and services that are not used. Table 8-53: 272 X4000 User’s Guide WAN PARTNER ➧ EDIT ➧ IPX 8 IPX Settings The Send RIP/SAP Updates field contains the following selection options, which are explained with the aid of a table: Possible values for Send RIP/SAP Updates New connection opened? Update the existing tables? Periodic update? off never no no All routes and services must be entered statically. triggered + piggyback (on changes, only if link active) only for changes yes yes This is the default setting, which is sufficient in most cases. triggered (on changes) only for changes yes no Less data traffic than triggered + piggyback, but also less reliable. piggyback (only if link active) never yes yes At least 1 static route and 1 static service must be entered for the WAN partner. passive triggered (on changes only if link active) never yes no At least 1 static route and 1 static service must be entered for the WAN partner. timed update (always) always yes yes Cost-intensive! Table 8-54: To do Remarks Send RIP/SAP Updates Proceed as follows: ➤ Go to WAN PARTNER ➧ EDIT ➧ IP. ➤ Select Enable IPX: yes. ➤ Enter IPX NetNumber. ➤ Select Send RIP/SAP Updates. ➤ Enter Update Time, if applicable. ➤ Enter Age Multiplier, if applicable. X4000 User’s Guide 273 8 Advanced Configuration of the Basic Unit with the Setup Tool ➤ Confirm with OK. ➤ Press SAVE. 274 X4000 User’s Guide 8 Bridging 8.5 Bridging X4000 supports the bridging function. The description of the configuration of X4000 as a bridge can be found in the Software Reference. X4000 User’s Guide 275 8 Advanced Configuration of the Basic Unit with the Setup Tool 8.6 Extra License Features This chapter briefly describes the X4000 features you can activate with extra licenses. The relevant extra licenses are activated by adding the information received with the license in the Setup Tool menu LICENSES (see chapter 7.1.1, page 121). Extra licenses are currently obtainable for the following features: ■ X.25 ■ Frame Relay ■ OSPF ■ VPN (Virtual Private Network) ■ TAF (Token Authentication Firewall) You can find detailed information and configuration instructions (with examples) in the Extended Features Reference. 276 X4000 User’s Guide 9 9 Configuration of Expansion and Resource Cards with the Setup Tool This chapter tells you the configuration steps you can carry out if you have equipped your X4000 basic unit with an expansion card and possibly resource cards. Any expansion and resource cards equipped are automatically detected by X4000 on startup. To install your expansion and resource cards, please follow the installation guide supplied with the cards and chapter 3.2, page 53. Enter any necessary license(s) in the Setup Tool (see chapter 7.1.1, page 121) before you start the configuration. This chapter is broken down as follows: ■ WAN Interface Card for ISDN BRI (Basic Rate Interface) (chapter 9.1, page 278) ■ WAN Interface Card for ISDN PRI (Primary Rate Interface) (chapter 9.2, page 281) ■ LAN Interface Card for 10/100 Mbps (chapter 9.3, page 287) ■ Resource Cards with Digital Modems (chapter 9.4, page 295) ■ Resource Card for Encryption and Compression (chapter 9.5, page 306) X4000 User’s Guide 277 9 Configuration of Expansion and Resource Cards with the Setup Tool 9.1 WAN Interface Card for ISDN BRI By installing a BRI (Basic Rate Interface) expansion card, you can equip X4000 with up to three additional ISDN BRI interfaces. You can use these interfaces for both dialup and leased lines over ISDN. The ISDN BRI expansion card can be equipped with a resource card with digital modems (see chapter 9.4, page 295) and/or with a resource card for encryption and compression (see chapter 9.5, page 306). 9.1.1 Configuration with the Setup Tool The additional interfaces are shown in the Setup Tool main menu under Module: as follows: X4000 Setup Tool BinTec Communications AG MyRouter Licenses System LAN: CM-100BT,Fast Ethernet WAN: CM-1BRI,ISDN S0 Module: X4E-3BRI,ISDN S0 Serial WAN: CM-SERIAL,Serial WAN Partner IP IPX PPP MODEM ISDN CAPI Configuration Management Monitoring and Debugging Exit The interface(s) are configured in the following menus: ■ X4E-3BRI, ISDN S0 ➧ UNIT 0 for the first additional ISDN BRI port ■ X4E-3BRI, ISDN S0 ➧ UNIT 1 for the second additional ISDN BRI port ■ X4E-3BRI, ISDN S0 ➧ UNIT 2 for the third additional ISDN BRI port 278 X4000 User’s Guide 9 WAN Interface Card for ISDN BRI The number of ISDN BRI ports available with the expansion card can vary, depending on how many interfaces are activated by license. You can obtain any necessary licenses from your dealer. To do Proceed as follows to configure the ISDN BRI interface(s) of the expansion card: ➤ Go to X4E-3BRI, ISDN S0 ➧ UNIT 0 for the first interface. This menu offers the same options as CM-1BRI, ISDN S0 for the ISDN BRI interface of the basic unit. For a detailed description, see chapter 7.2.1, page 137. ➤ Select ISDN Switch Type: autodetect on bootup. This setting enables X4000 to use its automatic D-channel detection. As long as the D-channel detection is running, running appears next to Result of Autoconfiguration. Once the setting has been found, it is displayed, e.g. Euro ISDN, point-to-multipoint. ➤ Select D-Channel, if applicable. ➤ Select B-Channel 1: e.g. dialup. ➤ Select B-Channel 2: e.g. dialup. In most cases, you can accept the preset values for D-Channel, B-Channel 1 and B-Channel 2. If you use an ISDN leased line and have requested a special service from your service provider, it may be necessary to set the local side of the leased line at this point (DTE or DCE). You must then ensure that the far end has set the opposite value. You must also set D-channel, B-channel 1 and B-channel 2 to the same values, if you have selected several D-/B-channels under ISDN Switch Type and the values can be changed. Incoming Call Answering If dialup connections are to be set up over the ISDN BRI interface, first tell X4000 how it is to respond to incoming calls over this interface (these settings are not necessary for a leased line): ➤ Go to X4E-3BRI, ISDN S0 ➧ UNIT 0 ➧ INCOMING CALL ANSWERING. This menu lists the services previously assigned to numbers and offers the same options as CM-1BRI, ISDN S0 ➧ INCOMING CALL ANSWERING for the X4000 User’s Guide 279 9 Configuration of Expansion and Resource Cards with the Setup Tool distribution of incoming calls over the ISDN BRI interface of the basic unit. For a detailed description, see "Incoming call answering", page 141. ➤ Use ADD to add a new entry or select an existing entry. Confirm with Return to change the entry. ➤ Select the Item, e.g. PPP (routing). ➤ Enter the Number, e.g. 091112330. ➤ Select the Mode, e.g. right to left. ➤ Select the Bearer, e.g. data. ➤ Press SAVE. You have returned to menu X4E-3BRI, ISDN S0 ➧ UNIT 0 ➧ INCOMING CALL ANSWERING. The entries are saved and displayed in the list. You have now assigned a possible service (PPP (routing)) to one of your numbers (0911 123 30). This means that when a data call is received for the Called Party Number 0911 123 30, it is put through to the PPP (routing) service. ➤ Repeat these steps until you have assigned to all phone numbers the services to be reached under these numbers. You have now configured Incoming Call Answering for this ISDN BRI interface and X4000 distributes the incoming calls to the internal services. ➤ Leave X4E-3BRI, ISDN S0 ➧ UNIT 0 ➧ INCOMING CALL ANSWERING with EXIT. ➤ Press SAVE. ➤ If applicable, go to X4E-3BRI, ISDN S0 ➧ UNIT 1 to configure the second interface. ➤ If applicable, go to X4E-3BRI, ISDN S0 ➧ UNIT 2 to configure the third interface. WAN partner 280 To enable X4000 to make connections to networks or hosts outside your LAN, you must configure the partners you want to connect to as WAN partners on your X4000. This applies to outgoing connections, incoming connections and leased lines. Refer to chapter 7.3, page 159. X4000 User’s Guide 9 WAN Interface Card for ISDN PRI and/or G.703 9.2 WAN Interface Card for ISDN PRI and/or G.703 The PRI (Primary Rate Interface) or G.703 expansion card is equipped with two ports, each with two sockets (IN and OUT). By installing the expansion card, you can equip X4000 with ■ one ISDN PRI and/or one G.703 interface or ■ two ISDN PRI interfaces or ■ two G.703 interfaces The necessary licenses for activating the desired interfaces can be obtained from your dealer. PRI You can connect X4000’s ISDN PRI interface to a Primary Rate Interface. This is done by connecting the NT (Network Termination) adapter of your telephone provider to the IN socket of a port activated by license. In Germany, this provides you with 30 B-channels and 1 D-channel, which you can use for both dialup and leased lines over ISDN. G.703 With an X4000 G.703 interface, you can install a G.703 leased line to a connection partner. This is also done by connecting the NT (Network Termination) adapter of your telephone provider to the IN socket of a port activated by license. A G.703 leased line is an unstructured high-speed line of up to 2 Mbps for the transmission of data with HDLC framing. The connection status is not checked at layer 1; if necessary, this must be done by higher protocol layers such as the PPP. You can use a PRI interface as both a PRI and G.703 interface. You can only use a G.703 interface as a G.703 interface. The PRI or G.703 expansion card is equipped as standard with hardware support for encryption and compression (chapter 9.5, page 306) and can be optionally equipped with up to two resource cards with digital modems (chapter 9.4, page 295). X4000 User’s Guide 281 9 Configuration of Expansion and Resource Cards with the Setup Tool 9.2.1 Configuration with the Setup Tool The additional interfaces are shown in the Setup Tool main menu under Module: as follows: X4000 Setup Tool BinTec Communications AG MyRouter Licenses System LAN: CM-100BT,Fast Ethernet WAN: CM-1BRI,ISDN S0 Module: X4E-2PRI, ISDN S2M Serial WAN: CM-SERIAL,Serial WAN Partner IP IPX PPP MODEM ISDN CAPI Configuration Management Monitoring and Debugging Exit The ISDN PRI/G.703 interface(s) is/are configured in the menus ■ X4E-2PRI, ISDN S2M ➧ UNIT 0 for the first ISDN PRI/G.703 port ■ X4E-2PRI, ISDN S2M ➧ UNIT 1 for the second ISDN PRI/G.703 port The number of ISDN PRI or G.703 ports available with the expansion card can vary, depending on how many and which interfaces are activated by license. You can obtain any necessary licenses from your dealer. 282 X4000 User’s Guide 9 WAN Interface Card for ISDN PRI and/or G.703 The menus contain the following fields: Field Meaning Result of Autoconfiguration Status of ISDN autoconfiguration. Automatic ➤➤ D-channel detection runs until a setting is found or until the ISDN protocol is entered manually under ISDN Switch Type. ISDN Switch Type Defines the ISDN ➤➤ protocol supplied by your ISDN provider. Possible values: ■ autodetect on bootup: automatic D-channel detection (default setting) ■ Euro ISDN S2M user profile (TE) ■ Euro ISDN S2M network profile (NT) ■ leased line B1..B30 ■ leased line, 1 hyperchannel ■ leased line, chann. E1, 31 diff. endpoints: This type of leased line is also called an "aggregated kilostream" in the UK. ■ back to back ISDN Line Framing Possible values: ■ standard (CRC4) (default setting) ■ special (no CRC) ■ G.703: necessary if you want to configure a G.703 leased line over the interface. The default setting is used in most cases for a PRI interface. In some cases in Sweden and France, the setting special (no CRC) is necessary if X4000 is connected to a PABX. X4000 User’s Guide 283 9 Configuration of Expansion and Resource Cards with the Setup Tool Field Meaning Clock Mode Defines which connection partner sends the clock signal for synchronization between transmitter and receiver. If the clock signal is not generated by the (PABX) network itself, one of the two connection partners must generate this signal. Possible values: ■ external (default setting): X4000 receives the clock signal ■ internal: X4000 sends the clock signal Table 9-1: To do X4E-2PRI, ISDN S2M ➧ UNIT 0 and X4E-2PRI, ISDN S2M ➧ UNIT 1 Proceed as follows: ➤ Go to X4E-2PRI, ISDN S2M ➧ UNIT 0 for the first ISDN PRI interface. ➤ Select ISDN Switch Type: autodetect on bootup. This setting enables X4000 to use its automatic D-channel detection. As long as the D-channel detection is running, running appears next to Result of Autoconfiguration. The setting found is then displayed, e.g. Euro ISDN S2M user profile (TE). If the ISDN protocol is set incorrectly, an ISDN connection cannot be set up and the provider’s exchange may disconnect the line if it is not used! Make sure X4000 detects the ISDN protocol used correctly and displays it under Result of Autoconfiguration. If not, enter it manually under ISDN Switch Type. The automatic D-channel detection is then switched off. ➤ Select ISDN Line Framing, e.g. standard (CRC4). ➤ Select Clock Mode, e.g. external. 284 X4000 User’s Guide 9 WAN Interface Card for ISDN PRI and/or G.703 Incoming Call Answering If dialup connections are to be set up over the ISDN PRI/G.703 interface, first tell X4000 how it is to respond to incoming calls over this interface (these settings are not necessary for a leased line): ➤ Go to X4E-2PRI, ISDN S2M ➧ UNIT 0 ➧ INCOMING CALL ANSWERING. This menu lists the previously completed assignment of systems to numbers. The menu offers the same options as CM-1BRI, ISDN S0 ➧ INCOMING CALL ANSWERING for distribution of incoming calls over the ISDN BRI interface of the basic unit. For a detailed description, see "Incoming call answering", page 141. ➤ Use ADD to add a new entry or select an existing entry. Confirm with Return to change the entry. ➤ Select the Item, e.g. PPP (routing). ➤ Enter the Number, e.g. 091112330. ➤ Select the Mode, e.g. right to left. ➤ Select the Bearer, e.g. data. ➤ Press SAVE. You have returned to menu X4E-2PRI, ISDN S2M ➧ UNIT 0 ➧ INCOMING CALL ANSWERING. The entries are saved and displayed in the list. You have now assigned a possible service (PPP (routing)) to one of your numbers (0911 123 30). This means that when a data call is received for Called Party Number 0911 123 30, it is put through to the PPP (routing) service. ➤ Repeat these steps until you have assigned to all phone numbers the services to be reached under these numbers. You have now configured Incoming Call Answering for this ISDN PRI interface and X4000 distributes the incoming calls to the internal services. ➤ Leave X4E-2PRI, ISDN S2M ➧ UNIT 0 ➧ INCOMING CALL ANSWERING with EXIT. ➤ Press SAVE. ➤ If applicable, go to X4E-2PRI, ISDN S2M ➧ UNIT 1 to configure the second ISDN PRI/G.703 interface. X4000 User’s Guide 285 9 Configuration of Expansion and Resource Cards with the Setup Tool WAN partner 286 To enable X4000 to make connections to networks or hosts outside your LAN, you must configure the partners you want to connect to as WAN partners on your X4000. This applies to outgoing connections, incoming connections and leased lines. Refer to chapter 7.3, page 159. X4000 User’s Guide 9 LAN Interface Card for 10/100 Mbps 9.3 LAN Interface Card for 10/100 Mbps By installing a LAN expansion card, you can equip your X4000 with two additional LAN interfaces. You can equip the LAN expansion card with an optional resource card for encryption and compression (see chapter 9.5, page 306). 9.3.1 Configuration with the Setup Tool The additional interfaces are shown in the Setup Tool main menu under Module: as follows: X4000 Setup Tool BinTec Communications AG MyRouter Licenses System LAN: CM-100BT,Fast Ethernet WAN: CM-1BRI,ISDN S0 Module: X4E-100BT,FastEthernet Serial WAN: CM-SERIAL,Serial WAN Partner IP IPX PPP ISDN CAPI Configuration Management Monitoring and Debugging Exit You can configure the interfaces in the following menus: ■ X4E-100BT, FAST ETHERNET ➧ UNIT 0 for the first additional LAN interface ■ X4E-100BT, FAST ETHERNET ➧ UNIT 1 for the second additional LAN interface X4000 User’s Guide 287 9 Configuration of Expansion and Resource Cards with the Setup Tool To do Proceed as follows to configure the LAN interface(s) of the expansion card: ➤ Go to X4E-100BT, FAST ETHERNET ➧ UNIT 0 for the first interface. This menu offers the same options as CM-1OOBT, FAST ETHERNET for the LAN interface of the basic unit. For a detailed description, see chapter 7.2.1, page 137. ➤ Enter Local IP Number, e.g. 192.168.1.250. ➤ Enter Local Netmask, e.g. 255.255.255.0. ➤ If applicable, enter Second Local IP Number and Second Local Netmask. ➤ Select Encapsulation, e.g. Ethernet II. ➤ Select Mode, e.g. auto. ➤ Press SAVE. You have returned to the main menu and the entries have been saved. Advanced configuration If you wish to use the IPX ➤➤ protocol, you will find an explanation of how to configure the LAN interface for IPX in chapter 8.4, page 268. Information about bridging can be found in the Software Reference. 9.3.2 Broadband Internet Access (ADSL) with X4000 and LAN Expansion Card BinTec Communications AG’s X4000 offers the PPP-over-Ethernet protocol. This protocol is required, for example, for connecting terminals to the Internet over the T-DSL connection of Deutsche Telekom AG to achieve increased bandwidth. If you use the ADSL connection of another provider, ask the provider about any special features of your ADSL connection that need to be taken into account. chapter 7.2.3, page 155 describes how you can use the T-DSL connection with X4000’s basic unit with only one LAN interface. The limitations and security risks described there do not apply if X4000 is equipped with a LAN expansion 288 X4000 User’s Guide 9 LAN Interface Card for 10/100 Mbps card and several LAN interfaces are therefore available. In this case, for example, you can use one of X4000’s LAN interfaces for your LAN and another LAN interface for access to T-DSL. Example Scenario The following scenario provides an example configuration for the settings in the Setup Tool. The LAN connection is handled over the LAN interface of X4000’s basic unit. The ADSL modem is connected to one of the LAN interfaces of the expansion card. If you receive a special cable from Deutsche Telekom AG or another provider for connecting the ADSL modem, use only this cable! LAN interface basic unit 192.168.1.1 LAN interface expansion card 4000 Ethernet Ethernet BinTec Your X4000 192.168.1.254 192.168.1.2 ADSL ADSL modem 192.168.1.3 Your local network Figure 9-1: IP address configuration Example scenario Proceed as follows to define the IP address of X4000: ➤ Go to CM-1OOBT, FAST ETHERNET. ➤ Enter your IP address in the Local IP Number field, e.g. 192.168.1.254. X4000 User’s Guide 289 9 Configuration of Expansion and Resource Cards with the Setup Tool ➤ Enter your netmask in the Local Netmask field, e.g. 255.255.255.0. This address should be the default gateway for the hosts in your LAN. ➤ Press SAVE. General PPP settings The general PPP settings are configured in PPP: Here you must configure an interface on which PPP-over-Ethernet is to run. You can leave all the other settings at the default value. ➤ Go to PPP. The following field is relevant: Field Meaning PPPoE Ethernet Interface Defines the interface used for ADSL. Table 9-2: PPP Proceed as follows to define the necessary PPP settings: ➤ Select your PPPoE Ethernet Interface, e.g. en2. ➤ Press SAVE. WAN partner settings To configure a PPP-over-Ethernet partner, proceed exactly as for configuration of a WAN partner. When configuring the WAN partner, make sure that Van Jacobson Header Compression is not activated in the menu WAN PARTNER ➧ ADD ➧ IP ➧ ADVANCED SETTINGS. The IPX, Bridging and Bandwidth on Demand functions should not be used either. ➤ Go to WAN PARTNER ➧ ADD. 290 X4000 User’s Guide 9 LAN Interface Card for 10/100 Mbps The following fields are relevant: Field Meaning Partner Name Enter a name for uniquely identifying the PPPover-Ethernet partner. Encapsulation Encapsulation defines how the data packets are packed for transfer to the WAN partner. PPP-over-Ethernet: Only PPP should be selected here. Calling Line Identification Table 9-3: Indicates whether calls from this WAN partner should be identified by means of the calling party number (CLID). The value of this field is dependent on Direction in the submenu WAN NUMBERS and cannot be set here. WAN PARTNER ➧ ADD ➤ Enter your WAN partner’s name for PPP-over-Ethernet under Partner Name, e.g. t-online. ➤ Select Encapsulation: PPP. WAN partner PPP settings ➤ Go to WAN PARTNER ➧ ADD ➧ PPP. X4000 User’s Guide 291 9 Configuration of Expansion and Resource Cards with the Setup Tool The following fields are relevant: Field Meaning Partner PPP ID ID of WAN partner. Remains empty. Local PPP ID Your T-Online user ID. Comprises the following elements: <Kennung><T-Online-Nr.>#<MitbenutzerNr.>@t-online.de Kennung = the 12-digit user account (here: 000460004256) T-Online-Nummer = telephone number (here: 091169386) Mitbenutzer-Nr. = 4-digit co-user number (here: 0001) The T-Online-Nr. and the Mitbenutzer-Nr. must be separated by # if the T-Online-Nr. has less than 12 digits. PPP Password Your T-Online password. Keepalives Activates keepalive packets. The activated Keepalive function checks the interface status. This permits faster detection and signaling if the connection to the provider fails (for example, if the LAN cable is accidentally disconnected). Table 9-4: WAN PARTNER ➧ ADD ➧ PPP ➤ Make no entry under Partner PPP ID. ➤ Enter the Local PPP ID, e.g. 000460004256091169386#[email protected]. ➤ Enter the PPP Password. ➤ Select Keepalives: on. ➤ Confirm with OK. 292 X4000 User’s Guide 9 LAN Interface Card for 10/100 Mbps Advanced settings ➤ Go to WAN PARTNER ➧ ADD ➧ADVANCED SETTINGS. The following field is relevant: Field Meaning Layer 1 Protocol Here you can define the Layer 1 Protocol of the ISDN B-channel that X4000 is to use for connections to the WAN partner. PPP over Ethernet (PPPoE) must be selected here for access to T-DSL. Table 9-5: WAN PARTNER ➧ ADD ➧ADVANCED SETTINGS ➤ Select Layer 1 Protocol: PPP over Ethernet (PPPoE). ➤ Confirm with OK. IP settings ➤ Go to WAN ➧ ADD ➧ IP. The following field is relevant: Field Meaning IP Transit Network Defines whether X4000 uses a transit network to the WAN partner. The IP address is assigned dynamically if dynamic client is selected. Table 9-6: WAN PARTNER ➧ ADD ➧ IP ➤ Select IP Transit Network: dynamic client. ➤ Press SAVE. ➤ Press SAVE. ➤ Leave WAN PARTNER with EXIT. Creating a default route ➤ Go to IP ➧ ROUTING ➧ ADD. X4000 User’s Guide 293 9 Configuration of Expansion and Resource Cards with the Setup Tool The following field is relevant: Field Meaning Partner / Interface Your PPPoE partner. Table 9-7: IP ➧ ROUTING ➧ ADD ➤ Select Route Type: Default route. ➤ Select Partner / Interface, e.g. t-online. ➤ Press SAVE. Activating Network Address Translation (NAT) You can use NAT to ensure that ■ no more accesses can be made to your network from the Internet, ■ and that connections to the Internet appear only under a single dynamically assigned IP address. ➤ Go to IP ➧ NETWORK ADDRESS TRANSLATION. ➤ Select the WAN interface on which you want to activate NAT, e.g. t-online, and confirm with Return. Another menu window opens: The following field is relevant: Field Meaning Network Address Translation Here you can activate Network Address Translation (NAT) for your WAN partner. This conceals your whole network to the outside world with just one IP address. Table 9-8: IP ➧ NAT ➤ Select Network Address Translation: on. ➤ Press SAVE. 294 X4000 User’s Guide 9 Resource Card with Digital Modems 9.4 Resource Card with Digital Modems ISDN BRI and ISDN PRI/G.703 expansion cards (see chapter 9.1, page 278 and chapter 9.2, page 281) can also be equipped with resource cards with digital modems. Resource cards with digital modems are available in various versions: ■ XTR-S: resource card with 8 digital modems ■ XTR-M: resource card with 12 digital modems ■ XTR-L: resource card with 30 digital modems If your X4000 is equipped with resource card(s) with digital modems for analog data and fax connections, it can be used as ■ Remote Access Server for ISDN and GSM connections and for analog connections (dial-in) ■ fax gateway (please observe future software releases and release notes). If you are using an expansion card with resource card(s) in the X4000 built-in unit, BinTec Communications AG recommends that you use the fan unit obtainable as optional equipment. 9.4.1 X4000 with Digital Modems as Remote Access Server X4000 equipped with digital modems can be used for dial-in connections, e.g. by home office staff with analog modems or by field service staff with laptop, mobile phone and modem. X4000 uses the digital modems of the resource card(s) as a modem pool and always dynamically takes the next available modem for an incoming dial-in connection. X4000 User’s Guide 295 9 Configuration of Expansion and Resource Cards with the Setup Tool WAN incoming analog call allocate a free modem select modem profile Profile 1: Default Profile Profile 2: V.90 Modem Caller Profile 3: V.34 Modem Caller .... preset receiving modem using selected profile negotiate connection with dial-in partner Figure 9-2: Dial-in to X4000 with digital modems The modems (e.g. 30 modems with an XTR-L resource card) need not be individually configured, as X4000 uses a flexible concept of modem profiles. Up to eight modem profiles can be configured for X4000 in the menu MODEM ➧ PROFILE CONFIGURATION; the modem actually used then dynamically assumes the settings of the appropriate modem profile on connection setup. A modem profile defines the modem settings that are required for a connection to the opposite terminal, e.g. automatic baud rate negotiation, compression and maximum or minimum baud rate. Creating several modem profiles gives you a tuning facility if you do not want to use just the default settings. 296 X4000 User’s Guide 9 Resource Card with Digital Modems When defining the settings for Incoming Call Answering, e.g. in menu CM-3BRI, ISDN S0, UNIT 0 ➧ INCOMING CALL ANSWERING for the first ISDN BRI interface of a BRI expansion card (see "Incoming Call Answering", page 285), you can explicitly define which modem profile is to be used for an incoming call. If the party dialing in has not been assigned a modem profile or the calling party cannot be authenticated, the modem automatically uses modem profile 1. Modem profile 1 is therefore used as default setting and should allow maximum selection of the settings. As all dial-in users that cannot be authenticated by CLID etc. are assigned modem profile 1 for the connection, modem profile 1 should be able to operate all modems. You can use the remaining seven modem profiles to define user groups, so that the dial-in connection partners find optimum modem settings in X4000. X4000 User’s Guide 297 9 Configuration of Expansion and Resource Cards with the Setup Tool Example scenario A typical scenario, e.g. for an Internet Service Provider, could look like this: GSM connection analog connection digital connection GSM WAN Incoming Call Answering: 4000 BinTec X4000 Figure 9-3: Number Item 99 50 30 41 42 ... ISDN Login PPP V.110 PPP (routing) PPP Modem Profile 1 PPP Modem Profile 2 ... Scenario for dial-in ■ Dial-in users who dial in over an analog connection use the numbers 0911 123 41 to 0911 123 48 for dialing in (according to which analog modem type they use). ■ Dial-in users who use an ISDN connection use 0911 123 30. ■ Dial-in users who dial in with a mobile phone over a GSM connection use 0911 123 50. ■ Incoming calls to the number 0911 123 99 are connected through to the ISDN Login service. 298 X4000 User’s Guide 9 Resource Card with Digital Modems Configuration with the Setup Tool If X4000 is equipped with a resource card with digital modems, the menu MODEM appears in the Setup Tool main menu: X4000 Setup Tool BinTec Communications AG MyRouter Licenses System LAN: CM-100BT,Fast Ethernet WAN: CM-1BRI,ISDN S0 Module: X4E-3BRI,ISDN S0 Serial WAN: CM-SERIAL,Serial WAN Partner IP IPX PPP MODEM ISDN CAPI Configuration Management Monitoring and Debugging Exit The modem profiles whose settings are used by the digital modems in X4000 are defined in menu MODEM. General procedure for the configuration of dial-in connections: 1. First define the settings for modem profile 1 in MODEM ➧ PROFILE CONFIGURATION. 2. Define other modem profiles 2 ... 8 as necessary in MODEM ➧ PROFILE CONFIGURATION. 3. Use the settings for Incoming Call Answering to control the use of the modem profiles according to the dial-in connection partner, e.g. in X4E3BRI, ISDN S0 ➧ UNIT 0 ➧ INCOMING CALL ANSWERING. 4. Configure a WAN partner entry for each dial-in user in WAN P ARTNER. X4000 User’s Guide 299 9 Configuration of Expansion and Resource Cards with the Setup Tool The menus MODEM ➧ PROFILE CONFIGURATION ➧ PROFILE 1 ... 8 contain the following fields: Field Meaning Name Profile 1 ... 8 is displayed. Description Freely selectable description of the modem profile. Modulation Defines the modem standard to be used. The selected modem standard must be supported by the analog modem of the opposite terminal. V.90 and lower are supported by 56000modems, V.34 and lower by 33600-modems, V.32bis and lower by 14400-modems. Possible values: ■ V.90 ■ V.34bis ■ V.34 ■ V.32bis ■ V.32 ■ V.23 ■ V.22bis ■ V.22 ■ V.21 Error Correction Defines the error correction to be used. For possible values, see Table 9-10, page 303. 300 X4000 User’s Guide 9 Resource Card with Digital Modems Field Meaning Automode Defines whether dynamic negotiation of parameters for baud rates and modem standards is allowed with the dial-in user. Possible values: ■ on (default value): Negotiation is allowed. ■ off: The set values are always used. Min Bps Defines the minimum baud rate that can be used with the modem profile. Any speed supported by the modem standard set under Modulation can be set here. The connection is cleared if the only baud rates that can be negotiated with the opposite terminal are smaller than the value set here. Scalable from 300 (default value) to 56000. Max Receive Bps Defines the maximum baud rate of incoming data ("upstream") that can be used with the modem profile. Any speed supported by the modem standard set under Modulation can be set here. The value set under Max Transmit Bps is used here if this value is less than the value set here. Scalable from 300 to 56000, default value: 33600. Max Transmit Bps Is only used if Modulation = V.90. Defines the maximum baud rate of outgoing data ("downstream") that can be used with the modem profile. Scalable from 300 to 56000, default value: 33600. X4000 User’s Guide 301 9 Configuration of Expansion and Resource Cards with the Setup Tool Field Meaning V.42bis Compression Defines whether V.42bis compression can be negotiated for a connection. Possible values: ■ auto: Negotiation is allowed. ■ off: V.42bis compression is not used. MNP5 Compression Defines whether MNP5 compression can be negotiated for a connection. Possible values: ■ auto: Negotiation is allowed. ■ off: MNP5 compression is not used. Table 9-9: 302 X4000 User’s Guide Menu MODEM ➧ P ROFILE C ONFIGURATION ➧ PROFILE 1 ... 8 9 Resource Card with Digital Modems The Error Correction field contains the following selection options: Possible values Meaning none Error correction is not used. required First LAPM and then MNP4 is tried for error correction. If both fail, the modem clears the connection. auto (default value) First LAPM and then MNP5 is tried for error correction. If both fail, error correction is not used. This setting should generally be selected, except for dial-in users with modems that only support obsolescent standards such as V.23, V.22bis or V.21. LAPM LAPM (Link Access Protocol for Modems) is used. If this fails, the modem clears the connection. MNP MNP4 (Microcom Networking Protocol) is used. If this fails, the modem clears the connection. Table 9-10: To do Error Correction Proceed as follows: ➤ Go to MODEM ➧ PROFILE CONFIGURATION. ➤ Select PROFILE 1 and confirm with Return. Modem profile 1 configuration ➤ Enter Description, e.g. Default Modem Profile. ➤ Select Modulation, e.g. V.34. ➤ Select Error Correction, e.g. auto. ➤ Select Automode, e.g. on. ➤ Select Min Bps, e.g. 2400. ➤ Select Max Receive Bps, e.g. 33600. ➤ If applicable, select Max Transmit Bps, e.g. 33600. X4000 User’s Guide 303 9 Configuration of Expansion and Resource Cards with the Setup Tool ➤ Select V.42bis Compression, e.g. auto. ➤ Select MNP5 Compression, e.g. auto. ➤ Press SAVE. Modem profile 2 ... 8 configuration Incoming Call Answering ➤ Configure other modem profiles as necessary, see Table 9-11, page 305. Proceed as follows to assign the defined modem profiles to the dial-in users (the example values are taken from the scenario in Figure 9-3, page 298): ➤ Go to X4E-3BRI, ISDN S0 ➧ UNIT 0 ➧ INCOMING CALL ANSWERING if you wish to assign an incoming dial-in connection over the first interface of an ISDN BRI expansion card. ➤ Add a new entry with ADD. ➤ Select Item, e.g. PPP Modem Profile 2. ➤ Enter Number, e.g. 091112342. ➤ Select Mode, e.g. right to left. ➤ Select the Bearer, e.g. any. ➤ Press SAVE. ➤ Add other entries as necessary. WAN partner Proceed as follows to create WAN partner entries for the dial-in users: ➤ Go to WAN PARTNER, add a new entry with ADD. You will find detailed information about configuring a WAN partner in chapter 7.3, page 159; the following settings are essential here: ➤ Enter Partner Name, e.g. homeoffice_2. ➤ Select Encapsulation, e.g. PPP. ➤ Select authentication information in WAN PARTNER ➧ ADD ➧ PPP. ➤ Go to WAN PARTNER ➧ ADD ➧ ADVANCED SETTINGS. ➤ Select Layer 1 Protocol, e.g. Modem Profile 2. ➤ Confirm with OK. ➤ Go to WAN PARTNER ➧ ADD ➧ WAN NUMBERS ➧ ADD. 304 X4000 User’s Guide 9 Resource Card with Digital Modems ➤ Enter the number to be used by X4000 under Number, e.g. 09117890. ➤ Select Direction, e.g. outgoing. ➤ Press SAVE. ➤ Leave WAN PARTNER ➧ ADD ➧ WAN NUMBERS with EXIT. ➤ Select the necessary settings in WAN PARTNER ➧ ADD ➧ IP (see "Carrying out IP configuration", page 173). ➤ Press SAVE. The WAN partner entry is displayed. ➤ Proceed in a similar way to configure other WAN partners. Table 9-11, page 305 uses a general example to show how you could meaningfully use the modem profiles in X4000: Profile Modulation Error Correction Automode Min Bps Max Receive Bps Max Transmit Bps V.42bi s MNP5 Profile 1 V.34 auto on 2400 33600 33600 auto auto Profile 2 V.90 auto on 28800 31200 50000 auto auto Profile 3 V.90 auto on 28800 31200 44000 auto auto Profile 4 V.90 auto on 14400 31200 40000 auto auto Profile 5 V.32bis auto on 4800 14400 14400 auto auto Profile 6 V.32 auto on 4800 9600 9600 auto auto Profile 7 V.23 auto on 300 1200 1200 auto auto Profile 8 V.22bis auto on 300 2400 2400 auto auto Table 9-11: Standard set of modem profiles X4000 User’s Guide 305 9 Configuration of Expansion and Resource Cards with the Setup Tool 9.5 Resource Card for Encryption and Compression The ISDN PRI or G.703 expansion card is equipped as standard with hardware support for encryption and compression. The ISDN BRI expansion card and the LAN expansion card can be optionally equipped with an appropriate resource card. A resource card for encryption and compression provides hardware support for STAC compression and symmetrical encryption processes (DES, 3DES, CAST, Twofish, Blowfish). This enables the available bandwidth to be fully utilized and costs cut, without affecting the performance of X4000. If you are using an expansion card with resource card(s) in the X4000 built-in unit, BinTec Communications AG recommends that you use the fan unit obtainable as optional equipment. 9.5.1 Configuration with the Setup Tool STAC compression and encryption are configured in the usual way in the Setup Tool menu WAN PARTNER ➧ EDIT (see chapter 8.2.9, page 232 and chapter 10.3.1, page 354). 306 X4000 User’s Guide 10 10 SAFERNET Configuration of Security Functions and Firewall The X4000 from BinTec Communications AG gives you a high degree of security for your network and connections. The security functions available (SAFERNET) offer monitoring of activities via the router and effective access and line tapping security. The necessary configuration steps are described in this chapter. Some of the features can only be configured by making entries directly in the ➤➤ MIB tables and not by using the Setup Tool. The relevant tables and variables are given in the respective section. You can make MIB entries either by commands in the ➤➤ SNMP shell or via external SNMP managers, e.g. the Configuration Manager. A description of the SNMP commands is given in the Software Reference. This chapter is broken down as follows: ■ Activity Monitoring (chapter 10.1, page 308) ■ Access Security (chapter 10.2, page 325) ■ Line Tapping Security (chapter 10.3, page 354) ■ Special Features (chapter 10.4, page 358) ■ Checklist (chapter 10.5, page 360) X4000 User’s Guide 307 10 Configuration of Security Functions and Firewall 10.1 Activity Monitoring A major requirement for a high degree of security is the possibility of accurately monitoring all activities on and over the router. BinTec Communications AG provides a variety of facilities for this purpose: ■ Syslog Messages (chapter 10.1.1, page 308) ■ Monitoring Functions in the Setup Tool (chapter 10.1.2, page 313) ■ Credits Based Accounting System (chapter 10.1.3, page 316) ■ HTTP Status Page (chapter 10.1.4, page 320) ■ Java Status Monitor (chapter 10.1.5, page 321) ■ Activity Monitor (chapter 10.1.6, page 322) 10.1.1 Syslog Messages All major events on X4000’s various subsystems (➤➤ ISDN, ➤➤ PPP, ➤➤ CAPI, etc.) are logged in the form of syslog messages (system logging messages). The number of details visible depends on the level set (eight steps from critical and information to debug). The logged data are saved by X4000 in a list of adjustable length. All information can be and should be passed to one or more external computers for saving and further processing, e.g. to the system administrator’s computer. The syslog messages are lost when you restart X4000. Avoid forwarding syslog messages to log hosts reached over a dialup connection. This raises your telephone bill unnecessarily. 308 X4000 User’s Guide 10 Activity Monitoring Make sure you only pass syslog messages to a safe computer. Check the data regularly and ensure that there is always enough spare capacity available on the hard disk of your PC. Syslog Demon All Unix operating systems support the recording of syslog messages (for setting up a Syslog Demon in Unix, see the Software Reference). For Windows PCs, the Syslog Demon included in DIME Tools can record the data and distribute to various files depending on the contents (see BRICKware for Windows). Settings for syslog messages are made in: ■ SYSTEM ■ SYSTEM ➧ EXTERNAL SYSTEM LOGGING ■ CM-100BT, FAST ETHERNET ➧ ADVANCED SETTINGS ■ WAN PARTNER ➧ EDIT ➧ IP ➧ ADVANCED SETTINGS X4000 User’s Guide 309 10 Configuration of Security Functions and Firewall Field Meaning Syslog Output on Serial Console Enables the display of syslog messages on the PC connected to the serial interface of X4000. Use this setting only if you make a fault analysis, as a very large output over the serial console adversely affects the throughput of the other interfaces. Possible values: ■ yes ■ no Message Level for Syslog Table Specifies the priority of the syslog messages to be recorded internally. Possible values: ■ emerg: emergency messages (highest priority) ■ alert: alert messages ■ crit: critical messages ■ err: error messages ■ warning: warning messages ■ notice: notice messages ■ info: info messages ■ debug: debug messages (lowest priority) Syslog messages are only recorded internally if they have a higher or identical priority to that indicated. Maximum Number of Syslog Entries Table 10-1: 310 X4000 User’s Guide SYSTEM Maximum number of syslog messages saved internally in X4000 (possible values: 0 ... 100). 10 Activity Monitoring Field Meaning Log Host ➤➤ IP address of the host to which syslog messages are passed. Level Priority of the syslog messages to be sent to Log Host. Corresponds to Message Level for Syslog Table in SYSTEM. Facility Syslog facility at Log Host. Only required if the Log Host is a Unix computer. Type Message type. Possible values: ■ all: all messages. ■ system: syslog messages ➤➤ accounting messages. except ■ accounting: accounting messages. Table 10-2: SYSTEM ➧ EXTERNAL SYSTEM LOGGING Field Meaning IP Accounting For saving accounting messages for ➤➤ TCP, ➤➤ UDP and ICMP sessions. Possible values: on, off. Table 10-3: CM-100BT, FAST ETHERNET ➧ ADVANCED SETTINGS Field Meaning IP Accounting For saving accounting messages for ➤➤ TCP, ➤➤ UDP and ICMP sessions. Possible values: on, off. Table 10-4: To do WAN PARTNER ➧ EDIT ➧ IP ➧ ADVANCED SETTINGS Make the desired settings for syslog messages as follows: X4000 User’s Guide 311 10 Configuration of Security Functions and Firewall ➤ Go to SYSTEM. ➤ Select Syslog Output on Serial Console. ➤ Select Message Level for Syslog Table. ➤ Enter Maximum Number of Syslog Entries. ➤ Go to SYSTEM ➧ EXTERNAL SYSTEM LOGGING to pass syslog messages to external hosts. ➤ Select an existing entry and confirm it with Return or add a new entry with ADD. ➤ Enter Log Host. ➤ Select Level. ➤ Select Facility. ➤ Select Type. IP accounting LAN side Proceed as follows to activate IP accounting for a LAN partner. X4000 then generates and records accounting messages for the selected LAN partner from TCP, UDP and ICMP sessions: ➤ Go to CM-100BT, FAST ETHERNET ➧ ADVANCED SETTINGS. ➤ Activate IP Accounting with on. IP accounting WAN side Proceed as follows to activate extended IP accounting. X4000 then generates and records accounting messages for the selected WAN partner from TCP, UDP and ICMP sessions: ➤ Go to WAN PARTNER ➧ EDIT ➧ IP ➧ ADVANCED SETTINGS. ➤ Activate IP Accounting with on. Displaying syslog messages Proceed as follows to display syslog messages: ➤ Go to MONITORING AND DEBUGGING ➧ MESSAGES. This displays the syslog messages saved internally in X4000: 312 X4000 User’s Guide 10 Activity Monitoring X4000 Setup Tool [MONITOR][MESSAGE]: Syslog Messages BinTec Communications AG MyRouter Subj Lev Message SNMP SNMP DEB sent TRAP (linkUp,0) 115 bytes to circindex 1001 Port 36880 DEB sent TRAP (linkUp,0) 115 bytes to 199.1.1.13 Port 162 EXIT RESET Press <Ctrl-n>, <Ctrl-p> to scroll Deleting syslog messages ➤ Select RESET to delete the syslog messages in X4000. For interpretation of syslog messages, see the Software Reference. 10.1.2 Monitoring Functions in the Setup Tool You can also use the Setup Tool to display other data in addition to syslog messages. The current status of certain subsystems is updated periodically and displayed. Display modules are available for the following functional areas: ■ ISDN connections ■ Credits Based Accounting System ■ Interface statistics (comparative display of several interfaces) ■ ➤➤ TCP/IP statistics ■ Syslog messages (see chapter 10.1.1, page 308) ISDN connections Proceed as follows to display ISDN connections: ➤ Go to MONITORING AND DEBUGGING ➧ ISDN MONITOR. A list of the existing ISDN connections (incoming and outgoing calls) is displayed. X4000 User’s Guide 313 10 Configuration of Security Functions and Firewall X4000 Setup Tool [MONITOR][ISDN CALLS]: ISDN Monitor - Calls Dir Remote Name/Number Charge in 2 out 3 (c)alls Duration Stack 2910 106 (h)istory (d)etails BinTec Communications AG MyRouter Channel State 0 0 (s)tatistics B1 B2 active active (r)elease This menu also offers you other options: ➤ Select h to display a list of the last 20 ISDN calls (incoming and outgoing) completed since the last system start. ➤ Place the cursor on an existing or completed ISDN connection and select d to display detailed information about this connection. ➤ Select s to display statistics on the activity of the existing ISDN connections. ➤ Select r to release the tagged ISDN connection. ➤ Select c to display the list of existing ISDN connections again. Credits Based Accounting System Proceed as follows to display the state of the Credits Based Accounting System (chapter 10.1.3, page 316): ➤ Go to MONITORING AND DEBUGGING ➧ ISDN CREDITS. ➤ Select a subsystem and confirm with Return. The current status of the Credits Based Accounting System for the selected subsystem is displayed. 314 X4000 User’s Guide 10 Activity Monitoring X4000 Setup Tool BinTec Communications AG [MONITOR][CREDITS][STAT]: Monitor isdnlogin Credits MyRouter Time till end of measure interval(sec) Total 7794 Maximum % reached 86400 91 Number of Incoming Connections Number of Outgoing Connections 0 0 2 20 0 0 Time of Incoming Connections Time of Outgoing Connections 4 13 28800 28800 0 0 Charge 0 EXIT Information about configuring the Credits Based Accounting System can be found in chapter 10.1.3, page 316. Interface statistics Proceed as follows to display the current values and activities of X4000’s interfaces: ➤ Go to MONITORING AND DEBUGGING ➧ INTERFACES. The values for two interfaces are displayed side by side. X4000 Setup Tool [MONITOR][INTERFACE]: Interface Monitoring BinTec Communications AG MyRouter Interface Name Operational Status PROVIDER dormant en1 up total per second total per second Received Packets Received Octets Received Errors 5512 920664 0 0 0 0 0 0 0 0 Transmit Packets Transmit Octets Transmit Errors 9 1193 0 0 0 0 0 0 0 0 Active Connections Duration N/A N/A 0 0 EXIT EXTENDED EXTENDED Use <Space> to select ➤ Select the interface to be displayed under Interface Name. X4000 User’s Guide 315 10 Configuration of Security Functions and Firewall ➤ Select EXTENDED to display additional information. You can then change the status of the interface under Operation and confirm the entry with START OPERATION. TCP/IP statistics Proceed as follows to display the statistics for connections to ICMP, ➤➤ IP, UDP and TCP: ➤➤ protocols ➤ Go to MONITORING AND DEBUGGING ➧ TCP/IP. The statistics for IP connections are displayed. You can find the meaning of the MIB variables in the MIB Reference. X4000 Setup Tool [MONITOR][IP]: IP Statistics InReceives InHdrErrors InAddrErrors ForwDatagrams InUnknownProtos InDiscards InDelivers OutRequests OutDiscards BinTec Communications AG MyRouter 3912 0 0 0 0 0 3321 9 0 OutNoRoutes ReasmTimeout ReasmReqds ReasmOKs ReasmFails FragOKs FragFails FragCreates RoutingDiscards 0 500 0 0 0 0 0 0 0 EXIT I(C)MP (I)P (U)DP (T)CP ➤ Select c to display statistical data for ICMP. ➤ Select i to display statistical data for IP. ➤ Select u to display statistical data for UDP. ➤ Select t to display statistical data for TCP. 10.1.3 ISDN charges 316 Credits Based Accounting System X4000’s Credits Based Accounting System enables you to control the costs billed for ISDN charges for data connections. This means you can keep the effects of possible configuration errors within limits. For example, the system enables you to define the maximum number of connections allowed in a certain period of time. You can make settings for each subsystem (➤➤ PPP, ➤➤ CAPI, ➤➤ ISDN Login) to define the number of connections, the connection time and the charges billed. If the defined limit is exceeded, X4000 X4000 User’s Guide 10 Activity Monitoring cannot set up any more connections within the defined period of time. This means you can detect configuration errors in good time, before your telephone bill gets too big! Syslog messages Syslog messages are generated if the number of connections reaches 90 % or 100 % of the limit and if a connection is prevented by the Credits Based Accounting System because the limit is exceeded. The whole account is available again if you switch X4000 off and then switch it on again (i.e. reboot). X4000 User’s Guide 317 10 Configuration of Security Functions and Firewall The configuration is made in ISDN ➧ CREDITS: 318 Field Meaning Surveillance Defines whether the Credits Based Accounting System is to be activated for the respective subsystem. Possible values: off, on. With on, you can define the parameters listed below. Measure Time (sec) Time in seconds for which the limit applies. Maximum Number of Incoming Connections Number of incoming connections allowed during the Measure Time (sec). If you activate this setting with on, you can enter the desired value in the line below. Maximum Number of Outgoing Connections Number of outgoing connections allowed during the Measure Time (sec). If you activate this setting with on, you can enter the desired value in the line below. Maximum Charge Maximum charges allowed (amount, units) during the Measure Time (sec). If you activate this setting with on, you can enter the desired value in the line below. Maximum Time for Incoming Connections (sec) Maximum time in seconds allowed for incoming connections during the Measure Time (sec). If you activate this setting with on, you can enter the desired value in the line below. X4000 User’s Guide 10 Activity Monitoring Field Meaning Maximum Time for Outgoing Connections (sec) Maximum time in seconds allowed for outgoing connections during the Measure Time (sec). If you activate this setting with on, you can enter the desired value in the line below. Maximum Number of Current Incoming Connections Maximum number of incoming connections allowed at any one time. If you activate this setting with on, you can enter the desired value in the line below. Maximum Number of Current Outgoing Connections Maximum number of outgoing connections allowed at any one time. If you activate this setting with on, you can enter the desired value in the line below. Table 10-5: To do ISDN ➧ CREDITS Proceed as follows: ➤ Go to ISDN ➧ CREDITS. ➤ Select Subsystem and confirm with Return. ➤ Select Surveillance: on, if you want to use the Credits Based Accounting System for the selected Subsystem. ➤ Enter Measure Time (sec), e.g. 86400 (= 24 hours). ➤ Activate Maximum Number of Incoming Connections, if applicable, and enter the desired value. ➤ Activate Maximum Number of Outgoing Connections, if applicable, and enter the desired value. ➤ Activate Maximum Charge, if applicable, and enter the desired value. ➤ Activate Maximum Time for Incoming Connections (sec), if applicable, and enter the desired value. ➤ Activate Maximum Time for Outgoing Connections (sec), if applicable, and enter the desired value. ➤ Activate Maximum Number of Current Incoming Connections, if applicable, and enter the desired value. X4000 User’s Guide 319 10 Configuration of Security Functions and Firewall ➤ Activate Maximum Number of Current Outgoing Connections, if applicable, and enter the desired value. ➤ Press SAVE. 10.1.4 HTTP Status Page Every BinTec router is equipped with an internal home page, the so-called HTTP status page. You can use this together with an Internet browser (e.g. Netscape Navigator, Internet Explorer) to display the status of X4000. This enables all users of the X4000 LAN to take a look at the status of the router, provided they know the password for the user name http. Please note: HTTP pages are usually stored in the cache memory of the browser. This means they can possibly be read by other users at the same workspace and may also be visible at proxy ➤➤ servers involved. ➤ Enter the URL http://<system name> in your browser. (You can also enter X4000’s IP address instead of the name.) The HTTP status page of the BinTec router with the system name <System Name> is displayed with the IP address entered. The HTTP status page contains three tables: ■ System description: In addition to the version of the system software, this also lists information from the MIB table system, such as System name and Contact. If a valid e-mail address is given under Contact, this is shown underlined. ■ Software options: This table lists information from the MIB table biboAdmLicInfoTable and displays the status of X4000’s subsystems. ■ Hardware interfaces: This table displays the LAN and WAN interfaces of X4000. The third column of the table provides information about the current status of the physical interfaces. 320 X4000 User’s Guide 10 Activity Monitoring The HTTP status page contains a number of links: ■ update Click update to update the status page. ■ login Click login to log in to the associated BinTec router via ➤➤ telnet. ■ http://www.bintec.de Use this link to access BinTec’s WWW server with the latest information on products and the current system software and documentation for X4000. ■ system tables Click system tables to display a list with all the X4000 MIB tables. Clicking a table name lists the variables contained in the table. If you don’t want to display X4000’s HTTP status page, enter 0 as the port number of the http port: ➤ Go to IP ➧ STATIC SETTINGS. ➤ Enter HTTP TCP port: 0. ➤ Press SAVE. 10.1.5 Java Status Monitor The Java status monitor offers you another facility for displaying information about X4000 using an Internet browser. You can call up the following information with the JAVA status monitor: ■ Static information such as the system name of the BinTec router and the software version. ■ Data flow over the individual interfaces. ■ Connections to WAN partners. X4000 User’s Guide 321 10 Configuration of Security Functions and Firewall If you have installed the JAVA status monitor together with BRICKware (see chapter 6.2, page 112), you can start it as follows: ➤ Select Program ➧ BRICKware ➧ Java Status Monitor in the Windows Start menu. The JAVA status monitor opens with your standard browser. Further information about the JAVA status monitor can be found in BRICKware for Windows. 10.1.6 Activity Monitor What do you need it for? The Activity Monitor enables Windows users to monitor the activities of X4000. Important information about the status of physical interfaces (e.g. ISDN line) and virtual interfaces (e.g. WAN partner) is easily obtained with ONE tool. A permanent overview of the utilization of X4000’s interfaces is possible. How does it work? A Status Demon collects information on X4000 and transfers it in the form of UDP packets to the broadcast address of the LAN (default setting) or to an explicitly entered IP address. One packet is sent per X4000 interface and time interval, which can be adjusted individually to values from 1 - 60 seconds. All physical interfaces and up to 100 virtual interfaces can be monitored, provided the packet size of approx. 4000 bytes is not exceeded. A Windows application on your PC receives the packets and displays the information received in various forms. This application is obtainable with BRICKware Release 5.1.1 and higher. Activate the Activity Monitor as follows: ■ Appropriately configure the X4000(s) to be monitored. ■ Start and use the Windows application on your PC (see BRICKware for Windows). 322 X4000 User’s Guide 10 Activity Monitoring The configuration is made in SYSTEM ➧ EXTERNAL ACTIVITY M ONITOR: Field Meaning Client IP Address IP address to which X4000 sends the UDP packets. The default value 255.255.255.255 means that the broadcast address of the first LAN interface is used. Note: If you enter the IP address of a WAN partner that can be reached over an ISDN dialup connection, you will get a large telephone bill due to frequent setting up of ISDN connections (a packet is usually sent every 5 seconds). Client UDP Port Port number for Activity Monitor (default value: 2107, registered by IANA - Internet Assigned Numbers Authority). Type Type of information sent in the UDP packets to the Windows application. Possible values: ■ off: deactivates Activity Monitor (default value) ■ physical: only information about physical interfaces ■ physical_virt: information about physical and virtual interfaces Update Interval (sec) Table 10-6: Update interval in seconds. Possible values: 0 to 60 (default value: 5). SYSTEM ➧ EXTERNAL ACTIVITY MONITOR The breakdown of X4000’s interfaces into physical and virtual interfaces is described in detail in the Software Reference. Note: A leased line always represents a physical interface, but a group of leased lines is displayed as both a physical and virtual interface! X4000 User’s Guide 323 10 Configuration of Security Functions and Firewall To do Proceed as follows: ➤ Go to SYSTEM ➧ EXTERNAL ACTIVITY MONITOR. ➤ Enter Client IP Address, Client UDP Port, Type and Update Interval (sec). ➤ Press SAVE. 324 X4000 User’s Guide 10 Access Security 10.2 Access Security There are several ways of restricting logging in and access to X4000 to authorized users only: ■ Logging In (chapter 10.2.1, page 325) ■ Checking the Calling Party Number (CLID) (chapter 10.2.2, page 326) ■ Authentication of PPP Connections (chapter 10.2.3, page 327) ■ Callback (chapter 10.2.4, page 327) ■ Closed User Group (chapter 10.2.5, page 330) ■ Access to Remote CAPI (chapter 10.2.6, page 330) ■ Network Address Translation (NAT) (chapter 10.2.7, page 331) ■ Filters (chapter 10.2.8, page 335) ■ Local Filters (chapter 10.2.9, page 348) ■ Back Route Verification (chapter 10.2.10, page 352) ■ TAF (chapter 10.2.11, page 353) ■ Extended IP Routing (XIPR) (chapter 10.2.12, page 353) 10.2.1 Password Logging In Logging in to X4000 can be done in several ways as described in chapter 4.2, page 76, but is always protected by a password. Every unsuccessful attempt to log in is logged with the source of the attempt by a syslog message and creates a corresponding SNMP trap. Pauses are inserted after several unsuccessful attempts to make it difficult for automatic attempts to find the password. X4000 User’s Guide 325 10 Configuration of Security Functions and Firewall Caution! All BinTec routers are shipped with the same user names and passwords. As long as the password remains unchanged, they are not protected against unauthorized use. How to change the passwords is described in "Changing the password", page 85. ➤ You must change the passwords as described in chapter 4.2, page 76. ➤ Also make sure that unauthorized persons do not have access to the X4000 power supply, serial console and ➤➤ Ethernet connection. Until you have changed the default password for the user name admin, a warning is always given after logging in. Auto logout To make unauthorized access difficult, the connection to X4000 is disconnected if no keyboard entry is made for a period of 15 minutes. You can change the time with the command t <time in seconds> (see chapter 14.1, page 412). If you carry out a software update (see chapter 11.2, page 371), you should deactivate auto logout as follows: Enter t 0 in the SNMP shell. You can create additional user accounts with the aid of SNMP commands (see the Software Reference). A certain password and a certain action can be assigned to a user. 10.2.2 326 Checking the Calling Party Number CLID X4000 uses Calling Line Identification (➤➤ CLID) to check the calling party number of an incoming call. Screening indicator You can also determine whether calling party numbers have been modified by the calling parties. With some connections, it is possible that another number (e.g. 5678) is displayed at the called party’s terminal, instead of the calling party’s own extension number (e.g. 1234). X4000 can detect this from the X4000 User’s Guide 10 Access Security screening indicator in the setup message of the ISDN screening indicator has four possible values: ➤➤ D-channel. The ■ user: The calling party number indicated originates from the far end and has not been checked by the network. ■ user_verified: The calling party number has been checked by the exchange and is correct. ■ user_failed: The calling party number has been checked by the exchange and is incorrect. ■ network: The calling party number indicated originates directly from the exchange (normal case). If you want X4000 to check the screen indicator for incoming calls, you must enter one of the values stated in the following MIB tables or variables (only incoming calls with the corresponding screening indicator are accepted): ➤ For incoming PPP connections: Screening variable in biboDialTable. ➤ For incoming ISDN Login connections: Screening variable in isdnloginAllowTable. 10.2.3 Authentication of PPP Connections with PAP, CHAP or MS-CHAP ➤➤ PAP, ➤➤ CHAP and MS-CHAP are the common procedures used for authentication of ➤➤ PPP connections. These use a standard procedure to exchange a user ID and a password for checking the identity of the far end. You can find further information in chapter 7.3, page 159 and chapter 8.1.3, page 194. 10.2.4 Callback Callback The callback mechanism can be used for each WAN partner to obtain additional security regarding the connection partner or to clearly allocate the costs of connections. A connection is then not set up until the calling party has been X4000 User’s Guide 327 10 Configuration of Security Functions and Firewall clearly identified by calling back. X4000 can answer an incoming call with a callback or dial into a WAN partner and then wait for a callback. Identification can be based on the calling party number or PAP/CHAP/MSCHAP authentication. Identification is made in the first case without call acceptance, as the calling party number is transferred over the ISDN Dchannel, and in the second case with call acceptance. You can find a detailed description of the callback mechanism in the Software Reference. This is configured in WAN PARTNER ➧ EDIT ➧ ADVANCED SETTINGS: Field Meaning Callback Activates the callback function. Table 10-7: 328 X4000 User’s Guide WAN PARTNER ➧ EDIT ➧ ADVANCED SETTINGS 10 Access Security Callback offers the following selection options: Possible values Meaning no X4000 does not call back. expected (awaiting callback) X4000 calls the WAN partner to initiate callback. yes (PPP negotiation) X4000 calls back with the extension entered for the WAN partner. If no number is entered, the required number can be reported by the caller in a PPP negotiation. This setting should be avoided if possible for security reasons. However, no alternative is currently available for connecting Microsoft ➤➤ clients over data transmission networks. yes (delayed, CLID only) X4000 calls back after approx. four seconds, if requested to by the WAN partner. yes (PPP negotiation, callback optional) Corresponds to the value yes (PPP negotiation), but contains an abort option. The Microsoft client has the option of aborting callback and maintaining the initial connection to X4000 without callback. This is done by pressing CANCEL to close the dialog box that appears. Exception: This abort option cannot be used if the WAN partner dialing in uses Windows NT and his extension number is entered in X4000. yes Table 10-8: X4000 calls back immediately, if requested to by the WAN partner. Callback If yes (PPP negotiation) is used as the setting for Callback, a B-channel is always opened, which results in costs. X4000 User’s Guide 329 10 Configuration of Security Functions and Firewall To do Proceed as follows to activate callback for a WAN partner: ➤ Go to WAN PARTNER ➧ EDIT ➧ ADVANCED SETTINGS. ➤ Select Callback. ➤ Confirm with OK. 10.2.5 Closed User Group X4000 supports the use of the Closed User Group service feature, which you can request for your ISDN line from your telephone company. The external/ internal reachability is monitored and controlled by the exchanges if this feature is selected. To do Proceed as follows to activate a Closed User Group for a WAN partner: ➤ Go to WAN PARTNER ➧ EDIT ➧ WAN NUMBERS ➧ EDIT ➧ ADVANCED SETTINGS. ➤ Select Closed User Group: specify. ➤ Enter the CUG index. ➤ Confirm with OK. 10.2.6 Access to Remote CAPI The special features offered by BinTec routers include implementation of the ➤➤ Remote CAPI and Remote TAPI programming interfaces (only for PABX devices). This enables applications on computers in the LAN to use the resources of the router as if these components were installed directly in the computer. 330 User concept By using BinTec’s user concept, you can make sure that only users authenticated by user name and password can access X4000’s Remote CAPI interface (see chapter 7-3, page 142). Filters You can also prevent unauthorized access by defining filters (see chapter 10.2.8, page 335) and local filters (see chapter 10.2.9, page 348). X4000 User’s Guide 10 Access Security 10.2.7 NAT (Network Address Translation) ➤➤ NAT is a simple-to-operate procedure that can be used for several purposes in the BinTec implementation: ■ Hiding the internal host addresses of a LAN by remapping to one or more external addresses. ■ Controlling external to internal access. In the external direction, the router forwards all ➤➤ data packets (forward NAT) and connections from external callers are only allowed if explicitly enabled. inside X4000 ? BinTec 192.168.1.1 X4000D LAN IP 192.168.1.254 Forward NAT 4000 outside Access only when explicitly allowed 16.0.0.30 ISDN IP 16.0.0.30 ISDN BI AN CA /B RI CK -X M 192.168.1.2 192.168.1.3 Network of your WAN Partner Your Local Area Network Figure 10-1: Forward NAT ■ Permanent monitoring of the connections via the router with indication of the source and destination addresses and ➤➤ ports. See your syslog messages for this purpose! NAT always refers to an interface. X4000’s LAN side is always referred to as "internal", the WAN partner as "external". You will find more information on NAT in the Software Reference. X4000 User’s Guide 331 10 Configuration of Security Functions and Firewall Configuration is made in IP ➧ NETWORK ADDRESS TRANSLATION. IP ➧ NETWORK ADDRESS TRANSLATION lists all the X4000 interfaces with a status display for current NAT settings: Field Meaning Name Interface name Nat Indicates if NAT is activated for the relevant interface. Possible values: ■ off: NAT not activated. ■ on: Forward NAT activated. ■ reverse: Reverse NAT activated static mappings Table 10-9: If Nat = on or Nat = reverse, indicates the number of entries that have been made for the interface for enabling certain IP connections in IP ➧ NETWORK ADDRESS TRANSLATION ➧ Return ➧ ADD. IP ➧ NETWORK ADDRESS TRANSLATION Activate NAT for an X4000 interface with IP ➧ NETWORK ADDRESS TRANSLATION ➧ EDIT: Field Meaning Network Address Translation Defines the type of NAT for the selected interface. Possible values: ■ off: Do not execute NAT. ■ on: Execute Forward NAT. ■ reverse: Execute Reverse NAT. Table 10-10: IP ➧ NETWORK ADDRESS TRANSLATION ➧ Return 332 X4000 User’s Guide 10 Access Security You can explicitly allow a NAT interface certain IP connections to a certain internal host in IP ➧ NETWORK ADDRESS TRANSLATION ➧ EDIT ➧ ADD: Field Meaning Service Service allowed for connections to the host defined under Destination. Possible values: ■ ftp ■ telnet ■ smtp ■ domain/udp ■ domain/tcp ■ http ■ nntp ■ user defined: If you do not use any of the predefined services. Enter the required values under Protocol and Port to define a service. Protocol Only for Service = user defined. Defines the protocol allowed. Possible values: ■ icmp ■ tcp ■ udp ■ gre ■ esp ■ ah ■ l2tp X4000 User’s Guide 333 10 Configuration of Security Functions and Firewall Field Meaning Port (-1 for any) Only for Service = user defined. Defines the port allowed. Entering -1 allows any port for the protocol. If you specify the port, the entry must agree with the port number of the destination host in the LAN. Destination IP address of the host in the LAN. Table 10-11: IP ➧ NETWORK ADDRESS TRANSLATION ➧ Return ➧ ADD To do Proceed as follows to activate NAT: ➤ Go to IP ➧ NETWORK ADDRESS TRANSLATION. ➤ Select the interface for which you want to activate NAT and confirm with Return. ➤ Select Network Address Translation, e.g. on. This activates NAT for the selected interface. ➤ Press SAVE. An entry takes effect as soon as you confirm it here with SAVE. Never forget this, especially if you are configuring NAT from a remote host, e.g. with telnet! Proceed as follows to allow certain connections for a NAT interface to a certain host in the LAN: ➤ Go to IP ➧ NETWORK ADDRESS TRANSLATION ➧ EDIT. ➤ Add an entry with ADD or select an existing entry and confirm with Return. ➤ Select Service. ➤ Select Protocol, if applicable. ➤ Enter Port (-1 for any), if applicable. ➤ Enter Destination. ➤ Press SAVE. 334 X4000 User’s Guide 10 Access Security ➤ Repeat these steps to define several entries for the selected NAT interface. 10.2.8 Filters (Access Lists) IP filters (➤➤ Access Lists) in X4000 are based on a concept of ➤➤ filters, rules and so-called chains. IP filters respond to incoming data packets, which means they can allow or deny access to X4000 for certain data. Filters A filter describes a certain part of the IP data traffic based on the source and/or destination IP address, ➤➤ netmask, protocol and source and/or destination port. If you define a filter, you are telling X4000: "Watch out for all data packets that match the following: ...". Rule You use a rule to tell X4000 what to do with the data packets it has filtered out, i.e. whether or not it should allow them to pass through. You can also define several rules, which you arrange in the form of a chain to obtain a certain sequence. Chain There are various approaches for the definition of rules and rule chains: ■ Allow all packets that are not explicitly prohibited, i.e.: – Deny all packets that match Filter 1. – Deny all packets that match Filter 2. – ... – ... – Allow the rest. ■ Allow only what is explicitly permitted, i.e.: – Allow all packets that match Filter 1. – Allow all packets that match Filter 2. – ... – ... – Deny the rest. ■ Combination of the two possibilities described above Several rule chains can be created, either completely or partly separated from each other. The common use of filters is possible and practicable. Interface You can also define a rule chain individually for each X4000 interface. X4000 User’s Guide 335 10 Configuration of Security Functions and Firewall WAN Partner 1 WAN Partner 2 Rule 1 Rule 4 Next Rule = 2 Next Rule = 2 Rule 2 Rule 5 Next Rule = 3 Next Rule = 0 Rule 3 Next Rule = 0 Rule 0 = Discard Packet Figure 10-2: Rule chains for various interfaces Configuration is made in: ■ IP ➧ ACCESS LISTS ➧ FILTER ■ IP ➧ ACCESS LISTS ➧ RULES ■ IP ➧ ACCESS LISTS ➧ RULES ➧ REORG ■ IP ➧ ACCESS LISTS ➧ INTERFACES 336 X4000 User’s Guide WAN Partner 3 10 Access Security You can define filters in IP ➧ A CCESS LISTS ➧ FILTER: Field Meaning Description Designation of the filter. Note that only the first 10 or 15 characters are visible in other menus. Index Cannot be changed here. X4000 automatically issues a number to new filters defined here. Protocol Defines a protocol. Possible values: any, icmp, ggp, ip, tcp, egp, igp, pup, chaos, udp, hmp, xns_idp, rdp, rsvp, gre, esp, ah, tlsp, skip, kryptolan, iso-ip, igrp, ospf, ipip, ipx-in-ip, vrrp, l2tp. any matches any protocol, tcp matches only TCP data packets, etc. Type Only if Protocol = icmp. Possible values: any, echo reply, destination unreachable, source quench, redirect, echo, time exceeded, param problem, timestamp, timestamp reply, address mask, address mask reply. See RFC 792. Connection State If Protocol = tcp, you can define a filter based on the status of the TCP connection. Possible values: ■ established: All TCP packets that would not open any new connection on routing over X4000 match the filter. ■ any: All TCP packets match the filter. Source Address Source IP address of the data packets that matches the filter. Source Mask Source Netmask. The combination of Source Address and Source Mask describes a range of IP addresses that match the filter. Source Port Source port number or range of source port numbers that matches the filter. X4000 User’s Guide 337 10 Configuration of Security Functions and Firewall Field Meaning Specify Port If Source Port or Destination Port = specify or specify range: Enter port numbers or range of port numbers. Destination Address Destination IP address of the data packets that matches the filter. Destination Mask Destination Netmask. The combination of Destination Address and Destination Mask describes a range of IP addresses that match the filter. Destination Port Destination port number or range of destination port numbers that matches the filter. Type of Service (TOS) Type of Service TOS Mask Mask for Type of Service Table 10-12: IP ➧ ACCESS LISTS ➧ FILTER 338 X4000 User’s Guide 10 Access Security The fields Source Port and Destination Port offer the following selection options: Possible values Meaning any All ➤➤ port numbers match the filter. specify Permits the entry of a port number under Specify Port. specify range Permits the entry of a range of port numbers under Specify Port. priv (0..1023) Port numbers: 0 ... 1023. server (5000..32767) Port numbers: 5000 ... 32767. clients 1 (1024.0.4999) Port numbers: 1024 ... 4999. clients 2 (32768..65535) Port numbers: 32768 ... 65535. unpriv (1024..65535) Port numbers: 1024 ... 65535. Table 10-13: Source Port and Destination Port Port numbers The port numbers are distributed as follows: 0 ... 1023 1024 ... 4999 Well-known ports, i.e. permanently assigned. The ports are created by priv (0..1023) 5000 ... 32767 32768 ... 65535 ➤➤ clients and ➤➤ servers dynamically and have no fixed meaning (except for special agreements): unpriv (1024..65535) clients 1 (1024.0.4999) server (5000..32767) clients 2 (32768..65535) Table 10-14: Ranges of port numbers X4000 User’s Guide 339 10 Configuration of Security Functions and Firewall The following table contains a list of some frequently used port numbers with the services assigned to them: Service Protocol Port number File Transfer Protocol (➤➤ FTP) (data) TCP 20 File Transfer Protocol (FTP) (commands) TCP 21 Telnet TCP 23 Simple Mail Transfer Protocol (SMTP) TCP 25 Domain Name Server (➤➤ DNS) TCP, UDP 53 Trivial File Transfer Protocol (➤➤ TFTP) UDP 69 HTTP TCP 80 POP3 (e-mail inquiry) TCP 110 Network Time Protocol TCP, UDP 119 ➤➤ NetBIOS Name (NBNAME) UDP 137 NetBIOS Datagram (NBDATA) UDP 138 NetBIOS Session (NBSESSION) TCP 139 Simple Network Management Protocol (SNMP) (Port Lists) UDP 161 SNMP (Trap Port) UDP 162 Syslog Service (SYSLOG) UDP 514 Network File System (NFS) UDP 2049 Remote CAPI TCP 2662 Remote TAPI TCP 2663 Table 10-15: Services and port numbers Example 340 A simplified FTP connection is used as an example to illustrate how to use source and destination ports: In addition to source and destination IP addresses, the IP protocol also uses source and destination port numbers to X4000 User’s Guide 10 Access Security uniquely identify data connections. The FTP client creates a number, e.g. xyz, which is used as source port. As destination port, the client uses the number under which the FTP server offers the FTP service, e.g. 21. The FTP server then answers with IP packets that use 21 as source port and xyz as destination port: Src IP = 192.168.1.1 Src Port = xyz Dest IP = 10.1.1.2 Dest Port = 21 1 4000 ISDN BinTec 192.168.1.1 BI AN CA /B RI CK -X M X4000D 192.168.1.2 2 FTP-Server FTP Server 10.1.1.2 Src IP = 192.168.1.1 Src Port = xyz Dest IP = 10.1.1.2 Dest Port = 21 192.168.1.3 Your Local Area Network Network of your WAN Partner Figure 10-3: Example: FTP connection X4000 User’s Guide 341 10 Configuration of Security Functions and Firewall You can define rules in IP ➧ ACCESS LISTS ➧ RULES: Field Meaning Index Cannot be changed. X4000 automatically issues a number to new rules defined here or displays the Index of existing rules. Insert behind Rule Appears only if a new rule is defined. Defines the rule behind which the new rule is inserted. You start a new independent chain with none. Action Defines the action to be taken for a filtered data packet. Filters Filter used. Next Rule Appears only if an existing rule is edited. Defines the next rule to be used. Table 10-16: IP ➧ ACCESS LISTS ➧ RULES The Action field contains the following selection options: Possible values Meaning allow M Allow packet if it matches the filter. allow !M Allow packet if it does not match the filter. deny M Deny packet if it matches the filter. deny !M Deny packet if it does not match the filter. ignore Use next rule. Table 10-17: Action 342 X4000 User’s Guide 10 Access Security You can change the order of rules in a chain in the submenu IP ➧ ACCESS LISTS ➧ RULES ➧ REORG: Field Meaning Index of Rule that gets Index 1 Defines the first rule in the chain. Table 10-18: IP ➧ A CCESS LISTS ➧ RULES ➧ REORG X4000 User’s Guide 343 10 Configuration of Security Functions and Firewall If you reorganize such a chain, X4000 renumbers the remaining rules according to the selection in Index of Rule that gets Index 1: REORG Before After Rule 1 = 1st Rule of Chain Rule 1 Rule 1 Next Rule = 4 Next Rule = 2 Rule 4 Rule 2 Next Rule = 8 Next Rule = 3 Rule 8 Rule 3 Next Rule = 0 Next Rule = 0 Rule 0 = Discard Packet Rule 0 = Discard Packet Figure 10-4: Example of chain reorganization In IP ➧ ACCESS LISTS ➧ INTERFACES, you can define which interface starts with which rule and if and how the sender of a packet is to be informed if the packet is denied by X4000 due to a filter violation: 344 X4000 User’s Guide 10 Access Security The rule with Index = 1 is normally always used as the first rule for a newly created interface (e.g. to a WAN partner). Field Meaning Interface X4000 interface First Rule Defines which rule is used first for data packets that reach X4000 via the interface. If you enter none, you specify that no filters are used for the Interface. Deny Silent Defines whether the sender of a packet is to be informed of its denial due to a filter violation. Possible values: ■ no: Packet is denied, sender is informed by a corresponding ICMP error message. ■ yes: Packet is denied, sender is not informed. Reporting Method Defines whether the denial of a packet due to a filter violation creates a syslog message. Possible values: ■ none: No syslog message. ■ info: A syslog message is generated with the protocol number, source IP address and source port number. ■ dump: A syslog message is generated with the contents of the first 64 bytes of the denied packet. Table 10-19: IP ➧ ACCESS LISTS ➧ INTERFACES X4000 User’s Guide 345 10 Configuration of Security Functions and Firewall To do Proceed as follows to define filters and rules: Ensure that you don’t lock yourself out when configuring the filters. For example, if you link the first filter to a rule that executes Action = Allow M, only what you have expressly allowed with the filter actually gets through. It may easily occur that your telnet access to X4000 is no longer allowed as soon as you enter the rule and confirm with SAVE. ■ Do not use any filters on the LAN interface (First Rule = none) if you access X4000 via telnet. ■ If you access X4000 via the serial interface or ISDN login, at least nothing can happen to you during configuration. Filters ➤ Go to IP ➧ ACCESS LISTS ➧ FILTERS. ➤ Add a new entry with ADD or select an existing entry and confirm with Return to change it. ➤ Enter Description. ➤ Select Protocol. ➤ Enter Source Address, if applicable. ➤ Enter Source Mask, if applicable. ➤ Select Source Port. ➤ Enter Specify Port, if applicable. ➤ Enter Destination Address, if applicable. ➤ Enter Destination Mask, if applicable. ➤ Select Destination Port. ➤ Enter Specify Port, if applicable. ➤ Press SAVE. ➤ Repeat these steps until you have defined all the desired filters. Do not forget to define a filter, if necessary, for enabling the remaining data packets (Protocol = any, Source Port = any, Destination Port = any). 346 X4000 User’s Guide 10 Access Security ➤ Leave IP ➧ ACCESS LISTS ➧ FILTERS with EXIT. Rules ➤ Go to IP ➧ ACCESS LISTS ➧ RULES to interconnect the filters to form rule chains. ➤ Add a new entry with ADD or select an existing entry and confirm with Return to change it. ➤ Select Insert behind Rule if you create a new rule. ➤ Select Action. ➤ Select Filter. ➤ Select Next Rule if you change an existing rule. ➤ Press SAVE. ➤ Repeat these steps until you have defined all the desired rules. Do not forget to define the last rule in the chain, if necessary, as a rule with a suitable filter for enabling all the remaining data packets (Action = allow M). You can open a new rule chain with Insert behind Rule = none. ➤ Leave IP ➧ ACCESS LISTS ➧ RULES with EXIT. Interface ➤ Go to IP ➧ ACCESS LISTS ➧ INTERFACES. ➤ Select an interface and confirm with Return if you wish to use a rule as the first rule for this interface that is not the rule displayed. ➤ Select First Rule. ➤ Select Deny Silent. ➤ Select Reporting Method. ➤ Press SAVE. X4000 User’s Guide 347 10 Configuration of Security Functions and Firewall Reorganizing a chain Proceed as follows to reorganize an existing chain of rules: ➤ Go to IP ➧ ACCESS LISTS ➧ RULES ➧ REORG. ➤ Select Index of Rule that gets Index 1. ➤ Confirm with REORG. If you work with Windows PCs in your network, it is usually advisable to define a NetBIOS filter. An example of this configuration is explained step by step in chapter 7.1.5, page 132. 10.2.9 Local Filters Access to the local UDP and TCP services on X4000 (telnet, ➤➤ CAPI, trace, etc.) can be controlled via the separate Setup Tool menu IP ➧ LOCAL S ERVICES ACCESS CONTROL. One or more restrictions can be defined here for each service. If no entry exists for a service, there are no access restrictions for this service, i.e. access is possible to this service over all interfaces and from any source address, provided this is not prohibited by the use of NAT (see chapter 10.2.7, page 331) or global filters (see chapter 10.2.8, page 335). Strategy As soon as at least one entry for local filters exists in X4000, incoming requests for the corresponding local services of X4000 are only allowed if 1. the source address is 127.0.0.1 (loopback address), or 2. no entry exists for the corresponding service, or 3. the incoming call is expressly allowed by at least one entry. The existing entries are processed in the order in which they are listed in the corresponding table in the SNMP shell (localTcpAllowTable or localUdpAllowTable). If an entry in this sorted list does not apply, the next entry is checked. This enables requests over several interfaces or from several IP addresses to be admitted individually to a certain service. If a matching entry for a request has still not been found after checking the last entry in the list, there are two alternatives: ■ The request is forwarded to the relevant service if no entry in the list refers to this service. 348 X4000 User’s Guide 10 Access Security ■ The request is rejected if one or more entries for this service exist in the list, but none of these matches the request. Local filters therefore provide an additional tool that is different to handle than global filters and does not adversely affect performance in normal routing either. X4000 User’s Guide 349 10 Configuration of Security Functions and Firewall Configuration is made in IP ➧ LOCAL SERVICES ACCESS CONTROL ➧ ADD: Field Meaning Service Defines the local X4000 service to which access is to be controlled with this entry. Possible values: ■ snmp(udp) ■ rip(udp) ■ bootps(udp) ■ dns(udp) ■ telnet(tcp) ■ trace(tcp) ■ snmp(tcp) ■ capi(tcp) ■ tapi(tcp) ■ rfc1086(tcp) ■ http(tcp) ■ nbns(udp) ■ statmon(udp) Verify IP Address Defines if the source IP address is to be checked when an incoming call is received for the service selected under Service. Possible values: ■ verify ■ don’t verify 350 X4000 User’s Guide 10 Access Security Field Meaning IP Address (Only if Verify IP Address = verify) Defines an IP address or network address (together with Mask) from which incoming requests are allowed for the service selected under Service. If a request has a different source address, the next entry is checked. Mask (Only if Verify IP Address = verify) Defines a netmask. A network address is thus defined together with the IP Address from which incoming requests are allowed to the service selected under Service. If a request has a different source address, the next entry is checked. If the value of Mask is 0.0.0.0 or 255.255.255.255, the entry is a host entry, i.e. the IP address must match exactly. Verify Interface Defines if a check is to be made to determine which X4000 interface is used for an incoming call received for the service selected under Service. Possible values: ■ verify ■ don’t verify Interface (Only if Verify Interface = verify) Defines an interface of X4000. If X4000 receives an incoming call over this interface for the service selected under Service, the connection is allowed. If the incoming call crosses another interface, the next entry is checked. Table 10-20: IP ➧ LOCAL SERVICES ACCESS CONTROL ➧ ADD X4000 User’s Guide 351 10 Configuration of Security Functions and Firewall Proceed as follows to restrict access to a local service: If an entry defines both an address and an interface for checking, both criteria must be fulfilled for an incoming call before X4000 accepts this call. ➤ Go to IP ➧ LOCAL SERVICES ACCESS CONTROL. All the entries made until now are listed here. ➤ Press ADD to add a new entry. ➤ Select Service. ➤ Select Verify IP Address, e.g. verify. ➤ Enter IP Address, if applicable. ➤ Enter Mask, if applicable. ➤ Select Verify Interface, e.g. verify. ➤ Select Interface, if applicable. ➤ Press SAVE. The entry is listed. 10.2.10 Back Route Verification This term conceals a simple but very effective X4000 function. If Back Route Verification is activated at a WAN partner, only those data packets are transported via the interface to the WAN partner that would be routed over the same interface on the back route. You can therefore prevent packets with fake IP addresses being fed to your LAN – even without filters. This means you can easily prevent known and as yet unknown Denial-of-Service and IP spoofing attacks. To do Proceed as follows to activate Back Route Verification for a WAN partner: ➤ Go to WAN PARTNER ➧ EDIT ➧ IP ➧ ADVANCED SETTINGS. ➤ Activate Back Route Verify with on. ➤ Confirm with OK. 352 X4000 User’s Guide 10 Access Security 10.2.11 TAF Client Personalized authentication The Token Authentication Firewall (TAF) function permits personal authentication of IP connection partners. BinTec’s solution integrates the Token Authentication mechanisms from Security Dynamics and does not allow data packets to cross the router until the associated source address has been authenticated successfully. You can activate this function in X4000 (with extra license) and configure the router as TAF Server or TAF Client. A detailed description of the operation and the necessary configuration steps can be found in BRICKware for Windows. 10.2.12 Extended IP Routing (XIPR) In addition to the normal routing table, X4000 can also make routing decisions based on an additional table called the Extended Routing Table (Extended IP Routing). Apart from the destination address, X4000 can also include the protocol, source and destination port, type of service (TOS) and the status of the destination interface in the decision. If there are entries in the Extended Routing Table, these are treated preferentially compared with entries in the normal routing table. Example XIPR is useful, for example, if two networks are connected via ISDN with a LANLAN connection, but certain services (e.g. telnet) should be routed over an X.25 link and not over an ISDN switched connection. By making entries in the Extended Routing Table, you can allow part of the IP traffic to run over the ISDN switched connection and part of the IP traffic (e.g. for telnet) to run over an X.25 link (see also the Software Reference). Configuration Configuration is made in the Setup Tool menu IP ➧ ROUTING ➧ ADDEXT and in the MIB table ipExtRtTable. A detailed description (including configuration using the MIB variables) can be found in the Software Reference. For configuration with the Setup Tool, please see the relevant additions in the next version of the User’s Guide. X4000 User’s Guide 353 10 Configuration of Security Functions and Firewall 10.3 Line Tapping Security You can use an encryption mechanism to obtain data security for critical PPP connections over connections with critical security, provided both connection partners support this mechanism. The following functions are possible: ■ Encryption (chapter 10.3.1, page 354) ■ VPN (with extra license) (chapter 10.3.2, page 357) 10.3.1 Encryption X4000 supports encryption of PPP connections to WAN partners. The ➤➤ MPPE (Microsoft Point to Point ➤➤ Encryption) version 1 and 2, DES and Blowfish methods are used. DES and Blowfish are implemented as BinTec proprietary solutions. MPPE V2 The MPPE Version 2 encryption protocol, the successor to MPPE, has been developed by Microsoft and also uses a 40-bit or 56-bit key. These are generated on authentication. If a larger key length is set in X4000 than in the dial-in client, the connection is not set up. If one connection partner is set to MPPE V1 as encryption protocol, MPPE V2 is also accepted on connection setup if the set key length is the same. DES and Blowfish If these proprietary encryption algorithms are used, either X4000 can generate a key automatically or you can define an individual key statically in consultation with the connection partner. The DES and Blowfish encryption algorithms are only supported if a license for VPN is entered in X4000. Configuration is made in: ■ WAN PARTNER ➧ EDIT 354 X4000 User’s Guide 10 Line Tapping Security ■ WAN PARTNER ➧ EDIT ➧ ADVANCED SETTINGS ➧ EXTENDED INTERFACE SETTINGS (OPTIONAL) The following field in WAN PARTNER ➧ EDIT is relevant for this configuration step: Field Meaning Encryption Defines the type of encryption. Possible values: ■ MPPE 40: MPPE version 1 with 40-bit key ■ MPPE 56: MPPE version 1 with 56-bit key ■ MPPE V2 40: MPPE version 2 with 40-bit key ■ MPPE V2 56: MPPE version 2 with 56-bit key ■ DES 56: DES with 56-bit key ■ Blowfish 56: Blowfish with 56-bit key ■ none: No encryption These values are only available if PPP, Async PPP over X.75, Async PPP over X.75/T.70/ BTX or X.25_PPP has been selected under Encapsulation. Table 10-21: WAN PARTNER ➧ EDIT X4000 User’s Guide 355 10 Configuration of Security Functions and Firewall If DES or Blowfish are used, the key can be generated automatically with authentication or defined statically. The following fields in the WAN PARTNER ➧ EDIT ➧ ADVANCED SETTINGS ➧ EXTENDED INTERFACE SETTINGS (OPTIONAL) menu are relevant for this purpose: Field Meaning Encryption Key Negotiation Defines whether a key for the connection to the WAN partner is generated automatically or defined statically. Possible values: ■ authentication (default value): Key is generated automatically by X4000. ■ static: The key is defined statically and must be entered under Encryption Key (TX) and Encryption Key (RX). Encryption Key (TX) (Only for Encryption Key Negotiation = static) Key (in hexadecimal format) for encryption of outgoing data (must be the same as the entry under Encryption Key (RX) at the connection partner’s). Encryption Key (RX) (Only for Encryption Key Negotiation = static) Key (in hexadecimal format) for encryption of incoming data (must be the same as the entry under Encryption Key (TX) at the connection partner’s). Table 10-22: WAN PARTNER ➧ ADD ➧ ADVANCED SETTINGS ➧ EXTENDED INTERFACE SETTINGS (OPTIONAL ) To do Proceed as follows to exchange data in encrypted form with a WAN partner: ➤ Go to WAN PARTNER. ➤ Select a WAN partner and confirm with Return to encrypt the PPP connections to this partner. ➤ Select Encryption, e.g. DES 56. 356 X4000 User’s Guide 10 Line Tapping Security ➤ Go to WAN PARTNER ➧ EDIT ➧ ADVANCED SETTINGS ➧ EXTENDED INTERFACE SETTINGS (OPTIONAL). ➤ Select Encryption Key Negotiation, e.g. static (if you wish to define the key yourself). ➤ Enter Encryption Key (TX), if applicable, e.g. 1A35EFC17B56. ➤ Enter Encryption Key (RX), if applicable, e.g. 89A1288CD131. ➤ Press SAVE. ➤ Confirm with OK. ➤ Press SAVE. 10.3.2 VPN (with extra license) X4000 can set up a VPN (Virtual Private Network) using the PPTP (Point-toPoint Tunneling Protocol). This provides safe (encrypted) transmission of data over WAN connections, e.g. over the Internet. It can be used, for example, by field service staff to obtain low-cost access to data in the company network via Internet and laptop (dial-in via a local Internet Service Provider). You can find detailed information and configuration instructions (with examples) in the Extended Features Reference. X4000 User’s Guide 357 10 Configuration of Security Functions and Firewall 10.4 Special Features The following special features support your network security: ■ Startup Procedure (chapter 10.4.1, page 358) ■ Auto logout (chapter 10.4.2, page 358) ■ Prevention of Denial-of-Service Attacks (chapter 10.4.3, page 358) 10.4.1 Startup Procedure X4000 does not start its routing activities until the complete configuration is loaded, especially the defined filters. This means it is not possible to provoke a system start to make use of an intermediate system state in which perhaps routing takes place before the filters are active. 10.4.2 Auto Logout Connections to X4000 via telnet, ➤➤ isdnlogin or serial interface are disconnected automatically if no entry is made on the keyboard for a period of 15 minutes. This makes it difficult to read out or change the system configuration on "forgotten" connections. You can change the time with the command t <time in seconds> (see chapter 14.1, page 412). 10.4.3 Prevention of Denial-of-Service Attacks A Denial-of-Service (DoS) attack is an attempt to flood a system or force a restart by sending certain packets. This means the system or a certain service can no longer be used. Some Denial-of-Service attacks on the router itself are already prevented by the internal coding. For example, all X4000 interfaces for which you activate Network Address Translation (NAT) protect the connected PCs against some DoS attacks with 358 X4000 User’s Guide 10 Special Features fragmented packets. The packet fragments are assembled again on passing through NAT, before the packet can pass the router. You can prevent some DoS attacks that operate with fake source IP addresses by using the Back Route Verification function (see chapter 10.2.10, page 352). You can counter DoS attacks that speculate on destroying the system by causing the log files to overflow (syslog messages) by suitably positioning and limiting the size of these files. X4000 User’s Guide 359 10 Configuration of Security Functions and Firewall 10.5 Checklist The following list indicates the most important critical security points that you should observe when configuring X4000: ■ Have you changed all four passwords for system access (admin, read, write, http)? See chapter 4.2, page 76. ■ Are the activities of your X4000 sufficiently accurately logged on at least one external computer and do you check the syslog messages regularly? See chapter 10.1.1, page 308. ■ Have you restricted access to the local services and resources to known computers or networks? In particular, you should only allow access via CAPI, SNMP, HTTP, trace and telnet to known computers. ■ Are configuration files saved by TFTP kept in a safe place? ■ Have you protected all PPP accesses with a password? ■ If applicable, have you activated Network Address Translation (NAT) for the connection to the Internet Service Provider (ISP)? See chapter 10.2.7, page 331. ■ Have you limited the IP data traffic at critical interfaces, if necessary with the aid of filters, and prevented IP address spoofing? You should pay special attention to the interfaces you have not protected with NAT! See chapter 10.2.8, page 335. ■ Have you restricted remote maintenance access via ISDN Login? Have you made an entry under CM1BRI, ISDN S0 ➧ INCOMING C ALL A NSWERING? See "Incoming call answering", page 141. You should also observe the following additional points: ■ Do you use the Microsoft callback procedure for PPP connections? Please refer to the information in chapter 10.2.4, page 327. ■ Do you use an encryption protocol for line tapping security on connections with critical security? See chapter 10.3.1, page 354. ■ Do you use personal authentication on connections with critical security? 360 X4000 User’s Guide 10 Checklist ■ Do you allow the influence of routing protocols (e.g. RIP) only on trustworthy networks? See chapter 8.2.8, page 229. ■ Do you check what computers have access to the Remote CAPI interface, what applications are used on them and whether the connections used with these applications are desired? Do you use BinTec’s user concept (chapter 7-3, page 142)? ■ Are any additional user accounts created trouble-free? ■ Have you prevented the interception of connections on the Ethernet by a suitable LAN infrastructure? X4000 User’s Guide 361 10 362 Configuration of Security Functions and Firewall X4000 User’s Guide 11 11 Configuration Management In this chapter, you will find instructions on the administration of your configuration files and on updating the X4000 software. The following areas are covered: ■ Administration of Configuration Files – Where are the configuration files? – What is flash and memory? – How do I handle configuration files? ■ Updating Software: – How do I keep in touch with the latest developments? – How do I load a new Boot Image? X4000 User’s Guide 363 11 Configuration Management 11.1 Administration of Configuration Files Flash X4000 reads its configuration information from configuration files. These configuration files are stored in the flash EEPROM (electronically eraseable, programmable read-only memory) of X4000. Several different configuration files can be stored in the flash memory. The data also remains stored in the flash when X4000 is switched off. Memory The current configuration and all changes you set during the operation of X4000 are stored in the working memory (RAM). The contents of the RAM are lost when X4000 is switched off. So if you modify your configuration and want to retain these changes for the next time you start X4000, you have to save the modified configuration to the flash before switching off: Exit ➧ Save as boot configuration and exit (see chapter 7.4, page 186). This file is then saved in the flash as a boot configuration file under the name "boot". When X4000 is started again, this very file, the configuration file with the name "boot", is loaded in the RAM and becomes operative. Operations Imagine the flash memory as a directory of configuration files. The files in this directory can be copied, moved, erased and newly filed. It is also possible to transfer configuration files between X4000 and a remote host by TFTP. Windows In Windows, you can use the TFTP server of DIME Tools (see BRICKware for Windows). You can then, for example, save a configuration file from X4000 on your local PC. The names of the files to be transferred with the TFTP server of DIME Tools may only consist of a maximum of 8 characters (and a maximum of 3 characters as extension), e.g. b5104.x4a. Unix A TFTP server is part of the system in Unix; please read the instructions included in the Software Reference. You can perform the various operations with the help of the Setup Tool: ➤ Go to the CONFIGURATION MANAGEMENT menu. 364 X4000 User’s Guide 11 Administration of Configuration Files X4000 Setup Tool [CONFIG]:Configuration Management BinTec Communications AG MyRouter Operation get TFTP Server IP Address TFTP File Name 192.168.1.1 b5104.x4a Name in Flash boot Type of last operation State of last operation get (TFTP --> FLASH) done START OPERATION (TFTP --> FLASH) EXIT Use <Space> to select The menu contains the following fields: Field Meaning Operation Operation you want to perform. TFTP Server IP Address The IP address or host name (if the host name can be resolved) of the TFTP server which you want to transfer a configuration file from or to. TFTP File Name Name of the configuration file on the TFTP server (without path data). Name in Flash Name of the configuration file in the flash. New Name in Flash Name of the configuration file to be newly created in the flash (with Operation = move or copy). Type of Last Operation Type of previous operation (since the last X4000 start). State of last operation The state of the last operation executed. Table 11-1: CONFIGURATION MANAGEMENT X4000 User’s Guide 365 11 Configuration Management The Operation field contains the following selection options: 366 Possible values Meaning save (MEMORY --> FLASH) Save all current settings from memory to flash as configuration file <Name in Flash>. <Name in Flash> is overwritten or recreated. load (FLASH --> MEMORY) Loading the configuration file <Name in Flash> from flash to memory. The settings in <Name in Flash> take immediate effect. move (FLASH --> FLASH) Rename configuration file <Name in Flash> to <New Name in Flash>. copy (FLASH --> FLASH) Copy configuration file <Name in Flash> as <New Name in Flash>. delete (FLASH) Delete configuration file <Name in Flash>. put (FLASH --> TFTP) Transfer configuration file <Name in Flash> from flash to TFTP host with the IP address <TFTP Server IP Address>. <TFTP File Name> is then overwritten or recreated on the TFTP host with the contents of <Name in Flash>. <TFTP File Name> is saved in ASCII format and can be edited. get (TFTP --> FLASH) Transfer configuration file <TFTP File Name> from TFTP host with the IP address <TFTP Server IP Address> to flash. <Name in Flash> is then overwritten and recreated with the contents of <TFTP File Name>. As the configuration file is transferred to flash and not to memory, the file must then be loaded (FLASH --> MEMORY), so that the settings can take effect on X4000. state (MEMORY --> TFTP) Save all current settings in the memory as <TFTP File Name> on the TFTP host with the IP address <TFTP Server IP Address>. <TFTP File Name> is then overwritten or recreated. X4000 User’s Guide 11 Administration of Configuration Files Possible values Meaning reboot Restart X4000. All settings in the memory are replaced by boot settings from the flash. Table 11-2: Operation The State of last operation field can display the following: Possible values Meaning todo The operation has not yet been started. running The operation is being executed. done The operation has been executed successfully. error The operation could not be fully executed (see syslog message). Table 11-3: State of last operation If an error should occur while running get (TFTP --> FLASH) and the operation is aborted, the file to be overwritten in the flash is deleted. So if you transfer a "boot" file, X4000’s boot file will be deleted and X4000 cannot load a configuration on restarting. If necessary, rename the file to be transferred! To run put (Flash --> TFTP), get (TFTP --> Flash) and state (MEMORY --> TFTP), you need a TFTP server on the host to or from which you can transfer a configuration file. If the TFTP host is a Windows PC, click Program ➧ BRICKware ➧ DIME Tools in the Windows Start menu to open DIME Tools and activate the TFTP server with File ➧ TFTP Server before you run the operation in question. X4000 User’s Guide 367 11 Configuration Management If you want to use your Windows PC as a TFTP host but are not sure what the IP address of the PC is, proceed as follows: For Windows 95: ➤ Click Run in the Windows Start menu. ➤ Type in winipcfg. A window opens where you can see the IP address of your PC and other network information. For Windows NT: ➤ Click Program ➧Command Prompt in the Windows Start menu. ➤ Enter ipconfig or ipconfig/all to request the IP address of your PC and other network information. Running an operation To run an operation, proceed as follows: ➤ Select Operation. ➤ Activate a TFTP server if you have selected put, get or state as the Operation. ➤ Select or type in the necessary settings in CONFIGURATION MANAGEMENT. ➤ Select START OPERATION and press Return. As long as the operation is being carried out, OPERATING appears in the help line of the Setup Tool; State of last operation displays running. When the operation has been executed successfully, the operation is displayed under Type of last operation, State of last operation assumes the value done. 368 X4000 User’s Guide 11 Administration of Configuration Files If error is displayed under State of last operation, check your settings: ■ Have you entered an incorrect IP address under TFTP Server IP Address? ■ Does the name of the configuration file consist of more than 8 characters and the extension of more than 3 (when using DIME Tools)? ■ Does the host not support TFTP (did you forget to start the TFTP server of DIME Tools before starting the operation)? ■ Is the source file not in the configured directory of the TFTP path of DIME Tools (when Operation = get)? To change the TFTP path, refer to BRICKware for Windows. ■ If none of these points applies, proceed as follows to find the cause of the problem: ➤ Leave the Setup Tool. ➤ Type in the following in the SNMP shell: debug config &. ➤ Reopen the Setup Tool with setup. ➤ Carry out the desired operation in CONFIGURATION MANAGEMENT. If an error occurs, an error message with the cause of the error appears in the help line of the Setup Tool. ➤ Solve the problem and carry out the operation again. ➤ Leave CONFIGURATION MANAGEMENT with EXIT. Example You have created the configuration file brick.cf, e.g. with the help of the Configuration Wizard. You have not transferred the file to X4000 over the serial interface; brick.cf can be found in the directory C:\BRICK on your PC. Your PC has the IP address 192.168.1.1. If you want to transfer brick.cf from your PC to X4000, proceed as follows: ➤ For a Windows PC: Click the Windows Start button then Program ➧ BRICKware ➧ DIME Tools to start DIME Tools. The TFTP server must be active. ➤ Activate a TFTP server under Unix: see the Software Reference. ➤ Go to CONFIGURATION MANAGEMENT. X4000 User’s Guide 369 11 Configuration Management TFTP host --> flash ➤ Select Operation: get (TFTP --> FLASH). ➤ Type in TFTP Server IP Address, e.g. 192.168.1.1. ➤ Type in TFTP File Name: brick.cf. ➤ Type in Name in Flash, e.g. boot. ➤ Select START OPERATION and press Return. As long as the operation is being carried out, OPERATING appears in the help line of the Setup Tool; State of last operation displays running. When the operation has been successfully executed, get (TFTP --> FLASH) is displayed under Type of last operation; State of last operation assumes the value done. The configuration file brick.cf is saved, for example, in X4000’s flash under the name boot. To make the settings of brick.cf take immediate effect in X4000, proceed as follows: Flash --> memory ➤ Reselect Operation: load (FLASH --> MEMORY). ➤ Select Name in Flash, e.g. boot. ➤ Select START OPERATION and press Return. As long as the operation is being carried out, OPERATING appears in the help line of the Setup Tool; State of last operation displays running. When the operation has been successfully executed, load (FLASH --> MEMORY) is displayed under Type of last operation; State of last operation assumes the value done. The configuration file boot has been loaded to X4000’s memory and the settings have been activated. ➤ Leave CONFIGURATION MANAGEMENT with EXIT. You have returned to the main menu. There is another way to transfer configuration files using the XMODEM protocol over the serial interface. The procedure for this is explained in the Software Reference. 370 X4000 User’s Guide 11 Updating Software 11.2 Updating Software As BinTec Communications AG is constantly improving the software for all its products and you certainly want to use the latest features of X4000, this chapter tells you how to update your software. www.bintec.de If you want to update your software, load a new software image in X4000 (boot image). Every boot image includes new features, better performance and any necessary bugfixes from the previous version. The latest software images are available free of charge from BinTec Communications AG on the World Wide Web at http://www.bintec.de. Here you can also find current product-specific documentation (Release Notes, handbooks, quick install guides) and general product information (Software Reference, Extended Features Reference, BRICKware for Windows). If you want to update software, make sure you read the corresponding Release Notes. The release notes describe the changes provided by the new boot image. update There are various ways to update software. This chapter will show you how to update with the help of the update command in the SNMP shell, which is described step for step. The alternatives to this method can be found in the Software Reference and in the Chapter: Boot Sequence chapter 3.5, page 66. Caution! An additional update of the module logic, BOOTmonitor and/or firmware logic is recommended in isolated cases. If this should be the case with a new release, this is clearly noted in the corresponding release notes. The procedure and recommendation can then be found in the "BOOTmonitor and Firmware Logic Update" release notes under www.bintec.de (Section: "Download"). The result of incorrect updating operations (e.g. power cut during the update) could be that X4000 no longer boots! ➤ Update the module logic, Bootmonitor or firmware logic only if BinTec Communications AG explicitly recommends such action! X4000 User’s Guide 371 11 Configuration Management To do To update the software (boot image), proceed as follows: Do not turn X4000 off during the update! Before starting the update, deactivate auto logout by entering t 0 in the SNMP shell. ➤ Type in the URL www.bintec.de in your browser (e.g. Internet Explorer or Netscape Navigator). The BinTec home page opens. ➤ Click "Solutions and Products" and then "Download". Here you will find the latest software and documentation for BinTec products. ➤ Click "X4000". Here you will find the latest software and documentation for X4000. ➤ Click the current boot image with the right mouse button, e.g. Boot Image Rel. 5.1 Rev. 4. ➤ In the context menu, click Save link as... ➤ Type in the directory and name under which the new boot image should be saved on your PC. The directory is normally C:\BRICK for Windows PCs and /tftpboot for Unix workstations. You can use this name. ➤ Press SAVE. The boot image is saved on your PC. ➤ Activate a TFTP server on your PC. For a Windows PC: Click the Windows Start menu and then Program ➧ BRICKware ➧ DIME Tools to start DIME Tools (for installation of DIME Tools, see chapter 6.2, page 112). Activate the TFTP server. For a Unix computer: Follow the instructions in the Software Reference. ➤ Log in to X4000, if you have not already done so. ➤ Deactivate auto logout with t 0. ➤ In the SNMP shell, type in update <IP address> <file name>. The <IP address> is the IP address of the TFTP server, e.g. the IP address of your Windows PC on which the TFTP server of DIME Tools is 372 X4000 User’s Guide 11 Updating Software running and on which you have saved the new boot image (e.g. 192.168.1.1). <file name> is the name of the boot image you have saved on your PC. The file <file name> is first transferred to the memory of X4000 and checked. The following appears in the SNMP shell: Perform update (y or n)? ➤ Enter y and confirm with Return. The software update process is executed and the new boot image is loaded to the flash memory. X4000 requires a connected block of working memory that is somewhat larger than the new software image. If insufficient memory is available on X4000, X4000 offers an incremental update, in which the image is loaded directly in "chunks" to the flash memory without checking. Proceed as follows: If insufficient memory is available, a query will appear in the SNMP shell: Do you want to perform an incremental update (y or n)? ➤ First enter n. ➤ Enter update -v <IP address> <file name>. The image is checked, but not yet loaded. ➤ Type in update <IP address> <file name>. The following appears in the SNMP shell: Perform update (y or n)? ➤ Enter y and confirm with Return. X4000 performs an incremental update and the image is saved to the flash memory. This procedure takes longer than a normal update! The following appears in the SNMP shell: Reboot now (y or n)? ➤ Enter y and confirm with Return. X4000 starts with the new boot image. The previous configuration is overwritten. X4000 User’s Guide 373 11 374 Configuration Management X4000 User’s Guide 12 12 Tips Troubleshooting If you are having problems with X4000, the following tips should help you to overcome some of the more usual stumbling blocks: ➤ Log in to X4000 and enter in the SNMP shell: debug all This makes available all the debugging information in the SNMP shell. ➤ Check the syslog messages created by X4000 (see chapter 10.1.1, page 308). It is wise to forward syslog messages to an external host and save them to be able to evaluate the outputs for a longer period of time. To interpret debugging information and syslog messages, see the Software Reference. This chapter shows you what the causes of particular problems can be and how to determine these causes. It is structured as follows: ■ Aids to Troubleshooting ■ Typical Errors X4000 User’s Guide 375 12 Troubleshooting 12.1 Aids to Troubleshooting Here you can find methods to help narrow down the possible causes of your problem: ■ Input keys and display for operating the Man-Machine Interface (MMI) ■ Local SNMP Shell Commands ■ External Aids 12.1.1 Man-Machine Interface (MMI) You can use the MMI to show information about the status of X4000 (basic unit and expansion card) on the display, without having to log in on the equipment. For example, you can quickly obtain the version of the current software release or the current operating status of the interfaces. The MMI is easy to use and the display messages are intuitive. This is explained in detail in chapter 5, page 93. 12.1.2 Local SNMP Shell Commands These commands are entered directly in X4000’s SNMP shell: debug You can use the debug command for troubleshooting in one or more subsystems of X4000. A detailed explanation of the syntax and options can be found in chapter 14.1, page 412. Examples: ➤ Enter debug all to display debugging information for all subsystems. ➤ Enter debug config & for tracking down configuration management problems (see chapter 11, page 363). 376 X4000 User’s Guide 12 Aids to Troubleshooting If you add & to an SNMP shell command, the program runs in the background. isdnlogin You can use the isdnlogin command to verify that an ISDN connection can be made. This is explained in chapter 14.1, page 412. Example: ➤ Enter isdnlogin 1234 telephony to establish a connection to the telephone in your local office with the number 1234. If a connection is made, the telephone will ring. trace The trace command can be used to display and interpret data packets sent or received over ISDN (D and B-channels) and over the LAN. An explanation of the syntax can be found in chapter 14.1, page 412. Examples: ➤ Enter trace -ip next to display data packets that are to run over the next B-channel to be opened. ➤ Enter trace -x -s me -d 0:a0:f9:d:5:a 0 0 1 to output data packets sent from X4000’s MAC address over the LAN to the host with the MAC address 0:a0:f9:d:5:a. 12.1.3 External Aids You can analyze connections to X4000 using the following utility programs on a Windows PC or Unix workstation. X4000 User’s Guide 377 12 Troubleshooting DIME Tracer (Windows) The DIME Tracer enables you to trace X4000’s ISDN and CAPI data traffic from a Windows PC. DIME Tracer is a part of DIME Tools. A detailed explanation can be found in BRICKware for Windows. bricktrace (Unix) The bricktrace program enables data sent over X4000’s ISDN channels to be inspected at a Unix workstation. bricktrace is part of BRICKtools for UNIX on your BinTec Companion CD. A detailed explanation can be found in chapter 14.2, page 419. 378 X4000 User’s Guide 12 Typical Errors and Procedure 12.2 Typical Errors and Procedure A compilation of typical error situations with instructions for error detection and clearance is given below. Try to narrow down the causes of the problem. These situations are broken down into the following categories: ■ System errors ■ ISDN connections ■ IPX routing 12.2.1 System Errors I have forgotten my password. You must return X4000 to the unconfigured ex works state: ➤ Connect your router over the serial interface to X4000 as explained in chapter 3.3, page 59. ➤ Switch X4000 off and then switch it on again. You see various selftests and then "Press <sp> for BOOTmonitor or any other key to boot system". ➤ Now press the Space bar. A BOOTmonitor menu is displayed. ➤ Select "(4) Delete Configuration" and press Return. Note and confirm the following safety prompts. The password as well as the complete configuration of X4000 are deleted. ➤ Select "(1) Boot System". X4000 is restarted. ➤ Reconfigure X4000. I can’t reach X4000 in the LAN. ➤ Use the MMI to check whether you have entered an IP address. X4000 User’s Guide 379 12 Troubleshooting If an IP address has been entered, try to set up a serial connection: ➤ Connect your PC to X4000 over the serial interface. ➤ Log in as the user admin with the corresponding password. ➤ Start the Setup Tool with setup. ➤ Check if a configuration error is the cause: Have you entered a filter under IP ➧ ACCESS LISTS that is locking you out? If so, make the required corrections. If a serial connection does not work either: ➤ Check the settings of the terminal program (see chapter 4.1.2, page 71). If you have changed the default settings in BOOTmonitor, adjust your terminal settings accordingly. ➤ If this doesn’t succeed, proceed as described under "I have forgotten my password.", page 379. 12.2.2 ISDN Connections Here you will find possible causes of errors in ISDN connections. Your telephone bill is unusually high. Use the Credits Based Accounting System (see chapter 10.1.3, page 316). This enables you to set a limit for connections to X4000 to prevent unnecessary charges accumulating as a result of mistakes made during configuration. X4000 possibly has ISDN connections that remain connected or unwanted ISDN connections are set up, which cause additional costs. ➤ Use debug all or trace to check if a PC in the LAN is using a different netmask from the one entered on X4000. ➤ Use debug all or trace to check if a PC in the LAN is configured for Remote CAPI with an incorrect IP address (destination port 2662). 380 X4000 User’s Guide 12 Typical Errors and Procedure ➤ Use SYSTEM ➧ EXTERNAL SYSTEM LOGGING to check if X4000 is configured so that syslog messages are sent to a host outside the LAN (destination port 514). ➤ Use IP ➧ STATIC SETTINGS to check if an IP address located outside the LAN has been entered for X4000 under Time Server. ➤ Check the MIB table biboAdmTrapHostTable to determine if X4000 is configured so that SNMP traps are sent to a host outside the LAN (destination ports 161, 162). ➤ Check if the second B-channel is frequently set up and cleared for connections with dynamic channel bundling due to fluctuating traffic. ➤ Use debug all or trace to check if a PC in the LAN is configured for the WINS server with an incorrect IP address (destination ports 137-139). If necessary, configure the PC properly or set the corresponding filters. ➤ Use debug all or trace to check if a PC in the LAN is configured for the resolution of NetBIOS names with the help of DNS (it is accessed from a client port to destination port 53). Do not try to resolve NetBIOS names with DNS! ➤ Use debug all or trace to check if an application on a PC in the LAN is trying to resolve names that the name server at the Internet provider does not know (it is accessed from a client port to destination port 53). Install a local HOSTS file in the Windows directory that can carry out name resolution. ➤ Use debug all or trace to check if NetBIOS over IP is configured on a PC in the LAN (it is accessed from source port 137 to destination port 53). An attempt is thus made to resolve NetBIOS names over DNS. Disable NetBIOS over IP or insert filters (configuration of the corresponding filters can be found in chapter 10.2.8, page 335 or use the simple NetBIOS filter of the Configuration Wizard, see chapter 6, page 109). ➤ Check if you have configured Callback (see chapter 10.2.4, page 327) and in doing so entered an incorrect number (Number under WAN P ARTNER ➧ EDIT ➧ WAN NUMBERS ➧ EDIT). ➤ Check if you left a trace program running over an ISDN-PPP connection. This would cause packets to be sent constantly over ISDN and the connection would remain permanently open. X4000 User’s Guide 381 12 Troubleshooting Outgoing calls cannot be made. ➤ Use isdnlogin to check if outgoing calls are possible. ➤ Check MONITORING AND D EBUGGING ➧ ISDN MONITOR to see if any outgoing calls have been recorded at all, if the number dialed is correct and if the call was connected. ➤ Check if ISDN syslog messages with "disconnect cause" have been recorded. ➤ Check if Encapsulation in WAN PARTNER ➧ EDIT is the same for both connection partners. ➤ Check if Authentication in WAN PARTNER ➧ EDIT ➧ PPP is the same for both connection partners. ➤ Use trace to check what is being sent over the ISDN channels. ➤ Check in the MIB table isdnStkTable if the MIB variable Status has the value loaded. ➤ Make sure your own number is correctly entered in CALLS ➧ ADD. This also applies to outgoing calls. Incoming calls cannot be made. ➤ Check MONITORING AND DEBUGGING ➧ ISDN MONITOR to see if an incoming call has been recorded. ➤ Check WAN PARTNER ➧ EDIT ➧ WAN NUMBERS to see if a suitable number for incoming calls has been entered. ➤ Check the MIB variables DSS1Cause and LocalCause in the MIB table isdnCallHistoryTable. To interpret the entries, see the Software Reference. ➤ Check CALLS to determine if you have made the necessary entries for incoming calls. ➤ Check if Encapsulation in WAN PARTNER ➧ EDIT is the same for both connection partners. ➤ Check if Authentication in WAN PARTNER ➧ EDIT ➧ PPP is the same for both connection partners. 382 X4000 User’s Guide 12 Typical Errors and Procedure 12.2.3 IPX Routing Here you will find some problems that could crop up with IPX routing together with suggestions on how they can be solved. ➤ Use the Setup Tool or MMI to check if you have entered the right license. ➤ Use the Setup Tool to check in IPX if the entry under Internal Network Number is unique in the LAN. A server exists in a remote LAN (LAN-LAN connection over ISDN), but is "invisible" for clients in the local LAN. The server could be invisible for clients because SAP packets are not received from the server: ➤ Check the entries in Update Time and Age Multiplier in WAN PARTNER ➧ EDIT ➧ IPX. The settings must be compatible with the settings on the servers in X4000’s LAN. ➤ Check if a router between them filters out the SAP packets. ➤ Check with isdnlogin if an ISDN connection can be made between client and server. ➤ Check if you have made the correct entries in Local IPX NetNumber and Encapsulation under CM-100BT, FAST ETHERNET and if the server can receive them. When the client tries to reach a server in a remote network over a PPP connection, he must wait a long time and the connection is possibly terminated. In some cases, the local router erroneously tells the client that a server can be reached. ➤ Check if the server has crashed and that the aging interval has not yet expired. If necessary, change the setting of Send RIP/SAP Updates under WAN PARTNER ➧ EDIT ➧ IPX. ➤ Check if the server and the router in the remote network are simultaneously inactive (e.g. because of a power cut). Briefly set the WAN interface of the corresponding WAN partner with the command ifconfig to down and X4000 User’s Guide 383 12 Troubleshooting then back to dialup, in order to delete the routes and services learned by the WAN partner. I can’t change to a network drive on the client station. ➤ The file server may be "invisible" to the client. Proceed as described under "A Server exists in a remote LAN ...". ➤ Check if all the licenses available on the server are in use. ISDN connections are constantly reconnected. It is not only RIP/SAP packets that cause ISDN connections to be set up. ➤ Check if there is an entry in the MIB table ipxDenyTable that is preventing Novell serialization packets from being sent over the dialup connection. ➤ Check under IPX if you have activated enable IPX spoofing and enable SPX spoofing with yes. ➤ Check if any RCONSOLE is running with a constantly changing screen (e.g. MONITOR, IPXCON, TCPCON, screensaver, etc.). ➤ Check if NetBIOS over IPX is used in the LAN (Windows for Workgroups, NT, Win 95). If necessary, select no or on LAN only under IPX for NetBIOS Broadcast replication. ➤ Check if NDS Replica Synchronization is active (for Netware 4.1 servers and higher). ➤ Evaluate the syslog messages (Level = debug) and, if applicable, filter out the IPX packets indicated in the messages as causing unwanted connections to be set up. The MIB variable ipxAdmSpxConns shows more connections than are actually active. X4000 may not be receiving SPX disconnect messages from the server. ➤ Enter the command reset router on the console of the respective server. All inactive connections between the server and X4000 are cleared. 384 X4000 User’s Guide 12 Typical Errors and Procedure ➤ If the disconnect for the client is lost, SPX connections could remain until timeout. These connections would then be displayed in ipxAdmSpxConns until timeout. X4000 User’s Guide 385 12 386 Troubleshooting X4000 User’s Guide 13 13 Technical Data General product features: Feature Description Dimensions: W x H x D in mm Desktop unit 105 x 260 x 300 19-inch built-in unit 220 x 44 x 290 Weight: Desktop unit 2.6 kg 19-inch built-in unit 2.1 kg Transport weight (incl. documentation, cabling, packaging): Desktop unit 5.1 kg 19-inch built-in unit 4.6 kg Ambient requirements: Storage temperature -20 °C to 50 °C Operating temperature 0 °C to 40 °C Relative humidity 20 to 90 % non-condensing in operation 5 to 95 % non-condensing in storage Room classification Operate only in dry rooms Printed documentation supplied with equipment User’s Guide Table 13-1: X4000 technical data X4000 User’s Guide 387 13 Technical Data 13.1 Mains Unit Connect the IEC AC socket of the mains unit to the power supply using the power cord supplied with the equipment. Electrical ratings Mains unit Wide-range mains unit without fan Mains voltage 100 to 240 V AC Mains frequency 50 to 60 Hz Max. current drawn 800 mA Table 13-2: 388 X4000 User’s Guide Technical data for mains unit 13 Features of Basic Unit 13.2 Features of Basic Unit Feature Description Processor Motorola MPC860T RISC CPU Memory 16 MB SDRAM 4 MB flash ROM Interfaces Console interfaces Serial, mini-DIN Ethernet/LAN interface 10/100 Base-T auto sensing, RJ45 socket WAN interfaces ISDN interface BRI S/T, RJ45 socket 2 x X.21/V.35/V.36/X.21bis, 26-pole mini Delta ribbon socket, up to 2048 kbps Displays Illuminated green 122 x 132-pixel LC display with illuminated input keys Blue Power LED on the front panel of X4000 2 Status LEDs, green and red, on the back of X4000 Extension capability Table 13-3: Slot for an X4000 expansion card Features of basic unit X4000 User’s Guide 389 13 Technical Data 13.2.1 Serial Console Interface Pin assignment of serial console interface of basic unit (8-pole mini-DIN socket): 6 7 3 8 4 1 5 2 1 For test purposes 5 RXD 2 For test purposes 6 NC 3 TXD 7 NC 4 GND 8 NC Figure 13-1: Serial console interface with pin assignment 390 X4000 User’s Guide 13 Features of Basic Unit 13.2.2 Ethernet/LAN Interface Pin assignment of 10/100 Base-T Ethernet/LAN interface of basic unit (RJ45 socket): 1 ... 8 1 T+ 5 Shield 2 T- 6 R- 3 R+ 7 Shield 4 Shield 8 Shield Figure 13-2: 10/100 Base-T Ethernet/LAN interface (RJ45 socket) of basic unit with pin assignment The LAN cable used must have the following technical features: ■ 100 Base-T cable CAT5 STP (Shielded Twisted Pair) ■ 8-pole RJ45 plug fully shielded at both ends ■ 4 twisted wire pairs; the following wires are twisted: – Pin 1+2 – Pin 3+6 – Pin 4+5 – Pin 7+8 Outer shielding for all four pairs. X4000 User’s Guide 391 13 Technical Data 13.2.3 ISDN BRI Interface Pin assignment of ISDN BRI interface (RJ45 socket): 1 ... 8 1 NC 5 R- 2 NC 6 T- 3 T+ 7 NC 4 R+ 8 NC Figure 13-3: ISDN BRI interface (RJ45 socket) of basic unit with pin assignment 392 X4000 User’s Guide 13 Features of Basic Unit 13.2.4 Serial WAN Interfaces: The X4000 basic unit is equipped with two serial WAN interfaces: ■ The first serial port (Setup Tool menu CM-SERIAL, SERIAL ➧ UNIT 0) can be used as interface type – X.21/V.11 – V.35/V.11 – V.36/V.11 The setting in the Setup Tool Connector field (see Table 7-11, page 153) enables the port to be changed so that X4000 can be operated in both DCE and DTE Mode. Making the relevant settings in the Setup Tool Connector field physically reverses the signal direction and the pin functions. ■ The second serial port (Setup Tool menu CM-SERIAL, SERIAL ➧ UNIT 1) can be used as interface type – X.21bis/V.28 Changing this port from DCE to DTE Mode and vice versa is only possible using a DCE or DTE cable. The cables to be used are not supplied with X4000, but can be ordered from your dealer. We recommend you use original BinTec cables, which you can buy from your dealer. The use of other cables may cause damage to your equipment and invalidates the guarantee! The description below first deals with the plugs that are generally used for X.21, V.35, V.36 and X.21bis interfaces: ■ "DB-15 Plug for X.21", page 395 ■ "M34 Plug for V.35", page 396 ■ "DB-37 Plug for V.36", page 397 X4000 User’s Guide 393 13 Technical Data ■ "DB-25 Plug for X.21bis", page 399 This is followed by a description of the two serial X4000 ports used for implementing the stated interfaces in X4000: ■ "26-Pole Mini Delta Ribbon Socket for X.21, V.35 and V.36", page 400 ■ "20-Pole Mini Delta Ribbon Socket for X.21bis", page 403 394 X4000 User’s Guide 13 Features of Basic Unit DB-15 Plug for X.21 A DB-15 plug to ISO 4903 is normally used for an X.21 interface: 1 9 ..... 8 ..... 15 Figure 13-4: DB-15 plug (DTE) The DB-15 plug (DTE) and socket (DCE) have the following pin assignment: Variable Connector=DTE ITU-T Signal 101 PG 102 SG 103 T+ 103 T- 104 R+ 104 R- 105 C+ 105 C- 106 I+ 106 Signal direction Pin no. Variable Connector=DCE Signal ITU-T ––– 1 ––– PG 101 ––– 8 ––– SG 102 9 ––––> R+ 104 2 ––––> R- 104 <–––––11 T+ 103 <––––– 4 T- 103 10 ––––> I+ 106 3 ––––> I- 106 <–––– 12 C+ 105 I- <––––– 5 C- 105 115 S+ <–––– 13 S+ 114 115 S- <––––– 6 S- 114 Table 13-4: Pin assignment of DB-15 plug for X.21 (ISO 4903) X4000 User’s Guide 395 13 Technical Data M34 Plug for V.35 An M34 plug to ISO 2593 is normally used for a V.35 interface: NN JJ DD Z LL FF BB X MM HH CC Y KK EE AA W V R T U L N P S F J K M H B D E A C Figure 13-5: M34 plug The M34 plug has the following pin assignment: Variable Connector=DTE ITU-T Signal 101 ChGND 102 SigGND 103 TDA 103 TDB 104 RDB 104 RDA 105 RTS 106 CTS 115 Variable Connector=DCE Signal ITU-T ––– A ––– ChGND 101 ––– B ––– SigGND 102 P –––––> RDA 104 S –––––> RDB 104 <––––– R TDB 103 <––––– T TDA 103 CTS 106 <––––– D RTS 105 RCA <––––– V TCA 114 115 RCB <––––– X TCB 114 108/2 DTR DSR 107 109 DCD <––––– F DCD 109 107 DSR <––––– E DTR 108/2 114 TCB <––––– Y TCB 114 114 TCA <––––– AA TCA 114 Table 13-5: 396 Signal direction Pin no. X4000 User’s Guide C –––––> H –––––> Pin assignment of M34 plug for V.35 (ISO 2593) 13 Features of Basic Unit DB-37 Plug for V.36 A DB-37 plug to ISO 4902 is normally used for a V.36 interface: 1 20 5 10 25 15 30 19 37 Figure 13-6: DB-37 plug X4000 User’s Guide 397 13 Technical Data The DB-37 plug has the following pin assignment: Variable Connector=DTE ITU-T Signal Signal direction Pin no. 101 ChGND ––– 1 ––– ChGND 101 102 SigGND ––– 19 ––– SigGND 102 103 TDB 22 ––––> RDB 104 103 TDA 4 ––––> RDA 104 104 RDB <–––– 24 TDB 103 104 RDA <–––– 6 TDA 103 105 RTSB 25 ––––> RTSB 106 105 RTSA 7 ––––> CTSA 106 106 CTSB <–––– 27 RTSB 105 106 CTSA <–––– 9 RTSA 105 115 RCB <–––– 26 TCB 114 115 RCA <–––– 8 TCA 114 108/2 DTRB 30 ––––> DSRB 107 108/2 DTRA 12 ––––> DSRA 107 109 DCDB <–––– 31 DCDB 109 109 DCDA <–––– 13 DCDA 109 107 DSRB <–––– 29 DTRB 108/2 107 DSRA <–––– 11 DTRA 108/2 114 TCB <–––– 23 TCB 114 114 TCA <–––– 5 TCA 114 Table 13-6: 398 X4000 User’s Guide Variable Connector=DCE Signal ITU-T Pin assignment of DB-37 plug for V.36 (ISO 4902) 13 Features of Basic Unit DB-25 Plug for X.21bis A DB-25 plug to ISO 2110 is normally used for an X.21bis interface: 1 14 7 13 20 25 Figure 13-7: DB-25 plug The DB-25 plug has the following pin assignment: DTE cable ITU-T Signal Signal direction Pin no. 101 ChGND ––––– 1 –––– 103 TD 104 RD 105 RTS 106 CTS <––––– 5 RTS 105 107 DSR <––––– 6 DTR 108/2 102 SigGND SigGND 102 109 DCD <––––– 8 DCD 109 114 TxC <––––– 15 TxC 114 115 RxC <––––– 17 RxC 115 108/2 DTR 20 –––> DSR 107 113 XTC 24 –––> RxC / TxC 114/115 VCC +5V 2 ––––> <––––– 3 4 ––––> ––––– 7 –––– –––– 25 ––– DCE cable Signal ITU-T ChGND 101 RD 104 TD 103 CTS 106 VCC +5V Table 13-7: Pin assignment of DB-25 plug for X.21bis (ISO 2110) X4000 User’s Guide 399 13 Technical Data 26-Pole Mini Delta Ribbon Socket for X.21, V.35 and V.36 The serial X.21/V.35/V.36 interface of X4000 is designed as a 26-pole mini Delta ribbon socket. The interface can be used for X.21, V.35 or V.36, depending on the setting under Interface Type. 13 ...... 1 26 ...... 14 Figure 13-8: 26-pole mini Delta ribbon socket (first serial port, left) 400 X4000 User’s Guide 13 Features of Basic Unit The 26-pole mini Delta ribbon socket has the following pin assignment in DTE Mode (Connector = DTE): ITU-T Direction and pin no. X.21 pin (DB-15) V.35 pin (M34) V.36 pin (DB-37) 101 ––– 1 ––– 1 PG A ChGND 1 ChGND 102 ––– 2 ––– 8 SG B SigGND 19 SigGND 103 3 ––––> 9 T+ S TDB 22 TDB 103 4 ––––> 2 T- P TDA 4 TDA 104 <–––– 5 11 R+ T RDB 24 RDB 104 <–––– 6 4 R- R RDA 6 RDA 25 RTSB 7 RTSA 27 CTSB 105 7 ––––> 10 C+ 105 8 ––––> 3 C- C RTS 106 <–––– 9 12 I+ 106 <–––– 10 5 I- D CTS 9 CTSA 115 <–––– 11 13 S+ X RCB 26 RCB 115 <–––– 12 6 S- V RCA 8 RCA 30 DTRB 12 DTRA 31 DCDB 13 DCDA 29 DSRB 108/2 15 ––––> 108/2 16 ––––> H DTR 109 <–––– 17 109 <–––– 18 107 <–––– 19 107 <–––– 20 E DSR 11 DSRA 114 <–––– 21 AA TCB 23 TCB 114 <–––– 22 Y TCA 5 TCA VCC+5V Table 13-8: F DCD ––– 25 ––– Pin assignment of 26-pole mini Delta ribbon socket (DTE Mode) X4000 User’s Guide 401 13 Technical Data The 26-pole mini Delta ribbon socket has the following pin assignment in DCE Mode (Connector = DCE): ITU-T Direction and pin no. X.21 pin (DB-15) V.35 pin (M34) V.36 pin (DB-37) 101 ––– 1 ––– 1 PG A ChGND 1 ChGND 102 ––– 2 ––– 8 SG B SigGND 19 SigGND 104 3 ––––> 9 R+ S RDB 22 RDB 104 4 ––––> 2 R- P RDA 4 RDA 103 <–––– 5 11 T+ T TDB 24 TDB 103 <–––– 6 4 T- R TDA 6 TDA 25 RTSB 7 CTSA 27 RTSB 106 7 ––––> 10 I+ 106 8 ––––> 3 I- C CTS 105 <–––– 9 12 C+ 105 <–––– 10 5 C- D RTS 9 RTSA 114 <–––– 11 13 S+ X TCB 26 TCB 114 <–––– 12 6 S- V TCA 8 TCA 30 DSRB 12 DSRA 31 DCDB 13 DCDA 29 DTRB 107 15 ––––> 107 16 ––––> H DSR 109 <–––– 17 109 <–––– 18 108/2 <–––– 19 108/2 <–––– 20 E DTR 11 DTRA 114 <–––– 21 AA TCB 23 TCB 114 <–––– 22 Y TCA 5 TCA VCC+5V F DCD ––– 25 ––– Table 13-9: Pin assignment of 26-pole mini Delta ribbon socket (DCE Mode) 402 X4000 User’s Guide 13 Features of Basic Unit 20-Pole Mini Delta Ribbon Socket for X.21bis The serial X.21bis interface of X4000 is a 20-pole mini Delta ribbon socket. 10 ...... 1 20 ...... 11 Figure 13-9: 20-pole mini Delta ribbon socket (second serial port, right) X4000 User’s Guide 403 13 Technical Data The 20-pole mini Delta ribbon socket has the following pin assignment (a DTE cable is required for DTE Mode and a DCE cable for DCE Mode): DTE/DCE Signal direction Pin no. Signal 101 ChGND 103 TD 104 RD 105 RTS 106 CTS <––––– 5 5 107 DSR <––––– 6 6 102 SigGND 109 DCD 108/2 DTR 9 ––––> 20 113 XTC 11 ––––> 24 114 TxC <––––– 12 15 115 RxC <––––– 13 17 VCC +5V –––– 1 –––– 2 ––––> <––––– 3 4 ––––> –––– 7 –––– <––––– 8 ––––– 14 –––– Table 13-10: Pin assignment of 26-pole mini Delta ribbon socket 404 X.21bis (DB-25) ITU-T X4000 User’s Guide 1 2 3 4 7 8 13 Features of Basic Unit 13.2.5 Display Interface The RJ11 socket for the display plug has the following pin assignment: 1...4 1 VDD: +3.3V Supply Voltage 3 SDA: I2C Serial Data 2 SCL: I2C Serial Data 4 GND Figure 13-10: RJ11 socket for display plug with pin assignment X4000 User’s Guide 405 13 Technical Data 13.3 Features of Expansion and Resource Cards 13.3.1 X4E-2/3BRI – WAN Interface Card for ISDN BRI (Basic Rate Interface) Feature Description Interfaces 3 x ISDN interfaces BRI S/T Operating temperature 0 °C to 40 °C Relative humidity 20 to 90 % non-condensing in operation 5 to 95 % non-condensing in storage Extensions Slot for resource card with digital modems Slot for resource card for encryption and compression Table 13-11: Features of BRI expansion card Pin assignment The ISDN BRI interfaces (RJ45 sockets) have the following pin assignment: 1 ... 8 1 NC 5 R- 2 NC 6 T- 3 T+ 7 NC 4 R+ 8 NC Figure 13-11: ISDN BRI interface (RJ45 socket) of BRI expansion card 406 X4000 User’s Guide 13 Features of Expansion and Resource Cards 13.3.2 X4E-1/2PRI – WAN Interface Card for ISDN PRI (Primary Rate Interface) and/or G.703 Feature Description Interfaces 2 x interfaces for ISDN PRI/G.703 with 2 sockets each (IN and OUT) If X4000 is switched off, the IN socket is looped to the OUT socket. Data compression and encryption Integrated hardware support for encryption and compression Operating temperature 0 °C to 40 °C Relative humidity 20 to 90 % non-condensing in operation 5 to 95 % non-condensing in storage Extensions 2 slots for resource card with digital modems Table 13-12: Features of PRI/G.703 expansion card Pin assignment The ISDN PRI/G.703 interfaces have the following pin assignment: 1 ... 8 1 R+ 5 T- 2 R- 6 NC 3 NC 7 NC 4 T+ 8 NC Figure 13-12: ISDN PRI/G.703 interface (RJ45 socket) of PRI/G.703 expansion card X4000 User’s Guide 407 13 Technical Data 13.3.3 X4E-2FE – LAN Interface Card for 10/100 Mbps Feature Description Interfaces 2 x 10/100 Base-T auto-sensing Operating temperature 0 °C to 40 °C Relative humidity 20 to 90 % non-condensing in operation 5 to 95 % non-condensing in storage Extensions Slot for resource card for encryption and compression Table 13-13: Features of LAN expansion card Pin assignment The LAN interfaces (RJ45 sockets) have the following pin assignment: 1 ... 8 1 T+ 5 Shield 2 T- 6 R- 3 R+ 7 Shield 4 Shield 8 Shield Figure 13-13: LAN interface (RJ45 socket) of LAN expansion card 13.3.4 XTR-S/M/L – Resource Cards with Digital Modems The resource cards with digital modems are available in the following versions for X4E-3BRI and X4E-2PRI: ■ XTR-S with 8 digital modems 408 X4000 User’s Guide 13 Features of Expansion and Resource Cards ■ XTR-M with 12 digital modems ■ XTR-L with 30 digital modems Feature Description Operating temperature 0 °C to 40 °C Relative humidity 20 to 90 % non-condensing in operation 5 to 95 % non-condensing in storage Table 13-14: Features of resource cards with digital modems If you are using an expansion card with resource card(s) in the X4000 built-in unit, BinTec Communications AG recommends that you use the fan unit obtainable as optional equipment. 13.3.5 XTR-ENC – Resource Card for Encryption and Compression The resource cards for encryption and compression offer hardware support for STAC compression and symmetric encryption. Encryption processes supported: DES, 3DES, CAST, Twofish and Blowfish. Feature Description Operating temperature 0 °C to 40 °C Relative humidity 20 to 90 % non-condensing in operation 5 to 95 % non-condensing in storage Table 13-15: Features of resource card for encryption and compression The ISDN PRI or G.703 expansion card is equipped as standard with hardware support for encryption and compression. The ISDN BRI expansion card and the LAN expansion card can be optionally equipped with an appropriate resource card. X4000 User’s Guide 409 13 Technical Data Due to export and import regulations, it is not always possible to guarantee delivery of resource cards for encryption and compression. If you are using an expansion card with resource card(s) in the X4000 built-in unit, BinTec Communications AG recommends that you use the fan unit obtainable as optional equipment. 410 X4000 User’s Guide 14 14 Important Commands This chapter describes the following commands: ■ SNMP shell commands: – telnet – ping – trace – isdnlogin – debug – ifconfig – ifstat – netstat – date – t – nslookup ■ BRICKtools for Unix commands: – bricktrace – capitrace X4000 User’s Guide 411 14 Important Commands 14.1 SNMP Shell Commands X4000 contains several pre-installed programs that can be started directly from the SNMP shell. A short description of the most commonly used programs and the associated command lines for starting the respective programs in the SNMP shell are given below. Entering ? displays a list of the most important commands available on X4000. Please note: Parameters shown in the command lines inside square brackets [ ] represent optional values. Terms inside angle brackets < > can have several values. Do not enter any brackets! telnet telnet [-f] <host> [<port>] Is used to communicate with another host. – -f: specifies that the telnet session should be transparent. This option is especially useful for establishing connections to non-telnet ports (e.g. uucp or smtp). – host: IP address or name of host. – port: port number. ping ping [-i] [-f <precount>] [-d <msec>] [-c <count>] <target> [<size>] Is used to test communication to another host. 412 – -i: sends each packet one byte larger. – -f <precount>: <precount> packets are sent first. The next packet is sent as soon as a packet has been received. Output: a dot appears on the screen for each packet sent and a dot is X4000 User’s Guide 14 SNMP Shell Commands deleted for each packet received. -f 1 without the additional parameter -d <msec> causes approx. half the equipment’s bandwidth to be loaded by sending and receiving packets. – -d <msec>: waits <msec> until the next packet is sent, default: 1000 millisecondsn – -c <count>: limits the number of packets sent, <count> sets the number of packets. – target: IP address or name of host to which echo_request packets are sent. – size: sets the length of the packets to be sent. If you do not specify -c <count>, packets will be sent to the host until you stop the operation, e.g. by pressing Ctrl-C. trace For WAN interfaces: trace [-h23aFADtpiNxX] [-T <tei>] [-c <cref>] [<channel> <unit> <slot> | next | <ifcname>] For LAN interfaces: trace [-h23iNxX1] [-d <destination MAC filter>] [-o] [-s <source MAC filter>]0 0 <slot> Is used to display and interpret data packets sent and received over ISDN (Dand B-channels) or the LAN. – -h: hexadecimal output. – -2: layer 2 output – -3: layer 3 output – -a: asynchronous HDLC (B-channel only) – -F: fax (B-channel only) – -A: fax and AT commands (B-channel only) – -D: additional time parameter (delta) – -t: output in ASCII text (B-channel only) – -p: PPP (B-channel only) X4000 User’s Guide 413 14 Important Commands – -i: IP output (B-channel only) – -N: Novell IPX output (B-channel only) – -x: raw dump mode. – -X: asynchronous PPP over X.75 (B-channel only) – -T <tei>: set TEI filter (D-channel only) – -c <cref>: set callref filter (D-channel only) – channel: 0 = D-channel or X.21 interface, 1 ... 31 = Bx-channel – unit: 0 ... 1. selects the physical interface for modules with two interfaces (e.g. CM-2BRI) – slot: 1 ... 2. indicates the slot in which the module is installed – next: only display information for the next B-channel opened – <ifcname>: name or index of the interface (see "ifstat", page 416). – -d <destination MAC filter>: set destination MAC address filter (LAN only). – -s <source MAC filter>: set source MAC address filter (LAN only). – -o: combine two or more -d filters or -s filters with a logical OR operation. – specific <MAC filter>: me = X4000’s MAC address, bc = broadcast packets. You can combine a -d MAC filter and an -s MAC filter with a logical AND operation by simply specifying them both. To combine two or more -d and -s MAC filters with a logical OR operation, specify the filters and separate them with -o. isdnlogin isdnlogin [-c <stknumber>] [-C] [-s <service>] [-a <addinfo>] [-b <bits>] isdn-number [isdn-service]| layer1-protocol] Is used to open a remote login shell on X4000 over ISDN. 414 – -c <stknumber>: defines the ISDN stack (if several ISDN cards are used). – -C: tries to use compression (V.42bis). X4000 User’s Guide 14 SNMP Shell Commands – -b <bits>: use only <bits> bits for transmission (e.g. enter -b 7 for 7-bit ASCII transmission). – isdn-number: isdn number of the ISDN partner you want to log in to. – isdn-service: the ISDN service you want to use (data, telephony, fax g3, fax g4, btx). – layer1-protocol: Possible values: v110_1200, v110_2400, v110_4800, v110_9600, v110_19200, v110_38400, modem, dovb56k, telephony. debug debug [show]|[[-q] all|acct|system|<subs> [<subs> ...]] Is used to selectively display debugging information originating from one of X4000’s subsystems. – show: displays all possible subsystems that can be debugged. – -q: no timestamp attached before each debugging message. – all: displays debugging information for all subsystems. – acct: displays debugging information for the accounting subsystem. – system: displays debugging information for all subsystems except the accounting subsystem. – subs: subsystem for which debugging information is to be displayed. Several entries are possible (separated by a space). ifconfig ifconfig <interface> [destination <destaddrs>] [<address>] [netmask <mask>] [up | down | dialup] [-] [metric <n>] Assigns the IP address and the associated netmask to the interface <interface> and configures the associated parameters. The routing table is changed accordingly. If you only enter ifconfig <interface>, the current interface parameters are displayed. – interface: name of the interface (ifDescr). – destination <destaddrs>: destination IP address of a host. This adds a host route for this host in the routing table (ipRouteDest). X4000 User’s Guide 415 14 Important Commands – address: X4000’s IP address for the interface (ipRouteNextHop). – netmask <mask>: netmask of the interface (ipRouteMask). – up: sets the interface to the up status. – down: sets the interface to the down status. – dialup: sets the interface to the dialup status. – -: does not define its own IP address (ipRouteNextHop = 0.0.0.0). – metric <n>: sets route metric to n (ipRouteMetric1). ifstat ifstat [-lur] [<ifcname>] Is used to display status information for the system’s interfaces, based on the contents of the MIB table ifTable. – -l: displays the full length of the interface information (normally the information is only displayed up to the twelfth character). – -u: only displays information on interfaces that are in the up status. – -r: displays the filters defined for the interface. – ifcname: only displays information on interfaces whose names start with the characters entered (e.g. ifstat en1 will display information on the interfaces en1, en1-IIc and en1-snap). netstat netstat [[-i | -r | -p [<interface>]] | -d <dest. IP addr.>] Is used to display a short list of system information. – -i: displays a list of the interfaces. – -r: displays a list of routing table entries. – -p: displays a list of WAN partners. – interface: limits the information displayed to the selected interface. – -d <dest. IP addr.>: displays routes to the IP address entered. date date [YYMMDDHHMMSS] X4000 has a software clock. Entering date displays the time set. 416 X4000 User’s Guide 14 SNMP Shell Commands Entering date YYMMDDHHMMSS sets the clock to the corresponding value (year, month, day, hour, minute, second). t t [<seconds>] Is used to define the auto logout time for the current login session (a connection to X4000 over telnet, isdnlogin or serial interface is normally disconnected automatically if no entry is made on the keyboard for 15 minutes). – seconds: auto logout is activated after seconds. Entering t deactivates auto logout. 0 nslookup nslookup [-an] [-t <type>] [-w <sec>] [-r <ret>] ipaddr | name [<server>] Is used to check how a name or an IP address is resolved by X4000 or another name server. – -a: displays all the data received. – -n: prevents the resolution of the indicated name server address (without this option, an attempt is made to resolve the address of the name server). – -t <type>: executes <type> requests. Possible values for type: 0, A, NS, MD, MF, CNAME, SOA, MB, MG, MR, NULL, WKS, PTR, HINFO, MINFO, MX, TXT, ANY or any decimal number. – -w <sec>: wait <sec> before sending a new request (default value: 3). – -r <ret>: send a request maximum <ret> times (default value: 5). – ipaddr: IP address to be resolved. – name: name to be resolved. – <server>: IP address of the name server that is to be asked for (default value: 127.0.0.1). An attempt is made to have this name server address resolved by the local DNS proxy. X4000 User’s Guide 417 14 Important Commands Entering -? usually provides syntax help. The update command can be found in chapter 11.2, page 371. Further SNMP commands can be found in the Software Reference. 418 X4000 User’s Guide 14 BRICKtools for Unix Commands 14.2 BRICKtools for Unix Commands The bricktrace and capitrace programs are included in BRICKtools for UNIX on the BinTec Companion CD. They are started on a Unix workstation by entering the following commands. bricktrace bricktrace [-h23aeFpiNtxs] [-T <tei>] [-c <cref>] [-r <cnt>] [-H <host>] [-P <port>] <channel> <unit> <slot> Is used to trace and evaluate ISDN messages (D- and B-channels). – -h: hexadecimal output – -2: layer 2 output – -3: layer 3 output – -a: asynchronous HDLC (B-channel only) – -e: ETS300075 (Euro File Transfer) output – -F: fax (B-channel only) – -p: PPP (B-channel only) – -i: IP output (B-channel only) – -N: Novell IPX output (B-channel only) – -t: output in ASCII text (B-channel only) – -x: raw dump mode – -s: Check X4000 for available trace channels. – -T <tei>: set TEI filter (D-channel only) – -c <cref>: set callref filter (D-channel only) – -r <cnt>: only receive cnt bytes – -H <host>: IP address or name of IP host – -p <port>: specify trace TCP port (default: 7000). – channel: 0 = D-channel or X.21 interface, 1 ... 31 Bx-channel – unit: 0 ... 1. selects the physical interface for modules with two interfaces (e.g. CM-2BRI) – slot: 1 ... 2. indicates the slot in which the module is installed X4000 User’s Guide 419 14 Important Commands capitrace capitrace [-h] [-s] [-l] Is used to trace and evaluate CAPI messages. All CAPI messages sent or received by X4000 are displayed. The IP address of X4000 must be entered as the environment variable CAPI_HOST. – -h: hexadecimal output. – -s: short output. Only the application ID, a connection identifier and the name of the CAPI message are displayed at the end of the information line. – -l: long output (default). A detailed interpretation is given for each parameter in the CAPI message. Each CAPI message is preceded by a line containing the following information: 420 – Timestamp ("seconds.milliseconds" local time) – Sent/received flag (X = sent, R = received) – Name of the CAPI message (ASCII string) – Command of the CAPI message (0xABXY, AB = <subcommand> XY = <command>) – Number of the tracer message (#<decimal>) – Length of the CAPI message ([<decimal>]) – Application ID (ID = <decimal>) – Number of the CAPI message (no. (<decimal>)) – Short output only: connection identifier (ident = 0x<hexadecimal>) X4000 User’s Guide 15 15 General Safety Precautions in 15 Different Languages Allgemeine Sicherheitshinweise in deutsch In den nachfolgenden Abschnitten finden Sie Sicherheitshinweise, die Sie beim Umgang mit Ihrem Gerät unbedingt beachten müssen. Transport und Lagerung ■ Transportieren und lagern Sie X4000 nur in der Originalverpackung oder in Aufstellen und in Betrieb nehmen ■ Beachten Sie vor dem Aufstellen und Betrieb von X4000 die Hinweise für einer anderen geeigneten Verpackung, die Schutz gegen Stoß und Schlag gewährt. die Umgebungsbedingungen (vgl. Technische Daten). Verwenden Sie eine feste und ebene Unterlage. ■ Elektrostatische Aufladungen können zu Geräteschäden führen. Tragen Sie daher eine geerdete Manschette um das Handgelenk oder berühren Sie eine geerdete Fläche, bevor Sie Buchsen oder Erweiterungskarten von X4000 berühren. Berühren Sie die Erweiterungskarten grundsätzlich nur an den Rändern und fassen Sie nicht auf Bauteile oder Leiterbahnen. ■ Halten Sie den nicht benutzten Erweiterungssteckplatz mit der Blindabdeckung verschlossen, damit keine Gegenstände ins Innere des Gerätes gelangen können. Befinden sich während des Betriebs Fremdgegenstände im Gerät, besteht Stromschlag- und Kurzschlußgefahr. ■ Achten Sie darauf, daß keine spitzen Gegenstände das Fenster des Displaymoduls beschädigen. Schützen Sie das Displaymodul vor Stoß und Fall und schließen Sie es nur an die dafür vorgesehene RJ11-Buchse von X4000 an, um Schäden an X4000 und dem Displaymodul zu vermeiden. ■ Achten Sie bei der Verkabelung darauf, daß die Lüftungsschlitze des Geräts nicht verdeckt werden und die Lüftung nicht behindert wird. Durch Beeinträchtigung der Lüftung von X4000 kann es zu Schäden am Gerät kommen. Durch mangelnde Lüftung entstandene Schäden führen zum Garantieverlust. X4000 User’s Guide 421 15 General Safety Precautions in 15 Different Languages ■ Öffnen Sie nicht das Grundgerät und nehmen Sie keinerlei Manipulationen am Netzteil vor, da sonst Lebensgefahr durch einen Stromschlag besteht. Entfernen Sie keine Befestigungsschrauben des Grundgerätes. ■ Wenn das Gerät aus kalter Umgebung in den Betriebsraum gebracht wird, kann Betauung sowohl am Geräteäußeren als auch im Geräteinneren auftreten. Warten Sie, bis Ihr Gerät temperaturangeglichen und absolut trocken ist, bevor Sie es in Betrieb nehmen. Beachten Sie die Umweltbedingungen in den Technischen Daten. ■ Prüfen Sie, ob die örtliche Netzspannung mit den Nennspannungen des Netzteils übereinstimmt. Das Gerät darf unter folgenden Bedingungen betrieben werden: – 100 - 240 VAC – 50 - 60 Hz ■ Stellen Sie sicher, daß die Schutzkontakt-Steckdose der Installation frei zugänglich ist. Zur vollständigen Netztrennung muß der Netzstecker gezogen werden. ■ Beachten Sie beim Verkabeln die Reihenfolge, wie im Handbuch beschrieben. Verwenden Sie nur Kabel, die den Spezifikationen in diesem Handbuch genügen oder original mitgeliefert wurden. Falls Sie andere Kabel verwenden, übernimmt BinTec Communications AG für auftretende Schäden oder Beeinträchtigung der Funktionalität keine Haftung. Die Gerätegaranie erlischt in diesen Fällen. ■ Beachten Sie beim Anschluß des Geräts die Hinweise im Handbuch. ■ Verlegen Sie Leitungen so, daß sie keine Gefahrenquelle (Stolpergefahr) bilden und nicht beschädigt werden. ■ Schließen Sie Datenübertragungsleitungen während eines Gewitters weder an noch ziehen Sie sie ab oder berühren Sie diese. Bestimmungsgemäße Verwendung, Betrieb 422 ■ X4000 ist für den Einsatz in einer Büroumgebung bestimmt. Als Multiprotokoll-Router baut X4000 in Abhängigkeit von der Systemkonfiguration WAN-Verbindungen auf. Um ungewollte Gebühren zu vermeiden, sollten Sie das Produkt unbedingt überwachen. X4000 User’s Guide 15 ■ X4000 entspricht den einschlägigen Sicherheitsbestimmungen für Einrichtungen der Büroumgebung. Informationstechnik für den Einsatz in einer ■ Der bestimmungsgemäße Betrieb gemäß IEC 950/EN 60950 des Systems ist nur bei komplett montiertem Blechgehäuse gewährleistet (Kühlung, Brandschutz, Funkentstörung). ■ Die Umgebungstemperatur darf 50 °C nicht übersteigen. Vermeiden Sie direkte Sonneneinstrahlung. ■ Achten Sie darauf, daß keine Gegenstände (z. B. Büroklammern) oder Flüssigkeiten ins Innere des Geräts gelangen (elektrischer Schlag, Kurzschluß). Achten Sie auf ausreichende Kühlung. ■ X4000 enthält keine Bauteile, die vom Benutzer getauscht werden dürfen oder Schalter/Jumper, die der Benutzer einstellen muß. ■ Unterbrechen Sie in Notfällen (z. B. beschädigtes Gehäuse oder Bedienelement, Eindringen von Flüssigkeit oder Fremdkörpern) sofort die Stromversorgung und verständigen Sie den Service. Reinigung und Reparatur ■ Das Gerät darf nur von einer BinTec-autorisierten Servicestelle geöffnet werden. Vor Öffnen des Geräts unbedingt den Netzstecker ziehen. Durch unbefugtes Öffnen und unsachgemäße Reparaturen können erhebliche Gefahren für den Benutzer entstehen (z. B. Stromschlag). Lassen Sie Reparaturen am Gerät nur von einer BinTec-autorisierten Servicestelle durchführen. Wo sich die Servicestelle befindet, erfahren Sie von Ihrem Händler. In allen anderen Fällen erlöschen jegliche Garantieansprüche. ■ Das Gerät darf auf keinen Fall naß gereinigt werden. Durch eindringendes Wasser können erhebliche Gefahren für den Benutzer (z. B. Stromschlag) und erhebliche Schäden am Gerät entstehen. ■ Niemals Scheuermittel, alkalische Reinigungsmittel, scharfe oder scheuernde Hilfsmittel benutzen. X4000 User’s Guide 423 15 General Safety Precautions in 15 Different Languages Yleiset turvallisuusmääräykset Seuraavista kappaleista löydät turvallisuusmääräykset, joita on ehdottomasti noudatettava reittivalitsinta käytettäessä. Kuljetus ja varastointi Asennus ja käyttöönotto ■ Kuljeta ja varastoi X4000 vain alkuperäispakkauksessaan tai muussa sopivassa pakkauksessa, joka suojaa töytäisyiltä ja iskuilta. ■ Tarkista ennen X4000 -laitteen asennusta ja käyttöä, että ympäristöolosuhteista annettuja ohjeita (kts. lukua Tekniset tiedot) on noudatettu. Aseta laite tukevalle, tasaiselle alustalle. ■ Sähköstaattiset varaukset voivat johtaa laitteen vioittumisen. Pidä siksi ranteen ympärillä maadoitettua ranneketta tai kosketa maadoitettua pintaa, ennen kuin kosket X4000:n liittimiä tai laajennuskortteja. Kosketa laajennuskortteja periaatteessa vain reunoista äläkä tartu rakenneosiin tai johdinratoihin. ■ Pidä käyttämättömät laajennuskorttipaikat suojuksilla suljettuina, jotta mitkään esineet eivät voi joutua laitteen sisälle. Jos laitteessa on käytön aikana vieraita esineitä, siitä aiheutuu sähköisku- ja oikosulkuvaara. ■ Huolehdi siitä, että mitkään terävät esineet eivät vahingoita näyttömodulin ikkunaa. Suojaa näytömoduli iskuja ja putoamista vastaan. Liitä se vain X4000:n tähän tarkoitukseen varattuun RJ11-liittimeen X4000:n ja näyttömodulin vaurioitumisen välttämiseksi. ■ Huomaa kaapeloitaessa, että laitteen tuuletusraot eivät peity ja tuuletus ei esty. X4000:n tuuletuksen estyessä laitteeseen voi syntyä vaurioita. Puutteellisesta tuuletuksesta aiheuneet vauriot johtavat takuun raukeamiseen. ■ Älä avaa peruslaitetta äläkä muuntele verkkolaitetta mitenkään, sillä siitä aiheutuu sähköisku- ja hengenvaara. Älä poista yhtää kiinnitysruuvia peruslaitteesta. ■ Kun laite tuodaan kylmästä ympäristöstä käyttötiloihin, sen ulko- sekä sisäpinnoille voi syntyä kastetta. Odota, että laitteen lämpötila on asettunut ja laite on ehdottoman kuiva, ennen kuin otat sen käyttöön. Huomioi ympäristövaatimukset, jotka on esitetty teknisissä tiedoissa. ■ Tarkista, vastaako paikallinen verkkojännite verkkolaitteen nimellisjännitteitä. Laitetta saa käyttää seuraavissa olosuhteissa: 424 X4000 User’s Guide 15 – 100 - 240 VAC – 50 - 60 Hz ■ Varmista, että suko-pistorasia on asennusta varten vapaasti tavoitettavissa. Verkkopistoke on vedettävä pistorasiasta laitteen irrottamiseksi täydellisesti verkosta. ■ Huomaa kaapeloitaessa käsikirjassa kuvailtu järjestys. Käytä vain kaapelia, joka vastaa tämän käsikirjan spesifikaatioita tai joka toimitettiin alunperin laitteen mukana. Jos käytät toista kaapelia, BinTec Communications AG ei ota vastuuta vahingoista tai toiminnan huonontumisesta. Tällaisissa tapauksissa laitetakuu raukeaa. ■ Noudata laitetta liittäessäsi käsikirjan ohjeita. ■ Vedä kaapelit sellaisiin paikkoihin, että ne eivät aiheuta vaaratilanteita (kompastumisia) eivätkä vahingoitu. ■ Älä liitä, irrota tai kosketa tiedonsiirtokaapeleita ukonilman aikana. Määräystenmukainen käyttö, käyttö ■ X4000 on tarkoitettu käytettäväksi toimistoympäristössä. X4000 on moniprotokollareititin, jonka avulla voidaan luoda järjestelmäkonfiguraatiosta riippuen WAN-yhteyksiä. Jotta ei-toivotuilta maksuilta vältytään, laitetta tulee ehdottomasti valvoa. ■ X4000 vastaa toimistotiloissa käytettäville tietotekniikan laitteistoille asetettuja asiaankuuluvia turvallisuusmääräyksiä. ■ Järjestelmän IEC 950/EN 60950 mukainen käyttö on taattu ainoastaan, mikäli peltikotelo on asennettu täydellisesti (jäähdytys,palosuoja, kipinäsuoja). ■ Ympäristön lämpötila ei saa nousta yli 50 °C:een. Vältä suoraa auringonpaistetta. ■ Varo, ettei mitään vieraita esineitä (esim. paperiliittimiä) tai nesteitä pääse laitteen sisäpuolelle (sähköisku, lyhytsulku). Huolehdi siitä, että laitteen jäähdytys on riittävä. ■ X4000 :ssa ei ole mitää rakenneosia, jotka täytyy vaihtaa. Laitteessa ei ole myöskään kytkimiä tai jumppereita, jotka käyttäjän täytyy säätää. X4000 User’s Guide 425 15 General Safety Precautions in 15 Different Languages ■ Keskeytä hätätilanteessa (esim. särkynyt kotelo tai käyttölaite, nesteen tai vieraiden esineiden joutuminen laitteen sisään) virransyöttö välittömästi ja ota yhteyttä huoltopalveluun. Puhdistus ja korjaus ■ Vain BinTec:in valtuuttama huoltokorjaamo saa avata laitteen. Verkkopistoke on ehdottomasti vedettävä seinästä ennen laitteen aukaisemista. Asiaton aukaiseminen ja asiantuntemattomat korjaukset voivat aiheuttaa käyttäjälle huomattavia vaaroja (esim. sähköisku). Anna vain BinTec:in valtuuttaman huoltokorjaamon korjata laitetta. Huoltokorjaamoa koskevia tietoja saat laitemyyjältäsi. Muissa tapauksissa kaikkinaiset takuuvaatimukset evätään. ■ Älä missään tapauksessa puhdista laitetta runsaalla vedellä. Sen sisään tunkeutunut vesi saattaisi aiheuttaa vakavia vaaroja (esim. sähköisku) käyttäjälle ja vaurioittaa laitetta pahasti. ■ Älä koskaan käytä puhdistamiseen hankausaineita, puhdistusaineita taikka syövyttäviä tai hankaavia tehoaineita. 426 X4000 User’s Guide alkalisia 15 Consignes de sécurité générales en français Vous trouverez, dans les paragraphes suivants, les consignes de sécurité que vous devez absolument respecter lors de l’utilisation de votre router. Transport et entreposage ■ Transportez et entreposez X4000 uniquement dans son emballage Installation et mise en service ■ Avant de procéder à l’installation et à la mise en service de X4000, veuillez d’origine ou un autre emballage approprié lui garantissant une bonne protection contre les chocs et les coups. vous référer aux indications concernant les conditions d’environnement (cf. Caractéristiques techniques). Utilisez un support stable et plat. ■ Des charges électrostatiques peuvent endommager l'appareil. Il est donc important que vous portiez un bracelet antistatique ou que vous touchiez une surface mise à la terre avant de saisir des prises ou des cartes d'extension de X4000. Il est impératif de ne saisir les cartes d'extension que par les bords et de ne pas toucher aux composants ni aux circuits conducteurs . ■ Refermez les emplacements des cartes d'extension non utilisées avec des caches borgnes de manière à ce que rien ne puisse pénétrer à l'intérieur de l'appareil. Si des objets se trouvent dans l'appareil en fonctionnement, il y a risque d'électrocution et de court-circuit. ■ Veillez à ce qu'aucun objet pointu n'endommage la fenêtre du module d'affichage. Protégez le module d'affichage contre les chocs et les chutes ; ne le raccordez qu'à la prise RJ11 X4000 prévue à cet effet, afin d'éviter tout dommage du X4000 et du module d'affichage. ■ Lors du câblage, veillez à ne pas recouvrir les fentes d'aération de l'appareil de manière à ne pas entraver la ventilaton. Le droit à la garantie est annulé lorsque les dommages résultent d’une ventilation insuffisante. ■ N’ouvrez pas l’appareil de base et n’effectuez aucune manipulation sur le bloc d’alimentation, sous risque de danger de mort par électrocution. Ne retirez aucune vis de fixation sur l’appareil de base. ■ Si l'appareil est transporté dans une pièce où la température est plus élevée que l'endroit d'où il provient, de la condensation risque de se former à l'extérieur comme à l'intérieur de l'appareil. Avant de mettre votre appareil X4000 User’s Guide 427 15 General Safety Precautions in 15 Different Languages en service, attendez qu'il soit à la même température que la pièce et qu'il soit absolument sec. Veuillez respecter les indications concernant les conditions d'environnement (cf. Caractéristiques techniques). ■ Vérifiez si la tension secteur locale correspond aux tensions nominales du bloc d’alimentation. L'appareil ne devra fonctionner que dans les conditions ci-après : – 100 - 240 Vca – 50 - 60 Hz ■ Vérifiez si la prise de courant de sécurité pour l'installation est librement accessible. Il faut retirer la fiche de contact pour garantir la déconnexion du secteur. ■ Lors du câblage, respectez les étapes indiquées dans le manuel. N'utilisez que les câbles correspondants aux spécifications indiquées dans ce manuel ou les câbles d'origine joints à la livraison. Dans le cas où vous utiliseriez d’autres câbles que ces derniers, la société BinTec Communications AG décline toute responsabilité pour des dommages éventuels ou pour tout défaut de fonctionnement pouvant en résulter. Dans de tels cas, la garantie s'annule. ■ Pour le raccordement de l’appareil, respectez les indications du manuel. ■ Posez les câbles de telle sorte qu’ils ne puissent pas être à l’origine de risques (risques de trébuchement) ou être endommagés. ■ Pendant un orage, ne connectez pas les lignes de transmission des données, ne les débranchez pas et ne les touchez pas. Utilisation conforme, fonctionnement ■ X4000 est conçu pour l'utilisation dans les bureaux. En tant que router multi-protocoles, X4000 établit les connexions WAN en fonction de la configuration existante. Pour éviter des frais de taxation indésirables, il est impératif de placer ce produit sous contrôle. ■ X4000 est conforme aux prescriptions de sécurité relatives aux équipements de la technique de l’information pour l’utilisation dans les bureaux. 428 X4000 User’s Guide 15 ■ Le fonctionnement de ce système conformément aux normes CEI 950/ EN 60950 ne peut être garanti que si le boîtier métallique est monté au complet (refroidissement, protections anti-incendie et antiparasite). ■ La température ambiante ne doit pas dépasser 50 °C. Evitez le rayonnement direct du soleil sur l'appareil. ■ Veillez à ce qu’aucun objet (des agrafes par ex.) ni aucun liquide ne s’introduise à l’intérieur de l’appareil (risque d'électrocution ou de courtcircuit). Veillez à ce que l’appareil ait suffisamment refroidi. ■ X4000 ne contient aucun composant devant être remplacé par l'utilisateur et aucun commutateur/fil volant ayant besoin d'être réglé. ■ Dans les cas d’urgence extrême (si le boîtier ou des éléments de commande sont endommagés, lorsque du liquide ou des corps étrangers se sont introduits dans l’appareil, par ex.), déconnectez immédiatement l’alimentation en courant et contactez le service après-vente. Nettoyage et réparations ■ L’appareil doit être ouvert uniquement par un point de service après-vente agréé par BinTec. Il est impératif de retirer la fiche secteur avant d'ouvrir l'appareil. L'ouverture non autorisée de l'appareil ainsi que des réparations non conformes exposent l'utilisateur à des risques graves (risque d'électrocution par ex.). Les réparations ne doivent être exécutées que un point de service après-vente agréé par BinTec. Votre concessionnaire vous fera part de l’adresse à laquelle vous pourrez contacter le service aprèsvente. Tout autre cas annule le droit à la garantie. ■ L’appareil ne doit être en aucun cas nettoyé à l’eau. Une pénétration d’eau dans l’appareil pourrait entraîner des risques graves pour l’opérateur (risque d'électrocution par ex.) et des dommages importants de l’appareil. ■ Ne jamais utiliser de produits récurants, de produits de nettoyage alcalins, ni d'outils tranchants ou grattants. X4000 User’s Guide 429 15 General Safety Precautions in 15 Different Languages ÃåíéêÝò ïäçãßåò áóöáëåßáò óôá ÅëëçíéêÜ Στισ ακüλουθεσ παραγράφουσ θα βρείτε τισ οδηγίεσ ασφαλείασ, τισ οποίεσ θα πρέπει να λάβετε οπωσδήποτε υπ’ üψιν σασ κατά τη χρήση του Router. Μεταφορά και αποθήκευση ■ Να µεταφέρετε και να αποθηκεύετε το X4000 µüνο στη γνήσια Εγκατάσταση και έναρξη τησ λειτουργίασ ■ Πριν την εγκατάσταση και την έναρξη τησ λειτουργίασ του X4000 να συσκευασία ή σε µία άλλη κατάλληλη συσκευασία, η οποία να εξασφαλίζει προστασία απü τισ κρούσεισ και τα χτυπήµατα. λάβετε υπ’ üψιν σασ τισ οδηγίεσ σχετικά µε τισ συνθήκεσ περιβάλλοντοσ (βλέπε Τεχνικά στοιχεία). Χρησιµοποιήστε ένα σταθερü και επίπεδο υπüβαθρο. ■ Ηλεκτροστατικά φορτία µπορούν να προκαλέσουν βλάβη στη συσκευή. Γι αυτü, πριν έρθετε σε επαφή µε τισ υποδοχέσ ή τησ πλατίνεσ αναβάθµισησ του X4000 θα πρέπει να φοράτε ένα αντιστατικü µανικέτι γύρω απü το χέρι σασ ή να αγγίζετε µία γειωµένη επιφάνεια. Αγγίζετε τισ πλατίνεσ αναβάθµισησ µüνο στισ άκρεσ και µη πιάνετε καλώδια η εξαρτήµατα. ■ Να διατηρείτε κλειστέσ τισ µη χρησιµοποιηµένεσ υποδοχέσ αναβάθµισησ µε το τυφλü κάλυµµα, ώστε να µην µπορούν να εισέλθουν αντικείµενα στο εσωτερικü τησ συσκευήσ. Αν κατά την διάρκεια τησ λειτουργίασ υπάρχουν µέσα στην συσκευή ξένα αντικείµενα υπάρχει κίνδυνοσ ηλεκτροπληξίασ και βραχυκυκλώµατοσ. ■ Να προσέχετε ώστε η οθüνη τησ µονάδασ ενδείξεων να µην υποστεί ζηµιέσ απü αιχµηρά αντικείµενα. Να προστατεύετε την µονάδα ενδείξεων απü χτυπήµατα και πτώσεισ και να την συνδέετε µüνον στην προβλεπüµενη υποδοχή RJ11 του X4000, για να αποφύγετε τισ ζηµιέσ στο X4000 και στην µονάδα ενδείξεων. ■ Κατά την καλωδίωση προσέξτε ώστε να µην καλύπτονται οι σχισµέσ εξαερισµού τησ συσκευήσ και να µην εµποδίζεται ο αερισµüσ. Απü τον µειωµένο αερισµü του X4000 µπορούν να προκληθούν ζηµιέσ στην συσκευή. Οι βλάβεσ που προκύπτουν απü ελλιπή αερισµü συνεπάγονται την απώλεια τησ εγγύσησ. 430 X4000 User’s Guide 15 ■ Μη ανοίγετε τη βασική συσκευή και µην κάνετε µετατροπέσ στον ρευµατολήπτη, διüτι υπάρχει κίνδυνοσ θάνατοσ απο ηλεκτροπληξία. Μη βγάζετε τησ βίδεσ στερέωσησ τησ βασικήσ συσκευήσ. ■ ¼ταν η συσκευή µεταφέρεται απü ψυχρü περιβάλλον στον χώρο λειτουργίασ µπορεί να παρουσιασθεί τήξη τüσο στο εξωτερικü üσο και στο εσωτερικü τησ συσκευήσ. Πριν την θέσετε σε λειτουργία περιµένετε µέχρι που η συσκευή να αποκτήσει την ίδια θερµοκρασία και να είναι τελείωσ στεγνή. Προσέξτε τισ συνθήκεσ περιβάλλοντοσ στο Τεχνικά στοιχεία. ■ Εξετάστε αν η τάση του τοπικού ηλεκτρικού δικτύου συµφωνεί µε την ονοµαστική τάση του ρευµατολήπτη. Η λειτουργία τησ συσκευήσ επιτρέπεται µüνο µε τισ ακüλουθεσ προϋποθέσεισ: – 100 - 240 VAC – 50 - 60 Hz ■ Βεβαιωθείτε πωσ η πρίζα σούκο τησ εγκατάστασησ είναι προσιτή. Για την πλήρη αποσύνδεση απü το ρεύµα πρέπει να βγάζετε το φισ απü την πρίζα.Κατά την καλωδίωση προσέξτε την σειρά που περιγράφεται στο εγχειρίδιο. Να χρησιµοποιείτε µüνον καλώδια που πληρούν τα χαρακτηριστικά στο εγχειρίδιο ή τα γνήσια που παραλάβατε. Αν χρησιµοποιείτε άλλα καλώδια, τüτε η BinTec Communications AG δεν αναλαµβάνει καµία ευθύνη για ζηµιέσ ή βλάβεσ στην λειτουργικüτητα. Σε αυτέσ τισ περιπτώσεισ παύει να ισχύει η εγγύηση τησ συσκευήσ. ■ Κατά την σύνδεση τησ συσκευή λάβετε υπüψη σασ τισ υποδείξεισ στο εγχειρίδιο. ■ ∆ιαστρώστε τα καλώδια κατά τέτοιον τρüπο, ώστε να µην προκύψουν σηµεία κινδύνου (κίνδυνοσ παραπατήµατοσ) και ώστε να µη µπορούν να υποστούν ζηµιά. ■ Κατά την διάρκεια µιασ καταιγίδασ ούτε να συνδέετε ούτε να βγάζετε τα καλώδια µεταφοράσ δεδοµένων, ούτε να τα ακουµπάτε. Προβλεπüµενη χρήση, λειτουργία ■ Το X4000 προορίζεται για χρήση σε περιβάλλον γραφείου. Σαν Router πολλαπλών πρωτοκüλλων (Multi-Protokoll) το X4000 σε εξάρτηση απü την διαµüρφωση του συστήµατοσ δηµιουργεί συνδέσεισ WAN. X4000 User’s Guide 431 15 General Safety Precautions in 15 Different Languages Για να αποφύγετε πρüσθετα τέλη θα πρέπει οπωσδήποτε να επιτηρείτε την συσκευή. ■ Το X4000 ανταποκρίνεται στισ σχετικέσ διατάξεισ ασφαλείασ για εγκαταστάσεισ τεχνολογίασ πληροφοριών κατά τη χρήση σε περιβάλλον γραφείου. ■ Η καθορισµένη λειτουργία του συστήµατοσ σύµφωνα µε το IEC950/ EN60950 διασφαλίζεται µüνο µε εγκαταστηµένο περικάλυµµα (ψύξη, ασφάλεια πυρκαγιάσ, εξάλειψη παρασίτων). ■ Η θερµοκρασία περιβάλλοντοσ δεν επιτρέπεται να υπερβαίνει τουσ 50 °C. Αποφύγετε την έκθεση σε άµεση ηλιακή ακτινοβολία. ■ Να προσέχετε, ώστε να µην εισέλθουν αντικείµενα (π.χ. συνδετήρεσ) ή υγρά στο εσωτερικü τησ συσκευήσ (κίνδυνοσ ηλεκτροπληξίασ, βραχυκυκλώµατοσ). Θα πρέπει να εξασφαλίζεται η επαρκήσ ψύξη. ■ Το X4000 δεν περιλαµβάνει εξαρτήµατα που µπορούν να αντικατασταθούν απü τον χρήστη ούτε διακüπτεσ ή Jumper, που πρέπει να ρυθµίσει ο χρήστησ. ■ Σε έκτακτεσ περιπτώσεισ (π.χ. üταν έχει προκληθεί βλάβη στο κέλυφοσ ή στη µονάδα χειρισµού ή üταν έχουν εισέλθει υγρά ή αντικείµενα) να διακüπτετε αµέσωσ την παροχή ρεύµατοσ και να έρχεστε σε επαφή µε το κατάλληλο συνεργείο. Καθαρισµüσ και επισκευή ■ Η συσκευή επιτρέπεται να ανοιχτεί µüνον απü συνεργεία που έχουν εξουσιοδοτηθεί απü την BinTec. Πριν το άνοιγµα τησ συσκευήσ θα πρέπει οπωσδήποτε να βγάλετε τον ρευµατολήπτη. Αναρµüδιο άνοιγµα και λανθασµένη επισκευή τησ συσκευήσ προκαλεί µεγάλο κίνδυνο για τον χρήστη (Ηλεκτροπληξία). Συνιστάται η επισκευή τησ συσκευήσ να γίνεται µüνο στο σέρβισ του BinTec. Που υπάρχει σέρβισ κοντά σασ το µαθαίνετε απο τον έµπορο σασ. Σε κάθε άλλη περίπτωση χάνεται κάθε δικαίωµα αξίωσησ αποζηµιώσεων. ■ Η συσκευή δεν επιτρέπεται σε καµία περίπτωση να καθαριστεί. Απü την ενδεχüµενη είσοδο νερού µπορεί να προκύψουν σηµαντικοί κίνδυνοι για το χρήστη (π.χ. ηλεκτροπληξία) και σοβαρέσ ζηµιέσ στη συσκευή. 432 X4000 User’s Guide 15 ■ Να µη χρησιµοποιείτε ποτέ συρµάτινα σφουγγαράκια και αιχµηρά ή αδρά βοηθητικά µέσα καθαρισµού. X4000 User’s Guide 433 15 General Safety Precautions in 15 Different Languages Istruzioni generali di sicurezza Nei seguenti paragrafi si trovano elencate le istruzioni generali di sicurezza da osservare rigorosamente nell’uso del Router. Trasporto e immagazzinaggio ■ Trasportare ed immagazzinare X4000 soltanto nell’imballaggio originale o Installazione e azionamento ■ Prima di installare ed usare X4000 fare attenzione alle istruzioni sulle in altro imballaggio adeguato a garantire protezione da urti e colpi. condizioni ambientali (cfr. Dati tecnici). Utilizzare un ripiano stabile e piano. ■ Le cariche elettrostatiche possono provocare danni all’apparecchio. Indossare quindi un polsino elettrostatico o toccare una superficie collegata a terra prima di afferrare prese o schede di espansione di X4000. Tenere sempre le schede di espansione soltanto per i bordi e non toccare gli elementi costruttivi né le guide per i conduttori. ■ Proteggere lo slot per la scheda di espansione non utilizzato con la copertura, per evitare che penetrino oggetti nell’apparecchio. Se nell’apparecchio ci sono corpi estranei durante il funzionamento, sussiste pericolo di scosse elettriche e di corto circuito. ■ Fare in modo che nessun oggetto appuntito possa danneggiare la finestra del modulo di visualizzazione. Proteggere il modulo di visualizzazione da urti e cadute e collegarlo soltanto all’apposito attacco RJ11 di X4000 , per evitare danni a X4000 e al modulo stesso. ■ Durante il collegamento dei cavi occorre accertarsi che le fessure di ventilazione dell’apparecchio non vengano coperte e che la ventilazione non sia ostacolata. L’impedimento della ventilazione di X4000 può danneggiare l’apparecchio. Danni provocati dalla carenza di ventilazione causano la perdita del diritto di garanzia. ■ Non aprire l’apparecchio base e non effettuare alcuna modifica sull’alimentatore, poiché sussiste pericolo di morte causata da scosse elettriche. Non rimuovere le viti di fissaggio dell’apparecchio base. ■ Quando l’apparecchio viene trasferito da un ambiente freddo nel locale di esercizio, l’involucro esterno e l’interno dell’apparecchio possono presentare tracce di condensazione. Attendere finché l’apparecchio ha superato lo sbalzo di temperatura ed è assolutamente asciutto, prima di 434 X4000 User’s Guide 15 metterlo in funzione. Attenersi alle condizioni ambientali riportate nei dati tecnici ■ Verificare se la tensione di rete locale corrisponde alle tensioni nominali dell’alimentatore. L’apparecchio deve essere impiegato alle seguenti condizioni: – 100 - 240 V c. a. – 50 - 60 Hz ■ Accertarsi che la presa con contatto di terra dell’installazione sia accessibile. Per la completa separazione dell’apparecchio dalla rete di alimentazione è necessario estrarre la spina. ■ Per il cablaggio si deve seguire la sequenza descritta nel manuale. Utilizzare soltanto i cavi rispondenti alle specifiche riportate in questo manuale o quelli originali forniti in dotazione. Se si utilizzano altri cavi, la BinTec Communications AG non risponde dei danni o della riduzione di funzionalità che ne risultano. In questi casi decade la garanzia per l’apparecchio. ■ Per il collegamento dell’apparecchio ci si deve attenere alle istruzioni del manuale. ■ Disporre i collegamenti in modo che non costituiscano fonte di pericolo (pericolo d’inciampo) e che non possano essere danneggiati. ■ Non collegare né disconnettere, né toccare i cavi di trasferimento dati durante un temporale. Utilizzazione conforme alla destinazione, funzionamento ■ X4000 è concepito per l’impiego negli uffici. Come Router per reti multiprotocollo X4000 stabilisce collegamenti WAN in rapporto alla configurazione del sistema. Per evitare canoni indesiderati, si consiglia di controllare assolutamente il prodotto. ■ X4000 è conforme alle relative disposizioni di sicurezza per impianti della tecnica informatica impiegati in ambiente d’ufficio. ■ Il funzionamento regolamentare del sistema secondo le disposizioni IEC950/EN60950 è garantito (raffreddamento, protezione antincendio, schermatura contro radiodisturbi) solo se è completamente montato l’involucro di lamiera. X4000 User’s Guide 435 15 General Safety Precautions in 15 Different Languages ■ La temperatura ambiente non deve superare 50 °C. Non esporre l’apparecchio all’azione diretta dei raggi solari. ■ Fare attenzione che nessun oggetto (p. es. fermagli) o liquido penetri all’interno dell’apparecchio (scossa elettrica, corto circuito). Provvedere ad un sufficiente raffreddamento. ■ X4000 non contiene elementi costruttivi che possono essere sostituiti dall’utente né interruttori/ponticelli che devono essere regolati dal cliente. ■ In casi d’emergenza (p. es. danneggiamento dell’involucro o dell’elemento di comando, infiltrazione di liquido o di corpi estranei) staccare immediatamente la corrente ed informare il servizio assistenza. Pulizia e riparazione ■ L’apparecchio deve essere aperto soltanto da un centro di assistenza BinTec autorizzato. Prima di aprire l’apparecchio estrarre assolutamente la spina di alimentazione. L’apertura da parte di personale non autorizzato e riparazioni non corrette possono esporre l’utilizzatore a notevoli pericoli (p. e. scossa elettrica). Affidare l’esecuzione delle riparazioni all’apparecchio soltanto ad un centro di assistenza BinTec autorizzato. Il rivenditore di fiducia può fornire informazioni sulle sedi di questi centri. In tutti gli altri casi decade ogni diritto alla garanzia. ■ L’apparecchio non deve assolutamente essere pulito con acqua. L’infiltrazione di acqua può causare gravi pericoli per l’utente (p. es. scossa elettrica) nonché gravi danni all’apparecchio. ■ Non utilizzare in nessun caso abrasivi, detergenti a base alcalina, attrezzatura affilata o abrasiva. 436 X4000 User’s Guide 15 Algemene veiligheidsinstructies in het Nederlands In de volgende paragrafen vindt u veiligheidsinstructies, die u bij de omgang met uw router absoluut moet in acht nemen. Transport en bewaring ■ Transporteer en bewaar X4000 alleen in de originele verpakking of in een Opstellen en in bedrijf nemen ■ Let voor het opstellen en het bedrijf van X4000 op de instructies voor de andere geschikte verpakking, die bescherming biedt tegen schokken en stoten. omgevingsvoorwaarden (vergelijk technische gegevens). Gebruik een harde en vlakke ondergrond. ■ Elektrostatische opladingen kunnen schade aan het toestel veroorzaken. Draag daarom een geaarde manchet rond de pols of raak een geaard oppervlak aan vooraleer u de bussen of uitbreidingskaarten van X4000 aanraakt. Raak de uitbreidingskaarten enkel aan de randen aan en neem geen componenten of conductoren vast. ■ De uitbreidingsslots die niet gebruikt worden met de blinde afdekking gesloten houden, zodat er geen voorwerpen in het inwendige deel van het toestel terecht kunnen komen. Als er zich tijdens het gebruik vreemde voorwerpen in het toestel bevinden, dan bestaat er gevaar voor stroomstoten en kortsluiting. ■ Zorg ervoor dat het displayvenster van de displaymodule niet door scherpe voorwerpen beschadigd wordt. Beveilig de displaymodule tegen het stoten en vallen en sluit de module enkel aan de daarvoor bestemde RJ11-bus van X4000 aan om schade aan de X4000 en de displaymodule te vermijden. ■ Zorg er bij de bedrading voor dat de ventilatie-openingen van het toestel niet afgedekt worden en de ventilatie niet gehinderd wordt. Door het hinderen van de ventilatie van de X4000 kan het toestel beschadigd worden. We kunnen geen garantie geven voor schade die veroorzaakt werd door een gebrekkige ventilatie. ■ Het basistoestel nooit openen en nooit manipuleren aan het netdeel omdat er anders gevaar voor stroomstoten bestaat. Geen schroeven van de bevestiging van het basistoestel verwijderen. X4000 User’s Guide 437 15 General Safety Precautions in 15 Different Languages ■ Als het toestel vanuit een koude omgeving in de bedrijfsruimte gebracht wordt, kan er aan de buiten- en binnenkant van het toestel condensatie optreden. Wacht tot uw toestel zich aan de temperatuur heeft aangepast en helemaal droog is vooraleer u het in gebruik neemt. Neem de milieuvoorschriften in de technische gegevens in acht. ■ Ga na of de plaatselijke netspanning overeenstemt met de nominale spanningen van het netdeel. Het toestel mag onder de volgende voorwaarden gebruikt worden: – 100 - 240 VAC – 50 - 60 Hz ■ Zorg ervoor dat de veiligheidscontactdoos van de installatie vrij toegankelijk is. Om het toestel helemaal van het net te scheiden moet de netstekker uitgetrokken worden. ■ Let bij de aansluiting van de kabels op de volgorde, zoals in het handboek wordt beschreven. Gebruik enkel kabels die aan de specificaties in dit handboek voldoen of die meegeleverd werden. Indien u andere kabels gebruikt, is BinTec Communications AG niet aansprakelijk voor mogelijke schade of het slecht functioneren van het toestel. In dit geval vervalt de garantie. ■ Bij de aansluiting van het toestel de voorschriften in de handleiding in acht nemen. ■ Leg de kabels zodanig, dat zij geen gevaarsbron (struikelgevaar) vormen en niet worden beschadigd. ■ Tijdens een onweer de datatransmissielijnen niet aansluiten, uittrekken of aanraken. Doelmatig gebruik, bedrijf ■ X4000 is enkel voor het gebruik in een bureau-omgeving geschikt. Als multi-protocol-router bouwt X4000 afhankelijk van de systeemconfiguratie WAN-verbindingen op. Om ongewenste kosten te vermijden, moet het product absoluut gecontroleerd worden. ■ X4000 voldoet aan de gebruikelijke veiligheidsbepalingen voor inrichtingen van informatietechniek voor toepassing in een kantooromgeving. 438 X4000 User’s Guide 15 ■ De reglementaire werking volgens IEC950/EN60950 van het systeem is alleen gegarandeerd bij een volledig gemonteerde blikken omhulling (koeling, brandbeveiliging, ontstoring. ■ De omgevingstemperatuur mag niet hoger zijn dan 50 °C. Vermijd direct zonlicht. ■ Let erop, dat er geen voorwerpen (bijv. paperclips) of vloeistoffen in het inwendige van het apparaat geraken (elektrische schok, kortsluiting). Let op voldoende koeling. ■ X4000 bevat geen modules die door de gebruiker vervangen mogen worden of schakelaars/jumpers die de gebruiker moet instellen. ■ Onderbreek in noodgevallen (bijv. beschadigd huis, of bedienelement, binnendringen van vloeistof of vreemde voorwerpen) onmiddellijk de stroomverzorging en neemt u contact op met de service-dienst. Reiniging en reparatie ■ Het toestel mag alleen door een door BinTec geautoriseerde servicedienst geopend worden. Voor het openen van het toestel in elk geval de netstekker uittrekken. Door onbevoegd openen en ondeskundige reparaties kan er groot gevaar voor de gebruiker ontstaan. (b. v. stroomstoten). Reparaties aan het toestel enkel door een door BinTec geautoriseerde servicedienst laten uitvoeren. Waar zich deze servicedienst bevindt, weet uw handelaar. In alle andere gevallen vervalt de aanspraak op garantie. ■ Het apparaat mag in geen geval nat worden gereinigd. Door binnendringend water kunnen er aanzienlijke gevaren ontstaan voor de gebruiker (bijv. elektrische schok) en kan er aanzienlijke schade ontstaan aan het apparaat. ■ Gebruik nooit schuurmiddelen, alkalische reinigingsmiddelen, scherpe of schurende hulpmiddelen. X4000 User’s Guide 439 15 General Safety Precautions in 15 Different Languages Generelle sikkerhetshenvisninger på norsk I de følgende avsnittene finner du sikkerhetshenvisninger som du absolutt må ta hensyn til ved omgangen med din router. Transport og lagring ■ Du må kun transportere og lagre X4000 i originalemballasjen eller i en Oppstilling og ibruktaking ■ Før oppstilling og drift av X4000 må du ta hensyn til henvisningene når det annen egnet emballasje som beskytter mot støt og slag. gjelder omgivelsesbetingelsene (sml. tekniske data). Bruk et fast og jevnt underlag. ■ Elektrostatisk oppladning kan føre til skader på apparatet. Bruk derfor en jordet mansjett rundt håndleddet eller berør en jordet flate før du berører kontakter eller utvidelseskort på X4000. Utvidelseskortene skal prinsipielt kun gripes i kantene, ta ikke på komponenter eller lederbaner. ■ Hold utvidelses-stikkplassene som ikke er i bruk stengt med blinddekselet, slik at ingen gjenstander kan komme inn i apparatets indre. Hvis det finnes uvedkommende gjenstander i apparatet under drift, er det fare for elektrisk støt og kortslutning. ■ Pass på at ikke spisse gjenstander forårsaker skader på displaymodulens displayvindu. Utsett ikke displaymodulen for støt eller fall, og kople den kun til den hertil tiltenkte RJ11-kontakt på X4000, slik at du unngår skader på X4000 og displaymodulen. ■ Under tilkoplingen må du passe på at apparatets ventilasjonsåpninger ikke blir tildekket og at ventilasjonen ikke blir hindret. Ved nedsatt ventilasjon av X4000 kan det oppstå skader på apparatet. Skader som oppstår på grunn av manglende ventilasjon fører til tap av garantien. ■ Åpne ikke basisapparatet og utfør ingen manipulasjoner på nettdelen, ettersom det i så fall er livsfare på grunn av elektrisk støt. Fjern ingen festeskruer på basisapparatet. ■ Dersom apparatet blir tatt fra en kald omgivelse og inn i rommet der det skal brukes, kan det oppstå kondens både på utsiden og på innsiden av apparatet. Vent til routeren har tilpasset seg temperaturen og er helt tørr før du tar den i bruk. 440 X4000 User’s Guide 15 ■ Kontroller at nettspenningen på stedet er identisk med nettdelens merkespenning. Apparatet kan tas i drift under følgende betingelser: – 100 - 240 VAC – 50 - 60 Hz ■ Kontroller at det er fri tilgang til installasjonens jordete stikkontakt. Nettstøpselet må trekkes ut for at apparatet skal være fullstendig frakoplet nettet. ■ Følg den rekkefølgen som er beskrevet i håndboken under tilkopling. Bruk kun kabler som svarer til spesifikasjonene i denne håndboken eller som fulgte med i original i leveringen. Hvis du bruker andre kabler, påtar seg BinTec Communications AG intet ansvar for eventuelle skader eller nedsatt funksjonalitet. Garantien på apparatet oppheves i slike tilfeller. ■ Følg instruksene i håndboken under tilkoplingen av apparatet. ■ Legg opp ledningene slik at de ikke kan bli skadet og at de ikke danner farekilder (fare for å snuble). ■ I tordenvær må du verken tilkople dataoverføringsledningene eller frakople eller berøre dem. Forskriftsmessig bruk, drift ■ X4000 er beregnet på bruk i et kontorlandskap. I egenskap av multiprotokoll-router bygger X4000 opp WAN-forbindelser, avhengig av systemkonfigurasjonen. Det er tvingende nødvendig å overvåke produktet for å unngå utilsiktede gebyrer.. ■ X4000 oppfyller gjeldende sikkerhetsbestemmelser for innretninger innen informasjonsteknikk for bruk i kontorlanskapp. ■ Forskriftsmessig bruk IEC950/EN60950 av systemet er kun gitt ved komplett montert metalldeksel (kjøling, brannbeskyttelse, radio-støydempning). ■ Omgivelsestemperaturen må ikke overskride 50 °C. Unngå direkte sollys. ■ Pass på at ingen gjenstander (f. eks. binders) eller væsker kan komme inn i apparatet (fare for elektrisk støt, kortslutning). Pass på tilstrekkelig avkjøling. ■ X4000 inneholder ingen komponenter som kan byttes ut av brukeren, eller brytere/jumpere som brukeren må innstille. X4000 User’s Guide 441 15 General Safety Precautions in 15 Different Languages ■ I nødstilfeller (f.eks. skadet hus eller betjenings-elementer, når væske eller fremmedlegemer er kommet inn) må du straks bryte strømforsyningen og tilkalle service. Rengjøring og reparasjon ■ Apparatet skal kun åpnes av et BinTec-autorisert serviceverksted. Trekk ut nettstøpselet før apparatet åpnes. Ved uautorisert åpning og usakkyndige reparasjoner kan det oppstå alvorlige risikoer for brukeren (f. eks. fare for elektrisk støt). Se til at reparasjoner på apparatet kun utføres av et BinTecautorisert serviceverksted. Din forhandler kan fortelle deg hvor nærmeste serviceverksted er. I alle andre tilfeller tapes garantien. ■ Apparatet må under ingen omstendighet rengjøres med vann. Dersom vann trenger inn, kan det oppstå alvorlige risikoer for brukeren (f. eks. elektrisk støt) og alvorlige skader på apparatet. ■ Bruk aldri skuremidler, alkaliske rengjøringsmidler, skarpe eller skurende hjelpemidler. 442 X4000 User’s Guide 15 Considerações genéricas em matéria de segurança em português Nos parágrafos que se seguem, encontra considerações em matéria de segurança que terá de respeitar estritamente ao lidar com o Router. Transporte e armazenamento ■ Transporte e armazene o X4000 apenas na embalagem original ou noutra Instalação e colocação em funcionamento ■ Antes de proceder à instalação e à colocação em funcionamento do X4000 adequada para o efeito que o proteja contra embates fortes e pancadas. tenha em conta as indicações relativas às condições ambientais (cf. Dados técnicos). Utilize uma base consistente e lisa. ■ As cargas electrostáticas podem causar danos nos aparelhos. Por conseguinte, use um punho de ligação terra à volta do pulso ou então toque numa superfície ligada à terra antes de mexer nas tomadas ou placas de expansão do X4000 . Toque apenas nos bordos das placas de expansão e não toque nos componentes ou circuitos impressos. ■ Mantenha a slot de expansão não utilizada fechada com a cobertura cega, de modo a que não possa entrar qualquer objecto no interior do aparelho. Se, durante o funcionamento, houver algum objecto estranho dentro do aparelho, existe perigo de choque eléctrico e de curto-circuito. ■ Tenha cuidado para que nenhum objecto pontiagudo danifique a janela do módulo de display. Para evitar danos no X4000 e no módulo de display, proteja o módulo de display contra embates fortes e quedas e conecte o mesmo à tomada RJ11 do X4000 destinada a esse fim. ■ Durante a cablagem, tenha atenção para que as ranhuras de ventilação do aparelho não fiquem tapadas e a ventilação não seja obstruída. A obstrução da ventilação do X4000 pode causar danos no aparelho. Os danos causados por uma ventilação insuficiente têm como consequência a perda da garantia. ■ Não abra o aparelho base, nem mexa no equipamento de alimentação de rede, uma vez que existe perigo de morte devido a choque eléctrico. Não retire quaisquer parafusos de fixação do aparelho base. ■ Quando o aparelho é deslocado de um local frio para o local de funcionamento, poderá haver formação de condensação tanto no exterior como no interior do aparelho. Aguarde até o aparelho se encontrar à X4000 User’s Guide 443 15 General Safety Precautions in 15 Different Languages temperatura ambiente e completamente seco antes de o colocar em funcionamento. Tenha em atenção as indicações relativas às condições ambientais nos Dados técnicos. ■ Verifique se a tensão de rede local corresponde às tensões nominais do equipamento de alimentação de rede. O aparelho pode ser operado nas seguintes condições: – 100 - 240 VAC – 50 - 60 Hz ■ Certifique-se de que a tomada de contacto de segurança da instalação está acessível. Para desligar completamente a corrente do aparelho, retire a ficha de rede. ■ Ao proceder à cablagem, respeite a sequência tal como está descrita no manual. Utilize unicamente cabos que correspondam às especificações contidas neste manual ou cabos originais que tenham sido fornecidos. Se usar outros cabos, a BinTec Communications AG não se responsabiliza por danos daí decorrentes ou por limitações de funcionamento. Nestes casos, a garantia do aparelho é anulada. ■ Aquando da conexão do aparelho, respeite as indicações constante do manual. ■ Instale os cabos de maneira a não constituírem uma fonte de perigo (perigo de tropeçar) nem se danificarem. ■ Em caso de trovoada, não ligue, retire ou toque nos cabos de transmissão de dados. Utilização conforme com as especificações, Operação ■ O X4000 destina-se à utilização em escritórios. Como Router de protocolos múltiplos, o X4000 constrói ligações WAN de acordo com a configuração do sistema. Para evitar custos indesejados, controle o produto. ■ O X4000 corresponde às normas de segurança habituais relativas a dispositivos de informática para utilização em escritórios. ■ Só é possível assegurar o funcionamento adequado do sistema em conformidade com IEC950/EN60950 se a caixa de chapa estiver completamente montada (refrigeração, protecção contra incêndio, supressão de interferências). 444 X4000 User’s Guide 15 ■ A temperatura ambiente não pode exceder os 50 °C. Evite expor o aparelho à luz solar directa. ■ Tenha o cuidado de não deixar entrar objectos (por ex. clipes) ou líquidos para o interior do aparelho (choque eléctrico, curto-circuito). Verifique se a refrigeração é suficiente. ■ O X4000 não contém componentes que possam ser substituídos pelo utilizador ou interruptores/conectores que o utilizador tenha de regular. ■ Em caso de emergência (por ex. caixa ou elemento de comando danificado, entrada de líquido ou de corpos estranhos), interrompa imediatamente a alimentação de corrente e recorra ao serviço de assistência técnica. Limpeza e reparação ■ O aparelho só pode ser aberto num serviço de assistência técnica BinTec autorizado. Antes de abrir o aparelho é indispensável retirar a ficha de rede. A abertura não autorizada e as reparações inadequadas podem representar riscos graves para o utilizador (por ex. choque eléctrico). Mande efectuar as reparações do aparelho apenas nos serviços de assistência técnica BinTec autorizados. O seu fornecedor indicar-lhe-á a localização dos referidos serviços. Caso contrário, perderá todos os direitos de garantia. ■ O aparelho nunca pode ser limpo a húmido. A infiltração de água pode constituir perigo para o utilizador (por ex. choque eléctrico) e danos de monta no aparelho. ■ Nunca utilizar abrasivos, produtos de limpeza alcalinos, objectos afiados ou que risquem. X4000 User’s Guide 445 15 General Safety Precautions in 15 Different Languages Ogólne zasady bezpieczeństwa w języku polskim Poniżej podano zasady bezpieczeństwa, których przestrzegać przy obchodzeniu się z routerem. należy bezwzględnie Transport i magazynowanie ■ Urządzenie X4000 należy transportować i magazynować wyłącznie w Ustawianie i uruchamianie ■ Przed ustawieniem i uruchomieniem urządzenia X4000 należy zastosować opakowaniu oryginalnym lub innym nadającym się do tego celu opakowaniu, zapewniającym ochronę przed obiciami i uderzeniami. się do wskazówek dotyczących warunków otoczenia (por. Parametry techniczne). Urządzenie należy ustawić na trwałym i równym podłożu. ■ Elektrostatyczna różnica potencjałów może doprowadzić do uszkodzenia urządzenia. Przed przystąpieniem do pracy należy założyć na przegub ręki antyelektrostatyczną opaskę zabezpieczającą lub dotknąć uziemionej powierzchni zanim dojdzie do kontaktu dłoni z puszkami lub kartami rozszerzenia X4000 Karty poszerzające chwytać zawsze na obrzeżach; nie dotykać bezpośrednio ścieżek drukowanych oraz elementów elektronicznych. ■ Nie używane pole do dodatkowych wcisków zamknąć zaślepkami zabezpieczającymi które zapobiegają dostaniu się do wnętrza niepożądanych przedmiotów. Obecność obcych elementów w urządzeniu w czasie jego eksploatacji stanowi zagrożenie porażenia prądem lub prowadzi do spięcia elektrycznego. ■ Zwrócić szczególną uwagę aby okienko displaya (pola wyświetlającego) w module displaya nie zostało uszkodzone ostrymi przedmiotami. Należy chronić moduł displaya przed uderzeniami i upadkiem i zamykać w do tego celu przeznaczonej puszce RJ11X4000, aby nie dopuścić do szkód na X4000 i module displaya. ■ Okablowanie powinno być tak prowadzone, żeby szczeliny wentylacyjne i otwory w obudowie nie zostały przysłonięte i w konsekwencji nie doszło do zakłócenia właściwego chłodzenia urządzenia. Niewystarczające przewietrzanie X4000może doprowadzić do awarii urządzenia. Uszkodzenia wynikające z niedostatecznej wentylacji mogą wiązać się z utratą reklamacji. 446 X4000 User’s Guide 15 ■ Otwieranie urządzenia głównego i dokonywanie manipulacji w części przewodowej jest niedozwolone i grozi śmiertelnym porażeniem prądem. Zabronione jest odkręcanie śrub mocujących z urządzenia głównego. ■ W momencie przemieszczenia urządzenia z zimnego otoczenia do pomieszczenia eksploatacyjnego, może wystąpić pokrycie parą zarówno części zewnętrznych jak i wewnętrznych. Należy odczekać aż urządzenie przejmie nową temperaturę i całkowicie wyschnie, dopiero wtedy możliwa jest jego eksploatacja. Należy przestrzegać warunków środowiskowych opisanych w danych technicznych urządzenia. ■ Konieczne jest sprawdzenie zgodności napięcia sieci zasilającej z napięciem znamionowym zasilacza prądowego. Urządzenie może być eksploatowane pod następującymi warunkami: – 100 - 240 VAC – 50 - 60 Hz ■ Należy upewnić się, czy gniazdko kontaktu bezpieczeństwa instalacji elektrycznej jest łatwo dostępne. Aby przerwać w pełni zasilanie prądem, wtyczka musi być wyciągnięta z gniazdka. ■ Przy przyłączaniu przewodów należy przestrzegać kolejności opisanej w instrukcji obsługi. Należy używać tylko takich kabli których specyfikacje odpowiadają danym z niniejszej instrukcji obsługi lub też są dostarczone wraz z urządzeniem. W przypadku zastosowania innych przewodów firma BinTec Communications AG nie ponosi odpowiedzialności za poniesione szkody. Tym samym umowa gwarancyjna staje się nieaktualna. ■ Podczas podłączania urządzenia do sieci należy przestrzegać wskazówek zawartych w instrukcji obsługi. ■ Przewody należy ułożyć tak, aby nie występowało niebezpieczeństwo potykania się o nie oraz ich uszkadzania. ■ Podczas burzy nie wolno podłanczać przewodów przenoszenia danych, ani też dotykać ich lub wyłanczać. Zgodne z przeznaczeniem stosowanie, eksploatacja ■ X4000 przeznaczona jest do pracy w otoczeniu biurowym. Jako MultiProtokoll-Router buduje X4000 niezależnie od konfiguracji systemowej połączenia WAN. Aby zapobiec nieprzewidzianym opłatom, powinno się go strzec. X4000 User’s Guide 447 15 General Safety Precautions in 15 Different Languages ■ Urządzenie X4000 spełnia obowiązujące zasady bezpieczeństwa dla urządzeń informatycznych przeznaczonych do stosowania w otoczeniu biurowym. ■ Zgodna z przeznaczeniem eksploatacja systemu zgodnie z IEC950/EN60950 jest zagwarantowana tylko w przypadku kompletnie zamontowanej obudowy blaszanej (chłodzenie, ochrona przeciwpożarowa, eliminacja zakłóceń w eterze). ■ Temperatura otoczenia nie powinna przekraczać 50°C. Należy unikać bezpośredniego działania promieni słonecznych. ■ Należy uważać, aby do wnętrza urządzenia nie wnikały żadnego rodzaju przedmioty (np. spinacze biurowe) bądź ciecze (udar prądowy, zwarcia). Zapewnić wystarczające chłodzenia urządzenia. ■ X4000nie zawiera żadnych części budowy które musiałyby być wymieniane przez użytkownika, nie zawiera też żadnych przełączników czy też innych elementów które trzeba ustawiać. ■ W sytuacjach awaryjnych (np. uszkodzona obudowa lub element obsługi, wniknięcie cieczy bądź ciał obcych) należy natychmiast przerwać zasilanie urządzenia prądem elektrycznym i zawiadomić serwis. Oczyszczanie i naprawa ■ Urządzenie może być otwarte tylko przez fachowca z autoryzowanego serwisu BinTec. Przed otwarciem urządzenia koniecznie wyjąć wtyczkę z gniazdka sieciowego. Otwarcie przez osoby nieupoważnione i niefachowo przeprowadzone naprawy mogą pociągnąć za sobą powstanie poważnych zagrożeń dla użytkownika (np.porażenie prądem). Naprawy mogą być wykonywane tylko przez autoryzowany serwis naprawczy BinTec. Adresy warsztatów serwisowych można uzyskać w placówkach handlowych. W pozostałych przypadkach wszelkie umowy gwarancyjne będą uznane za nieważne. ■ Urządzenia pod żadnym pozorem nie wolno czyścić na mokro. Dostanie się wody do wnętrza urządzenia może wywoływać poważne zagrożenia dla użytkownika (np. porażenie prądem) oraz poważne uszkodzenia produktu. ■ Nigdy nie stosować środków do szorowania, zasadowych środków czyszczących, ostrych lub szorujących środków pomocniczych. 448 X4000 User’s Guide 15 X4000 User’s Guide 449 15 General Safety Precautions in 15 Different Languages Instrucciones generales de seguridad En los párrafos siguientes encontrará unas instrucciones de seguridad. Es imprescindible tener las mismas en cuenta a la hora de manejar su router. Transporte y almacenamiento ■ Transporte y almacene su X4000 únicamente en su embalaje original o en Colocación y puesta en servicio ■ Antes de la colocación y puesta en servicio de X4000, observe las otro embalaje adecuado que garantice su protección contra golpes y choques. instrucciones acerca de las condiciones ambientales (ver ”Datos técnicos”). Utilice una superficie firme y plana. ■ Las cargas electrostáticas pueden ocasionar daños en los aparatos. Por ello, lleve un puño puesto a tierra alrededor de la muñeca o entre en contacto con una superficie puesta a tierra antes de tocar hembrillas o tarjetas de expansión de X4000. Toque las tarjetas de expansión sólo en los bordes y no entre en contacto con componentes ni con redes de circuitos impresos. ■ Mantenga cerrada la ranura de expansión con la cubierta ciega para que no pueda penetrar ningún objeto en el interior del aparato. Si durante el servicio hubiera dentro algún objeto extraño, se correría peligro de electrocución y de cortocircuito. ■ Preste atención a que ningún objeto afilado dañe la ventana de display del módulo de display. Proteja este módulo frente a golpes y caída y conéctelo únicamente a la hembrilla RJ11 prevista en X4000 a fin de evitar daños en X4000 y en el módulo de display. ■ Al instalar los cables, preste atención a no cubrir las rendijas de ventilación del aparato para no impedir la ventilación. Si la ventilación de X4000 resultase afectada, podrían ocasionar daños en el aparato. Los daños producidos a causa de una ventilación insuficiente conllevan la pérdida de garantía. ■ No abra el aparato base, ni manipule de ningún modo el bloque de alimentación, ya que en caso contrario se corre peligro de muerte por electrocución. No retire ninguno de los tornillos de fijación del aparato base. ■ Si el aparato proviene de un ambiente frío, al introducirlo en el local de trabajo se puede producir deshielo tanto en su exterior como en su interior. 450 X4000 User’s Guide 15 Por ello, antes de ponerlo en funcionamiento espere a que su temperatura se haya igualado y a que esté totalmente seco. Preste atención a las condiciones medioambientales expuestas en el apartado de Datos Técnicos. ■ Asegúrese de que la tensión de la red local coincida con las tensiones nominales del bloque de alimentación. El aparato puede funcionar bajo las siguientes condiciones: – 100 - 240 VCA – 50 - 60 Hz ■ Asegúrese de que no quede obstaculizado el acceso a la caja de enchufe con puesta a tierra de la instalación. Para desconectar totalmente el aparato de la red es necesario desenchufar el enchufe de la red. ■ Al instalar los cables respete el orden descrito en el manual. Utilice únicamente cables que cumplan las especificaciones expuestas en este manual o que hayan venido incluidos en el volumen de suministro. Si utiliza otros cables, BinTec Communications AG no se hará responsable en el caso de que se produzcan daños o una merma en el funcionamiento. En estos casos la garantía pierde su validez. ■ Al conectar el aparato, respete las indicaciones dadas en el manual. ■ Coloque los cables de manera que no constituyan un peligro (tropezones) y no puedan ser deteriorados. ■ Durante una tormenta, no enchufe ni desenchufe los conductos de transmisión de datos, ni los toque. Utilización prevista, servicio ■ X4000 está concebido para ser utilizado en oficinas. Como router multiprotocolo, X4000 establece conexiones WAN dependiendo de la configuración del sistema. Para evitar que se produzcan gastos de conexiones indeseadas, es absolutamente necesario vigilar el producto. ■ X4000 corresponde a las disposiciones de seguridad pertinentes para equipos informáticos utilizados en oficinas y despachos. ■ El servicio correspondiente al destino según IEC 950/EN 60950 del sistema está sólo asegurado al estar montada completamente la caja de chapa (refrigeración, protección contra incendios, antiparasitaje). X4000 User’s Guide 451 15 General Safety Precautions in 15 Different Languages ■ La temperatura ambiente no debe ser superior a los 50 °C. Evite que el aparato quede expuesto a la luz solar directa. ■ Procure que ningún objeto (p. ej. clips) o líquido entre en el interior del aparato (descargas eléctricas, cortocircuitos) y que exista una refrigeración suficiente. ■ El usuario de X4000 no puede cambiar ningún componente, ni debe ajustar ningún interruptor/puente. ■ En casos de emergencia (p. ej. caja o elemento de mando deteriorados, penetración de líquidos o de cuerpos extraños), interrumpa inmediatamente la alimentación de energía y avise al servicio técnico. Limpieza y reparación ■ Sólo personal de un servicio técnico autorizado por Bin Tec puede abrir el aparato. Antes de abrirlo, es imprescindible desconectar el enchufe de la red. Si se abre de forma no autorizada o las reparaciones no se efectúan como es debido, esto puede suponer riesgos considerables para el usuario (p. ej., electrocución). Por ello, encargue siempre los trabajos de reparación a un servicio técnico autorizado por BinTec, cuya dirección se la proporcionará su distribuidor. De otro modo, perderá todo el derecho de garantía. ■ En ningún caso, el aparato debe limpiarse en húmedo. Al penetrar agua, puede existir un peligro considerable para el usuario (p. ej., descargas eléctricas) y pueden producirse daños considerables en el aparato. ■ No utilizar jamás productos abrasivos, detergentes alcalinos, ni instrumentos afilados o abrasivos. 452 X4000 User’s Guide 15 Allmänna säkerhetsanvisningar på svenska Beakta alltid nedanstående säkerhetsanvisningar för användning av apparaten. Transport och förvaring ■ X4000 får endast transporteras och förvaras i originalförpackningen eller i Installation och start ■ Beakta uppgifterna om omgivningsförhållanden (se Tekniska data) innan en annan likvärdig förpackning som ger ett fullvärdigt skydd mot stötar och slag. X4000 installeras och startas. Installera den på ett stabilt och jämnt underlag. ■ Elektrostatisk uppladdning kan förorsaka skador på apparaten. Bär därför en antistatisk manschett runt handleden, eller rör alltid vid en jordad yta innan Du vidrör uttag/kontakter eller utbyggnadskort till X4000. Tag endast på utbyggnadskortens kanter, vidrör aldrig ledningarna och komponenterna. ■ Täck över en ej använd utbyggnadsinsticksplats med täckskivan så att inga främmande föremål kan komma in i apparaten. Risk för strömstötar och kortslutning om främmande föremål finns i apparaten under drift. ■ Säkerställ att displaymodulens displayfönster inte kan skadas av några spetsiga föremål. Installera displaymodulen så att den inte kan falla ned resp utsättas för stötar och slag. Anslut den endast till härför avsett RJ11uttag X4000 , annars kan X4000 och displaymodulen ta skada. ■ Säkerställ, under kabeldragningen, att apparatens ventilationsslitsar inte täcks över och att ventilationen inte påverkas. En reducerad ventilationseffekt kan medföra skador på X4000. Tillverkaren övertar inget garantiansvar för skador som uppstår p g a bristfällig ventilation. ■ Öppna inte basenheten, utför inga som helst förändringar på nätdelen; risk för strömstötar, livsfara. Tag inte bort några montageskruvar från basenheten. ■ Om enheten flyttas från en kall till en varm omgivning kan det bildas kondensvatten på och i apparaten. Tag apparaten i drift först när den har nått rumstemperatur och har torkat helt. Beakta uppgifterna över omgivningsförhållanden i Tekniska data. X4000 User’s Guide 453 15 General Safety Precautions in 15 Different Languages ■ Kontrollera att spänningen på plats överensstämmer med nätdelens märkspänning. Under följande villkor får apparaten användas: – 100 - 240 VAC – 50 - 60 Hz ■ Säkerställ att det jordade vägguttaget alltid är fritt tillgängligt. För separering från nätet måste nätkontakten dras ut. ■ Utför kabeldragningen i den ordningsföljd som anges i handboken. Använd endast medlevererade originalkablar eller kablar som överensstämmer med specifikationerna i denna handbok. BinTec Communications AG påtar sig inget ansvar för eventuella skador eller brister på apparaten om den används tillsammans med andra kablar. I detta fall gäller inte garantin längre. ■ Beakta anvisningarna i handboken vid anslutning av apparaten. ■ Drag kablarna så att de inte kan utgöra någon fara (de får inte ligga så att man kan snubbla över dem) och så att de inte kan skadas. ■ Dataöverföringskabeln får inte anslutas, dras ut eller vidröras under ett åskväder. Ändamålsenlig användning, drift ■ X4000 är avsedd för användning i kontorslokaler. X4000 är en multiprotokoll-router som, beroende på systemkonfiguration, upprättar WANförbindelser. Produkten bör övervakas så att inte onödiga kostnader uppstår. ■ X4000 uppfyller kraven i alla relevanta säkerhetsbestämmelser för informationsteknikutrustning i kontorslokaler. ■ Ändamålsenlig användning av systemet enligt IEC 950/EN 60950 säkerställs endast om plåthöljet är komplett monterat (kylning, brandskydd, radioavstörning). ■ Omgivningstemperaturen bör inte vara högre än 50°C . Undvik direkt solljus. ■ Säkerställ att det inte kan komma in några föremål (t ex häftklammer) eller någon vätska i apparaten (strömstötar, kortslutning). Sörj för fullgod kylning. 454 X4000 User’s Guide 15 ■ X4000 har inga komponenter som användaren kan byta ut, och inga kontakter/jumpers som måste ställas in. ■ Koppla genast ifrån strömförsörjningen i nödsituationer (t ex skadat hölje eller skadade manöverelement, eller om vätska eller främmande föremål har kommit in i apparaten) och tag kontakt med serviceavdelningen. Rengöring och reparation: ■ Apparaten får endast öppnas av en av BinTEc auktoriserad serviceverkstad. Drag alltid ut nätkontakten innan apparaten öppnas. Obehörigt öppnande resp ej sakkunniga reparationer på apparaten kan medföra fara för användaren (t ex elektriska stötar). Reparationer får bara utföras av en av BinTec auktoriserad serviceverkstad. Återförsäljaren tillhandahåller information om närmaste serviceverkstad. I annat fall upphör garantiansvaret att gälla. ■ Apparaten får aldrig våtrengöras. Vatten som kommer i enheten kan medföra fara för användaren (t ex elektriska stötar) och förorsaka skador på apparaten. ■ Använd inget skurpulver, inga alkaliska rengöringsmedel, använd inga vassa resp repande hjälpmedel. X4000 User’s Guide 455 15 General Safety Precautions in 15 Different Languages Genel güvenlik bilgileri türkçe Müteakip bölümlerde cihazınızı kullanırken mutlaka dikkat etmeniz gereken genel güvenlik bilgilerini bulabilirsiniz. Taşıma ve Depolama ■ X4000 cihazı sadece orjinal ambalajı içinde veya çarpmaya ve darbeye Kurulması ve Çalıştırılması ■ X4000 cihazını kurup çalıştırmadan önce çevre koşulları hakkındaki karşı koruyan uygun başka bir ambalajla taşıyıp depolayınız. bilgileri dikkate alınız (bak. Teknik Bilgiler). Sağlam ve düz bir altlık kullanınız. ■ Elektrostatik yüklenmeler cihazın zarar görmesine neden olabilir. Bu yüzden el bileğinize antistatik bir manşet takınız veya X4000 cihazının soketleri ve modüllerine dokunmadan önce, topraklı bir yüzeye dokununuz. Modülleri yalnız kenarlarından tutunuz, yapı parçalarına veya hatlara dokunmayınız. ■ Cihazın içine yabancı cisimlerin girmesini engellemek için kullanılamayan modül soketlerini körtapalarla kapatınız. Kullanım esnasında cihazın içinde yabancı cisimler bulunuyorsa, elektrik çarpması ve elektrik bağlantılarının kısa devre yapma tehlikesi bulunmaktadır. ■ Sivri aletlerin display modülünün display penceresine zarar vermemesine dikkat ediniz. Display modülünü çarpma ve düşmeden koruyunuz ayrıca X4000 cihazına ve display modülüne zarar gelmemesi için, sadece bunun için ön görülmüs olan X4000 cihazının RTJ11 soketine bağlayınız. ■ Kabloları yerleştirirken, cihazın havalandırma deliklerinin kapanmamasına ve havalandırmanın engellenmemesine dikkat ediniz. X4000 cihazının havalandırması engellendiği takdirde cihaza zarar gelebilir. Yetersiz havalandırmanın yol açtığı zararlar, cihazın garanti hakkının kaybına sebeb verir. ■ Ana cihazı kesinlikle açmayınız ve elektrik çarpması sonucunda hayati tehlike bulunduğundan, elektrik kablosunda hiçbir işlem yapmayınız. Ana cihazdan tespit vidalarını sökmeyiniz. ■ Cihaz, çalıştırılacağı odaya soğuk bir ortamdan getirilmiş ise, cihazın dışında ve içinde çiylenme olabilir. 456 X4000 User’s Guide Cihazınızı çalıştırmadan önce 15 tamamen kurumasını ve oda sıcaklığına uyum sağlamasını bekleyiniz. Teknik Bilgiler'deki çevre koşullarını dikkate alınız. ■ Yerel şebeke geriliminin, şebeke parçasının nominal gerilimine uygun olup olmadığını kontrol ediniz. Cihaz, aşağıdaki koşullar doğrultusunda çalıştırılabilir: – 100 - 240 VAC – 50 - 60 Hz ■ Koruyucu kontak prizinin montaj için rahatlıkla ulaşılabilecek durumda olmasını sağlayınız. Şebekeden tamam kopmak için, elektrik fişinin prizden çekilmeşi gerekir. ■ Kabloları takarken el kitapcığındaki sıralamaya dikkat ediniz. Sadece el kitapcığında belirtilen verilere uygun veya cihazla birlikte gönderilen kabloları kullanınız. Başka kablo kullandığınız takdirde, BinTec Communications AG meydana gelen hasar veya fonksiyonlardaki olumsuz etkilerden dolayı sorumluluk üstlenmez. Bu durumlarda garanti hakkı ortadan kalkar. ■ Cihazı bağlarken el kitapcığındaki açıklamalara dikkat ediniz. ■ Kabloları, tehlike kaynağı olamayacak ve zarar görmeyecek şekilde (takılma tehlikesi) döşeyiniz. ■ Fırtına esnasında veri iletişim hatlarını ne bağlayınız, ne çıkartınız, ne de bunlara dokununuz. Belirlenmiş şekilde kullanım, işletim ■ X4000 cihazı büro ortamında kullanım için tasarlanmıştır. Multi-ProtokolRouter olarak X4000 cihazı sistem konfigurasyonuna bağlı olarak WANbağlantıları kurmaktadır. Istenmeyen masrafları önlemek için, ürünü mutlaka kontrol altında tutunuz. ■ X4000 cihazı, büro ortamında kullanılan enformasyon teknik donanımları için geçerli olan güvenlik talimatnamelerine kesinlikle uymaktadır. ■ IEC 950/EN 60950 uyarınca, sistemin belirlenmiş şekilde kullanımı sadece saç kasnağı tamamiyle monte edildiğinde sağlanabilir (soğutma, yangın önleme, parazit giderme). ■ Çevre sıcaklığı kesinlikle 50°C’yi geçmemeli. Cihazı direk gelen güneş ışınlarından koruyunuz. X4000 User’s Guide 457 15 General Safety Precautions in 15 Different Languages ■ Cihazın içine yabancı cisimlerin (örneğin ataç) veya sıvıların girmesini önleyiniz (elektrik çarpması, kısa devre). Cihazın yeterli oranda soğutulmasına dikkat ediniz. ■ X4000 cihazında, kullanıcı tarafından değiştirilebilecek herhangi bir yapı elemanı veya kullanıcının bulunmamaktadır. ayarlaması gereken şalter/jumper ■ Acil durumlarda (örneğin hasarlı cihaz kasası veya kullanım parçası, cihazın içine sıvı veya yabancı maddelerin girmesi) derhal elektrik akımını kesip servise haber veriniz. Temizlik ve Tamir ■ Cihaz sadece BinTec'in yetkili servisi tarafından açılabilir. Cihazı açmadan önce, mutlaka elektrik fişini prizden çekiniz. Müsaade edilen işlemler dışında açılması ve uygun olmayan şekilde tamir edilmesi, kullanıcı için büyük tehlikeler doğurabilir (örneğin elektrik çarpması). Cihazın tamiratını sadece BinTec yetkili servisi tarafından yaptırınız. Yetkili servis yerlerini nerede bulabileceğinizi satıcınızdan öğrenebilirsiniz. Diğer durumlarda garanti hakkı kaybolmaktadır. ■ Cihazın su ile temizlenmesi kesinlikle yasaktır. Suyun cihaz içine kaçması, kullanıcı için büyük tehlikeler doğurabilir (örneğin elektrik çarpması) ve cihaza da ciddi zararlar verebilir. ■ Kesinlikle temizleme tozları, alkalik temizlik maddeleri, keskin veya aşındırıcı yardımcı maddeler kullanmayınız. 458 X4000 User’s Guide 15 Általános biztonsági útmutató A következő fejezetekben olyan biztonsági útmutatásokat talál, amelyeket a készüléke alkalmazása során feltétlenül figyelembe kell vennie. Szállítás és tárolás ■ Az X4000 csak az eredeti vagy egy más, arra alkalmas csomagolásban Felállítás és üzembe helyezés ■ Az X4000 felállítása és üzembe helyezése előtt vegye figyelembe a környezeti szállítandó és tárolandó, amely lökések és ütések ellen védelmet biztosít. feltételekre vonatkozó utasításokat (v.ö. a műszaki adatokkal). A készüléket szilárd és sík alapon alkalmazza. ■ Az elektrosztatikus töltések kisülése a berendezés meghibásodásához vezethet. Ezek megelőzése céljából viseljen földelt csuklópántot, vagy érintsen meg egy földelt felületet, mielőtt az X4000 csatlakozóhüvelyeihez vagy bővítőkártyáihoz hozzáérne. A bővítőkártyákat mindig csak a szélükön érintse meg, sose érjen alkatrészekhez vagy vezető vonalakhoz. ■ A nem használt slotokat mindig zárja le vakfedéllel, hogy ne kerülhessenek idegen tárgyak a készülék belsejébe. Amennyiben idegen tárgyak kerülnek a készülék belsejébe, áramütés és rövidzárlat veszélye áll fenn. ■ Ügyeljen arra, hogy a displaymodul display-jét semmilyen hegyes tárgy ne sérthesse meg. Óvja a displaymodult lökésektől és leeséstől. A displaymodult csak az X4000 erre kijelölt RJ11 csatlakozóhüvelyére csatlakoztassa, hogy az X4000 készüléken és a displaymodulon emiatt keletkező meghibásodásokat elkerülje. ■ A vezetékezésnél ügyeljen arra, hogy a készülék szellőzőnyílásai ne legyenek letakarva, a szellőzés zavartalanul működjék. A nem megfelelő szellőzés az X4000 meghibásodásához vezethet. A nem megfelelő szellőzés miatt fellépő károk esetében garanciaigénye megszűnik. ■ Ne nyissa ki a készülék burkolatát, és ne végezzen semmilyen átalakítást a tápegységen, mert ezáltal életveszélyes áramütés veszélye áll fenn. Ne távolítsa el a készülék rögzítő csavarjait. ■ Ha a készülék hideg környezetből kerül az üzemeltetési helyére, akkor a készülék külsején és belsejében lecsapódhat a nedvesség. Az üzembe helyezés előtt várja meg, amíg a készülék el nem éri a szobahőmérsékletet, X4000 User’s Guide 459 15 General Safety Precautions in 15 Different Languages és teljesen meg nem szárad. Vegye figyelembe a műszaki adatoknál megadott környezeti feltételeket. ■ Ellenőrizze, hogy a helyi hálózati feszültség megegyezik-e a tápegység névleges feszültségével. A készülék az alábbi feltételek mellett üzemeltethető: – 100 - 240 VAC – 50 - 60 Hz ■ Gondoskodjon róla, hogy a védőérintkezős csatlakozó aljzat a telepítésnél hozzáférhető legyen. A hálózatról való teljes leválasztáshoz húzza ki a hálózati csatlakozót. ■ A vezetékezés során vegye figyelembe a kézikönyvben megadott sorrendet. Csak olyan vezetékeket alkalmazzon, amelyek a kézikönyvben megadott specifikációknak megfelelnek, vagy amelyek a készülék szállítási terjedelmében találhatók. Amennyiben más vezetékeket alkalmaz, az emiatt fellépő károkért vagy a működésben fellépő változásokért a BinTec Communications AG nem vállal felelősséget. Ebben az esetben megszűnik a garanciajogosultsága. ■ Vegye figyelembe a készülék csatlakoztatásánál a kézikönyvben leírt ide vonatkozó utasításokat. ■ A vezetékeket úgy fektesse le, hogy azok ne lehessenek veszélyek forrásai (botlásveszély), azokban pedig kár ne keletkezhessen. ■ Az adatátvivő vezetékeket vihar esetében ne csatlakoztassa, ne húzza le, ne érintse meg. Rendeltetésszerű alkalmazás, üzemeltetés ■ Az X4000 irodai környezetben való alkalmazásra készült. Az X4000, mint multi-protokoll-router, a rendszerkonfigurációtól függően a WANösszeköttetésekre épül. A nem kívánt telefondíjak elkerülése végett, a terméket feltétlenül tartsa megfigyelés alatt. ■ Az X4000 megfelel az idevágó - irodai környezetben való használatra alkalmas információtechnikai berendezésekre vonatkozó - biztonsági előírásoknak. ■ Az A rendszer rendeltetésszerű üzemeltetése az IEC 950/EN 60950 szabályzatnak megfelelően csak a teljesen összeszerelt fémburkolattal biztosítható (hűtés, tűzvédelem, zavarszűrés). 460 X4000 User’s Guide 15 ■ A környezeti hőmérséklet nem haladhatja meg az 50 °C-t. Kerülje a közvetlen napsütést. ■ Ügyeljen arra, hogy semmilyen tárgy (pl. gémkapocs) vagy folyadék ne kerülhessen a készülék belsejébe (áramütés, rövidzárlat). Ügyeljen a megfelelő hűtésre. ■ Az X4000 nem tartalmaz alkatrészeket, amelyeket a felhasználó kicserélhet, vagy kapcsolókat, jumpereket, amelyeket a felhasználónak kellene beállítania. ■ Vészhelyzetben (pl. sérült burkolat vagy kezelőegység, folyadék vagy idegen test behatolása esetén) azonnal szakítsa meg az áramellátást, és értesítse a szervizt. Tisztítás és javítás ■ A készüléket csak a BinTec által feljogosított szervizek nyithatják fel. A készülék felnyitása előtt feltétlenül húzza ki a hálózati csatlakozót. A készülék jogtalan felnyitása és a helytelen javítás révén a felhasználó számára jelentős veszélyforrások keletkezhetnek (pl. áramütés). A készüléken szükséges javításokat ezért csak a BinTec által feljogosított szervizekkel végeztesse. A szervizek címét érdeklődje meg a szakkereskedőjénél. Ellenkező esetben a mindennemű garanciaigénye megszűnik. ■ A készüléket semmi esetre sem szabad nedvesen tisztítani. A behatoló víz jelentős veszélyforrásokat jelenthet a felhasználó számára (pl. áramütés), és jelentős károkat okozhat a készüléken. ■ Sohasem szabad súrolószereket, lúgos tisztítószereket, éles vagy karcoló segédeszközöket alkalmazni. X4000 User’s Guide 461 15 General Safety Precautions in 15 Different Languages Všeobecné bezpečnostní pokyny V následujících odstavcích jsou uvedeny bezpečnostní pokyny, které se při používání přístroje musí zásadně dodržovat. Doprava a uskladnění ■ X4000 dopravujte a skladujte pouze v originálním obalu anebo v jiném vhodném obalu, který jej chrání proti nárazům. Instalace a uvedení do provozu. ■ Před instalací a provozem X4000 přihlížejte k pokynům, které se týkají podmínek okolního prostředí (srovn. Technické údaje). Předpokládá se pevný a rovný podklad. ■ Elektrostatické náboje mohou způsobit poškození přístroje. Použijte proto uzemněnou manžetu připevnenou kolem zápěstí anebo se nejprv dotkněte některé uzemněné plochy, než se budete dotýkat konektorovoých zásuvek nebo rozširujících desek X4000. Rozšiřovacích desek se zásadně dotýkejte pouze na okrajích a nesahejte na součásti nebo vodivé spoje. ■ Uzavírejte nepoužívaný rozšiřovací slot záslepkou tak, aby do vnitřku přístroje nemohly vniknout cizí předměty. Pokud se během provozu v přístroji nacházejí cizí předměty, hrozí nebezpečí zasažení elektrickým proudem nebo zkratu. ■ Dbejte na to, aby okno displeje u displejového modulu nebylo poškozeno ostrými, špičatými předměty. Chraňte displejový modul před poškozením nárazy a pádem a připojte jej pouze na příslušný konektor RJ11 u X4000 , aby se zabránilo poškození X4000 a displejového modulu. ■ Při kabeláži dbejte na to, aby nedošlo k zakrytí větracích otvorů přístroje a aby nebyla omezována funkce větrání. V důsledku omezení větrání X4000 by mohlo dojít k poškození přístroje. Škody vzniklé v důsledku nedostatečného větrání vedou ke ztrátě nároků z ručení. ■ Neotevírejte základní přístroj a sít’ový zdroj nepodrobujte žádným manipulacím, jinak hrozí životní nebezpečí zasažením elektrickým proudem. Neodstraňujte žádné šrouby u upevnění základního přístroje. ■ Pokud se přístroj přemístí z chladného prostředí do provozního prostoru, může se vyskytnout orosení jak na vnějších částech tak i uvnitř přístroje. Vyčkejte teplotní přizpůsobení přístroje a jeho absolutní vysušení, než jej 462 X4000 User’s Guide 15 uvedete do provozu. Přihlížejte k podmínkám okolního prostředí uvedeným v Technických údajích. ■ Kontrolujte, zda se napětí místní sítě shoduje s hodnotami jmenovitého napětí sít’ového zdroje. Přístroj lze provozovat za těchto podmínek: – 100 - 240 VAC – 50 - 60 Hz ■ Postarejte se o to, aby zásuvka s ochranným kontaktem byla při instalaci volně přístupná. Pro úplné odpojení od sítě je třeba vytáhnout sít’ovou zástrčku. ■ Při propojování dbejte na pořadí tak, jak je popsáno v příručce. Používejte pouze kabely, jež odpovídají specifikacím v této příručce anebo dodané originální kabely. Pokud použijete jiné kabely, odmítá BinTec Communications AG ručení za vzniklé škody nebo za omezenou funkčnost. Ručení za přístroj v těchto případech zaniká. ■ Při připojování přístroje dbejte na pokyny uvedené v příručce. ■ Vedení ukládejte tak, aby se nestala zdrojem nebezpečí (např. zakopnutím) a aby se nepoškodily. ■ Během bouřky nepřipojujte vedení na přenos dat, neodpojujte je a ani se jich nedotýkejte. Použití, provoz podle stanoveného účelu ■ X4000 je určen pro použití v kancelářském prostředí. Jako MultiProtocol Router sestavuje X4000 v závislosti na systémové konfiguraci spojení WAN. Chcete-li zabránit účtování nežádoucích poplatků, měli byste výrobek bezpodmínečně hlídat. ■ X4000 odpovídá příslušným bezpečnostním předpisům pro zařízení informační techniky používaná v kancelářském prostředí. ■ Provoz systému odpovídající stanovenému účelu podle IEC 950/EN 60950 je zaručen pouze při kompletní montáži plechového krytu (chlazení, protipožární ochrana, odrušení). ■ Teplota okolí nesmí překročit 50 °C. Zabraňte přímému ozáření sluncem. X4000 User’s Guide 463 15 General Safety Precautions in 15 Different Languages ■ Dbejte na to, aby do vnitřku přístroje nemohly vniknout žádné předměty (např. kancelářské svorky) anebo kapaliny (elektrický výboj, zkrat). Dbejte na dostatečné chlazení. ■ X4000 neobsahuje žádné součásti, které by uživatel směl vyměňovat, nebo spínače/propojky, které by uživatel musel nastavovat. ■ V nouzových případech (např. poškozená skříň anebo ovládací prvek, vniknutí kapaliny nebo cizích těles) okamžitě přerušte přívod proudu a informujte servis. Čištění aopravy ■ Přístroj smí otvírat pouze autorizovaný servis firmy BinTec. Před otevřením se přístroj zásadně musí odpojit od sítě (vytáhnout zástrčku). Nepovolaným otevíráním a neodbornými opravami se uživatel vystavuje značnému ohrožení (např. zasažení elektrickým proudem). Provedením oprav přístroje pověřujte pouze autorizovaný servis firmy BinTec. Adresu servisu Vám sdělí Váš obchodník. Ve všech ostatních případech zanikají veškeré nároky ze záruky. ■ Přístroj se zásadně nesmí čistit mokrým způsobem. Vnikající voda může uživatele vystavit značnému ohrožení (např. zasažení elektrickým proudem) a může způsobit značné poškození přístroje. ■ Nikdy nepoužívejte prostředky na mechanické čištění, alkalické čisticí prostředky, agresivní a drhnoucí pomůcky. 464 X4000 User’s Guide 15 Generelle sikkerhedsforskrifter på dansk Nedenstående afsnit indeholder sikkerhedsforskrifter, som ubetinget skal overholdes ved brugen af apparatet. Transport og opbevaring ■ Transportér og opbevar kun X4000 i originalemballage eller i anden egnet Opstilling og ibrugtagning ■ Læs og overhold forskrifterne for de omgivende betingelser, før X4000 emballage, der beskytter mod stød og slag. opstilles og tages i brug (se Tekniske data). Brug et fast og jævnt underlag. ■ Statisk elektricitet kan medføre apparatskader. Bær derfor en antistatisk manchet om håndleddet eller rør ved en flade med jordforbindelse, inden du rører ved stik eller udvidelseskort på X4000. Berør kun udvidelseskort i kanten og tag ikke fat om konstruktionsdele eller ledninger. ■ Luk den ubenyttede udvidelsesmodulplads med blindafdækningen, så der ikke kan komme genstande ind i apparatets indre. Er der fremmede genstande i apparatet under driften, er der fare for elektriske stød og kortslutninger. ■ Sørg for, at ingen spidse genstande beskadiger displaymodulets displayrude. Beskyt displaymodulet mod stød og fald og slut det kun til den dertil beregnede RJ11-bøsning på X4000 for at undgå skader på X4000 og displaymodulet. ■ Ved ledningsføringen skal du sørge for, at apparatets udluftningsslidser ikke dækkes til og at der ikke skabes hindringer for ventilationen. Begrænsning af ventilationen for X4000 kan medføre skader på apparatet. Skader, som skyldes manglende ventilation, dækkes ikke af garantien. ■ Undlad at åbne basisapparatet og foretag ingen manipulationer med netdelen, da der ellers kan opstå livsfare ved elektrisk stød. Fjern ingen af basisapparatets fastgørelsesskruer. ■ Hvis apparatet bringes fra kolde omgivelser ind i det rum, hvor det skal bruges, kan der opstå kondensvand både udvendigt og indvendigt på apparatet. Vent, indtil apparatet har tilpasset sig temperaturen og er absolut tørt, før du tager det i brug. Overhold omgivelsesbetingelserne i Tekniske data. X4000 User’s Guide 465 15 General Safety Precautions in 15 Different Languages ■ Kontrollér, om den lokale netspænding stemmer overens med netdelens mærkespænding. Apparatet må anvendes under følgende betingelser: – 100 - 240 VAC – 50 - 60 Hz ■ Kontrollér, at der er fri adgang til installationens jordede sikkerhedsstikkontakt. For at opnå fuld afbrydelse fra strømnettet skal netstikket trækkes ud. ■ Følg den rækkefølge, der angives i denne håndbog, for tilslutningen af kablerne. Brug kun kabler som opfylder specifikationerne i denne håndbog eller de originale, medfølgede kabler. BinTec Communications AG hæfter ikke for evt. skader eller funktionsbegrænsninger ved brug af andre kabler. I sådanne tilfælde bortfalder apparatets garanti. ■ Overhold henvisningerne i denne håndbog mht. apparatets tilslutning. ■ Ledningerne skal trækkes på en sådan måde, at de ikke beskadiges og at de ikke er til fare for omgivelserne (fare for at snuble). ■ Undlad at tilslutte eller trække datatransmissionsledninger ud af apparatet, når det er tordenvejr, og undlad at berøre dem. Bestemmelsesmæssig anvendelse, brug ■ X4000 er beregnet til anvendelse i kontormiljø. Som multiprotokolrouter etablerer X4000 WAN-forbindelser afhængigt af systemkonfigurationen. For at forebygge uønskede afgiftsbetalinger bør du ubetinget overvåge produktet. ■ X4000 opfylder de gældende informationsteknisk udstyr til kontorer. sikkerhedsbestemmelser for ■ Bestemmelsesmæssig anvendelse af systemet iht. IEC_950/EN_60950, er kun sikret, når metalkabinettet er monteret komplet (køling, brandsikkerhed, radiostøjdæmpning). ■ Omgivelsestemperaturen må ikke overstige 50 °C. Undgå direkte sollys. ■ Sørg for, at genstande (f.eks. klips) eller væske ikke trænger ind i apparatet (elektrisk stød, kortslutning). Sørg for tilstrækkelig køling. ■ X4000 indeholder ingen komponenter, som må udskiftes af brugeren, eller kontakter/jumpere, som brugeren skal indstille. 466 X4000 User’s Guide 15 ■ Afbryd straks strømforsyningen og kontakt serviceafdelingen i nødstilfælde (f.eks. beskadiget kabinet eller betjeningselement, indtrængning af væske eller fremmede genstande). Rengøring og reparation ■ Apparatet må kun åbnes af et BinTec-autoriseret serviceværksted. Træk altid netstikket ud, før apparatet åbnes. Uautoriseret åbning og ukorrekt udførte reparationer kan medføre betydelige farer for brugeren (f.eks. elektrisk stød). Lad kun et autoriseret BinTEC-serviceværksted udføre reparationer på apparatet. Din forhandler kan oplyse dig serviceværkstedets adresse. I alle andre tilfælde bortfalder enhver garanti. ■ Apparatet må under ingen omstændigheder rengøres med væske. Indtrængende vand kan udsætte brugeren for alvorlige farer (f.eks. elektrisk stød) og forårsage alvorlige skader på apparatet. ■ Benyt aldrig skuremidler, alkaliske rengøringsmidler, skrappe eller skurende hjælpemidler. X4000 User’s Guide 467 15 468 General Safety Precautions in 15 Different Languages X4000 User’s Guide Glossary Glossary 100Base-T 10Base-T Twisted pair connection, Fast Ethernet. Network connection for 100-Mbps networks. Twisted pair connection. Network connection for 10-Mbps networks with ➤➤ RJ45 connector. 1TR6 D-channel protocol used in the German ISDN. Today the more common protocol is the ➤➤ DSS1. Access list A rule that defines a set of packets that should or should not be transmitted by the router. Accounting Recording of connection data, e.g. date, time, connection duration, charging information and number of data packets transferred. ADSL Asymmetric ➤➤ Digital Subscriber Line The data rate is up to 640 kbps ➤➤ upstream and 1.5 - 9 Mbps ➤➤ downstream over ranges of up to 5.5 km. The main ADSL applications are: Internet access, video-on-demand (digital and compressed) and high-speed data communication over ➤➤ POTS. ARP Address Resolution Protocol ARP belongs to the ➤➤ TCP/IP protocol family. ARP resolves IP addresses into their corresponding ➤➤ MAC addresses. Asynchronous transmission A method of data transmission in which the time intervals between transmitted characters can vary in length. This allows computers and peripheral devices to intercommunicate without being synchronized by clock signals. The beginning and end of the transmitted characters must be marked by start and stop bits – in contrast to ➤➤ synchronous transmission. B-channel Control and signaling channel of the ➤➤ ISDN Basic Rate Interface or the ➤➤ Primary Rate Interface for transmission of traffic (voice, data). An ISDN Basic Rate Interface consists of two B-channels and one ➤➤ D-channel. A Bchannel has a data transmission rate of 64 kbps. The data transmission rate of an ISDN Basic Rate Interface with X4000 can be increased to up to 128 kbps using ➤➤ channel bundling. BOD Bandwidth on Demand X4000 User’s Guide 469 Glossary Bandwidth on Demand is an extended method of ➤➤ channel bundling, in which it is also possible to connect ➤➤ dialup connections to ➤➤ leased lines or to configure dialup connections as a backup facility for leased lines. BootP Bootstrap protocol Based on the ➤➤ UDP or ➤➤ IP protocol. Automatically assigns an ➤➤ IP address. DIME Tools contain a BootP server that you can start on your PC to assign the as yet unconfigured router an IP address. Bridge Network components for connecting homogeneous networks. As opposed to a ➤➤ router, bridges operate at layer 2 (data link layer) of the ➤➤ OSI model, are independent of higher-level protocols and transmit data packets using ➤➤ MAC addresses. Data transmission is transparent, which means the information contained in the data packages is not interpreted. Bridges are used to physically decouple networks and to reduce network data traffic. This is done by using filter functions that allow data packets to pass to certain network segments only. Some BinTec routers can be operated in Bridging Mode. Broadcast Broadcasts (data packages) are sent to all stations in a network in order to exchange information. Generally, there is a certain address (broadcast address) in the network that allows all stations to interpret a message as a broadcast. Bus A data transmission medium for use by all the devices connected to a network. Data is forwarded over the entire bus and received by all devices on the bus. Called Party Number Number of the terminal called. Calling Party Number Number of the calling terminal. CAPI Common ISDN Application Programming Interface A software interface standardized in 1989 that allows application programs to access ISDN hardware from the PC. Most ISDN-specific software solutions (communications programs such as RVS-COM Lite) work with the CAPI interface. Such communications applications enable you, for example, to send and receive faxes or transfer data over the ISDN from your PC. See also ➤➤ Remote CAPI. 470 X4000 User’s Guide Glossary CCITT Consultative Committee for International Telegraphy and Telephony A predecessor organization of the ➤➤ ITU that passed recommendations for the development of communications standards for public telephony and data networks and data transmission interfaces. Channel bundling Channel bundling One of X4000’s features. Channel bundling is a method of increasing the data throughput. The data throughput is doubled by switching in a second ➤➤ Bchannel for data transmission. Channel bundling can be either dynamic (= on demand) or static (= always). CHAP Challenge Handshake Authentication Protocol A security mechanism during the establishment of a connection with a ➤➤ WAN partner using ➤➤ PPP. This protocol is used for checking the WAN partner name and the password defined for the WAN partner. If the partner name and password at both ends are not the same, a connection is not set up. The user name and password are encoded in CHAP before they are sent to the partner – as opposed to ➤➤ PAP. CLID Calling Line Identification A security mechanism during the establishment of a connection with a ➤➤ WAN partner. A caller is identified by means of his ISDN extension number before the connection is established. If the extension number is not the same as the extension number you have defined for a WAN partner, a connection is not established. Client A client uses the services provided by a workstations. ➤➤ server. Clients are usually Data compression A process for reducing the amount of data transmitted. This enables higher throughput to be achieved in the same transmission time. Examples of this technique include ➤➤ STAC, ➤➤ VJHC and ➤➤ MPPC. Datagram A self-contained ➤➤ data packet that is forwarded in the network with minimum protocol overhead and without an acknowledgement mechanism. Data packet A data packet is used for information transfer. Each data packet contains a prescribed number of characters (information and control characters). X4000 User’s Guide 471 Glossary DCE Data Circuit-Terminating Equipment Data Circuit-Terminating Equipment (see D-channel DCN Dialup connection Direct dialing range DHCP ➤➤ V.24) Control and signalling channel of the ➤➤ ISDN Basic Rate Interface or the ➤➤ Primary Rate Interface. The D-channel has a data transmission rate of 16 kbps. In addition to the D-channel, each ISDN BRI has two ➤➤ Bchannels. Data communications network A connection is set up when required by dialing an extension number, in contrast to a ➤➤ leased line. See ➤➤ extension numbers range Dynamic Host Configuration Protocol A Microsoft protocol that provides a mechanism for dynamic assignment of ➤➤ IP addresses. A DHCP server allocates each ➤➤ client in a network an IP address from a defined address pool compiled by the system administrator. Prerequisite: ➤➤ TCP/IP must be configured at the clients so that they can request their IP address from the server. X4000 can be used as a DHCP server. DIME Desktop Internetworking Management Environment DIME Tools is a collection of tools for the configuration and monitoring of routers over Windows applications. They are included with all BinTec routers free of charge. DNS Domain Name System Each device in a ➤➤ TCP/IP network is usually located by its ➤➤ IP address. Because ➤➤ host names are often used in networks to reach different devices, it is necessary for the associated IP address to be known. This task can be performed by a Domain Name Server (DNS), which resolves the host names into IP addresses. Alternatively, name resolution can also take place over the HOSTS file, which is available on all PCs. Domain 472 A domain refers to a group of devices in a network, whose host names share a common suffix, the domain name. Thus, in the ➤➤ Internet, a part of a naming hierarchy (e.g. bintec.de). X4000 User’s Guide Glossary Downstream DSL/xDSL Data transmission rate from the ➤➤ Internet Service Provider to the client. Digital Subscriber Line Data transmission technique that enables high transmission rates to be achieved on normal telephone lines. The data rate is dependent on the distance to be covered and the quality of the line and therefore varies. xDSL is used as a bookmark for the different DSL variants, such as ➤➤ ADSL, ➤➤ RADSL, ➤➤ VDSL, ➤➤ HDSL, ➤➤ SDSL, ➤➤ U-ADSL, etc., which are part of the family of DSL techniques. DSS1 Digital Subscriber Signalling System. A common D-channel protocol used in the Euro ISDN. DTE Data Terminal Equipment Data Terminal Equipment (see ➤➤ V.24) DTMF Dual Tone Multi Frequency (tone dialing system) Dialing method for telephony systems. In this method, pressing a key on the telephone keypad generates two simultaneous tones, which are correspondingly evaluated by the PABX or exchange. E1/T1 E1: European variant of the 2.048 Mbps ➤➤ ISDN Interface, which is also called the E1 system. ➤➤ Primary Rate T1: American variant of the ISDN Primary Rate Interface with 23 basic channels and one D-channel (1.544 Mbps). EAZ Terminal Selection Digit Is only used in the ➤➤ 1TR6 system and designates the last digit of an extension number. It is used for dialing various terminals connected to the ISDN Basic Rate Interface (e.g. fax). This occurs by attaching one digit between 0 and 9 to the actual ISDN telephone number. In Euro ISDN (DSS1), the complete extension number, ➤➤ MSN, is transferred instead of the EAZ. Encapsulation Encapsulation of ➤➤ data packets in a certain protocol for transmitting the packets over a network that the original protocol does not directly support (e.g. NetBIOS over TCP/IP). X4000 User’s Guide 473 Glossary Encryption Refers to the encoding of data, e.g. ➤➤ MPPE. Ethernet A local network that connects all devices in the network (PC, printers, etc.) via a twisted pair or coaxial cable. Extension An extension is an internal number for a terminal or subsystem. In ➤➤ pointto-point ISDN accesses, the extension is usually a number from the ➤➤ extension numbers range assigned by the telephone provider. In pointto-multipoint connections, it can be the MSN or a part of the MSN. Extension numbers range (direct dialing range) A point-to-point ISDN access includes a ➤➤ PABX number and an extension numbers range. The PABX number is used to reach the PABX. The extension numbers range is a group of numbers used for selecting terminals within the ➤➤ PABX. Filters A rule that defines a set of packets that should or should not be transmitted by the router. Firewall Designates the whole range of mechanisms to protect the local network against external access. X4000 provides protection mechanisms such as ➤➤ NAT, ➤➤ CLID, ➤➤ PAP/CHAP, access lists, etc. FTP File Transfer Protocol A TCP/IP protocol used to transfer files between different hosts. Gateway Entrance and exit, transition point Component in the local network that offers access to other networks, also offers transitions between different networks, e.g. ➤➤ LAN and ➤➤ WAN. HDSL High Data Rate ➤➤ DSL The ➤➤ upstream and ➤➤ downstream data rates are: Mbps and ➤➤ E1 2.048 Mbps over ranges up to 4 km. ➤➤ T1 1.554 The main HDSL applications are: High-speed data communication over leased lines. HDSL2 High Data Rate ➤➤ DSL, version 2 The ➤➤ upstream and ranges up to 4 km. 474 X4000 User’s Guide ➤➤ downstream data rate is 1.554 Mbps over Glossary The main HDSL applications are: High-speed data communication over leased lines. Host name A name used in ➤➤ IP networks as a replacement for the corresponding ➤➤ IP address. A host name consists of an ASCII string that uniquely identifies the host computer. Hub Network component used to connect several network components together to form a local network (star-shaped). Internet The Internet consists of a range of regional, local and university networks. The ➤➤ IP protocol is used for data transmission in the Internet. IP Internet Protocol One of the ➤➤ TCP/IP suite of protocols used for the connection of Wide Area Networks (➤➤ WANs). IP address IPX/SPX The first part of the address by which a device is identified in an IP network, e.g. 192.168.1.254. See also ➤➤ netmask. Internet Packet Exchange/Sequenced Packet Exchange Protocol suite from Novell for the transmission of data in a network. The two parts of this protocol suite are IPX (layer 3 of the OSI model) and SPX (layer 4 of the OSI model). ISDN Integrated Services Digital Network The ISDN is a digital network for the transmission of voice and data. There are two possible subscriber connections for ISDN, the ➤➤ ISDN Basic Rate Interface and the ➤➤ Primary Rate Interface. ISDN is an international standard. For ISDN protocols, however, there is a range of variations. ISDN Basic Rate Interface An ISDN subscriber interface. The Basic Rate Interface consists of two ➤➤ Bchannels and a ➤➤ D-channel. Compare ➤➤ Primary Rate Interface. The interface to the subscriber is provided by an ➤➤ S0 bus. ISDN BRI ISDN Basic Rate Interface ➤➤ ISDN Basic Rate Interface, also ➤➤ S0 interface. X4000 User’s Guide 475 Glossary ISDN Login ISDN PRI One of X4000’s features. X4000 can be configured and administrated remotely using ISDN Login. ISDN Login operates on routers in the ex works state as soon they are connected to an ISDN connection and therefore reachable via an extension number. ISDN Primary Rate Interface ISDN ISO ➤➤ Primary Rate Interface, also ➤➤ S2M interface. International Standardization Organization An international organization for the development of world-wide standards, e.g. ➤➤ OSI model. ISP Internet Service Provider Allows companies or private individuals access to the Internet. ITU International Telecommunication Union International organization that co-ordinates the construction and operation of telecommunications networks and services. LAN Local Area Network A network covering a small geographic area and controlled by its owner. Usually within the confines of a building or corporate center. Leased line Leased line Fixed connection to a subscriber. In contrast to a ➤➤ dialup connection, neither an extension number nor connection setup or clearing is necessary. MAC address MIB Every device in the network is defined by a fixed hardware address (MAC address). The network card of a device defines this internationally unique address. Management Information Base The MIB is a database that describes all the manageable devices and functions connected to a network. All MIBs (including the BinTec MIB) contain objects specific to the manufacturer. ➤➤ SNMP is based on MIB. MMI 476 Man-Machine Interface X4000 User’s Guide Glossary Is a convenient user guide with LC display and input keys for the user to navigate the basic functions of X4000. Modem Modulator/Demodulator An electronic device used to convert digital signals to analog tone signals and vice versa, so that data can be transmitted in an analog medium. MPPC Microsoft Point-to-Point Compression ➤➤ data compression procedure for MPPE Microsoft Point-to-Point Encryption Data encryption process. MSN Multiple Subscriber Number Multiple number for an ISDN BRI in Euro ISDN. The MSN is the extension number that permits a terminal to be addressed specifically on the ➤➤ S0 bus in Euro ISDN. An MSN has up to eight digits, e.g. 49 911 7654321, where 7654321 corresponds to the MSN. Usually three such MSNs are assigned to each ISDN BRI (point-to-multipoint connection) in Germany. Multiprotocol router NAT A ➤➤ router that can route several protocols, e.g. ➤➤ IP, ➤➤ IPX, etc. Network Address Translation Used as a security mechanism in X4000. Using NAT conceals your complete network to the outside world. The IP addresses of all devices in your own network remain confidential, only one IP address is made known for connections to the outside. NetBIOS Network Basic Input Output System A programming interface that activates network operations on a PC. It is a set of commands for transmitting and receiving data to and from other Windows PCs on the network. Netmask Network address The second part of an address in an IP network, used for identification of a device, e.g. 255.255.255.0. See also ➤➤ IP address. A network address designates the address of a complete local network. X4000 User’s Guide 477 Glossary NT Network Termination An NT adapter is the network termination unit of an ➤➤ ISDN connection. In Germany, this is obtained from Deutsche Telekom AG. It is used to connect a private network (➤➤ S0 bus) to the public ISDN network. It is equivalent to the terminal socket used for connecting an analog telephone. NTBA Network Termination for Basic Access. An NTBA adapter is the network termination unit of an ➤➤ ISDN Basic Rate Interface. In Germany, this is obtained from Deutsche Telekom AG. It is used to connect a private network (➤➤ S0 bus) to the public ISDN network. It is equivalent to the terminal socket used for connecting an analog telephone. OSI model OSI = Open Systems Interconnection ➤➤ ISO reference model for networks. Defines interface standards between computer manufacturers for software and hardware requirements. OSPF Open Shortest Path First Routing protocol used in networks to exchange information (routing tables) between ➤➤ routers. PABX Private Automatic Branch Exchange An ISDN PABX is used to set up an internal telephone infrastructure. Both analog terminals (e.g. fax, modem) and digital terminals can be connected to a PABX. The internal network provides free telephoning and connection switching. The individual terminals are given different extension numbers. PABX Private Automatic Branch Exchange An ISDN ➤➤ PABX is a telephone exchange with ➤➤ S0 interface and ➤➤ 1TR6 or other manufacturer-specific ➤➤ D-channel protocols on the subscriber side. Exchanges allow internal connections between the PABX extensions without the need to connect to the telephone service provider. Not all BinTec routers contain an exchange. 478 X4000 User’s Guide Glossary PABX number PAP A point-to-point ISDN access includes a PABX number and an ➤➤ extension numbers range. The PABX number is used to reach the PABX. A certain terminal of the ➤➤ PABX is then dialed via one of the numbers of the extension numbers range. Password Authentication Protocol Authentication process for connecting over ➤➤ PPP. Functions like ➤➤ CHAP, except that the user name and password are not encoded before being transmitted to the partner. Ping Packet Internet Groper Command that can be used to determine the range to remote network components. Ping is also used for test purposes to determine if the remote device can actually be reached at all. Point-to-multipoint Feature of a connection that is permanently connected between three or more data stations or set up via switching systems. Point-to-multipoint connection ➤➤ Point-to-multipoint) Several different terminals can be connected to a point-to-multipoint connection. The individual terminals are addressed via certain extension numbers (➤➤ MSNs). Point-to-point Feature of a connection between two data stations only. The connection can be permanently switched or set up via switching systems. Point-to-point ISDN access A point-to-point ISDN access is used for the connection of a ➤➤ PABX. The PABX can forward calls to a number of terminals. A point-to-point access includes a ➤➤ PABX number, via which the PABX is reached from outside and a group of numbers (➤➤ extension numbers range), with which the terminals connected to the PABX can be dialed. Port Input/output The port number is used to decide to which service (telnet, WWW) an incoming data packet should be sent. POTS Plain Old Telephone System The traditional analog telephone network. X4000 User’s Guide 479 Glossary PPP Point-to-Point Protocol A protocol suite for authentication of the connection parameters of a ➤➤ point-to-point connection. PPP is used to connect local networks over the ➤➤ WAN. Multiprotocol packets are encapsulated (➤➤ encapsulation) in a standard format before transmission. Establishing a connection involves a number of other components and subprotocols, such as the authentication mechanisms ➤➤ PAP/CHAP. PPP authentication PPPoE Security mechanism. A method of authentication using passwords in ➤➤ PPP. Point to Point Protocol over Ethernet The PPP-over-Ethernet (PPPoE) protocol permits Internet access over Ethernet via an ➤➤ xDSL modem or xDSL router. Primary Rate Interface (PRI) An ISDN subscriber interface. The PRI consists of a D-channel and 30 Bchannels (in Europe). (In America: 23 B-channels and a D-channel.) Compare ➤➤ ISDN Basic Rate Interface. Protocol Protocols are used to define the manner and means of information exchange between two systems. Protocols control and rule the course of data communication at various levels (decoding, addressing, network routing, control procedures, etc.). Proxy ARP ARP = Address Resolution Protocol Process used to determine the associated whose ➤➤ IP address is known. RADSL ➤➤ MAC address for a host Rate-Adaptive ➤➤ Digital Subscriber Line The data rate is up to 640 kbps ➤➤ upstream and 1.5 - 9 Mbps ➤➤ downstream over ranges of up to 18.5 km. The main RADSL applications are: Internet access, video-on-demand (digital and compressed) and high-speed data communication over ➤➤ POTS. Real Time Clock (RTC) Remote 480 Hardware clock with buffer battery Remote, as opposed to local. X4000 User’s Guide Glossary If a far station is not located in your own local network (LAN), but in another LAN, this is referred to as remote. This LAN must be connected to the local LAN over a WAN connection (over X4000). Remote access Remote CAPI Opposite to local access, see ➤➤ Remote. BinTec’s own interface for ➤➤ CAPI. The Remote CAPI interface enables all subscribers of a network to use CAPI services, but over X4000 to a single ISDN connection. All subscribers must have the corresponding application software installed to support the CAPI interface. This standard interface is, however, used by most communications applications. X4000 is supplied as standard with suitable software (RVS-COM Lite). BinTec’s CAPI interface is implemented as a dual-mode CAPI. CAPI 1.1 and 2.0 applications can access ISDN resources parallel to one another. This means new CAPI 2.0 applications can be used on the network or on the same PC parallel to old applications based on CAPI 1.1. RIP Routing Information Protocol Routing protocol used in networks to exchange information (routing tables) between ➤➤ routers. RJ45 Router Plug or socket for maximum eight wires. Connection for digital terminals. A device that connects different networks at layer 3 of the ➤➤ OSI model and routes information from one network to the other. Routers are able to recognize blocks of information and evaluate addresses (as opposed to a ➤➤ bridge, which operates with a transparent protocol). The best paths (routes) from one point to another are chosen by using routing tables. In order to keep the routing tables up to date, routers exchange information between themselves via routing protocols (e.g. ➤➤ OSPF, ➤➤ RIP). Modern routers such as X4000 are ➤➤ multiprotocol routers and thus capable of routing several protocols (e.g. IP and IPX). X4000 User’s Guide 481 Glossary S0 bus All ISDN sockets and the ➤➤ NTBA of an ISDN point-to-multipoint connection. All S0 buses consist of a four-wire cable. The lines transmit digital ISDN signals. The S0 bus is terminated with a terminating resistor after the last ISDN socket. The S0 bus starts at the NTBA and can be up to 150 m long. Any ISDN devices can be operated on this bus. However, only two devices can use the S0 bus at any one time, as only two ➤➤ B-channels are available. S0 interface See ➤➤ ISDN Basic Rate Interface S2M interface See ➤➤ ISDN Primary Rate Interface SDSL Single line ➤➤ Digital Subscriber Line The ➤➤ upstream and ranges up to 3.5 km. ➤➤ downstream data rate is up to 768 kbps over The main SDSL applications are: ➤➤ E1/T1 and ➤➤ POTS. Server A server offers services used by ➤➤ clients. Often refers to a certain computer in the LAN, e.g. DHCP server. In client-server architecture, a server is the software part that executes functions for its clients, e.g. ➤➤ TFTP server. In such a case, the server is not necessarily a computer server. Setup Tool Menu-driven tool for the configuration of X4000. The Setup Tool can be used as soon as the router has been accessed (serial, ➤➤ ISDN Login, ➤➤ LAN). Short hold Is the defined amount of time, after which a connection is cleared if no more data is transmitted. Short hold can be set to static (fixed amount of time) or dynamic (according to charging unit). SNMP Simple Network Management Protocol A protocol in the ➤➤ TCP/IP protocol suite that is used to transport management information about network components. Every SNMP management system contains an ➤➤ MIB. SNMP can be used to configure, control and administrate various network components from one system. Such an SNMP tool is included in your router: the Configuration Manager. As SNMP is a standard protocol, you can use any other SNMP managers, e.g. HP OpenView. SNMP shell 482 Input level for SNMP commands. X4000 User’s Guide Glossary SOHO Small Offices and Home Offices Small offices and home offices. Spoofing Technique for reducing data traffic (and thus saving costs), especially in WANs. The router answers as proxy for remote PCs to cyclically transmitted data packets with a monitoring function (e.g. sign of life messages). STAC Data compression procedure. Subnet A network scheme that divides individual logical networks into smaller physical units to simplify routing. Switch LAN switches are network components with a similar function to ➤➤ bridges or even ➤➤ routers. They switch data packets between the input and output port. In contrast to bridges, switches have several input and output ports. This increases the bandwidth in the network. Switches can also be used for conversion between networks with different speeds (e.g. 100-Mbps and 10Mbps networks). Synchronous Transmission process in which the transmitter and receiver operate with exactly the same clock signals – in contrast to ➤➤ asynchronous. Spaces are bridged by a stop code. TCP Transmission Control Protocol One of the ➤➤ TCP/IP suite of protocols used for the connection of Wide Area Networks (➤➤ WANs). TCP/IP Transmission Control Protocol/Internet Protocol A protocol suite for the connection of Wide Area Networks (➤➤ WANs). The two parts of this protocol suite are ➤➤ IP (layer 3 of the OSI model) and ➤➤ TCP (layer 4 of the OSI model). TE Terminal Equipment Terminal equipment for subscriber access, e.g. telephone, fax or PC. TEI Terminal Endpoint Identifier The TEI in ➤➤ ISDN is an address field in layer 2 that is used for identifying a certain terminal. X4000 User’s Guide 483 Glossary Telematics Telematics is a combination of telecommunication and computer technology and describes data communication between systems and devices. Telnet Protocol from the ➤➤ TCP/IP protocol suite. Telnet enables communication with a remote device in the network. TFTP Trivial File Transfer Protocol Protocol for data transmission. TFTP server software is a part of ➤➤ DIME Tools. It is used for the transfer of configuration files and software to and from the router. U-ADSL Universal ➤➤ Asymmetric Digital Subscriber Line The data rate is 128 kbps ➤➤ upstream and 1 - 9 Mbps over ranges of up to 5.5 km. ➤➤ downstream The main U-ADSL applications are: ➤➤ POTS Internet access. UDP User Datagram Protocol A transport protocol similar to ➤➤ TCP. UDP offers no control or acknowledgment mechanisms, but is faster than TCP. UDP is connectionless in contrast to TCP. Upstream URL Data transmission rate from the client to the ➤➤ Internet Service Provider. Universal/Uniform Resource Locator Address of a file on the Internet 484 V.11 ITU-T recommendation for balanced dual-current interface lines (up to 10 Mbps). V.24 CCITT and ITU-T recommendation that defines the interface between a PC or terminal as Data Terminal Equipment (➤➤ DTE) and a modem as Data Circuit-terminating Equipment (➤➤ DCE). V.28 TU-T recommendation for unbalanced dual-current interface lines V.35 ITU-T recommendation for data transmission at 48 kbps in the range from 60108 kHz. V.36 Modem for ➤➤ V.35. X4000 User’s Guide Glossary V.90 ITU standard for 56 kbps analog modems. In contrast to older V.34 modems, data is sent in digital form to the client when the V.90 standard is used and does not need to be first converted from digital to analog on one side of the modem (provider), as was the case with V.34 and earlier modems. This makes higher transmission rates possible. A maximum speed of 56 kbps can be achieved only under optimum conditions. VDSL Very high bit rate ➤➤ Digital Subscriber Line (also called VADSL or BDSL). The data rate is 1.5 to 2.3 Mbps ➤➤ upstream and 13 to 52 Mbps ➤➤ downstream over ranges of 300 m to 14 km. The main VDSL applications are: as for ➤➤ ADSL, but at higher transmission rates and with synchronization over short ranges. VJHC Van Jacobson Header Compression ➤➤ data compression procedure for IP header compression. VPN Virtual Private Network The use of existing structures such as the ➤➤ Internet structure for connecting private networks (e.g. SOHO exchange). The data can be encrypted between the two endpoints of the VPN to meet increased security requirements. WAN Wide Area Network Wide Area Network connections, e.g. over ISDN, X.25. WAN interface WAN interface WAN interfaces connect the local network to the (➤➤ WAN). This is usually done by means of analog or digital telephone lines (➤➤ switched or ➤➤ leased lines). WAN partner Remote station that is reached over a ➤➤ WAN, e.g. ISDN. X.21 The X.21 recommendation defines the physical interface between two network components in packet-switched data networks (e.g. Datex-P). X.21bis The X.21bis recommendation defines the ➤➤ DTE/➤➤ DCE interface to Vseries synchronous modems. X4000 User’s Guide 485 Glossary 486 X.25 An internationally agreed standard protocol that defines the interface between network components and a packet-switched data network. X.31 For integration of X.25-compatible DTEs in ISDN. X4000 User’s Guide Index Index A B C 132, 335 325 322 308 276 155 187 234 327 353 358 Access lists Access security Activity monitor Activity monitoring Additional license ADSL Advanced configuration with Setup Tool ARP Authentication TAF Auto logout 352 201 119 242 120 36, 389 40 37 389 389 20 66 266 20, 22, 112 112 275 40 Back route verification Bandwidth on Demand Basic configuration with Setup Tool Basic IP settings Basic router settings Basic unit Built-in unit Desktop unit Interfaces Technical data BinTec Companion CD Boot sequence BOOTP relay agent BRICKware Installation Bridging Built-in unit Callback CAPI Changing over the display Channel bundling CHAP 327 141 55 199 159, 194, 327 X4000 User’s Guide 487 Index Checking the calling party number Checklist for security functions CLID Closed User Group COM port driver Commands BRICKtools for Unix SNMP shell Communications applications Compression MS-STAC STAC Van Jacobson Header Compression Compuserve Configuration Advanced configuration with Setup Tool Basic configuration with Configuration Wizard Basic configuration with Setup Tool Basic router settings Configuration Configuration Management Configuring a PC Distribution of incoming calls Instructions for initial configuration Preparation Saving Security functions WAN interfaces WAN partner Configuration file administration Configuration Management Configuration Manager Configuration options Configuration Wizard Configuring a PC Configuring users Connection methods 488 X4000 User’s Guide 326 360 159, 326 330 115 411 419 412 115 232 232 232 232 182 187 109 119 120 117 363 115 141 91 110 186 307 137 159 364 363 78 78 78, 109 115 141 70 Index 390 159 316 Console interface Corporate network connection Credits Based Accounting System D E F G Default route Delay after connection failure Denial-of-Service attacks Desktop unit DHCP server Display Display interface Distribution of incoming calls DNS Documentation Domain Name Dynamic IP address server 159, 175 198 358 37 129 93 405 141 225, 246 22 246 188 Encapsulation Encryption Errors, typical Expansion cards Installation and removal Extended Features Reference Extended IP routing Extensions CAPI ISDN Login Routing 159 354, 357 379 53 55 22 353 Feedback Feedback facility Filters Firewall Flash memory 141 141 141 497 29 132, 335, 348 307 364 194 31 General PPP settings General Safety Precautions X4000 User’s Guide 489 Index H I 490 General WAN settings Guarantee terms 188 24 Hardware Basic unit Expansion cards LEDs Setting up and connecting HTTP status page 35 36 53 63 59 320 Incoming calls CAPI ISDN Login Routing Input keys Instructions for initial configuration Internet access Compuserve T-Online IP Basic settings Name resolution Transit Network IP address DHCP server Entering with MMI Entering with the Setup Tool IP address pools IP address server PCs in the LAN Pool IPX LAN interface WAN partner ISDN B-channel X4000 User’s Guide 141 141 141 93 91 159 182 182 242 246 222 129 93 126 188 188 115 188 268 270 271 219 Index J L M ISDN BRI interface Configuring Technical data ISDN Login 137 392 74, 141 JAVA status monitor 321 LAN interface ADSL access Configuring IPX Technical data LAN-LAN connection Layer 1 Protocol Leased lines LEDs License Additional license Entering License card Line tapping security Local filters Logging in 155 126 270 391 159 219 137, 148 63, 93 276 121 18 354 348 76, 325 388 364 78 22 Mains unit Memory MIB MIB Reference MMI Changing over the display Display Entering IP address Entering netmask Input keys Operation Status information Monitoring functions in the Setup Tool 55 93 93 93 93 93 93 313 X4000 User’s Guide 491 Index MPPE MS-STAC N P R S 492 Name resolution NAT NetBIOS NetBIOS filters Netmask Entering with MMI Entering with the Setup Tool Network Address Translation Novell networks 354 232 225 181, 331 225 132 93 126 181, 331 268 PAP Passwords Port Ports PPP authentication General settings PPP settings PPTP Proxy ARP 159, 194, 327 76, 123 265 335 159, 327 194 194 357 234 RAM Release Notes Remote CAPI Resetting to ex works state RIP Routing Routing entry Routing Information Protocol Rule RVS-COM Lite 364 22 115, 141, 330 379 229 159 159, 175 229 335 115 S0 interface Configuring Technical data X4000 User’s Guide 137 392 Index 307 31 186 18 307 325 308 360 307 354 358 159, 194 194 265, 335 59 79 187 119 79 313 79 159 76, 78 22 371 232 358 308 123 23 242 SAFERNET Safety Precautions Saving the configuration Scope of supply Security functions Access security Activity monitoring Checklist Configuration Line tapping security Special features Selecting General Settings Service Setting up and connecting Setup Tool Advanced configuration Basic configuration Menu architecture Monitoring functions Using Short hold SNMP shell Software Reference Software update STAC Startup procedure Syslog messages System data, entering System requirements System time T 353 155 387 389 388 TAF T-DSL Technical data Basic unit Mains unit X4000 User’s Guide 493 Index U V W 494 Telnet Testing Time server Token Authentication Firewall T-Online Transit Network Troubleshooting Aids IPX routing ISDN connections System errors 73 117 242 353 182 222 375 376 383 380 379 Update User concept 371 141 V.24 interface Technical data Van Jacobson Header Compression Virtual Private Network (VPN) VPN 393 232 357 357 WAN interfaces WAN partner advanced functions Compuserve Configuring (basic configuration) DNS Encapsulation Examples Internet access IPX PPP authentication Routing entry Short hold T-Online Transit Network WINS X4000 User’s Guide 137 198 182 159 225 159 182 182 271 159 159 159 182 159 225 Index 225, 246 WINS X 148 X.21 X.21 interface Configuring Technical data XIPR 148 393 353 X4000 User’s Guide 495 Index 496 X4000 User’s Guide Document #71000L, Version1.3 Doc ument #71000L, Version1.3 Manual questionnaire, fax back to +49 911 / 9673 1498 selected How do you rate your own skills? # O network specialist O average knowledge of networks O little knowledge of networks How do you rate the scope of the manual? O not enough O just right O too much Is something important missed out in the manual? # O no O yes, the following ……………………………………………………... Does the manual contain unnecessary information? O no O yes, the following ……………………………………………………... How do you rate the clarity of the manual? O very good O good O average O bad O very bad How do you rate the comprehensibility (examples, explanations, graphics)? # O very good O good O average O bad O very bad Did you have any problems during installation and configuration that you couldn’t solve with the manual? O no O yes, the following ……………………………………………………... Which configuration tools do you use? # O Configuration O Setup Tool Wizard O Configuration Manager O SNMP commands O others: ……………… ….. Comments: ................................................................................................................................................ ................................................................................................................................................ ................................................................................................................................................ ................................................................................................................................................ ................................................................................................................................................ X4000 User’s Guide 497 Document #71000L, Version1.3 498 X4000 User’s Guide