1
i
IBM SPSS Data Collection Interviewer
Server 6.0.1 User’s Guide
Note: Before using this information and the product it supports, read the general information
under Notices on p. 338.
This edition applies to IBM SPSS Data Collection Interviewer Server 6.0.1 and to all subsequent
releases and modifications until otherwise indicated in new editions.
Adobe product screenshot(s) reprinted with permission from Adobe Systems Incorporated.
Microsoft product screenshot(s) reprinted with permission from Microsoft Corporation.
Licensed Materials - Property of IBM
Licensed Materials - Property of IBM © Copyright IBM Corporation 2000, 2011
Licensed Materials - Property of IBM © Copyright IBM Corporation 2000, 2011
U.S. Government Users Restricted Rights - Use, duplication or disclosure restricted by GSA ADP
Schedule Contract with IBM Corp.
Preface
Welcome to the IBM® SPSS® Data Collection Interviewer Server 6.0.1 User’s Guide. This
guide provides information on using the IBM® SPSS® Data Collection Interviewer Server
application and activities. For information about installing the products, see the Interviewer
Server 6.0.1 User’s Guide.
Adobe Portable Document Format (.pdf) versions of the guides are available on the IBM SPSS
Data Collection Server DVD-ROM. Viewing and printing the documents requires Adobe Reader.
If necessary, you can download it at no cost from www.adobe.com. Use the Adobe Reader online
Help for answers to your questions regarding viewing and navigating the documents.
Notice: IBM® SPSS® Data Collection offers many powerful functions and features for use in
the business of our customers. IBM is not responsible for determining the requirements of laws
applicable to any licensee’s business, including those relating to Data Collection Program, nor that
IBM’s provision of (or any licensee’s receipt of) the Program meets the requirements of such laws.
All licensees shall comply with all laws applicable to use and access of the Program, whether such
use or access is standalone or in conjunction with any third party product or service.
About IBM Business Analytics
IBM Business Analytics software delivers complete, consistent and accurate information that
decision-makers trust to improve business performance. A comprehensive portfolio of business
intelligence, predictive analytics, financial performance and strategy management, and analytic
applications provides clear, immediate and actionable insights into current performance and the
ability to predict future outcomes. Combined with rich industry solutions, proven practices and
professional services, organizations of every size can drive the highest productivity, confidently
automate decisions and deliver better results.
As part of this portfolio, IBM SPSS Predictive Analytics software helps organizations predict
future events and proactively act upon that insight to drive better business outcomes. Commercial,
government and academic customers worldwide rely on IBM SPSS technology as a competitive
advantage in attracting, retaining and growing customers, while reducing fraud and mitigating
risk. By incorporating IBM SPSS software into their daily operations, organizations become
predictive enterprises – able to direct and automate decisions to meet business goals and achieve
measurable competitive advantage. For further information or to reach a representative visit
http://www.ibm.com/spss.
Technical support
Technical support is available to maintenance customers. Customers may contact Technical
Support for assistance in using IBM Corp. products or for installation help for one of the
supported hardware environments. To reach Technical Support, see the IBM Corp. web site
at http://www.ibm.com/support. Be prepared to identify yourself, your organization, and your
support agreement when requesting assistance.
Licensed Materials - Property of IBM ©
Copyright IBM Corporation 2000, 2011
iii
Contents
1
IBM SPSS Data Collection Interviewer Server User’s Guide
1
Welcome to the IBM SPSS Data Collection Interviewer Server User’s Guide. . . . . . . . . . . . . . . . . 1
What’s New in IBM SPSS Data Collection Interviewer Server Activities 6.0.1 . . . . . . . . . . . . . . . . 1
IBM SPSS Data Collection Interviewer Server in Other Languages . . . . . . . . . . . . . . . . . . . . . . . . 3
Converting Version 2.3 Scripts to Work With IBM SPSS Data Collection Interviewer Server 6.0.1 . 3
IBM SPSS Data Collection Interviewer Server Activities in IBM SPSS Data Collection
Interviewer Server Administration . . . . . . . . . . . . . . . . . . . . . . . . . . . . . . . . . . . . . . . . . . . . . . . . 4
Getting Started with the IBM SPSS Data Collection Interviewer Server Activities.
Managing Your Work . . . . . . . . . . . . . . . . . . . . . . . . . . . . . . . . . . . . . . . . . . . . . .
Build . . . . . . . . . . . . . . . . . . . . . . . . . . . . . . . . . . . . . . . . . . . . . . . . . . . . . . . . . .
Participant Rules . . . . . . . . . . . . . . . . . . . . . . . . . . . . . . . . . . . . . . . . . . . . . . . . .
Participants . . . . . . . . . . . . . . . . . . . . . . . . . . . . . . . . . . . . . . . . . . . . . . . . . . . . .
Launch . . . . . . . . . . . . . . . . . . . . . . . . . . . . . . . . . . . . . . . . . . . . . . . . . . . . . . . .
Promote Project. . . . . . . . . . . . . . . . . . . . . . . . . . . . . . . . . . . . . . . . . . . . . . . . . .
Email . . . . . . . . . . . . . . . . . . . . . . . . . . . . . . . . . . . . . . . . . . . . . . . . . . . . . . . . . .
Phone Surveys . . . . . . . . . . . . . . . . . . . . . . . . . . . . . . . . . . . . . . . . . . . . . . . . . .
Phone Participants . . . . . . . . . . . . . . . . . . . . . . . . . . . . . . . . . . . . . . . . . . . . . . .
Review Interviews . . . . . . . . . . . . . . . . . . . . . . . . . . . . . . . . . . . . . . . . . . . . . . . .
Quotas. . . . . . . . . . . . . . . . . . . . . . . . . . . . . . . . . . . . . . . . . . . . . . . . . . . . . . . . .
Status . . . . . . . . . . . . . . . . . . . . . . . . . . . . . . . . . . . . . . . . . . . . . . . . . . . . . . . . .
Survey Results. . . . . . . . . . . . . . . . . . . . . . . . . . . . . . . . . . . . . . . . . . . . . . . . . . .
Phone . . . . . . . . . . . . . . . . . . . . . . . . . . . . . . . . . . . . . . . . . . . . . . . . . . . . . . . . .
Export Data . . . . . . . . . . . . . . . . . . . . . . . . . . . . . . . . . . . . . . . . . . . . . . . . . . . . .
Interviewer Monitoring . . . . . . . . . . . . . . . . . . . . . . . . . . . . . . . . . . . . . . . . . . . .
Dialer Administration . . . . . . . . . . . . . . . . . . . . . . . . . . . . . . . . . . . . . . . . . . . . . .
Interviewing Activity Reports . . . . . . . . . . . . . . . . . . . . . . . . . . . . . . . . . . . . . . . .
Manage Logs. . . . . . . . . . . . . . . . . . . . . . . . . . . . . . . . . . . . . . . . . . . . . . . . . . . .
IBM SPSS Data Collection Remote Administration . . . . . . . . . . . . . . . . . . . . . . . .
Activation History . . . . . . . . . . . . . . . . . . . . . . . . . . . . . . . . . . . . . . . . . . . . . . . .
Desktop Tools . . . . . . . . . . . . . . . . . . . . . . . . . . . . . . . . . . . . . . . . . . . . . . . . . . . . . . .
...
...
...
...
...
...
...
...
...
...
...
...
...
...
...
...
...
...
...
...
...
...
...
...
...
...
...
...
...
...
...
...
...
...
...
...
...
...
...
...
...
...
...
...
...
...
... 5
... 8
... 9
. . . 78
. . . 81
. . 108
. . 118
. . 121
. . 128
. . 177
. . 203
. . 211
. . 216
. . 218
. . 230
. . 261
. . 272
. . 284
. . 293
. . 296
. . 301
. . 302
. . 304
Activating Projects from the Command Line . . . . . . . . . . . . . . . . . . . . . . . . . . . . . . . . . . . . . 304
2
IBM SPSS Data Collection Quota Setup
308
Starting IBM SPSS Data Collection Quota Setup . . . . . . . . . . . . . . . . . . . . . . . . . . . . . . . . . . . . . 308
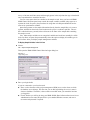
The IBM SPSS Data Collection Quota Setup Window . . . . . . . . . . . . . . . . . . . . . . . . . . . . . . . . . 309
Docking/Undocking the List and Details Panes. . .
Changing the Layout of the List Pane . . . . . . . . . .
Displaying All Variable Types in the List Pane. . . .
Displaying System Variables in the List Pane . . . .
iv
...
...
...
...
...
...
...
...
...
...
...
...
...
...
...
...
...
...
...
...
...
...
...
...
...
...
...
...
...
...
...
...
...
...
...
...
...
...
...
...
..
..
..
..
310
310
310
310
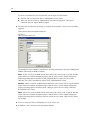
Displaying Sample Variables in the List Pane . . . . . . . . . . . . . . . . . . . . . . . . . . . . . . . . . . . . 310
Hiding Components of the IBM SPSS Data Collection Quota Window. . . . . . . . . . . . . . . . . . 313
Creating and Opening Quota Files . . . . . . . . . . . . . . . . . . . . . . . . . . . . . . . . . . . . . . . . . . . . . . . . 313
Undoing and Redoing Actions . . . . . . . . . . . . . . . . . . . . . . . . . . . . . . . . . . . . . . . . . . . . . . . . . . . 314
Choosing Your Working Language. . . . . . . . . . . . . . . . . . . . . . . . . . . . . . . . . . . . . . . . . . . . . . . . 314
Table Quotas. . . . . . . . . . . . . . . . . . . . . . . . . . . . . . . . . . . . . . . . . . . . . . . . . . . . . . . . . . . . . . . . 315
Defining Table Quotas . . . . . . . . . . . .
Creating More Than One Table Quota
Deleting Table Quotas . . . . . . . . . . . .
Expression Quotas . . . . . . . . . . . . . . . . . .
3
...
...
...
...
...
...
...
...
...
...
...
...
...
...
...
...
...
...
...
...
...
...
...
...
...
...
...
...
...
...
...
...
...
...
...
...
...
...
...
...
...
...
...
...
...
...
...
...
...
...
...
...
..
..
..
..
316
317
317
318
Filter on Categorical Variable Dialog Box . . . . . . . . . .
Filter on Numeric Variable Dialog Box . . . . . . . . . . . .
Filter on Text Variable Dialog Box. . . . . . . . . . . . . . . .
Filter on Boolean Variable Dialog Box . . . . . . . . . . . .
Filter on New Variable Dialog Box . . . . . . . . . . . . . . .
Defining Expression Quotas . . . . . . . . . . . . . . . . . . . .
Defining Quotas for Categorical Variables . . . . . . . . .
Defining Quotas for Numeric Variables . . . . . . . . . . .
Defining Quotas for Text Variables . . . . . . . . . . . . . . .
Defining Quotas for Boolean Variables. . . . . . . . . . . .
Expression Quotas using Two or More Variables . . . .
Advanced Expressions . . . . . . . . . . . . . . . . . . . . . . .
Editing Expression Quotas . . . . . . . . . . . . . . . . . . . . .
Deleting Expression Quotas . . . . . . . . . . . . . . . . . . . .
Reusing a Quota Definition File in Another Project . . .
...
...
...
...
...
...
...
...
...
...
...
...
...
...
...
...
...
...
...
...
...
...
...
...
...
...
...
...
...
...
...
...
...
...
...
...
...
...
...
...
...
...
...
...
...
...
...
...
...
...
...
...
...
...
...
...
...
...
...
...
...
...
...
...
...
...
...
...
...
...
...
...
...
...
...
...
...
...
...
...
...
...
...
...
...
...
...
...
...
...
...
...
...
...
...
...
...
...
...
...
...
...
...
...
...
...
...
...
...
...
...
...
...
...
...
...
...
...
...
...
...
...
...
...
...
...
...
...
...
...
...
...
...
...
...
..
..
..
..
..
..
..
..
..
..
..
..
..
..
..
319
320
321
322
323
323
324
325
325
325
325
325
332
333
333
IBM SPSS Data Collection Activation Console
334
Activation History tab . . . . . . . . . . . . . . . . . . . . . . . . . . . . . . . . . . . . . . . . . . . . . . . . . . . . . . . . . 334
Filters tab . . . . . . . . . . . . . . . . . . . . . . . . . . . . . . . . . . . . . . . . . . . . . . . . . . . . . . . . . . . . . . . . . . 336
Settings tab . . . . . . . . . . . . . . . . . . . . . . . . . . . . . . . . . . . . . . . . . . . . . . . . . . . . . . . . . . . . . . . . 337
Appendix
A Notices
338
Index
341
v
Chapter
1
IBM SPSS Data Collection Interviewer
Server User’s Guide
Welcome to the IBM SPSS Data Collection Interviewer Server User’s
Guide
This User’s Guide describes how to use IBM® SPSS® Data Collection Interviewer Server and
its associated applications to build and run Web-based interviewing questionnaires. It consists
of the following sections:
IBM SPSS Data Collection Interviewer Server
Describes how to use the various activities that
Activities in IBM SPSS Data Collection Interviewer Interviewer Server makes available through
Server Administration
IBM® SPSS® Data Collection Interviewer Server
Administration. The description of each activity
is based on the online help that is available by
clicking on the activity’s Help button, but it will
often provide additional background information,
pictures, or links to other sections of the User’s
Guide.
Desktop Tools
Describes programs that are not part of Interviewer
Server Administration, but that are available from
your desktop, either as shortcuts in the Start menu
or as commands that you can run from the command
line.
What’s New in IBM SPSS Data Collection Interviewer Server Activities
6.0.1
Support for reserved names and keywords in metadata. IBM® SPSS® Data Collection now
provides full support for SQL and mrScript reserved names and keywords in metadata variables.
In previous releases, the use of reserved SQL keywords could cause issues when using the IBM®
SPSS® Data Collection Data Model to query data for processes such as DMOM; the use of
reserved mrScript keywords could cause syntax errors when referenced within a routing script.
Refer to the Reserved Keywords and Keyword Summary topics in the IBM® SPSS® Data
Collection Developer Library for more information.
Export Data. The activity has been updated to support the following new features.
You can calculate and then generate two extra data columns that contain the start and finish
times for each case. The start and finish times are based on the selected time zone of your
choosing. For more information, see the topic Exporting Data on p. 262.
You can include only records that relate to a specific filter condition (such as time period
or survey status). Export Data provides several filters that you can modify to suit your
requirements. You can also create your own filters, or delete filters that are no longer needed.
Licensed Materials - Property of IBM © Copyright
IBM Corporation 2000, 2011
1
2
Chapter 1
These new features are supported via the new Set Filters dialog. For more information, see
the topic Edit Preset Filters dialog on p. 265.
You can choose to export data gathered before or after a specific date/time, or select a
date/time range. For more information, see the topic Exporting Data on p. 262.
The Export Data advanced dialog includes a new Connection Properties tab that allows you to
provide inputs for custom properties, allowing you to define the mr Init Custom portion of
both the input and output connection strings. For more information, see the topic Advanced
Options on p. 267.
Launch. The activity includes the following enhancements:
You can now define the expiration date and time (UTC time) for each project, prior to
activation. For more information, see the topic Project Information on p. 109.
Phone. The activity includes the following enhancements:
You can now filter phone reports on a project’s sample information or data, in addition to
filtering by date and time. For more information, see the topic Filtering Reports on p. 256.
You can now specify a date and time range when working with date filters. For more
information, see the topic Running Reports on p. 253.
You can now specify a report’s data source with the Table property in DPM Explorer (Site >
Servers > [ServerName] > Applications > CatiReports-> [Report] > Table). The Table property is
not set for sample base reports; the sample table is used as the default. For call history based
reports, the default is set as dbo.<ProjectName>_SampleOverview_Inner.
There is a new Sample Usage Across Projects report that shows a frequency table of the
number of participant records in each queue, across projects, for each project. For more
information, see the topic Phone on p. 230.
Phone Surveys. You can now specify answering machine detection settings on the Dialer Settings
tab. For more information, see the topic Autodialer Settings on p. 159.
x64 64-bit support. x64 64-bit editions are now provided for the Data Collection applications (note
that IBM® SPSS® Data Collection Author Server Edition and IBM® SPSS® Data Collection
Survey Reporter Server Edition are only provided as x86 32-bit). Refer to the appropriate Data
Collection installation guide for more information.
Fix pack and hotfix information. You can now view information regarding which fix packs and
hotfixes are installed via the application’s Help menu.
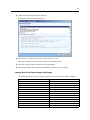
Help > About Data Collection... > Details...
What’s New Information for Previous Releases
What’s New information for previous Data Collection\Dimensions releases can be found in the
Data Collection\Dimensions What’s New document.
The document is in Adobe Portable Document Format (.pdf) Viewing and printing the document
requires Adobe Reader. If necessary, you can download it at no cost from www.adobe.com. Use
the Adobe Reader online Help for answers to your questions regarding viewing and navigating
the document.
3
IBM SPSS Data Collection Interviewer Server User’s Guide
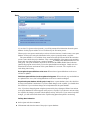
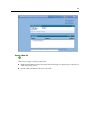
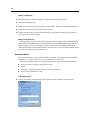
IBM SPSS Data Collection Interviewer Server in Other Languages
You can display the application in a language other than English. You can change the language at
any time by following the appropriate instructions below. Close the application before making
these changes. You can change the language back to English at any time or even switch back and
forth between supported languages.
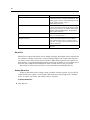
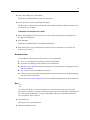
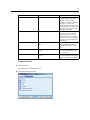
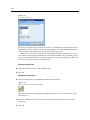
To change the display language
1. Open Internet Explorer and select:
Tools > Internet Options
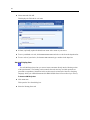
2. Click the Languages button and select the appropriate language from the Language Preference
list. If the desired language does not display in the list, click Add... and select the language in
the Add Language dialog.
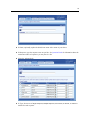
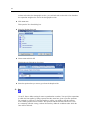
3. Use the Move up and Move down buttons to control the language order preference. The language at
the top of the list will be used as the default language.
4. Click OK to save your changes.
Converting Version 2.3 Scripts to Work With IBM SPSS Data Collection
Interviewer Server 6.0.1
The system architecture and the scripting language for IBM® SPSS® Data Collection Interviewer
Server 6.0.1 are completely different to those of earlier versions, and you will not normally be
able to use version 2.3 projects directly with version 6.0.1.
Export Data, Survey Results, Status, and IBM SPSS Data Collection Survey Tabulation Activities
You can use these activities on existing IBM® SPSS® Quancept™ projects even if you do not
have IBM® SPSS® Data Collection Interviewer Server with Quancept Support installed.
Questionnaires created with Build
To use these questionnaires with Interviewer Server 6.0.1, do the following:
E Open the project using Edit Project and, on the Properties tab, change the value of the
InterviewScriptType property from Quancept to IBM® SPSS® Data Collection.
E Click the Add Application link above the project properties frame.
In the Select application dialog box, choose Interviewer Server (Data Collection) from the drop-down
list. This adds a set of Data Collection project properties to the project.
Click OK to save your changes and close Edit Project.
E Open the questionnaire in Build and replace any version 2.3 templates with corresponding version
6.0.1 templates.
4
Chapter 1
E Reactivate the project.
E If you have IBM® SPSS® Data Collection Base Professional installed you can convert version
2.3 templates to version 6.0.1 by running the HTML Tidy tool on them. See “Validating an
Interview Template File” in the Base Professional section of IBM® SPSS® Data Collection
Developer Library for details.
IBM SPSS Data Collection Interviewer Server Activities in IBM SPSS
Data Collection Interviewer Server Administration
IBM® SPSS® Data Collection Interviewer Server activities are activities that you can run from
IBM® SPSS® Data Collection Interviewer Server Administration when you have Interviewer
Server installed. They are as follows:
Design Activities
Build for defining a questionnaire.
View Survey Link. This activity simply displays a message box listing URLs for running live
and test interviews. Select the test link to test your questionnaire. This opens a new browser
window and runs an interview in the same way that a respondent would run an interview.
There is no menu bar and no online help
Manage Activities
Launch for preparing projects for interviewing.
Promote Project for activating a project from one cluster to another.
Participants for loading participant records into the participant database.
Participant Rules for editing Sample Management scripts.
Email for sending email messages to respondents.
Phone Surveys for defining parameters required for telephone interviewing.
Review Interviews for reviewing telephone interviews after they have finished.
Interviewer Monitoring for real-time monitoring of telephone interviewers. This activity is
available from the Phone menu.
Dialer Administration for using autodialers with your telephone interviewing projects. This
activity is available from the Phone menu.
Quotas for checking quotas and changing quota targets.
Manage Logs for viewing and downloading Interviewer Server log files. This activity is
available from the Tools menu.
IBM SPSS Data Collection Remote Administration for monitoring remote interviewers.
Data Collection Activities
Phone Participants for conducting telephone interviews.
Export Data for exporting interview data in a variety of formats.
5
IBM SPSS Data Collection Interviewer Server User’s Guide
Reports Activities
Survey Results for generating topline tables using interview data.
Status for monitoring a project’s interviewing status.
Phone for running reports on telephone projects.
Interviewing Activity Reports for monitoring activity on interviewer session engines. This
activity is available from the Reports menu.
Activation History for monitoring project activation status. The activity provides options
for viewing pending and completed activations and creating activation history filters. This
activity is available from the Reports menu.
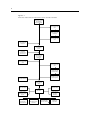
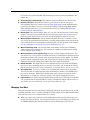
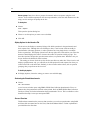
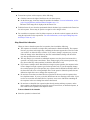
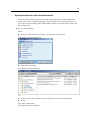
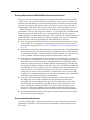
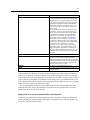
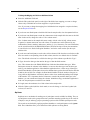
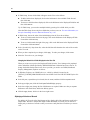
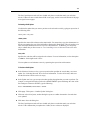
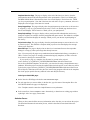
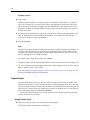
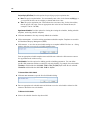
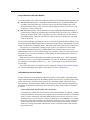
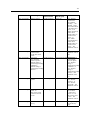
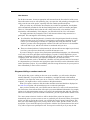
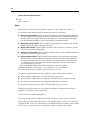
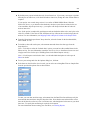
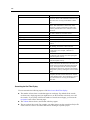
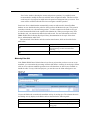
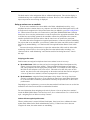
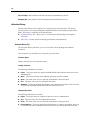
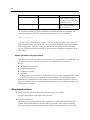
Getting Started with the IBM SPSS Data Collection Interviewer Server Activities
With so many activities available in IBM® SPSS® Data Collection Interviewer Server
Administration, it can be difficult knowing where to start or knowing in what order to use the
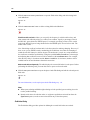
activities. The flowchart shown here outlines a suggested workflow.
6
Chapter 1
Figure 1-1
IBM SPSS Data Collection Interviewer Server Activities Flowchart
Build questionnaire
with Build (or another
Data Collection
authoring product)
Download .mdd file to
your computer using
Files
Define quotas using
Quota Setup
Upload .mdd file to
your user folder using
Files
Load sample with
Participants
Activate project in
Test mode with
Launch
Set telephone
interviewing
parameters with
Phone Surveys
Run test interviews
with View Survey
Link or Phone
Participants
Edit Sample Mgmt
script with Particpant
Rules
Download .mdd file to
your computer using
Files
Translate texts in
.mdd file using the
Translation Utility
Upload translated
.mdd file to your user
folder using Files
Send invitations to
participate with Email
Re-activate project in
Active mode with
Launch
Review interview
status with Status
Check/change
quotas with Quotas
Live interviewing
takes place
Monitor session
engine activity with
Interviewing Activity
Reports
Review telephone
interviews with
Review Interviews
Monitor telephone
interviewers with
Interviewer
Monitoring
View telephone
interviewing reports
with Phone
View topline tables
with Survey Results
Export data for
analysis with
Export Data
7
IBM SPSS Data Collection Interviewer Server User’s Guide
The usual path from creating a questionnaire through to analyzing the data is as follows:
Build the questionnaire. Create the questionnaire using the Build activity in Interviewer Server
Administration. Alternatively, you can use IBM® SPSS® Data Collection Base Professional
or IBM® SPSS® Data Collection Author to create the questionnaire.
Define quotas. If the project uses Quota Control, you will need to define the quota targets for
each quota controlled category. You use the desktop IBM® SPSS® Data Collection Quota
Setup activity to do this. This activity creates an .mqd file containing quota information,
which is then used to create the quota databases when the project is activated. You will
need to download the project’s .mdd file onto your computer before you run Quota Setup,
and then, once you have finished, you will need to upload the newly created .mqd file into
the project’s folder in your Users folder. If the project uses Sample Management quotas, you
will also need to upload an additional .mdd file that Quota Setup creates to hold Sample
Management variables. For more information, see the topic IBM SPSS Data Collection
Quota Setup in Chapter 2 on p. 308.
Upload participant records. If the project uses Sample Management, use Participants to load
some participant records for your test interviews.
Activate the project in Test mode. Once you have successfully compiled an interviewing
program, it is time to activate the project in Test mode. This allows you to test the
questionnaire by running interviews. These interviews are flagged as test interviews and can
easily be deleted or otherwise omitted from the data used for toplines and final analysis. Use
the Launch activity to activate the project.
Note: Build has built-in options for activating and testing questionnaires, which you can use
instead of the corresponding steps listed here.
Set up parameters for telephone interviewing. If the project is to be used for telephone
interviewing, run Phone Surveys to assign values to the various telephone interviewing
parameters used by the Sample Management script. You can also use this activity to customize
the call outcome list for the project, to specify which fields in the participant records can be
seen and edited by interviewers, and to specify that the project will use an autodialer to call
participants. (For more information about using autodialers, see Dialer Administration.)
Edit the Sample Management Script. If there are errors in the Sample Management script, use
Participant Rules to make the corrections.
If testing shows that there are errors in the questionnaire, or you want to make changes for
other reasons, return to Build (or the authoring product you are using), make your changes and
reactivate the project. You can do this as many times as necessary until the test interviews produce
the results you require.
Translate the questionnaire. Once you are satisfied that the test interviews are working
correctly, you can translate the questionnaire if the project requires multilingual interviewing.
Interviewer Server Administration does not has a translation tool, so you will need to
download the .mdd file onto your computer so that it can be translated using IBM®
SPSS® Translation Utility, and then upload the updated .mdd file into Interviewer Server
Administration ready for activation. The activity that you use for downloading and uploading
files between your computer and Interviewer Server Administration is called Files.
Send email invitations to prospective participants. If the survey allows self-completion
interviews, you may want to send email messages to prospective respondents inviting them
to participate in the survey and giving instructions on how to start an interview. You can
8
Chapter 1
use Email to set up email jobs that will send messages to all or selected respondents in the
Sample file.
Activate the project in Active mode. This makes the project available for live interviewing.
Interviews take place. Respondents connect to your web site to take the survey as a
self-completion interview, or interviewers use Phone Participants to make outbound calls to
prospective participants. If you have interviewers working remotely using IBM® SPSS®
Data Collection Interviewer, you can monitor their activity by running IBM SPSS Data
Collection Remote Administration.
Review quotas. Once interviewing is under way, you may want to keep track of interviewing
progress with regard to any quotas that have been set by the project. Quotas allows you to
check the quotas that have been set for each cell, and to change the targets if necessary.
Monitor telephone interviewers. You can monitor telephone interviews in real-time, so that
you can see the question that the interviewer is currently asking and the answer that he or she
enters. If the project uses an autodialer to call participants, you can also listen to the interview.
For more information, see the topic Interviewer Monitoring on p. 272.
Monitor interviewing status. You can keep track of the number of interviews terminating
which each status by running Status. You can also run a number of telephone interviewing
reports using the Phone activity.
Monitor interviewer session engine activity. Interviewer session engines run interviews. You
can run Interview Activity Report to monitor the activity of each engine to check that it is not
becoming overloaded. You can also check the spread of projects across engines. You should
run these reports regularly all the time that interviewing is in progress as they can help you
anticipate and deal with loading issues before they start to impact productivity.
Review interviews. You might want to review completed interviews to check that telephone
interviewers have conducting the survey correctly. If necessary, you can amend the answers
that the interviewer entered. For more information, see the topic Review Interviews on p. 203.
View topline tables. Use Survey Results to see at a glance how interviewing is progressing.
You can view data for a single question in the questionnaire or produce cross-tabulations of
two or more questions. Tables can be filtered based on the responses to questions in the
questionnaire, or on interview status (for example, only include completed interviews).
Export the data. Once interviewing has finished and you want to run a full analysis on the data,
you use Export Data to export the data in a variety of formats for analysis with an activity of
your choice. For more information, see the topic Export Data on p. 261.
Managing Your Work
This topic lists points to bear in mind when creating and working on projects that you are or will
be sharing with other users. For further information on these points, refer to IBM® SPSS® Data
Collection Interviewer Server Administration User’s Guide.
When you create a new project you can use the Permissions tab to specify which roles (user
groups) can access the project. If you forget to do this or you need to change your choices, ask
your IBM® SPSS® Data Collection Interviewer Server administrator to do it for you.
9
IBM SPSS Data Collection Interviewer Server User’s Guide
Files are created and updated in your user folder. If you want the files to become available to
other users you must check them in to the shared folder. There is no need to do this every time
you change or create a file so, for example, you can build a questionnaire using Build, test it,
refine it and then retest without checking anything in. When you have finished building the
questionnaire (or the first version of it) you should check it in then.
Some activities check in copies of files from your Users folder to the Shared folder.
Nevertheless, it is good practise always to check in all files that you want to make public
when you have finished with them.
The first time you work on a project, the project becomes locked by you. This means that
although other users may be able to access the project’s files for reading, they cannot change
them. Typically, all Interviewer Server activities are unavailable to other users of a project if
the project is locked by you.
Projects are not unlocked automatically. You must unlock a project when you have finished
working on it, after you have checked in the latest files.
Do not unlock a project before you have checked in all its files as this may mean that other
people who use the project will use old versions of the files which do not have your latest
changes in them.
Do not keep a project locked longer than you need to as this prevents others from editing
the files.
Note: Some users may have permission to unlock projects that have been locked by other people.
If you have this permission, always be very careful when unlocking other peoples’ projects,
especially of you are going to run activities that alter the project’s files. If you can, it is a good idea
to check with the user before unlocking the project, particularly if you suspect that the user may be
working on the project and may not have checked in the latest versions of the project files. If you
have to unlock a project to work on it, always let the project’s owner know what you have done.
Build
Build is an easy-to-use tool for building questionnaires that can be used with IBM® SPSS® Data
Collection Interviewer Server for web-based interviewing or with Paper for pen-and-paper-based
interviewing. It has been designed for relatively small and simple questionnaires of up to 100 or
so questions. If you want to create larger or more complex questionnaires you should use other
tools such as IBM® SPSS® Data Collection Base Professional.
Build breaks down the task of defining questions into the following stages: basic, advanced,
presentation, and export and analysis. This approach enables you to draft the basic outline of
your questionnaire without having to define the detailed structure and content of each question,
unless, of course, you wish to do so.
At the basic level, you define the question name (a default is supplied), the question text and, if
appropriate, the list of responses from which choices may be made.
The advanced level allows you to complete the definitions by defining, for example, response
types for single and multiple choice lists or valid ranges for numeric questions.
The presentation level currently applies only to Interviewer Server questionnaires and defines
how the question should appear on the screen.
10
Chapter 1
The export and analysis level lets you define alternative question and response texts for use
in tabulations. Typically, you tend to use longer texts in printed or Web questionnaires whereas
shorter texts work better in analyses.
Other facilities include:
Shared lists. Shared lists are a quick and easy way of dealing with responses that are common
to a number of questions. If you place the responses in a shared list, you can then insert them
in any number of questions simply by selecting the name of the list. There is no need to retype
the response texts or to copy and paste responses between questions.
Bookmarks. Bookmarks identify particular positions in a questionnaire with unique names and
are useful in large questionnaires with complex routing requirements.
Exit codes. You can terminate an interview immediately and for any reason by specifying an
exit code of your choice. A typical example is with quota control when you will usually
want to terminate the interview if the respondent belongs in a category whose quota has
already been filled.
Groups. Questions can be grouped so that they are all displayed on a single page when the
questionnaire is used for web-based interviewing with Interviewer Server (this is sometimes
referred to as a multiask question).
Gotos. Questions are presented in the order they appear in the questionnaire. You can define
simple routing for individual choices within a response list, and more complex routing
instructions based on combinations of answers to one or more questions can be specified
using If...Goto items. Routing that must be followed by all respondents can be defined using a
standard Goto item.
Library files. Questions that are common to a number of questionnaires can be saved in the
library and can be imported wherever they are needed.
Scripting statements for the Routing section. Questionnaires have two sections. The Metadata
section defines the questions and the Routing section determines how and when the questions
will be displayed. Build creates a simple Routing section based on the order you have defined
the questions in the questionnaire, but you will usually want to insert other statements in the
Routing section as well. Build provides IOM Script and Insert from Script Library items for
inserting code in the Routing section of the questionnaire.
Print preview. You can display an image of the printed questionnaire.
User and questionnaire options. You can set defaults for certain Build parameters, both for
yourself and for specific questionnaires.
Questionnaires are stored as .mdd files and can be translated for multilingual interviewing.
You can set a default primary language for all questionnaires or you can define the primary
language separately for each questionnaire when you create it. When you create an interviewing
questionnaire or print a questionnaire, this is the language that will be used if there are no
translations available.
Using Build With and Without IBM SPSS Data Collection Interviewer Server Administration
You can run Build from IBM® SPSS® Data Collection Interviewer Server Administration or as
a standalone program outside Interviewer Server Administration. When you run Build from
Interviewer Server Administration, it automatically opens the project that is current when you
select the Build link, and lets you work only on this project. If you want to work on another
11
IBM SPSS Data Collection Interviewer Server User’s Guide
project, you must close Build, return to Interviewer Server Administration to choose the project,
and then restart Build. If you are a Scriptwriter, this is the way you will normally use Build.
When you run Build by typing its URL into your browser, Build starts with no project selected
so you can either open an existing questionnaire or create a new one. If you are an administrator,
this is the way to create library files of general questions that can be loaded into any project. For
more information, see the topic Running Build Outside IBM SPSS Data Collection Interviewer
Server Administration on p. 73.
This difference in the way Build works means that the options that are available in the File
menu will differ according to how you started Build.
Switching between Build and IBM SPSS Data Collection Base Professional
Questionnaires can be created and edited in Base Professional as well as in Build, and you can
switch between applications while working on a single questionnaire. For more information, see
the topic Switching Between Build and IBM SPSS Data Collection Base Professional on p. 69.
Starting Build
To Start Build from within IBM® SPSS® Data Collection Interviewer Server Administration
E Choose the project you want to create and click Build.
To Start Build outside Interviewer Server Administration
E In your browser, type:
http://server_name/spssmr/InterviewBuilder
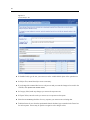
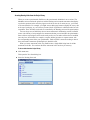
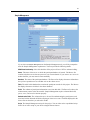
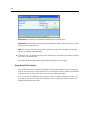
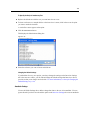
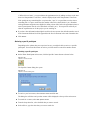
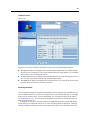
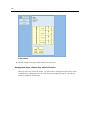
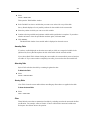
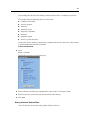
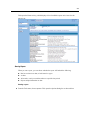
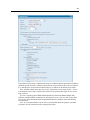
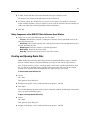
The Main Screen
The working area of the main screen is divided into five tabbed sections, each designed to present
different aspects of the questionnaire.
Overview tab. Displays the contents of each question in the questionnaire, and provides facilities
for inserting, deleting, and moving questions. You can also use this tab to select questions for
editing, and to link two or more questions to form a group.
Edit tab. Displays basic details (usually name, text and choices) about a single question. Use this
tab to create the basic content of your questionnaire and then insert more detail by working
on the Advanced tab.
Advanced tab. Displays full details for a single question, and provides facilities for defining
routing, specifying whether a question must be answered, whether it is a standard or dummy
question, and the order in which responses are to be displayed during interviews. For grids, you
also specify whether the subjects are the rows or columns of the grid. For numerics, you specify
the range of valid responses.
Presentation tab. Displays presentation details about a single question. Work on this tab when you
want to define how the question should appear on the screen or on the printed page.
12
Chapter 1
Export/Analysis tab. Displays export values for a question, including the label text and category
values (response codes). Use this tab when you want to export the questionnaire for analysis
purposes but do not want to use the default texts and response codes.
On all tabs, if you hover over a question name in the list of questions on the left of the page, Build
displays a pop-up showing the question text.
The menu bar at the top of the screen contains the following options:
File. Create, open or save questionnaires, and preview them before printing.
Tools. Activate a questionnaire, and set Build options.
Getting Started
When you open an empty questionnaire, follow the instructions below to define the content
of the questionnaire.
Note: These instructions assume that you will define each question in full before inserting the
next question. If you prefer, you can define the basics for every question using just the Edit tab
and then fill in the Advanced and Presentation details for each question as a second phase of the
questionnaire development.
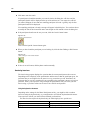
E Click Click here to insert first item.
This opens the New Item dialog box.
E Choose the item type for the first question and click OK.
Build selects the Edit tab and displays a form prompting for basic information about the item.
The fields on the form will vary depending on the type of item you are creating, but will always
include a item name and, for questions, a question text.
E Complete the fields on the form.
E Click the Advanced tab.
The item definition form appears in its more detailed format, showing other settings that you may
define for the current item. Some item types do not have advanced settings, so in these cases the
form that you see will be the same as the one you saw when you created the item. Usually,
you will need to set advanced options for single response, multiple response, numeric, and grid
questions only.
E On the Presentation tab, specify how the question should be displayed during the interview.
E Return to the Edit tab and click Insert Item when you are ready to start the next question.
Note: Build saves your changes to the current item when you move to another item, so there is no
Save facility. However, if you are making a number of changes to a item you can click Apply to
save the changes you have made so far.
13
IBM SPSS Data Collection Interviewer Server User’s Guide
Item Names
Build generates a unique name for every item you insert in the questionnaire. If you insert items
from a library file, and an item in the library file has the same name as an item that already exists
in the questionnaire, Build automatically modifies the name of the incoming item so that it remains
unique within the questionnaire as a whole.
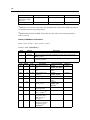
You can define your own item names if you wish. Names must be unique and must not match
any keyword in the Interview Scripting language or any of the SQL keywords listed below.
(The Interview Scripting language is what you use to create questionnaire scripts if you do not
use Build. It consists of mrScriptMetaData and mrScriptBasic.)
Add
All
Alter
As
Asc
Avg
Base
Boolean
By
Categorical
Column
Count
Create
Date
Default
Delete
Desc
Double
Drop
Exec
From
Group
Having
Insert
Into
Level
Long
Max
Min
Object
On
Order
Select
Set
Stdev
Sum
Table
Text
Truncate
Update
Value
Values
Where
With
Setting User and Questionnaire Options
You can set options for all your Build sessions and for all work that you do on the current
questionnaire. This allows you to streamline your work by making Build do a lot of the basic
work for you.
You can set the following options.
User options
Default presentation style for new questionnaires. The page layout template file to be used for
displaying questions during interviews with IBM® SPSS® Data Collection Interviewer Server,
when no other templates are defined within the questionnaire.
Default grid style for new questionnaires. The grid layout template file to be used for grid questions
during interviews with Interviewer Server, when no other templates are defined within the
questionnaire.
Primary language for new questionnaires. The language that will be used as the default primary
(base) language for all new questionnaires that you create.
Current questionnaire options
Primary language. The primary (base) language for the current questionnaire. Build displays this
at the top of the Edit, Advanced and Presentation tabs.
Default presentation style. The page layout template file to be used as the default for all questions
in the current questionnaire. To assign a different template to a particular question, select it
using the question’s Presentation tab.
14
Chapter 1
Answer prompt. Interviewer Server prompts for numeric and text responses using the word
Answer. To use a different prompt for the current questionnaire, select the radio button next to the
empty text box and type the prompt in the box.
To Set Options
E Choose:
Tools > Options
This opens the Options dialog box.
E Choose or set the options you want to use as defaults.
E Click OK.
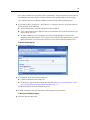
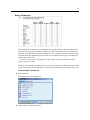
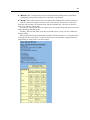
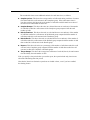
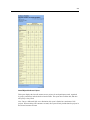
Display Options for the Overview Tab
The Overview tab displays a summary listing of the all the questions in the questionnaire and
their response lists. Although this a useful things to have, it can become a little unwieldy in
questionnaires with many questions, or where questions have long single choice or multiple
choice response lists. The Display options box in the top right corner of the tab lets you reduce the
amount of detail displayed in order to increase the number of questions visible per page. You
have three options: full question, question name and text, or question name. Whichever one you
choose becomes the default for future sessions.
The setting you choose for the Overview tab does not affect any other tabs. If the Overview tab
displays question names only, you will still see the full question text and response list when you
switch to the Edit or Advanced tab. Similarly, it does not affect other actions, such as question
grouping, that you perform on the Overview.
To Set Display Options
E In Display Options, choose the setting you want to use and click Apply.
Previewing the Printed Questionnaire
E Choose:
File > Print Preview
A new browser window opens using IBM® SPSS® Data Collection Questionnaire Viewer to
illustrate how the questionnaire will look when printed. Refer to IBM® SPSS® Data Collection
Developer Library for further information about Questionnaire Viewer. This is available as a free
download from http://www.spss.com/spssmr/DDL/.
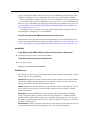
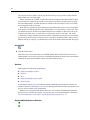
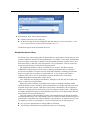
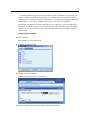
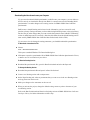
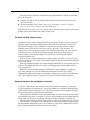
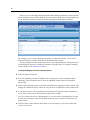
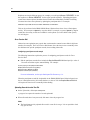
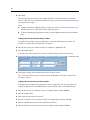
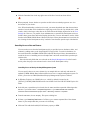
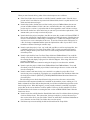
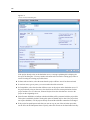
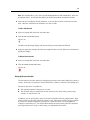
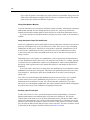
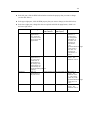
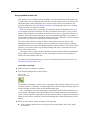
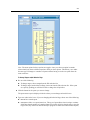
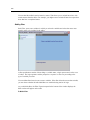
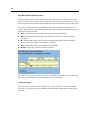
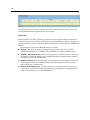
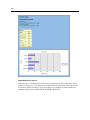
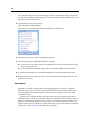
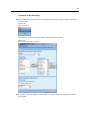
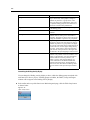
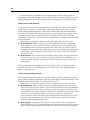
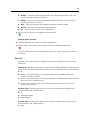
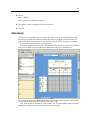
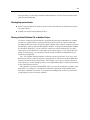
Process Flowchart
This flowchart summarizes the processes that run when you work on a questionnaire using Build
and shows file movement between the Users, Shared and Master folders. Further explanation is
provided below the flowchart.
15
IBM SPSS Data Collection Interviewer Server User’s Guide
Figure 1-2
Build Process flowchart
Although Build works mainly with files in the project’s folder within the Users folder, it will
sometimes use the corresponding files from the Shared folder if the files it wants are not available
in the Users folder, and will copy files from the Users folder into the Shared folder. In the upper
section of the flowchart, only the named files are copied from the Shared folder to the Users
folder. Template or image files used by the questionnaire and stored in the Shared folder are
16
Chapter 1
not copied to the Users folder. You can use the Files activity to copy (check out) files from the
Shared folder into you Users folder.
During activation, the .mdd file is copied from the Users folder into the Shared folder if this is
the first activation, otherwise the current version in the Users folder is merged into the existing
file in the Shared folder. All other files that are needed for interviewing are copied, overwriting
any existing files of the same name.
When files are copied between the Shared and Users folders their status is set to Checked Out.
If the project is locked then the files in the Shared folder are not accessible by anyone else. Once
you unlock the project, the files in the Shared folder become available to other users and can be
checked out by those users, even if the files are still present in your Users folder. The words
“Checked Out” simply mean that the files are present in the Shared area and in your Users folder;
they do not mean that you have exclusive access to the files in the Shared folder. When you have
finished working on a project, you should always check in all the files and then unlock the project.
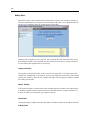
Leaving Build
E Click the Home button.
This closes your session and returns you to IBM® SPSS® Data Collection Interviewer Server
Administration. Do not close your browser with Build still running as this leaves the questionnaire
definition file open and unavailable to other users until Build times out.
Questions
Build supports the following question types:
Single and multiple response
Numeric
Text
Single and multiple response grids
Numeric grids
It also supports Shared Lists as an efficient method of defining responses that are common to a
number of questions, and Display Text items for defining instructional and other non-question text
that you want to include in the questionnaire.
Build has its own questionnaire library that comes with a number of standard questionnaires
that you can use or modify as required. You can also add your own questionnaires to the library.
For more information, see the topic Using the Questionnaire Library on p. 47.
Single and Multiple Response Questions
17
IBM SPSS Data Collection Interviewer Server User’s Guide
Single and multiple response questions (also known as categorical questions) have a predefined
set of answers from which choices can be made. Build provides separate options for creating
single response and multiple response questions, and you must choose the one that matches the
types of responses you want to allow.
You can filter the response list so that, when interviews take place, only responses that were
or were not mentioned at a previous question are displayed. This is particularly useful for
spontaneous and prompted awareness questions where you want to prompt only for the responses
that were not mentioned spontaneously.
In a multiple response question, you can flag some of the responses as single response — for
example, if there is a “None of the above” response.
If the response list contains an ‘Other’ response, respondents can also give answers that are
not in the predefined list.
You can associate pictures with responses. These can be in any of the following formats:
gif, jpg, jpeg, png, or bmp.
When you export categorical questions, the export process exports the question and response
texts exactly as they appear in the questionnaire. Sometimes you’ll want to use different texts in
your analyses than you used during interviewing. A typical example is question text, where you’ll
tend to use a more wordy approach in interviewing than in analyses, saying, for example, “What is
your overall opinion of the product?” rather than simply “Overall opinion”.
Categorical responses are exported as numeric codes, where codes are assigned to responses in
the order they appear in the questionnaire. The first response is code 1, the second is code 2, and
so on. Numbering is sequential and starts at 1 for each question.
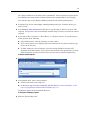
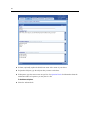
To Create a Single or Multiple Response Question
E Click Insert Item.
This opens the New Item dialog box.
E Choose either Single Response Question or Multiple Response Question and click OK.
18
Chapter 1
E In Name, optionally replace the default item name with a name of your choice.
E In Question Text, type the question text.
E In Responses, type the response texts one per line. See Question Limits for information about the
maximum number of responses you can place in a list.
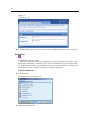
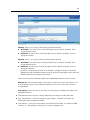
To Set Advanced Options
E Select the Advanced tab.
19
IBM SPSS Data Collection Interviewer Server User’s Guide
E In Require a response to this question, choose whether or not this question must be answered.
Note: If a question may be left unanswered, and you do not insert a No Answer response in
the category list, Build inserts one automatically. This is because the interview script that is
generated from the Build questionnaire requires this in order for respondents to be able to click
Next without having to select an answer. (You will not see the No Answer category until your
screen is refreshed, for example, when you change tabs. At this point, Build also displays a
message telling you that it has added No Answer.)
If you set this option to Yes and then edit the question later on and change this option to No,
Build does not automatically remove No Answer. If you want to disallow No Answer response,
you must delete it yourself.
E In Hide this question, choose No if the question should be displayed to the respondent. If this is a
dummy question that is to exist in the questionnaire but not be displayed to respondents, choose
Yes. (Typically, the responses to hidden questions are set by statements defined in IOM Script
items. They provide an efficient method of merging the responses to a number of related questions
20
Chapter 1
into a single variable for use elsewhere in the questionnaire. For this reason, the response list for
the hidden question often consists of all the responses to the questions that are to be merged.)
Note: Because they are not displayed, hidden questions are not valid in question groups.
E In Question Type, choose whether this is a single or multiple response question. By default, the
setting for this property matches the data type of the item you selected to create this question—that
is, if you chose Single Response then Single Response will be selected automatically for this
property. You should only need to change this setting if you want to change the question type after
the question has been defined. Changing the question type here changes the overall question type
in the questionnaire and also changes all the individual response types in the response list.
E In Response Order, choose the order in which responses should be presented. Choose Default to
present responses in the order they appear in the response list, Random to present responses in a
random order, Rotated to present responses in rotation so that each response takes a turn at being
first in the list, or Reversed to present responses in reverse order so that the last response in
the list appears first.
E Use the Display Responses boxes if you want to filter the response list based on the respondent’s
answers to previous related questions.
In the first box, choose one of All Responses, Chosen, or Not Chosen.
In the second box, choose the question whose answer controls the responses to be displayed
for the current question.
When prompted, confirm that the responses defined for the chosen question (the parent
question) may overwrite the response list for the current question.
Note: This facility requires that the response list to the current question remains identical to the
response list for the chosen question. To achieve this, Build makes the response list for the current
question read-only (greyed out) and prevents you changing it. Any changes that you make to the
response list in the parent question automatically appear in the response list to the current question.
E In the Responses section, in the Type column, choose one of Single Response, Multiple Response,
Don’t Know, No Answer, or Refuse to Answer for each response.
E If a response is to be treated as a Specified Other response, click its Other check box. During
interviews, respondents can select this response to give an answer that does not appear in the
category list.
E To define routing for a response, select the routing destination from the GoTo dropdown list for
that response. (If you want to skip forwards in the questionnaire, you must define the question you
want to route to before you can select it from the dropdown list.)
E To associate a picture with a response, do the following:
Click the button to the right of the Picture box for that response.
On the Select page, locate the image file and then click Select. For more information, see the
topic Copying Pictures and Presentation Templates on p. 50.
The name of the image file is displayed in the Picture box.
21
IBM SPSS Data Collection Interviewer Server User’s Guide
E You can add new responses to the list, delete responses, or alter the order of responses in the list
using the options above the response list. For more information, see the topic Editing Response
and Subject Lists on p. 65.
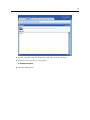
To Set Presentation Options
E Select the Presentation tab.
E In Presentation Style, select a layout template:
Click the button next to the empty box.
On the Select page, locate the template file and click Select. For more information, see the
topic Copying Pictures and Presentation Templates on p. 50.
The filename appears in the Presentation Style box.
E In Number of Columns, type the number of columns in which to display responses during the
interview.
E In Presentation, choose one of Check Box or List Box. If you are creating a single-response question
the selection list also includes Dropdown Box.
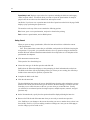
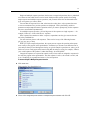
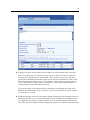
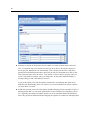
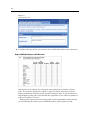
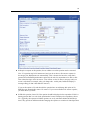
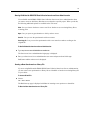
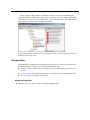
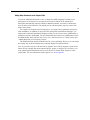
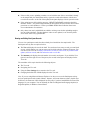
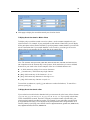
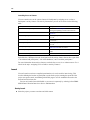
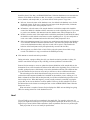
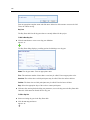
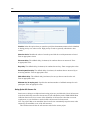
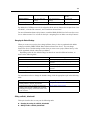
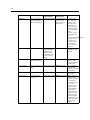
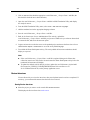
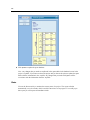
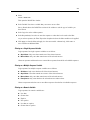
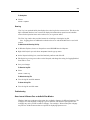
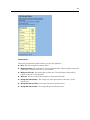
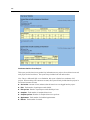
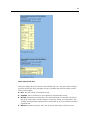
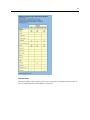
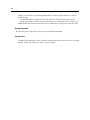
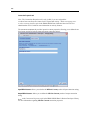
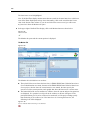
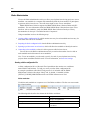
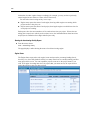
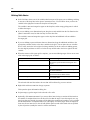
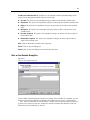
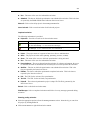
To Set Export and Analysis Options
E Select the Export/Analysis tab.
22
Chapter 1
Figure 1-3
Export/Analysis tab
E In Variable Label, type the text you want to use as the variable label in place of the question text.
E In Category Label, make any changes you want to the response texts.
E In Export Value, enter the code you want to use to represent each response.
E Select the Set as Missing checkbox for every response you want to treat as missing data.
E To define factors for use when the questionnaire data is tabulated, type a number in the Factor box
for each response. Factors may be positive or negative real or integer values.
Numeric Questions
Numeric questions require answers that are integer or real numbers, optionally within a specified
range.
When you export numeric questions, the export process exports the question texts exactly as
they appear in the questionnaire. Sometimes, you’ll want to use different texts in your analyses
than you used during interviewing. For example, in an interview you’ll ask “How old are you?”
but in tabulations you may prefer the text “Age” or “Age of respondent”.
To Create a Numeric Question
23
IBM SPSS Data Collection Interviewer Server User’s Guide
E Click Insert Item.
This opens the New Item dialog box.
E Choose Numeric Question and click OK.
E In Name, optionally replace the default item name with a name of your choice.
E In Question Text, type the question text.
To Set Advanced Options
E Select the Advanced tab.
24
Chapter 1
E In Require a response to this question, choose whether or not this question must be answered.
Note: If a question may be left unanswered, and you do not insert a No Answer response in
the category list, Build inserts one automatically. This is because the interview script that is
generated from the Build questionnaire requires this in order for respondents to be able to click
Next without having to select an answer. (You will not see the No Answer category until your
screen is refreshed, for example, when you change tabs. At this point, Build also displays a
message telling you that it has added No Answer.)
If you set this option to Yes and then edit the question later on and change this option to No,
Build does not automatically remove No Answer. If you want to disallow No Answer response,
you must delete it yourself.
E In Hide this question, choose No if the question should be displayed to the respondent. If this is a
dummy question that is to exist in the questionnaire but not be displayed to respondents, choose
Yes. (Typically, the responses to hidden questions are set by statements defined in IOM Script
items. They provide an efficient method of merging the responses to a number of related questions
25
IBM SPSS Data Collection Interviewer Server User’s Guide
into a single variable for use elsewhere in the questionnaire. For this reason, the response list for
the hidden question often consists of all the responses to the questions that are to be merged.)
Note: Because they are not displayed, hidden questions are not valid in question groups.
E In Number Type, choose either Integer or Real depending on the type of numeric answer you
want to accept.
E In the Minimum Value and Maximum Value boxes, type the range of values to accept as valid
responses. See Question Limits for information about the range of values you can use for numeric
responses.
E If you want to allow “No Answer”, “Don’t Know”, or “Refuse to Answer” as special responses
to this question, do the following:
In Special Responses, select the responses you want to allow.
If you want a response to be displayed with a text other than the one shown on this tab, type
the text in the Text box.
To define routing for a special response, select the routing destination from the GoTo
dropdown list for that response. (If you want to skip forwards in the questionnaire, you must
define the question you want to route to before you can select it from the dropdown list.)
To Set Presentation Options
E Select the Presentation tab.
E In Presentation Style, select a layout template:
Click the button next to the empty box.
On the Select page, locate the template file and click Select. For more information, see the
topic Copying Pictures and Presentation Templates on p. 50.
The filename appears in the Presentation Style box.
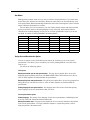
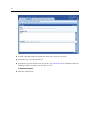
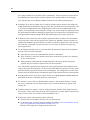
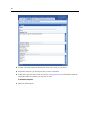
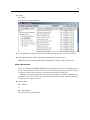
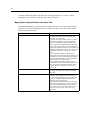
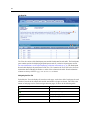
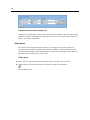
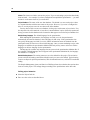
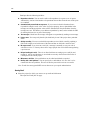
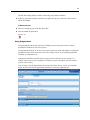
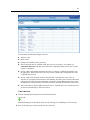
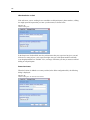
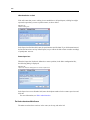
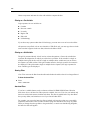
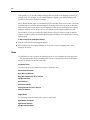
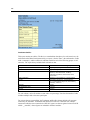
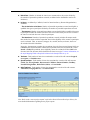
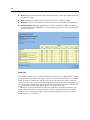
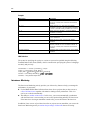
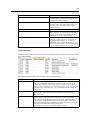
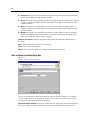
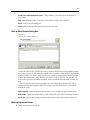
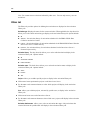
To Set Export and Analysis Options
E Select the Export/Analysis tab.
26
Chapter 1
Figure 1-4
Export/Analysis tab
E In Variable Label, type the text you want to use as the variable label in place of the question text.
Text Questions
Text questions accept any answer.
When you export text questions, the export process exports the question texts exactly as they
appear in the questionnaire. Sometimes, you’ll want to use different texts in your analyses than
you used during interviewing. For example, in an interview you’ll ask “What is your name?” but
in tabulations you may prefer the text “Name” or “Name of respondent”.
To Create a Text Question
E Click Insert Item.
This opens the New Item dialog box.
E Choose Text and click OK.
27
IBM SPSS Data Collection Interviewer Server User’s Guide
E In Name, optionally replace the default item name with a name of your choice.
E In Question Text, type the text of the question.
To Set Advanced Options
E Select the Advanced tab.
28
Chapter 1
E In Require a response to this question, choose whether or not this question must be answered.
Note: If a question may be left unanswered, and you do not insert a No Answer response in
the category list, Build inserts one automatically. This is because the interview script that is
generated from the Build questionnaire requires this in order for respondents to be able to click
Next without having to select an answer. (You will not see the No Answer category until your
screen is refreshed, for example, when you change tabs. At this point, Build also displays a
message telling you that it has added No Answer.)
If you set this option to Yes and then edit the question later on and change this option to No,
Build does not automatically remove No Answer. If you want to disallow No Answer response,
you must delete it yourself.
E In Hide this question, choose No if the question should be displayed to the respondent. If this is a
dummy question that is to exist in the questionnaire but not be displayed to respondents, choose
Yes. (Typically, the responses to hidden questions are set by statements defined in IOM Script
items. They provide an efficient method of merging the responses to a number of related questions
29
IBM SPSS Data Collection Interviewer Server User’s Guide
into a single variable for use elsewhere in the questionnaire. For this reason, the response list for
the hidden question often consists of all the responses to the questions that are to be merged.)
Note: Because they are not displayed, hidden questions are not valid in question groups.
E If you want to allow “No Answer”, “Don’t Know”, or “Refuse to Answer” as special responses
to this question, do the following:
In Special Responses, select the responses you want to allow.
If you want a response to be displayed with a text other than the one shown on this tab, type
the text in the Text box.
To define routing for a special response, select the routing destination from the GoTo
dropdown list for that response. (If you want to skip forwards in the questionnaire, you must
define the question you want to route to before you can select it from the dropdown list.)
To Set Presentation Options
E Select the Presentation tab.
E In Presentation Style, select a layout template:
Click the button next to the empty box.
On the Select page, locate the template file and click Select. For more information, see the
topic Copying Pictures and Presentation Templates on p. 50.
The filename appears in the Presentation Style box.
E In Width and Height, enter the dimensions of the response box in characters.
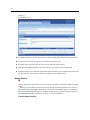
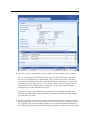
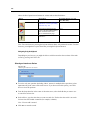
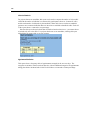
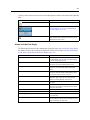
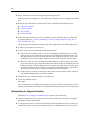
To Set Export and Analysis Options
E Select the Export/Analysis tab.
30
Chapter 1
Figure 1-5
Export/Analysis tab
E In Variable Label, type the text you want to use as the variable label in place of the question text.
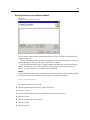
Single and Multiple Response Grid Questions
Grid questions are an efficient way of asking the same question about a number of related
topics. The question is displayed in a tabular or grid form, with the subquestions (subjects)
forming one dimension of the grid and the responses forming the other. A typical example of a
single/multiple response grid is a question that asks respondents to rate a number of products on
a scale of Excellent to Very Poor.
Build provides separate options for creating single response and multiple response grids, but
you can still change the response type of individual responses within a grid if you wish.
31
IBM SPSS Data Collection Interviewer Server User’s Guide
You can filter the response list so that, when interviews take place, only responses that were
or were not mentioned at a previous question are displayed. This is particularly useful for
spontaneous and prompted awareness questions where you want to prompt only for the responses
that were not mentioned spontaneously.
In a multiple response grid, you can flag some of the categories as single response—for example,
if there is a “None of the above” category.
You can associate pictures with responses. These can be in any of the following formats:
gif, jpg, jpeg, png, or bmp.
When you export grid questions, the export process exports the question and response texts
exactly as they appear in the questionnaire. Sometimes, you’ll want to use different texts in your
analyses than you used during interviewing. A typical example is question text, where you’ll tend
to use a more wordy approach in interviewing than in analyses, saying, for example, “What is
your overall opinion of the products?” rather than simply “Overall opinion”.
The variable labels for the grid subjects consist of the subject text followed by a colon and then
the main question text. For instance, if the main question text is “What is your overall opinion
of the products?” and the products are different brands of washing powder, the variable labels
for each product would default to, say, “Washo:What is your overall opinion of the products?”,
“Suds:What is your overall opinion of the products?”, and so on. These texts are unlikely to be
what you want to see in your tables.
To Create a Single/Multiple Response Grid Question
E Click Insert Item.
This opens the New Item dialog box.
E Choose Single Response Grid or Multiple Response Grid and click OK.
32
Chapter 1
E In Name, optionally replace the default item name with a name of your choice.
E In Question Subjects, type the subjects that you want to ask about.
E In Responses, type the answer texts one per line. See Question Limits for information about the
maximum number of responses you can place in a list.
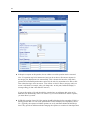
To Set Advanced Options
E Select the Advanced tab.
33
IBM SPSS Data Collection Interviewer Server User’s Guide
E In Require a response to this question, choose whether or not this question must be answered.
Note: If a question may be left unanswered, and you do not insert a No Answer response in
the category list, Build inserts one automatically. This is because the interview script that is
generated from the Build questionnaire requires this in order for respondents to be able to click
Next without having to select an answer. (You will not see the No Answer category until your
screen is refreshed, for example, when you change tabs. At this point, Build also displays a
message telling you that it has added No Answer.)
If you set this option to Yes and then edit the question later on and change this option to No,
Build does not automatically remove No Answer. If you want to disallow No Answer response,
you must delete it yourself.
E In Hide this question, choose No if the question should be displayed to the respondent. If this is a
dummy question that is to exist in the questionnaire but not be displayed to respondents, choose
Yes. (Typically, the responses to hidden questions are set by statements defined in IOM Script
items. They provide an efficient method of merging the responses to a number of related questions
34
Chapter 1
into a single variable for use elsewhere in the questionnaire. For this reason, the response list for
the hidden question often consists of all the responses to the questions that are to be merged.)
Note: Because they are not displayed, hidden questions are not valid in question groups.
E In Grid Variable Name, enter a name for this question within the grid item as a whole. The default
is GVnumber, so if the item name is Q5, the first line of code generated for this item will be
labelled Q5, whereas the question itself will be labelled GVnumber.
E In Grid Layout, choose how the grid will be structured. Choose Arrange subjects in columns to
have the subjects as the columns and the responses as the rows. Choose Arrange subjects in rows to
have the subjects as the rows of the grid and the responses as the columns. This is the default.
E In Question Type, choose whether this is a single or multiple response question. By default, the
setting for this property matches the data type of the item you selected to create this question—that
is, if you chose Single Response then Single Response will be selected automatically for this
property. You should only need to change this setting if you want to change the question type after
the question has been defined. Changing the question type here changes the overall question type
in the questionnaire and also changes all the individual response types in the response list.
E In Response Order, choose the order in which responses should be presented. Choose Default to
present responses in the order they appear in the response list, Random to present responses in a
random order, Rotated to present responses in rotation so that each response takes a turn at being
first in the list, or Reversed to present responses in reverse order so that the last response in
the list appears first.
E Use the Display Responses boxes if you want to filter the response list based on the respondent’s
answers to previous related questions.
In the first box, choose one of All Responses, Chosen, or Not Chosen.
In the second box, choose the question whose answer controls the responses to be displayed
for the current question.
When prompted, confirm that the responses defined for the chosen question (the parent
question) may overwrite the response list for the current question.
Note: This facility requires that the response list to the current question remains identical to the
response list for the chosen question. To achieve this, Build makes the response list for the current
question read-only (greyed out) and prevents you changing it. Any changes that you make to the
response list in the parent question automatically appear in the response list to the current question.
E In the Responses section, in the Type column, choose one of Single Response, Multiple Response,
Don’t Know, No Answer, or Refuse to Answer for each response.
E To associate a picture with a response, do the following:
Click the button to the right of the Picture box for that response.
On the Select page, locate the image file and then click Select. For more information, see the
topic Copying Pictures and Presentation Templates on p. 50.
The name of the image file is displayed in the Picture box.
To Set Presentation Options
35
IBM SPSS Data Collection Interviewer Server User’s Guide
E Select the Presentation tab.
E Click the image next to the empty Presentation Style box.
E On the Select page, locate the .htm file and click Select.
Build copies the file to the My Presentation Styles folder and displays a message to this effect.
E Click OK to close the message box.
The name of the presentation template file is displayed in the Presentation Style box.
E Click Apply.
To Set Export and Analysis Options
E Select the Export/Analysis tab.
36
Chapter 1
Figure 1-6
Export/Analysis tab
E In Variable Label, type the text you want to use as the variable label in place of the question text.
E In Subject Text, amend the subject texts as necessary.
E If you changed the common label text or a subject text and you want the changes to be saved in the
.mdd file, click Update Grid Variable Values.
E In Category Label, make any changes you want to the response texts.
E In Export Values, enter the codes you want to use to represent each response.
E Select the Set as Missing checkbox for every response you want to treat as missing data.
E To define factors for use when the questionnaire data is tabulated, type a number in the Factor box
for each response. Factors may be positive or negative real or integer values.
37
IBM SPSS Data Collection Interviewer Server User’s Guide
Numeric Grid Questions
Grid questions are an efficient way of asking the same question about a number of related topics.
The question is displayed in a tabular or grid form, with the subquestions (subjects) forming one
dimension of the grid and the responses forming the other. A typical example of a numeric grid is
a question that asks respondents how many times they consumed various types of soft drinks on
different days of the week.
You can associate pictures with responses. These can be in any of the following formats:
gif, jpg, jpeg, png, or bmp.
When you export numeric grid questions, the export process exports the subject and response texts
exactly as they appear in the questionnaire. You can specify different texts for analyses if you wish.
To Create a Numeric Grid Question
E Click Insert Item.
This opens the New Item dialog box.
E Choose Numeric Grid and click OK.
38
Chapter 1
E In Name, optionally replace the default item name with a name of your choice.
E In Question Subjects, type the subjects that you want to ask about.
E In Responses, type the answer texts one per line. See Question Limits for information about the
maximum number of responses you can place in a list.
To Set Advanced Options
E Select the Advanced tab.
39
IBM SPSS Data Collection Interviewer Server User’s Guide
E In Require a response to this question, choose whether or not this question must be answered.
Note: If a question may be left unanswered, and you do not insert a No Answer response in
the category list, Build inserts one automatically. This is because the interview script that is
generated from the Build questionnaire requires this in order for respondents to be able to click
Next without having to select an answer. (You will not see the No Answer category until your
screen is refreshed, for example, when you change tabs. At this point, Build also displays a
message telling you that it has added No Answer.)
If you set this option to Yes and then edit the question later on and change this option to No,
Build does not automatically remove No Answer. If you want to disallow No Answer response,
you must delete it yourself.
E In Hide this question, choose No if the question should be displayed to the respondent. If this is a
dummy question that is to exist in the questionnaire but not be displayed to respondents, choose
Yes. (Typically, the responses to hidden questions are set by statements defined in IOM Script
items. They provide an efficient method of merging the responses to a number of related questions
40
Chapter 1
into a single variable for use elsewhere in the questionnaire. For this reason, the response list for
the hidden question often consists of all the responses to the questions that are to be merged.)
Note: Because they are not displayed, hidden questions are not valid in question groups.
E In Grid Layout, choose how the grid will be structured. Choose Arrange subjects in columns to
have the subjects as the columns and the responses as the rows. Choose Arrange subjects in rows to
have the subjects as the rows of the grid and the responses as the columns. This is the default.
E In Response Order, choose the order in which responses should be presented. Choose Default to
present responses in the order they appear in the response list, Random to present responses in a
random order, Rotated to present responses in rotation so that each response takes a turn at being
first in the list, or Reversed to present responses in reverse order so that the last response in
the list appears first.
E In Number Type, choose either Integer or Real depending on the type of numeric answer you
want to accept.
E In the Minimum Value and Maximum Value boxes, type the range of values to accept as valid
responses. See Question Limits for information about the range of values you can use for numeric
responses.
E To associate a picture with a response, do the following:
Click the button to the right of the Picture box for that response.
On the Select page, locate the image file and then click Select. For more information, see the
topic Copying Pictures and Presentation Templates on p. 50.
The name of the image file is displayed in the Picture box.
To Set Presentation Options
E Select the Presentation tab.
E Click the image next to the empty Presentation Style box.
41
IBM SPSS Data Collection Interviewer Server User’s Guide
E On the Select page, locate the .htm file and click Select.
Build copies the file to the My Presentation Styles folder and displays a message to this effect.
E Click OK to close the message box.
The name of the presentation template file is displayed in the Presentation Style box.
E Click Apply.
To Set Export and Analysis Options
E Select the Export/Analysis tab.
Figure 1-7
Export/Analysis tab
E In Response Text, type the texts you want to use as the response texts for the grid.
E In Subject Text, amend the subject texts as necessary.
E If you want the changes to be saved in the .mdd file, click Update Grid Variable Values.
Question Limits
The following table describes the limits that apply when defining or responding to a question.
Question Type
Long (also known as Integer)
Limits
The minimum value is -2,147,483,648 and the
maximum value is 2,147,483,647.
42
Chapter 1
Question Type
Double (also known as Decimal or Real)
Text
Date (also known as Date/Time)
Categorical (also known as Single Response or
Multiple Response)
All
Limits
The minimum value is -1.79769313486232E308 and
the maximum value is 1.79769313486232E308. The
smallest negative value is -4.94065645841247E-324
and the smallest positive value is
4.94065645841247E-324.
Can in theory be up to 2 billion characters in length.
In reality, the length is limited by the database being
used to store the response. In a IBM® SPSS® Data
Collection relational MR database, the maximum
length is 4,000 characters.
The earliest value is 1 January 100 and the latest
value is 31 December 9999.
Can in theory contain up to 2 billion categories.
In reality, the number depends on the available
memory and the Data Source Component (DSC)
being used. A category name must contain between
1 and 128 characters.
A question name must contain between 1 and 128
characters.
Shared Lists
Shared lists are a quick and efficient way of dealing with single and multiple choice responses that
are common to a number of questions. A typical example might be a five-point rating scale that
you want to use for rating various aspects of product. Rather than retyping the five responses for
each question, or copying and pasting them from one question to another, you can set them up as a
shared list with a unique name and then insert them as a block wherever they are needed.
Shared lists are shown at the end of the Overview tab under the heading Shared Lists.
Creating Shared Lists
Setting up shared lists is like creating a single or multiple response question. You give the list
a name and enter the responses it will contain. Shared lists may contain single choice, multiple
choice, no answer, don’t know, and refused to answer responses.
To Create a Shared List
E Click New List.
43
IBM SPSS Data Collection Interviewer Server User’s Guide
E In Name, optionally replace the default item name with a name of your choice.
E In Responses, type the response texts one per line. See Question Limits for information about the
maximum number of responses you can place in a list.
E Select the Advanced tab.
E In Type, choose one of Single Response, Multiple Response, Don’t Know, No Answer, or Refuse to
Answer for each response.
44
Chapter 1
E To associate a picture with a response, do the following:
Click the button to the right of the Picture box for that response.
On the Select page, locate the image file and then click Select. For more information, see the
topic Copying Pictures and Presentation Templates on p. 50.
The name of the image file is displayed in the Picture box.
E To define factors for use when the questionnaire data is tabulated, type a number in the Factor box
for each response. Factors may be positive or negative real or integer values.
E You can add new responses to the list, delete responses, or alter the order of responses in the list
using the options above the response list. For more information, see the topic Editing Response
and Subject Lists on p. 65.
Using Shared Lists in Questions
When you insert a shared response list in a question, bear in mind the following:
The responses are inserted as a single entity and cannot be edited individually. The response
lines are greyed out and a single entry containing the list name appears above the list so that
you can move or delete the list as a whole. If you want to change a response text you must
make the change in the shared list item, but bear in mind that this change will also affect
any other questions that use the shared list.
The only changes you can make to individual responses once they have been inserted in a
question is to assign pictures and factors. These changes apply to the current question only;
they do not affect any other questions in which the shared list is used.
If you insert a multiple choice shared list into a single response question, the responses in the
list are changed to single response types for that question only. If you subsequently change
the overall response type for the question, any responses that are defined as multiple choice in
the shared list will revert to being multiple choice in the question. Shared responses that are
defined as single choice never change their response type.
Do not insert more than one shared list into a question as this may result in responses that
have duplicate names. If you try to do this, Build issues an error message to this effect. If you
need to use more than one shared list for a question, create a new shared list containing all
the responses in the two existing lists and use that instead.
Do not insert a shared list into a question that already contains ordinary responses, unless
those responses are flagged as the special No Answer, Don’t Know, or Refused responses, as
this could result in responses with duplicate names.
To Insert a Shared List in a Question
E Select the question’s Advanced tab.
45
IBM SPSS Data Collection Interviewer Server User’s Guide
E In the Responses section, click Append Shared List.
This opens the Insert Shared List dialog box.
E In Shared list name, select the name of the list you want to insert.
The responses in the list are displayed in the lower part of the dialog box.
E Click OK to insert the responses in the question’s Responses section.
E If necessary, assign pictures or factors to the responses you have just inserted.
Display Text Items
Display Text items place text or other non-question information in the questionnaire. They are
often used for general instructions to the interviewer or respondent.
To Create a Display Text Item
46
Chapter 1
E Click Insert Item.
This opens the New Item dialog box.
E Choose Display Text and click OK.
E In Name, optionally replace the default item name with a name of your choice.
E In Display Text, type the text you want to use.
To Set Presentation Options
E Select the Presentation tab.
47
IBM SPSS Data Collection Interviewer Server User’s Guide
E In Presentation Style, select a layout template:
Click the button next to the empty box.
On the Select page, locate the template file and click Select. For more information, see the
topic Copying Pictures and Presentation Templates on p. 50.
The filename appears in the Presentation Style box.
Using the Questionnaire Library
The Library is the central storage place for questionnaires or questionnaire sections that you want
to make available for inclusion in other questionnaires. For example, if most of the questionnaires
that your company creates have a standard set of demographic questions, it makes sense to store
them in the library so that they can be imported into every questionnaire. This saves time and
ensures that the questions are identical in all questionnaires.
The standard Questionnaire Library is divided into two sections. The Shared section
(FMRoot\Shared\Questionnaire Library Items) contains questionnaires that are available to
anyone who uses Build. The Roles section is divided into subfolders containing questionnaires
that are accessible only by members of a particular role; so, for example, only members
of RoleA will be able to access questionnaires saved in the RoleA area of the library
(FMRoot\Roles\RoleA\Questionnaire Library Items).
Note: Build does not support personal libraries, although if a role has only one member that
library is effectively a personal library.
Build comes with a collection of predefined surveys that are installed in different folders
within the Shared section of the library. Some questionnaires are complete and ready to use with
no further design work required, while others require minor customization such as replacing a
marker for a company name or product with your own company or product name. A third group
are smaller questionnaires that you would probably import into your own questionnaire files and
then expand to form more detailed surveys.
The exact structure of the main library sections will be determined by the person responsible
for maintaining the library, but it will probably consist of a number of folders for different types of
questionnaires. Each folder may contain subfolders or questionnaires, in much the same way that
you organize your files on your hard drive. You can use the library in the following ways:
Save your own questionnaires to existing folders in the library.
Import library questionnaires into questionnaires that you are designing.
48
Chapter 1
Saving Questionnaires to the Library
You can save the questionnaire you are working on as a library file. Once the file has been
created, the questionnaire remains open for you to work on. Any changes that you make are only
saved to the questionnaire file in the project’s folder within your IBM® SPSS® Data Collection
Interviewer Server Administration user folder; the library copy of the questionnaire is not updated
unless you re-save the questionnaire to the library.
All files in the library are available to anyone who uses Build. However, the questionnaires
do not become available to users of other Interviewer Server Administration activities until you
check the files in to the Shared folder manually or run an activity that does this automatically.
If you add a questionnaire file that uses a template to the library, you will need to create a separate
folder within the library to store the template and any files that the template uses, and then
copy those files into that folder manually. (Later versions of Build will do this automatically.)
Instructions for doing this are available in Copying Questionnaires that use Templates to the
Library but you may prefer to ask your administrator to do this for you.
E Choose:
File > Add To Library
This opens the Save As dialog box.
E In the left-hand frame, expand the library tree and select the folder in which you want to store
the questionnaire.
E In Filename, type the name that the questionnaire will have in the library.
E Click Save As.
Build confirms that the questionnaire is now part of the library.
E Click OK to close the message box and return to the questionnaire design page.
49
IBM SPSS Data Collection Interviewer Server User’s Guide
Importing Library Questions into the Current Questionnaire
When you import a library questionnaire into the current questionnaire, Build compares the
names of the items it is importing against the names of items in the current questionnaire. If
any of the item names already exists, Build appends a number to the item’s name so that it still
has a unique name.
E Do one of the following:
Either:
On any tab, click Insert item at the point you want to insert the question.
This opens the New Item dialog box.
Click Import from Library.
This displays the Select dialog box.
Or:
On the Overview tab, select the item above which you want to insert the library file.
Choose:
File > Insert > From Library
This displays the Select dialog box.
50
Chapter 1
E In the Folders frame, navigate to the folder containing the file you want to import.
E In the file list, double click on the filename.
Build inserts the items from the library file at the current point in the questionnaire.
Copying Pictures and Presentation Templates
Build does not use the library for storing shared pictures and presentation templates, although it
uses a similar structure of folders and subfolders for templates.
Build stores templates that are available to all users in a Shared Presentation Styles folder, and
templates that are available to all members of a particular role in a role-specific Presentation
Styles folder (Roles\RoleA\Presentation Styles, for instance).
The Presentation Styles folder represents the project’s folder in your IBM® SPSS® Data
Collection Interviewer Server Administration user folder, so it points to a different location
depending on the project you are working on. If you have templates that are specific to the current
project this is where to store them so that the Launch activity can find them.
Build does not have a central repository for picture files. Instead, it looks for them in a folder
that it refers to as My Images. This corresponds to the project’s folder within your Interviewer
Server Administration user folder, so My Images for project 1 is not the same as My Images for
project 2.
When you click the button for associating a picture with a response, or a presentation template
with a question, the dialog box that you see displays all the files that are available for this project.
Some will be shared and others will be specific to the current project. If the file you want is not
listed, you will need to upload it before you can use it.
You can also download files onto your computer if you need to edit them, for example, if you
want to change a template’s page layout or color scheme. Once you have made your changes, you
can upload the file to replace the original, or rename it and then upload it.
To Upload a File into the Project’s Folder
51
IBM SPSS Data Collection Interviewer Server User’s Guide
E On the Select dialog box, click Upload.
This opens a standard Windows Choose file dialog box.
E Locate the file you want to upload and click Open.
The file’s name is added to the list of filenames on the right of the Select dialog box and can now
be selected for use in Build.
To Download a File from the Project’s Folder
E On the Select dialog box, choose the file you want to download from the list of filenames on
the right of the dialog box.
E Click Download.
This opens a standard Windows File Download dialog box.
E Either click Open to open the file from its current location or click Save to save the file in a
location of your choice.
Non-Question Items
You can add the following non-question items to your questionnaires:
Notes. for inserting general comments about the questionnaire.
Bookmarks for naming specific locations in the questionnaire.
Mandatory and conditional routing for jumping over questions that are not appropriate for the
current respondent..
Exit codes for forcibly terminating the interview.
IOM script items for inserting Routing statements written in the Interview Scripting language
directly into the questionnaire.
There is also an Insert from Script Library item for inserting Routing statements from a library file.
Notes
Use a Note item when you want to include notes or other information that is not part of the
questionnaire. Typically, you might use this item type to make notes about further work that needs
to be done on the questionnaire, or on special information about the questionnaire that needs
to be recorded for future reference.
E Click Insert Item.
This opens the New Item dialog box.
E Select the Routing Items tab.
52
Chapter 1
E Choose Note and click OK.
This displays the Edit tab for notes.
E In Name, optionally replace the default item name with a name of your choice.
E In Note Text, type the note.
Bookmarks
53
IBM SPSS Data Collection Interviewer Server User’s Guide
The bookmark item identifies a particular point in the questionnaire with a unique name. It is most
commonly used in large or complex questionnaires, where respondents can reach a certain point
in the questionnaire via a number of routes. By placing a bookmark in the questionnaire, you
can easily gather all respondents together before proceeding with the rest of the questionnaire.
Bookmarks are also useful as destinations for Gotos, when you do not want to jump directly to a
question.
E Click Insert Item.
This opens the New Item dialog box.
E Select the Routing Items tab.
E Choose Bookmark and click OK.
This displays the Edit tab for bookmarks.
E In Name, optionally replace the default item name with a name of your choice.
Goto
A Goto applies to all respondents who reach this point in the questionnaire. You might use it in a
questionnaire that has many sections, where each respondent answers the questions in one section
plus a general demographic section only. To ensure that each respondent skips the unwanted
54
Chapter 1
sections and reaches the demographic section, you could end each section with a Goto that takes
the respondent straight to the start of the demographic section.
E Click Insert Item.
This opens the New Item dialog box.
E Select the Routing Items tab.
E Choose Goto and click OK.
This displays the Edit tab for Goto items.
E Select the question that you want to go to from the dropdown list.
If ... Goto
Use an If...Goto to define routing for some respondents but not others. You specify the respondents
to which the Goto applies by listing responses that they must have given to previous questions.
For example, to create an If...Goto that applies to women, you might say that the response
to the Gender question must be Female. The questions and answers that control an If...Goto
are commonly called the routing condition because they define the conditions under which the
Goto will be followed.
55
IBM SPSS Data Collection Interviewer Server User’s Guide
A routing condition can specify a single condition or a list of conditions. If you specify more
than one condition, you must also specify how each condition relates to the next one in the list.
Conditions can be related to one another using And or Or. Use And when respondents must satisfy
both conditions; use Or when respondents must satisfy at least one of the conditions.
The Advanced tab displays the routing condition as a text expression. If you are familiar with
the expression definition language, you can make changes to the expression on this tab, and will
be able to use the full expression syntax to define more complex expressions than are possible
on the Edit tab.
To Define Conditional Routing
E Click Insert Item.
This opens the New Item dialog box.
E Select the Routing Items tab.
E Choose If...Goto and click OK.
This displays the Edit tab for If...Goto items.
E Choose a question name from the dropdown list of question names.
56
Chapter 1
E Choose a condition from the dropdown list of conditions. The contents of this list will vary
according to the type of question you chose.
E The value box (the third box) varies according to the type of question you chose. For a single
or multiple choice question, select a response from the dropdown list. For a numeric or text
question, type a number or text in the box.
E If you want to define another condition, click And.
A second condition definition line is displayed, and the And button that you clicked changes to a
dropdown box so you can choose how the two conditions are to be combined.
E If you want the new condition to be combined with the previous condition using Or rather than
And, select Or from the dropdown list in the previous line.
E Define the next condition as you did the first one.
E Repeat these steps until you have fully defined the conditions under which the routing should take
place. If you make a mistake, click Delete to delete an incorrect line from the specification.
E In Goto, select the question or other item that you want to jump to if the condition is true.
Exit Codes
The Exit item lets you terminate an interview immediately and flag it with an exit code of your
choice. When you analyze the data you can use the exit code as a means of filtering the data to
include only interviews that terminated in a certain way, or to provide simple counts of the various
ways in which interviews were terminated.
Build provides a standard set of exit codes but also allows you to define your own codes with
your own meanings. Exit codes may be any whole number in the range 0 to 2147483647.
Predefined exit codes are as follows:
Code
1
Meaning
Successful completion
2
Premature termination with data.
Remarks
Any interview in which all
relevant questions have been
asked is flagged as successfully
completed. This is the default.
You can use this code to
identify interviews that were not
completed for whatever reason.
This is a useful exit code for
paper questionnaires or CATI
surveys where the respondent can
simply choose not to continue
answering questions. It allows
you to differentiate between
these interviews and interviews
that were stopped, where the
respondent may have had the
intention of continuing with the
interview.
57
IBM SPSS Data Collection Interviewer Server User’s Guide
Code
5
Meaning
Terminated by quota control
6
Early completion
8
Premature termination without
data
9
Interview stopped with no data
written
10
Interview stopped with data
written
To Define an Exit Code
E Click Insert Item.
This opens the New Item dialog box.
E Select the Routing Items tab.
Remarks
Interviews that are terminated
by quota control can often be
confused with successfully
completed or partially completed
interviews. Use this exit
code to flag interviews that were
terminated because the respondent
belonged in a group whose quota
had already been filled.
You can use this code to treat an
interview that is only partially
completed as if it were a fully
completed interview. You might
decide to do this if the respondent
has reached a certain point in the
questionnaire.
This code is not applicable to
IBM® SPSS® Data Collection
products, which always write
data.
This code is not applicable to
Data Collection products, which
always write data.
You can use this code to identify
interviews that have been stopped
pending completion at a later date.
58
Chapter 1
E Choose Exit and click OK.
This displays the Edit tab for exit items.
E In Name, optionally replace the default item name with a name of your choice.
E To use a predefined exit code, click Predefined Exit Code and select a code from the dropdown list.
E To use a code of your choice, click Custom Exit Code and type a number in the input box.
Interview Scripting Items
Use an IOM Script item when you want to insert statements directly into the Routing section
of the questionnaire. The Routing section controls the order and way in which questions are
presented to respondents. Statements in this section must be written in the Interview Scripting
Language which you will find documented in IBM® SPSS® Data Collection Developer Library.
To Create an IOM Script Item
E Click Insert Item.
This opens the New Item dialog box.
E Select the Routing Items tab.
59
IBM SPSS Data Collection Interviewer Server User’s Guide
E Choose IOM Script and click OK.
This displays the Edit tab for IOM script items.
E In Name, optionally replace the default item name with a name of your choice.
E In IOM Script, type the mrScriptBasic code exactly as you want it to appear in the IBM® SPSS®
Data Collection script file.
60
Chapter 1
Inserting Routing Code from the Script Library
When you create a questionnaire, Build saves the questionnaire definition in two sections. The
Metadata section contains the questions, and the Routing section contains statements that display
or print the questions in the order they appear on the Overview tab. In most surveys, you’ll want
to do more than this. For example, you might want to add a page banner to display the survey title
at the top of each page, or you’ll want to present a block of questions in a different order for each
respondent. These and other such tasks are controlled by the Routing section of the questionnaire.
You can always use an IOM Script item to insert statements in the Routing section, but Build
comes with a library of script snippets for common tasks that you can load into the questionnaire.
Some of these script snippets can be used exactly as they are, but others will need to be modified
once they have been loaded, for example, to replace dummy question or response names with
the corresponding names from your questionnaire. Each script file is named according to what it
does and contains comments explaining how it should be used.
When you insert statements in this way, Build creates a single IOM Script item for all the
statements in the file. You can then edit these statements in the usual way if necessary.
To Insert Code from the Script Library
E Click Insert Item.
This opens the New Item dialog box.
E Select the Routing Items tab.
61
IBM SPSS Data Collection Interviewer Server User’s Guide
E Choose Insert from Script Library and click OK.
This displays the Script Library dialog box.
E In the Interview Scripts frame, select the script you want to use.
The script is displayed in the Interview Script Item Description frame.
E Click OK to insert the script statements in the questionnaire.
E If the script indicates that it requires customization, make the necessary changes.
Language Codes for the Change Language Script Snippet
The following table shows the 3-character language codes for many of the world’s languages.
Code
AFK
SQI
ARG
ARH
ARE
ARI
ARJ
ARK
ARB
ARL
ARM
ARO
ARQ
Language
Afrikaans
Albanian
Arabic - Algeria
Arabic - Bahrain
Arabic – Egypt
Arabic – Iraq
Arabic – Jordan
Arabic – Kuwait
Arabic – Lebanon
Arabic – Libya
Arabic – Morocco
Arabic – Oman
Arabic – Qatar
62
Chapter 1
Code
ARA
ARS
ART
ARU
ARY
HYE
EUQ
BEL
BGR
CAT
CHS
ZHH
ZHI
CHT
HRV
CSY
DAN
NLB
NLD
ENA
ENL
ENC
ENB
ENI
ENJ
ENZ
ENS
ENT
ENG
ENU
ETI
FOS
FAR
FIN
FRB
FRC
FRA
FRL
FRS
DEA
DEU
DEC
DEL
DES
Language
Arabic – Saudi Arabia
Arabic – Syria
Arabic – Tunisia
Arabic – United Arab Emirates
Arabic – Yemen
Armenian
Basque – Basque
Belarusian
Bulgarian
Catalan
Chinese
Chinese – Hong Kong, SAR
Chinese – Singapore
Chinese – Taiwan
Croatian – Croatia
Czech
Danish
Dutch – Belgium
Dutch – The Netherlands
English – Australia
English – Belize
English – Canada
English – Caribbean
English – Ireland
English – Jamaica
English – New Zealand
English – South Africa
English – Trinidad
English – United Kingdom
English – United States
Estonian – Estonia
Faroese – Faroe Islands
Farsi
Finnish
French – Belgium
French – Canada
French – France
French – Luxembourg
French – Switzerland
German – Austria
German – Germany
German – Liechtenstein
German – Luxembourg
German – Switzerland
63
IBM SPSS Data Collection Interviewer Server User’s Guide
Code
ELL
HEB
HIN
HUN
ISL
IND
ITA
ITS
JPN
KOR
LVI
LTH
MSL
NOR
NON
PLK
PTB
PTG
ROM
RUS
SRB
SRL
SKY
SLV
ESS
ESB
ESL
ESO
ESC
ESD
ESF
ESE
ESG
ESH
ESM
ESI
ESA
ESZ
ESR
ESU
ESY
ESV
SVF
SVE
Language
Greek
Hebrew
Hindi
Hungarian
Icelandic
Indonesian
Italian – Italy
Italian – Switzerland
Japanese
Korean
Latvian
Lithuanian
Malay – Malaysia
Norwegian (Bokmal)
Norwegian (Nynorsk)
Polish
Portuguese – Brazil
Portuguese – Portugal
Romanian – Romania
Russian – Russia
Serbian (Cyrillic)
Serbian (Latin)
Slovak
Slovenian
Spanish – Argentina
Spanish – Bolivia
Spanish – Chile
Spanish – Colombia
Spanish – Costa Rica
Spanish – Dominican Republic
Spanish – Ecuador
Spanish – El Salvador
Spanish – Guatemala
Spanish – Honduras
Spanish – Mexico
Spanish – Nicaragua
Spanish – Panama
Spanish – Paraguay
Spanish – Peru
Spanish – Puerto Rico
Spanish – Uruguay
Spanish – Venezuela
Swedish – Finland
Swedish – Sweden
64
Chapter 1
Code
THA
TRK
URK
URD
VIT
Language
Thai – Thailand
Turkish
Ukrainian
Urdu
Vietnamese – Vietnam
Unsupported Items
If you load a questionnaire or script snippet that has been created outside of Build and it contains
items that Build does not support, Build flags the item with a “no entry” sign. On the Overview tab,
a note explains that you may edit the item using IBM® SPSS® Data Collection Base Professional.
Inserting IBM SPSS Data Collection WordCapture Files into the Current Questionnaire
If you have a questionnaire (.mdd) file that was created in IBM® SPSS® Data Collection
WordCapture you can insert it into a Build questionnaire in the same way that you might insert
files from the library.
When you insert an external file into the current questionnaire, Build compares the names of
the items it is inserting against the names of items in the current questionnaire. If any of the item
names already exists, Build appends a number to the item’s name so that it still has a unique name.
Similarly, if the base language for the inserted items is different to the base language of the current
questionnaire, Build will tell you so that you can choose a different language if one is available.
E On the Overview tab, select the item above which you want to insert the new items.
File > Insert > From File
This opens a file selection dialog box.
E Use the Browse button to locate and select the file you want to insert. The file’s name will appear
in the File box.
E Click OK.
Build inserts the items from the library file at the current point in the questionnaire.
65
IBM SPSS Data Collection Interviewer Server User’s Guide
Editing Questionnaires
This section describes various techniques for changing the content and appearance of a
questionnaire once the initial development stage is over. These include:
General procedure for changing a question’s definition
Editing response and subject lists
Saving and undoing changes
Grouping questions that are to appear all on the same page
Deleting questions
Moving questions up and down
Cutting and pasting questions
Duplicating questions
The section also includes some useful information about editing Build questionnaires.
Changing Questions
E On the Overview tab, select the question you want to change.
E Select the Advanced or Presentation tab as appropriate.
E Make the changes, and click Apply on the question’s display box.
E If necessary, switch to a different tab to make other changes.
Editing Response and Subject Lists
Responses are the texts that make up the list of possible responses to a categorical question or a
categorical grid question. Subjects apply to categorical and numeric grid questions and are the
sub-questions that you want to ask. For example, in a grid that asks the respondent to rate a
number of brands, the brands are the subjects and the ratings, which are the same for all brands,
are the responses. The facilities for editing responses and subjects are the same.
Each response or subject has a text and a name. The text is the text that you specify when you
add the response or subject to the question, and it is what appears in the questionnaire that is used
for interviewing. The same text can appear in a number of different questions.
The name is a label that uniquely identifies a particular text. Build generates these labels
automatically, basing them on the response or subject text. The labels are used as variable names
for storing data in the case data file, to ensure that variables, responses and subjects are consistent
across different versions of the script. Any response that has the same name in all versions of a
questionnaire is treated as being the same response even if the response texts have changed
between versions. For example, if version 1 of the questionnaire has the response text ‘Red’ with
the name Red and you change the response text to ‘Reddish colors’, there is no need to change
the name in version 2 because this is still the same response. However, if you replace ‘Red’ with
66
Chapter 1
‘Blue’ you must also change the name to ‘Blue’ otherwise the interviewing and analysis activities
will treat Blue as if it were Red.
Note: In general, although you may want to change response and subject texts, you should not
need to change the names.
To Insert Responses or Subjects
E Select the response or subject above or below which the new response is to be inserted, and then
click Insert Above Selection or Insert Below Selection as appropriate.
A new line is added to the list.
E In the Text column, replace the New Response text with the response text and then make any other
adjustments that are necessary. For example, it is usually a good idea to replace the default name
with a unique name that matches or is similar to the text in the Text column.
To Append Responses or Subjects
E Click Append.
A new line is added to the end of the list.
E In the Text column, replace the New Response text with the response text and then make any
other adjustments that are necessary.
To Delete Responses or Subjects
E Select the responses’ check boxes and then click Delete Selected. (To select all responses for
deletion, click the check box at the start of the responses menu bar.)
To Move Responses or Subjects
E Select the response’s check box and then click Move Up or Move Down as appropriate.
To Switch Multiple and Single Response Types
E Select the responses whose response type you want to change and then click Change to Single or
Change to Multi.
Note: Change to Multi is available only if the question allows multiple responses to be chosen.
To Switch the Question Type Between Single and Multiple Response
E In Question Type, click Single or Multi as appropriate.
This changes all the individual response types in the Responses list to match the new question
type, as well as changing the overall data type for the question.
Applying and Undoing Changes to the Current Question
Build automatically saves any changes you have made to the current question when the following
events take place:
When you move from the Edit, Advanced, or Presentation tab to another tab.
67
IBM SPSS Data Collection Interviewer Server User’s Guide
When you are working on the Edit, Advanced, or Presentation tab and you choose a question
from the question list or you click Next or Previous.
When you click Insert Item or New List.
When you move, group, ungroup, delete or paste questions on the Overview tab.
When you are working on the Advanced tab and you move, add, or delete responses, subjects,
or elements in a grid or categorical question.
Build does not save changes in the following situations:
When you choose an option from the menu. For example, when you leave Build or when you
open a new questionnaire when one is already open.
When you choose a picture for a response on the Advanced tab, or when you choose a layout
template on the Presentation tab.
Build provides Apply and Undo options on the Edit, Advanced, and Presentation tab for saving
or undoing changes to the current question. If you are working on any of these tabs you may want
to save your changes manually before taking the following actions:
Previewing the questionnaire.
Activating or testing the questionnaire.
Saving the questionnaire to the library.
Opening a new questionnaire.
Leaving Build.
E Click Apply to save any changes you have made to the current question.
E Click Undo to undo any unsaved changes for the current question.
Note: If you are working on the Presentation tab for a grid question, you must click Apply after
choosing the template (.htm) file before Build will search the template file for the name of the grid
template (.xml) file.
Grouping Questions
You can link adjacent questions so that they form a Group. If you use the questionnaire with
IBM® SPSS® Data Collection Interviewer Server, the questions in the group will all be displayed
on the same page. The exceptions are questions whose Hide Question property is set to Yes.
Grouping questions changes the behavior of the down-arrow button on the first question in the
group and the up-arrow button on the last question in the group so that they refer to the group
rather than to the individual question. If you want to move the first or last question in the group,
you must ungroup the question first.
The navigation buttons on other questions in the group remain unchanged, so you can move
other questions within the group in the normal way. However, if you want to move a question out
of the group you must ungroup it first.
Grouping questions also affects the contents of the Insert Item dialog box. If you insert an item
in a group the Insert Item dialog box shows only the item types that are can be inserted in the page.
68
Chapter 1
When you ungroup questions, Build removes the link at the point that you click. For example,
if you click the Ungroup link after a question, the link between that question and the next question
is broken. Depending on the question’s position in the group, this may mean that the questionnaire
now contains two smaller groups rather than one group.
To Group Questions
E On the Overview tab, click Group on Page between the two questions you want to group. If
you want to group more than two questions, click on the first/last question in the group, then
hold down the Ctrl key as you click on the last/first question in the group. Then click Group on
Page anywhere between those two questions.
A white line appears to the left of the grouped questions.
To Ungroup Questions
E On the Overview tab, click Ungroup between the question you want to ungroup and the question
before or after it. If the question is in the middle of a group, you may need to ungroup the question
from both the previous and the next questions in the group.
Deleting Questions
E On the Overview tab, navigate to the question you want to delete.
E Click the Delete button on the question’s display box.
Moving Questions Up or Down
E On the Overview tab, navigate to the question you want to move.
E Click the arrow buttons on the question’s display box to move the question up or down within
the questionnaire.
Moving a Question using Cut and Paste
E On the Overview tab, click Cut on the question you want to move.
E Navigate to the question above or below which you want to insert the question and click Paste.
Duplicating a Question using Copy and Paste
E On the Overview tab, click Copy on the question you want to copy.
E Navigate to the question below which you want to insert the question and click Paste.
The duplicate question is given a unique name which is the original name followed by a number.
69
IBM SPSS Data Collection Interviewer Server User’s Guide
Switching Between Build and IBM SPSS Data Collection Base Professional
When you create a questionnaire with Build, you define the questionnaire’s contents by filling
in online forms. As you do this, Build creates a questionnaire script (.mdd) file. The file has a
metadata section that defines the questions and responses and a collection of routing items that
specify how the questions and responses will be used in interviews (for example, the order in
which questions will be asked, which questions will be asked of which respondents, and so on).
Build is designed to be easy to use and to provide facilities for creating the majority of
questionnaires. There are some things that it cannot do, so your company may use IBM® SPSS®
Data Collection Base Professional to create or edit questionnaires directly in the interview
scripting language. Like Build, Base Professional creates an .mdd file with a metadata section and
routing information, but there are differences that you should be aware of if you use Build and
Base Professional on the same questionnaire file. These differences are as follows:
There are some questionnaire items that you can create in Base Professional that you cannot
create in Build. If you use Build on a questionnaire that contains these items, you will see
them flagged as unsupported items. For more information, see the topic Unsupported Items
on p. 64.
Questionnaires created in Base Professional have a routing section that contains IBM® SPSS®
Data Collection scripting code that determines how the questions in the metadata section are
presented during interviews. The default routing section is called Web, but scriptwriters can
create any number of different routing sections with different names if they wish.
Questionnaires created in Build do not have a routing section. Instead, they have a collection
of routing items. Only Build can write to these items. If you open a Build questionnaire in
Base Professional, the application runs the mrRoutingScript DSC to translate the routing
items into a routing script written in the Data Collection scripting language. The DSC calls
this routing section Paper and makes it read-only because it is a generated section rather than
something that exists in the .mdd file. You will be reminded that you will need to create a new
routing section (or use the default Web routing section) and copy the contents of the Paper
routing into it in order to run the questionnaire. For information on how to do this in Base
Professional, see “Adding a Routing Context” in the Base Professional section of the IBM®
SPSS® Data Collection Developer Library documentation.
If you edit a Build questionnaire in Base Professional and you add or delete questions,
the changes may not be visible in Build because Base Professional provides some
functionality that is not available in Build. If you use Base Professional, and you want
the questionnaire to work in Build, you should run the CreatePaperRouting.mrs script
on the .mdd file before opening it in Build. If not, ask the original scriptwriter to do
this for you. (The script is installed as part of the Data Collection Developer Library in
[INSTALL_FOLDER]\IBM\SPSS\DataCollection\6\DDL\Scripts\General\mrScriptBasic.)
Base Professional activate using the Web routing or another routing of your choice. Build
activates from the Paper routing only.
Testing and Activating Questionnaires
If you are developing large or complex questionnaires it can be useful to test the questionnaire
periodically as you build it. You can do this from within Build by selecting options from the
Tools menu.
70
Chapter 1
This section describes the following tasks:
Testing the questionnaire.
Activating the questionnaire for live interviewing using standard parameters.
Activating the questionnaire using manually set parameters.
Downloading the questionnaire file onto your computer.
Testing the Questionnaire
Use Build’s Test option to activate the project in test mode and optionally run a test interview.
Activating in test mode sets the project’s Test Version property to be the latest version of the
questionnaire, and its Active Version property to None.
The following things happen when you activate in test mode:
Build generates a read-only Routing section for the questionnaire based on the questions it
contains plus any statements you have placed in IOM Script items or loaded from the script
library. The Routing section is called Paper. (Note that this differs from the default Routing
section name used by IBM® SPSS® Data Collection Base Professional, which is Web.)
The Launch activity activates the project. If the project’s status is Inactive, the activation
process changes it to Test.
A dialog box displays the URL to use for running a test interview.
Note: You cannot run test interviews on projects whose status is Active. If you want to run test
interviews on an active project you must run the View Survey Link activity from IBM® SPSS®
Data Collection Interviewer Server Administration.
To Run a Test Interview
E Choose:
Tools > Activate > Test Mode
A message box reports the progress of the activation activity. When the process is complete, the
message box displays a URL that you can use for running test interviews on this project.
E Click Copy to Clipboard to copy to URL onto your clipboard.
E Start a new browser session and paste the URL into the Address box to run an interview.
E When you have finished testing, click Close to close the message box.
Making the Questionnaire Live
Use Build’s Go Live option to make the project available for live interviewing. When you select
this option, the following actions take place:
The Launch activity activates the project with the Active status.
A dialog box displays the URLs to use for test or running live interviews.
71
IBM SPSS Data Collection Interviewer Server User’s Guide
Note: If the questionnaire was created in IBM® SPSS® Data Collection Author, with the default
context of routing, when new questions are created in Build, the context paper is automatically
created. The paper context includes questions created in both Author and Build. When you
activate the questionnaire, routing is selected as the default context. Unless you manually change
the context to paper the activated questionnaire will not include those questions created in Build.
To Make the Questionnaire Live
E Choose:
Tools > Activate > Go Live
A message box reports the progress of the activation activity. When the process is complete, the
message box displays two URLs. One is for running test interviews; the other is for production
interviewing.
E Click Close to close the message box.
Setting Activation Parameters Manually
Use Build’s Advanced option to activate the questionnaire using activation parameters of your
choice. When you select this option, the following actions take place:
The Launch activity starts so that you can specify the parameters needed for activation (for
example, whether the project uses Sample Management or Quota Control, and which Web
pages to use for authentication).
A dialog box displays the URLs to use for running test and live interviews.
Note: If the questionnaire was created in IBM® SPSS® Data Collection Author, with the default
context of routing, when new questions are created in Build, the context paper is automatically
created. The paper context includes questions created in both Author and Build. When you
activate the questionnaire, routing is selected as the default context. Unless you manually change
the context to paper the activated questionnaire will not include those questions created in Build.
To Specify Activation Parameters
E Choose:
Tools > Activate > Advanced
E The Launch activity starts. Specify the activation parameters you want to use and click Activate
Now.
A message box reports the progress of the activation procedure. When the process is complete, the
message box displays two URLS that can be used for interviewing on this project.
E If you want to run test interviews or paste a URL into a Web document, click the appropriate Copy
to Clipboard to copy to the URLs onto your clipboard.
E Click Close to close the message box.
72
Chapter 1
Downloading the Questionnaire onto your Computer
If you want to download a Build questionnaire (.mdd) file onto your computer, you can either use
the Files activity or download it directly from Build. A common reason for downloading Build
questionnaires is to make changes to the routing section of a IBM® SPSS® Data Collection
questionnaire.
Build creates a simple Routing section based on the information you have entered for each
question, plus any routing statements you have added using IOM Script items or the script library,
but there may be other changes that you want to make that cannot be done in Build. The Routing
section is called Paper and it is read-only. (Note that this differs from the default Routing section
name used by IBM® SPSS® Data Collection Base Professional, which is Web.)
If you want to view the change the routing statements, you should download the questionnaire.
To Download a Questionnaire File
E Choose:
Tools > Download Questionnaire
This opens a standard Windows File Download dialog box.
E Click Open to open the questionnaire file in IBM® SPSS® Data Collection Questionnaire Viewer,
or Save to save it in a location of your choice.
To View the Routing Section
E Download the questionnaire file, open it in Base Professional and select the Paper tab.
To Change the Routing Section
E Download the questionnaire file and open it in Base Professional.
E Create a new Routing section with a unique name.
E On the Paper Routing tab, select any statements that you want to use in the new Routing section
and copy them onto the new tab.
E Make your changes to the statements on the new tab.
E When you activate the project, change the default routing context to point to the name of your
new Routing section.
Refer to the Base Professional and Interview Scripting sections of IBM® SPSS® Data Collection
Developer Library for further information on these steps.
73
IBM SPSS Data Collection Interviewer Server User’s Guide
Running Build Outside IBM SPSS Data Collection Interviewer Server Administration
You run Build outside IBM® SPSS® Data Collection Interviewer Server Administration when
you want to create or edit library files that are not related to a specific project. When you do this,
the following additional options are available in the File menu:
New. Lets you choose whether to create a new file or whether to use an existing library file as
a starting point.
Open. Lets you open any questionnaire to which you have access.
Save As. Lets you save the questionnaire with a new name.
Save Copy As. Lets you save the questionnaire with a new name but continue working on the
original file.
To Run Build Outside Interviewer Server Administration
E Type http://servername/SPSSMR/InterviewBuilder
The Interviewer Server Administration login page is displayed.
E Enter your Interviewer Server Administration user name and password and click Login.
Build starts and the main screen is displayed.
Creating a New Questionnaire or Library File
If you are using Build outside IBM® SPSS® Data Collection Interviewer Server Administration,
you can create a new questionnaire or library file as a blank file or based on an existing library file
of your choice.
To Create a Blank File
E Choose:
File > New > Blank
The Build start-up page is displayed with links for inserting a new question or a shared list.
To Base the New Questionnaire on a Library File
74
Chapter 1
E Choose:
File > New > Base on Library
This displays the Open dialog box.
E In the Folders frame, navigate to the folder containing the file you want to use.
E In the right-hand frame, double-click on the file you want to load.
Build inserts the questions from they library file into the current questionnaire.
Opening an Existing Questionnaire
If you are working outside IBM® SPSS® Data Collection Interviewer Server Administration,
you can open any questionnaire to which you have access. This option is not available when you
start Build from Interviewer Server Administration because then Build automatically opens the
questionnaire for the currently selected project.
75
IBM SPSS Data Collection Interviewer Server User’s Guide
E Choose:
File > Open
This displays the Open dialog box.
E In the Folders frame, navigate to the folder containing the questionnaire you want to work on.
E In the right-hand frame, double-click on the questionnaire you want to open.
Build opens the questionnaire definition file and displays a summary on the Overview tab.
Saving a Questionnaire
If you are working outside IBM® SPSS® Data Collection Interviewer Server Administration, you
can save the questionnaire with a new name. You will normally do this when you want to create a
new library file based on the contents of an existing questionnaire or library file.
Build saves the original questionnaire with its new name and then closes the original file and
opens the new one. If you want to save the questionnaire with a new name without opening the
new file, use Save Copy As instead.
E Choose either
File > Save As
or
File > Save Copy As
This opens the Save As dialog box.
76
Chapter 1
E In the Filename box, type a name for the new file.
E Click Save As.
Creating and Installing Shared Templates
Build has a central storage area for templates that are available for general use with all
questionnaires. When you are designing questionnaires, you can add templates to the central
storage area by using the Upload button on the Select dialog box that is displayed when you
select a presentation template for a question.
For simple templates this is all that is required. However, if the template refers to other
templates (for example, it names a grid template), or uses a stylesheet, or includes images, you
will also need to do the following:
Within the template, specify filenames as URLs or using a special notation that allows the
interviewing program to access them using the image cache. For more information, see the
topic Referring to External Files in a Shared Template File on p. 76.
Create a separate folder in the central storage area for all files referenced in the template file.
For more information, see the topic The Shared and Roles Templates Folders on p. 77.
If you add a questionnaire file that uses a template to the library, you will need to create a separate
folder within the library to store the template and any files that the template uses, and then copy
those files into that folder manually. This applies to both questionnaire-specific and shared
templates. For more information, see the topic Copying Questionnaires that use Templates to
the Library on p. 77.
Referring to External Files in a Shared Template File
When you want to refer to a different template from within the current template (typically, when
you want to refer to a grid template) you can refer to that template using just its filename. So, for
example:
<mrGridFormat1="DefaultGridTemplate.xml">
names a grid template associated with the current template.
77
IBM SPSS Data Collection Interviewer Server User’s Guide
You cannot refer to stylesheets or image files using simple filenames. Instead you should do
one of the following:
Enter the full URL for the file and then make sure that you install the file in the location
you have specified.
Precede the filename with /%image cache url%/; for example, <link rel=“stylesheet”
type=“text/css” href=“/%image cache url%/Summer.css”>
Build will replace /%image cache url%/ with the URL of the image cache so that the interviewing
program will be able to load the file from the image cache.
The Shared and Roles Templates Folders
The shared templates folder is called FMRoot\Shared\Templates. Within it, the Data Collection
subfolder contains templates for IBM® SPSS® Data Collection questionnaires written in the
mrScriptBasic language. In this subfolder you will find .htm files and a number of hidden
subfolders whose names are the same as the .htm files, but with a _Files extension. For
example, there is a DefaultTemplate.htm file and a hidden DefaultTemplate.htm_Files subfolder.
DefaultTemplate.htm is the default presentation template and DefaultTemplate.htm_Files
contains the files that the default template uses (in this case, the default grid template,
DefaultGridTemplate.xml).
When you create a shared template that uses other templates, stylesheets, or images, you will
need to create the .htm_Files folder in the Templates folder and copy all the files that the template
uses into that folder.
When a questionnaire designer uses a shared template, Build looks for an associated .htm_Files
folder for that template and copies the contents of that folder into the project folder with the
chosen template file.
Build also recognizes templates that are available only to users belonging to a particular
role. These templates are stored in FMRoot\Roles\RoleName\Templates (for example,
FMRoot\Roles\SWGroup1\Templates for templates available only to members of the SWGroup1
role). These Templates folders are the same as the shared Templates folder in all respects.
Copying Questionnaires that use Templates to the Library
If you copy a questionnaire to the library and that questionnaire uses templates, you must also
copy the templates and any files that are used by the templates into a subfolder within the library.
(Later versions of Build will do this for you.) The name and location of the subfolder depend on
the name and location of the questionnaire in the library.
The subfolder for templates used by a questionnaire must exist in the library at the same level as
the questionnaire file itself. For example, if you copy the questionnaire into the Human Resources
library folder you must create the template subfolder in the Human Resources subfolder too.
The name of the template subfolder must be the same as that of the questionnaire file, but with
a _Files extension. For example, if your questionnaire is called EmpSat.mdd, you must name the
template subfolder EmpSat.htm_Files. It is a good idea to create this as a hidden folder so that it
does not appear in the library structure that users see in Build.
78
Chapter 1
For an example of this structure, use Windows Explorer to browse to the Ratings and
Frequencies folder in FMRoot\Shared\Questionnaire Library Items in the IBM® SPSS® Data
Collection Interviewer Server installation folder. As the illustration shows, the folder contains
eight templates of which two have template subfolders.
Each template subfolder contains a set of .gif image files that are used to represent points in a
standard 5-point rating scale.
Participant Rules
Participant Rules is displayed in the application list whenever you choose a project that uses
Sample Management. It allows you to perform the following tasks:
Change or debug a sample script and validate its syntax without having to reactivate the
project.
Convert a column in the participant database into a Sample Field or Authentication Field.
Run a test interview using the revised script.
Starting Participant Rules
E Select the project you want to work on and click Participant Rules.
79
IBM SPSS Data Collection Interviewer Server User’s Guide
Changing the Sample Script
E On the Script tab, make whatever changes are necessary to the Sample Management script.
E Optionally, click Validate to validate the script. This checks that the script is syntactically correct
without you having the save the script first. A message is displayed above the script frame at
the end of the validation process.
E To save your changes, choose
Save
If there are errors in the script, an explanatory message is issued and the original version of
the script is reinstated.
80
Chapter 1
Changing Sample Fields and Authentication Fields
E Select the Columns tab.
E To select new sample fields or to cancel existing sample fields, click the check boxes of those
fields in the Sample Field column.
E To select new authentication fields or to cancel existing authentication fields click the check boxes
of those fields in the Authentication Field column.
Notes
All authentication fields must also be flagged as sample fields.
Queue is not a valid authentication field.
Testing the Script
You can test how the Sample Management script will work by running a test interview. This
allows you to check that any authentication of inbound calls works as intended, and that the script
correctly handles records returned to it with different outcome codes.
E Choose
Test
81
IBM SPSS Data Collection Interviewer Server User’s Guide
Any unsaved changes are saved before the test interview is started.
Participants
You use the Participants activity to copy participant records from a text file into a table in a
Sample (participant) database. You can either use an existing database and/or table or you can
create new ones. After you have loaded some records, you can use the Participants activity to
view and edit those records.
The Participants activity displays a page that contains six tabs. The first three tabs are used to
view, edit, delete, and download records that have already been loaded into the sample table—see
Viewing and Editing Participant Records for more information. The next three tabs correspond to
the three tasks you need to perform before you can upload records. These are:
Specify the text file and then choose or define the sample database and table into which the
participant records will be loaded. You use the Upload tab for this.
Map fields from the participant records to required columns in the sample table, or create the
required columns with default values. You use the Required Fields tab for this.
Define new columns that you want to create in the sample table to store other information
from the participant records. You use the Additional Fields tab for this.
When you have completed these tasks, you can then Upload Records from the Text File.
Participant File Format
Participants reads text files. The first line of the file must contain the names of the fields in each
record in the order in which the data appears in the records; the remaining lines contain the
participant records. The standard field delimiter is a semicolon; if you have used a different field
delimiter such as a comma or a colon, you must specify this on the Upload tab when you upload the
file. Note that you cannot use a non-printing character such as a tab character as a field delimiter.
Here is an example of a participant records file:
Id;name;region;password
001;Benjamin Brown;South East;pry6354
002;Veronica Burr;Midlands;qre9510
003;Rebecca Noakes;West;mtev037
If your file contains non-English accented characters (such as those with umlauts), or Chinese,
Japanese, or other double-byte characters, make sure that you save the file using the Unicode
text-encoding option (UTF-8) before uploading. The upload will stop with an error message if a
file containing these characters is not a Unicode file.
If you intend to upload any datetime fields from your file, the values must be in one of three
formats: yyyy-mm-dd, yyyy-mm-dd:hh:mi, or yyyy-mm-dd hh:mi:ss. If you specify only
the date, Participants will assume that the time part of the value is 00:00:00.
When you load sample records into a new table, Participants creates the table with columns to
match the fields in the sample records. If you load another file into the same table, and that file
has extra fields in addition to all those in the original file, the load process will create the new
columns in the table for those fields, but will do nothing to the original records in the table. This
82
Chapter 1
means that once you have loaded both files, you will still be able to use the old sample records
even though they contain less information than the newer ones.
Warning: Do not store your text file in your user’s folder for the IBM® SPSS® Data Collection
Interviewer Server project. For security reasons, the upload process will delete the file from
that location.
Starting Participants
E Select the project to which the participant records belong and click Participants.
The Participants activity opens and the Summary tab is displayed. If you want to load participants,
select the Upload tab.
Naming the Database Server, Sample Database, and Sample Table
Use the Upload tab to name the text file, the sample database and table in which the sample
should be placed, and the name of the server on which the database is located. The IBM®
SPSS® Data Collection Interviewer Server installation procedure creates an empty Participants
database that you can use if you wish, or you can create a new database for this project or a
group of projects. Once you have chosen the database, you can either select an existing table in
that database or create a new one.
You can also use the Upload tab to specify that the Participants activity will assign a random
number to each participant record, so that for telephone interviewing projects the sample
management system will select the records in random order.
To Specify Database Information
E Select the Upload tab.
83
IBM SPSS Data Collection Interviewer Server User’s Guide
E If the file you want to load uses something other than a semicolon as the field separator, replace
the semicolon in the Field delimiter box with the appropriate character and click Apply.
Note: You cannot use a non-printing character such as a tab character as a field delimiter.
E Click Load File and select the name of the file containing the participant records you want to load.
Warning: Do not store your text file in your user’s folder for the Interviewer Server project. When
you load your file, Participants uses that location to save a temporary copy of your file, with the
same name as your file. For security reasons, Participants later deletes the temporary copy.
E In “Server to upload to” select the server that contains the database of participant records or on
which you want to create a new database. The selection list shows the names of servers that are
accessible from your current server.
If the server’s name does not appear in the drop-down list, click Enter name and enter the name of
the server when prompted to do so.
E In “Database on server for storing participant records”, select the name of the database you want
to use. Participants defaults to using the same database as you used before, which is useful if you
always load records into the same database. If you want to create a new database, click New and
enter the database name when prompted to do so. However, you can create a new database only if
you have been assigned the Participants activity feature “Can create databases”—see Controlling
Access to Data and Features for more information.
Note: If you created a new database manually before opening Participants, you must give the
Interviewer Server Anonymous User permission to access that database otherwise the Participants
activity will be unable to load records into it.
E In “Table in database for storing participant records”, select the name of the table you want to load
the records into. Participants defaults to using a table with the same name as the project and will
create it if it does not exist. If you want to use or create a table with a different name, click New
and enter the table name when prompted to do so.
Note: If possible, create a separate table for each project. You can create a sample table that is
shared by a number of projects, but you then run the risk of overwriting a project’s data due
to the interview serial number field being populated on one project and then being used in the
second project. For example, if a record is used on project A and generates an interview with
serial number 100, the number 100 is written back into the Serial field. If the record is then used
on Project B, the interviewing program will read the serial number for the new interview from
the sample record and will create an interview with that serial number. If there is already an
interview with that serial number, its data will be overwritten. To avoid this, you should always
prepopulate the Serial field in shared sample tables.
E To specify that the SortId column on the sample table should be automatically populated with
random values, select the Re-randomize all participant records checkbox. This will allow the sample
management system to select the records in random order. Alternatively, if your participants
text file includes your own values for SortId, or you want the participant records to be selected
in ID column order, or you will not be using this project for telephone interviewing, clear this
checkbox. For more information, see the entry for SortId in Mapping Fields to Required Columns
in the Sample Table.
84
Chapter 1
You must complete all fields on this tab before selecting another tab. If you leave a field
incomplete, an error will occur when you try to use the other tabs.
Mapping Fields to Required Columns in the Sample Table
The Sample Management system requires each sample table to have at least the following five
columns. If you use the Participants activity to upload your file to a new table, these columns
will be created automatically.
Column
Id
Active
Queue
Description
Contains a number or code that uniquely identifies
each participant record. You must supply this
information in your text file.
If your text file contains a field called “id” (in any
combination of uppercase or lowercase letters),
Participants automatically maps that field to this
column, otherwise Participants maps the first field
in the text file to this column. You can change the
mapping if the field that contains the participant’s id
is not the first field in the text file—see “To Change
the Mapping of a Field to a Required Column”
below.
If you are loading participant records into an
existing table, this column must be the Primary Key
for the table. If you have specified that Participants
must create the sample table, it will automatically
set this column to be the primary key.
If you are loading participant records into an
existing table in a case-sensitive SQL database, the
name of the column on that table must be exactly
as shown, this is, an uppercase I followed by a
lowercase d.
The sample management system sets the value of
this column to 1 while it is running, and 0 at all
other times.
This column shows the queue in which the record
is currently held. Participants sets the value of
this column to FRESH when loading a participant
record. The sample management system then
updates the value as appropriate.
When replicate identifiers are defined in the queue
field for specific records, those records can then be
used to create sample/participant record subsets.
Refer to the “Queues” topic in the IBM® SPSS®
Data Collection Developer Library for more
information.
85
IBM SPSS Data Collection Interviewer Server User’s Guide
Column
Serial
Test
Description
Participants sets the value of this column to 0
when loading a participant record. The sample
management system then sets the value of this
column to the serial number of the interview
associated with the participant record.
This column is used by the Phone activity to filter
the participant records that appears in phone reports.
If the value of this column is 0, the Phone activity
will treat the record as real data (or “live” data). If
the value of this column is 1, the Phone activity will
treat the record as test data. If your text file does not
contain a field with this information, Participants
will set the value of this column to Null, and the
Phone activity will then treat the record as if it is
both real and test data.
If you are loading participant records into an
existing table, your table must include this column,
even if your project is not a telephone-interviewing
project.
Sample tables for telephone interviewing projects must also include the following columns.
If they do not exist, they will be added automatically if you select the “Use sample for phone
interviewing” option described later in this topic, or if you activate the project using the “With
CATI” option on the Sample Management tab of the Launch activity.
Column
ActivityStartTime
AppointmentTime
AppointmentTryCount
Audit
CallOutcome
CallRecordingsCount
Comments
ConnectCount
DayPart
ExpirationTime
Description
The StartTime of the latest record in history table
for a specific sample.
The time at which the respondent asked to be called.
(Times are shown in UTC format. The project’s
Sample Management script takes into account
any time differences between interviewers and
participants when it selects records for calling.)
The number of calls made to this record after an
appointment was set.
A list of the changes that interviewers have made
to this record.
The call outcome code for the previous call to this
record.
The number of call recordings for this record.
Call recording is an option when a telephone
interviewing project uses an autodialer.
Additional information about the participant.
The number of connect returns for the record.
Ensure that records are called at specific times of
the day in order to increase the chance of success
in reaching participants.
Defines the participant record expiration date and
time. For example, a project may dictate that
participant records can only be called within a
specific date range.
Expired records are not available for dialing (except
for retrieving appointments).
86
Chapter 1
Column
InternalDialerFlags
InterviewMode
NoAnswerCount
PhoneNumber
PreviousInterviewerId
PreviousQueue
RecallTime
ReturnTime
Screener
Description
Freeform string that can be used to store whatever
your dialer requires. For example, this field could
contain Name=Value pairs that you need to store
after calling the record. This could be useful when
the record is dialed again.
How the record can be used: set to Web for an
inbound self-completion interview or Web CATI for
outbound telephone interviewing.
The number of no answer returns for the record.
The participant’s phone number. If you are
uploading records for a telephone interviewing
project and you want interviewers to be able to
dial phone numbers automatically using a modem,
phone numbers must be formatted as follows:
+Country/RegionCode (Area/CityCode)
SubscriberNumber
For example, 44 12 3456 7890 for a subscriber in
the United Kingdom. The modem option might not
work if the phone number is in any other format.
If your telephone interviewing project will use an
autodialer, a phone number must contain only the
digits 0 to 9, * and # (optionally preceded by a plus
(+) to present the international access code). In
addition, the phone number can contain the visual
separators SPACE, (, ), . and -. Visual separators
are not allowed before the first digit.
The interviewer who last retrieved the record. Used
by the Sample Management script to return an
appointment to the interviewer who arranged it.
The name of the queue in which the record was
previously held.
The time in UTC that was set as the callback time
for appointments that are set automatically by the
Sample Management script.
The time at which the record was returned to Sample
Management.
Allows you to identify which respondents are the
suitable candidates for the current survey. Screener
questions are designed to filter respondents. If
a respondent answers do not meet the Screener
criteria, the respondent is not allowed to continue
the survey, and the Screener field is recorded as
Failed. If respondent answers meet the Screener
criteria, they are allowed to continue the survey, and
the Screener field is recorded as Passed.
87
IBM SPSS Data Collection Interviewer Server User’s Guide
Column
SortId
TimeZone
TrunkGroup
TryCount
UserId
Description
This integer column can be used to define the order
in which participant records are selected from the
FRESH queue by the sample management system.
If you are using the telephone-interviewing sample
management script that is supplied with IBM®
SPSS® Data Collection Interviewer Server, the
script will select the record with the lowest value
in this column.
You can populate this column in one of two ways:
by including your own values for SortId in your
text file, or by specifying that this column should
be populated with random values automatically
when your file is uploaded. To specify that you
want random values, select the “Re-randomize
all participant records” option on the Upload tab.
Note that this will also result in new values being
assigned to any existing records in the sample table.
If you choose not to populate this column,
Participants sets its value to Null when loading
a participant record. The telephone-interviewing
sample management script that is supplied with
Interviewer Server will then select the record from
the FRESH queue that has the lowest value in the
Id column.
The participant’s timezone.
If sample records are used in telephone interviewing
projects, you can use the TrunkGroup field to
specify which trunk group of the dialer will be used
for dialing the sample record. If you want the dialer
to automatically select the trunk group, the field
should be set to NULL or empty.
The number of calls made to this record.
The UserId of latest record in the history table for
a specific sample.
Your participants text file does not need to contain information for all the required columns, as
many of the columns are used only internally by the sample management system and will only
contain information once a participant has been called. As a minimum, you must supply a value in
your text file for the Id column. For telephone interviewing projects, you should provide a value
for the PhoneNumber column, and if you have participants in more than one time zone you might
want to provide a value for the TimeZone column.
For more detailed information about the sample table, use the search function in the Data
Collection Developer Library documentation to search for the text “Sample Table” and in the
search results open the topic with that title.
Mapping Fields in the Text File to Required Columns in the Sample Table
If a field in your participants text file has the same name as a required column, the Participants
activity automatically maps the field to that column. The upload process will subsequently copy
the value of that field to that column.
88
Chapter 1
However, your text file might contain information that should be uploaded to a required column,
but the field name in the text file is different from the required-column name. In this situation, you
use the Required Fields tab to change the default mappings that Participants has defined.
For example, if your text file contains phone numbers in a field called TelNo, you can use the
Required Fields tab to map the TelNo field to the PhoneNumber column.
If your participants text file contains other (that is, non-required) fields, the Participant activity
will automatically map those to additional columns in the sample table. To change the mapping
for those fields, use the Additional Fields tab.
To Change the Mapping of a Field to a Required Column
E Select the Required Fields tab.
E If you are uploading records for a telephone interviewing project, click Use sample for phone
interviewing. This refreshes the table to show the additional columns required for telephone
interviewing.
E Click the Edit symbol (the pencil) on the right of the field whose mapping you want to change. This
changes the “Initialize based on” column to a drop-down list of field names present in the text file.
E In “Initialize based on”, choose the field that should map to this required column. Alternatively,
choose new to specify that no field should be mapped to this column.
Note: If a column doesn’t have a field mapped to it, or if it does have a field mapped to it but the
text-file record contains no value for that field, the upload process will insert the Default value
in that column.
E Click the Update symbol (the blue check mark) to save the change, or the Cancel symbol (the
red cross) to cancel it.
89
IBM SPSS Data Collection Interviewer Server User’s Guide
Adding Other Information to the Sample Table
You use the Additional Fields tab to view or change the default mappings for fields in your
participants text file that do not correspond to the required columns in the sample table.
Participants automatically maps these fields to additional columns, and sets the column name
to be the same as the field name. The upload process will subsequently copy the value of that
field to that column.
For example, for telephone interviewing projects, you might want to upload the participant’s
name and address. In addition, for projects whose participants speak different languages, you
might want to upload the participant’s language so that you can use interviewer qualifications to
match interviewers to participants. For more information about interviewer qualifications, search
the IBM® SPSS® Data Collection Interviewer Server Administration User’s Guide for the topic
“Adding Properties to User Property Groups”.
The Additional Fields tab lists all fields in the file you are uploading. However, you can change
the settings only for those fields that are not already mapped to required columns.
Note: If you want to use the “Call Outcome by Segment” and “Calls by Segment” reports in the
Phone activity to display data about segments (that is, groups or categories of your choice), you
must upload segment information from your text file into a column called “Segment” in the
sample table. For more information about segments, see About Segments.
90
Chapter 1
Item
Original field name
Upload
New field name
Default
Type
Length
Description
The name of a field in the participants text file.
Whether to upload the field into a column in the
sample table.
The name for the corresponding column in the
sample table. If the field has already been mapped
to a required column, this is noted here and you are
not able to change the field’s settings on this tab.
The default value for this column if the record in
the text file does not contain a corresponding value
for this column.
The data type for this column. Based on the data
in the text file, Participants suggests the best data
type to use.
The maximum size of this column. This can be set
for some data types only.
91
IBM SPSS Data Collection Interviewer Server User’s Guide
To Change the Mapping of a Field to an Additional Column
E Select the Additional Fields tab.
E Click the Edit symbol (the pencil) on the right of the field whose mapping you want to change.
Choose only a field that has not been mapped to a required column.
Note: If you want to change the mapping for a field that has been mapped to a required column,
use the Required Fields tab.
E If you do not want Participants to load this field into the sample table, clear the Upload check box.
E If you do not want Participants to make the column name in the sample table the same as the field
name in the text file, change the value of “New column name”.
Note: Column names in the sample table must comply with the rules for SQL column names.
In general, a column name must start with a letter or an underscore and be followed by any
combination of letters, numbers, underscores, and the @, $, or # characters. For more information,
use the search function in the IBM® SPSS® Data Collection Developer Library documentation
to search for the text “Rules for Regular Identifiers” and in the search results open the topic
with that title.
E If you do not want Participants to set the value of this column to Null when the record in the text file
does not contain a corresponding value for this column, enter the new default value in “Default”.
Note: The default value must be a valid for the data type of the column as specified in “Type”.
E In Type, choose the data type that matches the type of data the field contains.
Note: This column shows the IBM® SPSS® Data Collection Data Model data types. When
Participants creates the columns in the database, it converts these data types into the data types
used by your database application. Most database applications have a wider range of data types
than the Data Model, so Participants chooses the database data type that best matches the data that
it finds in the text field. For example, the Data Model classifies all whole numbers (integers) as
Long, while an SQL database will classify them as either int or smallint depending on the length
of the number. If it is important that the columns are created with particular data types in the
database, you can examine and change the columns’ definitions using your database application’s
tools once the participant records have been loaded.
E In Length, enter the maximum size of this column in the sample table.
E Click the Update symbol (the blue check mark) to save the change, or the Cancel symbol (the
red cross) to cancel it.
Replicates
Replicates are a mechanism for making sets of participant records available for dialing. The sets
of participant records can be grouped based on a particular meaning (specific day of the week for
example) or may be arbitrary groups representing a portion of the available participant records.
The record sets are defined by applying replicate identifiers to each participants record’s Queue
field. These identifiers allow you to determine which replicates are being dialed.
92
Chapter 1
Replicates are simply different queues, for example you could specifyQueue='REPLICATE1' for the
first replicate (or Queue='MIDWEST1' for the region specific replicate). Uploading participant
records that contain replicate identifiers does not make them immediately available for dialing.
You must first release the replicates by updating the participant table. For example:
UPDATE ParticipantTable SET Queue='FRESH' WHERE Queue='REPLICATE1'
This can be performed in the IBM® SPSS® Data Collection Interviewer Server’s Participants
activity. You can report on Queue by any other field. For example, a report of Queue by Region
would show how many records are available in each replicate (as well as all the other queues)
for each Region.
Force Preview Dial
National or state regulations may require that certain numbers cannot be auto-dialed (cell phone
numbers for example). The Force Preview Dial feature forces the interviewer to manually select
the dial button for specific participant records, thus avoiding silent calls.
Configuring a participant records sample
The following instructions explain the process of configuring participant records for Force
Preview Dial:
Edit the participant records file to include the RequiresManualDial field and specify a value of
1 for each record that requires manual dialing. For example:
Id;name;region;password;RequiresManualDial
001;Benjamin Brown;South East;pry6354;1
002;Veronica Burr;Midlands;qre9510;1
003;Rebecca Noakes;West;mtev037;1
For more information, see the topic Participant File Format on p. 81.
When the participant records file is uploaded via the IBM® SPSS® Data Collection Interviewer
Server’s Participant activity, all records that have a value of 1 for the RequiresManualDial field
will require the interviewer to manually initiate dialing.
Uploading Records from the Text File
E On the Upload tab, click Import Participants.
A progress box reports the number of records uploaded.
E When all records have been processed, click OK to close the progress box.
Notes
The Participants activity uploads all records in a text file in one go. It is not possible to load
only part of a file.
93
IBM SPSS Data Collection Interviewer Server User’s Guide
If the text file you are uploading contains a record with the same Id as a record that is already
in the sample table, the Participants activity rejects the record and continues with the next
record in the text file. At the end of the upload, Participants displays a list of rejected records.
If the upload process fails with the message “CREATE DATABASE permission denied in
database ‘master’”, the problem might be that the Anonymous IIS User account does not have
permission to create databases. Contact your IBM® SPSS® Data Collection Interviewer
Server administrator for assistance.
Only values from newly added fields are added to existing records when uploading samples
into an existing database. Existing database values are not updated, even when they differ
from values in the newly uploaded file.
Viewing and Editing Participant Records
You can view participant records that have already been loaded into the sample table. The
Participants activity has two options for this:
The View tab displays the records in detail. You can choose how many records you want listed
at once, which columns you want to appear, and in which order the columns will appear. You
can also use the View tab to display a selection of records, to edit records, to perform a bulk
update, to delete records, and to download records to a text file.
The Summary tab displays the total number of records in each queue. If you click the View
Queue icon on the right of one of the queues, the records in that queue are displayed in the
View tab.
The remainder of this topic describes the following subjects:
The View tab.
Navigating the View tab.
Using the View Settings tab to customize the View tab.
Changing the default list of fields displayed on the View tab.
Note: If you are using Microsoft Internet Explorer 8 or above to access the Participants activity
and your participant records contain Chinese, Japanese, or Korean characters (that is, double-byte
characters), the characters will be displayed correctly only if you have installed files for East Asian
languages on your computer. You can normally do this from Regional and Language Options (or
Regional Options) in Windows Control Panel.
94
Chapter 1
The View Tab
The View tab consists of the Participants pane and the Participants Records table. The Participants
pane contains options for displaying all participant records or a selection of participant records.
For more information, see the topic Displaying a Selection of Records on p. 96. The Participants
Records table displays the participant records. See “To Customize the View Tab” below for more
information about changing the number or order of the columns in the table. Note that datetime
columns are always shown in yyyy-mm-dd hh:mi:ss format.
Navigating the View Tab
By default, the View tab displays 50 records on each page. At the lower left of each page, the total
number of records in the sample table and the total number of pages are shown. The icons at the
bottom of each page can be used to navigate between pages, as shown in the following table:
Icon
Description
Display the first page.
Display the previous page.
[1] [2] [3] ...
Display page 1, page 2, page 3, and so on.
Display the next page.
Display the last page.
95
IBM SPSS Data Collection Interviewer Server User’s Guide
To Customize the View Tab
E Select the View Settings tab.
E In Display Options, select the number of records that you want to appear in each page on the View
tab. You can select from 25 to 1000 records.
Note: The Participants activity can be customized by an administrator to show other values in
the Display Options list, for example, to display more than 1000 records. For more information,
use the search function in the IBM® SPSS® Data Collection Developer Library documentation
to search for the text “Settings for the Participants Activity” and in the search results open the
topic with that title.
E In “Select and Edit Options”, choose the method you want to use for selecting and updating
records on the View tab as follows:
Standard. This option allows you to construct your selection criteria by choosing values from
drop-down lists. If you select this option, you can update records on the View tab only by
changing their values in a dialog box.
Advanced. This option allows you to write your selection criteria by typing an expression
similar to the WHERE expression in an SQL SELECT statement. If you select this option,
you can also update the selected records by typing another expression similar to the SET
expression in an SQL UPDATE statement.
Note: You can select the Advanced option only if you have been assigned the Participants activity
feature “Can advanced edit participants”. For more information, see the topic Controlling Access
to Data and Features on p. 107.
96
Chapter 1
E In Table Setup, choose which fields will appear on the View tab as follows:
To add a field to those displayed, click on the field name in the Available Fields list and
then click Add.
To remove a field from those displayed, click on the field name in the Displayed Fields list and
then click Remove.
Tip: In Table Setup, you can select multiple fields by pressing Ctrl or Shift while you click.
Note that Table Setup shows only those fields that you have access to. For more information, see
the topic Controlling Access to Data and Features on p. 107.
E In Table Setup, choose the order of the fields displayed on the View tab as follows.
To move a field towards the left of the page, click on the field name in the Displayed Fields
list and then click Move Up.
To move a field towards the right of the page, click on the field name in the Displayed Fields
list and then click Move Down.
E In the “Sort table by” drop-down list, select the field that will determine the order of the records
on the View tab.
E When you have completed your changes, click Apply. To undo your changes, click Cancel.
E Select the View tab to see your changes.
Changing the Default List of Fields Displayed on the View Tab
When you create a new project, the Displayed Fields list in the View Settings tab is populated
with a default list of fields provided by IBM® SPSS® Data Collection Interviewer Server. To
change the default list that Interviewer Server provides, you need to use DPM (Distributed
Property Management) Explorer as follows:
E In Windows Explorer, run DPMExplorer.exe, which by default is located in the
[INSTALL_FOLDER]\IBM\SPSS\DataCollection\6\DDL\Code\Tools\VB.NET\DPM Explorer.Net
folder.
E In the left pane, expand the top-level node (the site name) and then click the Properties node.
E In the upper-right pane, click the ParticipantsDefaultDisplay property.
E In the lower-right pane, change the list of field names as required. Make sure that you separate
field names with semicolons, and do not add any spaces.
E Click the Apply button, which is in the lower-right corner.
Displaying a Selection of Records
By default, the View tab of the Participants activity displays all of the participant records in the
sample table. Because a sample table might contain thousands of records, you can choose to
display only a selection of records so that you can more easily find the records that you want to
view.
97
IBM SPSS Data Collection Interviewer Server User’s Guide
You specify the records that you want to display by defining selection criteria. For example, the
criteria might be to select a single record with a specific Id, or to select all the records for which an
interview has been successfully completed.
The method that you use to specify selection criteria depends on whether the Standard or
Advanced option under “Select and Edit Options” has been selected on the View Settings tab. The
rest of this topic assumes that the Standard option has been selected. If the Advanced option has
been selected, see Performing a Bulk Update.
Note: Depending on the sample database that you are using, text searches might be case sensitive.
If so, you must type text values so that they match the case of the data in the sample table. For
example, queue names such as COMPLETED must always be typed in upper case.
The remainder of this topic describes the following procedures:
To Display a Selection of Records
To Display Records that fall within a Range of Values
To Display Records that have one of Several Values
To Display Records that Contain a Word or Phrase
To Display Records that Contain a Date
To Display Records that Contain an Empty Field
To Display a Selection of Records
E On the View tab, make sure that the Participants pane is maximized so that you can see the Display
All and Display Selection options.
E Select the Display Selection option.
A group of drop-down lists, text boxes, and buttons appears. You use these to specify the selection
criteria that will determine which records are displayed. For example, your criteria might select
only records that are in the COMPLETED queue.
E In the Field drop-down list, select the field that you want to use in your selection criteria, for
example, Queue.
Note that the Field drop-down list includes only those fields that you have access to. For more
information, see the topic Controlling Access to Data and Features on p. 107.
E In the drop-down list to the right of Field, select the comparison that you want to use in your
selection criteria, for example, equal to.
E In the Value text box, type the value that you want to use in your selection criteria, for example,
COMPLETED. (However, if your sample database is not case sensitive, you could instead type
completed.)
98
Chapter 1
E Click Apply.
The list of participant records will now include only those records that match your selection
criteria. If there are more records than will fit on one page, use the icons at the bottom of the page
to navigate between pages.
Notes
A quicker method for displaying all the records in one queue is to click on the Summary tab
and then click the View Queue icon on the right of the queue.
To return to displaying all participant records, select the Display All option in the Participants
pane.
To Display Records that fall within a Range of Values
You might want to display only records that have a value that falls between two values, for
example, records that have an Id between 100 and 200.
E Enter the first part of your selection criteria, for example, Id, greater than, 99.
E Click the And/Or button.
A second group of drop-down lists, text boxes, and buttons appears under the first group.
E In this second group, enter the second part of your selection criteria, for example, Id, less than, 201.
E Click Apply to display the records that match your selection criteria.
Note: To remove a line from your selection criteria, click Delete on the right of the line that
you want to remove.
To Display Records that have one of Several Values
You might want to display only records whose value is equal to any one of several values, for
example, records that are in the FRESH queue, or the ACTIVE queue, or the FAILED queue.
E Enter the first part of your selection criteria, for example, Queue, equal to, FRESH.
E Click the And/Or button.
E In the And/Or drop-down list, select Or.
E Enter the second part of your selection criteria, for example, Queue, equal to, ACTIVE.
E Click the And/Or button and select Or from the drop-down list.
E Enter the third part of your selection criteria, for example, Queue, equal to, FAILED.
99
IBM SPSS Data Collection Interviewer Server User’s Guide
E Click Apply to display the records that match your selection criteria.
To Display Records that Contain a Word or Phrase
To display only records that contain a word or a phrase, use the contains comparison in your
selection criteria. For example, if your participant records include a Name field, you can display
all the participants whose surname is Smith by specifying Name, contains, Smith as your selection
criteria. Remember that if your sample database is case sensitive, you must type the word or
phrase so that its case matches the case of the data in the sample table.
Note: The contains, does not contain, starts with, does not start with, ends with, and does not end
with comparisons use the Transact-SQL LIKE operator, which means that you can use wildcard
characters in your search value. Some examples of the use of wildcard characters are:
%, which means any string of zero or more characters.
_ (an underscore), which means any single character.
[abc], which means any of the characters a, b, or c.
[w-z], which means any characters in the range w to z.
[^de], which means any character except d or e.
To search for an underscore, specify [_] (an underscore enclosed in brackets). To search for a
percent, specify [%].
To Display Records that Contain a Date
If your selection criteria includes a datetime field, you must enter the value in one of three formats:
yyyy-mm-dd, yyyy-mm-dd:hh:mi, or yyyy-mm-dd hh:mi:ss. If you specify only the date,
a time of 00:00:00 is assumed. Therefore, to display records that contain a specific date, your
selection criteria must be specified as a range. For example, if your participant records include
an AppointmentTime field, you can display all the participants that have an appointment on 23
February 2006 by specifying your selection criteria as AppointmentTime, greater than, 2006-02-23,
And, AppointmentTime, less than, 2006-02-24.
100
Chapter 1
To Display Records that Contain an Empty Field
To display only records that contain an empty field, select the field name, then select the is empty
comparison, and then click Apply. Note that you do not need to enter a value when using the is
empty or is not empty comparisons.
Editing Records
The View tab of the Participants activity allows you to change the value of any field in a
participant record, with the exception of the Id field. In addition to editing individual records,
you can also edit multiple records simultaneously, in which case any changes that you make are
applied to all the records that you chose to edit.
To Edit a Record
E On the View tab, select the check box on the left of the record that you want to edit.
E Click the Edit icon in the top-right corner of the list of records as shown below:
The Edit dialog opens.
101
IBM SPSS Data Collection Interviewer Server User’s Guide
Note: When you click on a field, the information pane at the bottom of the Edit dialog tells you
whether the corresponding column in the sample table is a text column, a numeric column, or a
date column. The information pane also shows the minimum and maximum values for numeric
columns, and the maximum length for text columns.
E Change any of the values to new values.
If you change a date field, the new value must be in one of three formats: yyyy-mm-dd,
yyyy-mm-dd:hh:mi, or yyyy-mm-dd hh:mi:ss. If you specify only the date, a time of
00:00:00 is assumed.
If you change the PhoneNumber field and your project uses modems or an autodialer to dial
participants’ phone numbers, make sure that the new phone number is in the correct format and
doesn’t contain any invalid characters. For more information, see the topic Mapping Fields to
Required Columns in the Sample Table on p. 84.
102
Chapter 1
E If a field contains a value, but you want the field to be empty, select the check box to the right
of the field, under the heading Set to Empty.
Note: The information pane at the bottom of the Edit dialog tells you what value will be used
if you select Set to Empty.
E When you have finished making your changes, click OK. To undo your changes, click Cancel.
The Edit dialog closes and after a brief pause, another dialog box opens to confirm that your
update was successful.
E Click Close.
The list of participant records refreshes to show your updates.
To Edit Multiple Records
Note that the records that you want to edit must appear on the same page. You cannot
simultaneously edit records on more than one page.
E On the View tab, select the check box on the left of every record that you want to edit.
Alternatively, if you want to edit all the records on the page, select the check box on the left of
the field names.
E Click the Edit icon in the top-right corner of the list of records as shown below:
The Edit dialog opens. Note that values are shown in the dialog only when the value is identical
for all the records that you selected. If a value is not shown, it might indicate that the records have
different values or that the field is empty in all the records that you selected.
E Make your changes and click OK.
The Edit dialog closes and after a brief pause, another dialog box opens to confirm the number of
records that were updated.
E Click Close.
Performing a Bulk Update
The bulk update feature of the Participants activity makes it easy to update many participant
records at once. You specify the records that you want to update and the updates that you want to
make by typing two expressions similar to those used in SQL statements. Alternatively, you can
just display a selection of records without updating them. To use the bulk update feature, select
the Advanced option under “Select and Edit Options” on the View Settings tab.
Warning: Always use the bulk update feature with care, as Participants does not have an undo
option.
Note that you cannot use the bulk update feature to delete records (instead, see Deleting Records).
103
IBM SPSS Data Collection Interviewer Server User’s Guide
Selecting Records
You specify the records that you want to select for updating or displaying (that is, your selection
criteria) by typing an expression of the following form:
column_name comparison_operator value
column_name
Specifies the name of the column on the sample table. You can specify only a column that you have
access to. For more information, see the topic Controlling Access to Data and Features on p. 107.
comparison_operator
Must be one of the following operators: = (equals), < (less than), > (greater than), <= (less than or
equal to), >= (greater than or equal to), !< (not less than), !> (not greater than), <> (not equal to),
or != (not equal to).
You can also specify the Transact-SQL LIKE operator, which will allow you to include wildcard
characters in your value. Some examples of wildcard characters are:
%, which means any string of zero or more characters.
_ (an underscore), which means any single character.
[abc], which means any of the characters a, b, or c.
[w-z], which means any characters in the range w to z.
[^de], which means any character except d or e.
value
104
Chapter 1
Specifies a value with the same data type as the column. If the column is a text or datetime
column, enclose the value in single quotation marks. If a text value contains double-byte
characters, add the capital letter N before the opening single quotation mark to specify that the
value is Unicode. If the column is a datetime column, the value must be in one of three formats:
yyyy-mm-dd, yyyy-mm-dd:hh:mi, or yyyy-mm-dd hh:mi:ss. If you specify only the
date, a time of 00:00:00 is assumed.
Note: Depending on the sample database that you are using, text searches might be case sensitive.
If so, you must type text values so that they match the case of the data in the sample table. For
example, queue names such as COMPLETED must always be typed in upper case.
An expression can also be of the following form:
column_name IS [NOT] NULL
Your selection criteria can consist of two or more expressions (or “sub-expressions”), combined
by using the AND, OR, and NOT logical operators.
Examples of Selection Criteria
1. To select all records that are in the COMPLETED queue:
Queue = 'COMPLETED'
2. To select all records that are in the COMPLETED queue and have an Id between 100 and 200:
Queue = 'COMPLETED' AND Id >= 100 AND Id <= 200
3. To select all records that are in either the FRESH or ACTIVE queue:
Queue = 'FRESH' OR Queue = 'ACTIVE'
4. To select all records whose Name column includes the Unicode text “Smith”:
Name LIKE N'Smith'
5. To select all records that have an appointment on 23 February 2006:
AppointmentTime >= '2006-02-23' AND AppointmentTime < '2006-02-24'
6. To select all records whose Test column is not null:
Test IS NOT NULL
To Display Records without Updating Them
E In the Selection Criteria text box, type your expression. To select all records, make sure that the
Selection Criteria text box is empty.
E Make sure that the Update text box is empty.
E Click Apply.
105
IBM SPSS Data Collection Interviewer Server User’s Guide
The list of participant records will now include only those records that match your selection
criteria. If there are more records than will fit on one page, use the icons at the bottom of the page
to navigate between pages.
Performing a Bulk Update
You define the update that you want to perform on the selected records by typing an expression of
the following form:
column_name = new_value
column_name
Specifies the name of the column on the sample table. You must always type the column name so
that its case matches the case of the field name as displayed in Participants. This rule applies even
when the sample database has been set up to be case-insensitive. In addition, you can specify
only a column that you have access to—see Controlling Access to Data and Features for more
information.
new_value
Specifies the value that will be assigned to the column. For more information, see the description
of value in “Selecting Records” above.
You can update several columns at once by separating the expressions with commas.
To Perform a Bulk Update
E In the Selection Criteria text box, type an expression that specifies the records that you want to
update. See “Selecting Records” above for more information. To select all records, make sure
that the Selection Criteria text box is empty.
E In the Update text box, type an expression that specifies the update that you want to perform. For
example, to assign all selected records to the APPOINTMENT queue and change the value of the
PreviousQueue column to SILENT, type the following:
Queue = 'APPOINTMENT', PreviousQueue = 'SILENT'
E Click Apply. This opens a “Confirm Update” dialog box.
E Click OK. After a brief pause, another dialog box opens to confirm the number of records that
were updated.
E Click OK to close the dialog box.
The list of participant records will now include only those records that match your selection
criteria. If the columns that you updated are visible, the new values are displayed.
106
Chapter 1
Deleting Records
Warning: Do not delete participant records from telephone interviewing projects, as this can cause
phone reports to show unexpected results. You can delete participant records only if you have
been assigned the Participants activity feature “Can delete participants”—see Controlling Access
to Data and Features for more information.
E On the View tab, select the check box on the left of the record or records that you want to delete.
Alternatively, if you want to delete all the records on the page, select the check box on the left of
the field names.
E Click the Delete icon in the top-right corner of the list of records as shown below:
E To confirm the deletion, click OK.
After a brief pause, another dialog box opens to confirm that your deletion was successful.
E Click Close.
The list of participant records refreshes to no longer show the deleted records.
Downloading Records
You can download one, some, or all participant records to a text (.csv) file. The
data in the file will be in the correct format for uploading into another sample table
and will adhere to standard .csv file conventions. Refer to Comma-separated values
(http://en.wikipedia.org/wiki/Comma-separated_values) for more information regarding .csv files.
All downloaded .csv files are encoded in 8-bit Unicode Transformation Format (UTF-8). As such,
you must ensure that whichever tool you choose to open the encoded files is UTF-8 compliant.
Warning: Downloading a very large number of participant records might affect the performance of
IBM® SPSS® Data Collection Interviewer Server. For more information, see the topic Participant
File Format on p. 81.
To Download All Records
E On the View tab, click the Download All icon in the top-right corner of the list of records as
shown below:
E When prompted, choose whether to open the text file in the associated program or save it to
the location of your choice.
To Download a Selection of Records
E On the View tab, select the check box on the left of the record or records that you want to
download. Alternatively, if you want to download all the records on the page, select the check
box on the left of the field names.
107
IBM SPSS Data Collection Interviewer Server User’s Guide
E Click the Download icon in the top-right corner of the list of records as shown below:
E When prompted, choose whether to open the text file in the associated program or save it to
the location of your choice.
Note: When downloading a selection of records, you cannot download more than the maximum
number of records that can be included in a single page on the View tab. By default, this is 1000
records, which is the largest value that can be selected from the Display Options list on the View
Settings tab. However, it is possible for an administrator to customize the Participants activity to
include values greater than 1000 in the Display Options list. For more information, use the search
function in the IBM® SPSS® Data Collection Developer Library documentation to search for the
text “Settings for the Participants Activity” and in the search results open the topic with that title.
Controlling Access to Data and Features
You can restrict access from the Participants activity to specified servers, databases, tables, and
columns by adding entries to the SampleMgtGUI.Config.xml file. For more information, use
the search function in the IBM® SPSS® Data Collection Developer Library documentation to
search for the text “Controlling Access to Sample Data” and in the search results open the topic
with that title.
Note also that only fields that were selected on the Sample Management tab of the Launch
activity when the project was activated can be viewed in the Participants activity.
Controlling Access to Data by the Sample Management System
You can specify that one or more columns in your sample table are read-only and cannot be
updated by IBM® SPSS® Data Collection Interviewer Server’s sample management system. To
do this, you need to use DPM (Distributed Property Management) Explorer as follows:
E In Windows Explorer, run DPMExplorer.exe, which by default is located in the
[INSTALL_FOLDER]\IBM\SPSS\DataCollection\6\DDL\Code\Tools\VB.NET\DPM Explorer.Net
folder.
E In the left pane, expand the top-level node (the site name) and then expand the following nodes:
Servers > <your server name> > SampleManagements > <your IBM® SPSS® Data Collection
Interviewer Server Administration project name> > Queueing > Queues > Properties
E From the Add menu, choose Property. This opens a dialog box.
E In Name, type ReadOnlyFieldColumns. In Value, type a comma-separated list of the column
names in your sample table that you want to be read-only.
E Click OK. This adds the ReadOnlyFieldColumns property to DPM.
108
Chapter 1
Controlling Access to Features
You can control access to the various features in Participants by assigning users or roles to
Participants’ activity features. The activity features that you can use are shown in the following
table.
Activity Feature Name
Can advanced edit participants
Can create databases
Can delete participants
Can download participants
Can edit participants
Can upload participants
Can view participants
Can view summary
Description
Whether the advanced option can be used for
selecting and updating records on the View tab.
Whether a new database can be created on the
Upload tab.
Whether participant records can be deleted on the
View tab.
Whether participant records can be downloaded on
the View tab.
Whether participant records can be edited on the
View tab.
Whether the Upload, Required Fields, and
Additional Fields tabs are visible.
Whether the View and View Settings tabs are
visible.
Whether the Summary tab is visible.
By default, the CATISupervisor role is assigned to all the activity features shown above apart from
“Can advanced edit participants”, “Can create databases”, and “Can delete participants”.
For more information about activity features, search the Interviewer Server Administration User’s
Guide for the topic “Assigning Users or Roles to Activity Features”.
Launch
You use Launch to activate a compiled questionnaire so it can be used for interviewing. This
involves defining the location of participant records for the project, naming the quota file if the
project uses quota control, and defining which Web pages to use for standard items such as the
start and end of an interview.
You can run Launch from within Build or you can run it separately by selecting it from IBM®
SPSS® Data Collection Interviewer Server Administration.
Starting Launch
E Select the project you want to activate and click Launch.
109
IBM SPSS Data Collection Interviewer Server User’s Guide
Project Information
The Project Info tab is where you enter general information about the project and where and how
it is to be activated. The information required is as follows.
Launch Notes. Background information about the project that you want to save in the project
database for reference by other users. You can leave this box blank.
Status. The project’s status. One of the following:
Test. The project is available for testing, but any data collected will be flagged as test data.
Active. The project is available for live interviewing.
Inactive. The project cannot be used for test or live interviewing.
Project Expiry (UTC Time). Provides options for specifying a project expiration time.
Date: The project expiration date. You can manually enter a date, in the format mm/dd/yyyy, or
you can click the down arrow to display a calendar and select a date.
Time: The project expiration time. This indicates the exact time of day, for the selected date,
that the project will expire. Enter an appropriate time in the 24-hour format hh:mm (for
example 17:00 for 5:00 PM).
Launch Subfolders? Select this option if the project’s folder contains localization subfolders that
must be copied to the Shared and Master project folders along with the main project files.
110
Chapter 1
Cluster. The cluster on which to activate the project. If you are activating a project that has already
been activated — for example, if you have changed and recompiled the questionnaire — you must
activate it on the same cluster as you used before.
Project Database. The name of the case data database. The default is to store each project’s data
in a separate database with the same name as the project. However, if your site is configured to
allow it, several projects can write case data to the same database.
You may also be able to create a new database for the project with a name of your choice. If so,
the drop-down list will contain the “Create New Custom Database” option. Select this option and
then type a name for this database in the Custom box that appears next to the Project Database box.
Default Survey Language. The default language for the questionnaire.
With multilingual questionnaires, the language in which you write the questionnaire
automatically becomes the default (or base) language for that script. If the questionnaire does
not specify the language in which it is to run, and the information cannot be obtained from the
participant record, the interview will run in this language. Once you start translating a script, other
languages are added to the questionnaire definition file and you may want to select one of those
languages as the base language for the questionnaire.
The language list contains only languages that are present in the questionnaire definition file. If
the computer’s default language does not appear in the questionnaire definition file, the language
list defaults to US English.
Default Routing Context. The routing context to set as the default for this project. The activation
process activates all routing contexts that it finds but only sets one as the default. Typical routing
contexts are Paper for printed questionnaires, Web for inbound interviews, and CATI for outbound
calling.
The Sample Management, Quota, and Interview Web Pages lines show whether these options have
been set for this project. The settings change according to the specifications on the other tabs.
Defining project information
E Select the Project Info tab.
E Enter or select values as described above.
111
IBM SPSS Data Collection Interviewer Server User’s Guide
Sample Management
If you select Use Sample Management on the Sample Management tab, you will be prompted to
enter the Sample Management requirements. You must provide the following details.
With Phone Interviewing. Select this checkbox if the project will use CATI for outbound calling.
Server. The name of the server on which the participant database is located. The Browse list
contains only those servers that are present in your current domain. If you want to use a server in
another domain, you must enter its name manually.
Database. The name of the participant database. The Browse list displays the names of databases
that you have permission to use and that exist on the chosen server.
Table. The table in this database that contains the participant records for this project. The Browse
list displays the names of tables in the chosen database.
Fields. The columns of participant information to use from this table. The Browse list shows the
column names present in the chosen table. Sample Management requires columns labeled Id,
queue, active, and serial to function properly.
Authentication Fields. The columns that are to be used for authenticating the participant record
associated with an inbound call before allowing an interview to start. The fields displayed in the
browse list are those that you selected in Fields.
Script. The Sample Management script for the project. You can either select a predefined script
from a list or load a script of your choice using the Browse button.
112
Chapter 1
Note: Sample management scripts are currently implemented as mrScript and should therefore
have the .mrs extension.
Script Type. The script type, either IBM® SPSS® Data Collection or VBScript. This box is
displayed only if you have permission to edit sample scripts1. You can use it to select the type
of scripts you want to choose from. If this box displays one script type and you choose a script
of a different type using the Browse button, Launch updates the Script Type box to reflect the
script type chosen.
Defining sample management parameters
E On the Sample Management tab select Use Sample Management.
The page is redrawn with prompts for Sample Management parameters.
E If the project allows CATI, select With Phone Interviewing. When the project is activated, this will
make the various CATI activities available in the activity list.
E In Server enter or select the server containing the participant database.
E In Database enter or select the name of the participant database.
E In Table enter or select the name of the participant table.
E In Fields select the columns that you want to be available to your Sample Management script
using standard Windows selection methods.
E In Authentication Fields select the columns that will be used for authentication of participants
making inbound calls. If you need to be able to select specific participant records, you should
select the Id column because this is a key to the database and is guaranteed to contain a unique
value for each record. If you authenticate on a column that may contain non-unique values, the
Sample Management system will select the first record whose value in that column matches the
values specified in the Sample Management script.
E To specify which Sample Management script to use, do one of the following:
Select a script from the predefined selection list in the Script drop-down list. The list you see
here can be customized by your Data Collection administrator, so the scripts that you see may
differ from the scripts that your colleagues see.
If the script does not appear in the selection list, click Browse and upload the file.
In both cases, the script will then be displayed in the script listing box and may sometimes be
edited. (Script editing is an optional facility that your Data Collection administrator can make
available if required1.) If the Script Type box is displayed and you chose a script of a different
type to the one shown in the box (for example, a VBScript script when the box shows Data
Collection) the text in this box is updated to show the type of script you have chosen.
1 For details of how to enable the facility to edit sample management scripts, see “Settings
for the Launch Activity and the Desktop Activation Program” in the IBM® SPSS® Data
Collection Interviewer Server section of the IBM® SPSS® Data Collection Developer Library
documentation.
113
IBM SPSS Data Collection Interviewer Server User’s Guide
Quota
If you select Use Quota on the Quota tab, you will be prompted for information about the quota
database for this project and how it is to be affected by the activation process.
When a project uses quota control and you activate it for the first time, Launch creates a new quota
database for the project using the information in the project’s quota document (.mqd) file.
The quota database is a set of tables whose names start with QUOTA and which the activation
process creates inside the project database. They contain definitions of the quota groups and their
targets and, once interviewing starts, counts of completed, pending, and rolled back interviews for
each group. The quota document (.mqd) file is the file that the IBM® SPSS® Data Collection
Quota Setup program creates when you save the quota definitions and targets. Launch uses it to
determine the structure and content of the quota database it is to create. The .mqd file is not
used during interviewing.
Do not update the quota definitions on the server: When selected, quota definitions on the server
will not be updated.
Publish new quota definitions, but do not update existing quotas: When selected, any new definitions
are updated to the server, but existing definitions on the server remain unchanged.
Resynchronize quota database with this project’s mqd: Once a quota database exists, this check box
is always activated but is unchecked. If you have made changes to the .mqd file, you should select
this check box if you want these changes to be implemented in the quota database.
Note: If you have changed quotas using the Quotas activity these changes will have been written
to the quota database but will not appear in the project’s .mqd file. If you choose to activate using
the .mqd file, the changes you made with the Quotas activity will be lost. If you want to keep these
changes, you will need to make them in the .mqd file using Quota Setup before reactivating.
Defining Quota information
E On the Quota tab select Use Quota.
E Click Browse and select the name of the project’s quota database.
114
Chapter 1
If this is the first time this project has been activated with Quota Control switched on, click
Create New Quota. The exception is when your project shares quotas with another project. In
this case, if the shared quota database already exists, select the quota from the list instead.
If this project has been activated with Quota Control before, select the name of the project’s
quota database from the list. If you have changed the project’s .mqd file and you want to
update the quota database with these changes, click Resynchronize quota database with this
project’s mqd.
Interview Web Pages
If you deselect Use Default Web Pages on the Interview Web Pages tab, you will be able to specify
the names of your customized Web pages for standard events such as starting and stopping an
interview.
There are seven customizable pages, of which five have defaults. You can find the
default files in the [INSTALL_FOLDER]\IBM\SPSS\DataCollection\6\Interviewer
Server\Server\mrIWeb\Templates folder.
Authentication Page. The page to display when a project uses Sample Management and you need
to verify that the person taking the interview is a member of the participant group. The default is
a template called authenticate.htm that displays the message ‘Please enter your authentication
information’.
Authentication Failed Page. The page to display when authentication fails. The default is a template
called authfailed.htm that displays the message ‘Your authentication information is incorrect’.
Authentication Retry Page. The page to display when authentication of a prospective participant
against the participant database fails, and you want the participant to re-enter the authentication
details. The default page is a template called authretry.htm that displays the message ‘The
authentication information you have entered is incorrect. Please try again’.
115
IBM SPSS Data Collection Interviewer Server User’s Guide
Completed Interview Page. The page to display at the end of the interview (that is, when the
participant has answered all relevant questions in the questionnaire). There is no default page,
but IBM® SPSS® Data Collection Interviewer Server itself displays ‘End of interview. Thank
you for your participation’. Note that if the interview ends with a display statement, this text is
displayed as the last page of the interview instead.
Survey Stopped Page. The page to display when the participant stops an interview or the interview
is stopped by a stop or signal statement in the script. There is no default page but Interviewer
Server itself displays ‘End of interview. Thank you for your participation.’
Survey Rejected Page. The page to display when a participant fails authentication and no retry
prompt is required, for example, when the participant fails quota control. The default is a template
called rejected.htm that displays the message ‘Thank you for your interest in participating in
this survey.’
Project Inactive Page. The page to display when the participant attempts to start an interview for
an inactive project. The default is a template called projinactive.htm that displays the message
‘Please come back later’.
Quota Full Page. The page to display when an interview is terminated because the respondent
belongs in a category whose quota target has already been met.
Note: You can specify all pages except Authentication and Authentication Retry as templates or
URLs. For these two pages we strongly recommend using only templates, as URLs can result
in an interview having two connections IDs.
If you specify a page as a template, the file must be present in the project’s
source directory or in [INSTALL_FOLDER]\IBM\SPSS\DataCollection\6\Interviewer
Server\Server\mrIWeb\Templates. In both cases, you select the file using a simple filename not a
pathname. When the project is activated, templates that exist in the project’s source directory will be
copied to the project’s directory [INSTALL_FOLDER]\IBM\SPSS\DataCollection\6\Interviewer
Server\Projects. When interviews take place, the interviewing program will look for the templates
first in the project-specific directory and then in the main Projects directory.
Selecting non-default Web pages
E On the Interview Web Pages tab deselect Use Default Web Pages.
E For each page that you want to define, in the first box, type the name of the template file or the
full URL that defines the page to be displayed.
Note: Templates must be entered as simple filenames not as pathnames.
E In the second box, choose Template or URL. Alternatively, to deactivate an existing page without
replacing it with a new page, choose None.
Activation Process
When you have entered all the necessary information on the four tabs you can activate the project.
The flowchart illustrates the activation process, which is described in more detail below the
flowchart.
116
Chapter 1
Figure 1-8
Activation flowchart
User runs Launch
activity
.mdd in Users?
No
.mdd in
Shared?
No
Fail with error
message
Yes
Copy .mdd from
Shared to Users
Yes
Master files
not in Shared?
Yes
Fail with error message
(v1.2 project)
No
User enters
requirements &
clicks Activate
Correct errors and
reactivate
No
Templates
well formed?
Yes
Copy User files
into Temp
Merge .mdd from Temp to Shared.
Copy .templates, stylesheets, images,
& .mqd from Temp to Shared. Set
status to Checked Out
Copy Shared to
Master
No
Activate Master to
other interviewing
servers
Copy .mdd from Shared
to Users. Set status to
Checked In
Activation
successful?
Yes
Delete files from
Temp
Option to run an
interview
117
IBM SPSS Data Collection Interviewer Server User’s Guide
When you start Launch, the key points of the activation process are as follows:
If the Users folder does not contain a .mdd file, Launch is unable to start. If the file is not
present in the Users folder but is present in the Shared folder, then it is copied into the Users
folder and activation can begin.
Launch then checks whether there are files for this project in FMRoot\Master that are not
present in FMRoot\Shared. If this is the case, activation fails since it is possible that the
project may be a version 1.2 project that has not been upgraded to work with later versions.
Once the file checks have been carried out you can enter your activation requirements. Click
Activate when you are ready to activate the project.
Launch checks the project’s template (.htm) files to ensure they contain well formed HTML. If
files are not well formed, Launch displays a message box listing the names of the files that are
incorrect. Each filename is followed by a warning icon (a ! symbol in a triangle) which you
can hover over to see a description of the error. To save the contents of the message box to
a file, click Copy to Clipboard and then paste the clipboard into a file of your choice. Click
Proceed to continue activating or Cancel to stop.
Launch copies the project’s .htm, .xml, .mdd, and .mqd files, as well as any image files, into
a subfolder within your UserName\Temp folder. This is a safety precaution that ensures
that any changes made by other users to the User files during activation cannot affect the
activation process.
Launch copies the files from UserName\Temp folder into FMRoot\Shared. If an .mdd file
already exists in the shared project folder, Launch merges the newer version of the file into
the existing file and displays a progress box while this happens. If the merge fails an error
message is displayed.
Launch adds the datasource connection string for the project’s case data to the .mdd file.
Launch copies the project’s folder from FMRoot\Shared into FMRoot\Master. If an .mdd
file already exists in the shared project folder, Launch merges the newer version of the file
into the existing file.
Launch contacts each interviewing server and tells it to update its project files. Each
interviewing server responds by copying the new or updated files from the Master folder into
the local project folder in [INSTALL_FOLDER]\IBM\SPSS\DataCollection\6\Interviewer
Server\Projects.
The activation process checks that all interviewing servers have the same version of the
ActivateServer.dll component installed as is installed on the machine you are working on. If it
finds a mismatch, activation fails at that point and you will have mismatched project files on the
interviewing servers. When this happens, you may usually continue by manually copying the
project files to the servers that have not been updated. However, the best solution is to ensure
that all machines in the cluster are running the same version of IBM® SPSS® Data Collection
Interviewer Server.
Launch copies the .mdd file from the Shared folder back to the User folder (effectively doing a
check in and check out). This ensures that, if merges took place, you have the most up to
date version of the file in your User folder. If there are other files in the Shared folderthat are
newer than the versions in the User folder, these are also copied.
If all these steps run successfully, the files are deleted from the Temp folder.
118
Chapter 1
Activating a project
E Click Launch.
When activation is complete, a message box lists two URLS for running interviews. The first
one is for live interviews; you can copy this URL to the clipboard for pasting into a Web page.
The second one is for designers wishing to test their questionnaires; data for these interviews is
flagged as test data in the case data database so that it can be ignored in analyses and exports of
the final survey data.
E If activation is successful and you want to run a test interview, click Copy to Clipboard next to the
URL for designers who want to test their questionnaires. You can then pate this URL into a
new browser window to test the questionnaire.
E Click Close Window.
Notes
The .NET Framework’s default encoding reads the registry’s ANSI codepage when encoding. As
a result you may encounter errors when activating questionnaires that include characters such
as umlauts (for example, when the project name contains the character Ä). You can resolve this
issue by updating the server’s ANSI codepage:
1. Access the registry on the server (Start > Run >regedit).
2. Navigate to HKEY_LOCAL_MACHINE\SYSTEM\CurrentControlSet\Control\Nls\CodePage\ACP
3. For servers running a German operating system, enter a value of 850; for Chinese, enter a value of
936; for Japanese, enter a value of 932.
Refer to Encoding Class (http://msdn.microsoft.com/en-us/library/system.text.encoding.aspx) on
the Microsoft MSDN site for more information.
Promote Project
You use Promote Project when you want to activate a project from one cluster to another. This
might be required where you have separate clusters for test and production work. You create and
test projects on the test cluster and then activate them to the production cluster when the project is
ready to go live. Since activation is usually between clusters on different sites, you may hear this
type of activation referred to as site to site activation.
You can also use Promote Project to activate projects over the internet when you do not have
a direct connection to your cluster.
Starting Promote Project
E Select the project you want to activate and click Promote Project.
The Promote Project login dialog box is displayed.
119
IBM SPSS Data Collection Interviewer Server User’s Guide
Logging in to the Destination Server
In order for activation to work, you must be logged in to the Activate component on your current
machine and the destination machine. When you start Promote Project, you are prompted to log in
to the destination machine — that is, the project management server to which you want to activate.
The first time you use Promote Project you will need to complete all the fields on the login
dialog box, but after that all fields except password will be filled in with the values you used the
previous time.
E In Destination Server or IBM® SPSS® Data Collection Interviewer Server Administration URL, do
one of the following:
If you are connected to your local network, type the name of the project management server
on the cluster you want to activate to.
If you are not connected to your local network, you can activate across the internet by typing
the URL for Interviewer Server Administration on the cluster to which you want to activate.
E In Destination User Name, enter the user name that you want to use for logging in on the destination
server. In many cases this will be the same as the Interviewer Server Administration user name
that you are currently using, but if you do not have access to the destination server using this
name then you may enter a different name here.
E In Destination User Password, type the password for this user.
E In the Authentication drop-down menu, select either IBM® SPSS® Data Collection Interviewer Server
Authentication or Windows Authentication. Refer to the “Configuring for Single Sign-on” topic in
the IBM® SPSS® Data Collection Developer Library for more information.
E Click Login to log in to the destination server.
Specifying the Activation Parameters
Once you have logged on to the destination server, the second Promote Project dialog box is
displayed. You use this dialog box to specify activation parameters. Note that the Participants
frame is displayed only if the project has already been activated with sample management.
120
Chapter 1
Figure 1-9
Site-to-Site Activate dialog box
If the project already exists on the destination server, a message explaining this is displayed at
the top of the dialog box. You may continue activation and overwrite the existing project files or
cancel it leaving the existing project files intact.
E In Status after activation, select the status that the project will have once it has been activated.
E In Activate notes, type any notes you want to make about this activation.
E In Groups/Roles, select the roles that will have access to the project on the destination server. If
the project already exists on that server, the check boxes show the current permissions for that
project on that server. If it does not, Promote Project selects the roles that have access to the
project on the originating server.
E Select Promote Subfolders to indicate whether subfolders will be promoted with the project files.
This option is enabled by default. Turning this option off should only be done if the project does
not require subfolders, or if the project already exists and the subfolder content has not changed.
E If the project has participant records that you want to copy as part of the activation procedure,
use the boxes in the Participants frame to specify where the records can be found and where they
121
IBM SPSS Data Collection Interviewer Server User’s Guide
should be placed. Note that your IBM® SPSS® Data Collection administrator can customize the
behavior of the fields in this frame so that, for example, you cannot change the names of the
server, database, and sample table, or you cannot choose which queues to copy from.
In Server, choose the name of the database server; the default is the database server for the
destination cluster. If the server’s name does not appear in the drop-down list, click Enter
name and type the name when prompted to do so.
In Database, select the name of the sample database in which the sample table should be
created; the default is a database with the same name as on the originating server. If you want
to create a new database, click New and enter the database name when prompted to do so.
In Table, select the name of the sample table to which the participant records should be added;
the default is a table with the same name as on the originating server. If you would prefer to
create a new table, click New and enter the table name when prompted to do so.
Select Copy participant records if you want to copy participant records from the local database
server onto the destination machine’s database server. Note that if the sample table already
exists on the destination machine, only new records will be copied. (This matches the
behavior of the Participants activity that uploads only records with new IDs.)
In From queues, use Shift+Click or Ctrl+Click to select the queues from which to copy
records. The default is to copy records from the FRESH queue only.
E Click Activate to start the activation procedure.
During activation, a progress dialog box tells you what the activation procedure is doing. It’s
useful to watch these messages as they will help you locate problems if activation fails.
Promote Project attempts to create or update the schema (definition) of the sample table on the
destination server so that it matches the schema of the table on the originating server. If this is not
possible, perhaps because a field already exists in the destination table but with a different data
type, then Promote Project issues an error and you will have to choose a different table name.
The activation process checks that all interviewing servers have the same version of the
ActivateServer.dll component installed as is installed on the machine you are working on. If it
finds a mismatch, activation fails at that point and you will have mismatched project files on the
interviewing servers. When this happens, you may usually continue by manually copying the
project files to the servers that have not been updated. However, the best solution is to ensure
that all machines in the cluster are running the same version of IBM® SPSS® Data Collection
Interviewer Server.
When activation is complete, Promote Project displays the SPSS Activate dialog box giving
URLs for running interviews on the destination server.
Email
You use Email to send e-mail to respondents in the sample file. For example, at the start of a
project you might send a message to everyone inviting them to participate in the survey. Later, you
might set up a second job that sends reminders to those respondents who have not yet taken part.
Each project has its own set of email job specifications.
122
Chapter 1
Email provides the following facilities:
Respondent selection. You can send e-mail to all respondents in a queue or set of queues.
Alternatively, send to a fixed number of respondents chosen either from the start of the queue
or at random.
Customized and personalized message texts. If you want to include information from a
respondent’s sample record, or the value of a project property, insert a placeholder in the
message text and the appropriate values will be substituted for the placeholders when the
messages are sent. This allows you to address respondents by name, and to include the URL
for starting the interview as part of the message.
Test messages. Check how the message will appear to respondents by sending a test message.
Project status. You can specify that the job should only be run if the project has a particular
status.
Activity recording. You can record which respondents received which e-mail by updating a
field in the sample record with a note of the time and date at which the e-mail was sent.
No repeat e-mail. If you rerun an e-mail job, a message is normally to everyone who is
selected to receive it. You may choose not to target people who received this message during
a previous run.
Delayed sending of e-mails. There is no direct link between setting up an e-mail job and
running it. All job specifications are saved and are run only when selected from a list of
e-mail jobs for the current project.
Maintenance facilities. Job specifications can be edited and deleted as required.
Dealing with e-mail problems. You can specify the e-mail address of a user who is to be
contacted if there are problems. This user is also the person who receives test e-mails.
Note: E-mail does not support SMTP servers that are set up to require authentication.
Starting Email
E Select the project for which you want to set up email and click Email.
This opens the Email jobs list page.
123
IBM SPSS Data Collection Interviewer Server User’s Guide
Creating a New Job
There are two stages to setting up email jobs:
Define email parameters such as the subject and the message text, and the types of projects on
which the job may be run.
Specify which respondents will receive the email.
124
Chapter 1
E Click the Add icon or Click here to add new.
This opens the Email settings dialog box with the Email text tab selected.
E In Job name, enter a name for this email job.
E In Subject, enter a short description of what the email is about. This will appear as the message
subject in the recipient’s message box.
E In Reply email address, enter your name or email address or the name or email address of the
person on whose behalf you are sending the message. Whatever you type here will appear as the
sender’s name in the recipient’s message box.
E In Priority, choose the email priority from the drop-down list. You can choose either a High,
Medium, or Low priority.
E In Project status, choose the status that the project must have in order for the email to be sent. You
may choose more than one status if you wish.
E In Subject, type a subject for the message.
E The Text of email box displays a suggested message text, complete with substitution markers for
inserting respondent- or project-specific information in the text. You can either accept this text as
it is, modify it, or replace it with a new text of your own.
125
IBM SPSS Data Collection Interviewer Server User’s Guide
E If you want to insert the value of a Sample Management field or project property in the message
text, click in the text at the point you want to make the insertion, then click Substitutions and
choose the field or property you want to insert from the dialog box that is displayed. The
property name appears in the message text enclosed in curly brackets and will be replaced by the
appropriate value when the message is sent.
E In Send Email as, choose either Plain text or HTML.
Note: If you’re using HTML format you’ll need to include HTML formatting codes in the
message text wherever you want line breaks or new paragraphs.
E If you’re sending the message in HTML format and you want to see what it will look like for
recipients, click Preview.
E In Email address field, select the Sample Management field that contains recipients’ Email
addresses.
E If you want to record the date and time at which the message was sent as part of each recipient’s
sample record, do the following:
Click Write date and time that email was sent to sample.
Click Write into sample field named and choose the name of the sample field from the
drop-down list.
Note: You must use this facility if you want to prevent the same message being sent to
respondents more than once.
If the respondent is sent the same message more than once, the date and time field information
will be overwritten each time a new message is sent.
E If you want to send a test message, click Send test email.
Email uses the information on this tab as the content of the message and attempts to send it to the
user named on the Email jobs list page. It tells you whether or not the attempt was successful.
E Select the Participants tab.
126
Chapter 1
E In Choose queues, select the queues from which recipients may be chosen.
Note: The list of queue names shows only queues that contained sample records at the time the
mrDPMServer3 service was started. This may mean that the list shows out of date information,
for example, because records have been moved into a queue that was previously empty or because
a queue that contained records is now empty. To see an up to date list of queues, you may need
to ask your IBM® SPSS® Data Collection Interviewer Server administrator to stop and restart
the mrDPMServer3 service.
E To restrict your selections even further do the following:
In “Choose additional field to be used for participant selection”, choose a field. The list shows
all fields in the sample table except Queue.
In “Choose additional values to be used for participant selection”, choose the values that the
field must contain in order for respondents to be selected. The list shows all values present
in the chosen field.
E Either choose All participants or do the following:
Click Selected number of participants and enter the number of participants you want to email
in the box provided.
Click First x to select respondents from the top of the list of those matching the selection
criteria, or Randomly selected to choose respondents from the list at random.
E If appropriate, select This message can be sent to the same participant more than once.
Note: This option is available only if you chose to save the date and time at which the message
was sent. Email displays the name of the field that will be used for checking whether mail has
127
IBM SPSS Data Collection Interviewer Server User’s Guide
been sent before; it is the same as the field that you chose in Write to sample field named on the
Email text tab.
E Click OK.
The jobs list is updated with the job you have just defined.
Running an Email Job
E In the Email jobs list, click Send now for the job you want to run.
The Send Mail dialog box reports the job’s progress.
Naming a User for Test and Problem Messages
When you test an email project, Email always sends the message to a single specified user. This
user is also the recipient of any emails that are generated if there are errors while an email job
is running. You define this user on the Email jobs list page so that the same name can be used
for all jobs belonging to the project.
E In the text box at the foot of the Email jobs list, type the email address of the user who is to
receive test and problem emails.
Editing an Existing Job
You can edit an existing job to change any of its parameters or simply to check them before you
run the job. Any changes you make are saved automatically when you click OK.
The jobs list shows the status of each job. This can be:
Incomplete. The job does not have all the necessary parameters specified.
Ready. The job is ready for running.
Sent. The job has been run once.
Sent (n). The job has been run n times.
E In the jobs list, double click the job you want to inspect or change, or select the job and click the
Edit icon.
This opens the Email settings dialog box and displays the job’s settings.
E Make your changes, if any, and click OK.
Deleting Jobs
E In the list of jobs, select the job you want to delete and click the Delete icon.
The project is deleted immediately. There is no prompt for confirmation.
128
Chapter 1
Phone Surveys
Phone Surveys lets you specify the following information for a telephone interviewing project:
Which Sample Management fields are required in the participant records, which fields should
be displayed on the interview page, and which of the displayed fields interviewers can edit.
Whether soft appointments (that is, appointments that are set automatically for numbers that
are busy or unanswered when called) should take precedence over appointments that have
been arranged between participants and interviewers.
The amount of time to wait before recalling numbers that are busy, unanswered, or answered
by an answering machine. The Sample Management script uses these elapse times to set the
appointment times for the next calls to these numbers.
The maximum number of times a number may be called before it is no longer eligible for
calling.
The times at which participants may be called on weekdays and at weekends.
The time zones in which participants are located. These time zones should match the time
zones stored in the TimeZone field in the participant records. Records with time zones that
do not match those specified with Phone Surveys or that have a blank TimeZone field will
never be used. If you do not specify the project’s time zones, IBM® SPSS® Data Collection
Interviewer Server will ignore time zone and calling time parameters when selecting records
for interviewers to call.
Additional call outcome codes to appear in the list that is displayed for interviewers.
Whether interviewers can retrieve specific participants from the sample database.
Whether the next participant for an interviewer should be selected as soon as the interviewer
becomes available, rather than requiring the interviewer to click a button to request the next
contact.
Whether the project uses an autodialer, and if not, whether interviewers can use modems to dial
phone numbers automatically. If an autodialer is used, you can specify a number of settings,
such as whether predictive dialing should be used, whether telephone interviewer stations not
configured for autodialing can be used to conduct interviews, and how long an interviewer
must wait to be connected to a participant before the connection attempt is abandoned.
Whether monitoring and recording is allowed, and whether interviewers must obtain consent
from each participant for monitoring and recording.
Whether interviewers must review completed interviews, whether the review starts
automatically or must be started manually, and whether all questions or only text questions
can be reviewed.
Starting Phone Surveys
E Select the project you want to work on and click Phone Surveys.
129
IBM SPSS Data Collection Interviewer Server User’s Guide
Making Sample Data Available to Interviewers
When an autodialer connects a telephone interviewer to a participant (or, for projects that do not
use an autodialer, when the interviewer requests a number to call) the interviewing program
displays a page showing information about the participant and a list of possible call outcomes.
Some items of information are always displayed whereas other items are displayed only if selected
by the supervisor. The supervisor can change the selection of optional fields during the course
of the project. Supervisors can also specify for each displayed field whether or not interviewers
can change the field’s contents. For example, if the Comments field is displayed you might
want interviewers to be able to update this field with information that might be useful to other
interviewers who are about to speak to this participant.
The Fields tab tells you about the fields that are present in the participant database table.
If there are more lines of information to display than will fit on one page, the last line of the list
shows < and > symbols which you can click on to scroll to the previous or next page.
Settings on the Fields Tab
Setting
Label
Required
Description
Shows the field name that will be displayed on the
interviewing screen.
Shows which fields must be present in each
participant record. You cannot change the settings
in this column for any of the standard fields that
must be present in all telephone databases, but you
can change the settings for other fields.
130
Chapter 1
Setting
Show
Can Edit During Survey
Can Tabulate
Description
Determines which fields will be displayed on the
interviewing screen. Of the standard fields, the ID,
Queue, Name, Phone Number, Comments, and
Previous Queue fields are always displayed, so you
cannot clear the Show check box for these fields.
The settings in this column also define the fields
that interviewers can search when searching for a
specific contact. To allow interviewers to search for
specific contacts, you must select the Show Specific
Contact option on the dialog .
Determines which of the displayed fields
interviewers can edit. For the standard fields, you
can only change the settings for Return Time,
Interview Mode, and Call Outcome.
Specifies which fields should be available to the
Phone activity. The only standard field whose
setting you can change is Try Count. If your sample
data includes a Segment field and you want to run
the reports in the Phone activity that can display
data about segments, make sure that you select
Can Tabulate for your Segment field. For more
information about segments, .
Note: If you are using interviewer qualifications to match interviewers’ language abilities
to participants who speak those languages, you might want to allow interviewers to edit the
field that contains the participant’s language. In the event that the interviewer cannot speak
the same language as the participant, the interviewer can edit the language field and select the
Language Recall call outcome. An appointment will then be automatically scheduled with another
interviewer whose qualification settings indicate that they can speak that language. For more
information about interviewer qualifications, search the IBM® SPSS® Data Collection Interviewer
Server Administration User’s Guide for the topic “Adding Properties to User Property Groups”.
To Edit the Settings on the Fields Tab
E Click on the field that you want to change and then click the Edit button as shown below:
Figure 1-10
Edit icon
E Change the settings for the Label, Required, Show, Can Edit During Survey, and Can Tabulate
columns as required.
E Click Update.
Changing the Default Settings
If you find that for every new project you always change the settings on the Fields tab to the same
new values, you can instead change the default settings that IBM® SPSS® Data Collection
Interviewer Server provides so that you no longer need to do this. You can also define additional
default fields so that you no longer need to add them to every project. For more information, see
the topic Changing the Default Settings on p. 169.
131
IBM SPSS Data Collection Interviewer Server User’s Guide
Defining Sample Management Parameters
Sample Management scripts for telephone interviewing projects must perform the following tasks:
Select records for the autodialer to call (or, for projects that do not use an autodialer, select
records for interviewers to call manually).
Set appointment times for records that were busy or unanswered when called.
Ensure that records with appointments are presented for calling at the correct times to the
correct interviewers.
Assign records with specific requirements to interviewers with the appropriate qualifications.
Reschedule missed appointments.
Ensure that records are selected in a particular order of priority; for example, appointments
arranged with participants, then appointments that have been set automatically, and finally
new records.
Dispose of records that become ineligible for use due to being called too many times.
The Sample Management script needs to have certain information in order to accomplish these
tasks. For example, to set appointment times automatically it needs to know how much time must
elapse between the previous call and the appointment. The settings you can define are as follows;
the Sample Management script will use defaults for any settings that you do not define.
Setting
No answer delay
Busy delay
Answer machine delay
Web callback delay
Reject delay
Description
The number of minutes that must elapse between
consecutive calls to an unanswered number. The
default is 30 minutes.
The number of minutes that must elapse between
consecutive calls to a busy number. The default is
30 minutes.
The number of minutes that must elapse between
consecutive calls to a number that was answered by
an answering machine. The default is 30 minutes.
The number of minutes that must elapse before
a record that timed out or was stopped during a
self-completion (Web) interview may be called
using telephone interviewing. The default is zero
which means that records for timed out or stopped
Web interviews will not be called back.
The number of minutes that must elapse between
consecutive calls to a number that rejected a call.
Calls can be rejected if a mobile phone user has
activated a meeting profile that rejects calls, or if a
home phone has been set to reject calls that do not
also transmit the caller’s telephone number. The
default is 1620 minutes (or 27 hours).
132
Chapter 1
Setting
Description
The number of minutes that must elapse between
consecutive calls to a number that might have
received a silent call. Silent calls can occur when
an autodialer generates more connected calls than
there are interviewers available to handle the calls.
The default is 4320 minutes (or 72 hours). Note that
when a silent call occurs, the sample management
script will change the value of the Queue field on
the participant record to SILENT. To ensure that
the phone number will be recalled at the end of
the delay, the supervisor must change the value of
Queue from SILENT to APPOINTMENT.
No preference for appointments / Give preference to
Whether the ”Before an appointment, ...” setting
applies to any available interviewer, or only to the
the interviewer who arranged the appointment
interviewer who arranged the appointment. The
default is that it applies to any available interviewer.
If instead, you choose that it applies only to the
interviewer who arranged the appointment, and
the project uses group/predictive autodialing, the
interviewer will not be connected automatically to
the participant who has an appointment. Instead,
the participant’s details are displayed on the
interviewer’s screen, and the interviewer must then
click the Start Dialing button to dial the participant’s
phone number.
Before an appointment, by any interviewer and Before The number of minutes before the appointment
time when a number with an appointment can be
an appointment, by the arranger only (these are
actually a single setting)
called, either by any interviewer or the arranger
only, depending on the setting of ”No preference for
appointments / Give preference to the interviewer
who arranged the appointment”. The default is five
minutes.
After an appointment, by any interviewer
The number of minutes after the appointment
time when a number with an appointment can be
called by any available interviewer. The sample
management script uses this setting only when the
”No preference for appointments / Give preference
to the interviewer who arranged the appointment”
setting is to give preference to the arranger. The
default is five minutes.
The number of minutes before the recall time when
Before a recall
a number with an automatic appointment can be
called. The default is ten minutes.
Time zones
The time zones in which participants are located.
The values that you enter in this field must be the
indexes of the time zones in the list of time zones
stored in the registry. If you need to enter more than
one time zone, separate them with semicolons, and
do not include any spaces.
Silent appointment
Time Zone Name
Greenwich
Standard Time
Index Value
Displayed As
(GMT) Casablanca, 90
Monrovia
133
IBM SPSS Data Collection Interviewer Server User’s Guide
Setting
Description
GMT Standard
Time
(GMT) Greenwich 85
Mean Time :
Dublin, Edinburgh,
Lisbon, London
(GMT) Casablanca -2147483571
Morocco Standard
Time
W. Europe Standard (GMT+01:00)
Time
Amsterdam, Berlin,
Bern, Rome,
Stockholm, Vienna
Central Europe
(GMT+01:00)
Standard Time
Belgrade,
Bratislava,
Budapest,
Ljubljana, Prague
Romance Standard (GMT+01:00)
Time
Brussels,
Copenhagen,
Madrid, Paris
Central European
(GMT+01:00)
Standard Time
Sarajevo, Skopje,
Warsaw, Zagreb
W. Central Africa (GMT+01:00) West
Standard Time
Central Africa
GTB Standard Time (GMT+02:00)
Athens, Istanbul,
Minsk
E. Europe Standard (GMT+02:00)
Time
Bucharest
Egypt Standard
(GMT+02:00)
Time
Cairo
South Africa
(GMT+02:00)
Standard Time
Harare, Pretoria
FLE Standard Time (GMT+02:00)
Helsinki, Kyiv,
Riga, Sofia, Tallinn,
Vilnius
Israel Standard
(GMT+02:00)
Time
Jerusalem
Jordan Standard
(GMT+02:00)
Time
Amman
Middle East
(GMT+02:00)
Standard Time
Beirut
Namibia Standard (GMT+02:00)
Time
Windhoek
Arabic Standard
(GMT+03:00)
Time
Baghdad
Arab Standard Time (GMT+03:00)
Kuwait, Riyadh
Russian Standard
(GMT+03:00)
Time
Moscow, St.
Petersburg,
Volgograd
110
95
105
100
113
130
115
120
140
125
135
-2147483582
-2147483583
-2147483578
158
150
145
134
Chapter 1
Setting
Description
E. Africa Standard
Time
Georgian Standard
Time
Iran Standard Time
Arabian Standard
Time
Caucasus Standard
Time
Azerbaijan
Standard Time
Mauritius Standard
Time
Armenian Standard
Time
Afghanistan
Standard Time
Ekaterinburg
Standard Time
West Asia Standard
Time
Pakistan Standard
Time
India Standard Time
Nepal Standard
Time
N. Central Asia
Standard Time
Central Asia
Standard Time
Sri Lanka Standard
Time
Myanmar Standard
Time
SE Asia Standard
Time
North Asia Standard
Time
China Standard
Time
(GMT+03:00)
Nairobi
(GMT+03:00)
Tbilisi
(GMT+03:30)
Tehran
(GMT+04:00) Abu
Dhabi, Muscat
(GMT+04:00)
Baku, Tbilisi,
Yerevan
(GMT+04:00) Baku
155
(GMT+04:00) Port
Louis
(GMT+04:00)
Yerevan
(GMT+04:30)
Kabul
(GMT+05:00)
Ekaterinburg
(GMT+05:00)
Islamabad, Karachi,
Tashkent
GMT+05:00)
Islamabad, Karachi
(GMT+05:30)
Chennai, Kolkata,
Mumbai, New
Delhi
(GMT+05:45)
Kathmandu
(GMT+06:00)
Almaty,
Novosibirsk
(GMT+06:00)
Astana, Dhaka
(GMT+06:00) Sri
Jayawardenepura
(GMT+06:30)
Rangoon
(GMT+07:00)
Bangkok, Hanoi,
Jakarta
(GMT+07:00)
Krasnoyarsk
(GMT+08:00)
Beijing, Chongqing,
Hong Kong,
Urumqi
-2147483569
-2147483577
160
165
170
-2147483584
-2147483574
175
180
185
-2147483570
190
193
201
195
200
203
205
207
210
135
IBM SPSS Data Collection Interviewer Server User’s Guide
Setting
Description
227
(GMT+08:00)
Irkutsk, Ulaan
Bataar
215
Singapore Standard (GMT+08:00)
Time
Kuala Lumpur,
Singapore
W. Australia
(GMT+08:00) Perth 225
Standard Time
220
Taipei Standard
(GMT+08:00)
Time
Taipei
235
Tokyo Standard
(GMT+09:00)
Time
Osaka, Sapporo,
Tokyo
230
Korea Standard
(GMT+09:00)
Time
Seoul
240
Yakutsk Standard
(GMT+09:00)
Time
Yakutsk
250
Cen. Australia
(GMT+09:30)
Standard Time
Adelaide
245
AUS Central
(GMT+09:30)
Standard Time
Darwin
260
E. Australia
(GMT+10:00)
Standard Time
Brisbane
255
AUS Eastern
(GMT+10:00)
Standard Time
Canberra,
Melbourne, Sydney
275
West Pacific
(GMT+10:00)
Standard Time
Guam, Port
Moresby
265
Tasmania Standard (GMT+10:00)
Time
Hobart
270
Vladivostok
(GMT+10:00)
Standard Time
Vladivostok
280
Central Pacific
(GMT+11:00)
Standard Time
Magadan, Solomon
Is., New Caledonia
290
New Zealand
(GMT+12:00)
Standard Time
Auckland,
Wellington
285
Fiji Standard Time (GMT+12:00)
Fiji, Kamchatka,
Marshall Is.
300
Tonga Standard
(GMT+13:00)
Time
Nuku’alofa
80
Azores Standard
(GMT-01:00)
Time
Azores
Cape Verde
(GMT-01:00) Cape 83
Standard Time
Verde Is.
75
Mid-Atlantic
(GMT-02:00)
Standard Time
Mid-Atlantic
-2147483572
Argentina Standard (GMT-03:00)
Time
Buenos Aires
North Asia East
Standard Time
136
Chapter 1
Setting
Description
E. South America
Standard Time
SA Eastern
Standard Time
Greenland Standard
Time
Montevideo
Standard Time
Newfoundland
Standard Time
Atlantic Standard
Time
Central Brazilian
Standard Time
SA Western
Standard Time
Pacific SA Standard
Time
Venezuela Standard
Time
SA Pacific Standard
Time
Eastern Standard
Time
US Eastern
Standard Time
Central America
Standard Time
Central Standard
Time
Central Standard
Time (Mexico)
Mexico Standard
Time
Canada Central
Standard Time
US Mountain
Standard Time
Mexico Standard
Time 2
(GMT-03:00)
Brasilia
(GMT-03:00)
Buenos Aires,
Georgetown
(GMT-03:00)
Greenland
(GMT-03:00)
Montevideo
(GMT-03:30)
Newfoundland
(GMT-04:00)
Atlantic Time
(Canada)
(GMT-04:00)
Manaus
(GMT-04:00)
Caracas, La Paz
(GMT-04:00)
Santiago
(GMT-04:30)
Caracas
(GMT-05:00)
Bogota, Lima,
Quito
(GMT-05:00)
Eastern Time (US
and Canada)
(GMT-05:00)
Indiana (East)
(GMT-06:00)
Central America
(GMT-06:00)
Central Time (US,
Canada)
(GMT-06:00)
Guadalajara,
Mexico City,
Monterrey
(GMT-06:00)
Guadalajara,
Mexico City,
Monterrey - Old
(GMT-06:00)
Saskatchewan
(GMT-07:00)
Arizona
(GMT-07:00)
Chihuahua, La Paz,
Mazatlan - Old
65
70
73
-2147483575
60
50
-2147483576
55
56
-2147483573
45
35
40
33
20
-2147483581
30
25
15
13
137
IBM SPSS Data Collection Interviewer Server User’s Guide
Setting
Description
Mountain Standard (GMT-07:00)
Time
Mountain Time
(US, Canada)
Mountain Standard (GMT-07:00)
Time (Mexico)
Chihuahua, La Paz,
Mazatlan
Pacific Standard
(GMT-08:00)
Time
Pacific Time (US,
Canada), Tijuana
Pacific Standard
(GMT-08:00)
Time (Mexico)
Tijuana, Baja
California
Alaskan Standard
(GMT-09:00)
Time
Alaska
Hawaiian Standard (GMT-10:00)
Time
Hawaii
Samoa Standard
(GMT-11:00)
Time
Midway Island,
Samoa
Dateline Standard (GMT-12:00)
Time
International Date
Line West
If you leave this field blank, IBM® SPSS® Data
Collection Interviewer Server will ignore time
zones and calling times when selecting records for
interviewers to call.
Use interviewer qualifications
Whether or not to assign calls to interviewers based
on interviewer qualifications. For example, if the
participant’s native language is Spanish, then assign
the call to a Spanish speaking interviewer.
The Parameters tab lists the current settings for the project.
10
-2147483580
4
-2147483579
3
2
1
0
138
Chapter 1
You set these parameters at the start of the project, and can change them throughout the
interviewing period to match the current requirements of the survey. For example, if it is the last
day of the survey and you are running low on new participants, you might want to increase the
maximum number of times that numbers may be called. You might also wish to reduce the elapse
times for automatically set appointments so that numbers with callbacks become available for
recall more quickly.
To Define Sample Management Parameters
E Select the Parameters tab.
E In Use these Time Zones, enter the time zones in which the participants for this project are located.
If participants are located in more than one zone, separate the zone numbers with semicolons.
E Replace any of the default settings for other parameters by typing new values into the text boxes.
When entering calling times, you can specify times in 12-hour (hh:mm am/pm) or 24-hour
(hh:mm) format, but the next time you open the Phone Surveys the times will be shown in
24-hour format.
E If you want calls to be assigned to interviewers based on interviewers’ qualifications, select
Interviewer Qualifications.
139
IBM SPSS Data Collection Interviewer Server User’s Guide
Changing the Default Settings
If you find that for every new project you always change the settings on the Parameters tab to the
same new values, you can instead change the default settings that Interviewer Server provides
so that you no longer need to do this. For more information, see the topic Changing the Default
Settings on p. 169.
Ordering Settings
The Ordering tab provides options for defining the order in which records are retrieved from
each individual queue. For example, you may want to first dial records with a higher number
of attempts when scanning the Recall queue.
The Ordering tab lists the current queue order settings.
Order/Weight. Defines the ordering of records, by field, in each queue.
E Select either Order or Weight.
E Select the appropriate field from the drop-down menu.
E Click Add Field Order/Weight... to open the Field Order dialog. The dialog allows you to define
how record fields are ordered. For more information, see the topic Field Order Dialog on p. 140.
Order records by. The table displays the user-defined record order. Before performing any of the
following tasks, you must first select a field row from the table.
E You can use the Up and Down buttons to reorder the Order records by list:
Figure 1-11
140
Chapter 1
E Click the Edit record order by field button to open the Field Order dialog and edit existing field
order definitions:
Figure 1-12
E Click the Delete field order button to delete existing field order definitions:
Figure 1-13
Prioritize recalls over fresh. Allows you to specify the frequency in which recalls to busy and
other unanswered calls take priority over calls to new numbers. Specify a percentage to check
the RECALL queue before the FRESH queue. For example, specifying a value of 25% would
result in the RECALL queue being checked before the FRESH queue for one-in-four calls. The
default value is 90%.
Note: Prioritizing recalls to less than 100% is the best option for reducing clumping. However, if
there are no yet any FRESH records, randomizing the recall times can reduce the clumping of
recalls after the first clump in a shift or daypart. The multimode1_sample.mrs script randomizes
the recall time around the specified delay (using the specified before a recall time as the margin,
and adjusting that recall time between 2 and 10 minutes as the recall time after). For example,
when the busy delay is 30 minutes and the before a recall time is 10 minutes, numbers will be
recalled between 20 and 40 minutes from their return time.
Order records with each queue by. The table displays the current field order for each queue. Before
performing the following task, you must first select a queue row from the table.
E Click the Edit queue order button to open the Queue Order Edit dialog and edit the selected queue’s
field order
Figure 1-14
For more information, see the topic Queue Order Edit dialog on p. 141.
Notes
When queue ordering and field/weight ordering are both specified, queue ordering is used to
resolve parallel ordering.
Records with values for which no order or weight are specified are retrieved last from the
Appointment queue (records are not retrieved from any of the other queues).
Field Order Dialog
The Field Order dialog provides options for defining how record field values are ordered.
141
IBM SPSS Data Collection Interviewer Server User’s Guide
Value: The drop-down field lists all distinct values for the selected field, including null/empty. The
message “There is no order/weight based on this field” displays when you select a distinct value
for the first time. Select an appropriate value from the list.
Order\Weight: Enter a numeric value between 0 and 9999. The value you enter defines the order or
weight priority for the selected value. The priority controls the record retrieval order for all queues.
Note: When you enter a value of 0, records that contain an order or weight value of 0 are the last
to be retrieved from the selected queue, and are not retrieved from other queues.
E Click Add to save the defined value to the Field order table.
Field Order. The table lists all defined field order values and their associated priority. Before
performing any of the following tasks, you must first select a field row from the table.
E Click the Edit field value order button to edit the selected field value’s priority:
Figure 1-15
Click Update to save to edit or click Cancel to discard any change.
E Click the Delete field value order button to delete the selected field value:
Figure 1-16
E Click OK to save your changes and return to the Ordering tab.
The Order records by table updates and displays your defined record field values.
Queue Order Edit dialog
The Queue Order Edit dialog provides options for defining which sample field will be used for
ordering the selected queue’s records.
142
Chapter 1
Sample queue. This field is non-modifiable field displays the selected queue.
Sample field. The drop-down list provides all sample fields available to the selected queue. Select
an appropriate field from the list.
Order. The order in which the selected sample field will be sorted. The drop-down list provides
options for Ascending and Descending.
E Click OK to save your changes and return to the Ordering tab. Click Cancel to discard any changes
and return to the Ordering tab.
The Order records within each queue by table updates and displays your changes.
Setting Up Call Time Parameters
The Call Times tab provides options for defining valid participant call times and for creating day
parts for the current project. Day parts allow you to ensure that records are called at specific times
of the day in order to increase the chance of success in reaching participants.
Note: If you have an existing project that uses pre-version 5.6 sample management scripts, you
can setup day parts but they will not be recognized. The use of day parts requires version 5.6 or
higher sample management scripts.
143
IBM SPSS Data Collection Interviewer Server User’s Guide
Weekday: Allows you to specify valid weekday participant call times:
Start (hh:mm). The earliest time at which participants may be called on weekdays. Enter
an appropriate start time.
End (hh:mm). The latest time at which participants may be called on weekdays. Enter an
appropriate end time.
Weekend: Allows you to specify valid weekend participant call times:
Start (hh:mm). The earliest time at which participants may be called on weekends. Enter
an appropriate start time.
End (hh:mm). The latest time at which participants may be called on weekends. Enter an
appropriate start time.
By default, a weekend runs from 00:01 on Saturday to midnight on Sunday. The Sample
Management script will handle situations where the project has participants in time zones with
different definitions of weekdays and weekends.
When selected, the time parameters defined in the Valid participant call times section are used.
Maximum tries. The maximum number of times that a record may be called. The default is 3. If
an Appointment is made, then an additional “Maximum Tries” tries can be made to connect
the appointment.
Using day parts. When selected, you can utilize an existing day parts template that defines valid
participant call times.
E Click New Day Parts to clear any currently defined day part settings in the Day Parts table.
E Click Load Template... to load an existing day parts template. Templates are stored in the
Distributed Property Management (DPM).
E Click Save As... to save the current settings, listed in the Day Parts table, as a template in DPM.
The Save As... dialog displays, allowing you to specify a template name.
144
Chapter 1
Enter an appropriate template name and click Save. Otherwise click Cancel to return to the Call
Times tab without saving.
Day Parts
The Day Parts table lists all day parts that are currently defined for the project.
To Add a New Day Part
E Click the Add button to create a new day part definition:
Figure 1-17
The Day Parts dialog displays, providing options for defining a new day part.
Name: The day part name. Enter an appropriate name.
Tries: The maximum number of times that a record may be called. Enter an appropriate value.
Start time: The earliest time at which participants may be called. Enter the earliest call time.
End time: The latest time at which participants may be called. Enter the latest call time.
Days: Select the appropriate days of the week to contact participants.
E Click OK, after entering the desired day part parameters, to save the day part to the Day Parts table.
Otherwise click Cancel to discard the new day part.
To Edit a Day Part
E Select an existing day part in the Day Parts table.
E Click the Edit day part button.
Figure 1-18
145
IBM SPSS Data Collection Interviewer Server User’s Guide
The Day Parts dialog displays with the selected day part parameters filled in.
E Apply the appropriate changes and click OK to update the day part. Otherwise click Cancel to
discard the changes.
To Delete a Day Part
E Select an existing day part in the Day Parts table.
E Click the Delete day part button:
Figure 1-19
Setting Up Appointments
The Appointments tab provides options for defining a project expiry date and for creating
appointment schedules for the current project.
An appointment schedule can be used to specify the interviewer shifts and holidays, ensuring that
appointments can be made when interviewers are working. There can be multiple appointment
schedules for a distributed site.
Appointment schedules may differ between projects and are therefore project specific. For
example, interviewers may be scheduled to call business projects during the day and consumer
projects in the evening.
Note: In order to use the Appointment tab options in the Phone Survey activity, you must first
assign one time zone and one appointment schedule to at least one applicable user.
146
Chapter 1
Project Expiry (UTC Time). Provides options for specifying a project expiration time.
Date: The project expiration date. You can manually enter a date, in the format mm/dd/yyyy, or
you can click the down arrow to display a calendar and select a date.
Time: The project expiration time. This indicates the exact time of day, for the selected date,
that the project will expire. Enter an appropriate time in the 24-hour format hh:mm (for
example 17:00 for 5:00 PM).
Appointment Schedule. Provides options for clearing the existing sub-schedules, loading schedule
templates, and saving schedule templates.
E Click New Schedule to clear any currently defined sub-schedules.
E Click Load Template... to load an existing appointment schedule template. Templates are stored in
the Distributed Property Management (DPM).
E Click Save As... to save the current schedule settings as a template in DPM. The Save As... dialog
displays, allowing you to specify a schedule template name.
Enter an appropriate schedule template name and click Save. Otherwise click Cancel to return to
the Appointments tab without saving.
Sub Schedule. Provides options for defining specific scheduling parameters. You can define
specific shift parameters and date overrides for each sub-schedule. For example, the sub-schedule
Weekdays could include the shift 08:00 - 17:00 for Mon;Tue;Wed;Thu;Fri while the sub-schedule
Weekends could include the shift 12:00 - 19:00 for Sat;Sun.
To Create a New Sub-Schedule
E Click New Sub Schedule to open the New Sub Schedule dialog.
E Enter an appropriate sub schedule name and click OK to save the sub schedule. Otherwise click
Cancel to discard the new sub-schedule.
To Delete a Sub-Schedule
E Select a sub-schedule from the drop-down field.
147
IBM SPSS Data Collection Interviewer Server User’s Guide
E Click Delete Sub Schedule. The selected sub-schedule is deleted and is no longer available from
the drop-down field.
Regular Shifts. The table lists all shifts currently defined for the selected sub-schedule.
To Create New Shifts for a Sub-Schedule
E Select a sub-schedule from the drop-down field. If no sub-schedules exist, you must either create a
new sub-schedule or load an appointment schedule template (both explained above).
E Click the Add button in the Regular Shifts table:
Figure 1-20
The Regular Shift dialog displays, providing options for defining a new shift.
Start time: The earliest time at which participants may be called. Enter the earliest call time.
End time: The latest time at which participants may be called. Enter the latest call time.
Days: Select the appropriate days of the week to contact participants.
E Click OK, after entering the desired shift parameters, to save the shift to the Regular Shifts table.
Otherwise click Cancel to discard the new shift.
To Edit a Shift
E Select an existing shift in the Regular Shifts table.
E Click the Edit regular shift button.
Figure 1-21
The Regular Shift dialog displays with the preexisting shift parameters filled in.
E Apply the appropriate changes and click OK to update the shift. Otherwise click Cancel to
discard the changes.
To Delete a Shift
E Select an existing shift in the Regular Shifts table.
148
Chapter 1
E Click the Delete regular shift button:
Figure 1-22
Date overrides: The table lists all date override shifts currently defined for the selected
sub-schedule. Date overrides allow you to specify specific dates and/or times where appointments
are not allowed, as well as define specific dates and times that will override the shifts defined
in the Regular Shifts table.
To Create New Date Override Shifts for a Sub-Schedule
E Select a sub-schedule from the drop-down field. If no sub-schedules exist, you must either create a
new sub-schedule or load an appointment schedule template (both explained above).
E Click the Add button in the Date Overrides table:
Figure 1-23
The Date Override dialog displays, providing options for defining a new date override.
No appointment. Select this option when you want to define specific dates where no appointments
are allowed.
Date override. Select this option when you want to define specific dates and times that override
the shifts defined in the Regular Shifts table.
Start time: When No appointment is selected, the starting time at which participants may not
be called. Enter the starting time. When Date override is selected, the earliest time at which
participants may be called. Enter the earliest call time.
End time: When No appointment is selected, the end time at which participants may not be called.
Enter the end time. When Date override is selected, the latest time at which participants may
be called. Enter the latest call time.
149
IBM SPSS Data Collection Interviewer Server User’s Guide
Date. The calendar allows you to select specific No appointment or Date override dates. Select the
appropriate date(s). All selected dates display in the field immediately beneath the calendar.
E Click OK, after entering the desired parameters, to save the date override to the Date Overrides
table. Otherwise click Cancel to discard the new date override.
To Edit a Date Override
E Select an existing shift in the Date Overrides table.
E Click the Edit override date button.
Figure 1-24
The Date Override dialog displays with the preexisting override parameters filled in.
E Apply the appropriate changes and click OK to update the date override. Otherwise click Cancel to
discard the changes.
To Delete a Date Override
E Select an existing shift in the Date Overrides table.
E Click the Delete override date button:
Figure 1-25
Setting Up Project Overrides
The Overrides tab provides options for changing the parameters that control dialing for a subset of
records. All records, except those in the specified subset, continue to follow the base dialing rules.
Parameters that can be overridden are:
The maximum number of attempts for a record.
The call back delay for numbers that are not answered, busy, answered by an answering
machine, or started on the web.
In addition, you can specify that a subset of records be identified as having a high priority. High
priority records are generally called before other records. This feature could be used, for example,
if you discover that the completion percentage for a particular subset of records (region for
example) is particularly low. You could indicate that the subset has priority until the completion
percentage reaches the average, at which point you could disable the override.
150
Chapter 1
Prioritize. Select this option when you want the specify that the Selection criteria value be identified
as having priority over other records. High priority records are generally called before other
records
Selection criteria. Identifies the subset of records upon which the override parameters are based.
Enter an appropriate criteria.
No answer delay. The callback delay (in minutes) for numbers that are not answered. Enter
an appropriate value.
Busy delay. The callback delay (in minutes) for numbers that are busy. Enter an appropriate value.
Answering machine delay. The callback delay (in minutes) for numbers that are answered by an
answering machine. Enter an appropriate value.
Web callback delay. The callback delay (in minutes) for surveys that are started on the web.
Enter an appropriate value.
Maximum tries (for any day parts). Specifies the maximum number of callback attempts for each
participant. Enter an appropriate value.
Setting Up the Call Outcome List
Interviewers working on a telephone interviewing project are provided with a list of call outcome
codes from which they must select the outcome of each call that they make. IBM® SPSS® Data
Collection Interviewer Server comes with a default list of call outcome codes that cover most
requirements, so you should never need to build a call outcome list from scratch.
Note: For projects that use an autodialer, Interviewer Server automatically maps the status codes
returned by the autodialer to one of the call outcomes.
The Call Outcomes tab lists the call outcome codes for the current project.
151
IBM SPSS Data Collection Interviewer Server User’s Guide
You can make the following changes to the list:
Add new codes.
Delete codes.
Change code numbers, names, and texts.
Select codes that must be available while interviews are in progress; for example, an
Abandoned Interview code that can be selected if a participant starts an interview but then
refuses to complete it.
Specify which codes should prompt the interviewer to arrange a callback appointment with
the participant. When interviewers select one of these outcomes they will prompted to enter
a callback date and time.
Specify which code should be used for canceled calls. Canceled calls occur when an
interviewer is presented with a number to call manually, but clicks Cancel Contact rather than
making the call. This returns the participant record to the Sample Management system with
the appropriate code so that the record can be returned to the queue from which it was selected.
Select codes that are always hidden from interviewers. Typically, these are call outcomes that
are chosen automatically by Interviewer Server.
To Add a New Code
E Click the Add call outcome button in the Call Outcomes table:
Figure 1-26
Blank fields display near the bottom of the screen, allowing you to defining new call outcomes.
E In the Code field, type a unique number for the result code.
152
Chapter 1
E In the Name field, type a name for the result code.
E In the Text field, type a description of when the result code should be used.
This text is displayed in the call outcome list that the interviewer sees, so try to keep it short
and simple if possible.
E Click Add.
The code is added to the end of the list.
Note: The Sample Management script must contain code to process all the call outcome codes
used by a project. If you add codes, remember to liaise with whoever is responsible for the
project’s Sample Management script so that the script can be updated if this has not already been
done. If a code has been defined for a project but is not mentioned in the Sample Management
script, Interviewer Server will not be able to process calls returned with that outcome code.
To Change the Text
E Select the code you want to change and then click the Edit call outcome button.
Figure 1-27
Edit icon
This places the text field in edit mode.
E Update the text.
E Click Update.
To Delete a Code
E Select the code you want to delete and then click the Delete call outcome button.
Figure 1-28
Delete icon
To Display a Code when Interviews are Running
E Select the code you want to change and then click the Edit call outcome button.
Figure 1-29
Edit icon
E Select the Show During Interview check box.
E Click Update.
To Specify which Codes should Prompt for Appointment Details
E Select the code you want to change and then click the Edit call outcome button.
153
IBM SPSS Data Collection Interviewer Server User’s Guide
Figure 1-30
Edit icon
E Select the Show Appointment Page check box.
E Click Update.
To Specify which Code should be used for Canceled Contacts
E Select the code you want to change and then click the Edit call outcome button.
Figure 1-31
Edit icon
E Select the Cancel Code check box.
E Click Update.
To Hide a Code from Interviewers
E Select the code you want to change and then click the Edit call outcome button.
Figure 1-32
Edit icon
E Select the Always Hidden check box.
E Click Update.
Changing the Default Settings
If you find that for every new project you always change the settings on the Call Outcomes tab to
the same new values, you can instead change the default settings that Interviewer Server provides
so that you no longer need to do this. By editing the default settings, you can also do the following:
Define additional default call outcomes so that you no longer need to add them to every project.
Change the mapping of autodialer status codes (returned by the autodialer at the end of every
call) to call outcomes. (This is not relevant if your projects don’t use an autodialer.)
For more information, see the topic Changing the Default Settings on p. 169.
Interview Settings
On the Interview Settings tab, you can define the following:
Whether an autodialer is used to dial phone numbers, or whether interviewers must dial
numbers manually, or can use modems to dial numbers.
Whether interviewers can retrieve specific participants.
154
Chapter 1
Whether the interviewing program should select an interviewer’s next contact automatically,
or whether interviewers should click a button to request their next contact.
Whether interviewers can still start a survey after they have been disconnected from a call.
This option is only available when an IBM® SPSS® Data Collection Dialer option is selected.
Whether interviewers should be prompted to select their qualifications at the start of each
session.
Whether supervisors can monitor and record interviewers, and if so, whether interviewers
must obtain consent for monitoring and recording from each participant.
Whether interviewers must review completed interviews, and if so, whether the review starts
automatically and whether it includes all questions or only text questions.
You can also define the introductory script that interviewers should read to each participant.
You can also change the default values of these settings, so that your custom settings will
be used whenever a new project is created. See “Changing the Default Settings” at the end of
this topic.
155
IBM SPSS Data Collection Interviewer Server User’s Guide
Using an Autodialer to Dial Phone Numbers
To use an autodialer, select either of the following options from the Dialing Options drop-down list:
IBM SPSS Dialer (Extension) – Power dial for the interviewer screen. In extension dialing, the
autodialer dials participants only when interviewers click the Start Dialing button in the
Phone Participants activity. This mode can result in longer wait times for interviewers, but
is unlikely to result in silent calls.
IBM SPSS Dialer (Group) – Dial for the interview in a group (with optional predictive dialing). In
group/predictive dialing, the autodialer dials participants before interviewers are available to
answer the connected calls. That is, the software predicts when interviewers will click the
Start Dialing button. This mode can deliver the highest interviewer productivity, but might
result in silent calls.
For more information about the difference between extension and group/predictive dialing, use the
search function in the IBM® SPSS® Data Collection Developer Library documentation to search
for the text “How Does Autodialing Work?” and in the search results open the topic with that title.
The option to use an autodialer is displayed only if one or more dialers have been added
to the Dialer Administration activity in IBM® SPSS® Data Collection Interviewer Server
Administration. However, if the position settings for a telephone interviewer station specify that
the station can be used only for manual or modem dialing, the Start Dialing button will not be
usable on that station.
Phone numbers used for autodialing must contain only the digits 0 to 9, * and # (optionally
preceded by a plus (+) to present the international access code). In addition, the phone number
can contain the visual separators SPACE, (, ), . and -. Visual separators are not allowed before
the first digit..
If you select this option, you might also need to change the settings on the Autodialer Settings
tab. For more information about dialers and positions, see Dialer Administration.
Using a Modem to Dial Phone Numbers
To allow interviewers to use modems to dial phone numbers, select Modem – Show Dial Contact
button on the Interviewer screen from the Dialing Options drop-down list. The Dial Contact button
on the main screen of the Phone Participants activity will then be usable. When interviewers
click that button, the phone number displayed in the main screen will be dialed automatically by
the modem. Note that the modem option will work only for phone numbers that are formatted
as follows:
+Country/RegionCode (Area/CityCode) SubscriberNumber
For example, 44 12 3456 7890 for a subscriber in the United Kingdom. In addition, a separate
software installation is required on each telephone interviewer station that will use the modem
option. For more information, search the IBM® SPSS® Data Collection Interviewer Server
Installation Instructions for the topic “Things You Must Do on Local Machines”. If a station
has access to more than one modem, you can specify which one to use—for more information,
use the search function in the Data Collection Developer Library documentation to search
for the text “Settings for the Phone Participants Activity” and in the search results open the
topic with that title.
156
Chapter 1
If you select the option to use modems, the project cannot use an autodialer. Interviewers will
still be able to dial numbers manually if they have access to a telephone keypad. The modem
option works only on Microsoft Windows computers.
Dialing Phone Numbers Manually
To specify that interviewers must always dial phone numbers manually, select Manual – Interviewer
dials numbers manually from the Dialing Options drop-down list. Interviewers should then
manually dial the phone number displayed on the main screen of the Phone Participants activity.
If you select the option to dial phone numbers manually, the project cannot use an autodialer or
modems.
Letting Interviewers Choose Their Qualifications
Interviewer qualifications control which sample records are allocated to each interviewer and are a
good way of making the best use of your interviewers’ skills. There are two ways of assigning
qualifications to interviewers, which can be used together or separately. Administrators can set
an interviewer’s qualifications when they create Interviewer Server Administration accounts,
or interviewers may select their own qualifications at the start of each interviewing session or
during a session.
Depending on how your company uses qualifications, it may be appropriate for administrators to
set some qualifications and for interviewers to be allowed to select others. For example, language
or refusal-conversion qualifications could be set by administrators, while location qualifications
that specify which region an interviewer should call could be set and changed by interviewers
themselves.
If you want to allow interviewers to choose their own qualifications, select Interviewer to select
qualifications on the Interview Settings tab. Then choose the qualifications that interviewers may
select themselves. Selecting the option but no qualifications is the same as not selecting the
option at all.
Note: Take care when choosing which qualifications interviewers may select, as it is possible
to allow interviewers to select qualifications they do not have. For example, suppose the
administrator has created Sam’s account with a French language qualification. If you allow
interviewers to set the language qualification, Sam will be presented with the full list of languages
and will be able to choose any combination of languages from that list.
Retrieving a Specific Participant
To allow interviewers to retrieve specific participants from the sample database, select Show
Specific Contact button on the Interview screen on the Interview Settings tab. The Specific
Contact button on the main screen of the Phone Participants activity will then be usable. When
interviewers click that button, they will be presented with a dialog box in which they can choose
whether to retrieve their last contact or search for a contact. If they choose to search for a contact,
they can select the field to search and specify the value to search for. The choice of fields to search
is determined by the settings in the Show column on the Define Fields tab.
157
IBM SPSS Data Collection Interviewer Server User’s Guide
Selecting the Next Contact Automatically
When interviewers do not use an autodialer, they need to click the Next Contact button to request
their next contact. If you would prefer that the next contact is retrieved automatically as soon
as interviewers finish their current call, select Automatically select next contact on the Interview
Settings tab. When interviewers need to take a break, they may click the Cancel Current Contact
button. This takes them to the standard page where they may choose Next Contact, Specific
Contact, or Exit as appropriate.
Interviewers working on projects with this option set will see a check box labeled “Auto contact
selection” just above the list of call outcomes, so it is still possible for some interviewers to work
in fully manual mode if you wish.
Some projects may use a combination of automated and modem or manual dialing. You can still
select the “automatically select next contact” option for these projects, but interviewers who are
using the dialer will need to cancel the “Auto contact selection” check box on the interviewing
screen otherwise they will not be able to stop the dialer making calls when they reach the end of
their shift or need to take a break.
Starting surveys after a disconnection
When an Dialer option is selected you can select the Can start a survey after being disconnected
from a call option to specify that interviewers can start interviews even when respondents are
disconnected from a call. This can be useful, for example, when the survey contains interviewer
instructions at the end (allowing the interviewer to continue to the required instructions).
Interviewer Monitoring
The Interviewer Monitoring activity in Interviewer Server Administration can be used by call
center supervisors to monitor and record interviews while they are in progress. Depending on your
local laws or your organization’s policy, you can configure monitoring for three different scenarios:
Scenario
Monitoring and recording are not allowed for this
project
Monitoring and recording are always allowed for
this project
Monitoring and recording are allowed only if the
participant gives his or her consent
To Specify This
Clear the Enable monitoring/recording check box.
Select the Enable monitoring/recording check box
and clear the The interviewer must get approval for
monitoring/recording check box.
Select the Enable monitoring/recording and The
interviewer must get approval for monitoring/recording
check boxes.
If you have selected The interviewer must get approval for monitoring/recording, Yes and No options
will appear on the main screen of the Phone Participants activity whenever interviewers retrieve a
contact. As part of their introductory script, interviewers must ask each participant if they give
their consent for monitoring and recording, and record the participant’s answer by selecting either
158
Chapter 1
Yes or No. The three options underneath The interviewer must get approval for monitoring/recording
determine the default settings of the Yes and No options as described below:
Option
Interviewer must manually select an option
Default setting is ‘monitoring/recording prohibited’
Default setting is ‘monitoring/recording allowed’
Description
The interviewer must always select either Yes or No.
The No option is selected by default. The
interviewer can change the selection.
The Yes option is selected by default. The
interviewer can change the selection.
For more information, see Interviewer Monitoring.
Reviewing Interviews
You can choose whether interviewers can review the participant’s responses after the interview has
completed. In the “Review Interview Options” drop-down list, there are three options as follows:
Option
No Review
Review Interview
Review Open-ends
Description
The interviewer cannot review interviews.
The interviewer can review the whole interview.
The interviewer can review open-ended (text) responses only.
Note: The above setting does not affect the supervisor’s ability to review interviews using the
Review Interviews activity.
If you have selected either Review Interview or Review Open-ends, you can then choose
between the following two radio buttons:
Option
Show review button on interviewer screen
Interviewer must review
Description
To start the review, the interviewer must click the
Review Completed Interview button in the Phone
Participants activity.
The review starts automatically when the interview
finishes.
Defining the Introductory Script
When an autodialer connects a telephone interviewer to a participant (or, for projects that do not
use an autodialer, when the interviewer requests a number to call), interviewers are provided
with an introductory text that they can read to the participant to explain the reason for the call.
Interviewer Server comes with a default text that is suitable for all surveys, but you can define
your own text that is more specific to the current project.
Note: If the introductory text for most or all of your company’s projects is always the same, you
might wish to replace the default text that Interviewer Server provides with your organization’s
default text. See “Changing the Default Settings” below.
The Interview Settings tab displays the text that will be used for the current project, and
provides an option to insert references to fields in the sample records or to the interviewer’s name.
These references will be replaced with the values from the current sample record and the name of
the current interviewer when the text is displayed at the start of the interview.
159
IBM SPSS Data Collection Interviewer Server User’s Guide
To Specify the Project’s Introductory Text
E Replace the default text with the text you want interviewers to use.
E To insert a reference to a sample field or to the interviewer’s name, click in the text at the point
you want to make the insertion.
A vertical bar cursor appears at that point.
E Click the Substitutions button.
This displays the Substitutions dialog box.
Figure 1-33
Substitutions dialog box
E Select the reference you want to insert and click OK.
Changing the Default Settings
If you find that for every new project you always change the settings on the Interview Settings
tab to the same new values, you can instead change the default settings that Interviewer Server
provides so that you no longer need to do this. For more information, see the topic Changing the
Default Settings on p. 169.
Autodialer Settings
You use the Dialer Settings tab to define settings that relate to the use of an autodialer. You can
ignore this tab if you have not selected the option on the Interview Settings tab to use an autodialer.
160
Chapter 1
You can change the default values of these settings, so that your custom settings will be used
whenever a new project is created. See “Changing the Default Settings” at the end of this topic.
Dialer Settings
Send caller identification. Select this option to transmit the caller’s telephone number when the
autodialer makes a call.
Phone number to send. By default, the caller’s telephone number is provided by a setting on the
autodialer. To specify the caller’s telephone number, enter the number in this field. The phone
number must contain only the digits 0 to 9 and the following characters: #, *, ., (, ), -, and /. The
presence of any other characters might cause caller identification to fail.
Error if login position is not in configuration. If one or more autodialers have been added to
the Dialer Administration activity in IBM® SPSS® Data Collection Interviewer Server
Administration, every telephone interviewer station (that is, any computer on which the Phone
Participants activity will be used) must be assigned a position name. When a position name is
entered in Phone Participants, IBM® SPSS® Data Collection Interviewer Server validates the
name against those defined in the Dialer Administration activity.
For projects that use an autodialer, you can choose whether stations with unrecognized positions
can be used to conduct interviews (that is, Phone Participants will still open). If so, manual dialing
must be used on those stations. If you select this check box, Phone Participants will not open on a
station with an unrecognized position and an error message will be displayed instead.
For more information about positions, see Dialer Administration.
161
IBM SPSS Data Collection Interviewer Server User’s Guide
Ring time. You can choose the minimum length of time that an unanswered phone call must ring
before the autodialer terminates the call. To change the ring time, enter the number of seconds in
this field. Make sure that you set a value that allows participants plenty of time to pick up the
phone. In addition, your local laws might specify the minimum value that you must use.
Name of silent call announcement file. Silent calls can occur when an autodialer generates more
calls than there are interviewers available to handle the calls. You can specify the name of a
wave-sound (.wav) file that contains a message that will be played to the participant when a silent
call occurs. To do so, enter the name of the .wav file in this field (for example, SilentCall.wav).
The .wav file must be located in the autodialer’s “audio” folder, the location of which is defined in
the autodialer’s dialer.ini file. You can also specify a .wav file that is located in a sub folder of the
audio folder by including a relative path, for example, Projects\MyProject\SilentCall.wav.
Make sure that the name (and relative path, if specified) is correct, because Interviewer Server
does not log an error if it cannot find the .wav file.
Cancel dialing if interviewer not connected after. When a telephone interviewer clicks the Start
Dialing button on the main screen of the Phone Participants activity, the autodialer attempts to
connect the interviewer to a participant. If the number of connected calls being generated by the
autodialer is low compared with the number of interviewers available to handle the calls, there
might be a delay of several minutes or more before the interviewer is connected.
You can choose the numbers of minutes that interviewers must wait to be connected to a
participant before the autodialer cancels the connection attempt, allowing interviewers to leave
their stations if they need to. To change the wait time, enter the number of minutes in this field.
Percentage of calls to record. You can choose the percentage of calls that the autodialer will record.
Both individual questions and entire calls are recorded, and the recordings are saved as sound files
in the autodialer’s file system. To record calls, enter a whole number from 0 to 100 inclusive in
this field. To record no calls or all calls, enter 0 or 100 respectively. If you enter any other value,
that percentage of calls will be selected at random for recording, with the following exceptions:
All subsequent calls to a participant whose previous call was recorded will also be recorded.
This includes calls to keep an appointment or calls to complete an interview that was
interrupted by a disconnection.
Calls to participants retrieved by the Specific Contact button are recorded only if that
participant was called previously and that previous call was recorded.
Note that when you change this setting, there might be a delay of up to a minute before the
new value takes effect.
For more information, use the search function in the IBM® SPSS® Data Collection Developer
Library documentation to search for the text “Recording Calls and Interviews” and in the search
results open the topic with that title.
Answering machine detection settings
Answering machine detection (AMD) mode. Answering machine detection (AMD) can be useful
when dialing residential numbers. It is based on the observation that human greetings are
usually short, whereas answering machine messages are long. When an auto-dialed participant
record is dialed, and the dialer detects that an answering machine picked up the call, the call is
162
Chapter 1
automatically ended with the Answering Machine call outcome when the Interviewer Server
is properly configured to support the feature.
Select the appropriate answering machine detection mode from the drop-down menu.
AMD parameter (leave blank to use dialer’s settings). This field allows you to define specific AMD
parameters. For more information, see the topic Configuring Answering Machine Detection
on p. 163.
Name of AMD announcement file (leave blank to use dialer’s settings). You can specify the name of
a wave-sound (.wav) file that contains a message that will be played when answering machine
detection occurs. To do so, enter the name of the .wav file in this field (for example, AMD.wav).
The .wav file must be located in the autodialer’s “audio” folder, the location of which is defined in
the autodialer’s dialer.ini file. You can also specify a .wav file that is located in a sub folder of the
audio folder by including a relative path, for example, Projects\MyProject\AMD.wav.
Make sure that the name (and relative path, if specified) is correct, because Interviewer Server
does not log an error if it cannot find the .wav file.
Predictive settings
The next three headings in this topic apply only when you have selected the Dialer (Group/Predictive)
– Show Start Dialing button on the Interviewer screen option on the Interviews tab.
Initial dialing aggressiveness. You can set the initial “aggressiveness” of the autodialing system
when it calculates the number of predictive calls to make. A higher aggressiveness setting can
lead to less wait time for interviewers, but might result in more silent calls. To change the
aggressiveness setting, enter a whole number between 1 and 1000 in this field.
To stop the autodialing system from dialing predictively, set Initial dialing aggressiveness to 0. In
this mode, the autodialer dials participants only when interviewers click the Start Dialing button in
the Phone Participants activity, which is unlikely to result in silent calls.
Maximum percentage of silent calls. You can specify the maximum percentage of silent calls
that are allowed to occur in the 24 hour period since midnight. If the actual rate of silent calls
approaches this value, the autodialing system reduces the current rate of predictive calls to ensure
that the maximum percentage of silent calls is not exceeded. To change the maximum percentage,
enter a decimal number in this field.
Target percentage of silent calls. You can specify the target percentage of silent calls that should
occur at any time. The autodialing system attempts to keep the actual rate of silent calls at this
value by continually adjusting the current rate of predictive calls. To change the target percentage,
enter a decimal number in this field. The value must be less than the value of Maximum
percentage of silent calls.
Reset Statistics. The Dialers tab in the Interviewer Monitoring activity shows the percentage of
silent calls that are occurring for this project. To set that percentage figure to zero, click this
button on the Dialer Settings tab.
163
IBM SPSS Data Collection Interviewer Server User’s Guide
Changing the default settings
If you find that for every new project you always change the settings on the Dialer Settings
tab to the same new values, you can instead change the default settings that Interviewer Server
provides so that you no longer need to do this. For more information, see the topic Changing the
Default Settings on p. 169.
Configuring Answering Machine Detection
IBM® SPSS® Data Collection Dialer supports a simple answering machine detection (AMD)
that can be useful when dialing residential numbers. It is based on the observation that human
greetings are usually short, whereas answering machine messages are long. When an auto-dialed
participant record is dialed, and Dialer detects that an answering machine picked up the call, the
call is automatically ended with the Answering Machine call outcome when the IBM® SPSS®
Data Collection Interviewer Server is properly configured to support the feature. Answering
machine detection is currently configured through the DPM Explorer tool.
When answering machine filtering is in effect (amd=1), calls are only connected to an interviewer
if the greeting is shorter than max. All other calls are dispositioned as answering machines and
hung-up by the dialer. The dialer can optionally play a sound file (amfile) to the answering
machine.
A DSP listens for the greeting. The DSP asserts voice when the received audio signal raises above
a threshold (db, dBm, decibels relative to 1 mW power). Start-of-voice also starts timer max.
If the DSP asserts end-of-voice before timer max expires, the call is connected to an
interviewer. Since the interviewer does hear the respondent’s greeting, the dialer plays a
distinct beep WBeep that informs the interviewer to start talking.
If timer max expires before end-of-voice is asserted, the dialer dispositions “Answering
machine”:
– If no amfile is specified, the dialer simply hangs up the call.
– Otherwise the dialer awaits end-of-voice before playing amfile.
The dialing algorithm proceeds in dialing further calls, without waiting for the playback to
complete.
Notes
These instruction assume that you have a working knowledge of DPM Explorer. Refer
to the “DPM Explorer” topic in the IBM® SPSS® Data Collection Developer Library for
information on working with the tool.
Simple answering machine detection is not suitable when dialing business numbers with long
greetings, mobile numbers with loud background noise, or persons with disabilities who may
be slow in answering the phone.
1. Launch the DPM Explorer tool
([INSTALL_FOLDER]\IBM\SPSS\DataCollection\6\DDL\Code\Tools\VB.NET\DPM
Explorer.Net\DPMExplorer.exe).
164
Chapter 1
2. Create the following properties under:
Site > Properties > DefaultCatiProjectProperties
AmdMode
The answering machine detection mode. Possible values include: Disabled, Filtering, and
Calibration.
AmdParameters
The answering machine detection parameters. All of the optional parameters (off, max, on, db,
and so on) are encapsulated in this property. For example, max:4.5,on:11(using commas as
the delimiter).
AmFile
The name of the sound file to play for an answering machine, including the pathname (relative
to AudioDir on the Dialer). You are not required to provide a value for this setting.
Figure 1-34
3. Exit DPM Explorer after defining appropriate values for the three settings.
The answering machine detection properties will take effect for all new projects. When an
auto-dialed participant record is dialed, and Dialer detects that an answering machine picked up
the call, the call is automatically ended with the Answering Machine call outcome.
Existing projects
For existing projects, the answering machine detection properties need to be added for each project:
Projects > <ProjectName> > mrInterview
False Positives
False positives are humans that were misinterpreted as answering machines, in which case the
dialer hangs up the call, or plays the amfile. The main causes of false positives are:
The human speaks a long greeting (> max). This typically happens when reaching a business
number. If an amfile file is specified, the respondent will hear it.
The human has loud background noise (permanently above the db threshold). This typically
occurs with car phones. The playback of amfile starts when the AMD algorithm has waited
for end-of-greeting for off seconds. However, this timer needs to be longer than the longest
165
IBM SPSS Data Collection Interviewer Server User’s Guide
AM greeting (~30 seconds), so it is unlikely that the respondent will wait long enough
to hear amfile.
Humans can also be misinterpreted as “No audio”. This occurs when:
There is no audio connection (for example, because the battery in the respondent’s phone is
running low). After on seconds without start-of-voice, the dialer hangs up (call outcome:
No audio).
The human picks up the phone but does not start speaking immediately (for example, the
respondent is busy, or due to a disability). After on seconds, the dialer hangs up.
The greeting was spoken very softly (below the db threshold). Usually the respondent speaks
up louder, but if the voice is not raised the dialer hangs up after on seconds. The dialer plays
the amfile to “No audio” numbers unless the setting is disabled by option cp:-S (hangup
immediately if silence).
Qualification Timers
Spoken words contains short gaps in the audio due to articulation. The dialer ignores gaps that are
shorter than a qualification timer qoff; that is, the end-of-voice is asserted when qoff expires.
The dialer utilizes two qualification timers:
qoff, for humans, determines when a call is connected to an interviewer. The settings should
be short (<0.8 seconds); otherwise the respondent might become impatient and hang up.
However, a qoff that is too short causes many false negatives because the timer fails to bridge
well-articulated greetings.
qam, for answering machines, determines when amfile is played. It should be long (>2
seconds), otherwise the playback might start before the answering machine is ready to
record it.
Calibration Mode
Calibration mode is a means to determine the optimum AMD parameters. In calibration mode,
all calls are connected to interviewers (just as when AMD is disabled). The AMD measures
the duration of the respondent’s initial greeting. During this phase, the interviewer can hear
the respondent, but cannot talk. When the AMD measurement is finished (end-of-voice), the
interviewer hears a short beep (WBeep) and audio is connected in both directions.
In cases of long initial silence (longer than coff seconds) or persistent voice (longer than con
seconds), the AMD measurement is aborted and audio is connected in both directions. This makes
it possible to try out different values of db and qoff without losing the contacts.
The greet time measured by AMD is sent to the application and recorded in call.log. To determine
the reliability of a given max setting for the AMD call dispositions, make a frequency distribution
of the call outcomes according to the following table:
Interviewer’s Disposition
AMD ReportedgreetValue
166
Chapter 1
Human (proceed,
appointment, refusal,
and so on)
Answering machine
greet = 0
False positive? [1]
greet ≤ max
Correct (human)
greet > max
False positive
Semi-correct (AM) [2]
False negative
Correct (AM)
[1]greet=0 can be an artifact from using a too small coff value, such that the AMD measurement
was abandoned before the greeting started.
[2]greet=0 starts playback of amfile, but possibly too early, before the answering machine is
ready to record it.
Summary of AMD Modes and Parameters
Syntax: mode , param1 : value , param2 : value2...
Example: amd = 1,qoff:0.40,log:1
Mode
0
1
Meaning
Disabled
Filtering
2
Calibration
Name
off
Description
No AMD analysis (but the Call Progress parameter cp is used).
Only “live” calls are through-connected to an interviewer; otherwise the
amfile is played.
Calls are connected in listen-only mode during AMD analysis; the result
is reported in greet.
Default
6.0
Unit
seconds
coff
4.5
seconds
max
1.15
seconds
on
con
60.0
3.0
seconds
seconds
qoff
0.35
seconds
Qualification timer for
end of voice [2]
qam
2.9
seconds
Qualification timer for
starting playback
Silence threshold (range
-46 to -34 dBm) [3]
If =1, report greet
and silence times
(milliseconds) in
call.log[4]
Override dialer.ini
call progress analysis
completion criteria
CpComplete[5]
db
-34.0
dBm
log
0
0 or 1
cp
Description
Max silence at start of
call
Max silence at start of
call
Max greeting from
human [1]
Max greeting from AM
Max greeting measured
Action if exceeded
Hangup
QSAMP_NO_AUDIO
Connect two-way
audio
Hangup
QSAMP_ANSMC
Play amfile to AM
Connect two-way
audio
Connect
QSAMP_CONNECTED
Play amfile
Start max timer
Applies to
Filtering
Calibration
Filtering
Filtering
Calibration
Both
Filtering
Both
Both
All
167
IBM SPSS Data Collection Interviewer Server User’s Guide
[1]max recommended range from 0.9 seconds (aggressive, many false positives) to 2.1 seconds
(conservative, many false negatives).
[2]qoff recommended range from 0.3 seconds (many false negatives) to 1.1 (detects most AM, but
connects humans very slowly to an interviewer).
[3]db should be high (insensitive) to avoid detecting people in noisy environments as answering
machines (false positives).
[4]log times are measured on the dialer PC and can differ slightly from the greet times measured
by the DSP.
[4]log times are measured on the dialer PC and can differ slightly from the greet times measured
by the DSP.
[5]cp should normally not be applied for AMD; the only relevant parameter is cp:-S. If persistent
silence is detected, hangup call without playing amfile.
AMD Parameter for Call Progress Analysis
The cp parameter specifies the actions to take when detecting call progress tones, overriding the
default call progress analysis completion criteria CpComplete in the dialer.ini file. Application
areas:
Calling countries with non-standard ringback or “number unobtainable” tones.
Calling networks that announce tariff information at the start of the call.
Calling subscribers with personalized ringback tones (music or announcements).
In order to achieve special effects, such as recording of in-band announcements.
The table below lists the different call progress events. Each event is identified by a letter;
pre-CONNECT events in lower case, post-CONNECT in upper case. Each letter or group of
letters is preceded by an action identifier (see the legend below the table). The post-CONNECT
events are only detected in AMD filtering or calibration mode (amd=1 or amd=2).
Syntax: cp:actionID event... [ actionID event... ] ...
Default: cp:-b-c-d-f!r:t:v-B-C+D-F-T
Example: cp:=vea Ignore pre-CONNECT voice events (for instance, personalized ringback tones).
Example: cp:*t*v Record recfile when detecting tritone or start-of-voice (until stopped by noansw
timeout).
Example: cp:+v Connect to extension when detecting start-of-voice.
Call Progress Event
d Dial tone (steady tone for
>3 s)
r Ringback pulse (duration
1.5 - 3 s)
Def ault
pre post
con nect
Call Outcome if Action is ‘-’ or ‘:’
Dialer
Interviewer Phone
IBM® SPSS®
Quancept™
-d
+D
QSAMP_BADNUMBER
QSAMP_BUSY
d_badsyn
!r
=R
QSAMP_RINGING
n/a [6]
d_error [7]
168
Chapter 1
q End of ringback (no pulse
for >8 s)
b Busy tone (cadence or
“precise” tone [8])
c Congested / reorder tone
(cadence)
t Tritone (Special
Information Tone)
f Fax/modem tone
v Start of voice (diffuse
energy above db dBm)
e End of voice (for qoff
seconds)
a Voice for more than max
seconds
s Silence; no voice for off
seconds [9]
w Call waiting, ignore voice
events [10]
:
+
*
=q
=Q
QSAMP_NOANSW
coNoAnswer
d_na
-b
-B
QSAMP_BUSY
coBusy
d_busy
-c
-C
QSAMP_FASTBUSY
coFastBusy
d_sitout
:t
-T
QSAMP_TRITONE
coTriTone
d_sitout
-f
:v
-F
=V
QSAMP_MODEM
QSAMP_ANNOUNCEMT
coFaxModem
coAnnouncement
d_modem
d_sitout
=e
=E
QSAMP_ANNOUNCEMT
coAnnouncement
d_sitout
=a
=A
QSAMP_ANNOUNCEMT
coAnnouncement
d_sitout
n/a
=S
QSAMP_ANNOUNCEMT
coNoAudio
d_error [7]
=w
=W
QSAMP_BUSY
coBusy
d_busy
Action identifiers:
Hangup immediately.
Hangup if no CONNECT is received within
two seconds.
Connect to extension even if no CONNECT
was received.
Start recording (for use with recfile option
beg:3).
! Start noansw timer.
^ Stop CP analysis (ends AMD, connecting the
extension).
= No action (can be used to override default
actions).
[6] Call outcome QSAMP_RINGING does not map to a supported CallOutcome in Interviewer
Phone 5.6.
[7] Call outcomes can be mapped to other tipcode values in section [qsamp map] in the qts-sms.ini
file.
[8] “Precise” tone meaning the 480 + 620 Hz busy tone of the North American Precise Audible
Tones Plan.
[9] Condition S (silence) is only generated in AMD filtering or calibration mode (amd=1 or amd=2).
[10] Condition W (waiting) is generated by signaling events with the action announcemt in
causes.cfg.
Controlling Access to Phone Survey’s Features
You can control access to the various tabs in Phone Surveys by assigning users or roles to Phone
Survey’s activity features. The activity features that you can use are shown in the following table.
Tab Name
To View this tab
To Edit this tab
Fields
Parameters
Call Outcomes
Can view fields
Can view parameters
Can view call outcomes
Can edit fields
Can edit parameters
Can edit call outcomes
To Delete records from
this tab
Not applicable
Not applicable
Can delete call outcomes
169
IBM SPSS Data Collection Interviewer Server User’s Guide
Tab Name
To View this tab
To Edit this tab
Interview Settings
Can view interview
settings
Can view dialer settings
Can edit interview
settings
Can edit dialer settings
Dialer Settings
To Delete records from
this tab
Not applicable
Not applicable
By default, the CATISupervisor role is assigned to all the activity features shown apart from “Can
edit fields”, “Can edit call outcomes”, and “Can delete call outcomes”.
For more information about activity features, search the IBM® SPSS® Data Collection Interviewer
Server Administration User’s Guide for the topic “Assigning Users or Roles to Activity Features”.
Changing the Default Settings
When you create a new project, the settings in Phone Surveys’ tabs are populated with default
settings provided by IBM® SPSS® Data Collection Interviewer Server. You can change
Interviewer Server’s default settings so that when you create a new project, Phone Surveys’ tabs
will be populated with the values that you defined.
Depending on the tab, the default settings for that tab are stored in different locations, as
shown in the following table:
Tab Name
Fields
Parameters
Call Outcomes
Interview Settings
Dialer Settings
Location of Default Settings
In the catifields_default.mdd file
In DPM’s (Distributed Property Management’s) site
properties
In DPM’s site properties
In the catifields_default.mdd file and in DPM’s site
properties
In DPM’s site properties
For instructions on how to change the default settings, click the appropriate topic in the following
table:
To carry out one of these tasks
• Changing the settings in catifields_default.mdd
• Adding a field to catifields_default.mdd
• Changing the settings in DPM’s site properties
• Adding a call outcome to DPM’s site properties
• Changing the mapping of autodialer status codes
to call outcomes
See this topic
Editing catifields_default.mdd
Editing DPM’s Site Properties
Editing catifields_default.mdd
This topic describes how to carry out the following tasks:
Changing the settings in catifields_default.mdd
Adding a field to catifields_default.mdd
170
Chapter 1
Changing the Settings in catifields_default.mdd
To edit the catifields_default.mdd file, you will need to use MDM Explorer as follows.
E In Windows Explorer, run MDM Explorer.exe, which by default is located in the following
directory:
x86 32-bit installations:
[INSTALL_FOLDER]\IBM\SPSS\DataCollection\6\DDL\Code\Tools\VB6\MDM Explorer
x64 64-bit installations:
[INSTALL_FOLDER]\IBM\SPSS\DataCollection\6\DDL\Code\Tools\VB.NET\MDM Explorer
E From the File menu, choose Open Document.
E Open catifields_default.mdd, which by default is located in folder FMRoot\Shared\Cati.
E In the left pane, click the MDM collection that contains the property that you want to change
(see the table below).
E In the upper-right pane, double click the MDM property that you want to change (see the table
below). This opens a dialog box.
E In the dialog box, change the value as required and click OK.
E When you have finished, choose Exit from the File menu, and when prompted, save the file to
its original location.
Tab Name
Tab Setting
Fields
Label
Fields
Required, Show,
Can Edit During
Survey, Can
Tabulate
Corresponding
MDM Collection
Expand the Fields
collection and in
the left pane click
the field required
In the left pane,
expand the Fields
collection, then
expand the node
for the desired field,
and then click the
Custom Properties
collection
Corresponding
MDM Property
Label
Valid Values
A string that
describes the field.
The property names True or False.
are very similar to
the setting names,
with the exception
of the Editable
property, which
corresponds to the
Can Edit During
Survey setting
171
IBM SPSS Data Collection Interviewer Server User’s Guide
Tab Name
Tab Setting
Interview Settings
Dialing Options
Interview Settings
Show Specific
Custom Properties
Contact button
on the Interviewer
screen
Interviewer
Custom Properties
must manually
select an option /
Default setting is
‘monitoring/recording
prohibited’ /
Default setting is
‘monitoring/recording
allowed’
Interview Settings
Corresponding
MDM Collection
Custom Properties
Interview Settings
Review interview
options
Custom Properties
Interview Settings
Show review
button on
interviewer screen
/ Interviewer must
review
Custom Properties
Interview Settings
Introduction to
Survey
Labels
Corresponding
MDM Property
DialerType
Valid Values
0 for “Manual
– Interviewer
dials numbers
manually”, 1 for
“Modem – Show
Dial Contact button
on the Interviewer
screen”, 2 for
“Dialer (Extension)
– Show Start
Dialing button on
the Interviewer
screen”, or
3 for “Dialer
(Group/Predictive)
– Show Start
Dialing button on
the Interviewer
screen”. The
installation value is
0.
ShowSpecificContactButton
True or False. The
installation value is
True.
MonitoringApprovalDefaultOption
0 for “Interviewer
must manually
select an option”,
1 for “Default
setting is
‘monitoring/recording
prohibited’”, or
2 for “Default
setting is
‘monitoring/recording
allowed’”. The
installation value
is 0.
ReviewInterviewOption
0 for “No Review”,
1 for “Review
Interview”, or
2 for “Review
Open-ends”. The
installation value is
0.
ShowReviewInterviewOption
0 for “Show
review button
on interviewer
screen” or 1 for
“Interviewer must
review”. The
installation value is
0.
Text
A string, defining
the introductory
script.
172
Chapter 1
Adding a Field to catifields_default.mdd
E Start MDM Explorer and open catifields_default.mdd as described in “Changing the Settings in
catifields_default.mdd” above.
E In MDM Explorer’s left pane, click the Fields collection.
E From the Methods menu, choose Add Question.
This opens the “Add MDM Object” dialog box.
E Enter values for Name, Label, and DataType. Typically, DataType should be one of mtText,
mtLong, or mtDate. Then click OK.
E In the left pane, expand the node for the field you have just created and click the Custom
Properties collection.
E From the Methods menu, choose Add Custom Property. This opens a dialog box.
E Set the values in the dialog box as follows, and then click OK.
Setting
Name
Value
Type
Context
Value
Required
True or False
Boolean
Analysis
This adds a custom property called Required to the field you created.
E Repeat the last two steps three times, to add the Show, Editable, and CanTabulate custom
properties to the field you created.
E When you have finished, choose Exit from the File menu, and when prompted, save the file to
its original location.
Editing DPM’s Site Properties
This topic describes how to carry out the following tasks:
Changing the settings in DPM’s site properties
Adding a call outcome to DPM’s site properties
Changing the mapping of autodialer status codes to call outcomes
Changing the Settings in DPM’s Site Properties
To change settings in DPM, you need to use DPM Explorer as follows:
E In Windows Explorer, run DPMExplorer.exe, which by default is located in folder
[INSTALL_FOLDER]\IBM\SPSS\DataCollection\6\DDL\Code\Tools\VB.NET\DPM Explorer.Net.
E In the left pane, expand the top-level node (the site name) and then expand the Properties node.
173
IBM SPSS Data Collection Interviewer Server User’s Guide
E In the left pane, click the DPM collection that contains the property that you want to change
(see the table below).
E In the upper-right pane, click the DPM property that you want to change (see the table below).
E In the lower-right pane, change the value as required and click the Apply button, which is in
the lower-right corner.
Tab Name
Tab Setting
Parameters
No preference for
appointments /
Give preference
to the interviewer
who arranged the
appointment
Parameters
Before an
appointment, by
any interviewer
and Before an
appointment, by
the arranger only
(both settings are
controlled by the
AppointmentMarginBefore
property)
After an
DefaultCatiParametersAppointmentMarginAfter
The number of
appointment, by
minutes. The
any interviewer
installation value
is 5. This setting
applies only if the
AppointmentPreferArranger
property above is
set to 1.
Before a recall
DefaultCatiParametersRecallMarginBefore The number of
minutes. The
installation value is
10.
Parameters
Parameters
Corresponding
Corresponding
Valid Values
DPM Collection
DPM Property
DefaultCatiParametersAppointmentPreferArranger
1 to select “Give
preference to
the interviewer
who arranged the
appointment” or
0 to select “No
preference for
appointments”.
If the
AppointmentPreferArranger
property doesn’t
exist, then “No
preference for
appointments” is
implied.
DefaultCatiParametersAppointmentMarginBefore
The number of
minutes. The
installation value is
5.
174
Chapter 1
Tab Name
Parameters
Corresponding
Corresponding
DPM Collection
DPM Property
Any other setting
DefaultCatiParametersThe DPM property
on the Parameters
names are very
tab not listed above
similar to the tab
setting names.
Call Outcomes
“Text”
Call Outcomes
One or more call
outcome code
numbers, separated
by semicolons.
Show Appointment DefaultCatiProjectProperties
AppointmentCode One or more call
Page
outcome code
numbers, separated
by semicolons.
Cancel Code
CancelCode
A call outcome
DefaultCatiProjectProperties
code number.
ConfirmHangupOutcomes
One or more call
Confirm Hangup
DefaultCatiProjectProperties
outcome code
Outcomes
numbers, separated
by semicolons.
The default value
is 15. This
property is only
employed when
used with IBM®
SPSS® Data
Collection Dialer.
Interviewers will
need to exit and
reenter the Phone
participants activity
in order to pick up
changes to this
property.
Call Outcomes
Call Outcomes
Call Outcomes
Tab Setting
Show When
Interview Running
Text
Expand the
DefaultCatiSample–
RecReturnCodes
collection and in
the left pane click
the call outcome
required
RunningCodesList
DefaultCatiProjectProperties
Valid Values
In general, the
valid values for
a property are
the same as the
values that can
be entered on the
Parameters tab for
the corresponding
setting.
However, for the
PrioritizeRecalls
and
UseInterviewerQualifications
properties, enter
1 to select the
check box on the
Parameters tab
or 0 to clear the
check box.
A string value that
describes the call
outcome.
175
IBM SPSS Data Collection Interviewer Server User’s Guide
Tab Name
Tab Setting
Call Outcomes
Always Hidden
Interview Settings
Dialer Settings
Dialer Settings
Dialer Settings
Corresponding
Corresponding
DPM Collection
DPM Property
HiddenCodesList
DefaultCatiProjectProperties
Valid Values
One or more call
outcome code
numbers, separated
by semicolons.
MonitoringAllowed 0 to clear “Enable
Enable monitorDefaultCatiProjectProperties
monitoring/recording”,
ing/recording and
1 to select “Enable
The interviewer
monitoring/recording”
must get
and clear “The
approval for
interviewer must
monitoring/recording
get approval for
(both settings are
monitoring/recording”,
controlled by the
or 2 to select
MonitoringAllowed
both “Enable
property)
monitoring/recording”
and “The
interviewer must
get approval for
monitoring/recording”.
The installation
value is 2.
CallerID
Set the value to
Send caller
DefaultCatiProjectProperties
False to clear
identification and
“Send caller
Phone number to
identification”,
send (both settings
or True to select
are controlled
“Send caller
by the CallerID
identification”
property)
and clear “Phone
number to send”,
or set the value to a
string that specifies
the value of “Phone
number to send”. If
specified, the string
must contain only
the digits 0 to 9
and the following
characters: #, *, .,
(, ), -, and /. The
installation value is
True.
Error if login
RaisePositionError True or False. The
DefaultCatiProjectProperties
position is not in
installation value is
configuration
False.
Ring time
NoAnswerTimeout The number of
DefaultCatiProjectProperties
seconds. The
installation value
is 15. Do not set
a value lower
than that for
MinimumRingTime
below.
176
Chapter 1
Tab Name
Tab Setting
Dialer Settings
(There is no
corresponding
setting in Phone
Surveys, but the
MinimumRingTime
property defines
the minimum
value that can be
specified in the
Ring time setting)
SilentCallAudioFile The name of a
Name of silent call DefaultCatiProjectProperties
.wav file, including
announcement file
the full path. The
installation value is
an empty string.
AutoDialTimeout
The number of
The number of
DefaultCatiProjectProperties
seconds. The
seconds that
installation value is
auto-dialing should
600 (10 minutes).
continue trying to
dial numbers for an
Interviewer
Percentage of calls DefaultCatiProjectProperties
PercentCallsRecordedA whole number
to record
between 0 and 100.
The installation
value is 0 (that
is, no calls are
recorded).
Dialing
These three settings
aggressiveness,
do not have
Maximum
corresponding
percentage of silent DPM site
calls,
properties
Target percentage
of silent calls
Dialer Settings
Dialer Settings
Dialer Settings
Dialer Settings
Corresponding
DPM Collection
Properties
Corresponding
Valid Values
DPM Property
MinimumRingTime The minimum
value that can be
set in Ring time.
The installation
value is 0.
Adding a Call Outcome to DPM’s Site Properties
E Start DPM Explorer and expand the site’s Properties node as described in “Changing the Settings
in DPM’s Site Properties” above.
E In DPM Explorer’s left pane, click the DefaultCatiSampleRecReturnCodes collection.
E From the Add menu, choose Property Collection. This opens a dialog box.
E In the dialog box, enter a name for the call outcome and click OK.
E In the left pane, click the collection you have just created.
E From the Add menu, choose Property. This opens a dialog box.
E In Name, type Code. In Value, type a unique code number for the call outcome. Then click OK.
E Repeat the last three steps, but in Name, type Text, and in Value, enter a short description of
the call outcome.
177
IBM SPSS Data Collection Interviewer Server User’s Guide
Changing the Mapping of Autodialer Status Codes to Call Outcomes
When a project uses an autodialer, the autodialer returns a status code at the end of each call
attempt to indicate whether a successful call was generated. IBM® SPSS® Data Collection
Interviewer Server then maps the status code to one of the call outcomes for the project. For
example, if the autodialer returns the status code Congested (meaning that it was unable to make
the call because the telephone network is congested), Interviewer Server maps that code to the
NetworkBusy call outcome and as a result the participant record is assigned to the RECALL queue
by the sample management script.
You can change the default mapping of autodialer status codes to call outcomes as follows:
E Start DPM Explorer and expand the site’s Properties node as described in “Changing the Settings
in DPM’s Site Properties” above.
E In the left pane, expand the DefaultDialerCallOutcomes collection and click the autodialer status
code whose mapping you want to change.
E In the upper right pane, double click ReturnCode.
E In the lower right pane, change the value to the name of the call outcome that should be mapped to
this autodialer status code.
E Click the Apply button, which is in the lower-right corner.
Phone Participants
You use Phone Participants to conduct interviews by telephone.
Each interview has a dialing phase. The actions you take in this phase depend on whether the
IBM® SPSS® Data Collection Interviewer Server project you are working on uses an autodialer:
If an autodialer is used, you click a button to ask the autodialer to connect you to a participant.
For more information, see the topic Using an autodialer to make calls on p. 185.
If an autodialer is not used, you request a number to call and then manually dial the number
you have been given. Alternatively, you might be able to use a modem to dial the number
automatically. For more information, see the topic Using manual dialing or a modem to
make calls on p. 187.
If the participant agrees to be interviewed now, the call moves into the interviewing phase and the
first question is displayed. For more information, see the topic Conducting interviews on p. 194.
An interview might also include a reviewing phase, in which you review and if necessary
amend the participant’s answers after the interview has finished. For more information, see the
topic Reviewing interviews on p. 200.
Starting Phone Participants
E Select the project you want to work on and click Phone Participants.
This displays the Phone Participants main screen.
178
Chapter 1
When Autodialers are Used
If the call center you are working in uses autodialers to dial participants’ phone numbers, a dialog
box might open and request that you enter a position name, as shown below:
Figure 1-35
Position dialog box
In the Interviewer Position field, enter the position name that your supervisor has given you and
click OK. For some projects, your supervisor might want you to dial phone numbers manually
even though autodialers are available. If so, a message will inform you that you must use manual
dialing to call participants.
Remote Interviewers
When the Position is defined as a remote position (in the dialer configuration file), the following
dialog is displayed:
Figure 1-36
Position dialog box for remote interviewers
179
IBM SPSS Data Collection Interviewer Server User’s Guide
In the Interviewer Access Number field, enter the telephone number for the remote interviewer
and click OK.
The Phone Participants main screen
The main screen has four sections: along the top, on the left, in the top left corner, and in the center.
Figure 1-37
Phone Participants main screen
The top of the main screen
When the autodialer connects you to a participant (or, for projects that do not use an autodialer,
when you are given a number to call), the section at the top of the screen shows various details
about the participant as follows:
The participant ID number.
The participant’s telephone number. If you have been asked to manually dial a different
number to reach the participant, you might be able to change the value in the phone number
field, and the old number will be saved in the Audit field of the participant’s record with a
note of the date on which it was changed.
The queue from which the number has been selected. If the queue name is FRESH then the
participant has not been contacted before on this project. Numbers from other queues have
been called before, and the queue name will often indicate the outcome of that call. For
example, numbers from the RECALL queue were probably busy or not answered when
last called, whereas numbers from the APPOINTMENT queue have had an appointment
180
Chapter 1
time arranged between the participant and a previous interviewer, so the participant will be
expecting your call.
The participant’s name, if available. Your supervisor might ask you to update this field when
you speak to the participant.
Comments associated with this number. These comments generally contain useful additional
information and might have been added by interviewers who have previously called this
number. For example, if the participant is hard of hearing, you might find a note to this effect
in the comments box. For more information, see the topic Viewing and entering comments
on p. 190.
The left of the main screen
The section on the left of the screen contains buttons for various tasks, such as asking to be
connected to a participant, and starting an interview. The buttons are described in the following
table:
Button
Description
Retrieve the next contact. You
use this button if the project you
are working on does not use
an autodialer (that is, you dial
numbers manually or by using
a modem) and the project has
not been set up to select the next
contact automatically.
Retrieve a specific contact.
Depending on the options that
your supervisor has set, you
might not be able to use this
button.
Close Phone Participants and
return to the main IBM® SPSS®
Data Collection Interviewer
Server Administration page.
Display help for Phone
Participants.
Keyboard Shortcut (see note
below this table)
Alt+N
Alt+S
Alt+X
Alt+H
If the project you are working on Alt+/
uses an autodialer, you use this
button to ask to be connected to
a participant.
If the project does not use an
autodialer, you might be able
to use this button to dial the
participant’s phone number using
a modem.
181
IBM SPSS Data Collection Interviewer Server User’s Guide
Button
Description
Keyboard Shortcut (see note
below this table)
Alt+\
If the project you are working
on uses an autodialer, you can
use this button to end the call
immediately if you need to
(although normally you should
select a call outcome to end the
call).
If you used a modem to dial the
participant’s phone number, you
must use this button to disconnect
the modem at the end the call.
Start the interview.
Alt+I
Switch to another project.
You can use this button,
before retrieving a contact
or immediately after completing
a survey, to switch to another
project to which you are assigned.
After you click this button, the
Project List dialog displays,
allowing you to select another
project.
Cancel the contact. You can
use this button after you have
retrieved a contact, but before you
dial the contact’s phone number.
Occasionally the contact can only
be reached via a menu system (for
example, “Press 1 for Dr. Smith,
press 2 for Dr. Jones”). In these
situations, you can use this button
to display a dial pad, allowing
you to press the appropriate keys.
The resultant dial tones are sent
to the menu system. This works
when you are connected to the
Dialer via local extension dialing
or via ISDN.
Note: Audible tones do not occur
when clicking dial pad buttons.
If the project you are working
on allows you to specify your
interviewer qualifications, you
can use this button to set the
interviewer qualifications.
If the project you are working
on includes a reviewing phase,
you can use this button in the
reviewing phase to reject the
interview.
Alt+P
Alt+C
Alt+T
Alt+R
182
Chapter 1
Note: For some browsers, pressing the keyboard shortcut alone will perform the action. For other
browsers, you might have to press Enter after pressing the keyboard shortcut.
If you are using an autodialer and the project has been set up to select the next contact as soon
as you end your current call, you will see a checked “Auto contact selection” check box below
the button frame. Cancel it. If you do not, you will not be able to stop the dialer providing you
connections.
Below the buttons, the possible call outcomes for this project are listed. This list will generally
be standard across all the projects that you work on; if there are variations your supervisor will
tell you. Nevertheless, it is a good idea to familiarize yourself with the call outcome list at the
start of each project.
Many call outcomes can be selected using keyboard shortcuts, as shown in the following
table. Note that the standard name of each call outcome is shown below—the names you see
might be slightly different:
Call Outcome
Abandoned
Answering machine
Appointment
Business
Busy
Cell phone
Dialer Busy
Disconnected
Fast Busy
Fax
Language barrier
Language recall
Network busy
No answer
Not Available
Refused
Rejected
Transfer to web
Wrong number
Keyboard Shortcut (see note below this table)
Alt+Z
Alt+M
Alt+P
Alt+U
Alt+B
Alt+J
Alt+2
Alt+K
Alt+3
Alt+Y
Alt+O
Alt+L
Alt+4
Alt+1 (one)
Alt+5
Alt+R
Alt+6
Alt+Q
Alt+W
Note: For some browsers, pressing the keyboard shortcut alone will perform the action. For other
browsers, you might have to press Enter after pressing the keyboard shortcut.
If you see more call outcomes than appear in the above table, the next eight call outcomes in
the list are assigned keyboard shortcuts from Alt+2 to Alt+9. Any further call outcomes will not
have a keyboard shortcut.
You can find out what the keyboard shortcut is for any call outcome by moving the mouse
pointer over the call outcome. The keyboard shortcut will then be displayed in a ToolTip.
183
IBM SPSS Data Collection Interviewer Server User’s Guide
The top left corner of the screen
A image in the top left corner of the screen shows the current interview status.
Status Image
Description
Displays when working in manual dialing or modem dialing mode, and
indicates that the interviewer is currently not connected to a participant and
an interview is not running.
Displays when working in autodialing mode, and indicates that the
interviewer is currently not connected to a participant and an interview is
not running.
Indicates that the interviewer is currently idle.
Displays when working in manual dialing or modem dialing mode, and
indicates that the interviewer is connected to a participant and an interview
is currently in progress.
Displays when working in autodialing mode, and indicates that the
interviewer is connected to a participant and an interview is currently in
progress.
Indicates that the Interviewer Server is currently busy.
The center of the main screen
This is where the interview pages will be displayed while you are conducting an interview.
Note: Interviews can be monitored even when you select No for the Contact agrees to be monitored
and recorded option. This setting controls when the interview should not be monitored by external
parties, not when the interview can be reviewed by a supervisor.
Navigating using the keyboard
Depending on your browser, you might be able to switch between the three sections of the main
screen by pressing Ctrl+Tab or F6.
Setting interviewer qualifications
When you may set your own qualifications, Phone Participants displays the Login Info dialog
box, listing the qualifications you may set. (If you are using an autodialer, the dialog box will
also prompt for your station number.)
184
Chapter 1
Figure 1-38
Login Info dialog box
Single-choice selection lists are shown as a one-line box; multiple-choice lists show the first five
items in the list. In the example, if you select North and East, you will be allocated participants
who live in those regions but not anyone who lives in the south or west.
“Matches Any” is a special item and is often the default selection. It means that you do not
want to filter records using that qualification. In the example, Matches Any means that you will
receive records for participants in any location rather than, say, just participants in the West. You
can use it to cancel previously set selections in a list.
Setting your qualifications
E Choose at least one item from each qualification list.
E Click OK.
Changing your qualifications
E Click the Change Interviewer Qualifications button as shown below:
Figure 1-39
Change Interviewer Qualifications button
This opens the Interviewer Qualifications dialog box (the same as or very similar to the Login
Info dialog box).
E Select the qualifications you want to use for future calls and cancel any that are no longer
appropriate.
E Click OK.
185
IBM SPSS Data Collection Interviewer Server User’s Guide
Using an autodialer to make calls
If the project you are working on uses an autodialer, it will dial participants’ phone numbers for
you and connect you to a participant only when he or she picks up the phone. You will not know
which participant is being called before he or she answers the call. In some situations, your
supervisor might want you to dial numbers manually, even though other interviewers working
on the same project are using an autodialer.
When you are connected to a participant, the participant’s details are displayed on the main
screen together with some introductory text that you should read to him or her. Once you have
spoken to the participant, you will either start an interview or select a call outcome from a list of
outcomes. Some call outcomes will require you to enter additional information, for example, to
specify the date and time of an appointment. When the interview is finished or you have selected a
call outcome, you can ask to be connected to another participant.
The “Auto contact selection” check box will be checked if the project has been set up to
automatically select your next contact as soon as you finish your current call, and is primarily
designed for interviewers who will be dialing manually or using a modem. Cancel this check box
otherwise you will not be able to stop the dialer making calls when you reach the end of your
shift or need to take a break.
You might be able to change the data in the Phone Number and Name fields if the participant
tells you that the current information is wrong. Click edit next to the text box, type the new
details in the field, and then click save.
For details of the keyboard shortcuts you can use to click buttons and select call outcomes, see
The Phone Participants main screen.
Connecting to a participant
E Make sure that your telephone is off-hook.
E Click the Start Dialing button as shown below:
Figure 1-40
Start Dialing button
The autodialer will attempt to connect you to a participant. There might be a delay before you are
connected. If there is a long delay, a message might tell you that the connection attempt has been
canceled and that you need to click the Start Dialing button again.
Note: Occasionally, the system might display a participant’s details without connecting you to
the participant. This happens when another interviewer has added comments to the participant’s
record, so that you have the opportunity to read the comments before you speak to the participant.
When you have read the comments, click the Start Dialing button to dial the participant’s phone
number.
E When you hear someone answer the phone, do the following:
If the participant details at the top of the page show the participant’s name, ask to speak
to that person.
186
Chapter 1
Read the introductory text.
Depending on the options that your supervisor has set, you might be required to ask the
participant for consent to having the phone call monitored and recorded by your supervisor.
If so, make sure that you record the participant’s response by selecting either the Yes or
the No option above the introductory text.
Interviewing the participant
E If the participant agrees to be interviewed now, click the Start Interview button:
Figure 1-41
Start Interview button
The first question will be displayed. For more information, see the topic Conducting interviews
on p. 194.
When you reach the end of the interview, the telephone call is automatically terminated.
E You might now be required to review the answers that you have just entered. For more
information, see the topic Reviewing interviews on p. 200.
E Click the Start Dialing button to connect to another participant.
Scheduling an appointment
E If the participant agrees to be interviewed later on, choose the call outcome that lets you make an
appointment. For more information, see the topic Making appointments on p. 192.
E Enter the appointment time that the participant asks for, and click Submit.
The appointment is made and the telephone call is automatically terminated.
E Click the Start Dialing button to connect to another participant.
Reconnecting to a participant
Occasionally, you might be disconnected from a participant before you have finished an interview.
For example:
There is a fault with the telephone network or the autodialer.
You or the participant accidently hang up the phone.
You clicked the End Call button because you heard a loud noise on the telephone line.
In this situation, you can normally click the Start Dialing button to recall the participant. If
a dialog box opens and asks you to select a call outcome, click Cancel to close the dialog box
before you click Start Dialing.
However, if a problem with your computer caused your browser to close, restart Phone
Participants and, if available, use the Get last contact option to reconnect to the participant.
187
IBM SPSS Data Collection Interviewer Server User’s Guide
Other Outcomes
For all other outcomes, choose an appropriate call outcome from the list on the left of the screen.
Most call outcome texts are self explanatory, but your supervisor will probably go through the list
with you at the start of the project, especially if the list contains specialized options.
When you select any call outcome other than the one to make an appointment, the telephone
call is automatically terminated; click the Start Dialing button to connect to another participant.
However, if the autodialer detects that the call is being answered by a fax machine, it will
terminate the call immediately. If this happens, you must still select the “Fax” call outcome.
You might sometimes be prompted to select a call outcome without being connected to a
participant. This can happen in the following situations:
You clicked the Start Dialing button in a situation where the participant’s details are already
displayed on the screen, for example, if a participant’s record contains comments for you to
read, or you are attempting to reconnect to a participant after being disconnected. In this
situation, you must select the appropriate outcome if the call is not answered—the autodialer
will not do this for you, and the call will not be terminated until you do so.
There are technical problems. In this situation, the relevant call outcome might be pre selected,
but if not, your supervisor should tell you which call outcome to use.
If you are working on a project where participants speak different languages, you will normally
receive only records for participants whose language you speak. If it does happen that you are
unable to communicate effectively with the participant, select either the “Language barrier” or the
“Language recall” call outcome (your supervisor should tell you which one to use).
Some call outcomes, such as “Abandoned”, should be used only after the interview has started.
It is important that you choose the most appropriate option from the list as this information will be
used to plan future projects. If you accidentally select the wrong call outcome, let your supervisor
know immediately so that it can be corrected.
Using manual dialing or a modem to make calls
If the project that you are working on does not use an autodialer, you will need to dial phone
numbers manually. For projects that use an autodialer, you might still need to dial numbers
manually if your supervisor wants you to do so. However, if there is a modem connected to your
computer, you might be able to use the modem to dial phone numbers.
When you request a number to dial, the number and other associated details are displayed on
the main screen together with an introductory text to read to the participant.
Once you have made the call, you will either start an interview or select a call outcome from a
list of outcomes. Some call outcomes will require you to enter additional information; for example,
options to do with appointments prompt you to specify the appointment date and time. When the
interview is finished, or you have selected a call outcome, you can request another number to call.
The “Auto contact selection” check box will be checked if the project has been set up to
automatically select your next contact as soon as you finish your current call. When you reach the
end of your shift or need to take a break, you can click the Cancel Current Contact button. This
takes you to the standard page where you may choose Next Contact, Specific Contact, or Exit as
appropriate. If you cancel this option you will need to click the Next Contact button at the end of
every call to request a new participant to call. Your supervisor will tell you if you may do this.
188
Chapter 1
You might be able to change the data in the Phone Number and Name fields if the current
information is out of date. Click edit next to the text box, type the new details in the field, and
then click save.
For details of the keyboard shortcuts you can use to click buttons and select call outcomes, see
The Phone Participants main screen.
Requesting a number and make a call
E Click the Next Contact button as shown below:
Figure 1-42
Next Contact button
E If for any reason you do not want to dial the number you have been allocated, click the Cancel
Contact button:
Figure 1-43
Cancel Contact button
Then click the Next Contact button again when you are ready to make another call.
E If there is a Dial Contact button as shown below, click the button to use a modem to dial the
participant’s phone number:
Figure 1-44
Dial Contact button
E If there is no Dial Contact button, dial the phone number manually.
E If the phone is answered, do the following:
If the participant details at the top of the page show the participant’s name, ask to speak
to that person.
Read the introductory text.
Depending on the options that your supervisor has set, you might be required to ask the
participant for consent to having the phone call monitored and recorded by your supervisor.
If so, make sure that you record the participant’s response by selecting either the Yes or
the No option above the introductory text.
189
IBM SPSS Data Collection Interviewer Server User’s Guide
Interviewing the participant
E If the participant agrees to be interviewed now, click the Start Interview button:
Figure 1-45
Start Interview button
The first question will be displayed. For more information, see the topic Conducting interviews
on p. 194.
E Complete the interview.
E If you used the Dial Contact button to dial the participant’s phone number, you must click the End
Call button (to disconnect the modem) after you finish the interview:
Figure 1-46
End Call button
E You might now be required to review the answers that you have just entered. For more
information, see the topic Reviewing interviews on p. 200.
E If your next number is not selected automatically, click the Next Contact button to request
another number.
Scheduling an appointment
E If the participant agrees to be interviewed later on, choose the call outcome that lets you make an
appointment. For more information, see the topic Making appointments on p. 192.
E Enter the appointment time that the participant asks for, and click Submit.
The appointment is made.
E If you used the Dial Contact button to dial the participant’s phone number, you must click the End
Call button (to disconnect the modem) after you make the appointment:
Figure 1-47
End Call button
E If your next number is not selected automatically, click the Next Contact button to request
another number.
190
Chapter 1
Other Outcomes
For all other outcomes, choose an appropriate call outcome from the list on the left of the screen.
Most call outcome texts are self explanatory, but your supervisor will probably go through the list
with you at the start of the project, especially if the list contains specialized options.
If you used the Dial Contact button to dial the participant’s phone number and you select any
call outcome other than the one to make an appointment, the telephone call is automatically
terminated. If your next number is not selected automatically, click the Next Contact button
to request another number to call.
If you are working on a project where participants speak different languages, you will normally
receive only records for participants whose language you speak. If it does happen that you are
unable to communicate effectively with the participant, select either the “Language barrier” or the
“Language recall” call outcome (your supervisor should tell you which one to use).
Some call outcomes, such as “Abandoned”, should be used only after the interview has started.
It is important that you choose the most appropriate option from the list as this information will be
used to plan future projects. If you accidentally select the wrong call outcome, let your supervisor
know immediately so that it can be corrected.
Viewing and entering comments
When you call a participant, you may obtain information that is useful to other interviewers who
call that person. For instance, if the participant is hard of hearing your may wish to record this
information so that the next person who calls the participant will know to speak slowly and clearly.
Another time when comments are useful is when you arrange an appointment. You can record
the reason why you made the appointment, and any special instructions the participant may have
given you. This is particularly useful in business to business calling, where you may arrange the
appointment with the participant’s secretary.
All comments are stored in the sample record and are displayed in the Comments box at the
top of the interviewing screen. A note next to the box tells you how many comments there are.
You can view the comments by scrolling through the text, but it’s easier to click the edit button
next to the Comments box to display them in a new dialog box.
191
IBM SPSS Data Collection Interviewer Server User’s Guide
Figure 1-48
Comments dialog box
Each comment is displayed on three lines. The first line shows the date and time (local to the
interviewing server) at which the comment was entered, the server’s time zone, and name of the
interviewer who wrote the comment. The date and time are shown in the “long” format that
gives month and day names, which makes the information easy to understand regardless of the
date and time format you are used to.
The second line shows the comment itself. If the comment is long, this line will be split over
a number of physical lines in the dialog box. The third line shows the call outcome and, if
the interviewer arranged an appointment, the date and time of the appointment in the format
yyyy–mm–dd hh:mm. If there is more than one comment for a single call, only the last one
has a call outcome.
You cannot change or delete these comments, but you can append new ones to them.
The Comments box on the main screen can display up to 2000 characters. If the total size of all
comments exceeds this, the earliest comments are deleted and the words “*** Earlier comments
removed ***” are inserted in their place. It is therefore a good idea to keep comments as brief as
possible, perhaps by abbreviating or omitting commonly used words.
The Comments box normally displays comments in chronological order, but your administrator
may have changed this if your company prefers newer comments to appear at the top of the list.
Viewing and adding comments
E On the main screen, click edit next to the Comments box.
The Comments dialog box is displayed, showing any existing comments.
192
Chapter 1
E To add new comments, type them into the blank box at the foot of the dialog box. Text wraps
automatically in the box; press Enter if you want to force a new line in the comment text.
E Click OK to close the dialog box. If you have entered a new comment it is added to the comments
list.
Making appointments
When you choose a call outcome that allows an appointment to be made, you will see the Create
Appointment dialog box.
Figure 1-49
Create Appointment dialog box
E In Respondent’s Time Zone, select the time zone in which the participant is located. Often the
participant’s time zone is defined in his or her participant record so you will not need to change
this field.
E Use the calendar to select the appointment date. Click the date on which you want to call back
(today’s date is preselected). If necessary, use the arrow keys in the month bar to move to a
different month.
E In the Time drop-down lists, select the time at which the participant asks you to call. Therefore, the
time that you select is the time in the participant’s time zone. If the participant says something like
193
IBM SPSS Data Collection Interviewer Server User’s Guide
“Call back in two hours”, you can calculate the appointment time by adding two hours to the time
shown in “Respondent’s Local Time”, which is displayed just below Respondent’s Time Zone.
If the participant says something like “Any time after 3 pm”, it is a good idea to set the time to
something like 3:15 pm to ensure that the number will not be selected before 3 pm. (Numbers
with appointments might become eligible for calling a short while before the appointment time, to
cater for participants who ask to be called back “around 3 pm”.) Your supervisor will tell you
what the requirements are for the project you are working on.
E If you have other information that might be useful to the next person who calls this number, enter it
in the Comments field and it will be appended to the list of comments in the main Comments box.
E Click Submit.
Retrieving a specific participant
Depending on the options that your supervisor has set, you might be able to retrieve a specific
participant. You can use this feature to retrieve your last contact or search for another contact.
Retrieving a specific participant
E On the Phone Participants main screen, click the Specific Contact button as shown below:
Figure 1-50
Specific Contact button
The Specific Contact dialog box opens.
Figure 1-51
Specific Contact dialog box
E To retrieve your last contact, select Get last contact and click OK.
The dialog box will close and your last contact will be displayed at the top of the main screen.
E To search for a contact, select Get specific contact.
E From the drop-down list, select the field that you want to search.
E In the edit box, type the value that you want to search for.
194
Chapter 1
E Click OK to start the search.
If a participant is found that matches your search criteria, the dialog box will close and the
participant’s details will be displayed at the top of the main screen. Your supervisor will tell
you what will happen if more than one matching participant is found—typically, only the first
participant found will be displayed.
If no matching participant is found, a message will appear in the dialog box. You can then choose
to modify the search criteria and click OK to search again or click Cancel to close the dialog box.
E If the participant found is not the one you want, click the Cancel Contact button:
Figure 1-52
Cancel Contact button
Then click the Specific Contact button again.
E When you have found the participant you are looking for, click the Start Dialing or Dial Contact
button:
Figure 1-53
Start Dialing or Dial Contact button
E If there is no such button, dial the phone number manually.
Conducting interviews
The interviewing program displays the questions that the current participant needs to answer.
Depending on the complexity of the questionnaire and the answers that the participant gives, the
questions that you see might not be the same for every person that you call. Sometimes, the
responses that you see for a question will vary according to the participant’s answers to previous
questions. Often, your supervisor will go through the questionnaire with you before you start
interviewing, so you know what sorts of answers are valid for each question.
Using the keyboard or the mouse
Depending on the settings for the Phone Participants activity, you might be able to conduct
interviews using the keyboard only, or you might need to use both the keyboard and the mouse.
Your supervisor will tell you which of these methods you should use.
For interviews that require the keyboard only, the following keys have special uses:
Key
Page Down
Page Up
Use
Display the next question.
Display the previous question.
195
IBM SPSS Data Collection Interviewer Server User’s Guide
Key
Tab
Ctrl+Tab
Enter
Shift+Enter
Up Arrow
Space and Dash\Hyphen
Use
If more than question is displayed on the screen,
move the cursor to the next question.
If more than question is displayed on the screen,
move the cursor to the previous question.
For text questions, displays the next question.
Insert new lines within a text question’s response.
Use only for questions other than text questions.
If more than question is displayed on the screen,
move the cursor to the previous question on the
screen (same as Ctrl+Tab). If only one question
is displayed on the screen, display the previous
question (same as Page Up).
Can be used between multiple answers for
multiple-response, categorical questions.
For interviews that use the mouse, click the Next button to display the next question and click the
Previous button to display the previous question.
For interviews that require the keyboard only, the methods for answering different types of
questions are explained in the following topics. See “In This Section” below.
Valid keycode keystrokes
The following keystrokes can be used in support of keycodes created in IBM® SPSS® Data
Collection Author and IBM® SPSS® Data Collection Base Professional.
Keycode
A-Z, 0-9
CTRL+ [0-9]
Description
Common keycodes
CTRL based keycode. CTRL + any
keycode that is between “0” and “9”.
Example
A, 5
CTRL+1, CTRL+4, CTRL+9
Note: Avoid using keycodes that start with the same characters. You should not define ambiguous
keycodes, especially when one keycode is a part of another keycode. For example:
Q1 "What activities do you like?" {Basketball keycode(1), Football keycode(11)};
For this question, the interviewer’s intention cannot be determined when the 1 key is pressed.
Changing the keycodes to the following would result in better results:
Q1 "What activities do you like?" {Basketball keycode(01), Football keycode(11)};
For this question, the interviewer’s intention can be determined because although both keycodes
contain 1, the interviewer must press a unique first character.
General procedure for conducting interviews
When you click Start Interview the interviewing program displays the first question in the main
part of the screen. For each question, read the exact words of the question out to the participant
(excluding any instructions to interviewers) and select or enter the participant’s answer.
196
Chapter 1
Most interview pages contain just one question. If a page contains more than one question you
must enter answers for all questions before moving on to the next question.
The interviewing program displays error messages, usually in red, if you enter an invalid
answer and waits for you to enter another response.
Depending on the answers the participant gives, you might notice that different questions are
displayed for different participants. The interviewing program keeps track of which questions
each must answer and always presents the correct questions in the correct order.
At the end of the interview, the review phase might start automatically. If it doesn’t, click the
Review Completed Interview button if there is one. Otherwise, if your next number is not selected
automatically, click Start Dialing or Next Contact if you want to make another call, or Exit to close
the Phone Participants activity.
Multiple-choice questions
When the question is followed by a list of answers, you must choose the answer from the list. Some
questions require that only one answer is selected from the list whereas other questions allow more
than one answer to be selected. The way in which you make the selection depends on whether the
interview can be conducted using the keyboard only or whether the mouse must be used as well.
For interviews that require the keyboard only. All the answers in the list are numbered. If only
one answer can be selected from the list, the numbers will be enclosed in parentheses, for
example, ( 3 ). If more than one answer can be selected, the numbers will be enclosed in
brackets, for example, [ 3 ]. To select an answer, press the appropriate number key. To select
multiple answers, press the appropriate number keys in any order. The answer or answers that
you select will be highlighted in the question.
For interviews that use the mouse. If only one answer can be selected from the list, a radio
button is displayed next to each answer. If more than one answer can be selected, a check
box is displayed next to each answer. To select an answer, click on the appropriate radio
button or check box.
To cancel a single-choice answer, select a different answer. To cancel a multiple-choice answer,
select the same answer again.
When answering multiple-choice questions, be aware of the following:
Some multiple-choice questions that allow multiple answers might include answers that are
shown in bold text. These answers cannot be combined with any other answer in the list.
If the list contains an answer called “Other” followed by a text box, first select the answer and
then type the words in the text box. For interviews that require the keyboard only, the cursor
will automatically move to the text box when you select the answer.
If the response list is shown as a grid of single-choice or multiple-choice answers, you must
select an answer for each question in the grid. Usually, the questions are the rows of the grid
and the answers are the columns, but this is not always so.
Numeric, Text, Date/Time, and Yes/No questions
In addition to multiple-choice questions, you might also see questions that require numeric, text,
date/time, or boolean (“yes” or “no”) answers.
197
IBM SPSS Data Collection Interviewer Server User’s Guide
Numeric Questions
Questions that have numeric answers can be set up to accept only whole numbers or only real
(decimal) numbers. If the question requires a real response, you must always enter a decimal point
and at least one decimal place even if the answer is a whole number.
Questions that have numeric answers might specify a range of valid answers, and will reject
answers outside of this range.
Text Questions
Questions with text answers display a box of about six lines in which you should try to type the
participant’s exact words. There is no need to press Return or Enter at the end of each line. If you
make mistakes, you can backspace over them and retype to make the corrections.
Your supervisor might ask you to write down long text responses rather than typing them as the
participant speaks. If you have to do this, you must write down the participant ID number (the Id
box at the top of the screen) and the full question name as it appears on the screen, as well as the
participant’s answer. If you forget to do this it might not be possible to assign the response text
to the correct participant later on.
Date, Time, and Date/Time Questions
Date questions might accept an answer in several different formats, for example, mm/dd/yy, or
dd/mm/yy, or dd-mmm-yyyy. To ensure that the answer that you enter is unambiguous, use the
dd-mmm-yyyy format, for example, 01-Jan-2000. Time questions will normally require an answer
in an hh:mm or hh:mm:ss format. Sometimes, a question might require a date/time answer, such
as 01-Jan-2000 22:30:00.
Like numeric questions, date, time, and date/time questions might require an answer within
a certain range.
Boolean Questions
Boolean questions require participants to answer by saying “yes” or “no”, or “true” or “false”. For
some boolean questions, you have to select from one of two options, for example, “Yes, wants to
subscribe” and “No, doesn’t want to subscribe”. For other boolean questions, there might be just a
single option that you should select if the participant says “yes” or “true”. To select an answer to a
boolean question, use one of the following methods:
For interviews that require the keyboard only. If two answers are shown, press the number key
(either 1 or 2) that corresponds to the appropriate answer. If only one answer is shown, press
1 only if the participant answers “yes” or “true”.
For interviews that use the mouse. If the answer consists of two radio buttons, click the
appropriate radio button. If the answer consists of a single check box, click the check box
only if the participant answers “yes” or “true”.
198
Chapter 1
Special Responses
Sometimes, a numeric, text, date/time, or boolean question might include one or more special
responses that you can select when the participant cannot or does not want to answer the question.
For example, you might be able to select a special response that says “Don’t know” or “Refuse to
answer”. To select a special response, use one of the following methods:
For interviews that require the keyboard only. Press the keyboard shortcut that is shown
alongside the special response, that is, Ctrl+1 for the first special response in the list, Ctrl+2
for the second, and so on.
For interviews that use the mouse. Click on the appropriate check box.
To cancel a special response, select the same special response again.
Your answer will usually be rejected if you select a special response in addition to entering an
answer, or if you select more than one special response.
Playing a sound to the participant
If the project you are working on uses an autodialer, some questions might require you to play a
prerecorded sound to the participant. For example, the question might ask for the participant’s
opinion on an advertising jingle.
The question text will normally indicate that you must play a sound after you have asked the
question. Sometimes, there might be a separate sound for each answer in a multiple-choice
question, and you will need to play these one after the other.
If you are required to play a sound, the following buttons will appear close to the question text
or, for some multiple-choice questions, the answer texts:
Button
Description
Play the sound
Stop playing the sound
To play the sound again, click the Play button again.
For interviews that require the keyboard only
The following table describes the keyboard shortcuts that you can use:
Item that has a sound
A question
An answer to a multiple-choice question
A special response to a numeric, text, date/time, or
yes/no question
A question that does not require an answer, but
simply contains other questions
Keyboard shortcut to play or stop playing the
sound
Ctrl+Shift+P
Shift+n, where n is the answer number shown on
the screen. For example, Shift+4 for answer number
4. If the answer number is 10 or more, hold down
the Shift key while you type the number.
Ctrl+Shift+n, where n indicates the nth special
response shown on the screen. For example,
Ctrl+Shift+2 for the 2nd special response.
It is not possible to use the keyboard to play a sound
for this type of question—you must use the mouse.
199
IBM SPSS Data Collection Interviewer Server User’s Guide
Note: For some browsers, pressing the keyboard shortcut alone will perform the action. For other
browsers, you might have to press Enter after pressing the keyboard shortcut.
If more than one question is displayed on the screen, make sure that you move the cursor to the
question with the Play and Stop buttons before you press the keyboard shortcuts.
Recording the participant’s answer
If the project you are working on uses an autodialer, some questions might require you to record
the participant’s answer to an audio file. You might be required to do this in addition to typing
the answer or choosing an answer from a list.
The question text will normally indicate that you must record the participant’s answer after you
have asked the question. In addition, the following buttons will appear close to the question text:
Button
Description
Record the participant
Stop recording the participant
You can click the Record button as many times as required. Only the last recording will be saved
to an audio file.
If you do not stop the recording, it will be stopped automatically when you display the next
question.
For interviews that require the keyboard only
You can start or stop the recording using Ctrl+Shift+R. Note that for some browsers, pressing
this keyboard shortcut alone will perform the action. For other browsers, you might have to
press Enter after pressing the keyboard shortcut.
If more than one question is displayed on the screen, make sure that you move the cursor to the
question with the Record and Stop buttons before you press the keyboard shortcut.
Changing the answer to a previous question
If the participant changes his or her mind about the answer to a previous question, first display the
question using one of the following methods:
For interviews that require the keyboard only. Press the PAGE UP key until the question is
displayed.
For interviews that use the mouse. Click the Previous button until the question is displayed.
Then change the answer as appropriate. If the question requires you to record the participant’s
answer, your new recording will overwrite the previous one that was made for this question.
Changing an answer might mean that some of the questions you have already answered
become invalid, or that you will see some additional questions to the ones you saw previously. If
a question already has an answer, the interviewing program displays it and, if it is still correct,
you can move straight to the next question.
200
Chapter 1
Terminating interviews part-way through
If the participant starts an interview but is unwilling to finish it, you should try to terminate
it by selecting an appropriate call outcome from the list. For example, if the participant refuses
to continue the interview, you should select the “Abandoned” call outcome. This terminates the
interview immediately and leaves you ready to request the next participant.
You might also be able to terminate the interview using one of the following methods:
For interviews that require the keyboard only. Press the ESC key.
For interviews that use the mouse. Click the Stop button if one is displayed.
Your supervisor will normally tell you if you can use one of these methods.
Reviewing interviews
The project that you are working on might require you to review the participant’s answers after
the interview has completed. The reviewing phase might start automatically at the end of the
interview, or you might need to click a button to start the review.
Depending on the options that your supervisor has set, you might be able to review all answers,
or only answers to text questions. As you conduct the review, you can amend any answers that
you did not enter correctly during the interview, for example, if a text response contains a spelling
mistake. In addition, if your supervisor asked you to write down the participant’s text responses
instead of typing them in, you can use the reviewing phase to type them in.
When reviewing an interview, you might find that if you change the answer to a question,
typically a multiple-choice question, additional questions appear that did not appear when you
conducted the interview. Your supervisor will tell you what to do if this should happen. You
might be asked to leave these questions unanswered, or your supervisor might tell you which
answers to enter.
Starting a review
If the review does not start automatically when you end an interview or choose a call outcome,
click the Review Current Interview button in the center of the Phone Participants main screen.
Note that you can only review the interview that you have just completed. It is not possible for
you to review any other interviews.
201
IBM SPSS Data Collection Interviewer Server User’s Guide
The Review screen
Figure 1-54
The Review screen
When the review starts, the Phone Participants activity shows the following information:
The top of the main screen displays the same Participant’s details that were displayed when
the interview was conducted. If any of the fields are shown as being editable, you can update
them while you are conducting the review.
The left of the main screen displays a list of the questions that were asked during the interview.
You can click any question name to jump straight to that question.
The center of the main screen displays the current question. If you entered an answer to that
question during the interview, the answer is shown.
Conducting the Review
You can navigate through the questions and amend any answer using the same methods that you
use for conducting interviews. That is, you might be able to use the keyboard only, or you might
need to use the mouse as well. For more information, see “Using the Keyboard or the Mouse”
in Conducting interviews. You can also jump straight to any question by clicking the question
name in the list on the left.
If changing the answer to a question would cause additional questions to appear that did not
appear when you conducted the interview (or cause existing questions to disappear), a warning
message is displayed. When you click OK, the question list on the left of the main screen will
202
Chapter 1
refresh to include any additional questions and to remove any existing questions that are no
longer relevant.
If a question allowed you to record the participants’s answer (or the answer was recorded
automatically), the following buttons will appear to allow you to listen to the recording:
Button
Description
Play the participant’s answer
Stop playing the participant’s answer
Alternatively, press Ctrl+Shift+P to play or stop playing the participant’s answer.
Ending the Review
The review ends normally when you reach (or jump to) the last question and press ENTER or
click Next. You might also be able end a review by pressing the ESC key or clicking the Stop
button if there is one.
Alternatively, your supervisor might ask you to reject interviews that do not meet certain
standards. To reject an interview and end the review, click the Reject Interview button as shown
below:
Figure 1-55
Reject Interview button
At the end of the review, if your next number is not selected automatically, click Start Dialing or
Next Contact if you want to make another call, or Exit to close the Phone Participants activity.
Closing Phone Participants
E On the main screen, click the Exit button as shown below:
Figure 1-56
Exit button
Translating call outcomes codes
The following instructions explain the process of providing translated call outcomes codes in the
Phone Participants interface.
Note: These instructions assume you have access to the IBM® SPSS® Translation Utility
application.
1. Log into IBM® SPSS® Data Collection Interviewer Server Administration and select an
appropriate project from the project list.
203
IBM SPSS Data Collection Interviewer Server User’s Guide
2. Click on Files and download the appropriate catiCallOutcomes_<Project Name>.mdd file (the
file should be checked into a shared location).
3. Open the catiCallOutcomes_<Project Name>.mdd file in SPSS Translation Utility and display
the Analysis context.
4. From the SPSS Translation Utility menu, select Tools > Add / Remove Languages.
5. Add the translated text in the appropriate language column.
6. Save the catiCallOutcomes_<Project Name>.mdd file.
7. Back in the Interviewer Server Administration Files activity, upload the
catiCallOutcomes_<Project Name>.mdd file you just saved. Make sure you select No when asked
to rename the file, and select the Check In option.
8. Login as an interviewer who has access to the updated project and ensure the Interviewer Server
Administration Options > Preferences are set to the newly added language.
9. Test within the Phone Participants activity. The newly added call outcome translations should
display as expected.
Notes
If the catiCallOutcomes_<Project Name>.mdd file is updated during active Phone data
collection, interviewers will need to exit and reenter the Phone Participants activity before the
translated call outcomes will display.
To update the default .mdd for all new projects, update the catiCallOutcomes_default.mdd
file (located in [INSTALL_FOLDER]\IBM\SPSS\DataCollection\6\Interviewer
Server\FMRoot\Shared\Cati) on the primary application server.
Review Interviews
You use this activity to review the interviews that your telephone interviewers have completed. If
necessary, you can amend the answers that the interviewer entered.
Starting Review Interviews
E Select the project you want to work on and click Review Interviews.
This displays the Review Interviews main screen.
204
Chapter 1
When Autodialers are Used
If the call center that you are working in uses autodialers to call participants, a dialog box might
open and request that you enter a position name, as shown below:
Figure 1-57
Position dialog box
In the Supervisor Position field, enter the position name and click OK. If you click Cancel instead,
the Review Interviews activity will still open, but you will not be able to listen to audio recordings
of participants’ answers.
Remote Supervisors
When the Supervisor Position is defined as a remote position (in the dialer configuration file),
the following dialog is displayed:
Figure 1-58
Supervisor Position dialog box for remote supervisors
In the Supervisor Access Number field, enter the telephone number for the remote supervisor and
click OK.
For more information, see Dialer Administration.
The Review Interviews Main Screen
The main screen has three sections: in the center, at the top, and on the left.
205
IBM SPSS Data Collection Interviewer Server User’s Guide
Figure 1-59
Review Interviews main screen
The Center of the Main Screen
After you start the Review Interviews activity, you use the options displayed in the center of the
main screen to select the interview that you want to review. You can also specify whether you
want to review all questions or only text questions.
As you navigate through the interview, the questions appear in the center of the main screen
and show the answers that the interviewer entered.
The Top of the Main Screen
When the review starts, the frame at the top of the screen shows various details about the
participant who was interviewed, such as his or her ID number, name, and telephone number. If
any of the fields are shown as being editable, you can update them while you are conducting the
review. You might also see comments associated with this participant, which have been added by
interviewers who have called or interviewed this participant. For more information, see the topic
Viewing and entering comments on p. 190.
The Left of the Main Screen
The left of the main screen displays a list of the questions that were asked during the interview.
You can click any question name to jump straight to that question.
206
Chapter 1
Above the list of questions are buttons for various tasks as described below:
Button
Description
Reject the interview. For more
information, see the topic Ending
a Review on p. 210.
Close Review Interviews and
return to the main IBM® SPSS®
Data Collection Interviewer
Server Administration page.
Display help for Review
Interviews.
Keyboard Shortcut (see note
below this table)
Alt+R
Alt+X
Alt+H
Note: For some browsers, pressing the keyboard shortcut alone will perform the action. For other
browsers, you might have to press Enter after pressing the keyboard shortcut.
Navigating Using the Keyboard
Depending on your browser, you might be able to switch between the three sections of the main
screen by pressing Ctrl+Tab or F6.
Selecting an Interview to Review
Figure 1-60
Selecting an interview to review
E To review only text questions (including “Other” answers in multiple-choice questions), select
Open-ends only in the center of the main screen. If you do not select this option, you will be
able to review all questions.
E From the drop-down list in the center of the main screen, select the field that you want to use
to search for an interview.
E In the edit box, type the value that you want to search for. Enclose the value with % to search
for interviews that include comments (for example, %4964%).
Note: You can add % around
E Click Next to start the search.
207
IBM SPSS Data Collection Interviewer Server User’s Guide
If an interview is found that matches your search criteria, the questions asked in that interview will
be listed on the left of the main screen. If more than one matching interview is found, the first
interview’s questions will be listed.
Note: If the interview found is not the one you want, you should accept the interview as described
in Ending a Review, as this will allow the interview to be reviewed again.
If no matching interview is found, an error message will appear. You can then modify the search
criteria and click Next to search again.
Conducting a Review
After you have selected an interview, click on a question name on the left of the main screen to
start the review.
Using the Keyboard or the Mouse
Depending on the settings for the Review Interviews activity, you might be able to conduct
reviews using the keyboard only, or you might need to use both the keyboard and the mouse.
For reviews that require the keyboard only, the following keys have special uses:
Key
Page Down
Page Up
Tab
Ctrl+Tab
Enter
Shift+Enter
Up Arrow
Space and Dash\Hyphen
Use
Display the next question.
Display the previous question.
If more than question is displayed on the screen,
move the cursor to the next question.
If more than question is displayed on the screen,
move the cursor to the previous question.
For text questions, displays the next question.
Insert new lines within a text question’s response.
Use only for questions other than text questions.
If more than question is displayed on the screen,
move the cursor to the previous question on the
screen (same as Ctrl+Tab). If only one question
is displayed on the screen, display the previous
question (same as Page Up).
Can be used between multiple answers for
multiple-response, categorical questions.
For interviews that use the mouse, click the Next button to display the next question and click
the Previous button to display the previous question.
General Procedure for Conducting Reviews
The interviewing program displays error messages, usually in red, if you enter an invalid answer
and waits for you to enter another response.
For some questions, typically multiple-choice questions, changing the answer could cause
additional questions to appear that did not appear when the interview was conducted. In addition,
changing the answer might cause other existing questions to disappear. In this situation, a warning
208
Chapter 1
message is displayed telling you that the path you are now taking through the interview is no
longer the path that the interviewer took.
If the participant’s answer to a question has been recorded, the following buttons will appear to
allow you to listen to the recording:
Button
Description
Play the participant’s answer
Stop playing the participant’s answer
Alternatively, press Ctrl+Shift+P to play or stop playing the participant’s answer.
Note: Automatically calculated answers will not be updated when a review is conducted using the
Review Interviews activity.
Changing the Answer to a Question
This topic explains how to change the answers to different types of questions when conducting
a review. In addition to multiple-choice questions, you might also see questions that require
numeric, text, date/time, or boolean (“yes” or “no”) answers.
Multiple-Choice Questions
When the question is followed by a list of answers, you must choose the answer from the list. Some
questions require that only one answer is selected from the list whereas other questions allow more
than one answer to be selected. The way in which you make the selection depends on whether the
interview can be conducted using the keyboard only or whether the mouse must be used as well.
For interviews that require the keyboard only. All the answers in the list are numbered. If only
one answer can be selected from the list, the numbers will be enclosed in parentheses, for
example, ( 3 ). If more than one answer can be selected, the numbers will be enclosed in
brackets, for example, [ 3 ]. To select an answer, press the appropriate number key. To select
multiple answers, press the appropriate number keys in any order. The answer or answers that
you select will be highlighted in the question.
For interviews that use the mouse. If only one answer can be selected from the list, a radio
button is displayed next to each answer. If more than one answer can be selected, a check
box is displayed next to each answer. To select an answer, click on the appropriate radio
button or check box.
To cancel a single-choice answer, select a different answer. To cancel a multiple-choice answer,
select the same answer again.
When answering multiple-choice questions, be aware of the following:
Some multiple-choice questions that allow multiple answers might include answers that are
shown in bold text. These answers cannot be combined with any other answer in the list.
209
IBM SPSS Data Collection Interviewer Server User’s Guide
If the list contains an answer called “Other” followed by a text box, first select the answer and
then type the words in the text box. For interviews that require the keyboard only, the cursor
will automatically move to the text box when you select the answer.
If the response list is shown as a grid of single-choice or multiple-choice answers, you must
select an answer for each question in the grid. Usually, the questions are the rows of the grid
and the answers are the columns, but this is not always so.
Numeric Questions
Questions that have numeric answers can be set up to accept only whole numbers or only real
(decimal) numbers. If the question requires a real response, you must always enter a decimal point
and at least one decimal place even if the answer is a whole number.
Questions that have numeric answers might specify a range of valid answers, and will reject
answers outside of this range.
Text Questions
Questions with text answers display a box of about six lines in which the participant’s words have
been entered. When amending the text, there is no need to press Return or Enter at the end of
each line.
Date, Time, and Date/Time Questions
Date questions might accept an answer in several different formats, for example, mm/dd/yy, or
dd/mm/yy, or dd-mmm-yyyy. To ensure that the answer that you enter is unambiguous, use the
dd-mmm-yyyy format, for example, 01-Jan-2000. Time questions will normally require an answer
in an hh:mm or hh:mm:ss format. Sometimes, a question might require a date/time answer, such
as 01-Jan-2000 22:30:00.
Like numeric questions, date, time, and date/time questions might require an answer within
a certain range.
Boolean Questions
Boolean questions require participants to answer by saying “yes” or “no”, or “true” or “false”. For
some boolean questions, you have to select from one of two options, for example, “Yes, wants to
subscribe” and “No, doesn’t want to subscribe”. For other boolean questions, there might be just a
single option that you should select if the participant says “yes” or “true”. To select an answer to a
boolean question, use one of the following methods:
For interviews that require the keyboard only. If two answers are shown, press the number key
(either 1 or 2) that corresponds to the appropriate answer. If only one answer is shown, press
1 only if the participant answers “yes” or “true”.
For interviews that use the mouse. If the answer consists of two radio buttons, click the
appropriate radio button. If the answer consists of a single check box, click the check box
only if the participant answers “yes” or “true”.
210
Chapter 1
Special Responses
Sometimes, a numeric, text, date/time, or boolean question might include one or more special
responses that you can select when the participant cannot or does not want to answer the question.
For example, you might be able to select a special response that says “Don’t know” or “Refuse to
answer”. To select a special response, use one of the following methods:
For interviews that require the keyboard only. Press the keyboard shortcut that is shown
alongside the special response, that is, Ctrl+1 for the first special response in the list, Ctrl+2
for the second, and so on.
For interviews that use the mouse. Click on the appropriate check box.
To cancel a special response, select the same special response again.
Your answer will usually be rejected if you select a special response in addition to entering an
answer, or if you select more than one special response.
Ending a Review
You end a review in one of two ways, either by accepting or rejecting the interview.
Accepting the Interview
This is the usual way to end a review. The status of the interview will be defined as both completed
and reviewed. In addition, the call outcome on the participant’s sample record will be changed to
Reviewed, but the sample record will remain in the COMPLETED queue.
E On the left of the main screen, click on the name of the last question so that the last question is
displayed.
E Click Next or press ENTER.
This accepts the interview and ends the review. Use the options displayed in the center of the main
screen to select another interview to review, or click Exit to close the Review Interviews activity.
Note: You might also be able to accept an interview and end the review by clicking the Stop button
if one is displayed or by pressing the ESC key.
Rejecting the interview
You can reject the interview if it does not meet your organization’s standards. When you reject the
interview, the status of the interview will be defined as reviewed, but not completed. In addition,
the call outcome on the participant’s sample record will be changed to RejectedByReviewer and
the sample record will be moved to the UNUSABLE queue.
E Click the Reject Interview button as shown below:
Figure 1-61
Reject Interview button
211
IBM SPSS Data Collection Interviewer Server User’s Guide
This rejects the interview and ends the review. Use the options displayed in the center of the main
screen to select another interview to review, or click Exit to close the Review Interviews activity.
Note: If you changed the answer to the currently displayed question before clicking the Reject
Interview button, your new answer will not be saved.
Closing Review Interviews
E On the main screen, click the Exit button as shown below:
Figure 1-62
Exit button
Quotas
You use the Quotas activity to check and revise targets or to change the way quotas behave.
Starting Quotas
E Select the project whose quotas you want to work on and click Quotas.
The page displays a selection button for each quota in the questionnaire (that is, for each quota
matrix defined in the project’s .mqd file) and a drop-down selection list from which you choose the
type of changes, if any, that you want to make.
Checking Quotas
When you check quotas, the Quotas activity displays a table showing the current target for each
cell, and the number and percentage of completed and pending interviews per cell. You cannot
change anything in the table.
212
Chapter 1
To Check Quotas
E Click the button for the quota whose details you want to see.
Changing Quota Targets , Behavior Flags and/or Cell Priorities
When you select one of the Edit options, you will be able to change the targets and the counts
of completed or pending interviews in a cell. If priority pending has been set, you will also
be able to change the cell priorities.
213
IBM SPSS Data Collection Interviewer Server User’s Guide
Note: The menu points for these options are toggles. Once you select an option it remains
selected until you choose a different option or until you leave Quotas. This allows you to make
the same type of changes to a number of quotas without having to reselect an option from the
menu each time.
To Change Targets and/or Behavior Flags
E Do one of the following:
To change targets, choose Target from the Edit selection list.
To change targets and/or behavior flags, choose All from the Edit selection list. If the quota
uses priority pending you will also be able to change the cell priorities.
E Click the button for the quota you want to change.
The quota status report is displayed with the values you can change enclosed in boxes.
E Type new values in the boxes. If you are changing the behavior flags, choose one of the following:
Normal for a normal quota.
Overquota to allow over-quota interviews. This type of quota allows interviewing to continue
all the time that the number of completed interviews in this cell is less that the target. Once the
target is met, any interviews that are already in progress are allowed to continue and complete,
214
Chapter 1
so it is possible that the final number of completed interviews will slightly exceed the target.
Once the target has been met, all new interviews in the cell will fail the quota test and will be
dealt with as specified by the scriptwriter (usually the interview will be terminated).
Counter for a counter quota. This type of quota counts the number of interviews that take place
for this cell but does not compare this count against the target (usually, the target is zero).
This cell then has no quota control, but a record of the number of interviews achieved for
that cell will be maintained.
E Click Update to update the quota database.
Note: Any changes that you make are replicated in the quota tables in the database but not in the
project’s .mqd file. If you later reactivate the project and you choose the option to update the quota
tables with the information in the .mqd file, any changes that you made with Quotas will be
overwritten with the information from the .mqd file.
Prioritizing Quotas
When a quotas are defined for multiple response categorical questions, the quotas for all responses
chosen by the respondent are pended. If the interview is completed, then the corresponding
complete counts are incremented. When a respondent chooses more than one response, this results
in more than one quota cell being incremented.
Quota prioritization lets you decide how many cells to pend, and allows you to choose the method
by which those cells are chosen. There are four possibilities.
Priority Pending. Pend the cell with the highest priority, if this response is chosen. If this
response is not chosen, try the cell with the next highest priority, and so on. Cells with no
priority defined have the lowest priority of all.
Random Pending. Pend a cell at random from the cells for the responses that have been chosen.
If an interview times out and is restarted after a cell has been pended, the same cell will
be pended if the interview is restarted. If the questionnaire contains routing or other logic
based on the value of the pended cell, this ensures that the interview behavior will be the
same whether or not it times out.
LeastFull Pending based on the ratio of completes to targets. Pend the cell that is least full from
the cells for the responses that have been chosen. If an interview is restarted after timing out,
the LeastFull cell is recalculated using the latest quota information. This may mean that
a different cell is pended in the restarted interview to the one that was pended when the
interview was originally started. If the questionnaire has routing based on the pended cell,
the path through the interview may change once the completed portion of the interview
has been replayed.
LeastFull Pending based on the number of completes only. Pend the cell that has the fewest
completed interviews for the responses that have been chosen. If an interview is restarted
after timing out, the LeastFull cell is recalculated using the latest quota information. This
may mean that a different cell is pended in the restarted interview to the one that was pended
when the interview was originally started. If the questionnaire has routing based on the
pended cell, the path through the interview may change once the completed portion of the
interview has been replayed.
215
IBM SPSS Data Collection Interviewer Server User’s Guide
In Quotas, you can set the type of prioritization you want to use and, for priority pending, the
relative importance of each cell. Once you have a set the prioritization type you it is not advisable
to change it, although you can change the cell priorities for Priority pending if you wish. For
more information, see the topic Changing Quota Targets , Behavior Flags and/or Cell Priorities
on p. 212.
To Set Priorities
E Click the button for the quota you want to prioritize.
E In the Edit box, choose Prioritization.
The Prioritization dialog box is displayed.
E In Prioritization, choose the type of prioritization you want to set.
E In Number of cells, type the number of cells you want to prioritize. (This option is not appropriate
for Normal prioritization so it is greyed out.)
E Click OK.
The quota status report is displayed.
E If you chose Priority pending, the right-most box for each cell will contain a number (zero if
priority pending has not been set for this cell before). In these boxes, type the relative priority of
each cell. For example, type 1 for the cell with the highest priority, 2 for the cell with the next
highest priority, and so on.
216
Chapter 1
E Click Update to update the quota database.
Note: Any changes that you make are replicated in the quota tables in the database but not in the
project’s .mqd file. If you later reactivate the project and you choose the option to update the quota
tables with the information in the .mqd file, any changes that you made with Quotas will be
overwritten with the information from the .mqd file.
Status
You use the Status activity to monitor the current status of a project. The report refreshes
automatically every 60 seconds, which is useful if interviews are in progress. For a really up to
date report you can request an immediate refresh.
217
IBM SPSS Data Collection Interviewer Server User’s Guide
The report groups interviews using the following status codes:
Completed successfully. Interviews that were successfully completed because respondents
answered all questions that applied to them.
Active / In progress. Interviews that are currently in progress.
Timed out. Interviews that timed out before completion. This generally happens when a
respondent takes more than ten minutes to answer a question (perhaps he/she is interrupted in
the middle of the interview). If the respondent does not close his/her browser, the interview
usually restarts when the respondent clicks Next (otherwise, you can restart from the URL). As
long as the time-out period has not expired, the status of the interview remains Active. Note:
Ten minutes is the default time-out period. Speak to your IBM® SPSS® Data Collection
administrator if you regularly see a lot of timed out interviews on all or most of your projects.
Stopped by script. Interviews that were terminated by a stop statement in the questionnaire
script.
Stopped by respondent. Interviews that were stopped because the respondent clicked the Stop
button. If the project does not use Sample Management, interviews in this state cannot be
restarted.
Interview system shutdown. Interviews that were terminated due to a problem in the script.
Reviewed. Reserved for future use. This category will count interviews that have been
reviewed by replaying them.
Stopped by signal. Interviews that were stopped by a signal statement in the questionnaire
script.
Undetermined status. Interviews whose data collection status in the project’s case data file
could not be matched to a valid status in the project’s questionnaire definition (.mdd) file. You
should not see any interviews in this category.
218
Chapter 1
Starting Status
E Select the project you want to monitor and click Status.
The page displays a table showing the number of interviews with different outcomes achieved in
active and test mode.
Refreshing the Report On Demand
E Click the Refresh button.
Survey Results
Survey Results allows you to create simple tables using variables from your interview data. The
tables can be simple topline tables showing the number of respondents present in each category of
a single variable, or they can be two-dimensional cross-tabulations using one or more variables on
the side and top of the table.
Tables can be filtered to include certain categories of respondents only—for example, only
women aged between 21 and 30—or to include or exclude interviews that terminated in a
particular way—for example, to include all completed interviews or to exclude test interviews.
Survey Results uses the questionnaire definition (.mdd) file in the Master project folder and
reads the location of the case data from that file. If the .mdd file contains more than one version,
Survey Results uses the versions labelled LATEST.
Support for hierarchical data
Starting with version 6, Survey Results supports hierarchical data in the form of unbounded loop
questions. Unbounded loop questions are read from the MDM document fields (which include all
questions as fields).
Starting Survey Results
E Select the project you want to work on and click Survey Results.
219
IBM SPSS Data Collection Interviewer Server User’s Guide
The Main Screen
The main Survey Results screen has the following sections:
Question List. A frame on the left of the screen that lists questions and other variables that are
present in the database. If you hover over a variable in the list, you will see more information
about that variable.
Table Frame. The main part of the screen in which charts and tables are displayed.
You can do any of the following:
Choose an action from the menu.
Click on a variable in the Question List to display a table for that variable. For some types of
variables a chart is also displayed.
If there is a table already displayed, you can choose a variable in the Question List and Survey
Results will replace the side of the table with the variable you selected. All other aspects
of the table are retained.
Viewing Variables
You can view information about variables by hovering over the variable’s name in the Question
List or by selecting the variable in the Question List.
220
Chapter 1
Information About Categorical Variables
If you hover over a categorical variable, a pop-up displays the variable’s description and categories.
If you select a categorical variable in the Question List, Survey Results displays a table and, if
your options request it, a bar chart. The table lists each category with its count of cases and a
column percentage showing what proportion the category is of the variable as a whole. The chart
has one bar for each category showing the percentage of cases that are present in that category.
The percentages are based on the number of cases present in the variable, not the number of cases
in the dataset as a whole. The chart does not have a base row.
Information About Numeric Variables
If you hover over a numeric variable, a pop-up displays the variable’s description and its minimum
and maximum values as they are defined in the questionnaire definition file. If the data was
gathered using IBM® SPSS® Data Collection Interviewer Server, these will be the minimum and
maximum values defined for the question in the script.
If you select a numeric variable in the Question List, Survey Results displays a table showing
the base, mean, minimum, maximum, and standard deviation based on the values found in the
data. There are no charts for numeric variables.
221
IBM SPSS Data Collection Interviewer Server User’s Guide
Information About Text Variables
If you hover over a text variable, a pop-up displays the variable’s description.
If you select a text variable in the Question List, Survey Results lists the variable’s values, one per
line. There are no charts for text variables.
Information About Grid Variables
If you hover over a grid variable, a pop-up displays the variable’s description.
If you select a grid variable in the Question List, Survey Results displays a table that matches
the grid. The grid cells show counts and, depending on the options set in the dialog box and the
orientation of the grid, percentages may also be shown. If you choose column percents in the
Options dialog box and the grid is vertically oriented, then column percents will also be shown.
If you choose row percents and the grid is horizontally oriented, then row percents will also be
shown. Charts are not generated for grid variables.
Tables
You can build two-dimensional tables in Survey Results.
If you are building tables while interviews are in progress, there is no need to rebuild the table
to include new interviews. Instead, use the Refresh facility to reread the data and update the
table, leaving any filters intact.
222
Chapter 1
Building Tables
Build Table creates a table with more than one dimension. It opens a new window in which you
select the variables that are to form the rows and columns of the table. As you build the table, the
preview area is updated to show the current structure of the table.
When the table is displayed, it has a base row and, by default, the cells of the table show counts
and column percentages. Survey Results also shows the name of the project, the date and time it
was run and the filter applied at the top of the page.
Categorical Variables
You can place a categorical variable on the top or the side of the table. If you add a categorical
variable to an existing table or specification, you may also replace the existing top or side variable
with the new variable, or place the new variable to the right of the existing top variable or beneath
the existing side variable.
Numeric Variables
You can place a numeric variable on the side of the table and other variables can be placed below
it. Numeric variables cannot be placed on the top of the table and once a numeric variable is on
the side of a table, you cannot place any variable on the top.
Grid Variables
You can place a grid variable on the side of the table. No further variables can be added to the table.
To Build a Table
223
IBM SPSS Data Collection Interviewer Server User’s Guide
E Select
Actions > Build Table
This opens the Table Builder window.
E In the Variable List select a variable that you want to use as the side or top of the table.
Survey Results displays a list of possible positions for that variable in the current table.
E Select the position in which you want to use this variable.
E Continue selecting variables and positions until the table specification is complete. If you make a
mistake and want to clear the specification and start again, click Clear Table.
E Click Tabulate.
The Build Table window closes and the table is displayed on the main screen.
Amending Tables
If you have a table displayed on the main screen and you click on a categorical variable in the
Question List, Survey Results replaces the side of that table with the selected variable.
If you choose Build Table without clearing the current table, the current table is preserved and you
can add to it. If you want to make a completely new table, you must clear the current table first.
Refreshing Table
Refresh Table refreshes the table by rerunning it against the data.
To Refresh the Table
E Select
Actions > Refresh Table
Clearing Tables
Clear Table clears the current table without cancelling any filters that were applied to the table.
To Clear the Current Table
E Select
Clear > Clear Table
Filters
Filters limit the cases that are summarized in tables by excluding cases that do not match the filter
specification. For example, a filter of Gender=Female will include women and exclude men
and anyone who did not answer the question.
224
Chapter 1
You can also filter tables based on interview status. This allows you to exclude interviews with
certain statuses from the tables. For example, you might want to exclude all interviews apart from
those that have a completed status.
Building Filters
Build Filter opens a new window in which you select the variables and values that cases must
match in order to be included in the tables.
A filter specification consists of three things: a variable name, a logic operator and a value or set
of values. The logic operators and the prompt for a response or value vary according to the
type of variable you select.
You can define filters based on one or more variables. If the filter is based on more than variable,
you can choose whether the individual filters are combined using And or Or logic.
As you build the filter, the Filter Expression panel at the bottom of the window displays the
filter text that will appear on the table.
To Build a Filter
225
IBM SPSS Data Collection Interviewer Server User’s Guide
E Select
Actions > Build Filter
This opens the Build Filter window.
E In the Variable List select a variable that you want to use as a filter.
Survey Results draws the Build Filter section of the window to suit the type of variable you
have chosen.
E In the Logic box select a filter operator.
E In the Respondent(s) box select or enter the response or value that is to be used as the filter.
As you select responses, the Filter Expression is updated to show the filter condition to be applied.
E Click Apply to close the filter and apply it to the current table. Alternatively, click And>> or
Or>> to define an additional filter.
Filtering on a Single Response Variable
Logic operators for single response variables are as follows:
Any of these. Only cases that contain one of the selected answers.
None of these. Only cases that contain none of the selected answers.
Choose an operator and then select one or more filter responses from the list of available responses.
Filtering on a Multiple Response Variable
Logic operators for multiple response variables are as follows:
All of these. Only cases that have all of the selected answers.
Any of these. Cases that contain one or more of the selected answers.
None of these. Only cases that contain none of the selected answers.
Exactly these. Only cases that have the selected answers and no others.
Choose an operator and select one or more filter responses from the list of available responses.
Filtering on a Numeric Variable
Logic operators for numeric variables are:
Less than
Greater than
Equal to
Not equal to
Less than or equal to
Greater than or equal to
226
Chapter 1
Choose an operator and enter the value with which to compare the data.
Filtering on a Text Variable
Logic operators for text variables are:
Contains
Does not contain
Is exactly
Begins with
Ends with
Is blank/empty
If you choose any operator other than Is blank/empty, you must enter a text to be used as a filter.
All operators except Ends with are case insensitive. With Ends with, you must type the text in the
same case that it appears in the case data, otherwise the filter will fail.
Filtering on a Grid Variable
The grid is presented already ‘sliced’ into its various subquestions. Choose the variable that
represents the subquestion on which you wish to base your filter. If the variable is a single or
multiple choice grid, the slice will be a single or multiple choice variable and you can choose
the responses on which to filter. If the grid contains numerics, the logic operators for a numeric
are displayed. If the grid contains single or multiple choice responses, the logic operators for
those variable types are displayed.
Clearing Filters
Clear Filter removes the filter from the table and refreshes the table so that it is no longer filtered.
To Clear the Current Filter
E Select
Clear > Clear Filter
Interview Filters
If you have a suitable dataset, such as a dataset collected in IBM® SPSS® Data Collection
Interviewer Server, the Interview Filter option is available. Interview Filter lets you include only
interviews with certain statuses in tables and charts. The filter is applied before any other filters
that you may define, and remains set even if you clear all other filters.
For example, you can set the interview filter to include only interviews that were successfully
completed, and can then create a number of tables using case data filters such as age or gender.
When you change from the age filter to the gender filter, or cancel case data filtering altogether,
the interview filter still applies.
227
IBM SPSS Data Collection Interviewer Server User’s Guide
You can change the interview filter during a session and can remove it completely if necessary.
You can filter using the following interview status codes:
Completed successfully
Active/In progress
Timed out
Stopped by script
Stopped by respondent
Reviewed
Stopped by signal
Interview system shut down
You may also choose whether to include only respondent data from live interviews, only test data,
or both respondent and test data in the tables.
To Set an Interview Filter
E Select
Actions > Intv Filter
This displays the Interview Filter dialog box.
E Choose whether to include only respondent data, only test data, or both types of data.
E Select the interview statuses that you want to include in the analyses.
E Click Apply.
Clearing the Current Table and Filters
Clear All clears the current table and any filters that have been set.
228
Chapter 1
To Clear the Current Table and Filters
E Select
Clear > Clear All
Options
Options lets you control how Survey Results works for you. The defaults are as follows:
The Variables section determines which variables are shown in variable lists.
Display all system variables. System variables contain general information about an interview
as a whole and include such things as the time at which the interview started and ended, the
interview status code, and the interview serial number. Survey Results displays this option
only if IncludeSystemVariables is set to True within the metadata document.
Display other specify variables. These variables contain response texts entered using an Other
specify response in a single or multiple choice list.
Display coding variables. These variables contain the codes assigned to a question’s text and
other specify responses during coding.
Display source file variables. These variables contain the names of files containing handwritten
or spoken responses for a given question.
Display multiplier variables. These variables contain numeric values associated with specific
questions. When cases are counted in a table, the cell counts are normally incremented by 1
for each case present in the cell. If cell counts are to be incremented by a value other than
1, a multiplier variable will exist for the question specifying the value by which cells are
to be incremented for each case.
Refer to the IBM® SPSS® Data Collection Developer Library for further
information about these variable types. It is available as a free download from
http://www.ibm.com/software/analytics/spss/products/data-collection/.
The Labels section determines what types of labels are shown and how they are shown.
You can display variable names or variable labels (the question text).
You can display variable labels in any language in which the labels exist in the case data.
The context for which labels are to be displayed should always be Question.
Extra choices may appear for some options. These are label types not yet in use.
The Results section determines how your results are displayed. Currently, tables are always
displayed even if Display table is not selected.
You can set between 0 and 4 decimal places.
If you want to display charts in addition to the table of frequency counts, you may select Bar.
The Text Results section controls the amount of output displayed for text results. You can choose
to display the first 10, 50, 100, 500 responses, or an unlimited number of responses, and to display
the first 10, 50, 100, 500 characters, or an unlimited number of characters per response.
229
IBM SPSS Data Collection Interviewer Server User’s Guide
To Set Options
E Choose
Actions > Options
View Log
View Log is an optional facility that displays the action log for the current session. This shows the
SQL commands that have been executed to display information about questions and variables
selected in the Question frame on the main screen, or to generate tables.
The View Log window also provides buttons for refreshing or clearing the log file.
Note: Logging places an additional overhead on the server and should therefore be used with
caution.
To Switch On the View Log Facility
E In Windows Explorer, browse to \Inetpub\wwwroot\SPSSMR\InterviewReporter.
E Right click Default.aspx and choose Properties from the pop-up menu.
E On the Properties dialog box, cancel the Read-only attribute and click OK.
E Edit Default.aspx using a text editor such as Notepad, and change the setting for LoggingEnabled
from False to True.
E Save your changes.
To View the Log File
E Select
Actions > View Log
To Refresh the Log File
E View the log file and click Refresh.
To Clear the Log File
E View the log file and click Clear.
Troubleshooting
Boxes Instead of Element Texts on the Build Filter Window
Windows 2000 uses codepages to determine how to display characters in different languages. The
codepages for each language or language type are different, and characters that appear in one
codepage may not be present in another codepage. For example, a Western European codepage
may not have all the characters that are required for displaying Japanese texts.
230
Chapter 1
Your computer is set up with a default codepage that corresponds to the language in which you
normally work. For example, if your normal language is English, your default codepage will
probably be the Western European codepage.
Survey Results HTML pages are encoded using UTF-8 encoding which, in most cases, causes any
characters that are not on the default codepage to be displayed correctly. However, on Windows
2000, you may also need to add the project language in which you are working to your regional
settings in order for this encoding to process the element texts for categorical filters correctly.
You will know if you have to make this change because when you choose a single or multiple
response variable as a filter, the element selection frame will display boxes instead of text for the
element labels.
To Add a Language to your Regional Settings
E From the Control Panel select Regional Options.
E On the General tab, in Language Settings for the System, select the language that is being
displayed incorrectly.
Phone
Use the Phone activity to produce the following reports for your telephone interviewing project.
For more information about customizing these reports or running them outside of the Phone
activity, see the notes at the end of this topic.
Call History Based
The following reports are based on the project’s call-history data:
Answer Time Distribution
Busy, Wait, and Idle Time
Busy, Wait, and Idle Time Across Projects
Call Outcome Status
Dialer Statistics
Interviewer Statistics
Interviewer Statistics Across Projects
Silent Call Statistics
Sample Based
The following reports are based on the project’s sample data:
Appointments Distribution
Appointments Summary
Call Outcome by Segment
231
IBM SPSS Data Collection Interviewer Server User’s Guide
Calls by Segment
Incidence Statistics
Overall Disposition Across Projects
Queue Status
Queue Status by Time Zone
Review Calls
Sample Usage
Sample Usage Across Projects
Time Zone Status
Note that all reports display counts and percentages that are zero as a hyphen (-) and counts and
percentages that are rounded to zero as an asterisk (*).
Reports will include charts only if you have enabled the charting feature in IBM® SPSS® Data
Collection Interviewer Server. For more information, see the topic Running Reports on p. 253.
The rest of this topic describes the reports in detail.
Answer Time Distribution
For projects that use an autodialer, this report shows a frequency table of the time taken by
participants to answer calls. The categories are one second to 20 seconds in one second intervals,
with an additional category for durations greater than 20 seconds. Each cell shows a count, a
column percentage, and cumulative column percentage.
You might want to use the statistics in this report to adjust the minimum length of time that an
unanswered phone call must ring before the autodialer terminates the call. However, your local
laws might specify the minimum value that you must use. For more information, search the Phone
Surveys activity help file for the topic “Autodialer Settings”.
Note that this report always includes data for both real and test interviews—you cannot choose
to include only one or the other. For projects that do not use an autodialer, selecting this report
might display an empty table or an error message.
232
Chapter 1
Busy, Wait, and Idle Time
For projects that use an autodialer, this report shows the busy, wait and idle times for each
interviewer who has worked on the project. The definition of these times is as follows:
Busy time. This is when the interviewer is interacting with the participant.
233
IBM SPSS Data Collection Interviewer Server User’s Guide
Wait time. This is when the interviewer has clicked the Start Dialing button (in the Phone
Participants activity) and is waiting to be connected to a participant.
Idle time. This is when the interviewer can click the Start Dialing button, but has not done so.
Each cell, which corresponds to the busy, wait, or idle time for one interviewer, shows the
mean time, the total time, the minimum time, and the maximum time. All times are shown in
days, hours, minutes, and seconds.
If you specify a time period when you run the report, the report includes only interviewers who
made calls during that time period.
The Busy, Wait, and Idle Time report does not include a chart, even if you have enabled the
charting feature.
Note that this report always includes data for both real and test interviews—you cannot choose
to include only one or the other. For projects that do not use an autodialer, selecting this report
might display an empty table or an error message.
234
Chapter 1
Busy, Wait, and Idle Time Across Projects
This reports provides busy, wait, and idle information across projects for each interviewer and
project for the last 8 hours. This report is similar to the Busy, Wait, and Idle Time report, except
this report always includes data for both real and test interviews and it cannot specify a time period.
Note: Due to a Microsoft SQL server limitation, this report is limited to a maximum of 128
projects. When working with customers accounts, this report will only include data for projects in
the selected customer account.
Total. Total amount of time the interviewer spent working with the project.
Wait. Total amount of time the interviewer waited for the dialer to return a connected
respondent.
Idle. Total amount of time between interviewer interactions with the Phone Participants
activity (when not speaking to a respondent or waiting).
Busy. Total amount of time spent speaking with respondents.
Average. The average wait time per dialer connection.
Note: Refer to the “Across project reports” topic in the IBM® SPSS® Data Collection Developer
Library for more detailed information regarding across project reports.
Call Outcome Status
This report shows a frequency table of call outcomes. Each cell shows a count and a column
percentage. For projects that use an autodialer, the call outcomes include those selected by the
autodialer.
235
IBM SPSS Data Collection Interviewer Server User’s Guide
Dialer Statistics
This report provides dialer specific statistics over the past eight hours.
Base. The total of telephone numbers dialed.
Number of connects. The total number of successful connections. The percentage of successful
connections, in relation to the base, is also provided.
Number of silent calls. The total number of silent calls. The percentage of silent calls, in
relation to the base, is also provided.
Silent rate. The rate of silent calls in relation to successful connections.
Average busy time (minutes). The average busy time (also known as “talk time”) for all
interviewers.
Average wait time (seconds). The average wait time for all interviewers.
Average idle time (seconds). The average idle time for all interviewers.
236
Chapter 1
Interviewer Statistics
This report contains two tables. The first is a crosstabulation that shows, for each interviewer, the
total time that the Phone Participants activity was open (“Session Time”), the total number of calls
made (“Attempts”), and the number of calls that resulted in each of the following groups of call
outcomes. The report always includes both real and test data.
Column name
Completes
Terminates
System Terminates
Other Terminates
Recalls
Refusals
Reviewed Interviews
Cancels
Call outcomes included in this group
EarlyComplete, Completed
Stopped, OverQuota, FailedScreener
Failed, Fax, WrongNumber, Disconnected,
CellPhone, BusinessNumber, FastBusy,
PossibleWrongNumber, DialerFailed, Silent,
NotAvailable
Abandoned, LanguageBarrier, TransferToWeb
Appointment, NoAnswer, AnswerMachine,
Busy, LanguageRecall, Rejected, NetworkBusy,
DialerBusy, Unknown
Refused
Reviewed
Canceled
For each column, each cell contains a count and a row percentage. Note that the number of calls
includes multiple calls to the same participant.
For projects that use an autodialer, the Terminates and Recalls columns include call outcomes
selected by the autodialer. Autodialed calls that did not result in a connection (for example,
unanswered calls that were returned to the RECALL queue) are shown against an interviewer ID
called “__Autodial”, whose figures are included in the Base statistics.
237
IBM SPSS Data Collection Interviewer Server User’s Guide
The second table shows some additional statistics for each interviewer, as follows:
Completes per hour. This shows the average number of calls made during each hour of connect
time that resulted in a call outcome in the Completes group. If the total connect time is
less than one hour, this figure shows the number of calls that would be made in one hour if
the interviewer continued at the same rate.
Completes/Attempts. This shows the ratio (as a decimal between zero and one) of the number
of calls that resulted in a call outcome in the Completes group compared with the total
number of calls.
Refusals/Terminates. This shows the ratio (as a decimal between zero and one) of the number
of calls that resulted in a call outcome in the Refusals group compared with the number of
calls that resulted in a call outcome in the Terminates group.
Refusals/Recalls. This shows the ratio (as a decimal between zero and one) of the number of
calls that resulted in a call outcome in the Refusals group compared with the number of calls
that resulted in a call outcome in the Recalls group.
Response. This shows the ratio (as a percentage) of the number of calls that resulted in a call
outcome in the Completes group compared with the number of calls that resulted in a call
outcome in either the Completes or Refusals groups.
Time per Attempt. This shows the average time in minutes of each call, that is, the total connect
time divided by the total number of calls.
If the you specify a time period when you run the report, the report includes only interviewers
who made calls during that time period.
Note that the Interviewer Statistics report does not include a chart, even if you have enabled
the charting feature.
238
Chapter 1
Interviewer Statistics Across Projects
This report provides interviewer productivity information across projects for each interviewer and
each project for the last 8 hours. The report always includes both real and test data.
Note: Due to a Microsoft SQL server limitation, this report is limited to a maximum of 85
projects. When working with customers accounts, this report will only include data for projects in
the selected customer account.
Session time. Amount of time (minutes) that the interviewer was logged into the project.
Dials. Total number of participant records dialed.
Dials per hour. Number of participant records dialed per hour.
Completes. Total number of completed interviews.
Completes per hour. Number of completed interviews per hour.
Appointments. Total number of scheduled appointments.
Refusals. Total number of refusals.
239
IBM SPSS Data Collection Interviewer Server User’s Guide
Refusal Rate. Number of refusals the interviewer encountered tor the project divided by
the number of potential respondents screened (as defined in the denominator section for
Incidence).
Incidence. As defined by CASRO (Council of American Survey Research Organizations)
standards:
– The calculation for net incidence: Number of potential respondents screened and eligible or
qualified who agree to participate divided by the number of potential respondents screened.
– The numerator: Number of potential respondents screened and eligible or qualified who agree
to participate includes all contacts who have not been screened out by the screener section of
the interview and who have not refused to participate.
– The denominator: Number of potential respondents screened; includes all attempts made
that resulted in contact with the respondent wherein the eligibility of the contact to participate
can be evaluated. Thus, no answers, hangups, fax, modem, tritones, not home, busies are
all excluded from this calculation.
In practice, the numerator contains the respondents where the Screener participants field is set
to Passed while the denominator contains the respondents where the Screener field is either
Passed or Failed. Respondents whose eligibility cannot be evaluated will have Null in the
Screener field. The Screener field is defined in the interview script. For more information, see
the topic Mapping Fields to Required Columns in the Sample Table on p. 84.
Terminates. Total number of interviews terminated as a result of the call outcome Stopped,
OverQuota, or FailedScreener.
System Terminates. Total number of interviews terminated as a result of the call outcome
Failed, Fax, WrongNumber, Disconnected, CellPhone, BusinessNumber, FastBusy,
PossibleWrongNumber, DialerFailed, Silent, or NotAvailable.
Other Terminates. Total number of interviews terminated as a result of the call outcome
Abandoned, LanguageBarrier, or TransferToWeb.
Note: Refer to the “Across project reports” topic in the Data Collection Developer Library for
more detailed information regarding across project reports.
240
Chapter 1
Silent Call Statistics
For projects that use an autodialer, this report can be used to compare the number of “silent calls”
with both the number of calls that were answered by participants (shown as “Connected” calls)
and the total number of calls made by the autodialer. Silent calls can occur when an autodialer
generates more connected calls than there are interviewers available to handle the calls. Each cell
of the report shows a count and a row percentage.
Note that this report always includes data for both real and test interviews—you cannot choose
to include only one or the other. For projects that do not use an autodialer, selecting this report
might display an empty table or an error message.
Appointment Distribution
This report shows a frequency table of appointments arranged for the next two days. The
categories are 09:00 to 23:00 in one hour intervals, with two additional categories for appointments
taking place before 09:00 and after 23:00. Each cell shows a count and a column percentage.
241
IBM SPSS Data Collection Interviewer Server User’s Guide
242
Chapter 1
Appointments Summary
Lists all appointments arranged for a particular time period. You specify the time period before
running the report.
Call Outcome by Segment
A crosstabulation showing the number of calls for each combination of Queue (the rows in the
table) and Call Outcome (the columns). Each cell contains a count and a column percentage. For
projects that use an autodialer, the call outcomes include those selected by the autodialer, and the
table includes the autodialer-specific queues called CHECK_NUMBER and SILENT.
If the project’s sample table contains segment information, the data is further broken down by
segment. For more information, see the topic About Segments on p. 260. The example report
below shows the data broken down by location, which is one of the segments that the Phone
activity recognizes.
243
IBM SPSS Data Collection Interviewer Server User’s Guide
Calls by Segment
This report shows, for each queue, the frequency of the number of attempts required to contact
participants. The first set of categories, from one attempt to three attempts, excludes attempts
made after arranging an appointment. The second set of categories, also from one attempt
to three attempts, includes only attempts made after arranging an appointment. Participants
requiring more than three attempts are not shown separately, but are included in the base statistics.
For projects that use an autodialer, the report includes the autodialer-specific queues called
CHECK_NUMBER and SILENT.
If the project’s sample table contains segment information, the data is further broken down by
segment. For more information, see the topic About Segments on p. 260. The example report
below shows the data broken down by location, which is one of the segments that the Phone
activity recognizes.
244
Chapter 1
Incidence Statistics
This report provides an industry standard calculation for incidence. CASRO (Council of American
Survey Research Organizations) defines incidence as the number of potential respondents
screened and eligible or qualified who agree to participate divided by the number of potential
respondents screened.
The numerator is the number of potential respondents screened and eligible, or qualified, who
agree to participate. This includes all contacts who have not been screened-out by the screener
section of the interview and who have not refused to participate.
The denominator in the number of potential respondents screened, including all attempts made
that resulted in contact with the respondent, wherein the eligibility of the contact to participate
can be evaluated. As a result, no answers, hang-ups, fax, modem, tri-tones, not home, and
busy signals are all excluded from the calculation.
Incidence is a significant factor in calculating the project cost and in monitoring call center
performance.
Note: The sample table must contain the Screener field in order for the incidence calculation to
occur. Refer to the “Sample Table” topic in the Data Collection Developer Library for more
information on the Screener field.
245
IBM SPSS Data Collection Interviewer Server User’s Guide
Overall Disposition Across Projects
This report displays the last call outcome across projects for each participant record, organized
by project, and always includes both real and test data. The report does not filter data, and does
not specify a time period.
Note: Due to a Microsoft SQL server limitation, this report is limited to a maximum of 256
projects. When working with customers accounts, this report will only include data for projects in
the selected customer account.
246
Chapter 1
Note: Refer to the “Across project reports” topic in the Data Collection Developer Library for
more detailed information regarding across project reports.
Queue Status
This report shows two tables. The first is a frequency table showing the number of participant
records in each queue. Note that the FAILED queue is not included in this table. For projects that
use an autodialer, this table includes the autodialer-specific queues called CHECK_NUMBER and
SILENT.
The second table shows some additional statistics, as follows:
Resolved. This shows the number of participant records that are not in the ACTIVE,
APPOINTMENT, RECALL, TIMED_OUT, TRANSFER_TO_WEB, or FRESH queues.
Completes / Total attempt records. This shows the ratio (as a decimal between zero and one) of
the number of participant records in the COMPLETED queue compared with the number of
records that are not in the FRESH queue.
Completes / Resolved. This shows the ratio (as a decimal between zero and one) of the number
of participant records in the COMPLETED queue compared with the number of records
that are Resolved, as defined above.
Resolved / Total attempt records. This shows the ratio (as a decimal between zero and one)
of the number of participant records that areResolved, as defined above, compared with the
number of records that are not in the FRESH queue.
247
IBM SPSS Data Collection Interviewer Server User’s Guide
Queue Status By Time Zone
This report displays the queue status for each available time zone. The queue status can help a
supervisor decide how many participant records are available and what can be done to make
more records available.
Base. The total number of participant records.
Completed. Interviews that have been completed on the participant records.
Unusable. Participant records that have been called and found to be unusable. Records in
this group require effort, beyond a change in a supervisor setting, to become usable. This
includes records past their expiration time or records that are set to be recalled beyond their
expiration time.
Refused. Participant records are active, but can only be retrieved by refusal converters.
248
Chapter 1
Active Participant records that have been called at least once, but are still available for dialing
on online surveying.
Fresh. Participant records that have not been called and are available for dialing.
Pre-load. Participant records that have not been used, but are not available due to their queue.
Reached call limit. Participant records that are currently unusable but could be brought back
by changing the call limit (MaxTries). Note that this group must take into account Day Parts
if they are in effect.
Review Calls
Cross tabulates the data in two columns of the history table to produce a calling profile. Variables
that you can use in the tabulation are Queue, TryCount, UserId, and CallOutcome. As an example,
a table of UserId by CallOutcome will show one row for each interviewer and one column for
each call outcome code. The cell for an individual interviewer and call outcome combination will
tell you how many calls that interviewer made that resulted in that call outcome. It will also show
the total and mean amount of time that the interviewer spent on those calls.
Note that if you use the Email activity on a project that allows telephone interviewing, the
history table for the project will contain a history record for all participants who received the
message. These records have an empty UserId value and a duration of either 1 or 0, and they
appear in the base of your tables.
249
IBM SPSS Data Collection Interviewer Server User’s Guide
Sample Usage
This report shows a frequency table of the number of participant records in each queue. Each cell
contains a count and a column percentage. For projects that use an autodialer, the report includes
the autodialer-specific queues called CHECK_NUMBER and SILENT.
250
Chapter 1
Sample Usage Across Projects
This report shows a frequency table of the number of participant records in each queue, across
projects, for each project. The report always includes both real and test data. Each cell contains
a count and a column percentage. For projects that use an autodialer, the report includes the
autodialer-specific queues called CHECK_NUMBER and SILENT.
251
IBM SPSS Data Collection Interviewer Server User’s Guide
Time Zone Status
This report displays a list of all time zones in use by the project and whether the time zones are
active or inactive based on valid call times or day parts.
252
Chapter 1
Notes
You can customize many of the reports listed above, or even add your own reports to the Phone
activity. For more information, use the search function in the Data Collection Developer Library
documentation to search for the text “Customized Telephone Interviewing (CATI) Reports” and in
the search results open the topic with that title.
Instead of using the Phone activity, you can produce all of the reports listed
above by running a IBM® SPSS® Data Collection script. The script is called
RunAllPhoneReports.mrs, which by default is installed by the DDL in the
[INSTALL_FOLDER]\IBM\SPSS\DataCollection\6\DDL\Scripts\General\mrScriptBasic folder.
By editing a parameter in the script, you can select any of the following report formats: HTML;
Microsoft Excel; Microsoft Powerpoint; Microsoft Word; delimited text (.csv) file. You can
also specify a date range for those reports that require one, and whether the reports should use
real or test data.
Starting Phone
E Select the project you want to work on and click Phone.
253
IBM SPSS Data Collection Interviewer Server User’s Guide
This opens the Phone activity, which displays a list of available reports on its Overview tab.
Figure 1-63
Running Reports
When you run a report, you can choose whether the report will include the following:
Real or test interview data, or both interview types.
A chart.
All records, or only records that relate to a specific time period.
Project sample information or data.
Running a report
E From the Tools menu, choose Options. This opens the Options dialog box as shown below.
254
Chapter 1
E By default, many reports include data only for real interviews. If you want your report to include
data only for test interviews, or for both real and test interviews, change the value of Data Filter as
required.
If your project was created using version 3.0 or earlier of IBM® SPSS® Data Collection
Interviewer Server, or you intend to run one of the three reports that are related to the use of
an autodialer, skip the previous step—your report will always include data for both real and
test interviews.
Note: In the project’s sample table, participant records are defined as either real or test by the value
of the Test column. If the value is Null, the Phone activity will treat the record as being both real
and test. For more information, see Mapping Fields to Required Columns in the Sample Table.
E To include a chart with your report, select Include chart and choose the chart type from the
drop-down list.
Note 1: To be able to select the “Include chart” option, you must have first enabled charts in the
Phone activity. For more information, search the Interviewer Server Installation Instructions and
Configuration Notes for the topic “Enabling Charts in the Phone Reports Activity”.
Note 2: Not all reports can include a chart—see the individual description of each report in
Phone for details.
E To save your settings and close the Options dialog box, click OK.
E In the frame on the left of the Overview tab, you can select an existing Date Filter or Sample filter
from the provided drop-down lists as shown below.
255
IBM SPSS Data Collection Interviewer Server User’s Guide
To enter your own date and time range, select Other from the Date Filter list and then specify the
start and end dates and times using the drop-down lists. Note that the start and end times refer to
times in the Interviewer Server server’s local time zone, which might not be the same as your local
time zone. To specify that no filtering is required, select No limit.
For more information about creating your own filters, see Filtering Reports.
Note: The Appointments Summary report ignores any filter that you have selected. If you run that
report, the Phone activity will prompt you to enter a time period.
E In the Available Reports window, select the report that you want to run. This opens the Selected
Reports tab.
E Some reports prompt for additional information, as follows:
For the Review Calls report, select the variables that are to form the side and top of the table
from the drop-down lists.
For the Appointments Summary report, select the start and end dates from the calendars.
E If you have been prompted to enter additional information, click Generate Report to run the report.
After a brief pause, the Phone activity displays the report in the Selected Reports tab.
You can change the filter criteria for the displayed report (except for the Appointments Summary
report) by selecting a different option from the Date Filter or Sample Filter drop-down lists and
clicking the Refresh button.
Note: When the current report does not include time filters, the Refresh button is enabled and the
time filters are disabled. To specify that a specific report should not include time filters, the report
name must be added to the Phone activity’s web.config file. Refer to the topic Settings for the
Phone Activity in the IBM® SPSS® Data Collection Developer Library for more information.
256
Chapter 1
Filtering Reports
When you run or download a report, you can choose to include only records that relate to a
specific time period or choose records that contain specific sample information or data. You do
this by selecting a filter to apply to the report.
When installed, the Phone activity includes several different filters, which you can amend to
suit your own requirements. You can also add your own filters, or delete filters that you no longer
want. You define a filter by writing a filter expression.
Note that you cannot amend or delete the “Other” and “No limit” filters installed with the
Phone activity. In addition, the Appointments Summary report ignores any filter that you have
selected, and the cross project reports ignore datetime filters.
Adding a date filter
E From the Tools menu, choose Set Filters. This opens the Set Filters dialog box.
E Select the Date Filter tab.
E In Name, enter the name of your new filter. The maximum filter name length is 128 characters.
E In Filter expression, enter the expression for your new filter. The maximum filter expression length
is 512 characters. For more information, see “Writing a Filter Expression” at the end of this topic.
E Click Add. This adds your new filter to the list of filters.
E To save your new filter and close the Set Filters dialog box, click OK. Alternatively, click Cancel if
you do not want to save your new filter.
Note: An alternative for adding either a date or sample filter is using the Copy button. This will
copy the selected filter, allowing you to rename the filter and edit the syntax.
Editing a date filter
E From the Tools menu, choose Set Filters. This opens the Set Filters dialog box.
E Select the Date Filter tab.
257
IBM SPSS Data Collection Interviewer Server User’s Guide
E In Filters, select the filter you want to edit and click Edit.
E In Filter expression, amend the expression and click Update. For more information, see “Writing
a Filter Expression” at the end of this topic.
E To save your revised filter and close the Set Filters dialog box, click OK. Alternatively, click
Cancel if you do not want to save your amendment.
Deleting a filter
E From the Tools menu, choose Set Filters. This opens the Set Filters dialog box.
E Select the Date Filter tab.
E In Filters, select the filter you want to delete and click Delete. This opens a confirmation dialog box.
E Click OK. This removes the filter from the list of filters.
E To delete the filter and close the Set Filters dialog box, click OK. Alternatively, click Cancel if
you do not want to delete the filter.
Adding a sample filter
E From the Tools menu, choose Set Filters. This opens the Set Filters dialog box.
E Select the Sample Filter tab.
E In Name, enter the name of your new filter. The maximum filter name length is 128 characters.
E In Filter expression, enter the expression for your new filter. The maximum filter expression length
is 512 characters. For more information, see “Writing a Filter Expression” at the end of this topic.
E Click Add. This adds your new filter to the list of filters.
E To save your new filter and close the Set Filters dialog box, click OK. Alternatively, click Cancel if
you do not want to save your new filter.
Note: An alternative for adding either a date or sample filter is using the Copy button. This will
copy the selected filter, allowing you to rename the filter and edit the syntax.
Editing a sample filter
E From the Tools menu, choose Set Filters. This opens the Set Filters dialog box.
E Select the Sample Filter tab.
E In Filters, select the filter you want to edit and click Edit.
E In Filter expression, amend the expression and click Update. For more information, see “Writing
a Filter Expression” at the end of this topic.
E To save your revised filter and close the Set Filters dialog box, click OK. Alternatively, click
Cancel if you do not want to save your amendment.
258
Chapter 1
Deleting a sample filter
E From the Tools menu, choose Set Filters. This opens the Set Filters dialog box.
E Select the Sample Filter tab.
E In Filters, select the filter you want to delete and click Delete. This opens a confirmation dialog box.
E Click OK. This removes the filter from the list of filters.
E To delete the filter and close the Set Filters dialog box, click OK. Alternatively, click Cancel if
you do not want to delete the filter.
Writing a Filter Expression
The expression text that you use in filter expressions must be supported by the IBM® SPSS®
Data Collection Data Model and can include functions from the IBM® SPSS® Data Collection
Function Library. For more information, use the search function in the IBM® SPSS® Data
Collection Developer Library documentation to search for the text “Expression Evaluation” and in
the search results open the topic with that title.
Downloading Reports
You can download one or more reports to HTML or CSV files. The Phone activity will add the
report files to a .zip file, which you can save to the location of your choice.
When you download reports, you can choose whether the reports will include the following:
Real or test interview data, or both interview types.
A chart.
All records, or only records that relate to a specific time period.
Project sample information or data.
To Download Reports
E From the Tools menu, choose Options. This opens the Options dialog box as shown below.
259
IBM SPSS Data Collection Interviewer Server User’s Guide
E By default, many reports include data only for real interviews. If you want your reports to include
data only for test interviews, or for both real and test interviews, change the value of Data Filter as
required.
If your project was created using version 3.0 or earlier of IBM® SPSS® Data Collection
Interviewer Server, or you intend to download only the three reports that are related to the use
of an autodialer, skip the previous step—your reports will always include data for both real
and test interviews.
Note: In the project’s sample table, participant records are defined as either real or test by the value
of the Test column. If the value is Null, the Phone activity will treat the record as being both real
and test. For more information, see Mapping Fields to Required Columns in the Sample Table.
E From the “Download report format” drop-down list, select the format for the downloaded file,
either HTML or CSV.
E To include a chart with each report, select Include chart and choose the chart type from the
drop-down list.
Note 1: To be able to select the “Include chart” option, you must have first enabled charts in the
Phone activity. For more information, search the Interviewer Server Installation Instructions and
Configuration Notes for the topic “Enabling Charts in the Phone Reports Activity”.
Note 2: Not all reports can include a chart—see the individual description of each report in
Phone for details.
E To save your settings and close the Options dialog box, click OK.
E In the frame on the left of the Overview tab, you can select an existing Date Filter or Sample filter
from the provided drop-down lists as shown below.
To enter your own date and time range, select Other from the Date Filter list and then specify the
start and end dates and times using the drop-down lists. Note that the start and end times refer to
times in the Interviewer Server server’s local time zone, which might not be the same as your local
time zone. To specify that no filtering is required, select No limit.
For more information about creating your own filters, see Filtering Reports.
260
Chapter 1
Note: The filter that you have selected will apply to all the reports that you choose to download,
except for the Appointments Summary report. If you download that report, the Phone activity will
prompt you to enter a time period.
E From the Phone activity menu, choose:
Tools > Download > Selected Reports
This opens the “Download Selected Reports” dialog box as shown below.
E Select the reports that you want to download and click OK.
E Some reports prompt for additional information, as follows:
For the Review Calls report, select the variables that are to form the side and top of the table
from the drop-down lists.
For the Appointments Summary report, select the start and end dates from the calendars.
E If you have been prompted to enter additional information, click OK to download the reports.
E When prompted, choose whether to open the .zip file in its associated program or save it to the
location of your choice.
About Segments
Segments are a means of categorizing records using groupings of your choice. If segment
information is present in the project’s sample table, the Phone activity further breaks the data
down by segment when running either the “Call Outcome by Segment” report or the “Calls
by Segment” report.
Segment is not a required column in the sample table, and if not present the report shows
information at the top level only. Alternative names for the Segment column, in priority order, are
Market, Location, Region, or Bucket. That is, if there is no Segment column, the Phone activity
looks for a column called Market and uses that; if there isn’t a Market column it looks for one
called Location, and so on. Whatever its name, make sure that you set the column’s Can Tabulate
option to True on the Fields tab of the Phone Surveys activity.
261
IBM SPSS Data Collection Interviewer Server User’s Guide
Export Data
You use Export Data to export interview data for analysis using products such as
IBM® SPSS® Data Collection Survey Tabulation or IBM® SPSS® Statistics. The
files that Export Data creates are written to a zip file in your user folder. The
filename is InterviewExporter.ProjectName.DataType.DateTime.zip; for example,
InterviewExporter.test.csv.20061120.1600.zip for a delimited text file for the test project, exported
at 4pm on 20 November 2006.
You can export data in the following formats:
Delimited Text File (Excel)
IBM SPSS Data Collection Data File (supports hierarchical data)
Quantum Data File (DAT)
SAS System File
SPSS Statistics File (SAV)
Triple-S Data File (Fixed or CSV)
Data Collection XML Data File (supports hierarchical data)
You can calculate and then generate two extra data columns that contain the start and finish times
for each case. The start and finish times are based on the selected time zone of your choosing.
You can also include only records that relate to a specific filter condition (such as time period or
survey status). Export Data provides several filters that you can modify to suit your requirements.
You can also create your own filters, or delete filters that are no longer needed.
If you are exporting in delimited text format and the data contains categorical data, you may
choose between exporting category (response) names or values (codes).
You can export the following types of data:
Respondent data only (that is, data from live interviews)
Test data only
Both respondent and test data
and can include all system variables, only common system variables, or no system variables at all.
You can also choose which types of data variables to export; for example, categorical and numeric
variables but not text, boolean, or date variables.
You can export data with any combination of the following interview statuses:
Completed successfully
Active/in progress
Timed out
Stopped by the script
Stopped by the respondent
Interview system shutdown
Terminated by a signal from the questionnaire script
Reviewed
262
Chapter 1
Finally, you can choose to export data gathered before or after a specific date/time, or select a
date/time range.
An advanced option is available for users who want more control over the export process.
Export Data does not normally export dirty data but can be configured to do so. Speak to your
IBM® SPSS® Data Collection Interviewer Server administrator if you need to export dirty data.
Starting Export Data
E Select the project whose data you want to export and click Export Data.
Exporting Data
The main Export Data page is where you define the data format that you want to use for the output
data file, and the type of data you want to export to that file.
263
IBM SPSS Data Collection Interviewer Server User’s Guide
Export Data uses the project’s DataLocation property in DPM to find the questionnaire definition
(.mdd) file and the case data. If DataLocation points to a project folder in the User area and there
is no .mdd file there, Export Data will instead look for a .mdd file in the Shared project folder.
If the .mdd file contains more than one version, Export Data uses the superversion — that is,
a combination of all versions, which results in data for all questions that appear in any version
being exported.
If you are exporting data in IBM® SPSS® Quantum™ format and IBM® SPSS® Data
Collection Metadata Model to Quantum has previously been run on the case data, Export Data
will use the column allocations made using Metadata Model to Quantum rather than making
new allocations.
Note: If you downloaded the .mdd in order to run Metadata Model to Quantum, remember
to upload it into the shared area before running Export Data.
264
Chapter 1
Exporting data
E In Export to, choose the data format in which you want to write the exported data. Hierarchical data
is supported in the IBM SPSS Data Collection Data File and Data Collection XML Data File formats.
Note: When the MDM document contains unbounded loop questions, and you select IBM SPSS
Data Collection Data File or Data Collection XML Data File, the export will use HDATA (otherwise
VDATA is used).
E If the data format allows more than one file type, use the File type box to select the one you
want to use.
E If the questionnaire definition (.mdd) file contains more than one language, use the Language box
to select the language you want to use for question, response, and other texts. The default is
the project’s default (base) language.
E In System variables, choose how you want to deal with system variables. You can export all system
variables, no system variables, or only the common system variables.
E If you do not want to export all data variable types, do the following:
In Variable types choose Select below. Export Data displays one checkbox for each variable
type below the Variable types box.
Uncheck the boxes for the variables you do not want to export.
E If you are exporting data in Quantum format, a set of prompts to do with card column options is
displayed. Do the following:
In Width of serial number, type the number of columns to reserve for the respondent serial
number. The default is five columns.
In Width of card number, type the number of columns to reserve for the card number. The
default is two columns.
In Max card length, type the maximum number of columns to write per card. The default is 80.
In Full name of serial variable, type the serial variable name. The serial variable stores the
respondents’ serial numbers.
E If you are exporting data in delimited text format and you want to export category names rather
than values (codes), click Output category name rather than value for delimited text file.
E Select Generate extra columns for start and finish times in a specific time zone to calculate and
then generate two extra data columns that contain the start and finish times for each case. You
can select the following time zones:
Interview Server time zone - when selected, the Interview Server’s time zone is used as the
start and finish time zone values.
Respondent time zone - when selected, the respondent’s time zone is used as the start and
finish time zone values.
Note: When daylight savings time is in effect in the respondent’s time zone, an offset of 60
minutes is applied.
Other - when selected, you can select any start/finish time zone from the provided Time zone
list. The default time zone is (GMT) Greenwich Mean Time.
265
IBM SPSS Data Collection Interviewer Server User’s Guide
Filtering exported data
The Filter Options section allows you to include only records that relate to a specific filter condition
(such as time period or survey status). Export Data provides several preset filters that you can
modify to suit your requirements as well as shortcuts to support filtering based on status and date
time. You can also create your own filters, or delete preset filters that are no longer needed.
E Select an appropriate filter preset from the Select a preset filter list. You can create new, modify
existing, or delete existing filters. Refer to Edit Preset Filters dialog for information on creating,
modifying, and deleting filters.
View preset: Click to display the filter expression for the selected preset filter.
Hide preset: Click to hide the filter expression for the selected preset filter.
Edit presets: Click to create a new, modify an existing, or delete an existing filter. For more
information, see the topic Edit Preset Filters dialog on p. 265.
Filter expression: Displays the expression for the selected preset filter. Click Edit Presets to
modify the expression. For more information, see the topic Edit Preset Filters dialog on p. 265.
E Under Select filtering based on data collection status, choose Respondent data only, Test data only,
or All data, and then at least one of the interview result types.
E Optionally, enable the Select cases finished after a certain date/time and/or the Select cases finished
before a certain date/time options.
When Select cases finished after a certain date/time is selected, and an appropriate date/time is
defined, cases that finish after the specified date/time are returned.
When Select cases finished before a certain date/time is selected, and an appropriate date/time is
defined, cases that finish before the specified date/time are returned.
When both Select cases finished after a certain date/time and Select cases finished before a
certain date/time are selected, cases that fall between the two specified dates/times are returned.
Note: The defined filter condition date/time options do not correspond to the selected Respondent
time zone. When defining the Select cases finished after a certain date/time and Select cases finished
before a certain date/time options, the times are based on Coordinated Universal Time (UTC).
E Click Download Now after applying the appropriate settings.
This opens the Exporting dialog box. Messages are displayed in this dialog box documenting the
export’s progress and, when the export is complete, the number of cases transferred. Note that
Export Data does not normally export dirty data but can be configured to do so. Speak to your
IBM® SPSS® Data Collection Interviewer Server administrator if you need to export dirty data.
E When prompted, choose whether to open the file from its current location or save it in a location
of your choice.
Edit Preset Filters dialog
The Edit Preset Filters dialog provides options for creating, modifying, and deleting filters.
266
Chapter 1
Creating a filter
E From Export Data, click Edit Presets next to the Select a preset filter field. This displays the Edit
Preset Filters dialog, allowing you to define a new filter.
E Click the Add a new preset icon to add to new filter to the list of preset filters.
E Enter an appropriate filter name in the Name field.
E Enter the appropriate expression in the Filter expression field. Refer to the Writing filter expressions
section below for more information.
E Click Apply to save the new filter; click Cancel to discard the new filter.
Modifying an existing filter
E From Export Data, click Edit Presets next to the Select a preset filter field. This displays the Edit
Preset Filters dialog, allowing you to modify an existing filter.
E In the Presets list, select a filter to modify. The selected filter name and expression display in their
respective Name and Filter expression fields.
E Edit the filter expression as appropriate, and click Apply. Refer to the Writing filter expressions
section below for more information.
E Click OK to save the modified filter; click Cancel to discard the changes.
Copying an existing filter
E From Export Data, click Edit Presets next to the Select a preset filter field. This displays the Edit
Preset Filters dialog, allowing you to modify an existing filter.
E In the Presets list, select a filter to copy.
E Click the Copy & Paste icon. The selected filter is duplicated with a number appended to its name.
E Edit the copied filter name and expression as appropriate, and click Apply. Refer to the Writing
filter expressions section below for more information.
E Click OK to save the cloned filter; click Cancel to discard the changes.
Deleting a filter
E Click Edit Presets next to the Select a preset filter field. This displays the Set Filters dialog,
allowing you to delete an existing filter.
E In the Presets list, select a filter to delete, and then click the Delete icon.
Writing filter expressions
The expression text used in filter expressions must be supported by the IBM® SPSS® Data
Collection Data Model and can include functions from the IBM® SPSS® Data Collection
Function Library. Refer to the Expression Evaluation topic in the IBM® SPSS® Data Collection
Developer Library for more information.
267
IBM SPSS Data Collection Interviewer Server User’s Guide
Exporting Only Common System Variables
System variables contain general information about the interview as a whole rather than data
related to an individual question and, as such, they may be of little use for analysis purposes.
However, rather than forcing you to choose between exporting all or no system variables, Export
Data offers a third option of exporting only the more commonly used system variables. These
are as follows:
Variable Name
Respondent.ID
Respondent.Serial
DataCollection.Status
DataCollection.StartTime
DataCollection.FinishTime
DataCollection.MetadataVersionNumber
DataCollection.TerminateSignal
Description
ID that links a respondent record to log entries.
This is either the ID from the sample record or an
ID generated randomly by IBM® SPSS® Data
Collection Interviewer Server.
Respondent serial number
Interview status (completed, stopped, timed out,
and so on).
Interview start time.
Interview end time.
Version number of the metadata used for this
interview.
Signal used to terminate the interview.
Recommended Procedure for Exporting IBM SPSS Data Collection Interviewer Server Data to
IBM SPSS Quantum
The following procedure is recommended for exporting data in IBM® SPSS® Quantum™ format.
E In IBM® SPSS® Data Collection Interviewer Server Administration, run the Launch activity to
activate the project.
This ensures that the .mdd file contains up to date information about the questions in the
questionnaire.
E Run IBM® SPSS® Data Collection Metadata Model to Quantum on the .mdd file you have
just updated.
E Reactivate the questionnaire.
The version of the .mdd file in the Shared project folder will now contain card and column
information.
E In Interviewer Server Administration, run Export Data to export the data.
Advanced Options
The Interviewer Server Administration - Export Data dialog displays when you click Advanced
from Export Data. The dialog provides the following options.
268
Chapter 1
Connection Properties tab
Note: The Connection Properties tab is only visible if you are assigned the
canAlterConnectionProperties feature for the Export Data activity . Refer to Assigning users
or roles to activity features topic in the IBM® SPSS® Data Collection Interviewer Server
Administration User’s Guide for more information on activity features.
The Connection Properties tab provides inputs for custom properties, allowing you to define the mr
Init Custom portion of both the input and output connection strings.
Input MR Init Custom: Allows you to define the MR Init Custom portion of input connection string.
Output MR Init Custom: Allows you to define the MR Init Custom portion of output connection
string.
Refer to the Connection Properties topic in the IBM® SPSS® Data Collection Developer Library
for more information regarding MR Init Custom connection properties.
269
IBM SPSS Data Collection Interviewer Server User’s Guide
MDM Properties tab
The MDM Properties tab provides more control over the type of data that is exported by allowing
you to specify which version, language, context, and label type you want to export.
Questionnaire definition (.mdd) files typically contain versions, which record any changes to the
content of the questionnaire. Typically, when the questionnaire changes (for example, a question
or category is added or deleted), a new version is created and when the changes are complete,
the version is locked.
Using a combination of some or all of the versions is useful when, for example, you want to export
case data for more than one version and there have been changes to the variable and category
definitions that mean that case data collected with one version is not valid in another version.
Selecting all of the versions for which you want to export the case data, means that generally
you can export the case data collected with the different versions at the same time without
encountering validity errors due to the differences between the versions. However, depending on
the version changes, some validity errors may still be encountered.
270
Chapter 1
Current version. Displays an expression that represents the selection you have chosen. You can
optionally select the versions you want to use by typing an expression directly into the text box.
Syntax
..
v1, v2, v3, v4
v1..v2
^v1..v2
Description
Specifies all versions
Specifies individual versions
Specifies an inclusive range of versions
Excludes a range of versions
Specifies the most recent version.
You can specify a combination of individual versions, and ranges to include or exclude. For
example, the following specifies version 3:2 and all versions from 4:5 to 7:3 with the exception
of versions 7 through 7:2:
3:2, 4:5..7:3, ^7..7:2
When there is a conflict between the versions, the order of precedence is taken from the order in
which versions are specified in the expression, with the rightmost versions taking precedence over
the leftmost. For example, if a category label differs in the versions you select, the text in the
version with the higher precedence will be used. However the order of questions and categories
is always taken from the most recent version and there is special handling of changes to loop
definition ranges and the minimum and maximum values of variables.
For more information, see the topic Version Expressions on p. 271.
Latest. Select this option if you want to use the most recent version.
All. Select this option if you want to use a combination (superset) of all of the available versions.
(This is sometimes called a superversion).
Versions. A list of all of the versions that are available. For each version, the following
information is shown:
Name. The version name. Version names are made up of a combination of the major version
and minor version numbers in the form Major#:Minor#, where Major# is the number of the
major version and Minor# is the number of the minor version. Changes in the major version
number indicate that the structure of the case data has changed (for example, variables or
categories have been added or deleted) whereas changes in the minor version number indicate
that the changes affect the metadata only (for example, a question text has been changed).
Version names are created automatically when a version is locked. A version that has not
been locked is always called LATEST.
Created by. The ID of the user who created the version.
Created Date. This shows the date and time at which the version was locked.
Description. When present, this is a text that gives information about the version.
Languages. Select the language you want to use. You can change the language only if there
is more than one language defined.
271
IBM SPSS Data Collection Interviewer Server User’s Guide
Contexts. Select the user context you want to use. The user context controls which texts are
displayed. For example, select Question to display question texts, or Analysis to display shorter
texts suitable for displaying when analyzing the data.
LabelTypes. Select the label type you want to use. You should generally select the Label option.
Version Expressions
When you open a metadata (.mdd) file, you can specify the version or versions you want to use.
This topic describes the syntax that you use to specify the version or versions.
You can specify a single version using its name. Version names are made up of a combination of
the major version and minor version numbers in the form Major#:Minor#, where Major# is the
number of the major version and Minor# is the number of the minor version. Changes in the major
version number indicate that the structure of the case data has changed (for example, variables or
categories have been added or deleted) whereas changes in the minor version number indicate that
the changes affect the metadata only (for example, a question text has been changed). Version
names are created automatically when a version is locked. A version that has not been locked
is always called LATEST.
You can open the latest minor version that belongs to a specified major version by entering the
major version number followed by a colon. For example, if there are minor versions 2:1, 2:2, and
2:3, specifying 2: will open minor version 2:3.
You can use an expression to open a superset (sometimes called a superversion) of two or more
versions. The order in which you specify the versions determines the order of precedence that is
used when there is a conflict between versions. (The rightmost versions in the expression take
precedence over the leftmost.) For example, if a category label differs in the versions you select,
the text in the version with the highest precedence will be used. However the order of questions
and categories is always taken from the most recent version and there is special handling of
changes to loop definition ranges and the minimum and maximum values of variables between the
versions.
The version expression syntax is:
{<version> (, <version>)*}
<version>::= VersionName | [^] [VersionName] .. [VersionName]
where VersionName is the name of a major or minor version and ^ indicates that the following
range is to be excluded.
You can specify the name of versions that do not exist in a range. MDM will then automatically
use the next highest or lowest name it encounters, depending on whether the name is specified at
the start or end of the range and whether the range is in ascending or descending sequence.
272
Chapter 1
Examples
Expression
{..}
{2, 3, 7}
{5..1}
{2..7,9}
{2..11,^3:1..5:4}
{}
{LATEST}
{LASTLOCKED}
Description
Include all versions in the MDM Document. If
there are no versions, this selects the unversioned
Document.
Include versions 2, 3, and 7 and give highest
precedence to version 7, the next highest precedence
to version 3, and the lowest precedence to version 2.
Include versions 5 through 1, giving the highest
precedence to version 1.
Include versions 2 through 7 and version 9.
Include versions 2 through 11 but exclude versions
3:1 to 5:4 inclusive.
Include the most recent version in the MDM
Document.
Select the most recent version in the versions
collection, whether or not it is named LATEST. If
there are no versions, this selects the unversioned
document.
Include the most recent locked version in the MDM
Document.
EBNF Definition
The syntax for specifying the version or versions to open can be specified using the following
Extended Backus-Naur Form (EBNF), which is a notation for specifying the syntax of a language
succinctly and precisely:
<versionname> ::= <version> | (<vername>:) | <range>
<range> ::= { <range_item>(, <range_item>)* }
<range_item>::= [^]((<version>[..])|([<version>]..[<version>]))
<version> ::= (<vername>[:<vername>]) | LATEST | LASTLOCKED
<vername> ::= Any positive integer value
Interviewer Monitoring
The Interviewer Monitoring activity provides you with two key features to help you manage the
performance of your teams:
For the IBM® SPSS® Data Collection Interviewer Server projects that you have access to,
a list of all interviewers together with statistics relating to their performance. This view
can be set to refresh automatically.
The ability to monitor an interviewer. In this view, your screen automatically synchronizes
with the interviewer’s screen so that you can see the question being asked by the interviewer.
If the interviewer is using an autodialer to make calls, you can also listen to the interview.
In addition, if one or more of your Interviewer Server projects uses an autodialer, you can use the
Interviewer Monitoring activity to monitor the percentage of silent calls that are occurring.
273
IBM SPSS Data Collection Interviewer Server User’s Guide
Note: An interviewer is defined as a IBM® SPSS® Data Collection Interviewer Server
Administration user that has opened the Phone Participants activity.
Starting Interviewer Monitoring
E From the IBM® SPSS® Data Collection Interviewer Server Administration menu, choose:
Phone > Interviewer Monitoring
The Interviewer Monitoring activity opens and the Interviewers tab is displayed.
When Autodialers are Used
If the call center that you are working in uses autodialers to call participants, a dialog box might
open and request that you enter a position name, as shown below:
Figure 1-64
Position dialog box
In the Supervisor Position field, enter the position name and click OK. If you click Cancel
instead, the Interview Monitoring activity will still open, but only visual monitoring will be
possible—audio monitoring will not be available.
For more information, see Dialer Administration.
Setting up Monitoring
By default, the Interviewer Monitoring activity can be opened by anyone who is a member of
the CATIsupervisor role. For the IBM® SPSS® Data Collection projects that you have access
to, all interviewers are automatically included in the Interviewers Real Time display and no
additional setup tasks are required.
Audio monitoring is available only if the interviewer is using an autodialer to make calls, and
the supervisor’s station is connected to the same autodialer.
274
Chapter 1
The Interviewers Real Time Display
Figure 1-65
Interviewers tab
The Interviewers tab contains two windows:
The first window allows you to specify if, and how often, the Interviewers Real Time display
is automatically refreshed.
The second window is the Interviewers Real Time display, which contains one record for every
user (interviewer) who has opened the Phone Participants activity and is working on a IBM®
SPSS® Data Collection project that you can access.
An interviewer will remain listed in the Real Time display while Phone Participants remains open,
even if there is no activity for a period of a day or more. When an interviewer closes Phone
Participants, his or her record is removed from the Real Time display.
Note: If an interviewer reopens Phone Participants after it closes abnormally, the Real Time
display might contain more than one record for that interviewer. The current record will have a
lower value in the Session Time column. A record that isn’t current will be removed automatically
after one hour.
For each interviewer, the Real Time display shows a number of statistics, which are mostly
of three types:
Statistics that relate to the period since the interviewer last opened the Phone Participants
activity. This period is sometimes referred to as “the current session”.
Statistics that relate to the interview currently in progress, if there is one.
Statistics that relate to the current question being asked.
For more information about the statistics shown, see Columns in the Real Time Display.
You can change the Real Time display to show additional columns or to display the interviewer
records in a different order. For more information, see the topic Customizing the Real Time
Display on p. 276.
In the Real Time display, you can choose to monitor an interviewer who is conducting an
interview. For more information, see the topic Monitoring an Interviewer on p. 278.
275
IBM SPSS Data Collection Interviewer Server User’s Guide
At the top of the main screen, there are some toolbar buttons, which are described in the following
table:
Button
Description
Refresh the contents of the Real Time display.
Change the settings for the Real Time display. For
more information, see the topic Customizing the
Real Time Display on p. 276.
Close Interviewer Monitoring and return to the
IBM® SPSS® Data Collection Interviewer Server
Administration main screen.
Columns in the Real Time Display
The following table describes the columns that can appear in the Interviewers Real Time display.
By default, not all of these columns are displayed, but they can be added. For more information,
see the topic Customizing the Real Time Display on p. 276.
Column Name
Abandoned
Busy Rate
Completed
Contacts Since Last Survey
Idle Time
Interviewer ID
Interview Time
Is Monitored
Is Review
Monitoring Allowed
Off Hook
Description
The number of times the interviewer has selected
the “Abandoned” call outcome since last opening
the Phone Participants activity.
The percentage of the Session Time that the
interviewer has spent conducting interviews.
The number of interviews completed since the
interviewer last opened the Phone Participants
activity.
The number of participant records retrieved by the
interviewer from the sample management system
since the end of the previous interview.
The time elapsed since the interviewer last
submitted a page, either by retrieving the next
contact or pressing Next for an interview.
The interviewer’s IBM® SPSS® Data Collection
user name.
The time since the current interview was started.
If the interview has been restarted, the time shown
is that since the restart.
Whether the interview is monitored.
Whether the interview is reviewed.
Whether the participant has given his or her consent
to be monitored.
Whether the interviewer’s telephone is off hook.
This information is shown only if the interviewer is
using an autodialer to make calls.
276
Chapter 1
Column Name
Phone
Position
Access Number
Project ID
Project Type
Question ID
Question Time
Interviewer Status
Last Call Outcome
Refused
Session Time
Try Count
Wait Time
Description
The extension number used at the telephone
interviewer station. This information is shown only
if the interviewer is using an autodialer to make
calls.
The position name for the telephone interviewer
station. This information is shown only if the
interviewer is using an autodialer to make calls.
Positions prefixed with an “R” indicate a remote
interviewer.
The telephone number of the remote interviewer.
The value is blank for local interviewers.
The Data Collection project name.
The value is always Data Collection.
The name of the current question.
The time spent by the interviewer on the current
question.
An icon displays whether the interviewer’s status is
Idle, Waiting, Connected, or Disconnected.
The outcome of the last call completed by
the interviewer; for example, “Refused” or
“Completed”.
The number of times the interviewer has selected
the “Refused” call outcome since last opening the
Phone Participants activity.
The time since the interviewer last opened the
Phone Participants activity.
The number of interviews completed plus the
number of times that the interviewer selected a call
outcome since last opening the Phone Participants
activity. This figure does not include participant
records that the interviewer returned to the Sample
Management system by clicking the Cancel Contact
button.
For an interviewer waiting to be connected to a
participant, the time since the interviewer clicked
the Start Dialing button. This information is shown
only if the interviewer is using an autodialer to
make calls.
Customizing the Real Time Display
You can customize the following aspects of the Interviewers Real Time display:
The number of interviewer records that appear on each page. By default, all the records
are shown on a single page and you might have to use the scroll bar excessively to see all
the records. If you specify a limit to the number of records on each page, you can use the
navigation icons to move between pages.
The columns that are shown, and in what order they appear.
The sort order of the records. For example, you might want to sort the records into Project ID
order so that it’s easier to see all the interviewers working on a specific project.
277
IBM SPSS Data Collection Interviewer Server User’s Guide
To Customize the Real Time Display
E In the toolbar at the top of the Interviewer Monitoring main page, click the Table Setup button
as shown below:
Figure 1-66
Table Setup button
This opens the “Real Time Display Setting” dialog box as shown below:
Figure 1-67
Real Time Display Setting dialog box
E In “Display”, select the number of records that you want to appear on each page in the Real
Time display.
278
Chapter 1
E In Table Setup, choose which columns will appear in the Real Time display as follows:
To add a column to those displayed, click on the column name in the Available Fields list
and then click Add.
To remove a column from those displayed, click on the column name in the Displayed Fields
list and then click Remove.
Tip: In Table Setup, you can select multiple columns by pressing Ctrl or Shift while you click.
E In Table Setup, choose the order of the columns displayed in the Real Time display as follows.
To move a column towards the left of the page, click on the column name in the Displayed
Fields list and then click Move Up.
To move a column towards the right of the page, click on the column name in the Displayed
Fields list and then click Move Down.
E In the “Sort table by” drop-down list, select the column that will determine the order of the records
in the Real Time display.
E When you have completed your changes, click OK. To undo your changes, click Cancel.
The Real Time display will automatically refresh to show your changes.
Note: For information about using the “Dialer Monitoring Table Options” settings, see
“Customizing the Dialing Activity Display” in Monitoring Silent Calls.
Navigating the Real Time Display
By default, all interviewer records are displayed on a single page. However, you can customize
the Interviewers Real Time display to display the records over multiple pages instead. If you have
already done this, you will need to use the icons at the bottom of each page to navigate between
pages. The icons are described in the following table:
Icon
Description
Display the first page.
Display the previous page.
[1] [2] [3] ...
Display page 1, page 2, page 3, and so on.
Display the next page.
Display the last page.
Monitoring an Interviewer
You can monitor an interviewer who is conducting an interview. When you monitor an
interviewer, the question being asked and the previous question asked are displayed in the Monitor
tab. When the interviewer navigates to another question, the Monitor tab will automatically
refresh to show that question. When the interview finishes, the Monitor tab will show the call
outcome selected by the interviewer. If the interviewer then starts another interview, the Monitor
tab will refresh to show the first question of the new interview.
279
IBM SPSS Data Collection Interviewer Server User’s Guide
Because the Monitor tab is refreshed only when the interviewer navigates to another question, you
cannot see the answer to the current question as it is being entered by the interviewer. However,
the answer (if any) to the previous question is displayed, as is the answer to the current question if
it was asked earlier in the interview.
You can pause monitoring, for example, if you need more time to read a text response. When you
resume monitoring, and if the interview is still in progress, your screen will refresh to show the
current question being asked. You cannot choose which questions to view.
Note: You can monitor interviewers even when the interviewer selects No for the Contact agrees
to be monitored and recorded option in Phone Participants. This setting controls when the
interview should not be monitored by external parties, not when the interview can be reviewed
by a supervisor.
Audio Monitoring
If an interviewer is using an autodialer to make calls, and your station is connected to the same
autodialer, you can listen to the interview as well as watch it. You will hear both the interviewer
and the participant.
Note: Depending on the settings for the project that you are monitoring, interviews might also be
recorded and saved to sound files. For more information, see Autodialer Settings.
Selecting an Interviewer to Monitor
In the Interviewers Real Time display, an icon is displayed to the left of each interviewer to
indicate whether monitoring is possible. Each icon is described in the following table:
Icon
Description
Both visual and audio monitoring are possible.
No icon displayed
Only visual monitoring is possible.
Another supervisor is monitoring this interviewer.
Either the participant did not give his or her consent
to be monitored, or the project settings specify that
monitoring is never allowed. However, as local laws
sometimes allow monitoring by someone within the
same legal entity as the interviewer (for example,
a supervisor who works for the same organization
as the interviewer), monitoring is still possible.
In addition, this icon will also be displayed if the
interviewer is reviewing an interview.
The Monitoring Allowed column in the Real Time display will also tell you if an interviewer
can be monitored. If the Monitoring Allowed column is not shown, you can add it. For more
information, see the topic Customizing the Real Time Display on p. 276.
To Select an Interviewer to Monitor
E In the Interviewers Real Time display, click on the record of an interviewer who can be monitored.
280
Chapter 1
The interviewer record is highlighted.
Note: If the Real Time display contains more than one record for the same interviewer (which can
occur if the Phone Participants activity closes abnormally), click on the record that has a lower
value in the Session Time column. If you do not click on the correct record, you will not see
any interviews when the Monitor tab opens.
E In the upper right of the Real Time display, click on the Monitor button as shown below:
Figure 1-68
Monitor button
The Monitor tab opens and the current question is displayed.
The Monitor Tab
Figure 1-69
Monitor tab
The Monitor tab is divided into two sections:
The top half of the screen shows the interviewer’s IBM® SPSS® Data Collection Interviewer
Server Administration user name, the name of the IBM® SPSS® Data Collection Interviewer
Server project, the time since the current interview was started, the time spent by the
interviewer on the current question, and a graphic that shows the interviewer’s current status.
The bottom half of the screen contains two windows where the current and previous questions
are displayed. If a question is too big to fit in the window, scroll bars will appear. If the
participant did not give his or her consent to be monitored, or if the project settings specify
that monitoring is never allowed, or if the interviewer is reviewing the interview, the
following icon will be displayed:
Figure 1-70
Icon to indicate that monitoring is not allowed
281
IBM SPSS Data Collection Interviewer Server User’s Guide
Note: In the windows showing the current and previous questions, it’s possible (but not
recommended) to modify the answers and click on the navigation buttons. This has no effect
on the interview in progress, but might cause the question to disappear from your screen. Your
screen will be refreshed when the interviewer navigates to another question.
Interviewer Server Administration automatically creates an audit record in the mrUserData
database to store details about the period in which you have the Monitor tab open. This period is
sometimes referred to as “the monitoring session”. To add a comment to the audit record, type
it in the Document Ref field in the top half of the Monitor tab. When you navigate away from
the Monitor tab, your comment is added to the audit record. For more information, search the
IBM® SPSS® Data Collection Developer Library documentation for the topic “Interviewer
Server Administration Audit Trail”.
The bottom half of the Monitor tab also contains some buttons, which are described in the
table below:
Button
Description
Pause monitoring. Note that this button pauses
visual monitoring, but does not mute audio
monitoring.
Resume monitoring.
Monitoring Silent Calls
If the IBM® SPSS® Data Collection Interviewer Server projects that you have access to use an
autodialer, you can monitor the percentage of silent calls that are occurring for each project. Silent
calls can occur when an autodialer generates more calls than there are interviewers available to
handle the calls. For any of the listed projects, you can also reset the silent calls figure to zero.
Figure 1-71
Dialers tab
You use the Dialers tab to monitor the autodialer activity for each project. The columns shown in
the Dialing Activity display on the Dialers tab are described in the following table.
Column
Project
Dialer
Description
The name of the Interviewer Server project.
The name of the autodialer being used by this
dialing group.
282
Chapter 1
Column
Group
Engine
Total Interviewers
Waiting Interviewers
Silent Calls
Mode
Description
The ID number of the dialing group. A dialing
group is shown only if the project is using an
autodialer in predictive or group mode. If the
project uses interviewer qualifications, there will
be a separate dialing group for each collection of
interviewers with the same qualifications.
The URL of the interview session engine being used
by this dialing group.
The number of interviewers who are using an
autodialer.
The number of interviewers who are using an
autodialer and are waiting to be connected to a
participant. This figure is shown only if the project
is using the autodialer in predictive or group mode.
The percentage of silent calls that are occurring.
This figure is shown only if the project is using an
autodialer in predictive or group mode. The figure
is an average of the silent call percentage figures for
all of the interview session engines being used by
this project. Each engine’s silent call percentage
figure is based on the period since the engine was
last restarted or the percentage figure was last reset.
The current dialing mode being used by the
autodialer. The possible values are Predictive, Not
predictive, and Extension. For more information
about the difference between predictive, not
predictive (group), and extension dialing, use
the search function in the IBM® SPSS® Data
Collection Developer Library documentation to
search for the text “How Does Autodialing Work”
and in the search results open the topic with that
title.
Customizing the Dialing Activity Display
You can change the Dialing Activity display to show or hide the dialing groups associated with
each Interviewer Server project. If dialing groups are hidden, the Dialer, Group, and Engine
columns will not appear in the Dialing Activity display.
E In the toolbar at the top of the Interviewer Monitoring main page, click the Table Setup button
as shown below:
Figure 1-72
Table Setup button
283
IBM SPSS Data Collection Interviewer Server User’s Guide
This opens the “Real Time Display Setting” dialog box as shown below:
Figure 1-73
Real Time Display Setting dialog box
E In Dialer Monitoring Table Options, choose whether you want to display projects and their
associated dialing groups, or just the projects.
E In the “Sort table by” drop-down list, choose the sort order of the projects in the Dialing Activity
display.
E Click OK.
Note: For information about using the other settings in the “Real Time Display Setting” dialog
box, see Customizing the Real Time Display.
Resetting the Silent Calls Percentage
To set a project’s silent calls figure to zero, open the Phone Surveys activity for the project and
click the Reset Statistics button on the Dialer Settings tab. For more information, see Autodialer
Settings.
284
Chapter 1
Dialer Administration
You use the Dialer Administration activity to allow your telephone interviewing projects to use an
autodialer. An autodialer is a computer that automatically dials the phone numbers of participants
to generate calls for interviewers. Your call center might use one or more autodialers.
IBM® SPSS® Data Collection supports the IBM® SPSS® Data Collection Dialer and QTC
autodialers. For more information about how IBM® SPSS® Data Collection Interviewer Server
interfaces with an autodialer, search the IBM® SPSS® Data Collection Developer Library
documentation for the topic “The Dialer Interface Component”.
Using an autodialer involves the following steps:
1. Creating a dialer configuration file, which contains one entry for each autodialer and one entry for
each station that will use an autodialer.
2. Importing the dialer configuration file into the Dialer Administration activity.
3. Inputting a position name on each station, which will allow the autodialer to identify the station.
4. Connecting to the autodialer, so that it is able to generate calls for interviewers.
You can also use the Dialer Administration activity to monitor the number of active calls on
each autodialer and to disconnect from an autodialer.
Note: To use an autodialer, you also need to specify for each of your telephone interviewing
projects that an autodialer should be used. For more information, see Interview Settings.
Creating a dialer configuration file
A dialer configuration file is a Microsoft Excel spreadsheet that contains two worksheets
named Dialers and Positions. To help you create your first dialer configuration file,
an example spreadsheet called DialerConfiguration.xls is included with the IBM®
SPSS® Data Collection Developer Library and, by default, is installed in folder
[INSTALL_FOLDER]\IBM\SPSS\DataCollection\6\DDL\Administration Tools.
Dialers worksheet
You define each autodialer on a separate row of the Dialers worksheet. The first row must contain
the column headings.
The following table describes the columns in the Dialers worksheet:
Column
DialerName
Description
Address
Description
A name that uniquely identifies the autodialer. For
example, ChicagoDialer03.
A free-format description of the autodialer.
The network address of the autodialer. For example,
an IP address.
285
IBM SPSS Data Collection Interviewer Server User’s Guide
Column
DialerType
RemoteTrunkGroup
Port
Status
InternationalAccessCode
Description
When utilizing a 3rd party dialer, this value must
match the property collection that is added by the
specific 3rd party dialer install kit.
Identifies a particular ISDN trunk to support
connecting remote interviewers and/or supervisors.
This setting can be overridden in the sample
management script.
The port number to use on the autodialer.
The worksheet does not need to include this
column. However, to avoid having to manually
connect to the autodialer after importing the dialer
configuration file, set the value to Active.
The international access code that the autodialer
should use to replace the plus (+) at the start of
international phone numbers. If you enter an
international access code that starts with one or
more zeroes, make sure that you format this column
as Text so that the leading zeroes are preserved.
Positions worksheet
You define each position on a separate row of the Positions worksheet. The first row must contain
the column headings.
The following table describes the columns in the Positions worksheet:
Column
Position
DialerName
RemoteTrunkGroup
Description
A name that uniquely identifies the position. For example, R02-S18 for station
18 in room 2. Remember that someone will have to enter this name on the
corresponding telephone interviewer or supervisor station, so do not make
names too long or difficult to type. For more information, see the topic Setting
up stations to use an autodialer on p. 287. The maximum Position length is
80 characters.
The autodialer that will be used by this position. For example, ChicagoDialer03.
This value must match one of the entries in the DialerName column in the
Dialers worksheet.
Identifies a particular ISDN trunk to support connecting remote interviewers
and/or supervisors. This setting can be overridden on a per position basis.
If this setting is not specified for the position, the dialer’s RemoteTrunkGroup
should be used. If RemoteTrunkGroup is not set for the dialer, a trunk group
should not be specified when establishing the remote connection (it will be left
to the dialer to determine which trunk group to use).
Interviewers cannot specify the RemoteTrunkGroup value.
286
Chapter 1
Column
Extension
Description
AccessNumber
Description
The telephone extension used at this position. For the IBM® SPSS® Data
Collection Dialer and QTC autodialers, extensions must be entered in the format
Ennn, for example, E101 or E123. To specify that this position is not able to use
an autodialer, set the value to either Modem or Manual, which defines that only
modem or manual dialing can be used at this position.
If the position will be used by a supervisor for interviewer monitoring, an
extension must be specified. When using Remote Interviewing, this property
must be defined as “remote”. The maximum Extension length is 40 characters.
A free-format description of the position. The worksheet does not need to
include this column.
The telephone number of the remote interviewer. The maximum AccessNumber
length is 50 characters (the characters < and > are not valid).
Starting Dialer Administration
E From the IBM® SPSS® Data Collection Interviewer Server Administration menu, choose:
Phone > Dialer Administration
The Dialer Administration main screen opens.
Importing a dialer configuration file
In Dialer Administration, you add autodialers or update the information for existing autodialers
by importing a dialer configuration file. This file contains one entry for each autodialer and one
entry for each station that will use an autodialer. For more information, see the topic Creating a
dialer configuration file on p. 284.
Before you import a dialer configuration file, be aware of the following:
An existing autodialer that has the same name as an entry in the file will be overwritten.
An existing autodialer that does not have the same name as any entry in the file is unaffected,
that is, it is not removed. To remove an autodialer, see Connecting to and disconnecting
from an autodialer.
Any existing autodialers that are to be overwritten must be in the Stopped or Failed state,
otherwise the import will fail.
Importing a dialer configuration file
E Make sure that any existing autodialers that are to be overwritten are in the Stopped or Failed state.
E At the top of the Dialer Administration main screen, click the Import button as shown below:
The Upload Files dialog box opens.
E Click Browse and select the file that you want to import.
E On the Upload Files dialog box, click Upload.
287
IBM SPSS Data Collection Interviewer Server User’s Guide
The dialer entries in the configuration file are validated and imported. The real-time display is
refreshed and any new or updated autodialers are shown. However, if the validation failed, the
import stops and an error message is displayed.
Setting up stations to use an autodialer
If one or more autodialers have been added to the Dialer Administration activity, every
telephone interviewer station (that is, any computer on which the Phone Participants activity will
be used) must be assigned one of the position names that you defined in your dialer configuration
file. When an interviewer asks to be connected to a participant, IBM® SPSS® Data Collection
Interviewer Server uses the position name to route the request to the appropriate autodialer. When
a call has been successfully generated, the autodialer connects the participant to the extension
number specified for that position name so that the interviewer can speak to the participant.
If a station has not been assigned a recognized position name, it cannot be used for autodialing.
For projects that use an autodialer, you can choose whether the station can still be used to conduct
interviews by manual dialing—see “Stations with Unrecognized Position Names” later in this
topic.
You must also assign position names to supervisor stations that will be used for either audio
monitoring of interviewers or for reviewing interviews that include audio recordings—see
“Stations used for Audio Monitoring” and “Stations used for Reviewing Interviews” later in
this topic.
Assigning position names
Position names are assigned to telephone interviewer stations in one of two ways:
By an administrator. Make sure that you have been assigned the Phone Participants activity
feature “Can set up interviewer stations”. Then open Phone Participants on each station
and, when prompted, enter the appropriate position name. For example, the name might be
R02-S18 for the computer at seat 18 in room 2. This needs to be done only once on each
station. Any interviewers who subsequently use the station (and who have not been assigned
“Can set up interviewer stations”) will not be prompted for a position name.
By the interviewer. Assign the Phone Participants activity feature “Can set up interviewer
stations” to telephone interviewers. Every time that an interviewer opens Phone Participants,
he or she must either confirm the position name entered by the previous user or enter a new
position name.
Depending on your requirements, you can use the same method for all interviewers or use the first
method for some interviewers and the second method for others.
For more information about assigning to the activity feature “Can set up interviewer stations”,
search the IBM® SPSS® Data Collection Interviewer Server Administration User’s Guide for the
topic “Assigning Users or Roles to Activity Features”.
Stations with unrecognized position names
When a position name is entered in Phone Participants, Interviewer Server validates the name
against those defined in the Dialer Administration activity. If Interviewer Server does not
recognize the name, the station cannot use autodialing.
288
Chapter 1
For projects that use an autodialer, you can specify whether stations with unrecognized
positions can still be used to conduct interviews (that is, Phone Participants will still open). If so,
manual dialing must be used on those stations. For more information, see Autodialer Settings.
Stations used for audio monitoring
If you intend to use the Interviewing Monitoring activity in Interviewer Server and want audio
monitoring to be available, you must assign a valid position name to each station on which
the Interviewing Monitoring activity will be opened. When a supervisor starts monitoring an
interviewer, the autodialer will connect the interviewer’s telephone call to the extension number
associated with the position so that the supervisor can hear the interview. Note that audio
monitoring is possible only when the interviewer’s and supervisor’s positions are associated with
the same autodialer.
Position names are assigned to stations used for audio monitoring in one of two ways:
By an administrator. Make sure that you have been assigned the Interviewer Monitoring
activity feature “Can set up supervisor stations”. Then open Interviewer Monitoring and,
when prompted, enter the appropriate position name. This needs to be done only once on
each station. Any supervisors who subsequently open Interviewer Monitoring on that station
(and who have not been assigned “Can set up supervisor stations”) will not be prompted
for a position name.
By the supervisor. Assign the Interviewer Monitoring activity feature “Can set up supervisor
stations” to supervisors. Every time that a supervisor opens Interviewer Monitoring, he
or she must either confirm the position name entered by the previous user or enter a new
position name.
For more information about assigning to the activity feature “Can set up supervisor stations”,
search the Interviewer Server Administration User’s Guide for the topic “Assigning Users or
Roles to Activity Features”.
Stations used for reviewing interviews
If you intend to use the Review Interviews activity in Interviewer Server and want to be able to
listen to audio recordings of participants’ answers, you must assign a valid position name to each
station on which the Review Interviews activity will be opened.
Position names are assigned to stations used for reviewing interviews in one of two ways:
By an administrator. Make sure that you have been assigned the Review Interviews activity
feature “Can set up supervisor stations”. Then open Review Interviews and, when prompted,
enter the appropriate position name. This needs to be done only once on each station. Any
supervisors who subsequently open Review Interviews on that station (and who have not been
assigned “Can set up supervisor stations”) will not be prompted for a position name.
Note: If a station is being used for both audio monitoring and reviewing interviews, you do
not need to carry out the above step if you have already carried out the equivalent step in
“Stations used for Audio Monitoring” above.
By the supervisor. Assign the Review Interviews activity feature “Can set up supervisor
stations” to supervisors. Every time that a supervisor opens Review Interviews, he or she must
either confirm the position name entered by the previous user or enter a new position name.
289
IBM SPSS Data Collection Interviewer Server User’s Guide
For more information about assigning to the activity feature “Can set up supervisor stations”,
search the Interviewer Server Administration User’s Guide for the topic “Assigning Users or
Roles to Activity Features”.
Connecting to and disconnecting from an autodialer
You can use the Dialer Administration main screen to carry out the following tasks:
Connect to an autodialer, so that it is able to generate calls for telephone interviewers.
Disconnect from an autodialer, so that it is no longer able to generate calls.
Remove an autodialer from the Dialer Administration activity.
Check the status of an autodialer.
Note: To use an autodialer, you also need to specify for each of your telephone interviewing
projects that an autodialer should be used. For more information, see Interview Settings.
The real-time display
The real-time display contains one record for each autodialer and shows information such as the
number of active calls on an autodialer or the number of times that the connection to the autodialer
has failed. The fields shown in the real-time display are described in the following table:
Field
Dialer
State
Status
Description
The autodialer name as specified in the dialer
configuration file.
The current state of the autodialer, which might be
Starting, Active, Stopping, Stopped, or Failed.
For an autodialer in the Active state, this field
shows the number of interviewers who are dialing a
participant or who are connected to a participant. To
see the number of interviewers by project, expand
the node to the left of the status. For an autodialer in
the Failed state, this field shows the number of times
that the connection to the autodialer has failed.
290
Chapter 1
The top-right of the real-time display contains buttons that can be used for various tasks. The
buttons are listed in the following table:
Button
Description
Connect to this autodialer.
Disconnect from this autodialer.
Remove this autodialer from the Dialer
Administration activity.
Refresh the real-time display.
Note: The real-time display is refreshed only when you click one of these buttons. Click the
Refresh button periodically to keep the display up-to-date.
Connecting to and disconnecting from an autodialer
When you connect to an autodialer, it is able to generate calls for telephone interviewers that
request them. When you disconnect from an autodialer, it is no longer able to generate calls, but it
does allow any active calls to finish. If a telephone interviewer requests a call when the autodialer’s
current state is Stopped or Failed, a message will explain that the autodialer is unavailable.
Connecting to an autodialer
E In the Real-Time display, select the check box on the left of the autodialer you want to connect to.
Only select an autodialer if its current state is Stopped or Failed.
Tip: To connect to more than one autodialer, select more than one check box. To select all
autodialers, select the check box on the left of the header row.
E Click the Start button as shown below:
The autodialer state changes to Starting and after a short pause changes to Active. The autodialer
is now able to generate calls.
Disconnecting from an autodialer
E In the Real-Time display, select the check box on the left of the autodialer you want to disconnect
from. Only select an autodialer if its current state is Active.
Tip: To disconnect from more than one autodialer, select more than one check box. To select all
autodialers, select the check box on the left of the header row.
E Click the Stop button as shown below:
The autodialer state changes to Stopping and the autodialer is no longer able to generate calls.
When all active calls have come to an end, the autodialer state changes to Stopped.
291
IBM SPSS Data Collection Interviewer Server User’s Guide
Autodialer removal
You can remove an autodialer from the Dialer Administration activity. Before you do this, be
aware of the following:
If you need to restore an autodialer after removing it, you must import a dialer configuration
file that contains an entry for that autodialer.
When you remove an autodialer, all positions specified for that autodialer are also removed.
To continue to use autodialing at those positions, you must associate them with another
autodialer. For more information, see the topic Creating a dialer configuration file on p. 284.
You cannot remove an existing autodialer by deleting its entry from a dialer configuration file
and importing that file. Instead, follow the steps below to remove an autodialer.
Removing an autodialer
E In the Real-Time display, select the check box on the left of the autodialer that you want to remove.
Only select an autodialer if its current state is Stopped or Failed.
E Click the Delete button as shown below:
The real-time display is refreshed and the autodialer is no longer shown.
Closing Dialer Administration
E On the main screen, click the Exit button as shown below:
Dialer certification
Marketing Systems Group Pro-T-S dialer
Table 1-1
Marketing Systems Group Pro-T-S dialer certification
Feature
Power Dialing
Group Dialing
Dialer Administration
PhoneInterviewing Login
Call Outcomes
Dialer Settings
Interviewer Qualification
Review Audio
Answering Machine Detection
VoIP
Phone Reports
Remote Mode
Fail-Over
Status
Passed
Passed
Passed
Passed
Passed
Passed
Passed
Passed
Passed
Passed
Passed
Passed
Passed
Comments
292
Chapter 1
Feature
Load Test
Benchmark
Status
Passed
N/A
Comments
50 concurrent interviews
The Marketing Systems Group Pro-T-S dialer group dialing load test, with 50 concurrent
interviews, details are provided below:
Server version:IBM SPSS Data Collection Server 6 Patch 1
Marketing Systems Group Pro-T-S installation kit: Beta version 3
Concurrent interviews: 50
Loading mode: 1 interview per 5 seconds
Duration: 120 minutes
Project: Multimode
Dialing mode: Marketing Systems Group Pro-T-S group dialing
Dialer status: Marketing Systems Group Pro-T-S demo dialer (50 local extensions and 10
remote extensions)
Table 1-2
Timing results
Timing
Time to login to IBM® SPSS® Data Collection
Interviewer Server Administration
Time to start Phone Participants
Wait time
Time to start interview
Max
1.065672
Average
0.8497719
2.019375
22.7458
6.714832
1.716981
3.140847
0.2868351
Sytel dialer
Table 1-3
Sytel dialer certification
Feature
Power Dialing
Group Dialing
Dialer Administration
PhoneInterviewing Login
Call Outcomes
Dialer Settings
Interviewer Qualification
Review Audio
Answering Machine Detection
VoIP
Phone Reports
Remote Mode
Fail-Over
Load Test
Benchmark
Status
Passed
Passed
Passed
Passed
Passed
Passed
Passed
Passed
Passed
Passed
Passed
Passed
Passed
Passed
N/A
Comments
50 concurrent interviews
293
IBM SPSS Data Collection Interviewer Server User’s Guide
The Sytel dialer group dialing load test, with 50 concurrent interviews, details are provided below:
Hardware environment: Single machine - Intel Core 1.86Ghz, 4GB RAM
Software environment: Microsoft Windows Server 2003, Microsoft SQL Server 2005
Server version:IBM SPSS Data Collection Server 6 Patch 1
Sytel dialer version: 1.0.9
Concurrent interviews: 50
Loading mode: 1 interview per 2 seconds
Duration: 120 minutes
Project: Multimode
Dialing mode: Sytel group dialing
Table 1-4
Timing results
Timing
Time to login to Interviewer Server
Administration
Time to start Phone Participants
Wait time
Time to start interview
Min
0.82
Max
1.45
Average
0.97
Std Dev
0.98
1.46
0.23
0.22
2.22
4.15
2.05
1.73
0.40
0.26
1.74
0.43
0.27
Interviewing Activity Reports
You use the Interviewing Activity Report to monitor the current status of the session engines that
are responsible for running interviews. Depending on the size of your site and the way it has been
set up, you may have one session engine that runs all interviews for all projects, or you may have
a number of engines that share the interview load between them.
When a new interview starts and there is more than one session engine running, IBM® SPSS®
Data Collection Interviewer Server generally allocates the interview to the least busy session
engine. Your IBM® SPSS® Data Collection administrator can control how the system determines
which is the least busy engine. Sometimes it will be the engine that is actually doing the least
work, at other times engines that are already running interviews for the current project may take
precedence over other engines, even if those engines are less busy. This is why you may see new
interviews being allocated to engines that are not necessarily the least heavily loaded.
By running the Interviewing Activity Report and regularly updating it to get the latest figures,
you can monitor how busy the session engines are and can anticipate possible load problems. The
point to bear in mind is that the higher the load (that is, the busier the engine is), the more slowly
interviews will run. If an engine reaches or exceeds 100% loading and Interviewer Server allocates
another interview to it, that interview will fail with a message saying that the server is busy.
The report includes all session engines even if they are not currently registered. This does not
always indicate a problem. It may be that an engine has been unregistered for Web (inbound)
interviews but can still be used to run telephone interviews.
Sometimes an engine may fail while interviews are in progress. When this happens, those
interviews are automatically transferred to a different engine (the respondent or interviewer is
not normally aware of this). The report will show that the engine has failed and you will see the
294
Chapter 1
information for other engines change accordingly (for example, you may see that a previously
unused engine has now taken over some of those interviews).
You can look at interviewing activity in two ways:
Engine status reports the status of each engine, showing which engines are running which
projects and how busy they are.
Project status reports the status of each project, showing the engines on which interviews for
each project are running.
Both reports show the current numbers of live and test interviews per project. If interviews are
taking place on projects to which you do not have access, the information about those interviews
and projects is summarized in a single Other Projects entry.
Starting the Interviewing Activity Report
E From the menu, choose:
Tools > Interviewing Activity
The page displays a table showing the status of each interviewing engine.
Engine Status
The Engine Status report takes each engine in turn and reports the percentage loading (that is,
how busy it is, where fully loaded is 100%), how many interviews are currently running, and how
many projects this covers. You can expand the projects count to see the project names if you
wish. If an engine is running interviews for projects that you cannot access, the report shows a
single Other Projects entry for those projects.
295
IBM SPSS Data Collection Interviewer Server User’s Guide
The report uses two icons to mark engines whose load is high or excessively high:
The engine’s load is currently greater than 80%.
The engine can still function normally with this
load, but interviews may start to slow down.
The engine’s current load is greater than 95%. This
is excessively high and interviews will not run as
quickly as they should. If you regularly see this
icon in your reports, tell your IBM® SPSS® Data
Collection administrator as he/she may be able to
adjust the way in which interviews are allocated to
session engines.
Note: The load figures of 80% and 95% are defaults. Your Data Collection administrator can tell
you what the figures are for your site.
The report is a snapshot of activity at the point you request it. Refresh the report periodically to
see up to date figures.
To View the Engine Status Report
E In the Interviewing frame, click Engine Status.
E To see the names of the names of the projects for which interviews are running, click the “plus”
button to the left of the projects count. To return to the summary display, click the “minus” button.
Project Status
The Project Status report covers all projects for which interviews are currently in progress. The
report shows the project’s name, the version of the questionnaire file being used, the number of
engines that are running interviews for that project, and the number of live and test interviews in
progress. If interviews are in progress for projects that you cannot access, the report shows an
Other Projects entry for the engines running those interviews. This gives the total number of live
and test interviews in progress for all those projects combined.
The report is a snapshot of activity at the point you request it. Refresh the report periodically to
see up to date figures.
To View the Project Status Report
296
Chapter 1
E In the Interviewing frame, click Project Status.
E To see the names of the names of the engines that are running a project’s interviews, click the
“plus” button to the left of the engines count. To return to the summary display, click the “minus”
button.
Refreshing the Report
E Click the Refresh button.
Manage Logs
IBM® SPSS® Data Collection Interviewer Server Administration and the activities and
applications that run inside it create a number of log files that provide an audit trail of what each
activity has done. If you experience problems with IBM® SPSS® Data Collection Interviewer
Server, the IBM® SPSS® Data Collection administrator or a IBM Corp. support representative
will need to look at these files to find out what is causing the problems. In a small installation
where everything is installed on a single machine, all the log files will be stored in a single folder
and can be viewed easily using any text editor. On clustered installations, log files are created on
each machine in the cluster, which makes viewing them and matching up records between files
quite difficult.
Manage Logs provides an easy method of viewing log files, and can be used to create a zip
file containing logs of your choice for sending to an IBM Corp. support representative if you
have problems that need investigation.
Note: Although the primary purpose of log files is to record events, some log entries may
contain actual data or respondent details or references that enable data or respondent details to
be extracted from other files. In addition, log files are not project specific and many log entries
contain the project name, making it easy to locate information for a particular project.
Since these things are likely to be security issues in companies that provide Data Collection
services to a number of external clients or where different teams work on different clients’
projects, this first release of Manage Logs is available only to Data Collection administrators.
It is planned that future releases will automatically filter log entries so that users see only the
entries that refer either to the system as a whole or to their own projects. Administrators will, of
course, still have access to all records.
Starting Manage Logs
E From the IBM® SPSS® Data Collection Interviewer Server Administration menu, choose
Tools > Manage Logs
View Settings
The View Settings tab is where you specify the types of records you want to view and the number
of records to display per page. You can also specify a date range. This applies to the log files
themselves, not to the records they contain. The start date is the date on which the file was created
297
IBM SPSS Data Collection Interviewer Server User’s Guide
and the end date is the date that the file was last modified. Some log files grow more quickly than
others, so in order to see records for a problem that arose on 26 October you may need to request
log files for the period 20 to 27 October to see everything that happened.
Figure 1-74
View Settings tab
To Specify the View Settings
E Select the View Settings tab.
E In Number of records per page, choose whether to display 50, 100, 500, or 800 records per page.
E In Log file types, choose the log files whose records you want to see.
Select
IBM® SPSS® Data Collection Interviewer Server
(ISE)
Interviewer Server Components (IVW)
Others
For
Records related to the interview engine.
Records related to interviews.
Records from log files for other activities such as
Participants or Export Data.
E In Log files date filter, choose the date range for the files you want to use. Possibilities are the last
two, 12, or 24 hours, the last two days, or the last week. The default is the last two days. If you
would rather specify your own date range, select Custom and then choose the start and end dates
in the new fields that Manage Logs displays.
E Click Apply to save your changes.
Viewing Log Files
User the View Logs tab to look at individual records in log files.
298
Chapter 1
Figure 1-75
View Logs tab
Initially, records are filtered according to the settings on the View Settings tab so that, for
example, you may see only records from certain files and for certain dates. Within these
restrictions, you can request records from a selected machine only and can filter the records using
an SQL query. This allows you, for example, to select only records that are flagged as belonging
to a particular project, or that relate to events between noon and 5pm on a certain day. The default
is to display all records logged at the Info, Warning, Error, or Fatal logging levels and to sort them
in ascending date and time order. If you want more information about logging levels, refer to
To View Log Records
E Select the View Logs tab.
E In Machines, choose the machine whose log records you want to see.
E In SQL query, type the query you want to use for selecting and displaying records.
E Click View Logs.
E If there is more than one page of records, use the buttons and links below the list frame to see
those pages. If there are no records that match your selection criteria, the words “No records” are
displayed.
299
IBM SPSS Data Collection Interviewer Server User’s Guide
E To see the full text of an error message without scrolling, click the message text and it will be
displayed in a pop-up dialog box.
Downloading Log Files
If there are problems with your installation that you cannot solve, you may be asked to send the
log files to your SPSS support representative. The easiest way to do this is to use the Download
tab to create a zip (compressed) file that you can then send by email.
The download process copies all files that were created on or after a given start date or that were
last modified on or before a given end date. When choosing dates, remember that some files grow
more quickly than others so you may need to extend the date range outside the period when the
problem actually existed. The download process also creates a ReadMe file containing information
related to the problem. You provide some of this information and some comes from DPM.
Zipped files are named SiteName_yyyy–mm–dd.zip (for example, BJH_2007–10–26.zip).
Once the file has been created, Manage Logs displays a standard Windows download message box
asking whether you want to open or save the file.
The date range, the file types downloaded, and the setting for Windows event files are saved in
DPM as application settings so that they become the defaults the next time you run Manage Logs.
Notes
Although downloading is usually quite fast, it may take some time if you download a lot of
very large log files or you download Windows event logs. You will not be able to use IBM®
SPSS® Data Collection Interviewer Server Administration while the download is in progress.
If you have a number of people with administrator privileges, only one of those users can
download log files at a time.
To Zip and Download Log Files
E Select the Download Logs tab.
E In Machines, choose the machines whose log records you want to download.
E In Log file types, choose the types of log files you want to download:
Select
IBM® SPSS® Data Collection Interviewer Server
(ISE)
Interviewer Server Components (IVW)
Others
For
Records related to the interview engine.
Records related to interviews.
Records from log files for other activities such as
Participants or Export Data. Select the appropriate
log files from the list (Shift+Left Click or Ctrl+Left
Click).
E In Log files date filter, choose the date range you want to see. Possibilities are the last two, 12, or
24 hours, the last two days, the last week, or the latest (the last modified log file for each selected
log file type). The default is the last two days. If you would rather specify your own date range,
select Custom and then choose the start and end dates in the new fields that Manage Logs displays.
300
Chapter 1
Note: The date range applies to the creation and last modified dates of the log files themselves, not
to the dates that the log entries were written. On a lightly loaded system this may mean that some
files contain information that is not relevant to the current issue.
E Select Include windows event logs? if you want to download the Windows system and application
logs. The default is to download these files as they often contain useful information about what
has been happening on a machine while Interviewer Server Administration has been running.
E Select Use regular expression to filter? if you want to define a regular text expression upon which
to search. When selected, you can enter a text expression in the provided field. Only log files
that contain the defined text will be returned.
E Use the check boxes in the ReadMe content section to specify information to be added to the
ReadMe file that is created to accompany the log files.
In Priority, select the job’s importance to you.
In Contact details, type the name and telephone number or email address of the person that
the support representative should contact about the problem.
In Description of problem, type a clear and concise description of the problem that has been
observed. If you have other information that will be helpful, make a note of it here. For
example, if a sample management script has recently been changed or the problem occurred
after a system upgrade, add it to this field so that the support representative is aware of the
issue.
E Click Download Logs.
What’s in the Zip File
The zip file that Manage Logs creates contains the following files in the order shown:
Filename
dpm_out.txt
ReadMe.html
ApplicationEvents.csv
SystemEvents.csv
*.tmp
Description
A text file listing the contents of DPM.
Additional information about the files.
The Windows application and system event logs,
if requested.
IBM® SPSS® Data Collection log files. The exact
files depend what was requested.
The ReadMe File
The ReadMe.html file contains the following information:
When the zip file was created and by which version of the log tool.
Which versions of IBM® SPSS® Data Collection Interviewer Server Administration and its
associated applications are installed.
The names of the machines whose log files have been included, the function of each machine
in the cluster (interviewing server, for instance), each machine’s time zone, and how many log
files have been collected from each machine.
Information that you entered on the Download tab.
301
IBM SPSS Data Collection Interviewer Server User’s Guide
If you need to amend the problem description, you may do so by editing the file and saving it
back into the zip file. There is no need to rerun the download simply for this.
IBM SPSS Data Collection Remote Administration
The IBM® SPSS® Data Collection Remote Administration activity allows you to monitor the
remote interviewers working on a given project. Remote Administration is the server component
of IBM® SPSS® Data Collection Interviewer, which remote interviewers use to conduct
interviews and synchronize their data.
The Remote Administration activity provides status information on each remote interviewer,
including the number of interviews completed, the number of suspended interviews, and the last
time the interviewer synchronized.
Starting the IBM SPSS Data Collection Remote Administration Activity
E Select the project you want to monitor and click IBM® SPSS® Data Collection Remote
Administration.
The IBM SPSS Data Collection Remote Administration Interface
The IBM® SPSS® Data Collection Remote Administration interface provides status information
on each remote interviewer for the selected project.
Figure 1-76
The IBM SPSS Data Collection Remote Administration interface
Interviewer Id. The IBM® SPSS® Data Collection Interviewer Server Administration user ID of
the interviewer.
Description. The Interviewer Server Administration description of the user.
Completed. Number of interviews the interviewer has completed on the selected project.
Suspended. Number of interviews the interviewer has started but not completed on the selected
project.
302
Chapter 1
Successful Sync. Date and time of the last successful synchronization by the user.
Attempted Sync. Date and time of the last attempted synchronization by the user.
Activation History
The Activation History activity allows you to monitor project activation status. The activity
provides options for viewing pending and completed activations and creating activation history
filters. The activity is composed of the following tabs:
Activation History Tab – allows you to view the status of both pending and completed
activations.
Filters Tab – provides options for filtering questionnaire activation history.
Activation History Tab
The Activation History tab allows you to view the status of both pending and completed
activations.
Note: In general, you are limited to viewing only your activations.
Activation Report
Displays the status for each activation request.
Pending Activations
The following information is provided:
Project – The project name as it appears in IBM® SPSS® Data Collection Interviewer Server
Administration.
Status – The project activation status (pending, processing, success, or failed).
Server – The name of the server to which the questionnaire is being activated.
User – The name of the user who initiated the activation.
Submitted – The time at which the questionnaire was submitted for activation. This is the time
as reported by the IBM® SPSS® Data Collection Interviewer Server.
Completed Activations
The following information is provided:
Project – The project name as it appears in Interviewer Server Administration.
User – The name of the user who initiated the activation.
Server – The name of the server to which the questionnaire is being activated.
ProcessingServer – The server that performs the activation. In a cluster environment, the server
to which an activation is submitted is not necessarily the server that performs the activation.
303
IBM SPSS Data Collection Interviewer Server User’s Guide
StartTime – The time at which the questionnaire was submitted for activation. This is the
time as reported by the Interviewer Server.
EndTime – The time at which the questionnaire completed activation. This is the time as
reported by the Interviewer Server.
Status – The project activation status (pending, processing, success, or failed).
Test Link – The URL for the activated, test questionnaire.
Link – The URL for the activated, live questionnaire.
E You can click the refresh icon to update the activation status:
Removing pending activations
E Select the appropriate project from the Pending Activations list.
E Click the delete icon to remove the selected project from the Pending Activations list.
Note: You cannot remove activations initiated by other users. You can only remove your own
activations.
Filters Tab
The Filters tab provides options for defining how activations are displayed on the Activation
History tab.
Activation type. Displays the status for the current activation. When applicable, the drop-down list
allows you to select which activation types display on the Activation History tab. Options include:
All
Activate – the activation history for activations submitted via the IBM® SPSS® Data
Collection Activation Console.
Launch – the activation history for activations submitted via the IBM® SPSS® Data Collection
Interviewer Server’s Launch activity.
Promote – the activation history for activations submitted via the Interviewer Server’s
Promote Project activity.
Activation history. The drop-down list allows you to select which activations display in the
Activation History tab. Options include:
All
Successful activation
Failed activation
Activation status. The check boxes allows you to select the activation status to display in the
Activation History tab. Options include:
Active
304
Chapter 1
Inactive
Test
Project. Allows you to define specific projects to display in the Activation History tab.
E Click Find to locate questionnaire projects on the Interviewer Server.
E Use the Add>> and <<Remove buttons to select which projects will display in the Activation
History tab.
User. Allows you to define projects, activated by specific users, to display in the Activation
History tab.
E Click Find to locate users on the Interviewer Server.
E Use the Add>> and <<Remove buttons to select which users’ projects will display in the Activation
History tab.
Activation date between. Allows you to select an activation date range. Only activations that
occurred between the specified date will display in the Activation History tab.
E Click Apply to save your settings.
Desktop Tools
IBM® SPSS® Data Collection Interviewer Server comes with some programs that can only be
run from your desktop. These are:
Quota Setup for creating a quota database and defining quotas.
Activate Console for activating projects from a batch file or from the command line.
Activating Projects from the Command Line
You can activate projects from the command line. This is useful in the following circumstances:
You want to activate a number of projects, but do not want to have to wait while each one is
activated.
You want to activate to a number of clusters or servers.
You want activation to run unattended and/or at some time in the future.
The Activate Document
Activation from the command line uses an Activate Document that specifies how the project is to
be activated. It contains the same information as you would normally enter using the Activate
dialog box in IBM® SPSS® Data Collection Base Professional, but in XML format. This means
that if you have a number of projects with identical or similar activation requirements, you can
create the Activate Documents by copying and editing an existing file.
305
IBM SPSS Data Collection Interviewer Server User’s Guide
The easiest way to create an Activate Document from scratch is to fill in your requirements
on the Activate dialog box and then save the specification to a file, optionally without activating
the project at all.
If you have pre-version 2.3 activation .ini files, you can convert them into Activate Documents
by running the ActivateIniToXml tool.
If you create a new Activate Document by copying and editing an existing one, you need to
check the settings that specify whether activation is over the local network or across the internet.
These settings are as follows:
<?xml version="1.0"?>
<Activate usewebservice="False" webserviceurl="">
<ActivateSettings>
<Sites>
<Site dpmservername="MyDPMServer" username="" userticket="">
...
</Site>
</Site>
</ActivateSettings>
</Activate>
This example is set up for activation over a local network. To activate across the internet, change
usewebservice to True and webserviceurl to the URL for IBM® SPSS® Data Collection
Interviewer Server Administration on the destination server.
If dpmservername is not defined, it defaults to the DPM server set on the machine running the
accessories service.
Activating Projects
You activate projects from the command line by running the Activate program in either console
or dialog box mode. In both cases you will need to run the command from C:\Program
Files\Common Files\IBM\SPSS\DataCollection\6\\Interviewer Server\5.6.
In console mode, activation is based solely on the contents of the Activate Document named
on the command line, and is ideal for activating remotely or on an unattended machine. To
activate in this mode type:
activate -a "actdoc" [-u username] [-t ticketname] [-r] [-c] [-l] [-?]
Optional parameters are as follows:
Option
–a “actdoc”
–u username
–t ticket
–r
–c
Description
Names the Activate Document.
The user name to use for activating the document.
If none is specified, the activation process will use
the name specified in the Activate document. (It is
recommended that names are not stored in Activate
documents.) If there is no name or user ticket
specified in the Activate document, the activation
process attempts to log in as a trusted Windows user.
The user ticket to use for activating the document.
(It is recommended that tickets are not stored in
Activate documents.) This option is valid for
command-line activation only.
Display a progress box.
Write information to the screen.
306
Chapter 1
Option
–l
–?
Description
Display a login dialog box.
Display help.
In dialog box mode, Activate displays a dialog box in which you specify the activation
parameters (this is the mode in which Activate runs in IBM® SPSS® Data Collection Base
Professional). You can include options on the command line that pre-populate the dialog box with
certain types of information, such as the project name or interview script type. When you have
completed the dialog box, click Activate to start activation. This mode is ideal for creating new
Activate Documents. To activate in this mode type:
activate -g [-p proj_ID] [-s script_type] [-f "foldername"] [-d DPMservername]
[-w webservice URL] [-l] [-?]
Optional parameters are as follows:
Option
–g
–p project_id
–s script_type
–f “foldername”
–d DPMservername
–w web-service URL
Description
Displays the Activate dialog box. Use this option
when you want to create an Activate document. If
this option is not present, -a is required.
The project ID.
Interview script type. Must be set to IBM® SPSS®
Data Collection.
Pathname of the project’s source folder.
Names the initial DPM server.
Activate via the web-service URL. For example:
http://<servername>/spssmr/activatewebservice/activatewebservice.asmx
–l
–?
Display a login dialog box.
Display help.
Example Activation Commands
The following command displays the Activate dialog box:
activate
The following command activates using the myactdoc.xml Activate Document:
activate -a "c:\myactdoc.xml"
The following command activates using the myactdoc.xml Activate Document and writes any
output to the log.txt file:
activate -a "c:\myactdoc.xml" > log.txt
The following command activates using the myactdoc.xml Activate Document but displays a login
dialog box before activation starts.
activate -a "c:\myactdoc.xml" -l
307
IBM SPSS Data Collection Interviewer Server User’s Guide
The following command displays the Activate dialog box with the Project Id field containing
“museum” and the Source Files field containing “c:\myprojects\museum”:
activate -g -p museum -f "c:\myprojects\museum"
The following command displays help:
activate -?
Converting Activation .ini Files to .xml Format
If you used command line activation prior to version 2.3 and you want to reuse the activation .ini
files with Activate, you can convert them using the ActivateIniToXml tool. Go to the folder
called C:\Program Files\Common Files\IBM\SPSS\DataCollection\6\Interviewer Server\6.0.1.0.0
and type:
ActivateIniToXml -i "ini_filename" -x "xml_filename"
For example:
ActivateIniToXml -i "c:\mrproject\myproject.ini" -x "c:\mrproject\myproject.xml"
If you forget the command syntax, type:
ActivateIniToXml -?
for a reminder.
Chapter
IBM SPSS Data Collection Quota
Setup
2
You use the IBM® SPSS® Data Collection Quota Setup program to define the quota categories
and targets that you want to use for a project. Quota Setup provides the following features:
Questionnaire and sample variables. Quotas can based on categorical, numeric, and text
variables from the questionnaire script, as well as on variables present in the sample data.
Independent quotas. Quotas based on a single variable such as gender, age, region or preferred
brand. Independent quotas are also known as one-dimensional quotas.
Dependent quotas. Quotas based on a combination of between two and six variables. For
example, a dependent quota for gender and age will define targets for gender and age
combinations such a male aged 18 to 24, male aged 25 to 34, female aged 18 to 24, and so on.
Dependent quotas are also known as multidimensional quotas.
Over quota cells. When a target has almost been met and there are several interviews running
that belong in that cell, you can allow those interviews to continue even though the target will
be exceeded if all those interviews complete successfully. Interviews that start after the target
has been met will be terminated in the usual way.
Counter quotas. Interviews may be counted for a cell without the cell being used for quota
control. You can use this type of quota for null, dk, ref and Other Specify categories where
quota control is not required.
Table or expression quotas. Quotas may be defined in tabular form or in text form using an
expression builder.
Sample management quotas. You can define quotas based on variables present in the sample
files. Sample data and questionnaire data can be combined in the same quota if required.
Block setting of targets. Groups of quota cells with identical targets and other settings can be
preselected, so that the specifications for those cells can be entered once and then applied
automatically to each selected cell.
Reusing quota files. Once you have set up a quota file you can reuse it in other projects that
have identical quotas.
For further information about the IBM® SPSS® Data Collection Interviewer Server quota
control system, refer to “Quota Control” in the Interviewer Server section of IBM® SPSS®
Data Collection Developer Library.
Starting IBM SPSS Data Collection Quota Setup
IBM® SPSS® Data Collection Quota Setup needs a questionnaire definition (.mdd) file in order
to run. This tells it which questions are available and what responses each question allows. If
the questionnaire has been created using IBM® SPSS® Data Collection Interviewer Server
Administration activities, you will need to download the .mdd file from the Interviewer Server
Licensed Materials - Property of IBM © Copyright
IBM Corporation 2000, 2011
308
309
IBM SPSS Data Collection Quota Setup
Administration project folder onto your computer. You can do this from Interviewer Server
Administration using the Files activity.
E Go to the folder containing the project’s .mdd file.
E From the Start menu choose:
Programs > IBM® SPSS® Data Collection > IBM® SPSS® Data Collection Interviewer Server
6.0.1 > Quota
The IBM SPSS Data Collection Quota Setup Window
The IBM® SPSS® Data Collection Quota Setup window is divided into three panes:
The List Pane lists the variables that are present in the project’s .mdd file. For each variable,
you see its name, variable number, data type, and description (question text). You can change the
layout of the List Pane so that only icons and names are displayed if this is what you prefer.
The List Pane normally shows only categorical variables as these are the ones most commonly
used for quotas, but you can display numeric, text, and boolean variables as well. Quota Setup
also hides system variables as these are rarely useful for quota-ing, but you can choose to display
system variables if you wish.
The Details Pane lists the categories (responses) in the variable that is currently selected in the
List Pane.
The Quota Construction Area is where you define the quotas by dragging in variables from the
List Pane and then adding targets.
The List and Details Panes are undockable. This means that you can convert them into
windows, resize them, and move them anywhere on the screen, even outside the Quota window.
Options in the View menu also allow you to hide components of the Quota window, which
can be useful when you have finished defining quotas on a large grid, and you want to see the
whole grid on the screen.
310
Chapter 2
Docking/Undocking the List and Details Panes
To Undock a Pane
E Double-click the double bars at the top of the pane.
To Dock an Undocked Pane
E Double-click the pane’s title bar.
Changing the Layout of the List Pane
E Click one of the following buttons in the toolbar:
Display a small icon followed by the variable name.
Display a list of icons and variable names.
Display a list of icons and variable names.
Return to the default, four-column layout.
Displaying All Variable Types in the List Pane
It is less common to define quotas based on numeric and text variables, so the List Pane does
not display them unless requested.
To Display All Variable Types in the List Pane
E Choose All Variables from the drop-down list at the top of the View Pane.
Displaying System Variables in the List Pane
System variables are created by IBM® SPSS® Data Collection Interviewer Server when you
parse the questionnaire, and contain general information such as the interview serial number, the
date and time at which the interview started, and the name of the last question that the respondent
answered. As such, they are not normally useful for quota control and do not appear in the
standard list of variables.
To Display System Variables in the List Pane
E Choose:
View > View System Variables
Displaying Sample Variables in the List Pane
When your sample records contain personal data such as age, gender, or brand tried, you can
apply quotas based on this data either in the sample management authentication script or in the
questionnaire script. For example, you could set up sample management quotas that restrict the
311
IBM SPSS Data Collection Quota Setup
survey to 500 men and 500 women, and then apply quotas in the script based on age or brand tried
once respondents have started the interview.
You can create quotas based on variables in the sample records. Once you have told IBM®
SPSS® Data Collection Quota Setup to make the sample variables available (they appear on a
separate tab in the List pane), the procedures for using them to build quota definitions are the
same as for questionnaire variables.
Quota Setup cannot use the sample information directly from the sample files so it creates a
separate .mdd file for them in the same location as the project’s .mdd and .mqd files. The new
file is called tablename_sm.mdd, where tablename is the name of the sample table containing
the sample records.
Note: Most sample variables are not categorical variables and would not normally be visible
in the List Pane, so Quota Setup automatically selects the option to display all variable types in
the List Pane when you display sample management variables.
To Display Sample Variables in the List Pane
E Choose:
File > Open Sample Management
This opens the IBM® SPSS® Data Collection Login dialog box.
Figure 2-1
Login dialog box
E Enter your login details.
If you are connected to your local network:
Enter or select the name of the project management (DPM) server on the cluster to which
the database server belongs. The first time you use this login dialog, the server’s name is
shown as localhost. Thereafter, it shows whatever machine name you entered the last time
you logged in.
Choose whether you will log in using your IBM® SPSS® Data Collection Interviewer Server
Administration user name and password or your standard Windows account, and enter a
user name and password if required.
312
Chapter 2
If you are not connected to your local network, you can log in over the internet:
Enter the URL for Interviewer Server Administration on the cluster.
Enter your Interviewer Server Administration user name and password. This type of
connection does not support Windows logins.
E For both types of connection, click Login. A message reports whether or not you are successfully
logged in.
This opens the Open Participants dialog box.
Figure 2-2
Open Participants dialog box
The defaults for Server, Database, and Tables are set using information in the project management
database (also known as DPM), as follows:
Server. If there is a project in DPM with the same name as the current .mdd or .mqd file and that
project references a sample management object, then the value set in the sample management
property Queueing>Queues>Properties>INIT_DATASOURCE is used as the server name.
Otherwise, the value of the DPM site property INIT_DATASOURCE is used.
Database. If there is a project in DPM with the same name as the current .mdd or .mqd file and that
project references a sample management object, then the value set in the sample management
property Queueing>Queues>Properties>INIT_catalog is used as the server name. Otherwise,
the Database box is empty.
Tables. If there is a project in DPM with the same name as the current .mdd or .mqd file and that
project references a sample management object, then the value set in the sample management
property Queueing>Queues>Properties>Table is used as the server name. Otherwise, the Tables
box is empty.
E In Server, choose the name of the database server you want to use.
E In Database, choose the name of the participants database.
313
IBM SPSS Data Collection Quota Setup
E In Table, choose that name of the table that holds the project’s sample records.
The names of the columns in the table appear in the Columns box.
E In Columns, choose the variables that you want to use for quotas. The default is to make all
sample variables available. (It may be quicker to click “Clear all” and then select the columns you
want to use rather than canceling unwanted columns individually.)
E Click OK.
Hiding Components of the IBM SPSS Data Collection Quota Window
E Choose one or more of the following from the View menu:
List Pane. Show/hide the List Pane. Clicking the X button in the top right-hand corner of the
pane also hides the pane.
Details Pane. Show/hide the Details pane. Clicking the X button in the top right-hand corner of
the pane also hides the pane.
Default Layout. Return the window to its default appearance.
Main Toolbar. Show/hide the main toolbar.
Status Bar. Hide/show the status bar at the foot of the window.
Creating and Opening Quota Files
IBM® SPSS® Data Collection Quota Setup obtains its information about a project’s variables
from the .mdd file and saves the quota definitions you create in a file with an .mqd extension.
Note: If quotas exist for a project, you should always work on the .mqd file rather than the .mdd
file. If you open an .mdd file when a .mqd file exists, Quota Setup will overwrite the original
contents of the .mqd file rather than adding the new quotas you have just created.
To Create a New Quota Definition File
E Choose:
File > New
This opens the Open dialog box.
E Navigate to the project’s source folder and choose the project’s .mdd file.
E Click Open.
The List Pane displays the names of the project’s categorical variables, and the Quota Construction
Area is prepared for defining quotas.
To Open an Existing Quota Definition File
E Choose:
File > Open
This opens the Open dialog box.
E Navigate to the project’s source folder and choose the project’s .mqd file.
314
Chapter 2
E Click Open.
The List Pane displays the names of the project’s categorical variables, and the Quota Construction
Area shows details of the existing quotas.
Undoing and Redoing Actions
IBM® SPSS® Data Collection Quota Setup keeps track of the drag and drop actions that you take
during a session and the order in which you take them, and allows you to roll back or reinstate
the changes one at a time.
When using Undo and Redo, bear in mind the following points:
Once you add targets to a quota table, Quota Setup forgets about the individual changes you
made up to that point and treats all actions on that table up to and including the addition of the
targets as a single step. For example, if you add a new table with two dimensions and then
add targets, clicking Undo removes the second variable and the targets, and clicking Undo a
second time removes the first variable; clicking Redo reinstates the first variable and then
the second variable and the targets. You cannot undo the targets by themselves or undo
the addition of the second variable.
Saving changes to a table does not prevent you from undoing them.
You cannot undo the addition of a new table: delete the table instead.
Undo and Redo are disabled for Expression Quotas.
To Undo Actions
E Choose:
Edit > Undo
E Repeat this step to undo the previous change, and so on. When there are no more changes to undo,
Quota Setup makes the Undo feature unavailable.
To Reinstate Undone Actions
E Choose:
Edit > Redo
E Repeat this step to reinstate other actions that you undid in the order in which the actions were
originally taken. When there are no more actions to redo, Quota Setup makes the Redo feature
unavailable.
Choosing Your Working Language
When you work on a multilingual project, IBM® SPSS® Data Collection Quota Setup displays
question and response texts in the project’s base language. If you would prefer to work in one of
the project’s other languages, you may do so.
To Choose Your Working Language
315
IBM SPSS Data Collection Quota Setup
E Choose:
Tools > Language
This opens the Select Language dialog box.
E In Language, choose a language from the drop-down list.
E Click OK.
Table Quotas
The easiest way of defining quotas for categorical variables is to use the Table Quota tab. Using
this method, you define the quota dimensions and structure by dragging variables from the List
Pane into the Quota Construction Area. The position of the variables in the Quota Construction
Area determines the characteristics of each quota cell.
The following illustration shows a three-dimensional quota of gender by region by age in which
each cell will contain a target for a different combination of those three characteristics:
As you build the quota table, IBM® SPSS® Data Collection Quota Setup prepares a grid in which
you can enter the targets and other settings for the various cells.
Note: Table Quotas are available for script variables only. If you are defining quotas for Sample
Management variables, you must define them as Expression Quotas.
316
Chapter 2
Defining Table Quotas
E In the List Pane, choose one of the variables that forms part of the quota you are defining, and drag
it onto one of the drop lines in the Quota Construction Area. You will know when you have the
variable in the right place because the drop line will turn pink.
The variable’s name and categories appear on the drop line, and an empty grid appears in which
to define the targets.
E If you are defining a two-dimensional quota, drag the second variable from the List Pane into the
Quota Construction Area, but this time drop it on the other line.
The variable’s name and categories appear on the drop line and additional cells are added to
the target grid.
E If you are defining a quota with more than two dimensions, drag the additional variables to the
appropriate positions relative to the other variables in the grid. You can place the new variables
above, below, and to the left or right of existing variables, but in the context of defining quotas,
the most logical positions are above or below the top variable and to the left or right of the side
variable.
E When the structure of the quota grid is complete, you can start defining targets. Select one or more
cells in the target grid, as follows:
To Select
A single cell
A number of nonadjacent cells
All cells in a row
All cells in a column
All cells in the grid
Do the following
Click in the cell. (Double click to select the cell
and open the Quota information dialog box all in
one go.)
Hold down the Ctrl key and click on each cell in
turn.
Position the cursor over a cell in that row, right-click
and choose Select Row.
Position the cursor over a cell in that column,
right-click and choose Select Column.
Position the cursor over any cell, right-click and
choose Select Table.
The selected cells turn blue and are the ones that will be affected by your next actions.
E Right-click and choose Edit from the pop-up menu.
This opens the Quota information dialog box.
E In Quota target, type the target for the selected cell or cells.
E Optionally, click Allow Over Quota if you want to allow interviewing to continue all the time that
the number of completed interviews in this cell is less that the target. Once the target is met, any
interviews that were already in progress will be allowed to continue and complete, so it is possible
that the final number of completed interviews will slightly exceed the target. Once the target has
been met, all new interviews in the cell will fail the quota test and will be dealt with as specified
by the scriptwriter (usually the interview will be terminated).
317
IBM SPSS Data Collection Quota Setup
E Optionally, click Counter Quota to count the number of interviews that take place for these cells
without specifying targets. These cells will then have no quota control, but a record of the number
of interviews achieved for each cell will be maintained.
E Click OK to close the dialog box.
The quota table is updated to show the targets for each cell. The symbol in the top right-hand
corner of each cell shows the quota type: N for a normal quota, an up-arrow for allow over quota,
and C for a counter quota.
E Repeat these steps until you have defined a target for each cell.
E In Title, replace the default title with something that describes the quota.
The scriptwriter may use the title that you define to identify the quota in the script. It is therefore a
good idea to replace the default title that IBM® SPSS® Data Collection Quota Setup provides
with a title that reflects the content of the quota because this will make the script easier to follow.
E To save the definition choose:
File > Save
Note: You must give the .mqd file the same name as the project and save it in the project’s source
directory otherwise the activation process will fail when the scriptwriter tries to activate the project.
Creating More Than One Table Quota
You can create as many quota tables as you need, based on different questions or combinations of
questions in the questionnaire. In a soft drinks survey, for example, you may want to have one
quota based on age and gender and then, further on in the questionnaire, a quota based on the type
of soft drink that respondents usually drink.
E Either click Add Table or choose the New tab at the foot of the Quota Construction Area.
E Select the quota variables and define the targets. For more information, see the topic Defining
Table Quotas on p. 316.
Deleting Table Quotas
E Choose the tab for the quota you want to delete.
E Click Delete Table.
E Confirm your request when prompted to do so.
Note:Deleting quota tables from IBM® SPSS® Data Collection Quota Setup does not delete
the tables from the Quota database. Instead, the tables are flagged as Inactive, so that they are
ignored by the quota control system.
318
Chapter 2
Expression Quotas
The Expression Builder lets you define quotas by creating expressions that describe the
characteristics of each quota. You can create Expression Quotas using any types of variables, but
they are particularly useful for quotas based on numeric, text, or boolean variables, because these
types of quotas cannot be defined in quota tables.
To understand more about how Expression Quotas work, consider a simple Table Quota for
gender. The expression that describes the cell for men is that the gender variable should contain
‘Male’; the expression for the cell for women is that gender should contain ‘Female’. If you
wanted, you could replace the Table Quota for gender with two Expression Quotas using the
expressions noted here.
With numeric variables, you can define quotas based on single values or ranges of values. For
example, if age is a numeric variable, you can define quotas for people aged 21, people aged 18 to
21, or people who are older than 21.
With text variables, you can define quotas based on words that are present or not present in
a variable — for example, people who mention the word ‘expensive’ when saying why they
would not buy a product.
Note:Expression Quotas exist only for the characteristics you define. If your expressions do
not cover all possible values for a variable, there will be no quotas for the missing values. This
is not the same as Table Quotas, where choosing a variable automatically creates quotas for all
categories in the variable. For example, if you define a single expression for people aged 35
years and below, there will be no quota for respondents aged over 35 and respondents in this age
group will not be checked. This is not wrong, but you may prefer to create a counter quota for
these respondents instead.
When a quota has more than one characteristic, the expression that defines the quota will
consist of a number of sub-expressions, one for each characteristic. So, a quota for young men will
consist of two sub-expressions, one for male respondents and the other for young respondents.
The two sub-expressions will be linked by an operator that tells the quota system that respondents
should be included in the quota only if they have both characteristics. All women and men who
are not young will be excluded from the quota.
319
IBM SPSS Data Collection Quota Setup
Note:Although each expression has a unique name, they are normally stored as a single
group under one title. This means that the scriptwriter will not be able to choose to check some
Expression Quotas but not others, as is possible with Table Quotas. Expression Quotas based
on Sample Management variables are stored separately from Expression Quotas based on
variables that are present in the script. The default title for Expression Quotas for script data is
Expressions, whereas the default title for Expression Quotas for Sample Management data is
tablename_sm:Expressions, where tablename is the name of the sample table in the sample
database.
When you choose a variable for quotas, IBM® SPSS® Data Collection Quota Setup displays a
Filter On dialog box that prompts you for the information required to create a quota for that type
of variable. The content of the dialog box varies according to the variable type.
Filter on Categorical Variable Dialog Box
Figure 2-3
Filter on Categorical Variable dialog box
You can use expressions to define quotas based on categories from single response and multiple
response variables, and grid subvariables. For example, you can set up an expression that includes
male respondents, or includes respondents who usually drink Assam or Darjeeling tea.
Filter on the categorical variable. Displays the variable that you dragged onto the Expression
Quotas tab. To use a different variable, click the arrow and choose another from the drop-down list.
Include cases where. Specifies how to determine whether the categories that you are about to
select will be part of the current quota expression.
Any of these. The quota is for respondents who choose at least one of the selected categories.
None of these. The quota is for respondents who do not choose any of the selected categories.
All of these. The quota is for respondents who choose all of the selected categories. Not
available for single response variables.
320
Chapter 2
Exactly these. The quota is for respondents who choose all of the selected categories and no
others. Not available for single response variables.
At least. The quota is for respondents who choose at least the specified number of the selected
categories. Specify the number in the box that appears to the right. Not available for single
response variables.
At most. The quota is for respondents who choose no more than the specified number of
categories. Specify the number in the box that appears to the right. Not available for single
response variables.
Between. The quota is for respondents who choose a certain number of selected categories.
Specify the minimum and maximum number of categories in the boxes that appear to the
right. Not available for single response variables.
Categories are selected. Select the categories of the variable that define the characteristics of
this quota.
Next. Click to add another variable to the expression.
Finish. Click to close the dialog box.
Cancel. Click to close the dialog box without creating the quota expression.
Filter on Numeric Variable Dialog Box
Figure 2-4
Filter on Numeric Variable dialog box
You can use expressions to define quotas based on values in numeric variables. For example,
you can create a quota for people who are under 24 years of age, or you can create a series of
expressions for respondents in different age ranges.
Filter on the numeric variable. Displays the variable that you dragged onto the Expression Quotas
tab. To use a different variable, click the arrow and choose another from the drop-down list.
321
IBM SPSS Data Collection Quota Setup
Include cases where the value is. Specifies how to determine which respondents belong in this
quota. Type an appropriate number in the box on the right.
Less than. The quota is for respondents who give an answer less than the specified value.
Greater than. The quota is for respondents who give an answer greater than the specified value.
Equal to. The quota is for respondents who give an answer that is the same as the specified
value.
Not equal to. The quota is for respondents who give an answer that is not the same as the
specified value.
Less than or equal to. The quota is for respondents who give an answer less than or equal to
the specified value.
Greater than or equal to. The quota is for respondents who give an answer greater than or
equal to the specified value.
Next. Click to add another variable to the expression.
Finish. Click to close the dialog box.
Cancel. Click to close the dialog box and cancel the expression.
Filter on Text Variable Dialog Box
Figure 2-5
Filter on Text Variable dialog box
You can define expressions that are based on text strings in text variables. For example, you can
define an expression that includes respondents who mention the word “noisy” in their answer.
Note: All text expressions are case insensitive. In other words, it does not matter whether you
type the text in upper or lower case, because the expression matches the characters in the text
and not the case in which they are entered.
322
Chapter 2
Filter on the text variable. Displays the variable that you dragged into the Expression Quotas tab.
To use a different variable, click the arrow and choose another from the drop-down list.
Include cases where the text. Specifies how to determine which respondents will be included in
the quota. Type the text that defines the quota characteristic in the box on the right.
Contains. The quota is for respondents who mention the specified text.
Is exactly. The quota is for respondents whose answers consist of the specified text and
nothing else.
Begins with. The quota is for respondents whose answers begin with the specified text.
Ends with. The quota is for respondents whose answers end with the specified text.
Is blank/empty. The quota is for respondents whose answers are blank or empty. This includes
null and silent null responses.
Is not blank/empty. The quota is for respondents whose answers contain any text at all.
Next. Click to add another variable to the expression.
Finish. Click to close the dialog box.
Cancel. Click to close the dialog box and cancel the expression.
Filter on Boolean Variable Dialog Box
Figure 2-6
Filter on Boolean Variable dialog box
You can define expressions that are based on the values in boolean variables. A boolean variable
can contain only one of two values: true or false.
Filter on the boolean variable. Displays the variable that you dragged onto the Expression Quotas
tab. To use a different variable, click the arrow and choose another from the drop-down list.
323
IBM SPSS Data Collection Quota Setup
Include cases where the Boolean value is. Choose whether you want the quota to count true or
false values.
Next. Click to add the values or categories from another variable to the expression.
Finish. Click to close the dialog box.
Cancel. Click to close the dialog box and cancel the expression.
Filter on New Variable Dialog Box
Figure 2-7
Filter on New Variable dialog box
You use the Filter on New Variable dialog box to combine characteristics from multiple variables
into a single expression. This dialog box appears when you define a characteristic using a variable
and then click the Next button. When you create an expression using multiple variables, you can
combine the characteristics using either the And operator or the Or operator. For example, you
could create a quota for respondents who drink Assam tea and who normally make tea using tea
bags.
The And operator specifies that respondents must have all the listed characteristics. The Or
operator specifies that respondents must have at least one of the characteristics to be counted
towards the quota.
Logical operator. Choose the operator that you want to use to combine the quota characteristics.
New variable. Choose the variable that you want to add to the expression from the drop-down list.
Expressions. Displays the variables and characteristics that you have chosen for the expression.
Defining Expression Quotas
E Choose the Expression Quotas tab.
324
Chapter 2
E Drag a variable from the List Pane onto the Expression Quotas tab.
This opens the Filter On dialog box. The content of the dialog box varies according to the variable
type.
E Define the quota characteristics and selection criteria as described in the following topics:
Categorical variables
Numeric variables
Text variables
Boolean variables
E If the expression is based on two or more variables or values, click Next, otherwise click Finish
to close the dialog box. For more information, see the topic Expression Quotas using Two or
More Variables on p. 325.
The quota appears on the Expression Quotas tab with a unique name and a default target of 100.
E In Target, type the target you want to set.
E In Type, choose one of the following from the drop-down list:
Normal. This is an ordinary quota, so the sum of pending and completed interviews for this
quota must never exceed the target. Once the sum of pending and completed interviews for
this quota matches the target, all subsequent interviews for this quota will fail. If any of the
pending interviews do not complete, further interviews will be required to meet the target.
Allow over. Allow the sum of pending and completed interviews for this quota to exceed the
target. New interviews may be started for this quota until the number of completed interviews
matches the target. If all the pending interviews complete, the target may be exceeded. Once
the target has been met, any new interviews for this quota will fail the quota test and will be
dealt with as specified by the scriptwriter (usually the interview terminates).
Counter. There is no target for this quota so there will be no quota control, but the number of
respondents belonging to the quota will be counted.
E In Description, type a short description of the expression.
E To save the definition choose:
File > Save
Note: You must give the .mqd file the same name as the project and save it in the project’s source
directory otherwise the activation process will fail when the scriptwriter tries to activate the project.
Defining Quotas for Categorical Variables
When the Filter on Categorical Variable dialog box appears, do the following.
E From the “Include cases where” drop-down list, choose the inclusion criteria for the categories
that define the quota characteristics.
E In “categories are selected”, choose the characteristics that respondents must have in order to be
included in the quota. You can select multiple categories by holding down Ctrl while you click.
325
IBM SPSS Data Collection Quota Setup
Defining Quotas for Numeric Variables
When the Filter on Numeric Variable dialog box appears, do the following:
E From the “Include cases where the value is” drop-down list, choose the selection criteria for
this quota.
E In the number box on the right, type the value to which the criteria apply.
Defining Quotas for Text Variables
When the Filter on Text Variable dialog box appears, do the following:
E From the “Include cases where the text” drop-down list, choose the option that defines when
respondents will be included in this quota.
E In the box on the right, type the text that defines the quota characteristic.
Defining Quotas for Boolean Variables
When the Filter on Boolean Variable dialog box appears, do the following:
E From the “Include cases where the boolean value is” drop-down list, choose whether you want to
include respondents whose values are true or false.
Expression Quotas using Two or More Variables
When the Filter on New Variable dialog box appears, do the following:
E In Logical operator, choose how the sub-expressions are to be combined. Choose And to create
a quota expression that requires both sub-expressions to be True; choose Or to create a quota
expression that requires at least one of the expressions to be True.
E In New variable, choose a variable from the drop-down list. This list displays all variable types
and includes system variables even if you have chosen not to view these variables in the List Pane.
E Define the expression for this variable.
E Click Next to add another sub-expression or Finish to end the expression.
Advanced Expressions
You can define quotas whose characteristics are of almost unlimited complexity using the
Expression Definition language. This is based on VBScript and supports all of the VBScript
functions. It also includes additional functions that have been designed to meet the needs of the
market research industry. For detailed information about the many functions that are available,
refer to the Function Library documentation in the IBM® SPSS® Data Collection Developer
Library.
326
Chapter 2
When you create a simple expression, IBM® SPSS® Data Collection Quota Setup converts the
expression into the Expression Definition language automatically. When you create an advanced
expression, you write the expression yourself in the Advanced Filter Specification window, which
is designed to make creating expressions easy. The Advanced Filter Specification window has
buttons for the operators and functions that you are most likely to use, as well as lists of all of
the variables and functions that are available. You can build an expression by choosing variables
and clicking operator buttons, by entering the expression directly, or by using a combination of
the two approaches.
Expression Syntax
At its most basic, an expression is:
Variable Operator Value
where
Variable is the name of a variable.
Operator is a comparison operator, such as > (greater than) or = (equal to), or one of the
functions for selecting respondents on the basis the answers given to a question (variable).
Value is one or more answers held in the variable. You must enclose text values in double
quotes—for example, "noisy". You specify values of a categorical variable by defining a
comma-separated list of category texts enclosed within braces and parentheses—for example,
({Assam, Darjeeling, China}). You can specify values from numeric variables as
numeric values.
When a quota statement for an Expression Quota is executed during an interview, the expression
is evaluated and returns a value of true for a respondent who has the quota characteristics and false
for a respondent who does not have the required characteristics.
327
IBM SPSS Data Collection Quota Setup
Specifying Expressions using the Advanced Method
Figure 2-8
Advanced Filter Specification window
You can use the Advanced Filter Specification window to create new Expression Quotas and to
modify existing ones.
If you are editing an existing expression, it is displayed in the quota expression box when you
open the dialog box. Otherwise, the quota expression box is blank.
You can build Expression Quotas by adding variables and clicking the operator and function
buttons. Alternatively, you can enter expressions directly into the quota expression box. In
practice, you will probably use a combination of both methods.
Example
If the questionnaire script contains a categorical question called gender, with the categories Male
and Female, you can create the following expression to select male respondents:
gender.ContainsAny({MALE})
To create this expression, you would
E Click the Variables button and choose gender from the list.
E Click the . button.
E Click the Functions button and choose ContainsAny from the list that appears.
E Click the { button.
E Choose MALE from the list that appears.
E Click the } button.
E Click the ) button.
328
Chapter 2
Note: This example uses a simple expression that could be created using the Filter on Categorical
Variable dialog box. However, because it was created using the Advanced method, it can only be
edited on the Advanced Filter Specification dialog box.
Comparison Operators in Expression Quotas
When you build an expression, you can use the comparison operators to compare the value in
a variable with a specified value of the same type. For example, you can compare the value in
a numeric variable with a numeric value and the value in a text variable with a text string. The
operators are also valid with other variable types. Refer to the IBM® SPSS® Data Collection
Developer Library documentation for more details. The following table lists the comparison
operators.
Operator
=
<>
>
<
>=
<=
Meaning
Equal to
Not equal to
Greater than
Less than
Greater than or equal to
Less than or equal to
Used with
Numeric and text variables.
Numeric and text variables.
Numeric variables.
Numeric variables.
Numeric variables.
Numeric variables.
For example:
Expression
visits > 5
visits <= 5
Selects
Respondents for whom the visits numeric variable
holds a value greater than 5.
Respondents for whom the visits numeric variable
holds a value less than or equal to 5.
Functions
There are many functions that you can use to define Expression Quotas based on values in
categorical variables. The functions you are most likely to use for defining quotas are ContainsAny
and ContainsAll for quotas based on subsets of responses from a multiple response list, and
AnswerCount for quotas based on the number of responses chosen from a list.
For information about the many other functions that are available, refer to the Function Library
documentation in the IBM® SPSS® Data Collection Developer Library.
ContainsAny
Use the ContainsAny function to define a quota for respondents who have chosen any of a
number of listed categories. The categories can belong to a single response variable, a multiple
response variable, or a grid subvariable.
The syntax is:
variable.ContainsAny({Category1_ID, Category2_ID, ...})
329
IBM SPSS Data Collection Quota Setup
Note that the syntax uses the unique ID of the category rather than its label.
For example, you might define the quota expression for young people as:
age.ContainsAny({E1720_years, E2124_years})
This quota expression counts all respondents in the 17-20 years or 21-24 years categories.
Not ContainsAny
You can use the ContainsAny function in combination with the logical operator Not to define a
quota for respondents who have not chosen any of a number of listed categories. The categories
can belong to a single response variable, a multiple response variable, or a grid subvariable.
The syntax is:
Not variable.ContainsAny({Category1_ID, Category2_ID, ...})
For example, you might define the quota expression for all respondents who are older than 20
years of age as:
Not age.ContainsAny({E1116_YEARS, E1720_YEARS})
This expression selects all respondents except those in the 11-16 years or 17-20 categories.
ContainsAll
Use the ContainsAll function to create a quota for respondents who choose all of a number of
listed answers for a multiple response question.
The syntax is:
variable.ContainsAll({Category1_ID, Category2_ID ...})
Note that the syntax uses the unique ID of the category rather than its label.
For example, you can define a quota for respondents who regularly drink tea and coffee
as follows:
drink.ContainsAll({Tea, Coffee})
Respondents who drink only tea, only coffee, or neither beverage are excluded from the quota.
Note: You can use ContainsAll with a single response variable, but you must be careful not to
specify more than one category. If you do, the expression will never select any respondents.
All the listed answers and no others
You can use the ContainsAll function with the Exactly flag set to true to define a quota for
respondents who choose all of a number of listed categories from a multiple response question
and no others.
330
Chapter 2
For example, you would define a quota for respondents who drink water and nothing else as:
drink.ContainsAll({Water}, True)
AnswerCount
Use the AnswerCount function to define a quota based on the number of answers chosen from a
multiple response list.
The syntax is:
variable.AnswerCount()numeric condition
For example, to define a quota for respondents who can name more than five brands of fizzy drinks:
fizzy.AnswerCount() > 5
Logical Operators in Expression Quotas
When a quota definition is based on data from two or more variables, you define the
overall expression by combining two or more sub-expressions using logical operators. Each
sub-expression defines a single characteristic within the quota. For example, a quota for young
men is a combination of a gender characteristic and an age characteristic.
Logical operators that join quota expressions are And and Or. The Not logical operator
negates expressions.
And
Combine two sub-expressions with the And operator when you want to define a quota for
respondents who satisfy both sub-expressions.
The syntax is:
Expression1 And Expression2
For example, you would define a quota for young male respondents as follows:
gender.ContainsAny({MALE}) And age.ContainsAny({E1720_YEARS, E2124_YEARS})
This expression selects respondents whose gender is male and whose age is either 17-20 years
or 21-24 years.
Or
Combine expressions with the Or operator when you want to define a quota for respondents
who satisfy at least one of the sub-expressions.
331
IBM SPSS Data Collection Quota Setup
The syntax is:
Expression1 Or Expression2
For example, to define a quota for men of all ages and all women between the ages of 17 and 24,
you would specify:
gender.ContainsAny({MALE}) Or age.ContainsAny({E1720_YEARS, E2124_YEARS})
The gender expression selects all men and rejects all women. The age expression selects anyone
aged 17 to 24 and rejects anyone outside that age range. A man passes the gender expression
regardless of his age. A woman fails the gender expression but passes the age expression if she is
in the specified age group.
Not
Use the Not operator when you want to define a quota for respondents who do not have a
particular characteristic.
The syntax is:
Not Expression1
For example, to define a quota for male respondents who are not in the 17-20 or 21-24 age groups
(that is, they are younger than 17 or older than 24):
gender.ContainsAny({MALE}) And Not age.ContainsAny({E1720_YEARS, E2124_YEARS})
Arithmetic Operators in Expression Quotas
You can define quotas in which the quota characteristics are based on the results of arithmetic
calculations. The arithmetic calculations consist of numeric variables, numeric values, and
numeric expressions all joined by arithmetic operators.
Operator
+
Operation
Addition
-
Subtraction
Description
Use to add numeric values,
numeric variables, or numeric
expressions.
Use to subtract one numeric
value, numeric variable, or
numeric expression from another
such value, variable or expression.
332
Chapter 2
Operator
/
Operation
Division
*
Multiplication
Description
Use to divide one numeric value,
numeric variable, or numeric
expression by another such value,
variable or expression.
Use to multiply two numeric
values, numeric variables, or
numeric expressions.
For example, the following expression defines the quota characteristics for respondents who
visited the museum more than five times prior to the year the survey was conducted:
visits - visits12 > 5
visits and visits12 are both numeric variables. visits records the total number of previous visits
each respondent made to the museum and visits12 records the number of visits each respondent
made in the previous 12 months. This expression subtracts the number of visits made in the
previous 12 months from the total number of visits and selects respondents for whom the result is
greater than 5.
Operator Precedence in Expression Quotas
When there is more than one operator in an expression, they are evaluated in a set order, known as
the order of precedence. The order of precedence, in evaluation order, is as follows:
Not
Multiplication and division
Addition and subtraction
Comparison operators
And and Or
When operators are at the same level of precedence, they are simply evaluated from left to right.
You can override the order of precedence by using parentheses. Operators that are within
parentheses are evaluated before operators that are not contained within parentheses. However,
when more than one operator is contained within parentheses, they are evaluated according to the
normal order of precedence.
Editing Expression Quotas
E On the Expression Quotas tab click on the expression you want to change.
An arrow button appears to the right of the expression.
E Click the arrow button.
The expression is opened for editing. If the expression is a simple expression based on one
variable, the Filter On dialog box for that variable type appears. If the expression contains
sub-expressions, the Filter On dialog box for the last sub-expression appears. To access other
333
IBM SPSS Data Collection Quota Setup
sub-expressions you will need to click the Advanced button to view the whole expression in the
Quota Expression language.
Deleting Expression Quotas
E On the Expression Quotas tab click the red cross at the end of the line for the Expression Quota
you want to delete.
E Confirm your request when prompted to do so.
Reusing a Quota Definition File in Another Project
If you have a number of projects that have quotas based on the same combinations of variables,
you can save yourself time by copying an existing .mqd file into the new project rather than
recreating the file from scratch. A typical example would be when you have a number of projects
that all require quotas on the same demographic variables. As long as the demographic variables
are the same in all projects, you can create the .mqd for one project and then copy it to all the
other projects’ source directories. If the targets vary between projects, or you want to add extra
quotas for some projects, you can edit the copied .mqd file to make these adjustments as you
would on the original file.
Note: The .mqd file contains a number of references to the project name. If you copy .mqd
files between projects, your first step after copying must be to edit the new file and change these
references to point to the new project name. For example, if you copy cars.mqd into the travel
source directory, you must change its name to travel.mqd and then edit it to replace all references
to cars with references to travel.
The .mqd file is a text file containing XML code so you can edit it using any text editor. Lines
in the file are very long, so it is usually best to make the replacements using a global search
and replace command. You must be very careful when editing the file because if you make the
wrong changes, the file can become unusable.
Chapter
IBM SPSS Data Collection Activation
Console
3
The IBM® SPSS® Data Collection Activation Console allows you to monitor questionnaire
activation status. The console provides options for viewing pending and completed activations,
and creating activation history filters. The console is composed of the following tabs:
Activation History tab – allows you to view the status of both pending and completed
activations.
Filters tab – provides options for filtering questionnaire activation history.
Settings tab – provides options for configuring the Activation Console.
When the Activation Console is launched, an icon displays in the Windows taskbar. Whenever a
questionnaire is submitted for activation, or completes activation, the icon provides relevant status
notification messages. The notification messages include the survey URL link for each completed
activation. For more information, see the topic Settings tab on p. 337.
Activation History tab
The Activation History tab allows you to view the status of both pending and completed
activations.
Note: In general, you are limited to viewing only your activations.
Pending Activations
The following information is provided:
ProjectIcon – Provides a visual cue for the activation status.
Icon
Description
Indicates that project files are currently uploading to the server.
Indicates that the project is pending activation.
Indicates that project activation is currently in progress.
Project – The project name as it appears in IBM® SPSS® Data Collection Interviewer Server
Administration.
Status – The project activation status (pending, processing, success, or failed).
Server – The name of the server to which the questionnaire is being activated.
Licensed Materials - Property of IBM © Copyright
IBM Corporation 2000, 2011
334
335
IBM SPSS Data Collection Activation Console
User – The name of the user who initiated the activation.
Submitted – The time at which the questionnaire was submitted for activation. This is the time
as reported by the IBM® SPSS® Data Collection Interviewer Server.
Select all. Click to select all projects in the Pending Activations list.
Cancel selected. Click to cancel activation for all selected projects.
Completed activations
The following information is provided:
ProjectIcon – Provides a visual cue for the activation status.
Icon
Description
Indicates that project activation was successful. You can select the appropriate table row
and click View Message... to view all activation messages.
Indicates that project activation failed. You can select the appropriate table row and click
View Message... to view related activation error information.
Project – The project name as it appears in Interviewer Server Administration.
Status – The project activation status (pending, processing, success, or failed).
Server – The name of the server to which the questionnaire is being activated.
User – The name of the user who initiated the activation.
ProcessingServer – The server that performs the activation. In a cluster environment, the server
to which an activation is submitted is not necessarily the server that performs the activation.
StartTime – The time at which the questionnaire was submitted for activation. This is the
time as reported by the Interviewer Server.
EndTime – The time at which the questionnaire completed activation. This is the time as
reported by the Interviewer Server.
Link – The URL for the activated, live questionnaire.
Test Link – The URL for the activated, test questionnaire.
ProjectId – The activated questionnaire project’s unique ID. The ID is generated by the
Interviewer Server.
Refresh. Click to refresh the activation status.
View Messages. Select a completed activation and click to view any messages generated during
activation.
Removing pending activations
E Select the appropriate project(s) from the Pending Activation section. Alternatively you can select
all project by clicking Select all.
E Click Cancel selected or right-click and select Cancel.
336
Chapter 3
Note: You cannot remove activations initiated by other users. You can only remove your own
activations.
Filters tab
The Filters tab provides options for defining how activations are displayed on the Activation
History tab.
Activation type. Displays the status for the current activation. When applicable, the drop-down list
allows you to select which activation types display on the Activation History tab. Options include:
All
Activate – the activation history for activations submitted via the IBM® SPSS® Data
Collection Activation Console.
Launch – the activation history for activations submitted via the IBM® SPSS® Data Collection
Interviewer Server’s Launch activity.
Promote – the activation history for activations submitted via the Interviewer Server’s
Promote Project activity.
Activation history. The drop-down list allows you to select which activations display in the
Activation History tab. Options include:
All
Successful activation
Failed activation
Activation status. The check boxes allows you to select the activation status to display in the
Activation History tab. Options include:
Active
Inactive
Test
Project. Allows you to define specific projects to display in the Activation History tab.
E Click Find to locate questionnaire projects on the Interviewer Server.
E Use the Add>> and <<Remove buttons to select which projects will display in the Activation
History tab.
User. Allows you to define projects, activated by specific users, to display in the Activation
History tab.
E Click Find to locate users on the Interviewer Server.
E Use the Add>> and <<Remove buttons to select which users’ projects will display in the Activation
History tab.
Activation date between. Allows you to select an activation date range. Only activations that
occurred between the specified date will display in the Activation History tab.
337
IBM SPSS Data Collection Activation Console
E Click Apply to save your settings.
Settings tab
The Setting tab provides IBM® SPSS® Data Collection Activation Console configuration settings.
Activation status run option. The drop-down menu provides options for determining how the
activation console will handle submitted activations:
Start Activation Status when activation queued. The Activation Console begins immediately
after activations are added to the queue. This is the default setting.
Start Activation Console when my computer starts. The Activation Console automatically
begins when the computer is started.
Start Activation Console manually. The Activation Console is manually started.
Default date range. Controls the date range that displays for the Activation date between fields on
the Filters tab.
Activation message range.
Show activation notification. When selected, the Activation Console taskbar icon provides
activation notification messages.
Activation auto refresh on/off. When selected, the Activation History tab automatically refreshes
based on the Activation auto refresh interval setting.
Play audible notification. When selected, the Activation Console taskbar icon provides audible
notifications whenever activation messages are generated. The Play this sound file field allows you
to specify a sound file. Click the Browse (...) button to select a sound file.
E Click Save changes to save your settings.
Appendix
A
Notices
This information was developed for products and services offered worldwide.
IBM may not offer the products, services, or features discussed in this document in other countries.
Consult your local IBM representative for information on the products and services currently
available in your area. Any reference to an IBM product, program, or service is not intended to
state or imply that only that IBM product, program, or service may be used. Any functionally
equivalent product, program, or service that does not infringe any IBM intellectual property right
may be used instead. However, it is the user’s responsibility to evaluate and verify the operation
of any non-IBM product, program, or service.
IBM may have patents or pending patent applications covering subject matter described in this
document. The furnishing of this document does not grant you any license to these patents.
You can send license inquiries, in writing, to:
IBM Director of Licensing, IBM Corporation, North Castle Drive, Armonk, NY 10504-1785,
U.S.A.
For license inquiries regarding double-byte character set (DBCS) information, contact the IBM
Intellectual Property Department in your country or send inquiries, in writing, to:
Intellectual Property Licensing, Legal and Intellectual Property Law, IBM Japan Ltd., 1623-14,
Shimotsuruma, Yamato-shi, Kanagawa 242-8502 Japan.
The following paragraph does not apply to the United Kingdom or any other country where such
provisions are inconsistent with local law: INTERNATIONAL BUSINESS MACHINES
PROVIDES THIS PUBLICATION “AS IS” WITHOUT WARRANTY OF ANY KIND,
EITHER EXPRESS OR IMPLIED, INCLUDING, BUT NOT LIMITED TO, THE IMPLIED
WARRANTIES OF NON-INFRINGEMENT, MERCHANTABILITY OR FITNESS FOR A
PARTICULAR PURPOSE. Some states do not allow disclaimer of express or implied warranties
in certain transactions, therefore, this statement may not apply to you.
This information could include technical inaccuracies or typographical errors. Changes are
periodically made to the information herein; these changes will be incorporated in new editions
of the publication. IBM may make improvements and/or changes in the product(s) and/or the
program(s) described in this publication at any time without notice.
Any references in this information to non-IBM Web sites are provided for convenience only and
do not in any manner serve as an endorsement of those Web sites. The materials at those Web sites
are not part of the materials for this IBM product and use of those Web sites is at your own risk.
IBM may use or distribute any of the information you supply in any way it believes appropriate
without incurring any obligation to you.
Licensees of this program who wish to have information about it for the purpose of enabling: (i) the
exchange of information between independently created programs and other programs (including
this one) and (ii) the mutual use of the information which has been exchanged, should contact:
IBM Software Group, Attention: Licensing, 233 S. Wacker Dr., Chicago, IL 60606, USA.
Licensed Materials - Property of IBM © Copyright
IBM Corporation 2000, 2011
338
339
Notices
Such information may be available, subject to appropriate terms and conditions, including in
some cases, payment of a fee.
The licensed program described in this document and all licensed material available for it are
provided by IBM under terms of the IBM Customer Agreement, IBM International Program
License Agreement or any equivalent agreement between us.
Any performance data contained herein was determined in a controlled environment. Therefore,
the results obtained in other operating environments may vary significantly. Some measurements
may have been made on development-level systems and there is no guarantee that these
measurements will be the same on generally available systems. Furthermore, some measurements
may have been estimated through extrapolation. Actual results may vary. Users of this document
should verify the applicable data for their specific environment.
Information concerning non-IBM products was obtained from the suppliers of those products,
their published announcements or other publicly available sources. IBM has not tested those
products and cannot confirm the accuracy of performance, compatibility or any other claims
related to non-IBM products. Questions on the capabilities of non-IBM products should be
addressed to the suppliers of those products.
All statements regarding IBM’s future direction or intent are subject to change or withdrawal
without notice, and represent goals and objectives only.
This information contains examples of data and reports used in daily business operations.
To illustrate them as completely as possible, the examples include the names of individuals,
companies, brands, and products. All of these names are fictitious and any similarity to the names
and addresses used by an actual business enterprise is entirely coincidental.
If you are viewing this information softcopy, the photographs and color illustrations may not
appear.
Trademarks
IBM, the IBM logo, ibm.com, and SPSS are trademarks of IBM Corporation, registered in
many jurisdictions worldwide. A current list of IBM trademarks is available on the Web at
http://www.ibm.com/legal/copytrade.shtml.
Adobe, the Adobe logo, PostScript, and the PostScript logo are either registered trademarks or
trademarks of Adobe Systems Incorporated in the United States, and/or other countries.
Intel, Intel logo, Intel Inside, Intel Inside logo, Intel Centrino, Intel Centrino logo, Celeron, Intel
Xeon, Intel SpeedStep, Itanium, and Pentium are trademarks or registered trademarks of Intel
Corporation or its subsidiaries in the United States and other countries.
Microsoft, Windows, Windows NT, and the Windows logo are trademarks of Microsoft
Corporation in the United States, other countries, or both.
Java and all Java-based trademarks and logos are trademarks of Sun Microsystems, Inc. in the
United States, other countries, or both.
340
Appendix A
Other product and service names might be trademarks of IBM or other companies.
Index
– and * symbols in telephone interviewing reports, 230
display options for Overview tab, 14
display text items, 45
downloading questionnaires, 72
downloading templates/pictures, 50
duplicating questions, 68
Edit tab, 11
editing response & subject lists, 65
exit codes, 56
file movement between Users and Shared folders, 14
filtering response lists, 20, 34
getting started, 12
importing library questions, 49
inserting IBM SPSS Data Collection WordCapture files,
64
interview scripting statements, 58
item names, 13
leaving, 16
library structure, 47
main screen, 11
making questionnaires live, 70
more than one question per page, 67
moving questions up/down, 68
name of routing section, 72
naming external files in shared templates, 76
notes/comments, 51
numeric grid questions, 37
numeric questions, 22
opening existing questionnaires, 74
options, 13
overview, 9
Overview tab, 11
presentation style, 13
Presentation tab, 11
previewing questionnaire, 14
process flowchart, 14
questionnaires created with IBM SPSS Data Collection
Base Professional, 69
routing facilities, 10
running from IBM SPSS Data Collection Interviewer
Server Administration, 10
running outside IBM SPSS Data Collection Interviewer
Server Administration, 10, 73
saving questionnaires to library, 48
saving questionnaires/library files, 75
setting activation parameters, 71
shared lists, 42
shared templates, 76
shared templates folders, 77
single/multiple choice grid questions, 30
single/multiple choice questions, 16
starting, 11
terminating interviews, 56
testing questionnaires, 70
text questions, 26
unconditional routing, 53
unsupported item types, 64
Abandoned, 182
Activating projects
Activate command, 305
Activate command examples, 306
Activate Document, 304
converting .ini files to .xml format, 307
converting .ini files to Activate Documents, 305
from command line, 304
Activation
between clusters, 118
over the internet, 118
Activation History
Activation History tab, 302
activity, 302
Activation History activity
Filters tab, 303
Activation History tab, 302, 334
Activation process, 115
Activities
overview, 4
using, 5
what’s new, 1
Activity
Activation History, 302
Answering machine, 182
answering machine detection, 163
Appointment, 182
Appointments tab, 145
Audio monitoring of interviewers, 272, 287
Audio recordings - playback during interview review, 287
Authentication failed page, 114
Authentication fields
changing, 80
Authentication page, 114
Authentication retry page, 114
Autodialers
using for telephone interviewing, 284
Bookmarks in scripts, 52
Boolean variables
quotas for, 318
Build
adding statements from script library, 60
Advanced tab, 11
answer prompt, 13
applying & undoing changes, 66
bookmarks, 52
changing questions, 65
conditional routing, 54
copying shared templates to library, 77
creating questionnaires/library files, 73
cutting & pasting questions, 68
deleting questions, 68
341
342
Index
uploading loading templates/pictures, 50
user options, 13
viewing/changing routing section, 72
Business, 182
Busy, 182
call outcomes
translating, 202
Categorical questions
editing response/subject list, 65
Categorical responses
switching between single and multiple response types,
65
Categorical variables
in expression quotas, 325
catifields_default.mdd
default settings for Phone Surveys - changing, 169
Cell phone, 182
certification
dialer, 291
Marketing Systems Group Pro-T-S, 291
Sytel, 291
Changes
saving, 66
undoing, 66
Changing behavior flags, 212
Changing cell priorities for Priority quotas, 212
Changing targets, 212
Changing the question order, 68
cut and paste, 68
Checking quotas, 211
Cluster to activate on, 109
Columns required in sample table, 84
Comments in scripts, 51
Completed interview page, 114
consistent keystokes, 194
Copy and paste, 68
creating filters, 265
Cut and paste, 68
data location, 218
Database server
naming, 82
day parts, 142
Default Web pages
allow use of, 109
deleting filters, 265
Deleting records from a sample table, 93
Desktop tools, 304
dialer
certification, 291
Marketing Systems Group Pro-T-S, 291
Sytel, 291
Dialer Administration activity, 284
Dialer Busy, 182
Dialer configuration file
creating, 284
importing, 286
Disconnected, 182
Display Text items
shared lists, 45
Downloading
reports for telephone interviewing projects, 258
Downloading records from a sample table, 93
DPM
default settings for Phone Surveys - changing, 169
Edit Preset Filters dialog, 265
Editing the records in a sample table, 93
Email
creating new jobs, 123
deleting jobs, 127
editing existing jobs, 127
overview, 121
running jobs, 127
starting, 122
user for test/problem messages, 127
Export Data
advanced options, 267
defining export parameters, 262
exporting only common system variables, 267
hierarchical data, 262
overview, 261
procedure for exporting IBM SPSS Quantum data, 267
starting, 262
Expression quotas, 318
defining, 327
Expressions
for specifying versions, 271
Fast Busy, 182
Fax, 182
Field Order dialog
Ordering tab, 140
Files
checking in/out, 8
making available to other users, 8
mqd, 313
Files activity
starting, 296
filter
creating, 265
deleting, 265
modifying, 265
Filters tab, 303, 336
Gotosee alsoRouting (goto’s), 54
Grid questions
editing response/subject list, 65
HDATA
unbounded loops, 218
343
Index
Hidden questions
defining, 19, 24, 28, 33, 39
hierarchical data, 262
IBM SPSS Data Collection Activation Console
Activation History tab, 334
Filters tab, 336
questionnaire, 334
Settings tab, 337
IBM SPSS Data Collection Interviewer Server
displaying a different language, 3
localization, 3
IBM SPSS Data Collection Interviewer Server
Administration
activate questionnaire to, 302, 334
IBM SPSS Data Collection Quota Setup program
adding tables, 317
And operator in expressions, 330
AnswerCount function, 330
arithmetic operators in expressions, 331
choosing working language, 314
comparison operators in expressions, 328
ContainsAll function, 329
ContainsAny function, 328
creating new files, 313
defining table quotas, 316
deleting expression, 333
deleting tables, 317
Details pane, 309
Details Pane, 310
displaying numeric/text variables in List pane, 310
displaying sample variables in List pane, 310
displaying system variables in List pane, 310
editing expression, 332
expression quotas, 318, 323, 327
expression—advanced features, 325
expressions containing two or more variables, 325
expressions for boolean variables, 325
expressions for categorical variables, 324
expressions for numeric variables, 325
expressions for text variables, 325
Filter On dialog box, 319–323
hiding components of IBM SPSS Data Collection Quota
Setup program window, 313
List pane, 309–310
List Pane, 310
List Pane, docking/undocking, 310
logical operators in expressions, 330
Not operator in expressions, 331
opening existing files, 313
operator precedence in expressions, 332
Or operator in expressions, 330
overview, 308
quotas using sample variables, 310
returning to default window layout, 313
reusing mqd files in different projects, 333
showing/hiding Details pane, 313
showing/hiding List pane, 313
showing/hiding status bar, 313
showing/hiding toolbar, 313
starting, 308
table, 315
undoing/redoing actions, 314
IBM SPSS Data Collection Quota Setup program window,
309
IBM SPSS Data Collection Remote Administration
interface, 301
overview, 301
starting, 301
If..Goto item, 54
Inserting IBM SPSS Data Collection WordCapture files, 64
Interview monitoring, 272
audio monitoring, 287
Interview rejected page, 114
Interview scripting
questionnaires created with Build, 69
Interview scripting statements
adding to questionnaires, 58
Interview stopped page, 114
Interviewer comments, 190
Interviewer Monitoring
audio monitoring, 287
Interviewer Monitoring activity, 272
Interviewer qualifications
setting/changing, 183
turning on/off for project, 131
Interviewer stations
using for autodialing, 287
Interviewers
monitoring, 272
Interviewing
using an autodialer to make calls, 284
Interviewing activity report
engine status, 294
overview, 293
project status, 295
refreshing, 296
starting, 294
Interviews
monitoring, 272
language
changing, 3
Language barrier, 182
Language recall, 182
Launch
activation process, 115
cluster to activate on, 109
interview web pages, 114
localization subfolders, 109
overview, 108
project database, 109
project status after activation, 109
quota control, 113
344
Index
routing context, 109
sample management, 111
starting, 108
legal notices, 338
Library
copying templates to, 77
importing questions from, 49
Library files
creating, 73, 75
Localization
IBM SPSS Data Collection Interviewer Server, 3
Manage Logs
downloading log files, 299
overview, 296
view settings, 296
viewing log files, 297
zip file contents, 300
Marketing Systems Group Pro-T-S
certification, 291
.mdd file
where read from, 218
Missing values, 21, 31, 37
modifying filters, 265
Monitoring interviewers, 272
Monitoring silent calls, 272
More than one question on a page, 67
mqd file
quota definitions, 313
mqd files
reusing, 333
Network busy, 182
New questionnaire
creating, 73
No answer, 182
Not Available, 182
Notes in scripts, 51
Numeric questions, 22
Numeric variables
quotas for, 318
Overrides tab, 149
Participant Rules
changing sample script, 79
changing sample/authentication fields, 80
overview, 78
starting, 78
testing the script, 80
Participants
access permissions for manually created databases, 81
activity features, 107
column set-up parameters, 89
columns required in sample table, 84
database server, 82
deleting records, 93
downloading records to a text file, 93
editing records, 93
features - controlling access to, 107
force preview dial, 92
overview, 81
replicates, 91
RequiresManualDial, 92
sample data - controlling access to, 107
sample database & table, 82
sample file format, 81
segment field, 89
starting, 82
updating records, 93
uploading records, 92
viewing records, 93
Phone activity
– and * symbols displayed in reports, 230
charts - including in reports, 253
downloading reports, 258
filtering reports, 256
overview, 230
running reports, 253
segments, 260
starting, 252
Phone Participants
autodialer - using to make calls, 185
cancelling calls, 187
changing the answer to a previous question, 199
closing, 202
comments - viewing/entering, 190
conducting interviews, 194
grid questions, 196
keyboard shortcuts, 179, 196, 198–199
language problems, 185, 187
main screen, 179
making appointments, 192
making calls by auto-dialing, 185
making calls by manual dialing, 187
making calls by using a modem, 187
manual dialing - using to make calls, 187
modem - using to make calls, 187
multiple-choice questions, 196
numeric questions, 196
overview, 177
playing a sound to the participant, 198
position name, 177
recording the participant’s answer, 199
rejecting an interview during a review, 200
retrieving a specific participant, 193
returning uncalled numbers, 187
reviewing interviews, 200
setting/changing interviewer qualifications, 183
single-choice answers, 196
starting, 177
terminating interviews part-way through, 200
345
Index
Phone Reports
for IBM SPSS Data Collection Interviewer Server
projects, 230
Phone Surveys
activity features, 168
answering machine detection, 163
Appointments tab, 145
autodialer settings, 159
autodialer status codes - mapping to call outcomes, 169
automatically select next contact, 153
call outcomes, 150
call outcomes - adding to default settings, 169
call times, 142
change participant database, 129
controlling access to features of, 168
default settings - changing, 169
defining Sample Management parameters, 131
dialer settings, 159
display sample fields on interview page, 129
elapse times for automatic/soft appointments, 131
fields, 129
fields - adding to default settings, 169
interview settings, 153
interviewer stations, 159
interviewers can select qualifications, 153
introductory text, 153
maximum number of retries, 131
monitoring interviewers, 153
Ordering tab, 139
Overrides tab, 149
overview, 128
parameters, 131
positions, 159
prioritizing automatic/soft appointments, 131
required sample fields, 129
retrieving specific participants, 153
reviewing interviews, 153
sample fields changeable by interviewers, 129
starting, 128
using an autodialer, 153
using modems to dial phone numbers, 153
Pictures
downloading from project folder, 50
for grid responses/subjects, 32, 38
for shared lists, 43
for single/multiple responses, 20, 34, 40, 44
uploading into project folder, 50
Positions
for autodialing, 287
Predictive dialer, 284
Prioritizing quotas, 214
Project inactive page, 114
Project status report, 216
projects
Activation History Activity - Filters tab, 303
Projects
activate from one cluster to another, 118
activate over the internet, 118
different interview and analysis texts, 25, 29, 31, 35,
37, 41
locking/unlocking, 8
monitoring remote interviewers, 301
Promote Project
activation parameters, 119
logging in to destination server, 119
overview, 118
participant records, 119
starting, 118
Questionnaire
opening existing, 74
saving a copy, 75
saving with a new name, 75
questionnaire version used, 218
Questionnaires
Activation History tab, 334
changing texts before exporting, 21, 25, 29, 31, 35, 37,
41
copying to library when use templates, 77
Filters tab, 336
IBM SPSS Data Collection Activation Console, 334
Item names, 13
making live, 70
setting activation parameters, 71
Settings tab, 337
testing, 70
Questions
adding, 49, 64
changing, 65
copying and pasting, 68
cutting and pasting, 68
deleting, 68
dummy, 19, 24, 28, 33, 39
grouping, 67
hiding, 19, 24, 28, 33, 39
missing values, 21
moving up/down, 68
numeric, 22
numeric grid, 37
respondent must answer, 19, 24, 28, 33, 39
single/multiple response, 16
single/multiple response grid, 30
text, 26
Queue Order Edit dialog
Ordering tab, 141
Quota control
allow use of, 109
prioritization of multiple responses, 214
see also Quotas activity, 211
see alsoIBM SPSS Data Collection Quota Setup
program, 315
setting up, 113
Quota files
reusing in different projects, 333
346
Index
Quotas
functions in expressions, 328
Quotas activity
changing targets/behavior flags/cell priorities, 212
checking quotas, 211
overview, 211
prioritizing quotas, 214
starting, 211
Refused, 182
Rejected, 182
replicates, 91
Reports
for telephone interviewing projects, 230
RequiresManualDial, 92
Response lists
filtering based on previous questions, 20, 34
Response types
for shared lists, 43
single/multiple response grids, 32, 38
single/multiple response questions, 18
Response/subject lists
adding responses/subjects to, 65
deleting responses/subjects, 65
moving responses/subjects in, 65
Responses common to several questions, 42, 44
Review Interviews
accepting an interview, 210
audio recordings - playback, 287
changing the answer to a question, 208
closing, 211
conducting a review, 207
ending a review, 210
keyboard shortcuts, 204, 207–208
main screen, 204
overview, 203
rejecting an interview, 210
selecting an interview to review, 206
Routing
for single/multiple responses, 18
grid response lists, 32, 38
Routing (goto’s)
conditional, 54
unconditional, 53
Routing in scripts, 53–54
Routing section
name of, 70
Routing statements
adding from script library, 60
adding manually, 58
Sample database
which to use, 82
Sample fields
changing, 80
Sample file
uploading records, 92
Sample management
allow use of, 109
setting up, 111
Sample script
changing, 79
testing, 80
Sample table
column set-up parameters, 89
deleting records from, 93
downloading records to a text file, 93
required columns, 84
segment field, 89
viewing and editing records, 93
which to use, 82
Script library
loading Routing statements from, 60
Scripts
converting v2.3 to v3, 3
Segments
including in sample table, 89
reporting on for telephone interviewing projects, 260
Settings tab, 337
Shared lists
creating, 42
overview, 42
using, 44
Silent calls
monitoring, 272
Single/multiple response questions
changing type, 20, 34
creating, 16
using shared lists with, 42, 44
Site properties
default settings for Phone Surveys - changing, 169
Site-to-site activation, 118
Special characters
displayed in telephone interviewing reports, 230
Specified other
single/multiple response grids, 32
single/multiple response questions, 18
Stations
using for audio monitoring, 287
using for autodialing, 287
using for playback of audio recordings, 287
Status activity
on demand refreshing, 218
overview, 216
starting, 218
Superversions
expressions for, 271
Survey Results
adding new variables to an existing table, 223
boxes instead of text in the Build Filter window, 229
categorical variables in tables, 222
clearing filters, 226
clearing filters and tables, 227
clearing tables, 223
347
Index
clearing the log file, 229
frequency counts, 219
grid variables as filters, 226
grid variables in tables, 222
log file, 229
main screen, 219
numeric variables as filters, 225
numeric variables in tables, 222
options, 228
refreshing a table, 223
refreshing the log file, 229
replacing the side variables in a table, 223
starting, 218
text variables as filters, 226
viewing connection string, 229
viewing the log file, 229
switch project, 180
Symbols
displayed in telephone interviewing reports, 230
Sytel
certification, 291
Telephone interviewing
using an autodialer, 284
Templates
copying to library, 77
downloading from project folder, 50
location of, 77
referring to external files in, 76
role-specific, 77
sharing with other users, 76
uploading into project folder, 50
Terminating interviews
from the script, 56
Testing questionnaires, 70
Text questions, 26
Text to display at end of interview, 114
Text variables
quotas for, 318
trademarks, 339
Transfer to web, 182
translate
call outcomes, 202
unbounded loops, 218
Unsupported item types
list of recognized codes, 64
Updating the records in a sample table, 93
Uploading participant records, 92
Versions
expressions for superversions, 271
Viewing the records in a sample table, 93
Web pages
assigning to projects, 114
writing filter expressions, 265
Wrong number, 182
Zero values
symbols for in telephone interviewing reports, 230